engine FORD TRANSIT 2006 7.G Body And Equipment Mounting Section Manual
[x] Cancel search | Manufacturer: FORD, Model Year: 2006, Model line: TRANSIT, Model: FORD TRANSIT 2006 7.GPages: 234, PDF Size: 33.19 MB
Page 198 of 234
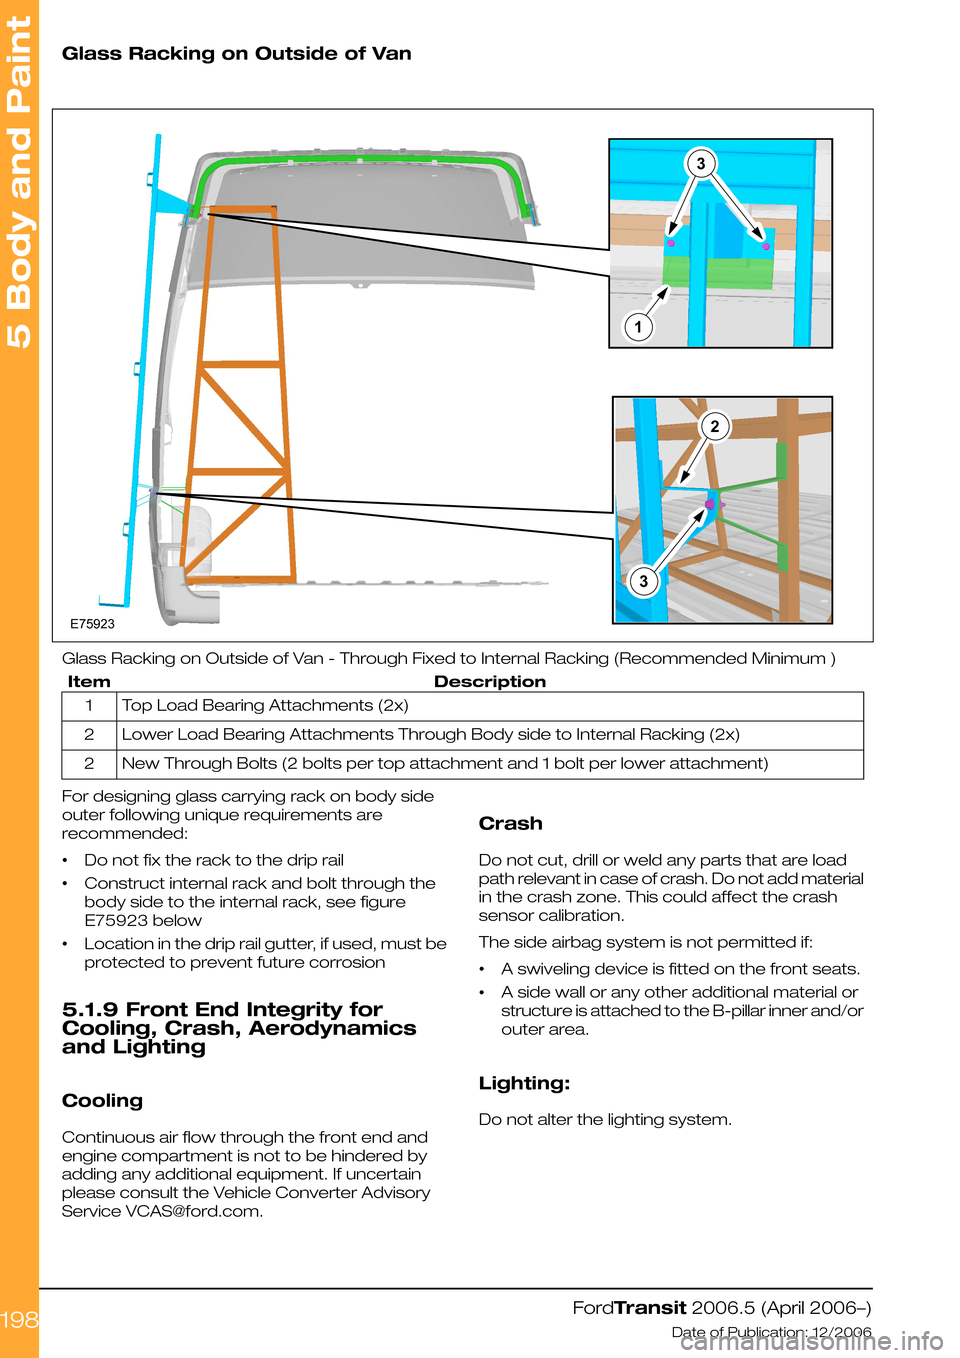
Glass Racking on Outside of Van
Glass Racking on Outside of Van - Through Fixed to Internal Racking (Recommended Minimum )
DescriptionItem
Top Load Bearing Attachments (2x)1
Lower Load Bearing Attachments Through Body side to Internal Racking (2x)2
New Through Bolts (2 bolts per top attachment and 1 bolt per lower attachment)2
For designing glass carrying rack on body side
outer following unique requirements are
recommended:
•Do not fix the rack to the drip rail
•Construct internal rack and bolt through the
body side to the internal rack, see figure
E75923 below
•Location in the drip rail gutter, if used, must be
protected to prevent future corrosion
5.1.9 Front End Integrity for
Cooling, Crash, Aerodynamics
and Lighting
Cooling
Continuous air flow through the front end and
engine compartment is not to be hindered by
adding any additional equipment. If uncertain
please consult the Vehicle Converter Advisory
Service [email protected].
Crash
Do not cut, drill or weld any parts that are load
path relevant in case of crash. Do not add material
in the crash zone. This could affect the crash
sensor calibration.
The side airbag system is not permitted if:
•A swiveling device is fitted on the front seats.
•A side wall or any other additional material or
structure is attached to the B-pillar inner and/or
outer area.
Lighting:
Do not alter the lighting system.
FordTransit 2006.5 (April 2006–)
Date of Publication: 12/2006
5 Body and Paint
198E759233123
Page 199 of 234
Static & Dynamic Sealing and
Finishing
Use Ford approved sealing and finishing material,
and underbody corrosion protection.
Refer to: 5.10 Corrosion Prevention (page 221).
Ensure proper sealing against ingress of water,
salt, dust etc. after cutting or drilling the body.
5.1.10 Tipper Bodies
For tipper conversions single an double Chassis
Cab versions except extended rear chassis
frame can be used. All variants allow single and
three way tipping.
It is recommended to have the tipping system
operative only when the engine is running. It is
also recommended to have the master control
switch in the security of the cab. According
routing of wires and hydraulic lines please refer
to section hydraulic lift.
Ensure that axle plated weights including the
front axle minimum are not exceeded.
For tipper sub-frames please refer to the
following guidelines:
•Design for full length continuous frame with
mountings for motor, pump unit, reservoir,
pivot points and ram
•Use all mounting points on chassis frame to
mount sub-frame
•The rear two sets of chassis frame mounting
brackets should have a full torque with 100%
grip. The attachment to the remaining forward
chassis frame brackets must be precisely
located and retained, but allow some relative
flexing between the sub-frame and chassis
frame. That is clamp control devices such as
conical washer stacks or machine springs with
self locking fastenings.
•Very stiff sub-frames may damage the chassis
frame by preventing its natural flexing,
therefore compliant mounts should be captive
fail safe with up to plus and minus 12mm
compliance, vehicle laden or un-laden
whichever is worst case, rated 2mm
deflection minimum per 200kg mass at each
chassis frame forward mount, please see also
Figures E74696 Sub-frame attachment to
Chassis frame and Figure E75880 Rigid or
Torsion Stiff sub-frame for Chassis Cab.
•Use two M10 grade 8.8 minimum bolts,
washers and self locking nuts at each solid
and compliant chassis frame location.
•Sub-frame must extend to the back of the
cab and attach to all mounting locations, with
the forward end designed to minimize local
frame stress, please refer to Figure E74575
Sub-frame for low floor or other equipment.
However it is preferable to mount the
sub-frame onto the mounting brackets with
a clearance to the chassis frame top surface.
•Side tipping loads/forces must be resolved
by the sub-frame. It is not recommended to
strain the chassis frame.
5.1.11 Tank and Dry Bulk Carriers
Due to the high rigidity of tanks it is necessary to
isolate the tank and its sub-frame from the
chassis frame allowing the chassis frame to
naturally flex. Please refer to the following
guidelines:
•Mount tank to full length of sub-frame.
•Mount sub-frame to all chassis frame
mounting points.
•The rear two sets of chassis frame mounting
brackets should have solid full bolts torque
with 100% grip.
•The remaining forward location mounts must
be compliant to allow relative chassis frame
to sub-frame deflections.
•Sub-frame must extend to the back of the
cab and not contact chassis frame at forward
end under worst case deflection.
•Compliant mounts should have captive fail
safe through bolts, please refer to Figures
E74696 Sub-frame attachment to Chassis
frame and Figure E75880 Rigid or Torsion Stiff
sub-frame for Chassis Cab, with up to
plus/minus 12mm compliance, vehicle laden
or un-laden whatever is worst case, rated at
2.0mm minimum deflection per 200kg mass
each.
•Use two M10 grade 8.8 minimum bolts,
washers and self lock nuts per chassis frame
mount bracket at each solid and compliant
location.
FordTransit 2006.5 (April 2006–)
Date of Publication: 12/2006
5 Body and Paint
199
Page 212 of 234
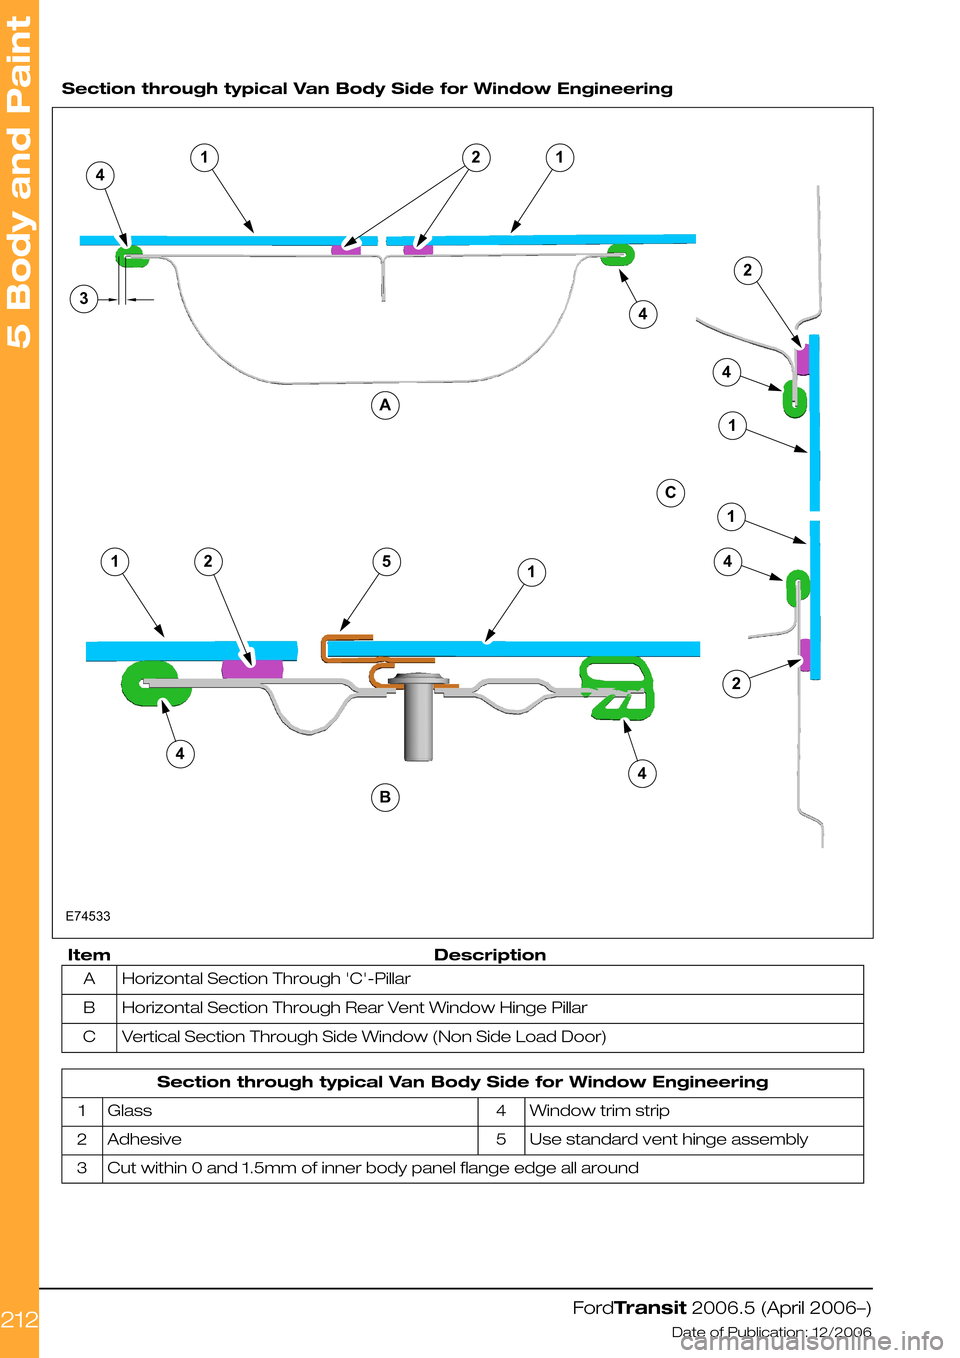
Section through typical Van Body Side for Window Engineering
DescriptionItem
Horizontal Section Through 'C'-PillarA
Horizontal Section Through Rear Vent Window Hinge PillarB
Vertical Section Through Side Window (Non Side Load Door)C
Section through typical Van Body Side for Window Engineering
Window trim strip4Glass1
Use standard vent hinge assembly5Adhesive2
Cut within 0 and 1.5mm of inner body panel flange edge all around3
FordTransit 2006.5 (April 2006–)
Date of Publication: 12/2006
5 Body and Paint
2121413ABC21251424444211E74533
Page 214 of 234
5.7 Roof Opening Panel
5.7.1 Driver's Standing Head
Room
When planning cab walk-through capability on a
Van, Bus or Kombi, select the Special Vehicle
option, which replaces the front headlining and
parcel shelf in Vans and provides the maximum
height headlining for increased standing head
room height.
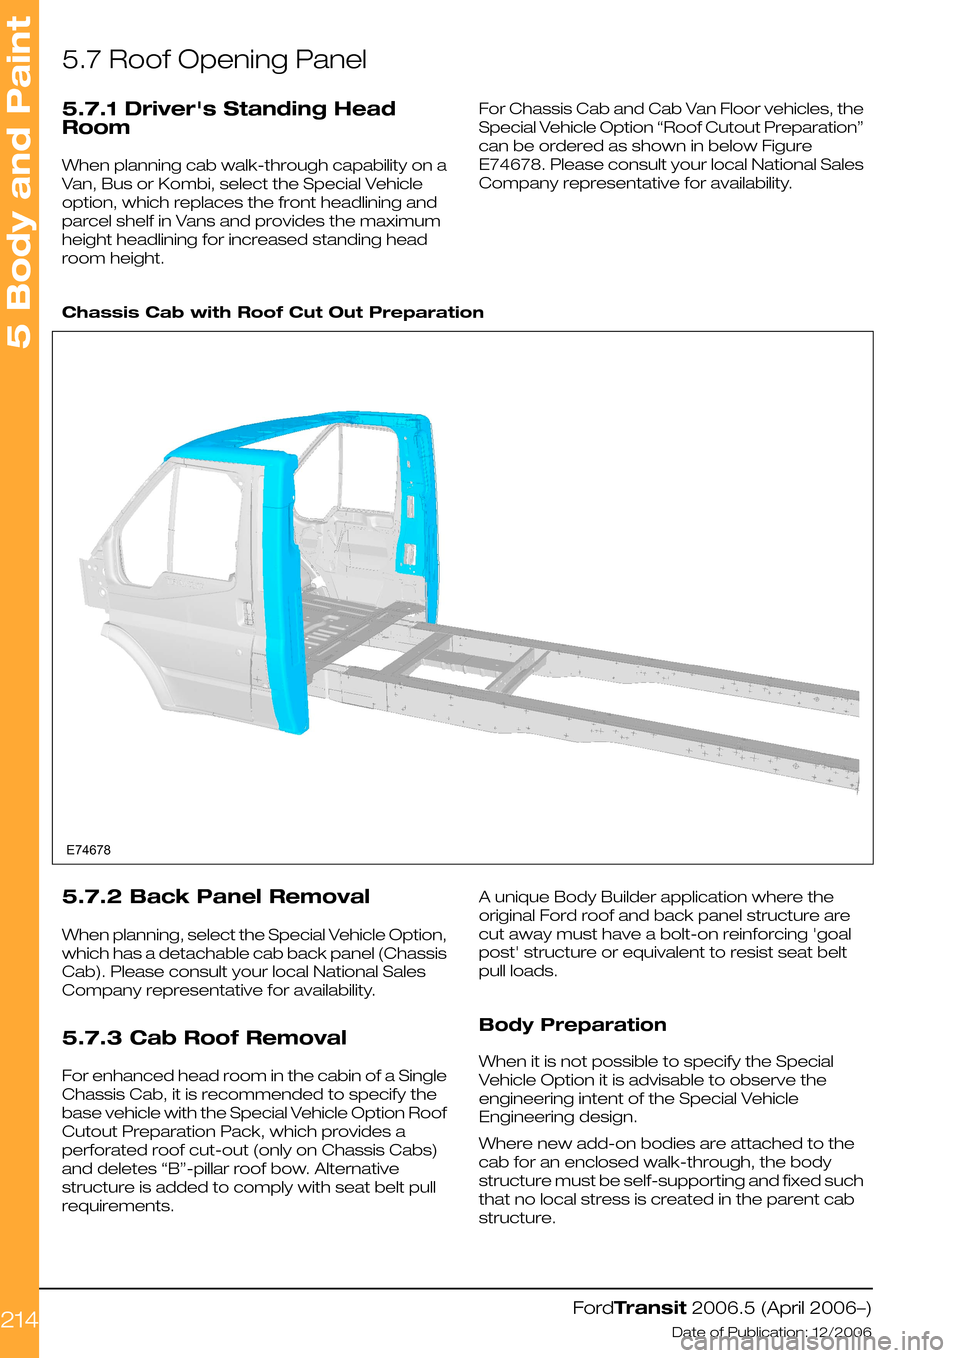
For Chassis Cab and Cab Van Floor vehicles, the
Special Vehicle Option “Roof Cutout Preparation”
can be ordered as shown in below Figure
E74678. Please consult your local National Sales
Company representative for availability.
Chassis Cab with Roof Cut Out Preparation
5.7.2 Back Panel Removal
When planning, select the Special Vehicle Option,
which has a detachable cab back panel (Chassis
Cab). Please consult your local National Sales
Company representative for availability.
5.7.3 Cab Roof Removal
For enhanced head room in the cabin of a Single
Chassis Cab, it is recommended to specify the
base vehicle with the Special Vehicle Option Roof
Cutout Preparation Pack, which provides a
perforated roof cut-out (only on Chassis Cabs)
and deletes “B”-pillar roof bow. Alternative
structure is added to comply with seat belt pull
requirements.
A unique Body Builder application where the
original Ford roof and back panel structure are
cut away must have a bolt-on reinforcing 'goal
post' structure or equivalent to resist seat belt
pull loads.
Body Preparation
When it is not possible to specify the Special
Vehicle Option it is advisable to observe the
engineering intent of the Special Vehicle
Engineering design.
Where new add-on bodies are attached to the
cab for an enclosed walk-through, the body
structure must be self-supporting and fixed such
that no local stress is created in the parent cab
structure.
FordTransit 2006.5 (April 2006–)
Date of Publication: 12/2006
5 Body and Paint
214E74678
Page 215 of 234
Use metal fasteners through double thickness
flanges for example with nuts, bolts and spreader
plates where possible.
“Pop” type rivet structural value is only as good
as the material or thickness of the body panels,
therefore ensure the application is suitably
engineered.
Protect all metal edges to comply with interior
projection legislation.
Corrosion protect all cut or drilled metal edges
and repair any paint damage.
5.7.4 Roof Ventilation
General
Apertures must not cut through roof bows.
Ventilators must prevent direct entry of water
and dust.
A shut-off system should be available to prevent
fume ingress.
Interior and exterior projection legal requirements
must be maintained.
Sun Roof
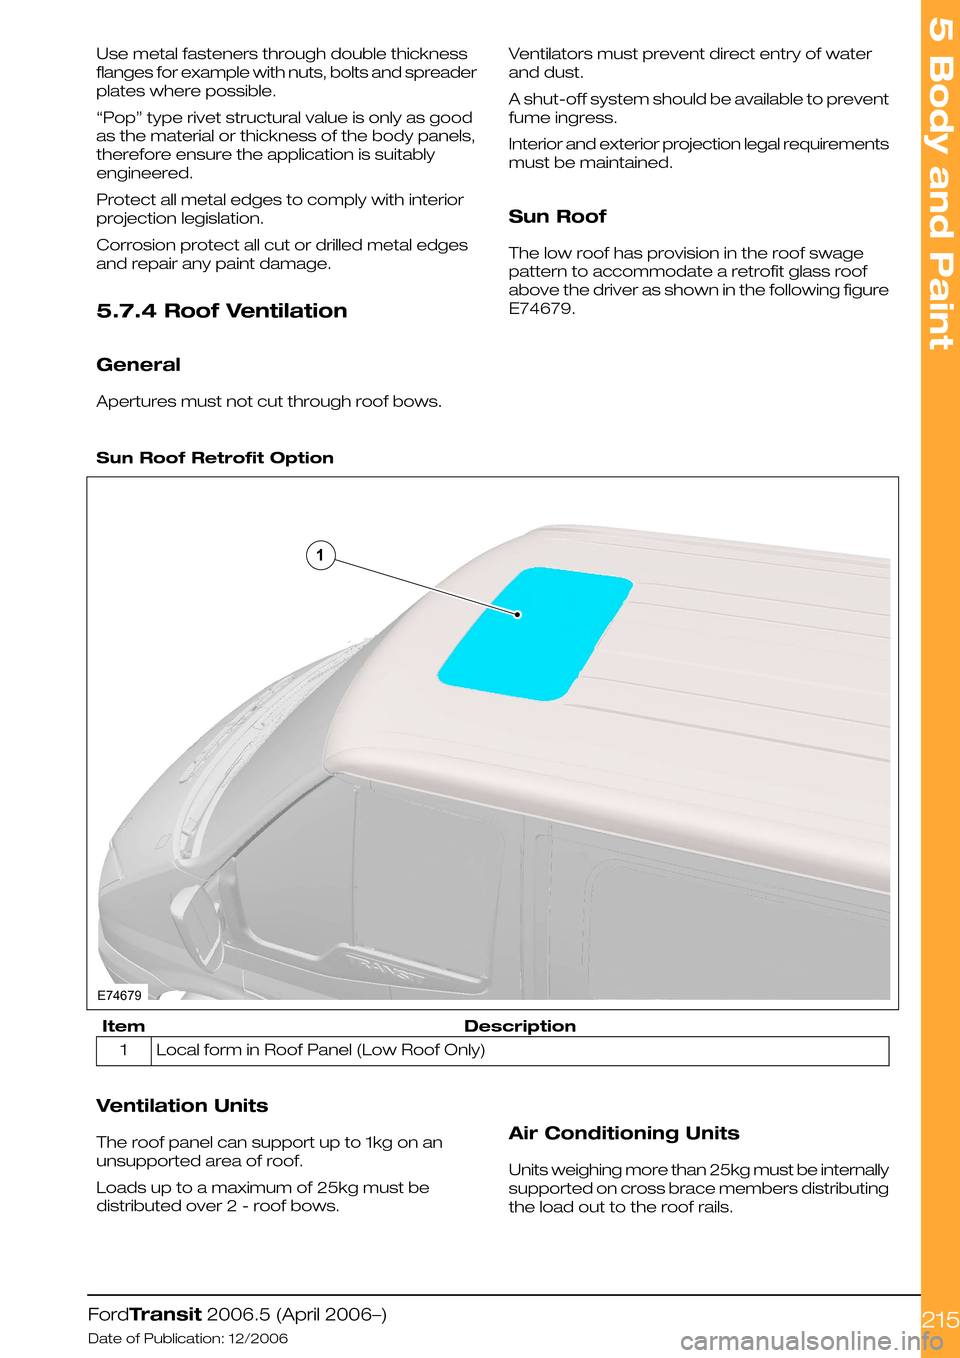
The low roof has provision in the roof swage
pattern to accommodate a retrofit glass roof
above the driver as shown in the following figure
E74679.
Sun Roof Retrofit Option
DescriptionItem
Local form in Roof Panel (Low Roof Only)1
Ventilation Units
The roof panel can support up to 1kg on an
unsupported area of roof.
Loads up to a maximum of 25kg must be
distributed over 2 - roof bows.
Air Conditioning Units
Units weighing more than 25kg must be internally
supported on cross brace members distributing
the load out to the roof rails.
FordTransit 2006.5 (April 2006–)
Date of Publication: 12/2006
5 Body and Paint
215E746791
Page 224 of 234
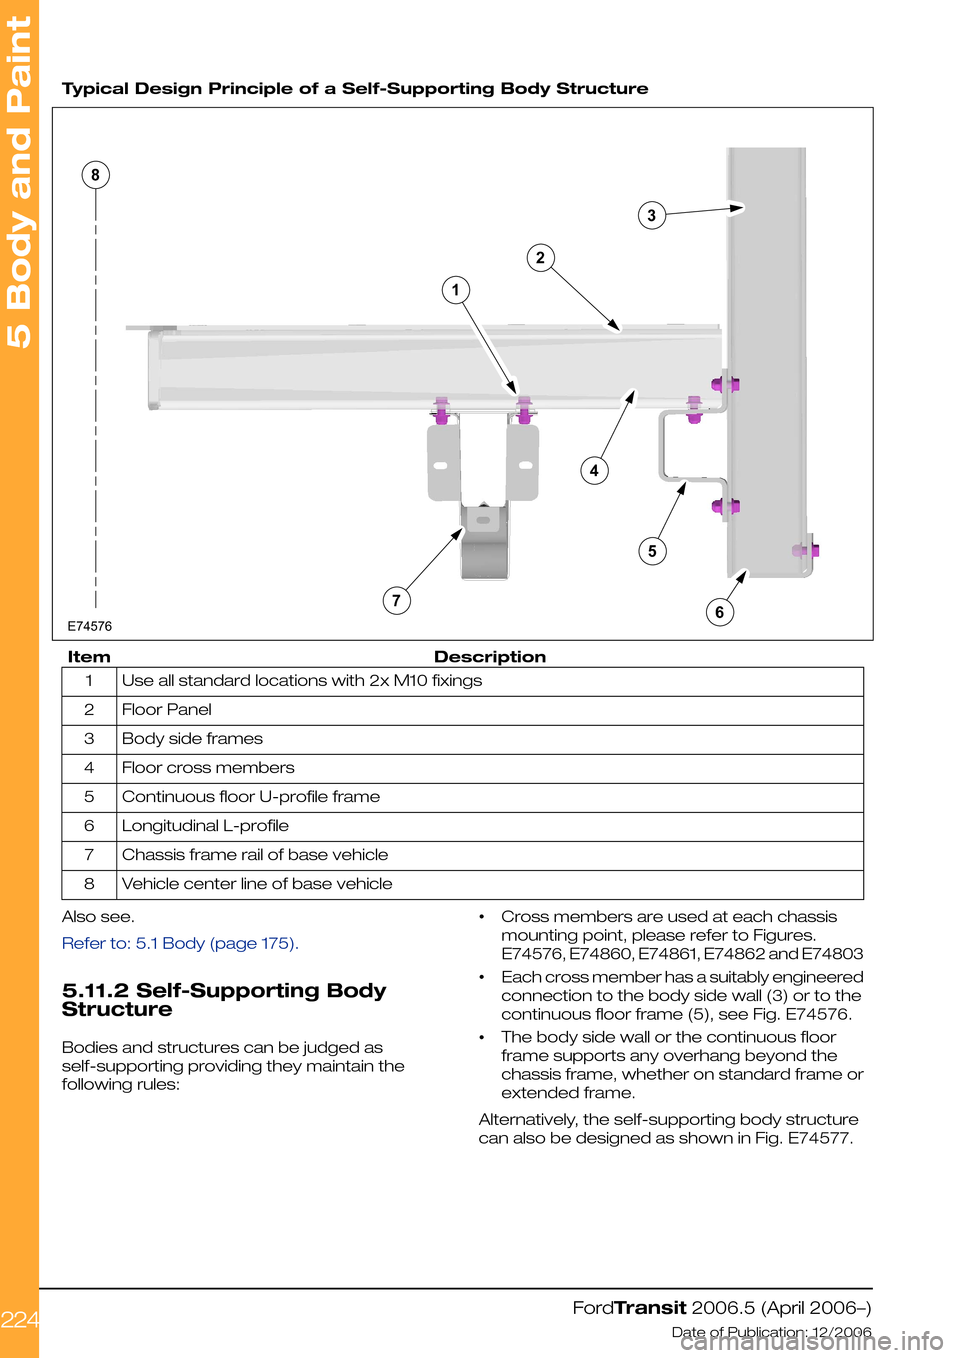
Typical Design Principle of a Self-Supporting Body Structure
DescriptionItem
Use all standard locations with 2x M10 fixings1
Floor Panel2
Body side frames3
Floor cross members4
Continuous floor U-profile frame5
Longitudinal L-profile6
Chassis frame rail of base vehicle7
Vehicle center line of base vehicle8
Also see.
Refer to: 5.1 Body (page 175).
5.11.2 Self-Supporting Body
Structure
Bodies and structures can be judged as
self-supporting providing they maintain the
following rules:
•Cross members are used at each chassis
mounting point, please refer to Figures.
E74576, E74860, E74861, E74862 and E74803
•Each cross member has a suitably engineered
connection to the body side wall (3) or to the
continuous floor frame (5), see Fig. E74576.
•The body side wall or the continuous floor
frame supports any overhang beyond the
chassis frame, whether on standard frame or
extended frame.
Alternatively, the self-supporting body structure
can also be designed as shown in Fig. E74577.
FordTransit 2006.5 (April 2006–)
Date of Publication: 12/2006
5 Body and Paint
224E7457612345678
Page 225 of 234
•This concept is based on a self-supporting
structure where the floor is mounted directly
onto the top surface of the chassis frame.
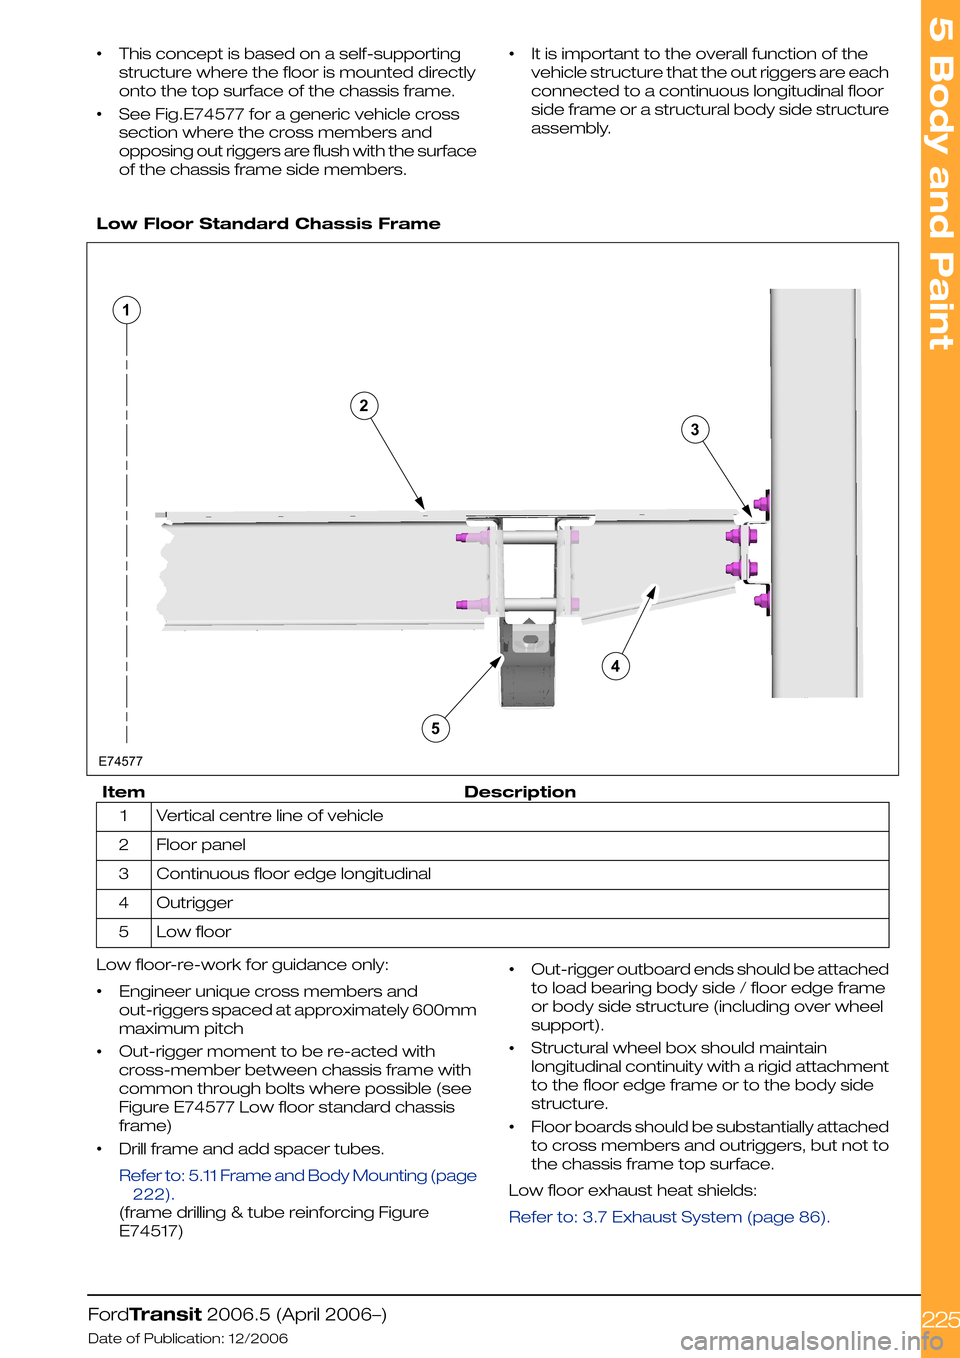
•See Fig.E74577 for a generic vehicle cross
section where the cross members and
opposing out riggers are flush with the surface
of the chassis frame side members.
•It is important to the overall function of the
vehicle structure that the out riggers are each
connected to a continuous longitudinal floor
side frame or a structural body side structure
assembly.
Low Floor Standard Chassis Frame
DescriptionItem
Vertical centre line of vehicle1
Floor panel2
Continuous floor edge longitudinal3
Outrigger4
Low floor5
Low floor-re-work for guidance only:
•Engineer unique cross members and
out-riggers spaced at approximately 600mm
maximum pitch
•Out-rigger moment to be re-acted with
cross-member between chassis frame with
common through bolts where possible (see
Figure E74577 Low floor standard chassis
frame)
•Drill frame and add spacer tubes.
Refer to: 5.11 Frame and Body Mounting (page
222).
(frame drilling & tube reinforcing Figure
E74517)
•Out-rigger outboard ends should be attached
to load bearing body side / floor edge frame
or body side structure (including over wheel
support).
•Structural wheel box should maintain
longitudinal continuity with a rigid attachment
to the floor edge frame or to the body side
structure.
•Floor boards should be substantially attached
to cross members and outriggers, but not to
the chassis frame top surface.
Low floor exhaust heat shields:
Refer to: 3.7 Exhaust System (page 86).
FordTransit 2006.5 (April 2006–)
Date of Publication: 12/2006
5 Body and Paint
225E7457723451
Page 226 of 234
5.11.3 Extended Chassis Frame
General:
•Rear overhang extensions are available as
Regular Production Option.
•Bodies or equipment exceeding the standard
extension length must be supported, please
refer to Figure E74575 low body longitudinal
members or Figure E74576 self-supporting
body structures.
•It is the Body Builder's responsibility to mark-up
the owners’ handbook advising the available
payload. Axle plated weights and maximum
allowable axle mass as shown in this manual
must not be exceeded.
•The vehicle should be planned for uniformly
distributed loads.
5.11.4 Non Standard Rear Chassis
Frame Extension
Extensions longer than the standard Regular
Production Option must comply with the following
guidelines:
•The original rear cross member and or
under-run bar or equivalent must be
repositioned at the end of any altered
extension to meet legislation, please refer to
Figure E74578 Non Regular Production Option
rear chassis frame extensions. Also see.
Refer to: 1.17 Towing (page 54).
(Figure E74854)
•The standard fit under-run bar is bolted on as
shown in Figure E74578 and Figure E74854
as mentioned in previous paragraph.
•The altered extension assembly must include
a cross member adjacent to the end of the
original chassis frame to replace the relocated
under-run bar, see Figure E74577.
•Flat-beds and low bodies built onto Non
Regular Production Option extensions must
have continuous longitudinal members
engineered by the Body Builder or equipment
supplier (please refer to Figure. E74577) to
resolve the worst case moments at rear bump
stop.
•Extensions should be secured to the chassis
frame sandwiched under the rear spring
shackle bracket utilizing the four (4) bolts and
four (4) holes in the rear of the chassis frame,
totaling eight (8) per vehicle side (please refer
to Figure E74578).
•The four (4) rear most existing holes in the
chassis frame must be sleeved with tubes to
prevent chassis frame collapse, refer to Figure
E74578.
•The spacer tubes should, ideally, be part of a
welded bracket and tube assembly to hold the
tubes accurately in place, avoiding the need
to weld the tubes in place, see Figure E74578.
•Care must be taken when tightening the spring
shackle bracket bolts and nuts to the correct
torque. See
Refer to: 1.15 (page 43).
(tightening torques).
•Extensions sleeved over the outside of the
chassis frame will necessitate the removal of
the under-run bar attachment flanges turned
out at the chassis frame ends. The cut edges
must be protected against corrosion.
Refer to: 5.10 Corrosion Prevention (page 221).
•Drilling of the top flanges turned out is only
permissible rearward of the spring hanger
brackets, for continuity of the altered extension
closing plate, if required. The diameter of the
holes should be 6.0mm maximum.
•If the chassis frame includes the inverted top
hat closure of the 4.25 tonne chassis double
cab variant, a similar closure must be included
in the extension and sleeved over the chassis
frame. It will be necessary to add two (2) holes
and reinforcing tubes in the inverted top hat
chassis frame vertically in line with the group
of four (4) holes see Figure E74578.
FordTransit 2006.5 (April 2006–)
Date of Publication: 12/2006
5 Body and Paint
226
Page 230 of 234
A
About This Manual................................................6
Accessory Drive..................................................77
Adding Connectors, Terminals and Wiring....
162
Additional 'Theatre Lighting' for rear of vehicle
interior...............................................................118
Additional External Lamps...............................116
Additional Ignition, Instrument Panel Illumination
and Air Conditioning On Signals...................124
Additional Internal Lamps ................................118
Additional Vehicle Signals / Features.............147
Aids for Vehicle Entry and Exit..........................33
Air Bags..............................................................218
Air Bag Supplemental Restraint System (SRS)..
218
Air Flow Restrictions...........................................76
Alternative Type Approval....................................7
Ancillary Equipment - Sub Frame Mounting....
228
Antenna Location...............................................24
Anti-Lock Control - Stability Assist..................65
Auxiliary Fuses, Fuse Box and Relays (Fuses -
Standard)..........................................................119
Auxiliary Heater Installation...............................76
Auxiliary Heater Systems..................................75
B
Back Panel Removal................................177, 214
Battery and Cables............................................98
Battery Information............................................98
Body....................................................................175
Body Closures..................................................203
Body Structures - General Information.........175
Body System - General
Information—Specifications.........................200
Brake Hoses General........................................62
Brake System.....................................................62
C
Cab Roof Removal...........................................214
Cab Van Floor....................................................185
CAN-Bus System Description and Interface....
90
Cellular Phone....................................................115
Center of Gravity ...............................................46
Central Junction Box (CJB)...............................91
Charge Balance Guidelines..............................97
Charging System...............................................95
Chassis Cab.......................................................179
Circit Diagram.....................................................94
Circuit Diagram...................................................93
Circuit Diagrams.................................................97
Climate Control System..................................106
Clutch...................................................................82
Commercial and Legal Aspects.........................7
Communications Network...............................90
Connectors........................................................133
Contact Corrosion............................................221
Contact Information.............................................9
Conversion Affect on Fuel Economy and
Performance.....................................................25
Conversion Affects on Parking Aids................33
Conversion Homologation...............................23
Conversion Type.................................................14
Corrosion Prevention.......................................221
Customer Connection Points.........................120
D
Drilling and Welding..............................................8
Driver's Standing Head Room........................214
Driver Field of View.............................................33
Driver Reach Zones...........................................33
Driveshaft.............................................................61
E
Electrical Conversions.......................................95
Electrically operated Door Mirrors..................117
Electrics for Tow bar........................................136
Electromagnetic Compatibility (EMC)............24
Electronic Engine Controls................................81
End of Life Vehicle (ELV) Directive...................26
Engine Cooling....................................................75
Engine..................................................................66
Engine Power Curves.......................................66
Engine RPM (Revs Per Minute) Speed
Controller..........................................................157
Engine Run Signal (D+ Alternative)................132
Exhaust Heat Shields.........................................86
Exhaust Pipes and Supports............................86
Exhaust System.................................................86
Extended Chassis Frame...............................226
Extensions and Optional Exhausts..................86
Exterior Lighting.................................................116
F
Fitting of Equipment Containing an Electric
Motor..................................................................97
Frame and Body Mounting............................222
Frame Drilling and Tube Reinforcing.............228
Front, Rear and Side Under-run Protection....
38
Front and Rear Brakes......................................64
Front End Accessory Drive 2.2l Diesel............79
Front End Accessory Drive 2.4l Diesel and 2.3l
Petrol...................................................................77
Front End Integrity for Cooling, Crash,
Aerodynamics and Lighting..........................198
Front Suspension...............................................58
Fuel System........................................................88
Fuses and Relays..............................................119
G
General........................................................62, 221
General Component Package Guidelines.....33
General Information and Specific Warnings....
95
General........................................................62, 221
General Product Safety Requirement...............7
Index
230