engine FORD TRANSIT 2006 7.G Body And Equipment Mounting Section Manual
[x] Cancel search | Manufacturer: FORD, Model Year: 2006, Model line: TRANSIT, Model: FORD TRANSIT 2006 7.GPages: 234, PDF Size: 33.19 MB
Page 96 of 234
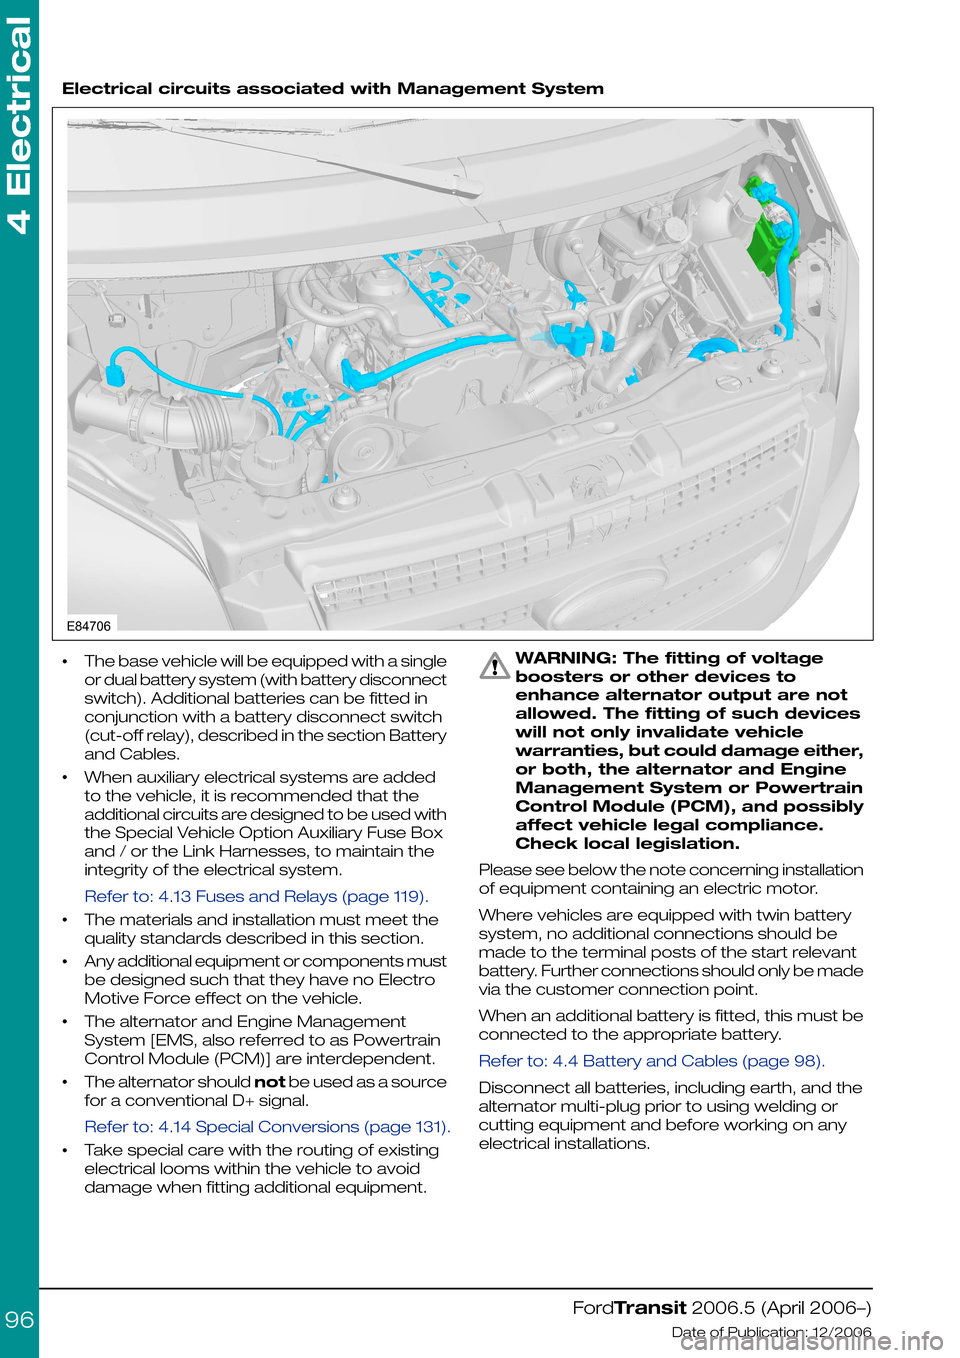
Electrical circuits associated with Management System
•The base vehicle will be equipped with a single
or dual battery system (with battery disconnect
switch). Additional batteries can be fitted in
conjunction with a battery disconnect switch
(cut-off relay), described in the section Battery
and Cables.
•When auxiliary electrical systems are added
to the vehicle, it is recommended that the
additional circuits are designed to be used with
the Special Vehicle Option Auxiliary Fuse Box
and / or the Link Harnesses, to maintain the
integrity of the electrical system.
Refer to: 4.13 Fuses and Relays (page 119).
•The materials and installation must meet the
quality standards described in this section.
•Any additional equipment or components must
be designed such that they have no Electro
Motive Force effect on the vehicle.
•The alternator and Engine Management
System [EMS, also referred to as Powertrain
Control Module (PCM)] are interdependent.
•The alternator should not be used as a source
for a conventional D+ signal.
Refer to: 4.14 Special Conversions (page 131).
•Take special care with the routing of existing
electrical looms within the vehicle to avoid
damage when fitting additional equipment.
WARNING: The fitting of voltage
boosters or other devices to
enhance alternator output are not
allowed. The fitting of such devices
will not only invalidate vehicle
warranties, but could damage either,
or both, the alternator and Engine
Management System or Powertrain
Control Module (PCM), and possibly
affect vehicle legal compliance.
Check local legislation.
Please see below the note concerning installation
of equipment containing an electric motor.
Where vehicles are equipped with twin battery
system, no additional connections should be
made to the terminal posts of the start relevant
battery. Further connections should only be made
via the customer connection point.
When an additional battery is fitted, this must be
connected to the appropriate battery.
Refer to: 4.4 Battery and Cables (page 98).
Disconnect all batteries, including earth, and the
alternator multi-plug prior to using welding or
cutting equipment and before working on any
electrical installations.
FordTransit 2006.5 (April 2006–)
Date of Publication: 12/2006
4 Electrical
96E84706
Page 97 of 234
•Before disconnecting the battery, check
availability of radio key code.
•Fuses – when auxiliary electrical systems are
to be added to the vehicle it is mandatory that
the additional circuit design includes the
necessary fuses.
•The Special Vehicle Option auxiliary fuse box
is recommended.
Refer to: 4.13 Fuses and Relays (page 119).
4.3.4 Fitting of Equipment
Containing an Electric Motor
WARNINGS:
When equipment containing an
electrical motor is connected, it
must be connected via a blocking
diode or relay to prevent “back
Electro Motive Force (EMF)” being
applied to the auxiliary terminal.
When electric motors are to be
fitted, account must be taken of the
potentially high currents that a
motor can draw.
CAUTION: The following must be
observed:
•All motors must be driven via relays with
contacts rated at least 3 times the maximum
rated current of the motor.
•All motor supply circuits must be individually
fused with the proper fuse rating for the
motor.
•All power wiring must be rated for at least 3
times the rating of the motor and installed as
far away as possible from any existing vehicle
wiring.
•All motors fitted should be fully suppressed to
ensure electrical interference does not affect
the vehicle systems.
•Add EMC emissions statement to CE
approval.
4.3.5 Vehicle Electrical Capacity
- Alternator
WARNING: Do not cut into the
alternator wires or use the
alternator as a source to obtain a
'D+ Signal'
An engine run signal is available from the Central
Junction Box by installing a T-piece jumper
harness (Ford Part Number 6C1V-14A411-F_).
Refer to: 4.14 Special Conversions (page 131).
4.3.6 Charge Balance Guidelines
The base vehicle is fitted with a 150A alternator.
It is recommended to conduct a charge balance
calculation in case the conversion comprises a
high number of electrical consumers or high
electrical consumption is expected.
4.3.7 Circuit Diagrams
For circuit diagrams for Auxiliary Fuse Box
Connections and Standard Ford relays.
Refer to: 4.13 Fuses and Relays (page 119).
Full vehicle wiring and circuit diagrams are in the
Ford Workshop Manual.
NOTE: For further information please contact
your local National Sales Company
representative, or Local Ford Dealer. If they are
unable to help you then please contact the
Vehicle Converter Advisory Service at
[email protected].
FordTransit 2006.5 (April 2006–)
Date of Publication: 12/2006
4 Electrical
97
Page 100 of 234
Pull-in us actuvated within 70 ms of switching to
key position II
Pull-out is activated when switching to key
position I, or 0, and in key position II when no
engine run signal is sensed within 120 secs.
It is not possible to change state within 500 ms.
Removal of the Battery Disconnect
Switch (on twin battery models) and
wiring of batteries in parallel for high
current applications.
For vehicles equipped with a twin battery system,
wiring of the two batteries in parallel is not
recommended. If higher current is required,
680Ah batteries can be fitted (or a deep cycle
battery in lieu of the non-start relevant battery
only). Where a single passenger seat is fitted,
further batteries (1 or 2) can be installed in the
pedestal and added in parallel to the
non-start-relevant battery, although due
consideration then needs to be given to
increased current availability in the event of a
short circuit. Additional batteries should not be
installed under a passenger bench seat.
if this requirement is imperative, it would be
possible to disconnect the battery disconnect
switch and put the start-relevant and
non-start-relevant batteries in parallel using a
shorting bar (available from the Ford Delerships,
part number 6C1T-14A439-A*). There is one
important consideration when replacing the
battery disconnect switch with a shorting bar:
•Where the vehicle is configured for
twin-battery operation, the Central Junction
Box will detect if the battery disconnect switch
is missing (or has been removed), or the
mating connector short-circuited, and although
the vehicle will be functional, Diagnostic
Trouble Codes will be generated that will
flag-up during service. Hence if a shorting bar
is fitted, the vehicle needs to be reconfigured
(via the Dealership and Dealership Hotline).
Single to Dual Battery Conversion
For vehicles equipped with a single battery, it is
possible to upgrade to a twin battery system -
the connector for the battery disconnect switch
is present on all vehicles. In addition to
reconfiguring the vehicle for twin battery
operation (at a Dealership), the following battery
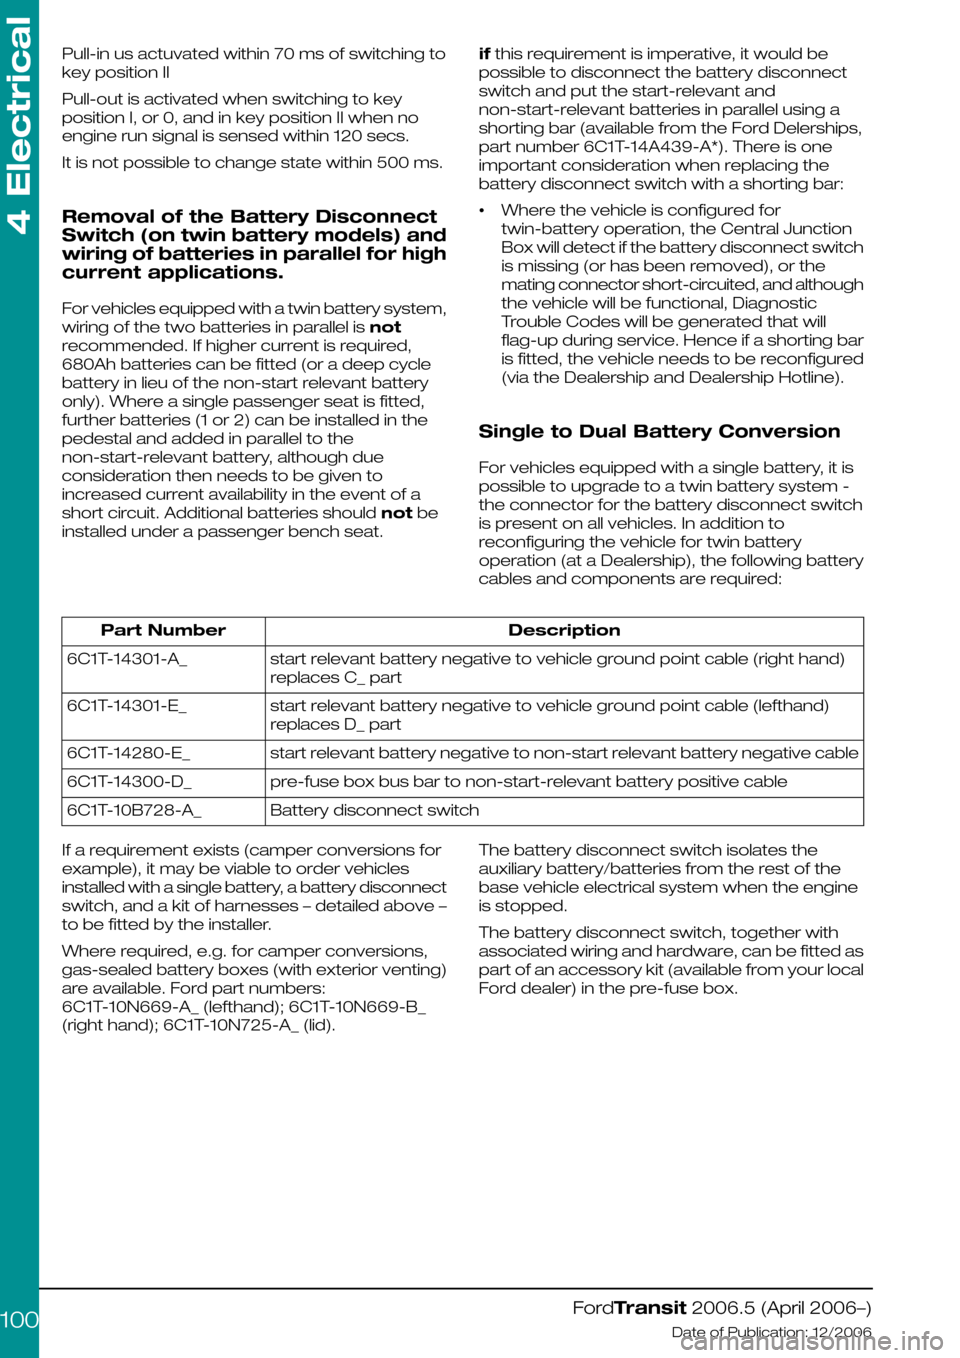
cables and components are required:
DescriptionPart Number
start relevant battery negative to vehicle ground point cable (right hand)
replaces C_ part
6C1T-14301-A_
start relevant battery negative to vehicle ground point cable (lefthand)
replaces D_ part
6C1T-14301-E_
start relevant battery negative to non-start relevant battery negative cable6C1T-14280-E_
pre-fuse box bus bar to non-start-relevant battery positive cable6C1T-14300-D_
Battery disconnect switch6C1T-10B728-A_
If a requirement exists (camper conversions for
example), it may be viable to order vehicles
installed with a single battery, a battery disconnect
switch, and a kit of harnesses – detailed above –
to be fitted by the installer.
Where required, e.g. for camper conversions,
gas-sealed battery boxes (with exterior venting)
are available. Ford part numbers:
6C1T-10N669-A_ (lefthand); 6C1T-10N669-B_
(right hand); 6C1T-10N725-A_ (lid).
The battery disconnect switch isolates the
auxiliary battery/batteries from the rest of the
base vehicle electrical system when the engine
is stopped.
The battery disconnect switch, together with
associated wiring and hardware, can be fitted as
part of an accessory kit (available from your local
Ford dealer) in the pre-fuse box.
FordTransit 2006.5 (April 2006–)
Date of Publication: 12/2006
4 Electrical
100
Page 103 of 234
![FORD TRANSIT 2006 7.G Body And Equipment Mounting Section Manual 4.4.2 Generator and Alternator
Torque Curve of Alternator
Diagram E75871 shows the torque in Nm which
is required to drive the alternator. The vertical
axis (A) shows the torque [Nm] and the horizon FORD TRANSIT 2006 7.G Body And Equipment Mounting Section Manual 4.4.2 Generator and Alternator
Torque Curve of Alternator
Diagram E75871 shows the torque in Nm which
is required to drive the alternator. The vertical
axis (A) shows the torque [Nm] and the horizon](/img/11/5471/w960_5471-102.png)
4.4.2 Generator and Alternator
Torque Curve of Alternator
Diagram E75871 shows the torque in Nm which
is required to drive the alternator. The vertical
axis (A) shows the torque [Nm] and the horizontal
axis (B) shows the alternators revolutions per
minute [1/min].
NOTE: For equivalent engine revs per minute
(RPM), the alternators revolutions, axis (B) should
be divided by the following factors: 2.66 for diesel
(2.2L and 2.4L), 2.4 for Gasoline (2.3L).
NOTE: These alternator curves do not show
spare output capacity as this would be
dependant on original vehicle features and
options
FordTransit 2006.5 (April 2006–)
Date of Publication: 12/2006
4 Electrical
1030246810121402000400060008000100001200014000160001800020000ABE75871
Page 119 of 234
4.13 Fuses and Relays
4.13.1 Wiring Specification
When designing wire installations for additional
equipment use the cable size recommended by
the equipment manufacturer or select a suitable
size from the Current Rating Wire Sizes
specifications chart.
Refer to: 4.2 (page 94).
Wiring consists a soft annealed copper core in
accordance with DIN 57201 (VDDE 0201)
sheathed in Hypalon or irradiated PVC.
For 0,5mm cable an alternative material with
conductor E-CU F20 or F21 in accordance with
DIN 40500 sheathed in cross linked PVC is
available.
4.13.2 Auxiliary Fuses, Fuse Box
and Relays (Fuses - Standard)
WARNING: No increase in existing
vehicle standard fuse capacity is
allowed under any circumstances.
There are no spare fuses in the
Engine Junction Box, Standard Relay
Box or Central Junction Box. The
vehicle converter/modifier must
provide additional fuses as required.
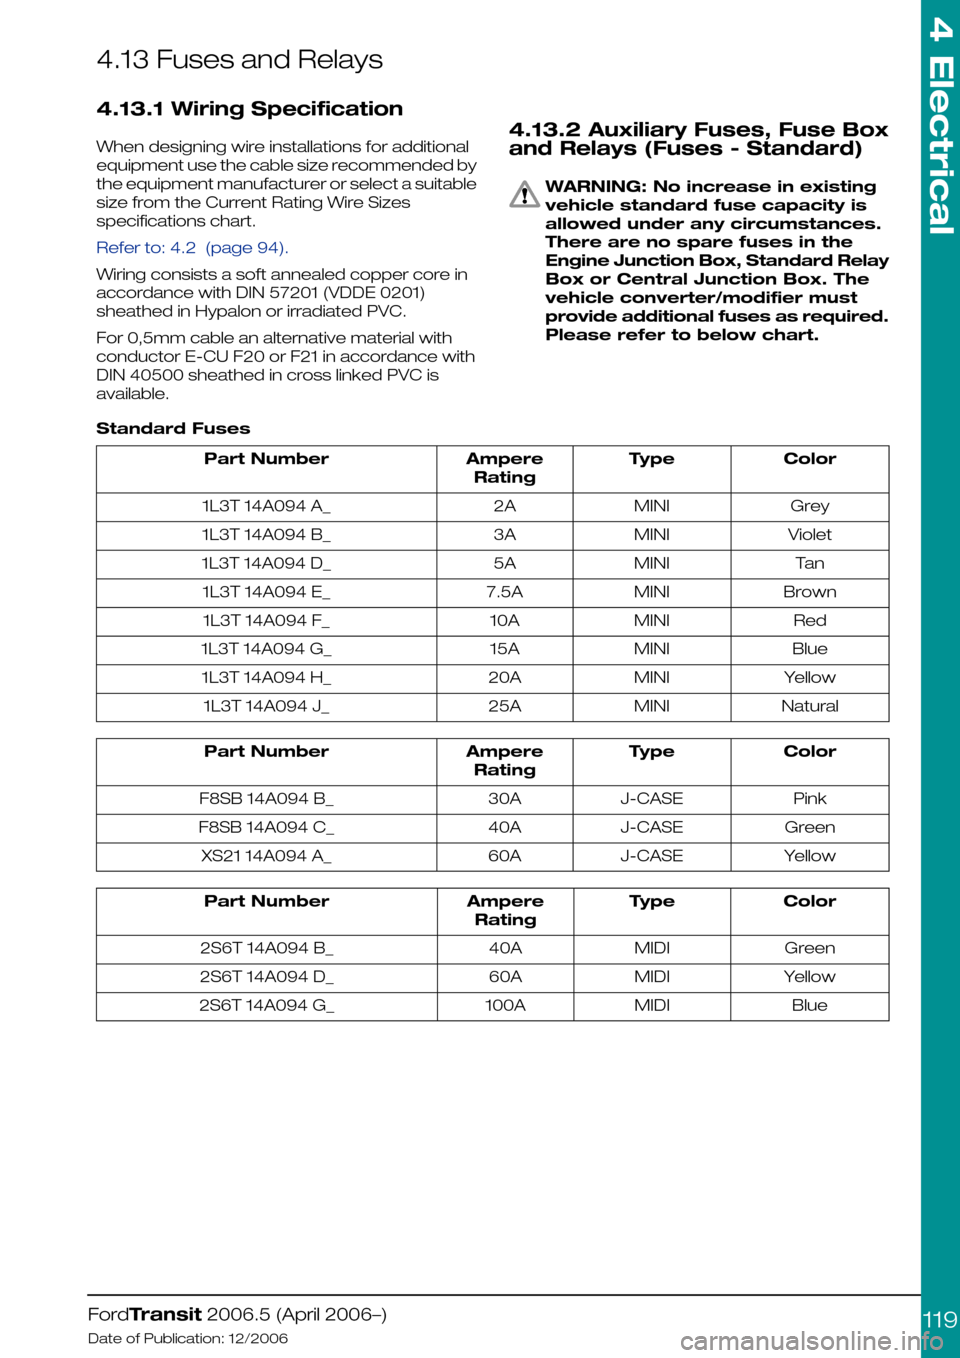
Please refer to below chart.
Standard Fuses
ColorTypeAmpere
Rating
Part Number
GreyMINI2A1L3T 14A094 A_
VioletMINI3A1L3T 14A094 B_
TanMINI5A1L3T 14A094 D_
BrownMINI7.5A1L3T 14A094 E_
RedMINI10A1L3T 14A094 F_
BlueMINI15A1L3T 14A094 G_
YellowMINI20A1L3T 14A094 H_
NaturalMINI25A1L3T 14A094 J_
ColorTypeAmpere
Rating
Part Number
PinkJ-CASE30AF8SB 14A094 B_
GreenJ-CASE40AF8SB 14A094 C_
YellowJ-CASE60AXS21 14A094 A_
ColorTypeAmpere
Rating
Part Number
GreenMIDI40A2S6T 14A094 B_
YellowMIDI60A2S6T 14A094 D_
BlueMIDI100A2S6T 14A094 G_
FordTransit 2006.5 (April 2006–)
Date of Publication: 12/2006
4 Electrical
119
Page 121 of 234
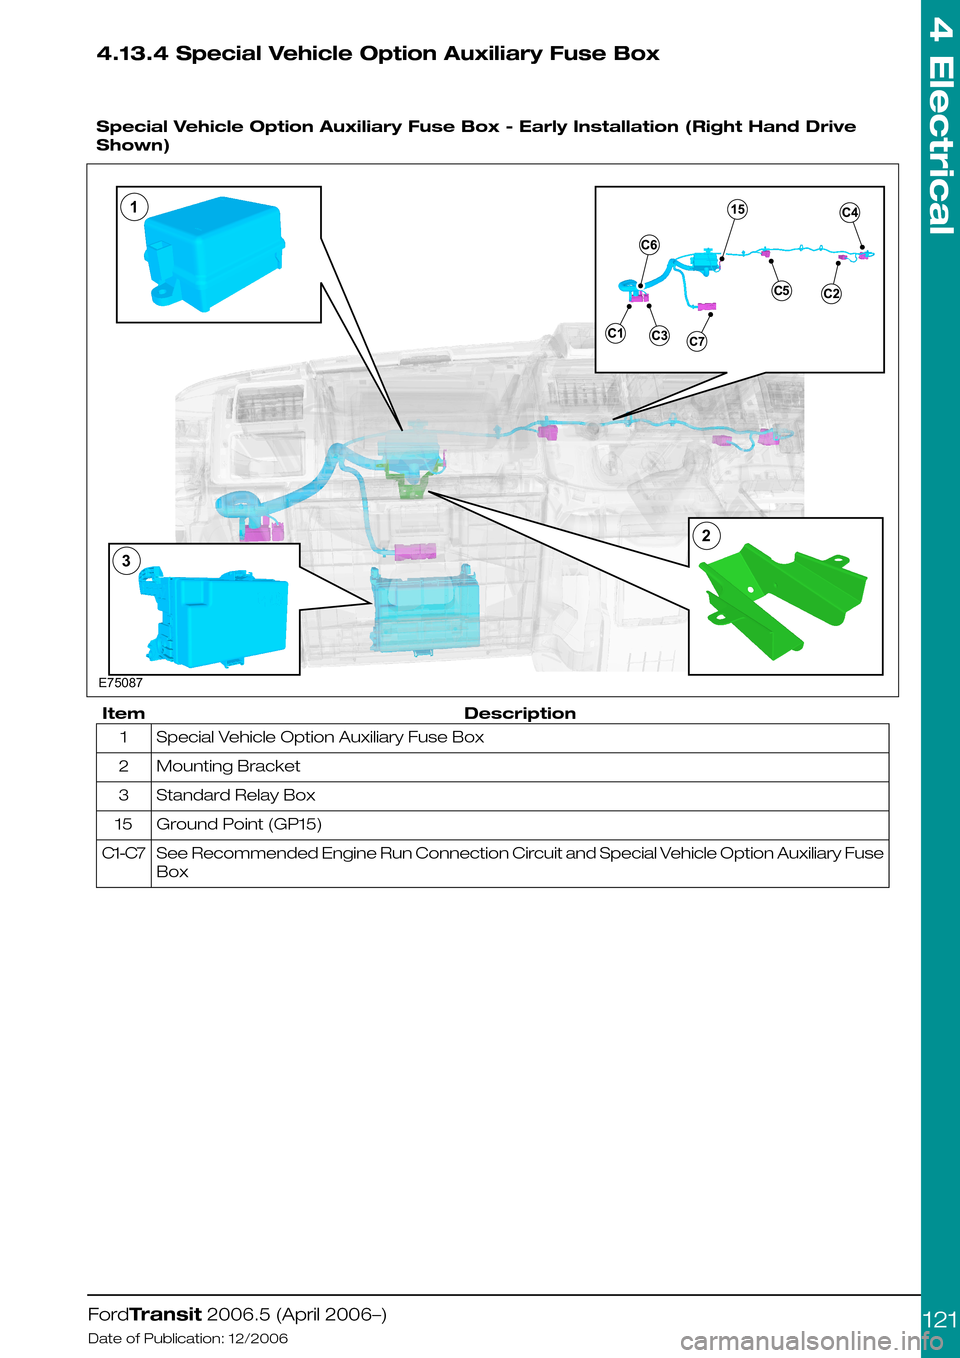
4.13.4 Special Vehicle Option Auxiliary Fuse Box
Special Vehicle Option Auxiliary Fuse Box - Early Installation (Right Hand Drive
Shown)
DescriptionItem
Special Vehicle Option Auxiliary Fuse Box1
Mounting Bracket2
Standard Relay Box3
Ground Point (GP15)15
See Recommended Engine Run Connection Circuit and Special Vehicle Option Auxiliary Fuse
Box
C1-C7
FordTransit 2006.5 (April 2006–)
Date of Publication: 12/2006
4 Electrical
121E75087132
Page 122 of 234
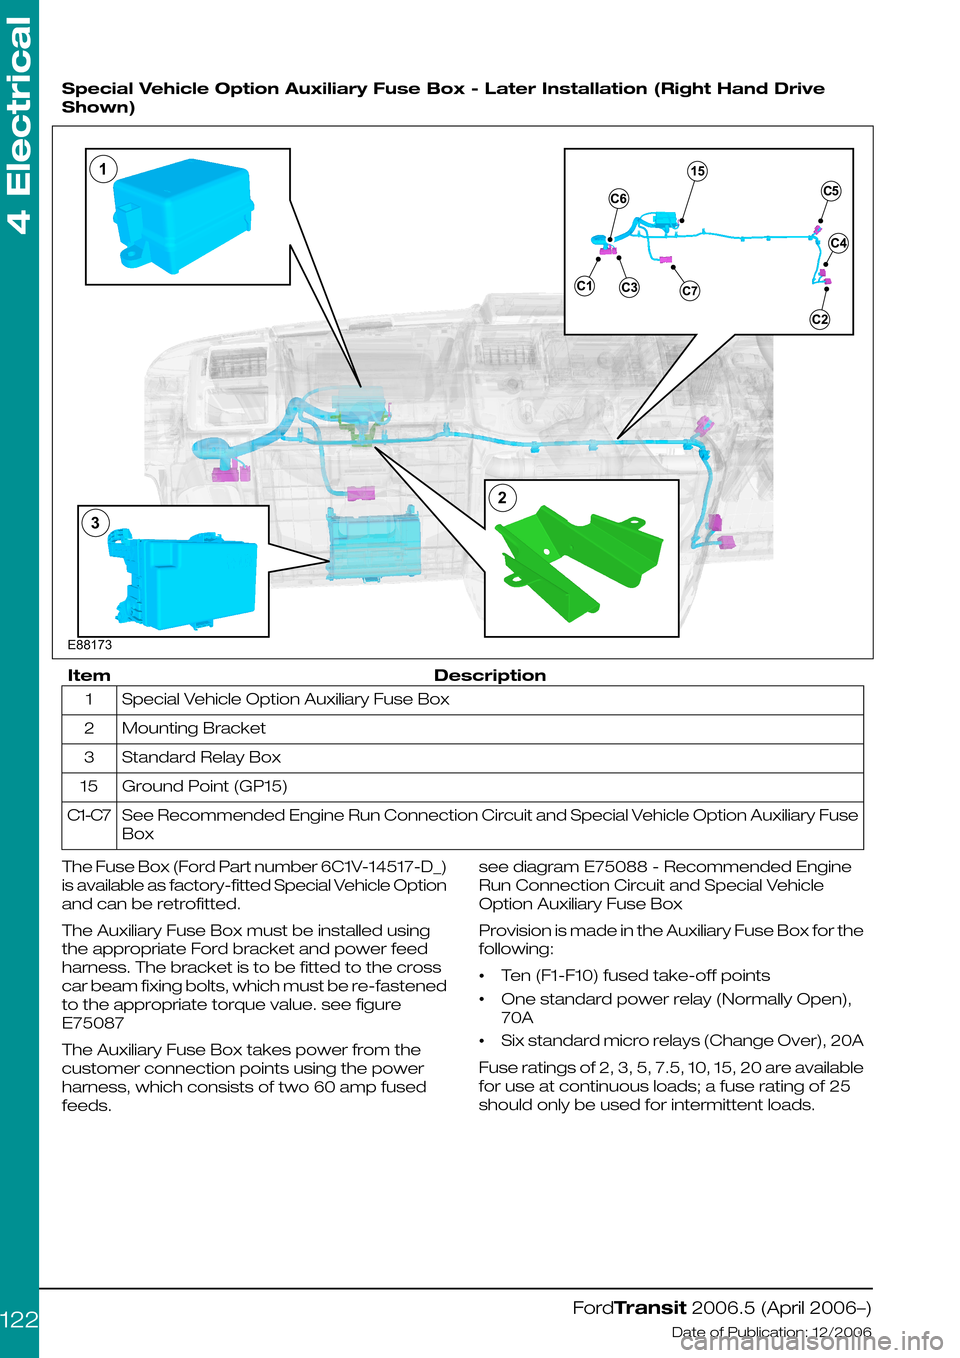
Special Vehicle Option Auxiliary Fuse Box - Later Installation (Right Hand Drive
Shown)
DescriptionItem
Special Vehicle Option Auxiliary Fuse Box1
Mounting Bracket2
Standard Relay Box3
Ground Point (GP15)15
See Recommended Engine Run Connection Circuit and Special Vehicle Option Auxiliary Fuse
Box
C1-C7
The Fuse Box (Ford Part number 6C1V-14517-D_)
is available as factory-fitted Special Vehicle Option
and can be retrofitted.
The Auxiliary Fuse Box must be installed using
the appropriate Ford bracket and power feed
harness. The bracket is to be fitted to the cross
car beam fixing bolts, which must be re-fastened
to the appropriate torque value. see figure
E75087
The Auxiliary Fuse Box takes power from the
customer connection points using the power
harness, which consists of two 60 amp fused
feeds.
see diagram E75088 - Recommended Engine
Run Connection Circuit and Special Vehicle
Option Auxiliary Fuse Box
Provision is made in the Auxiliary Fuse Box for the
following:
•Ten (F1-F10) fused take-off points
•One standard power relay (Normally Open),
70A
•Six standard micro relays (Change Over), 20A
Fuse ratings of 2, 3, 5, 7.5, 10, 15, 20 are available
for use at continuous loads; a fuse rating of 25
should only be used for intermittent loads.
FordTransit 2006.5 (April 2006–)
Date of Publication: 12/2006
4 Electrical
122E88173132
Page 123 of 234
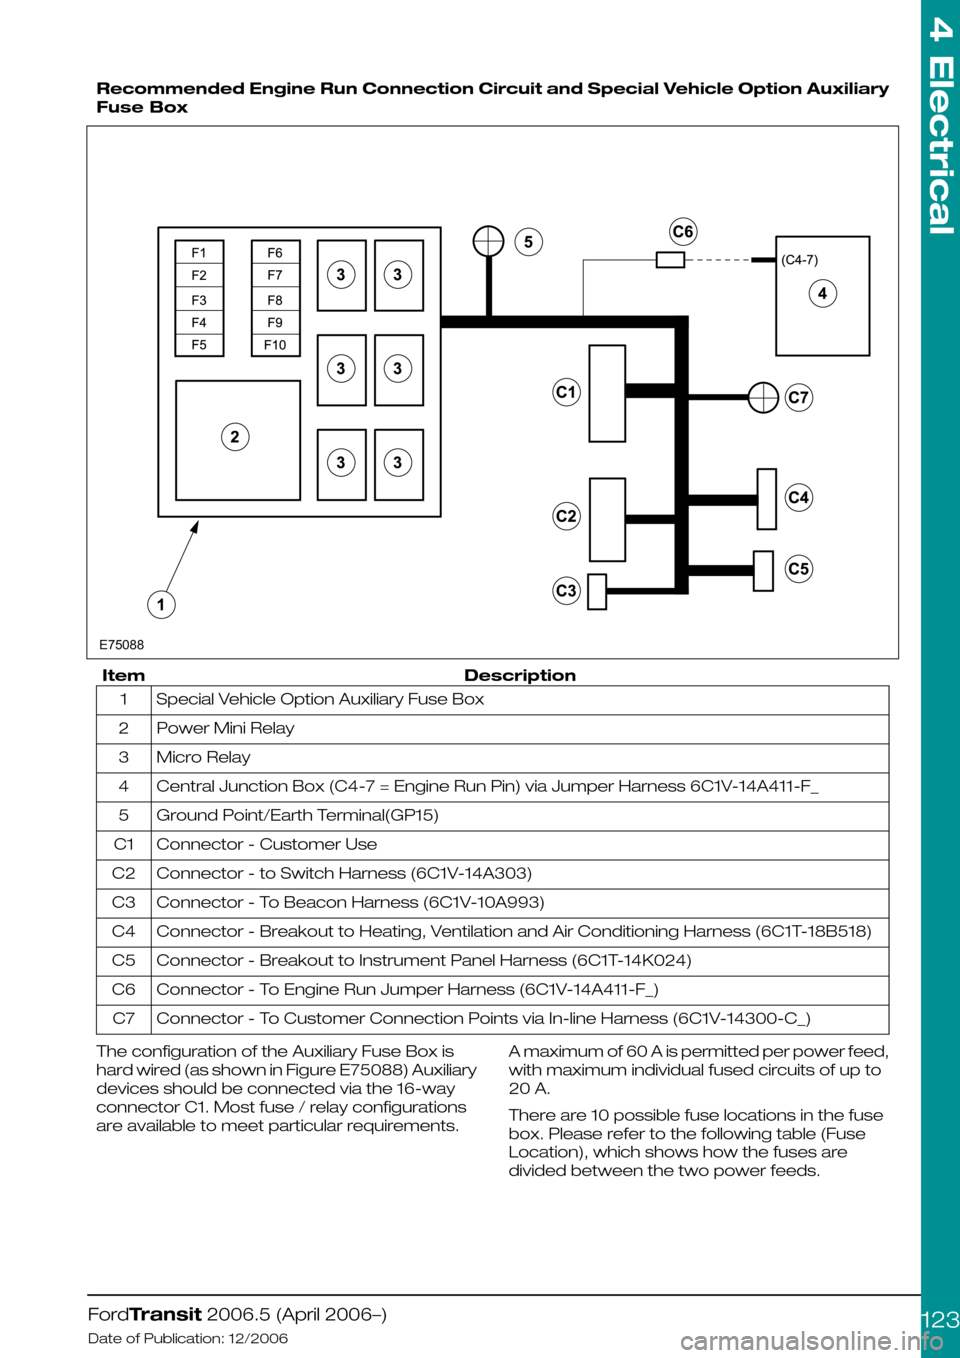
Recommended Engine Run Connection Circuit and Special Vehicle Option Auxiliary
Fuse Box
DescriptionItem
Special Vehicle Option Auxiliary Fuse Box1
Power Mini Relay2
Micro Relay3
Central Junction Box (C4-7 = Engine Run Pin) via Jumper Harness 6C1V-14A411-F_4
Ground Point/Earth Terminal(GP15)5
Connector - Customer UseC1
Connector - to Switch Harness (6C1V-14A303)C2
Connector - To Beacon Harness (6C1V-10A993)C3
Connector - Breakout to Heating, Ventilation and Air Conditioning Harness (6C1T-18B518)C4
Connector - Breakout to Instrument Panel Harness (6C1T-14K024)C5
Connector - To Engine Run Jumper Harness (6C1V-14A411-F_)C6
Connector - To Customer Connection Points via In-line Harness (6C1V-14300-C_)C7
The configuration of the Auxiliary Fuse Box is
hard wired (as shown in Figure E75088) Auxiliary
devices should be connected via the 16-way
connector C1. Most fuse / relay configurations
are available to meet particular requirements.
A maximum of 60 A is permitted per power feed,
with maximum individual fused circuits of up to
20 A.
There are 10 possible fuse locations in the fuse
box. Please refer to the following table (Fuse
Location), which shows how the fuses are
divided between the two power feeds.
FordTransit 2006.5 (April 2006–)
Date of Publication: 12/2006
4 Electrical
123E75088
Page 124 of 234
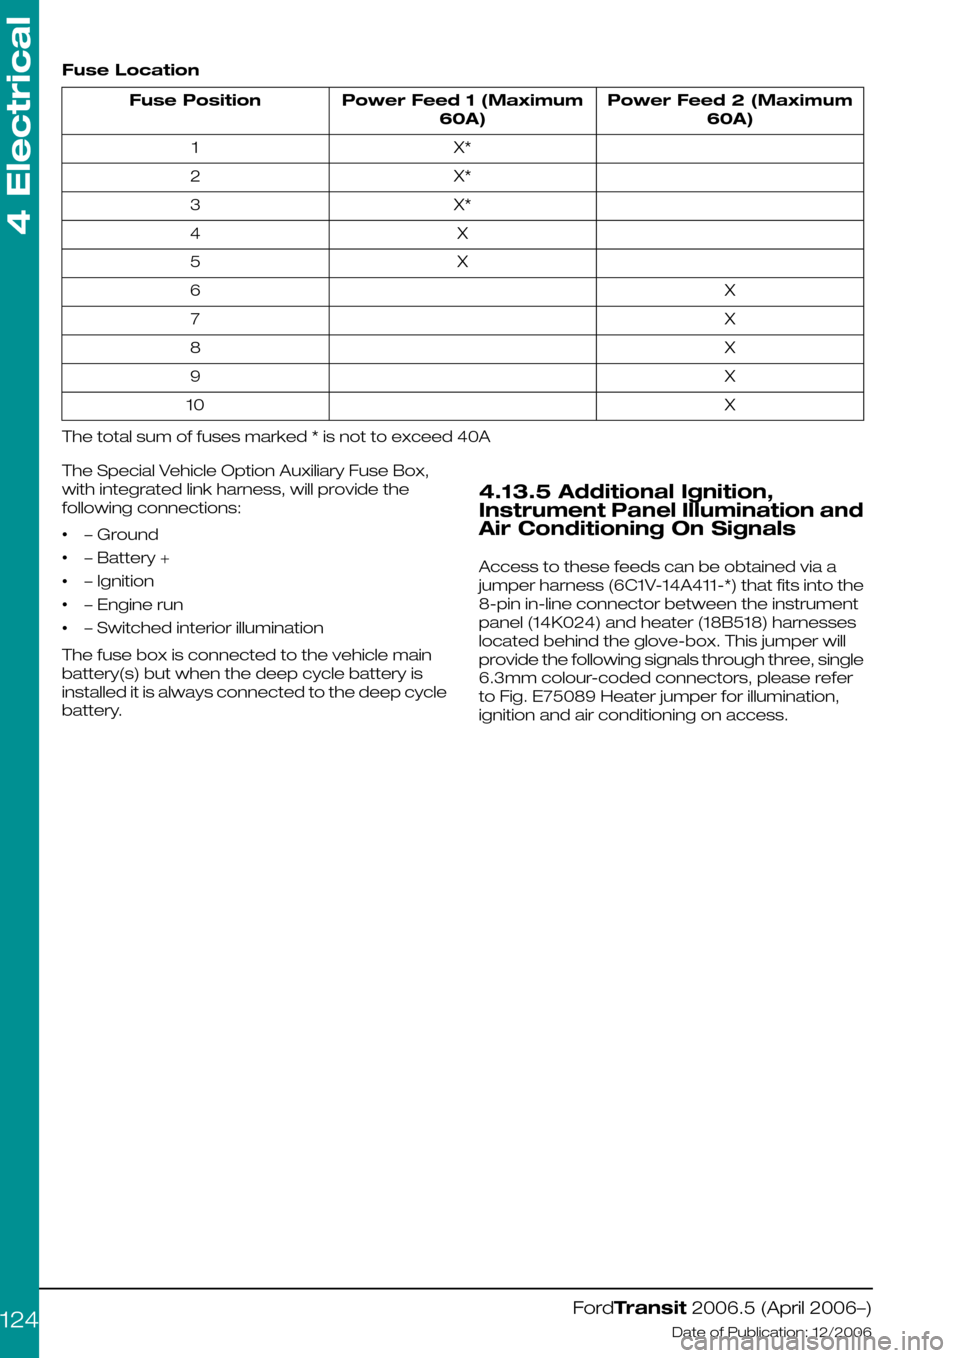
Fuse Location
Power Feed 2 (Maximum
60A)
Power Feed 1 (Maximum
60A)
Fuse Position
X*1
X*2
X*3
X4
X5
X6
X7
X8
X9
X10
The total sum of fuses marked * is not to exceed 40A
The Special Vehicle Option Auxiliary Fuse Box,
with integrated link harness, will provide the
following connections:
•– Ground
•– Battery +
•– Ignition
•– Engine run
•– Switched interior illumination
The fuse box is connected to the vehicle main
battery(s) but when the deep cycle battery is
installed it is always connected to the deep cycle
battery.
4.13.5 Additional Ignition,
Instrument Panel Illumination and
Air Conditioning On Signals
Access to these feeds can be obtained via a
jumper harness (6C1V-14A411-*) that fits into the
8-pin in-line connector between the instrument
panel (14K024) and heater (18B518) harnesses
located behind the glove-box. This jumper will
provide the following signals through three, single
6.3mm colour-coded connectors, please refer
to Fig. E75089 Heater jumper for illumination,
ignition and air conditioning on access.
FordTransit 2006.5 (April 2006–)
Date of Publication: 12/2006
4 Electrical
124
Page 125 of 234
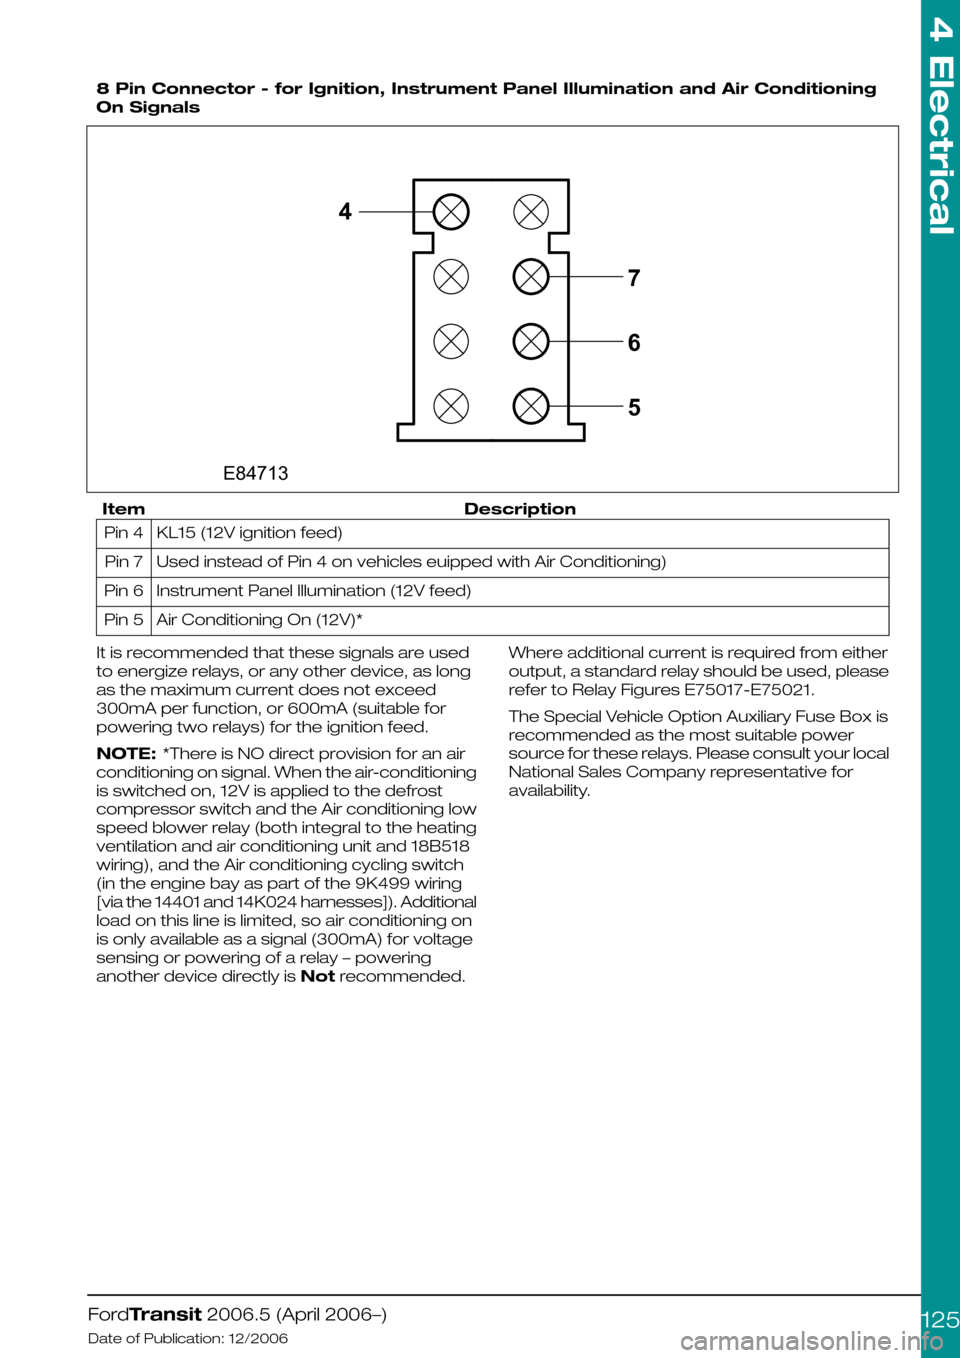
8 Pin Connector - for Ignition, Instrument Panel Illumination and Air Conditioning
On Signals
DescriptionItem
KL15 (12V ignition feed)Pin 4
Used instead of Pin 4 on vehicles euipped with Air Conditioning)Pin 7
Instrument Panel Illumination (12V feed)Pin 6
Air Conditioning On (12V)*Pin 5
It is recommended that these signals are used
to energize relays, or any other device, as long
as the maximum current does not exceed
300mA per function, or 600mA (suitable for
powering two relays) for the ignition feed.
NOTE: *There is NO direct provision for an air
conditioning on signal. When the air-conditioning
is switched on, 12V is applied to the defrost
compressor switch and the Air conditioning low
speed blower relay (both integral to the heating
ventilation and air conditioning unit and 18B518
wiring), and the Air conditioning cycling switch
(in the engine bay as part of the 9K499 wiring
[via the 14401 and 14K024 harnesses]). Additional
load on this line is limited, so air conditioning on
is only available as a signal (300mA) for voltage
sensing or powering of a relay – powering
another device directly is Not recommended.
Where additional current is required from either
output, a standard relay should be used, please
refer to Relay Figures E75017-E75021.
The Special Vehicle Option Auxiliary Fuse Box is
recommended as the most suitable power
source for these relays. Please consult your local
National Sales Company representative for
availability.
FordTransit 2006.5 (April 2006–)
Date of Publication: 12/2006
4 Electrical
1254E84713765