clock FORD TRANSIT 2016 5.G Owners Manual
[x] Cancel search | Manufacturer: FORD, Model Year: 2016, Model line: TRANSIT, Model: FORD TRANSIT 2016 5.GPages: 411, PDF Size: 5.65 MB
Page 31 of 411
Recommendations for attaching child safety restraints for children
Use any attachment method as indicated below by X
Combined
weight ofchild and child
restraint seat
Restraint
type Safety belt
only
Safety belt
and LATCH
(lower
anchors and top tether
anchor)
Safety belt
and toptether
anchor
LATCH
(lower
anchors only)
LATCH
(lower
anchors and top tether
anchor)
X
X
Up to 65 lb
(29.5 kg)
Rear facing
child seat
X
Over 65 lb
(29.5 kg)
Rear facing
child seat
X
X
X
Up to 65 lb
(29.5 kg)
Forward
facing
child seat
X
X
Over 65 lb
(29.5 kg)
Forward
facing
child seat
Note: The child seat must rest tightly
against the vehicle seat upon which it is
installed. It may be necessary to lift or
remove the head restraint. See Seats (page
97).
CHILD SAFETY LOCKS WARNING
You cannot open the rear side door
from inside if you have put the child
safety lock on.
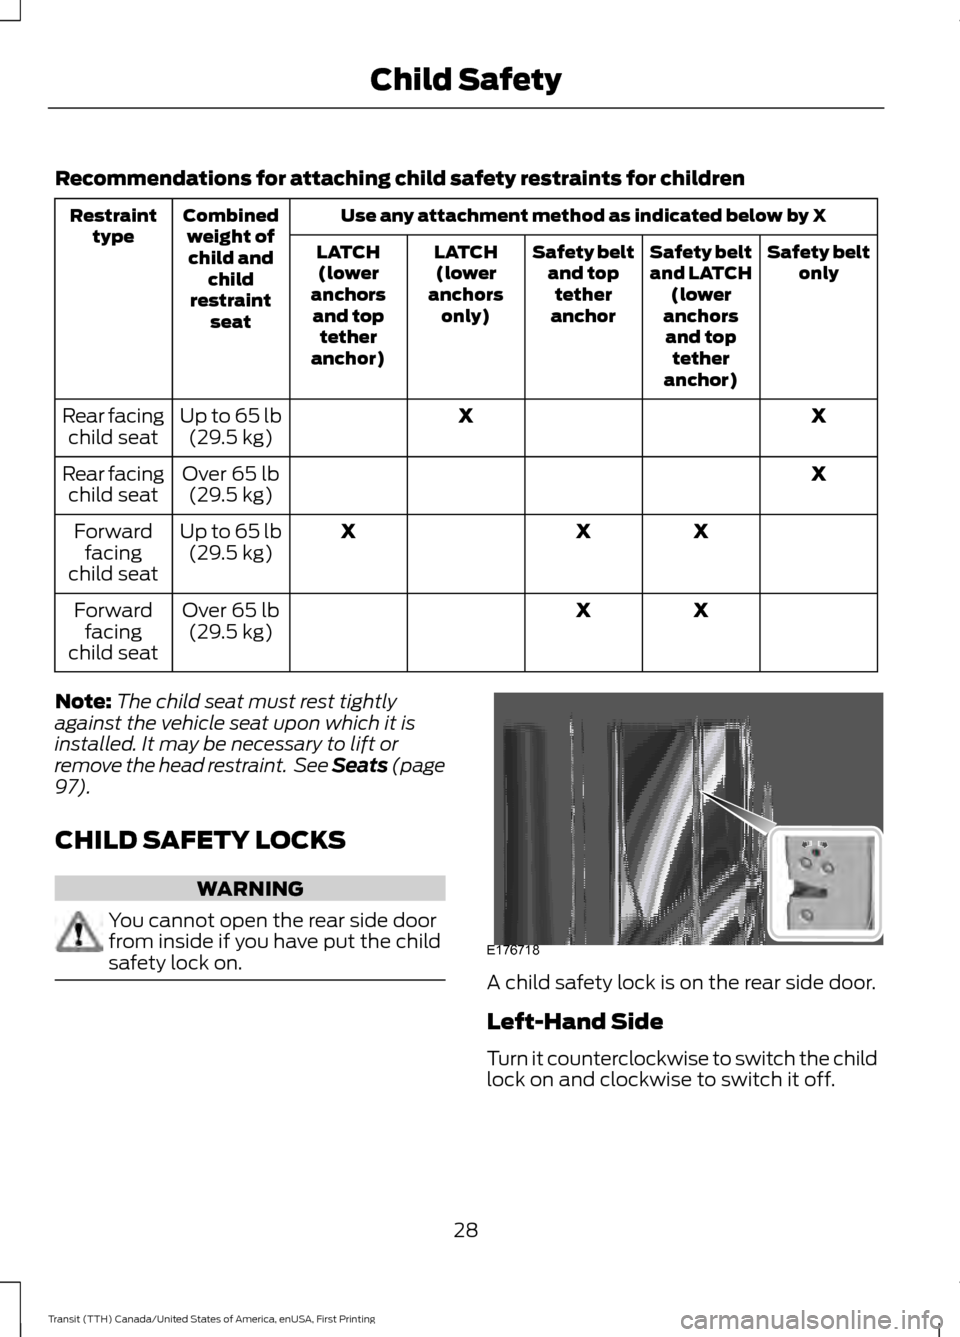
A child safety lock is on the rear side door.
Left-Hand Side
Turn it counterclockwise to switch the child
lock on and clockwise to switch it off.
28
Transit (TTH) Canada/United States of America, enUSA, First Printing Child SafetyE176718
Page 32 of 411
Right-Hand Side
Turn it clockwise to switch the child lock
on and counterclockwise to switch it off.
29
Transit (TTH) Canada/United States of America, enUSA, First Printing Child Safety
Page 102 of 411
WARNINGS
Make sure the driver seat fully locks
into place by rocking it backward and
forward.
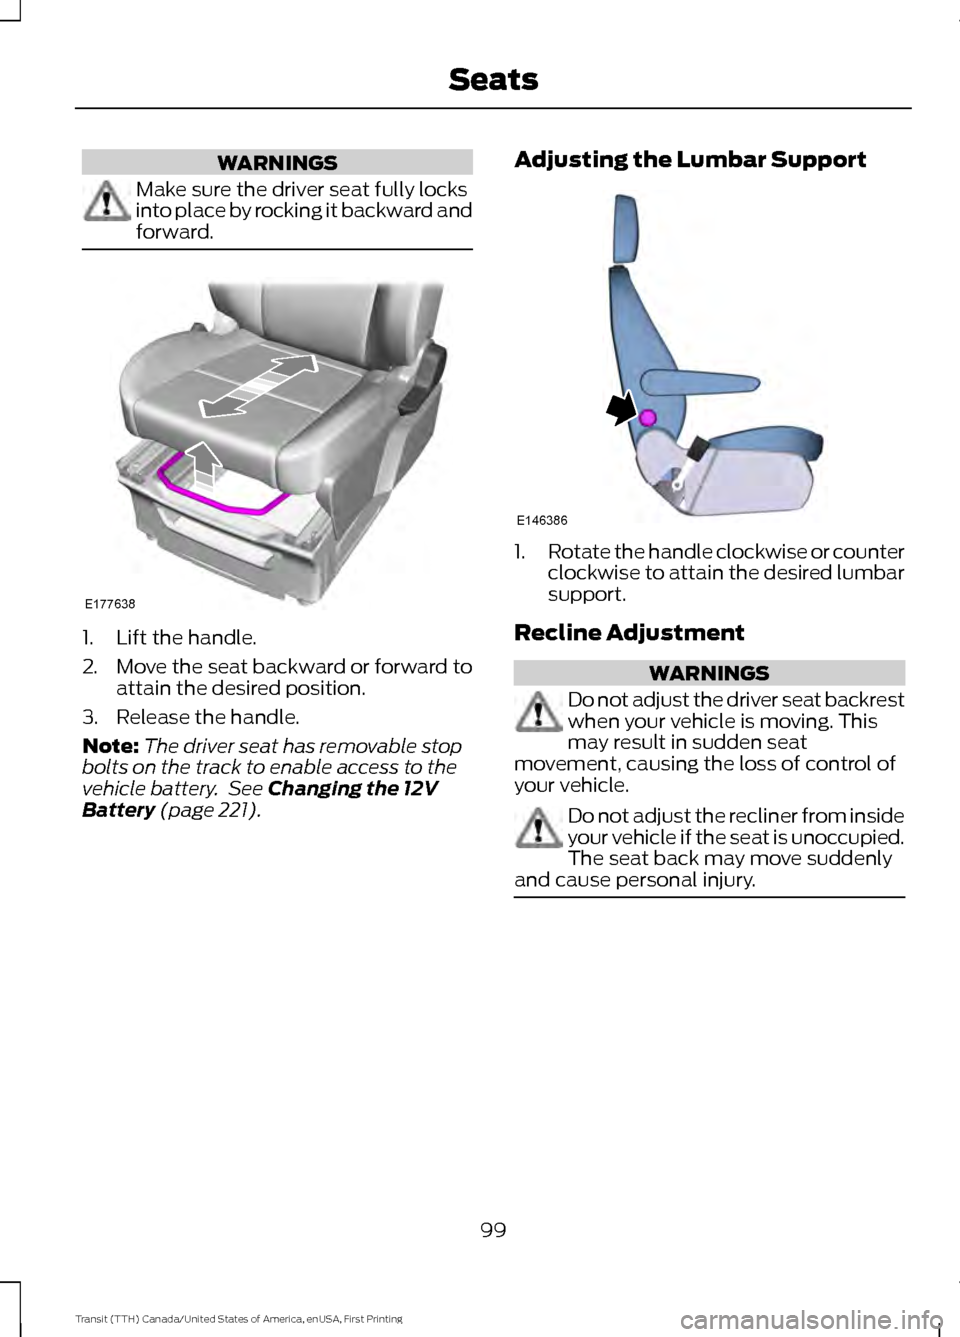
1. Lift the handle.
2. Move the seat backward or forward to
attain the desired position.
3. Release the handle.
Note: The driver seat has removable stop
bolts on the track to enable access to the
vehicle battery. See Changing the 12V
Battery (page 221). Adjusting the Lumbar Support 1.
Rotate the handle clockwise or counter
clockwise to attain the desired lumbar
support.
Recline Adjustment WARNINGS
Do not adjust the driver seat backrest
when your vehicle is moving. This
may result in sudden seat
movement, causing the loss of control of
your vehicle. Do not adjust the recliner from inside
your vehicle if the seat is unoccupied.
The seat back may move suddenly
and cause personal injury. 99
Transit (TTH) Canada/United States of America, enUSA, First Printing SeatsE177638 E146386
Page 222 of 411
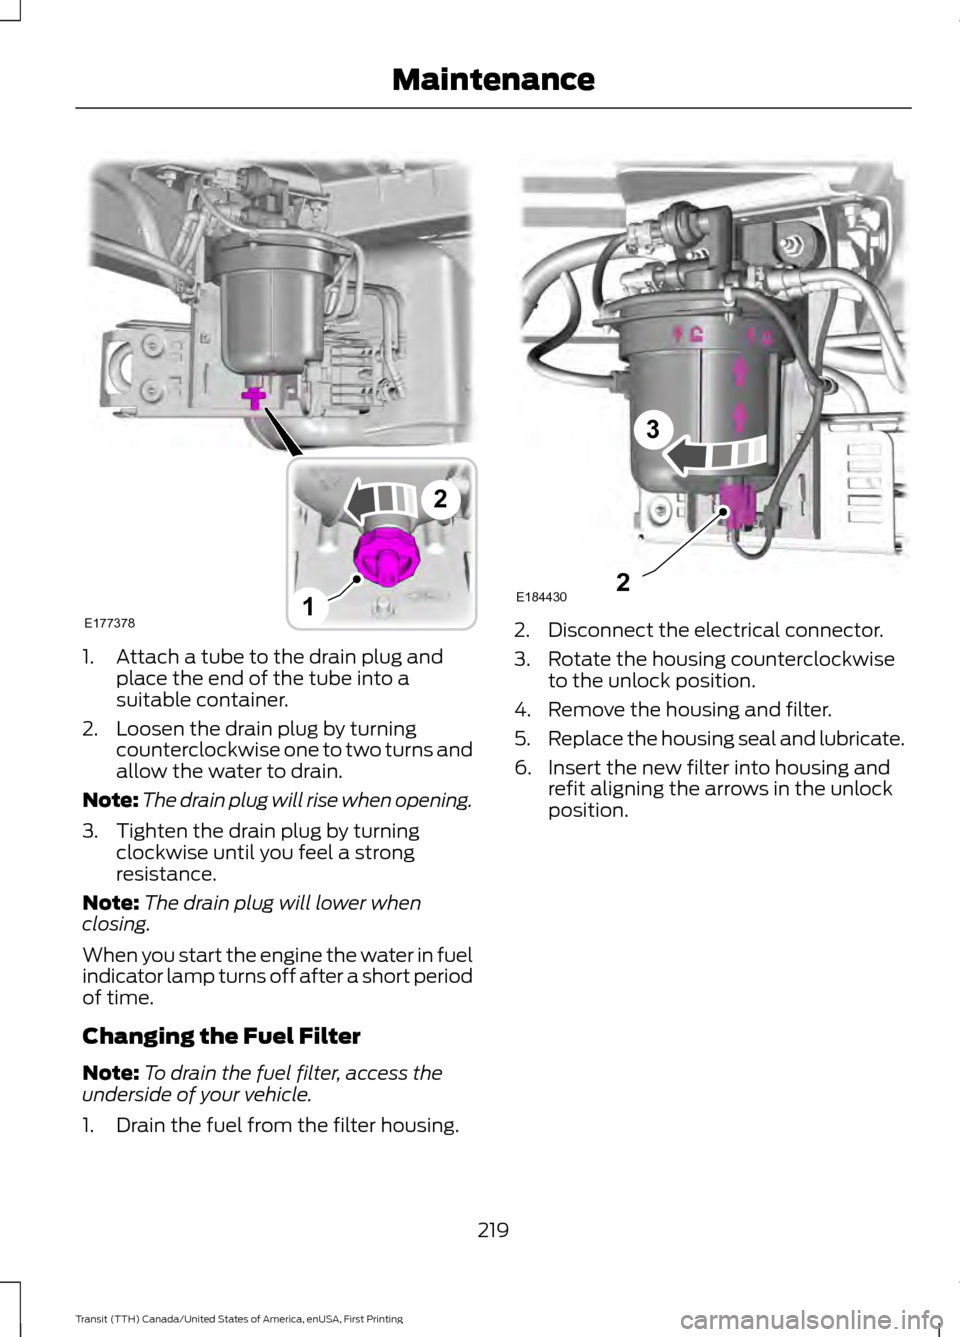
1. Attach a tube to the drain plug and
place the end of the tube into a
suitable container.
2. Loosen the drain plug by turning counterclockwise one to two turns and
allow the water to drain.
Note: The drain plug will rise when opening.
3. Tighten the drain plug by turning clockwise until you feel a strong
resistance.
Note: The drain plug will lower when
closing.
When you start the engine the water in fuel
indicator lamp turns off after a short period
of time.
Changing the Fuel Filter
Note: To drain the fuel filter, access the
underside of your vehicle.
1. Drain the fuel from the filter housing. 2. Disconnect the electrical connector.
3. Rotate the housing counterclockwise
to the unlock position.
4. Remove the housing and filter.
5. Replace the housing seal and lubricate.
6. Insert the new filter into housing and refit aligning the arrows in the unlock
position.
219
Transit (TTH) Canada/United States of America, enUSA, First Printing MaintenanceE177378
2
1 E1844302
3
Page 223 of 411
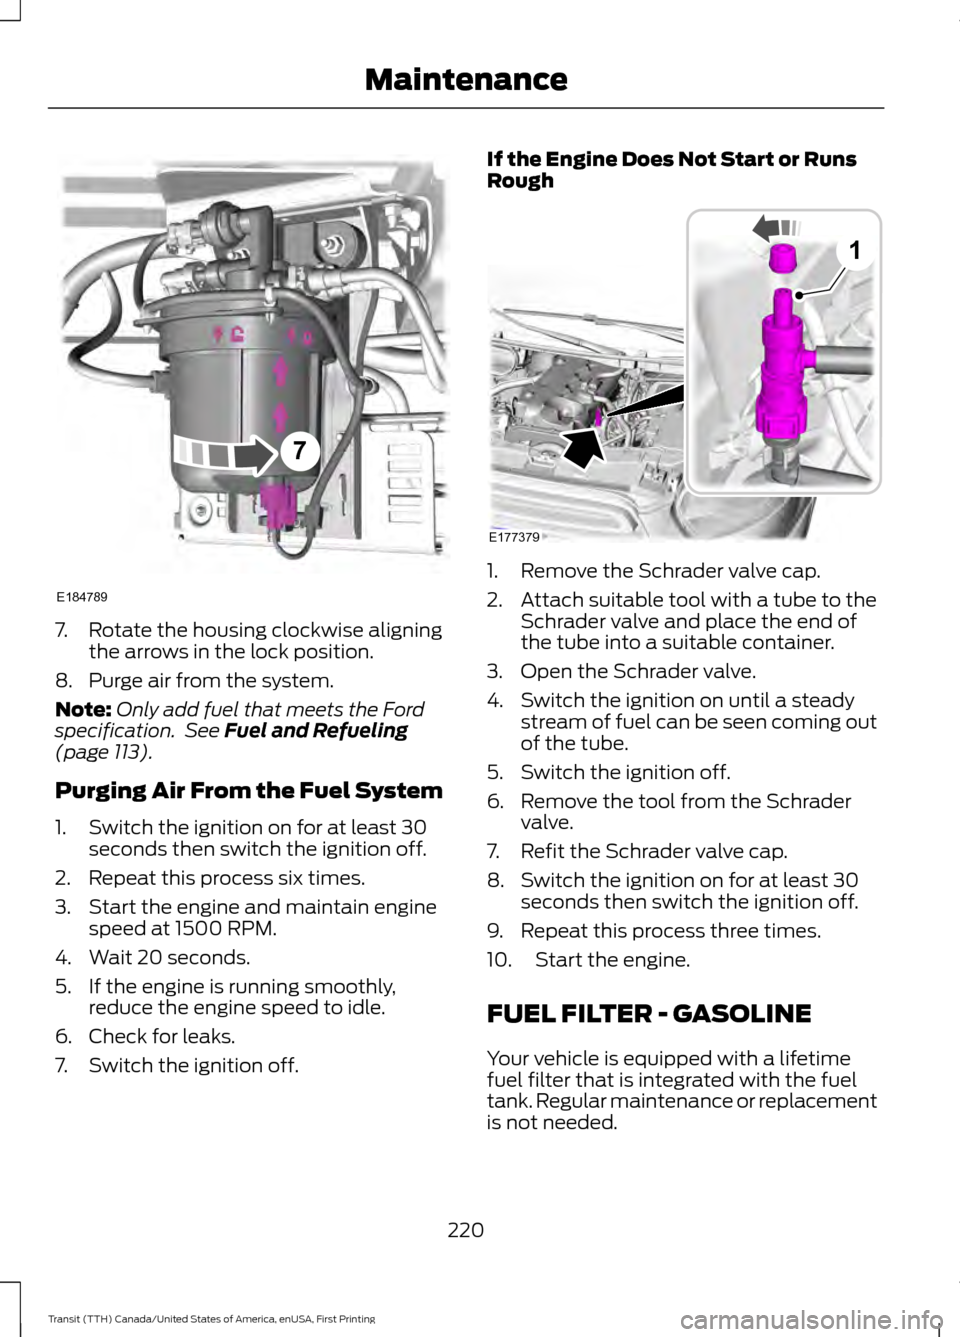
7. Rotate the housing clockwise aligning
the arrows in the lock position.
8. Purge air from the system.
Note: Only add fuel that meets the Ford
specification. See Fuel and Refueling
(page 113).
Purging Air From the Fuel System
1. Switch the ignition on for at least 30 seconds then switch the ignition off.
2. Repeat this process six times.
3. Start the engine and maintain engine speed at 1500 RPM.
4. Wait 20 seconds.
5. If the engine is running smoothly, reduce the engine speed to idle.
6. Check for leaks.
7. Switch the ignition off. If the Engine Does Not Start or Runs
Rough
1. Remove the Schrader valve cap.
2. Attach suitable tool with a tube to the
Schrader valve and place the end of
the tube into a suitable container.
3. Open the Schrader valve.
4. Switch the ignition on until a steady stream of fuel can be seen coming out
of the tube.
5. Switch the ignition off.
6. Remove the tool from the Schrader valve.
7. Refit the Schrader valve cap.
8. Switch the ignition on for at least 30 seconds then switch the ignition off.
9. Repeat this process three times.
10. Start the engine.
FUEL FILTER - GASOLINE
Your vehicle is equipped with a lifetime
fuel filter that is integrated with the fuel
tank. Regular maintenance or replacement
is not needed.
220
Transit (TTH) Canada/United States of America, enUSA, First Printing MaintenanceE184789
7 E177379
1
Page 228 of 411
5. Locate the vertical adjuster on each
headlamp. Use a suitable tool, for
example a screwdriver or hexagonal
socket, to turn the adjuster clockwise
or counterclockwise to adjust the
vertical aim of the headlamp. The
horizontal edge of the brighter light
should touch the horizontal reference
line.
6. Close the hood and switch off the lamps.
Horizontal Aim Adjustment
The horizontal aim of the headlamp beam
on your vehicle is not adjustable.
REMOVING A HEADLAMP WARNING
Switch all of the lamps and the
ignition off. Failure to follow this
warning could result in serious
personal injury. 1. Open the hood. See Opening and
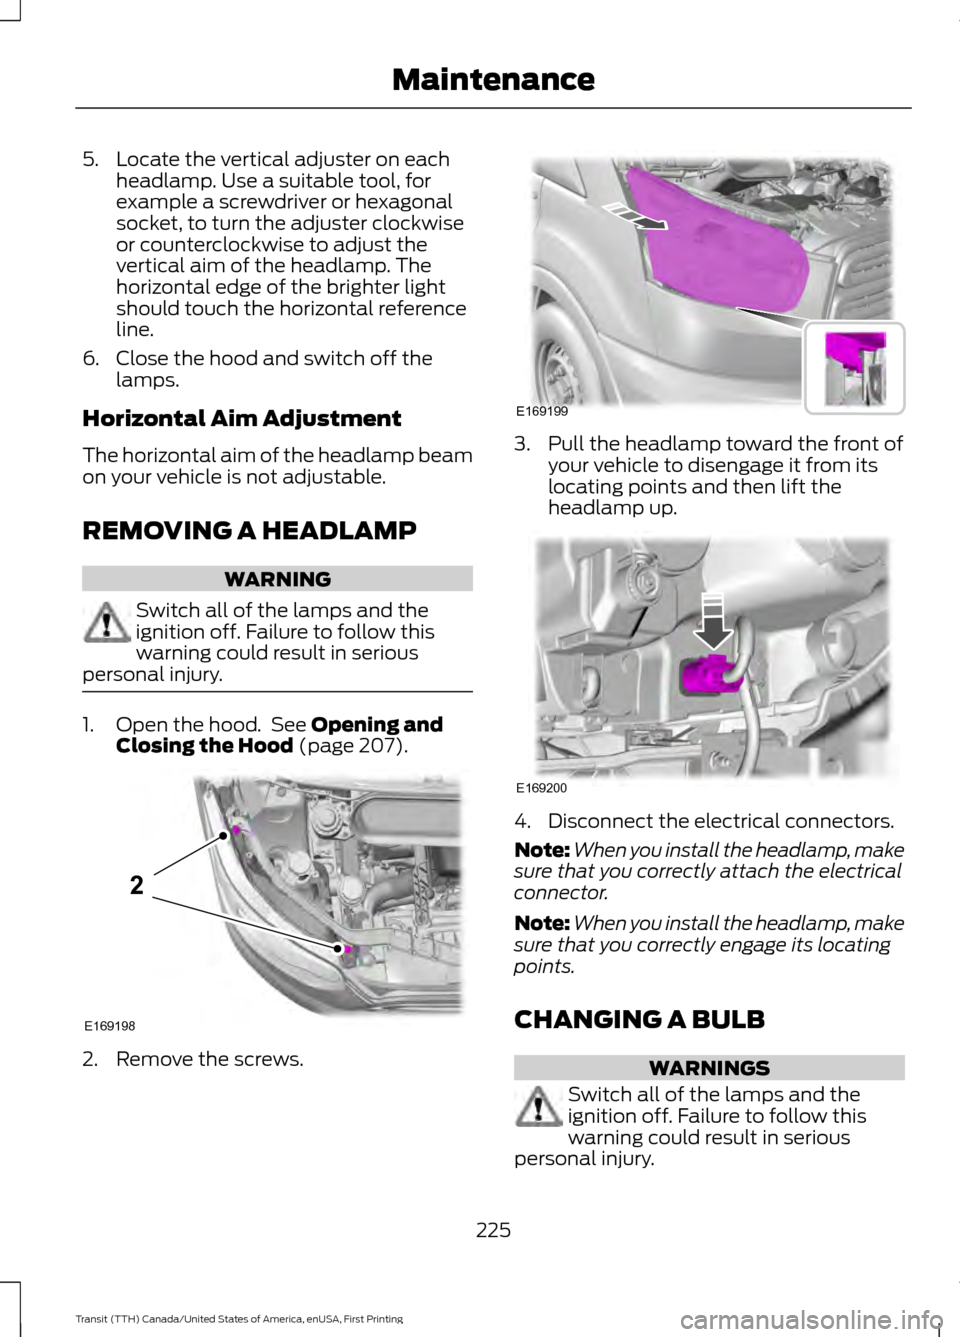
Closing the Hood (page 207). 2. Remove the screws. 3. Pull the headlamp toward the front of
your vehicle to disengage it from its
locating points and then lift the
headlamp up. 4. Disconnect the electrical connectors.
Note:
When you install the headlamp, make
sure that you correctly attach the electrical
connector.
Note: When you install the headlamp, make
sure that you correctly engage its locating
points.
CHANGING A BULB WARNINGS
Switch all of the lamps and the
ignition off. Failure to follow this
warning could result in serious
personal injury.
225
Transit (TTH) Canada/United States of America, enUSA, First Printing MaintenanceE169198
2 E169199 E169200
Page 229 of 411
WARNINGS
Bulbs become hot when in use. Let
them cool down before you remove
them.
Use the correct specification bulb. See
Bulb Specification Chart (page 230).
The following instructions describe how to
remove the bulbs. Install in the reverse
order unless otherwise stated.
Note: LED lamps are not serviceable. See
an authorized dealer.
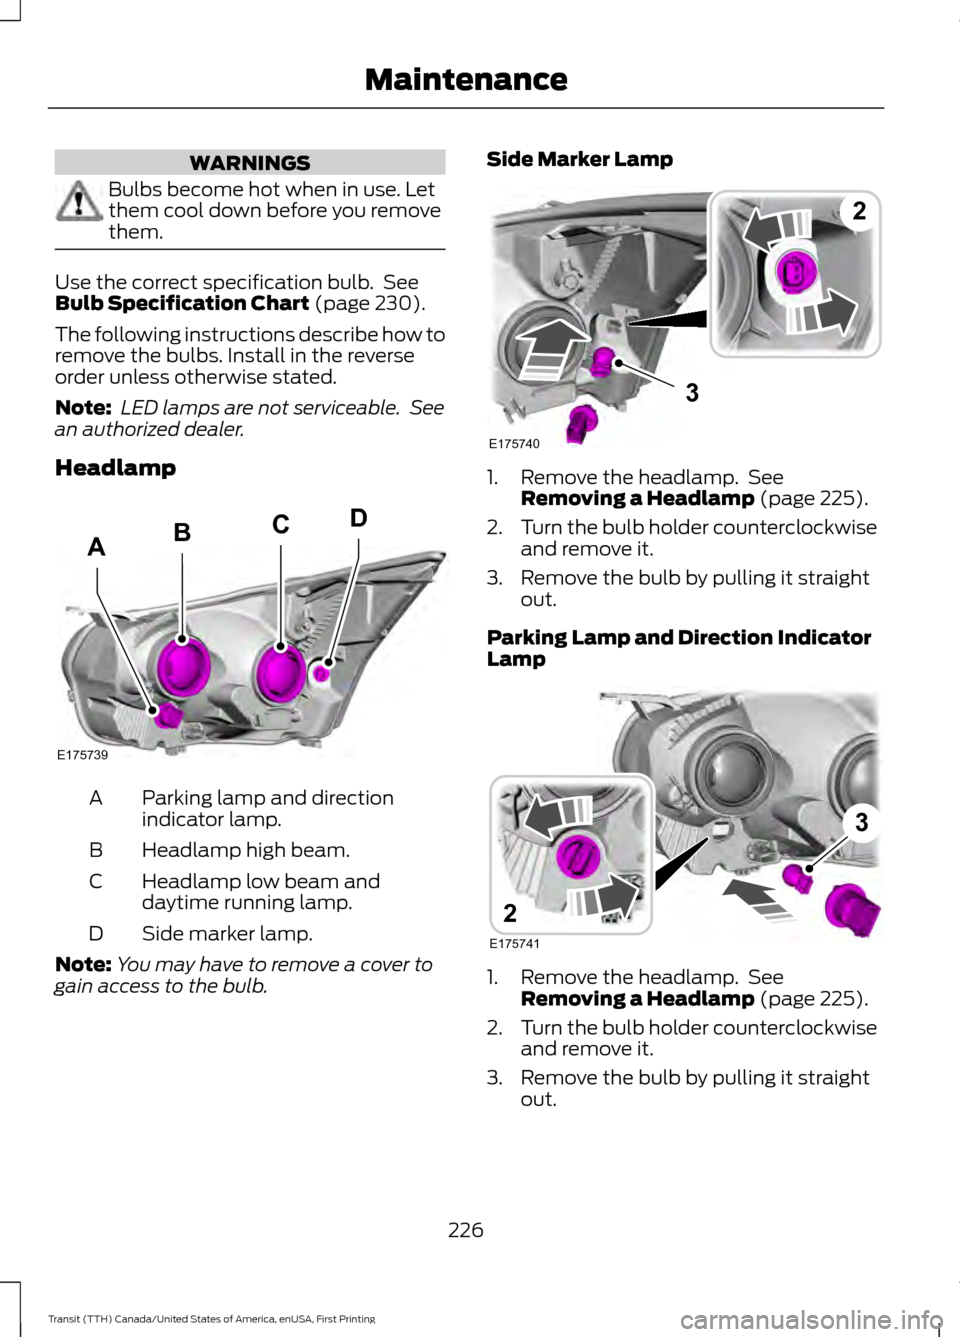
Headlamp Parking lamp and direction
indicator lamp.
A
Headlamp high beam.
B
Headlamp low beam and
daytime running lamp.
C
Side marker lamp.
D
Note: You may have to remove a cover to
gain access to the bulb. Side Marker Lamp
1. Remove the headlamp. See
Removing a Headlamp
(page 225).
2. Turn the bulb holder counterclockwise
and remove it.
3. Remove the bulb by pulling it straight out.
Parking Lamp and Direction Indicator
Lamp 1. Remove the headlamp. See
Removing a Headlamp
(page 225).
2. Turn the bulb holder counterclockwise
and remove it.
3. Remove the bulb by pulling it straight out.
226
Transit (TTH) Canada/United States of America, enUSA, First Printing MaintenanceE175739
BCD
A 3
E175740
2 3
E175741
2
Page 230 of 411
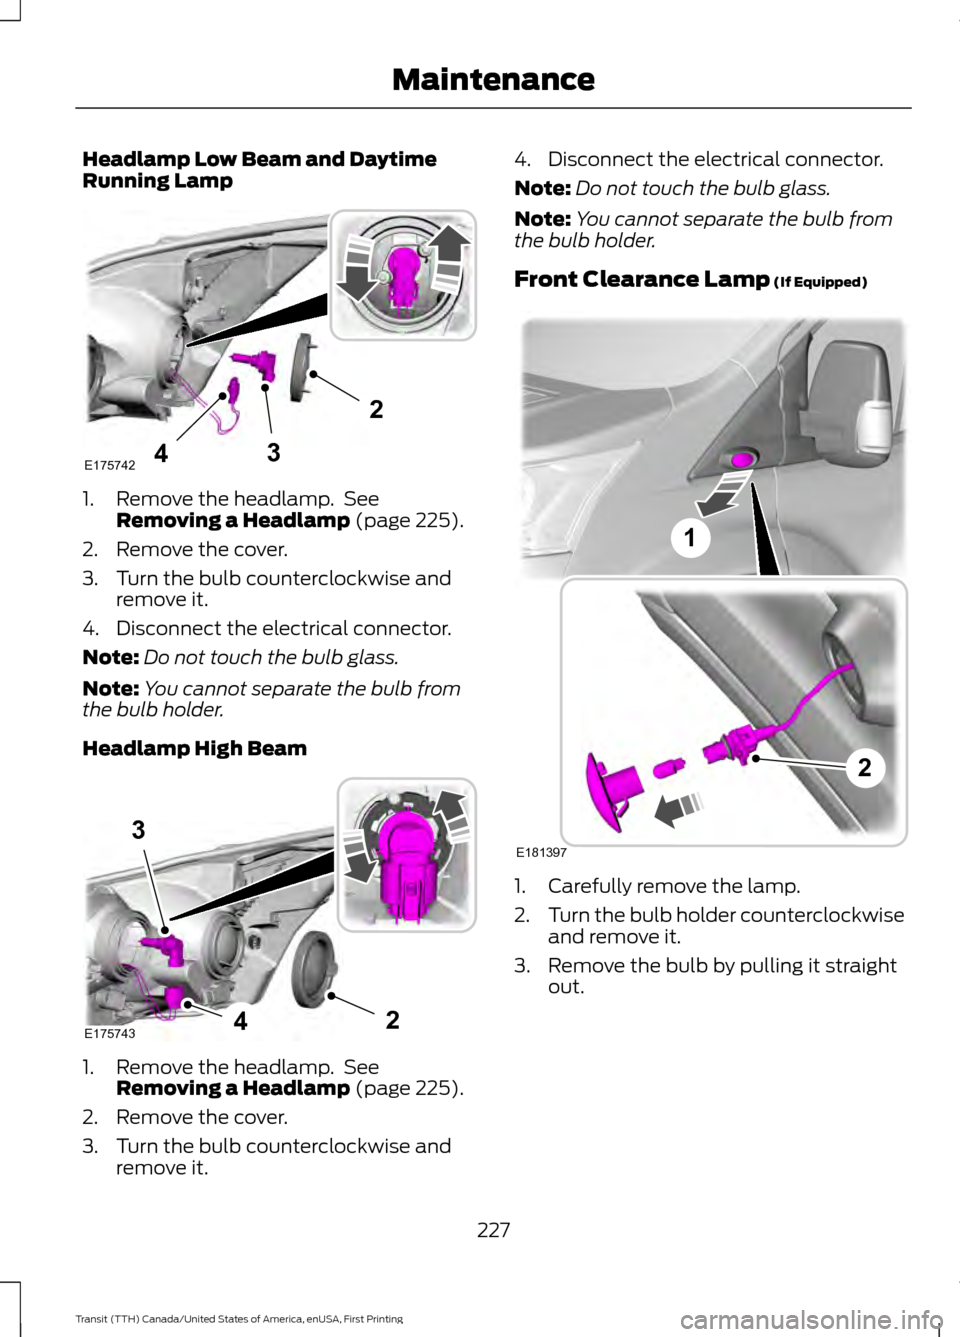
Headlamp Low Beam and Daytime
Running Lamp
1. Remove the headlamp. See
Removing a Headlamp (page 225).
2. Remove the cover.
3. Turn the bulb counterclockwise and remove it.
4. Disconnect the electrical connector.
Note: Do not touch the bulb glass.
Note: You cannot separate the bulb from
the bulb holder.
Headlamp High Beam 1. Remove the headlamp. See
Removing a Headlamp
(page 225).
2. Remove the cover.
3. Turn the bulb counterclockwise and remove it. 4. Disconnect the electrical connector.
Note:
Do not touch the bulb glass.
Note: You cannot separate the bulb from
the bulb holder.
Front Clearance Lamp
(If Equipped) 1. Carefully remove the lamp.
2.
Turn the bulb holder counterclockwise
and remove it.
3. Remove the bulb by pulling it straight out.
227
Transit (TTH) Canada/United States of America, enUSA, First Printing Maintenance43
2
E175742 4
3
2E175743 E181397
2
1
Page 231 of 411
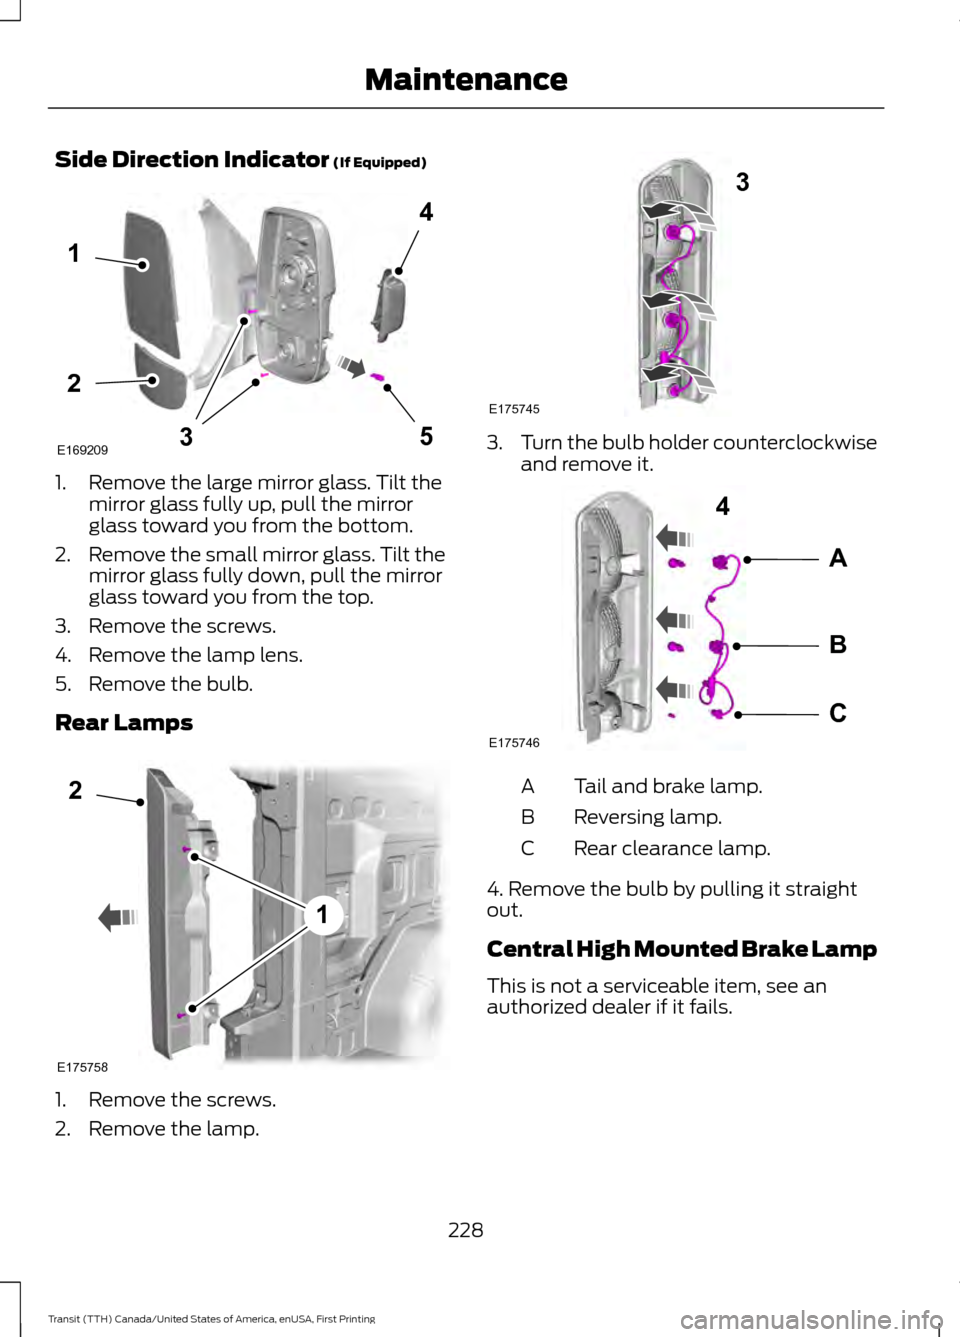
Side Direction Indicator (If Equipped)
1. Remove the large mirror glass. Tilt the
mirror glass fully up, pull the mirror
glass toward you from the bottom.
2. Remove the small mirror glass. Tilt the
mirror glass fully down, pull the mirror
glass toward you from the top.
3. Remove the screws.
4. Remove the lamp lens.
5. Remove the bulb.
Rear Lamps 1. Remove the screws.
2. Remove the lamp. 3.
Turn the bulb holder counterclockwise
and remove it. Tail and brake lamp.
A
Reversing lamp.
B
Rear clearance lamp.
C
4. Remove the bulb by pulling it straight
out.
Central High Mounted Brake Lamp
This is not a serviceable item, see an
authorized dealer if it fails.
228
Transit (TTH) Canada/United States of America, enUSA, First Printing MaintenanceE1692093
1
4
5
2 E175758
2
1 3
E175745 A
B
C
4
E175746
Page 232 of 411
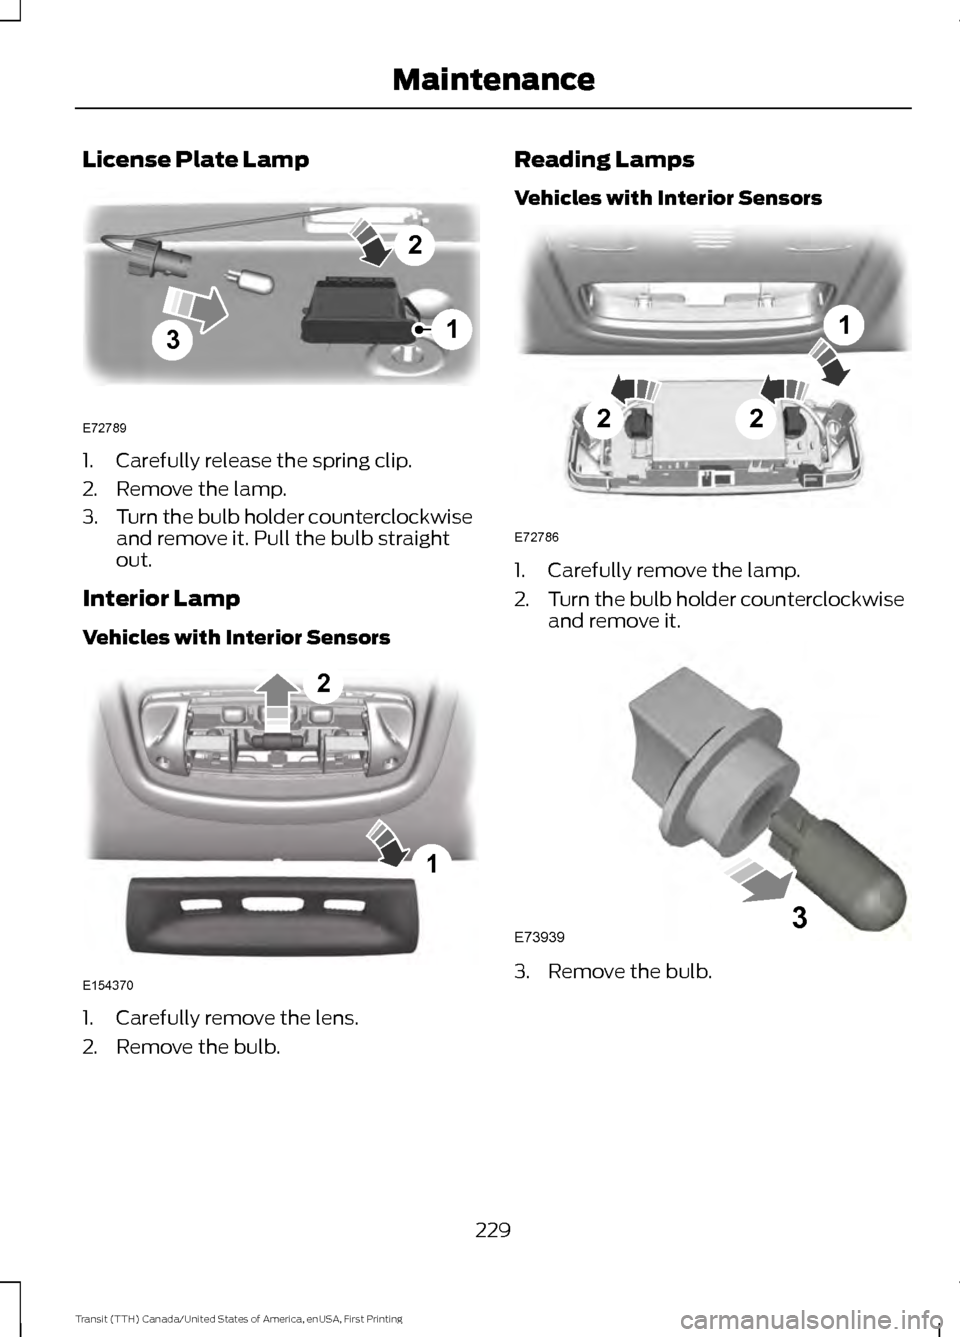
License Plate Lamp
1. Carefully release the spring clip.
2. Remove the lamp.
3.
Turn the bulb holder counterclockwise
and remove it. Pull the bulb straight
out.
Interior Lamp
Vehicles with Interior Sensors 1. Carefully remove the lens.
2. Remove the bulb. Reading Lamps
Vehicles with Interior Sensors
1. Carefully remove the lamp.
2.
Turn the bulb holder counterclockwise
and remove it. 3. Remove the bulb.
229
Transit (TTH) Canada/United States of America, enUSA, First Printing Maintenance3
2
1
E72789 1
2
E154370 22
1
E72786 E739393