air condition FORD TRANSIT CONNECT 2015 2.G Owner's Manual
[x] Cancel search | Manufacturer: FORD, Model Year: 2015, Model line: TRANSIT CONNECT, Model: FORD TRANSIT CONNECT 2015 2.GPages: 428, PDF Size: 6.27 MB
Page 181 of 428
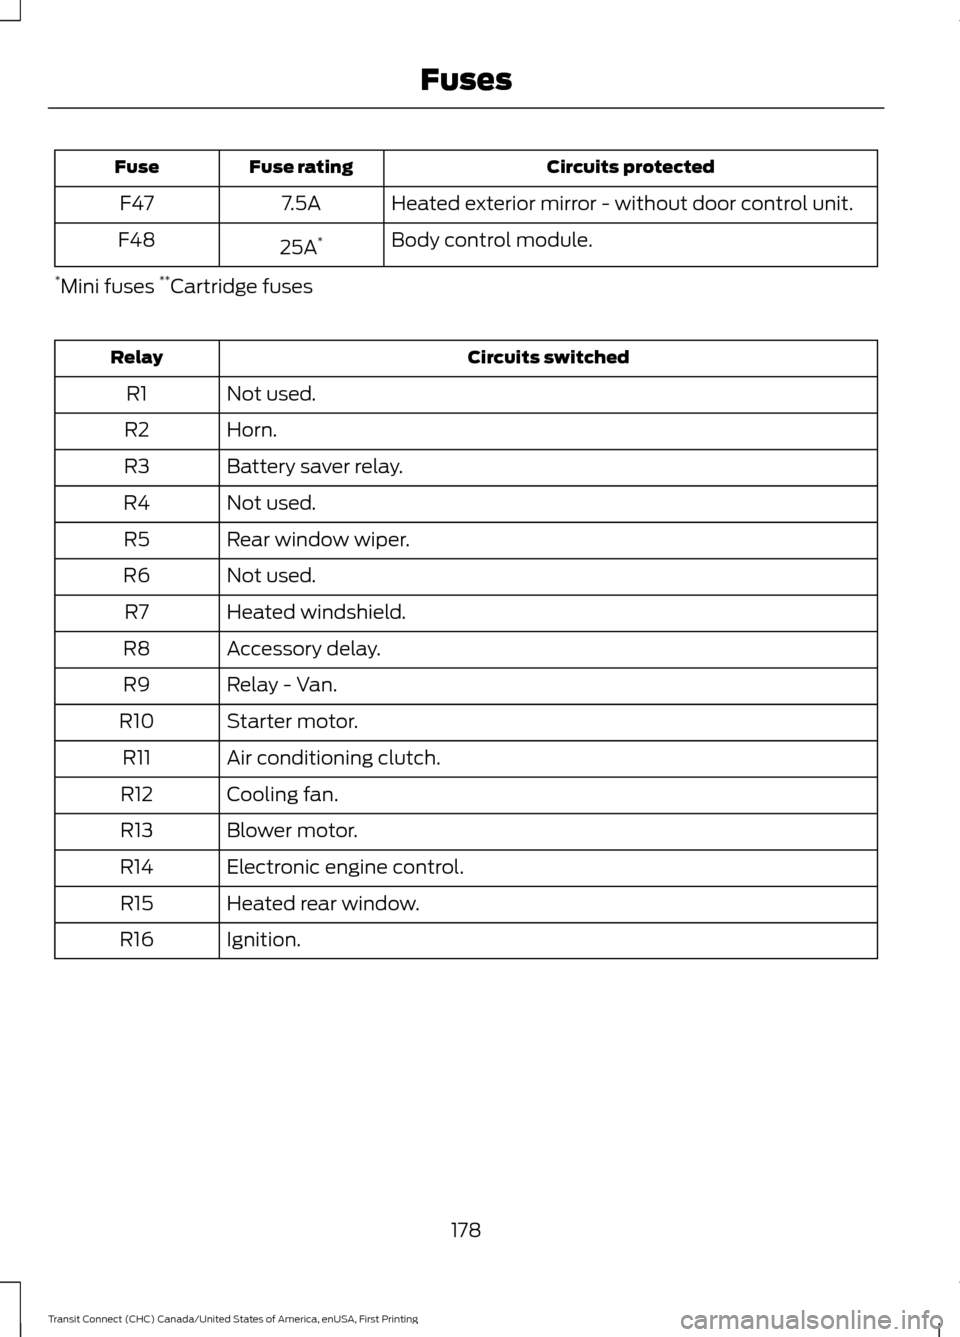
Circuits protected
Fuse rating
Fuse
Heated exterior mirror - without door control unit.
7.5A
F47
Body control module.
25A *
F48
* Mini fuses **
Cartridge fuses Circuits switched
Relay
Not used.
R1
Horn.
R2
Battery saver relay.
R3
Not used.
R4
Rear window wiper.
R5
Not used.
R6
Heated windshield.
R7
Accessory delay.
R8
Relay - Van.
R9
Starter motor.
R10
Air conditioning clutch.
R11
Cooling fan.
R12
Blower motor.
R13
Electronic engine control.
R14
Heated rear window.
R15
Ignition.
R16
178
Transit Connect (CHC) Canada/United States of America, enUSA, First Printing Fuses
Page 183 of 428
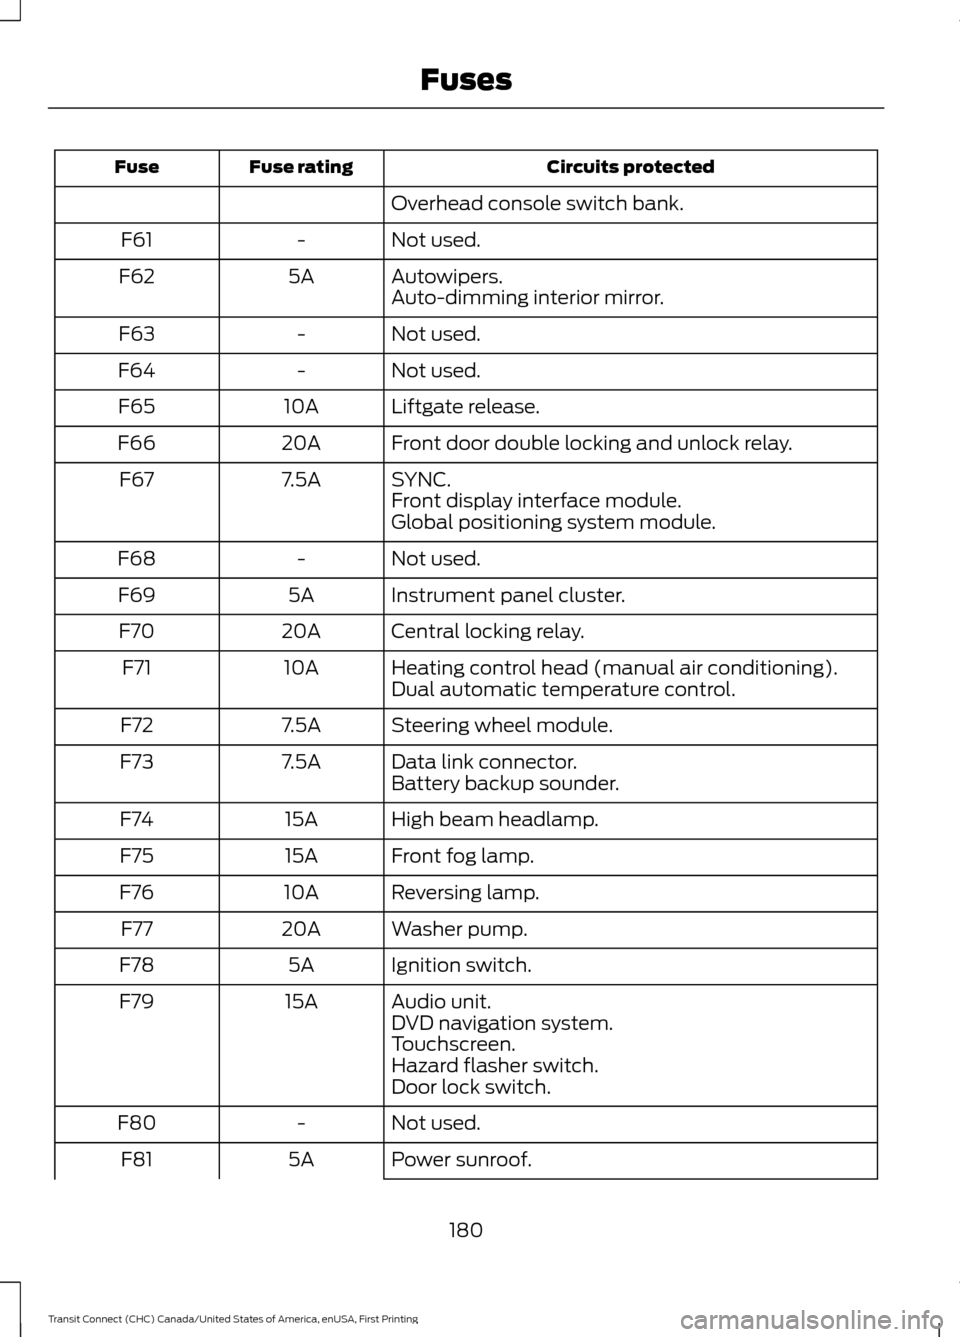
Circuits protected
Fuse rating
Fuse
Overhead console switch bank.
Not used.
-
F61
Autowipers.
5A
F62
Auto-dimming interior mirror.
Not used.
-
F63
Not used.
-
F64
Liftgate release.
10A
F65
Front door double locking and unlock relay.
20A
F66
SYNC.
7.5A
F67
Front display interface module.
Global positioning system module.
Not used.
-
F68
Instrument panel cluster.
5A
F69
Central locking relay.
20A
F70
Heating control head (manual air conditioning).
10A
F71
Dual automatic temperature control.
Steering wheel module.
7.5A
F72
Data link connector.
7.5A
F73
Battery backup sounder.
High beam headlamp.
15A
F74
Front fog lamp.
15A
F75
Reversing lamp.
10A
F76
Washer pump.
20A
F77
Ignition switch.
5A
F78
Audio unit.
15A
F79
DVD navigation system.
Touchscreen.
Hazard flasher switch.
Door lock switch.
Not used.
-
F80
Power sunroof.
5A
F81
180
Transit Connect (CHC) Canada/United States of America, enUSA, First Printing Fuses
Page 184 of 428
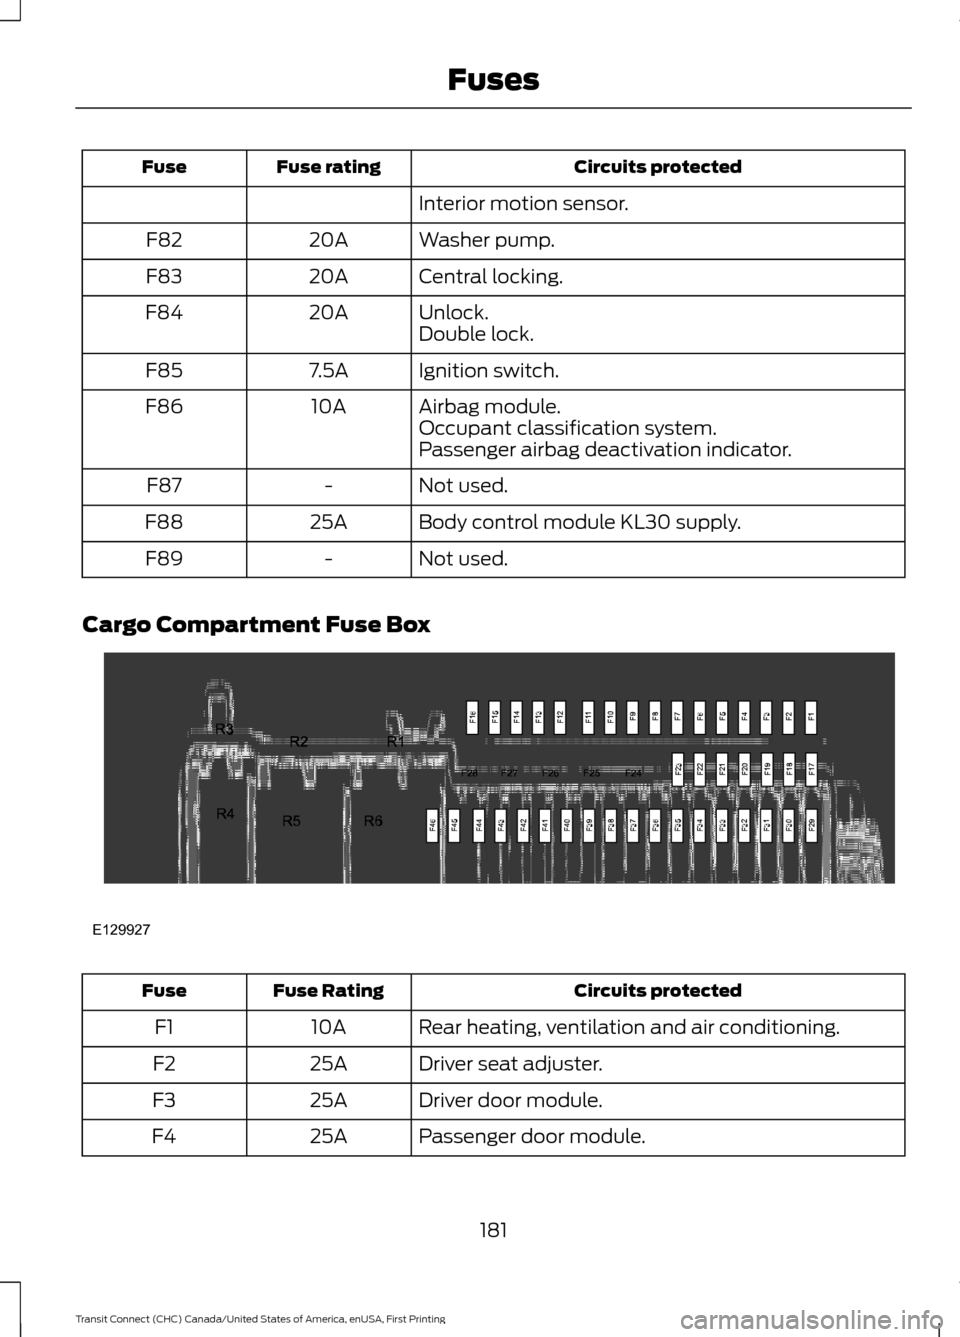
Circuits protected
Fuse rating
Fuse
Interior motion sensor.
Washer pump.
20A
F82
Central locking.
20A
F83
Unlock.
20A
F84
Double lock.
Ignition switch.
7.5A
F85
Airbag module.
10A
F86
Occupant classification system.
Passenger airbag deactivation indicator.
Not used.
-
F87
Body control module KL30 supply.
25A
F88
Not used.
-
F89
Cargo Compartment Fuse Box Circuits protected
Fuse Rating
Fuse
Rear heating, ventilation and air conditioning.
10A
F1
Driver seat adjuster.
25A
F2
Driver door module.
25A
F3
Passenger door module.
25A
F4
181
Transit Connect (CHC) Canada/United States of America, enUSA, First Printing FusesE129927
Page 186 of 428
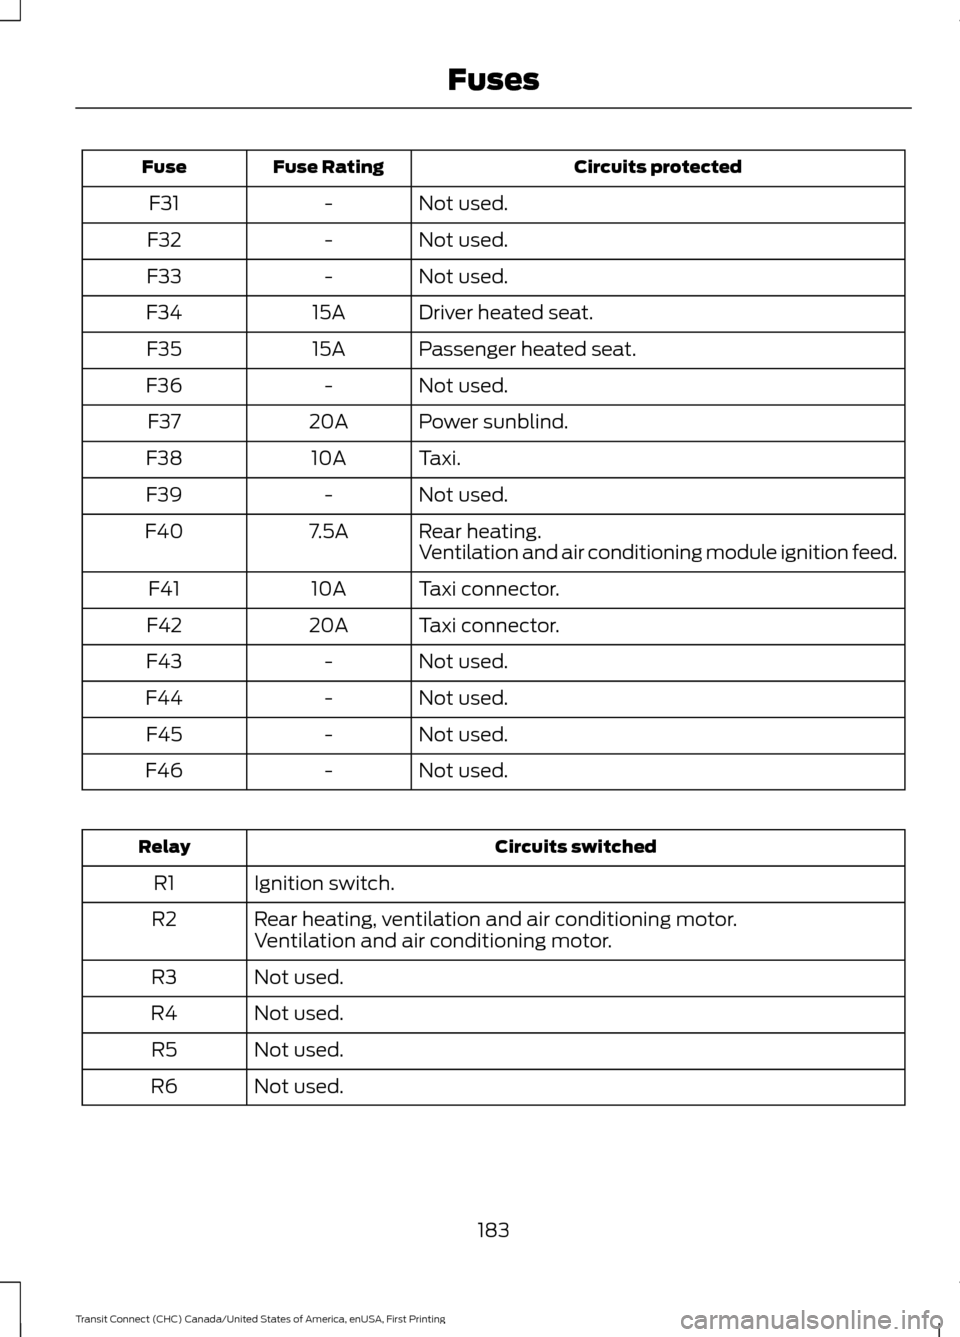
Circuits protected
Fuse Rating
Fuse
Not used.
-
F31
Not used.
-
F32
Not used.
-
F33
Driver heated seat.
15A
F34
Passenger heated seat.
15A
F35
Not used.
-
F36
Power sunblind.
20A
F37
Taxi.
10A
F38
Not used.
-
F39
Rear heating.
7.5A
F40
Ventilation and air conditioning module ignition feed.
Taxi connector.
10A
F41
Taxi connector.
20A
F42
Not used.
-
F43
Not used.
-
F44
Not used.
-
F45
Not used.
-
F46 Circuits switched
Relay
Ignition switch.
R1
Rear heating, ventilation and air conditioning motor.
R2
Ventilation and air conditioning motor.
Not used.
R3
Not used.
R4
Not used.
R5
Not used.
R6
183
Transit Connect (CHC) Canada/United States of America, enUSA, First Printing Fuses
Page 201 of 428
WARNINGS
Bulbs can become hot, let the bulb
cool down before removing it. Failure
to do so could result in personal
injury. The following instructions describe how to
remove the bulbs. Fit replacements in the
reverse order unless otherwise stated.
You must fit bulbs of the correct
specification. See Bulb Specification
Chart (page 202).
Note: We recommended that you see an
authorized dealer to change the headlamp
bulbs if your vehicle is fitted with air
conditioning. Some bulbs are difficult to
access.
Headlamp
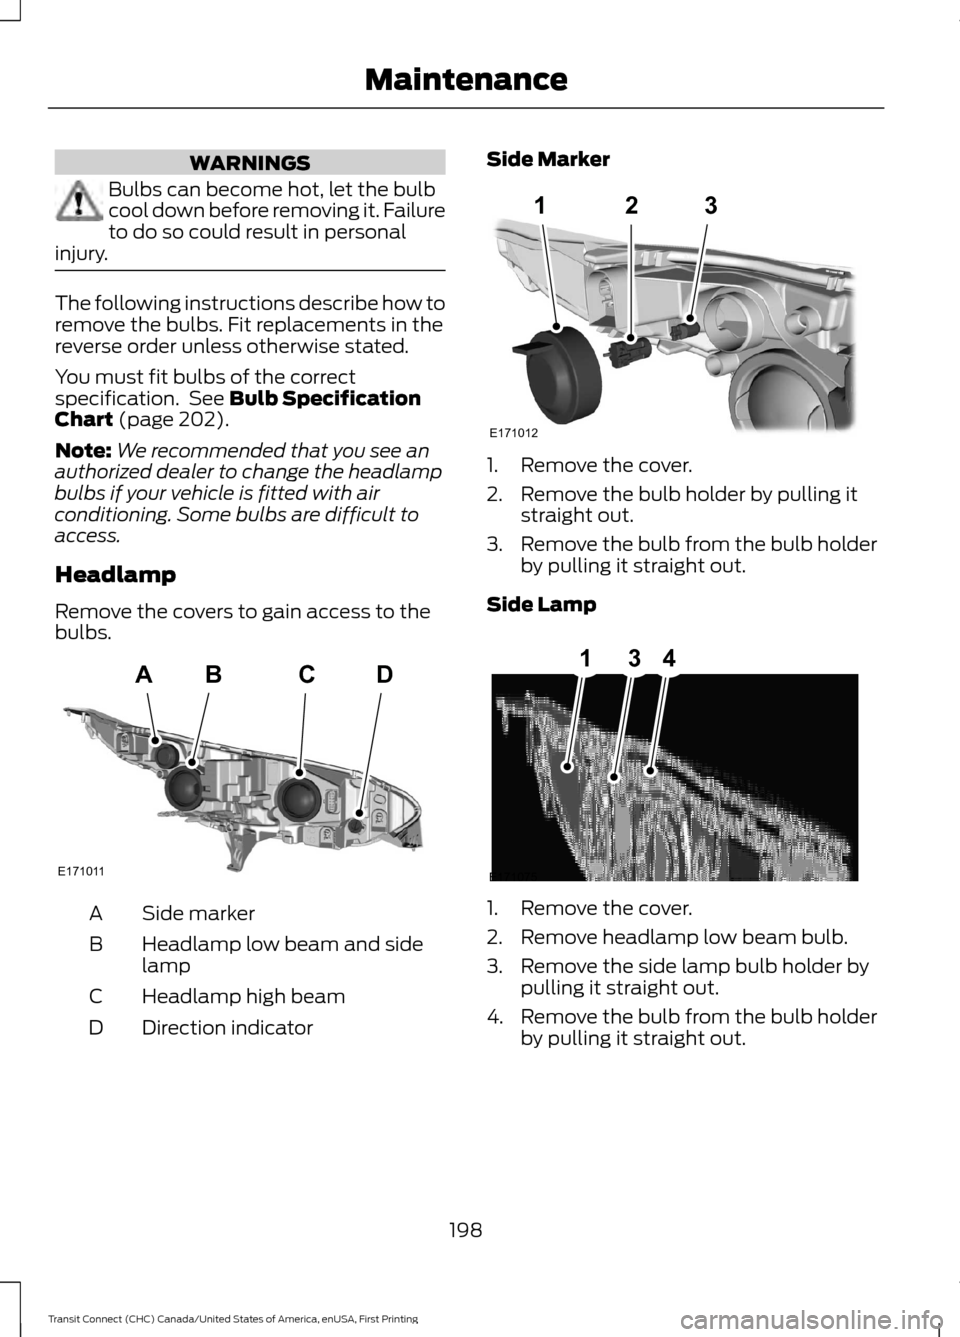
Remove the covers to gain access to the
bulbs. Side marker
A
Headlamp low beam and side
lamp
B
Headlamp high beam
C
Direction indicator
D Side Marker
1. Remove the cover.
2. Remove the bulb holder by pulling it
straight out.
3. Remove the bulb from the bulb holder
by pulling it straight out.
Side Lamp 1. Remove the cover.
2. Remove headlamp low beam bulb.
3. Remove the side lamp bulb holder by
pulling it straight out.
4. Remove the bulb from the bulb holder
by pulling it straight out.
198
Transit Connect (CHC) Canada/United States of America, enUSA, First Printing MaintenanceABCD
E171011 123
E171012 E171075
314
Page 208 of 428
6. Install the air filter housing cover.
7. Install the retaining screws to secure
the air filter housing cover to the air
filter housing.
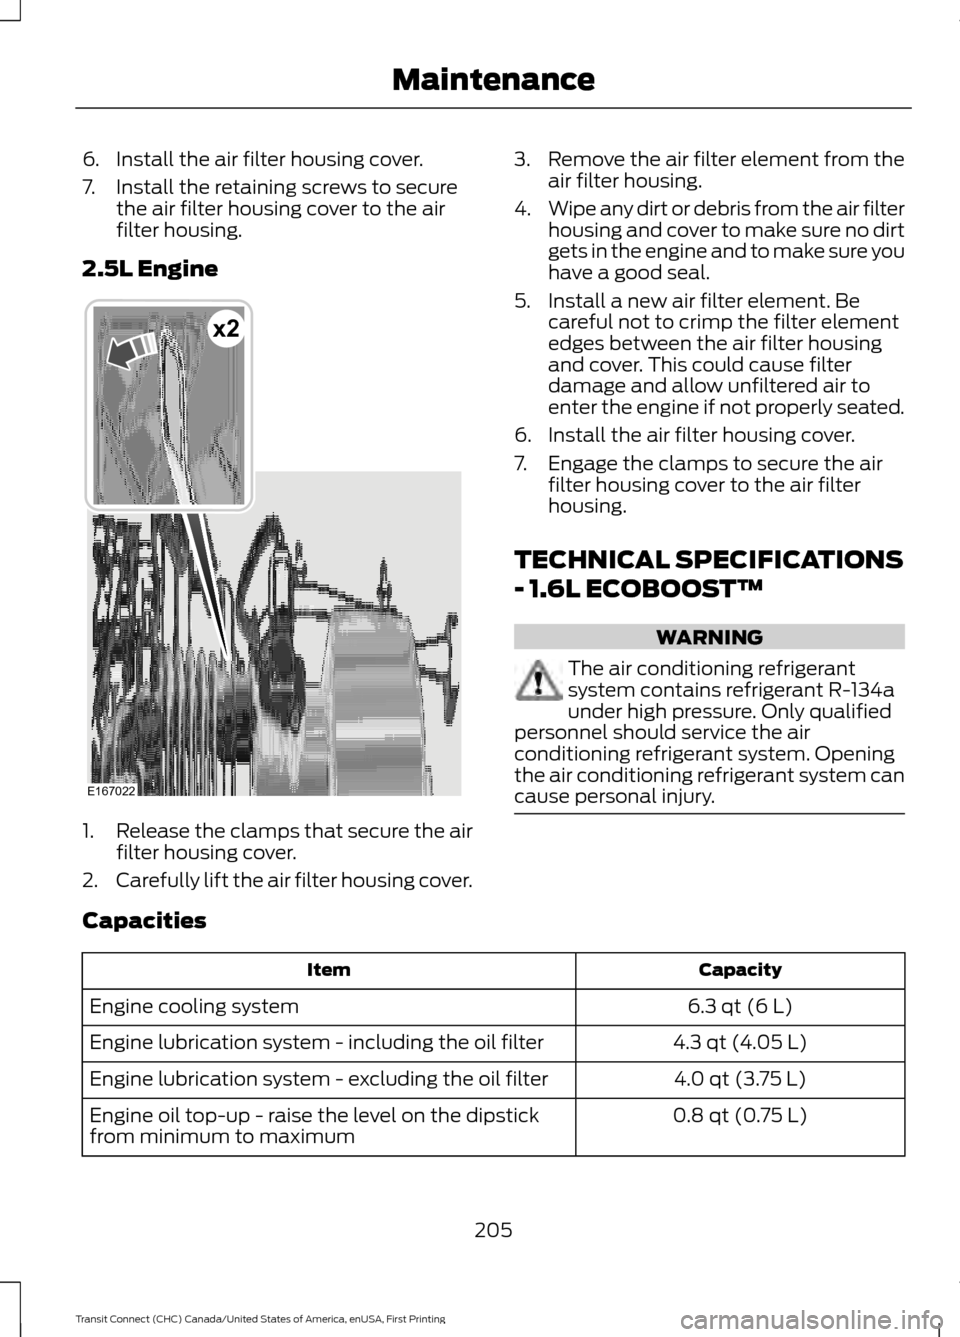
2.5L Engine 1.
Release the clamps that secure the air
filter housing cover.
2. Carefully lift the air filter housing cover. 3.
Remove the air filter element from the
air filter housing.
4. Wipe any dirt or debris from the air filter
housing and cover to make sure no dirt
gets in the engine and to make sure you
have a good seal.
5. Install a new air filter element. Be careful not to crimp the filter element
edges between the air filter housing
and cover. This could cause filter
damage and allow unfiltered air to
enter the engine if not properly seated.
6. Install the air filter housing cover.
7. Engage the clamps to secure the air filter housing cover to the air filter
housing.
TECHNICAL SPECIFICATIONS
- 1.6L ECOBOOST™ WARNING
The air conditioning refrigerant
system contains refrigerant R-134a
under high pressure. Only qualified
personnel should service the air
conditioning refrigerant system. Opening
the air conditioning refrigerant system can
cause personal injury. Capacities
Capacity
Item
6.3 qt (6 L)
Engine cooling system
4.3 qt (4.05 L)
Engine lubrication system - including the oil filter
4.0 qt (3.75 L)
Engine lubrication system - excluding the oil filter
0.8 qt (0.75 L)
Engine oil top-up - raise the level on the dipstick
from minimum to maximum
205
Transit Connect (CHC) Canada/United States of America, enUSA, First Printing MaintenanceE167022
x2
Page 210 of 428
Specification
Name
-
Penetrating and Lock Lubricant
XL-1
If you use oil and fluids that do not meet
the defined specification and viscosity
grade, this may lead to:
• Component damage which is not
covered by the vehicle warranty.
• Longer engine cranking periods.
• Increased emission levels.
• Reduced engine performance.
• Reduced fuel economy.
• Degraded brake performance.
Use of synthetic or synthetic blend motor
oil is not mandatory. Only use fluid that
meets Ford specifications. Motor oils of
the recommended viscosity grade that
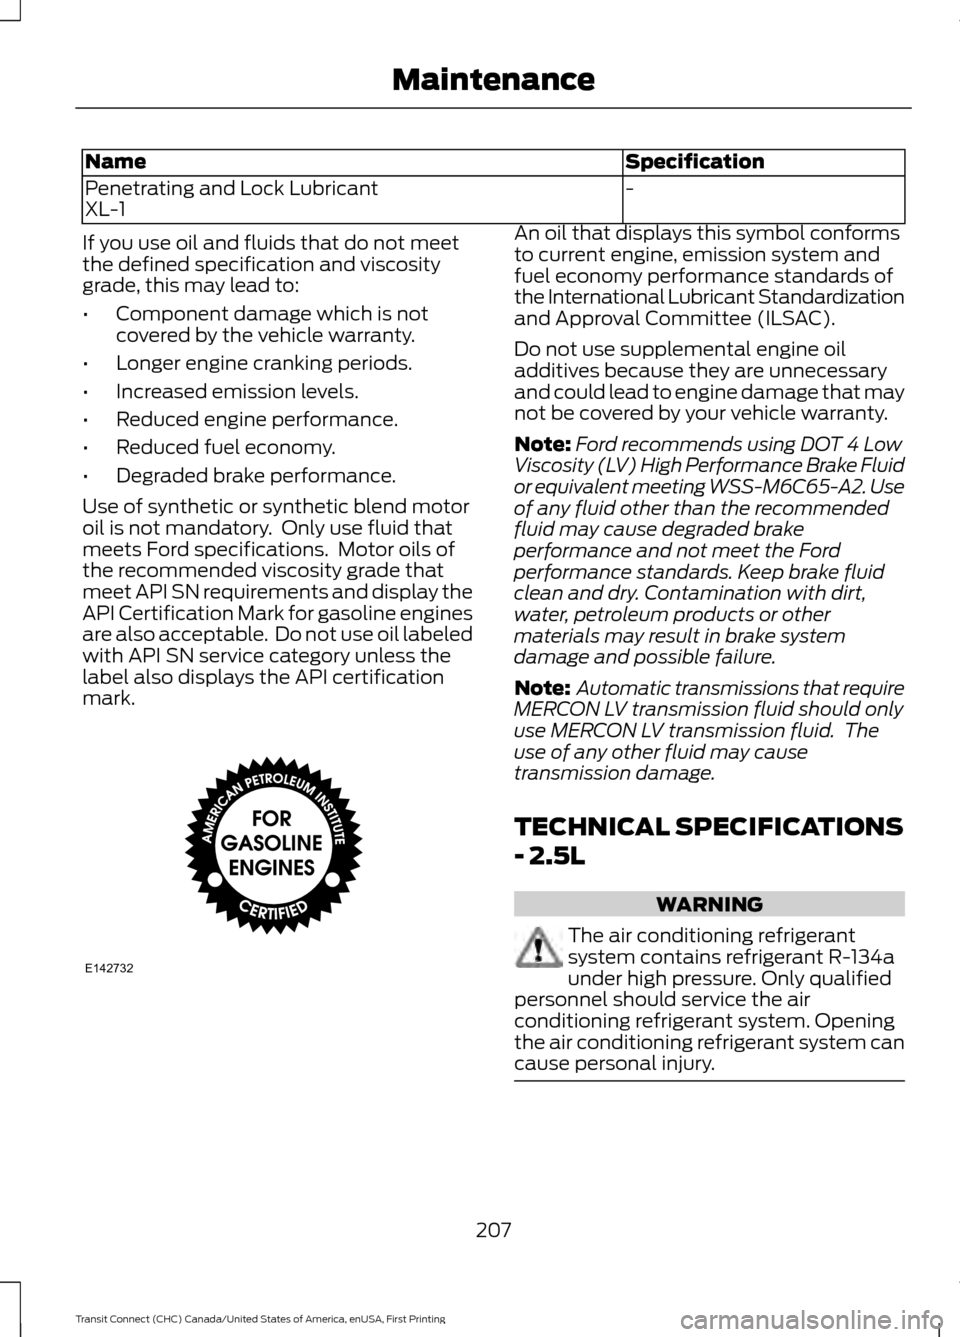
meet API SN requirements and display the
API Certification Mark for gasoline engines
are also acceptable. Do not use oil labeled
with API SN service category unless the
label also displays the API certification
mark. An oil that displays this symbol conforms
to current engine, emission system and
fuel economy performance standards of
the International Lubricant Standardization
and Approval Committee (ILSAC).
Do not use supplemental engine oil
additives because they are unnecessary
and could lead to engine damage that may
not be covered by your vehicle warranty.
Note:
Ford recommends using DOT 4 Low
Viscosity (LV) High Performance Brake Fluid
or equivalent meeting WSS-M6C65-A2. Use
of any fluid other than the recommended
fluid may cause degraded brake
performance and not meet the Ford
performance standards. Keep brake fluid
clean and dry. Contamination with dirt,
water, petroleum products or other
materials may result in brake system
damage and possible failure.
Note: Automatic transmissions that require
MERCON LV transmission fluid should only
use MERCON LV transmission fluid. The
use of any other fluid may cause
transmission damage.
TECHNICAL SPECIFICATIONS
- 2.5L WARNING
The air conditioning refrigerant
system contains refrigerant R-134a
under high pressure. Only qualified
personnel should service the air
conditioning refrigerant system. Opening
the air conditioning refrigerant system can
cause personal injury. 207
Transit Connect (CHC) Canada/United States of America, enUSA, First Printing MaintenanceE142732
Page 217 of 428
Note:
Follow the same procedure as
cleaning leather seats for cleaning leather
instrument panels and leather interior trim
surfaces. See Cleaning Leather Seats
(page 214).
Clean the instrument panel and cluster
lens with a clean, damp and soft cloth,
then use a clean, dry and soft cloth to dry
these areas.
• Avoid cleaners or polishes that increase
the gloss of the upper portion of the
instrument panel. The dull finish in this
area helps protect you from
undesirable windshield reflection.
• Do not use any household cleaning
products or glass cleaners as these
may damage the finish of the
instrument panel, interior trim and
cluster lens.
• Wash or wipe your hands clean if you
have been in contact with certain
products such as insect repellent and
suntan lotion to avoid possible damage
to the interior painted surfaces.
• Do not allow air fresheners and hand
sanitizers to spill onto interior surfaces.
If a spill occurs, wipe off immediately.
Your warranty may not cover these
damages.
If a staining liquid like coffee or juice has
been spilled on the instrument panel or on
interior trim surfaces:
1. Wipe up spilled liquid using a clean, soft cloth as quickly as possible.
2. Use Motorcraft Premium Leather and Vinyl Cleaner or a commercially
available leather cleaning product for
automotive interiors. Test any cleaner
or stain remover on an inconspicuous
area.
3. Alternatively, wipe the surface with a clean, soft cloth and a mild soap and
water solution. Dry the area with a
clean, soft cloth. 4. If necessary, apply more soap and
water solution or cleaning product to
a clean, soft cloth and press it onto the
soiled area. Allow this to set at room
temperature for 30 minutes.
5. Remove the soaked cloth, then with a clean, damp cloth, use a rubbing
motion for 60 seconds on the soiled
area.
6. Dry the area with a clean, soft cloth.
CLEANING LEATHER SEATS
(If
Equipped)
Note: Follow the same procedure as
cleaning leather seats for cleaning leather
instrument panels and leather interior trim
surfaces.
For routine cleaning, wipe the surface with
a soft, damp cloth and a mild soap and
water solution. Dry the area with a clean,
soft cloth.
For cleaning and removing spots and stains
such as dye transfer, use Motorcraft
Premium Leather and Vinyl Cleaner or a
commercially available leather cleaning
product for automotive interiors.
Note: Test any cleaner or stain remover on
an inconspicuous area.
You should:
• Remove dust and loose dirt with a
vacuum cleaner.
• Clean and treat spills and stains as
soon as possible.
Do not use the following products as these
may damage the leather:
• Oil and petroleum or silicone-based
leather conditioners.
• Household cleaners.
214
Transit Connect (CHC) Canada/United States of America, enUSA, First Printing Vehicle Care
Page 218 of 428
•
Alcohol solutions.
• Solvents or cleaners intended
specifically for rubber, vinyl and
plastics.
Note: Do not use Motorcraft Premium
Leather and Vinyl Cleaner ZC-56 on Lincoln
Black Label, Presidential or Reserve
Leathers because it can damage those and
other semi-aniline leather seating fabrics.
It can also damage surround microfiber
accent surfaces. To clean Lincoln Black
Label, Presidential or Reserve Leathers, first
vacuum the seats to remove loose dirt. Then
wipe the leather with a clean soft cloth
dampened with lukewarm water and a mild
soap. Wiper the leather again with a slightly
damp cloth to remove soap residue, and dry
with a soft cloth. To maintain the leather's
resiliency, it should be cleaned whenever
soiled.
REPAIRING MINOR PAINT
DAMAGE
You should repair paintwork damage
caused by stones from the road or minor
scratches as soon as possible. A choice of
products are available from an authorized
dealer.
Remove particles such as bird droppings,
tree sap, insect deposits, tar spots, road
salt and industrial fallout before repairing
paint chips.
Always read and follow the manufacturer ’s
instructions before using the products.
CLEANING THE ALLOY
WHEELS
Note: Do not apply a cleaning chemical to
warm or hot wheel rims and covers.
Note: Some automatic car washes may
cause damage to the finish on your wheel
rims and covers. Note:
Industrial-strength or heavy-duty
cleaners in combination with brush agitation
to remove brake dust and dirt, could wear
away the clear coat finish over a period time.
Note: Do not use hydrofluoric acid-based
or high caustic-based wheel cleaners, steel
wool, fuels or strong household detergents.
Note: If you intend parking your vehicle for
an extended period after cleaning the
wheels with a wheel cleaner, drive your
vehicle for a few minutes before doing so.
This will reduce the risk of increased
corrosion of the brake discs.
Alloy wheels and wheel covers are coated
with a clear coat paint finish. To maintain
their condition we recommend that you:
• Clean the wheels weekly using
Motorcraft Wheel and Tire Cleaner.
Apply using manufacturer's
instructions.
• Use a sponge to remove heavy
deposits of dirt and brake dust
accumulation.
• Rinse thoroughly with a strong stream
of water when you have completed the
cleaning process.
• To remove tar and grease, use
Motorcraft Bug and Tar Remover.
VEHICLE STORAGE
If you plan on storing your vehicle for 30
days or more, read the following
maintenance recommendations to make
sure your vehicle stays in good operating
condition.
We engineer and test all motor vehicles
and their components for reliable, regular
driving. Under various conditions,
long-term storage may lead to degraded
engine performance or failure unless you
use specific precautions to preserve engine
components.
215
Transit Connect (CHC) Canada/United States of America, enUSA, First Printing Vehicle Care
Page 232 of 428
Inspecting Your Tires and
Wheel Valve Stems
Periodically inspect the tire treads
for uneven or excessive wear and
remove objects such as stones,
nails or glass that may be wedged
in the tread grooves. Check the tire
and valve stems for holes, cracks,
or cuts that may permit air
leakage and repair or replace the
tire and replace the valve stem.
Inspect the tire sidewalls for
cracking, cuts, bruises and other
signs of damage or excessive
wear. If internal damage to the tire
is suspected, have the tire
demounted and inspected in case
it needs to be repaired or replaced.
For your safety, tires that are
damaged or show signs of
excessive wear should not be used
because they are more likely to
blow out or fail.
Improper or inadequate vehicle
maintenance can cause tires to
wear abnormally. Inspect all your
tires, including the spare,
frequently, and replace them if
one or more of the following
conditions exist:
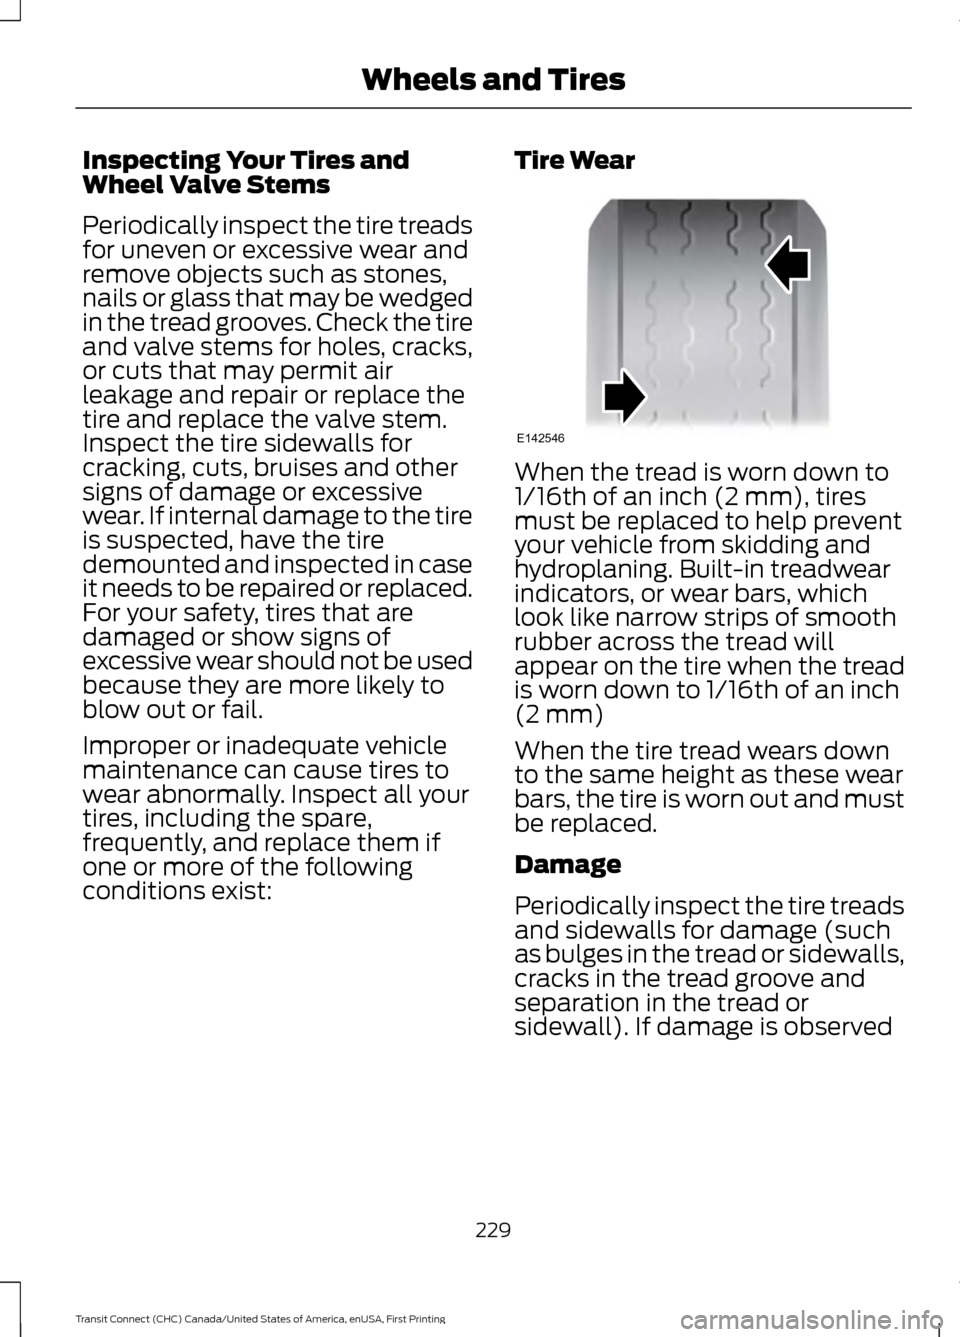
Tire Wear When the tread is worn down to
1/16th of an inch (2 mm), tires
must be replaced to help prevent
your vehicle from skidding and
hydroplaning. Built-in treadwear
indicators, or wear bars, which
look like narrow strips of smooth
rubber across the tread will
appear on the tire when the tread
is worn down to 1/16th of an inch
(2 mm)
When the tire tread wears down
to the same height as these wear
bars, the tire is worn out and must
be replaced.
Damage
Periodically inspect the tire treads
and sidewalls for damage (such
as bulges in the tread or sidewalls,
cracks in the tread groove and
separation in the tread or
sidewall). If damage is observed
229
Transit Connect (CHC) Canada/United States of America, enUSA, First Printing Wheels and TiresE142546