display FORD TRANSIT CONNECT 2015 2.G Owner's Manual
[x] Cancel search | Manufacturer: FORD, Model Year: 2015, Model line: TRANSIT CONNECT, Model: FORD TRANSIT CONNECT 2015 2.GPages: 428, PDF Size: 6.27 MB
Page 91 of 428
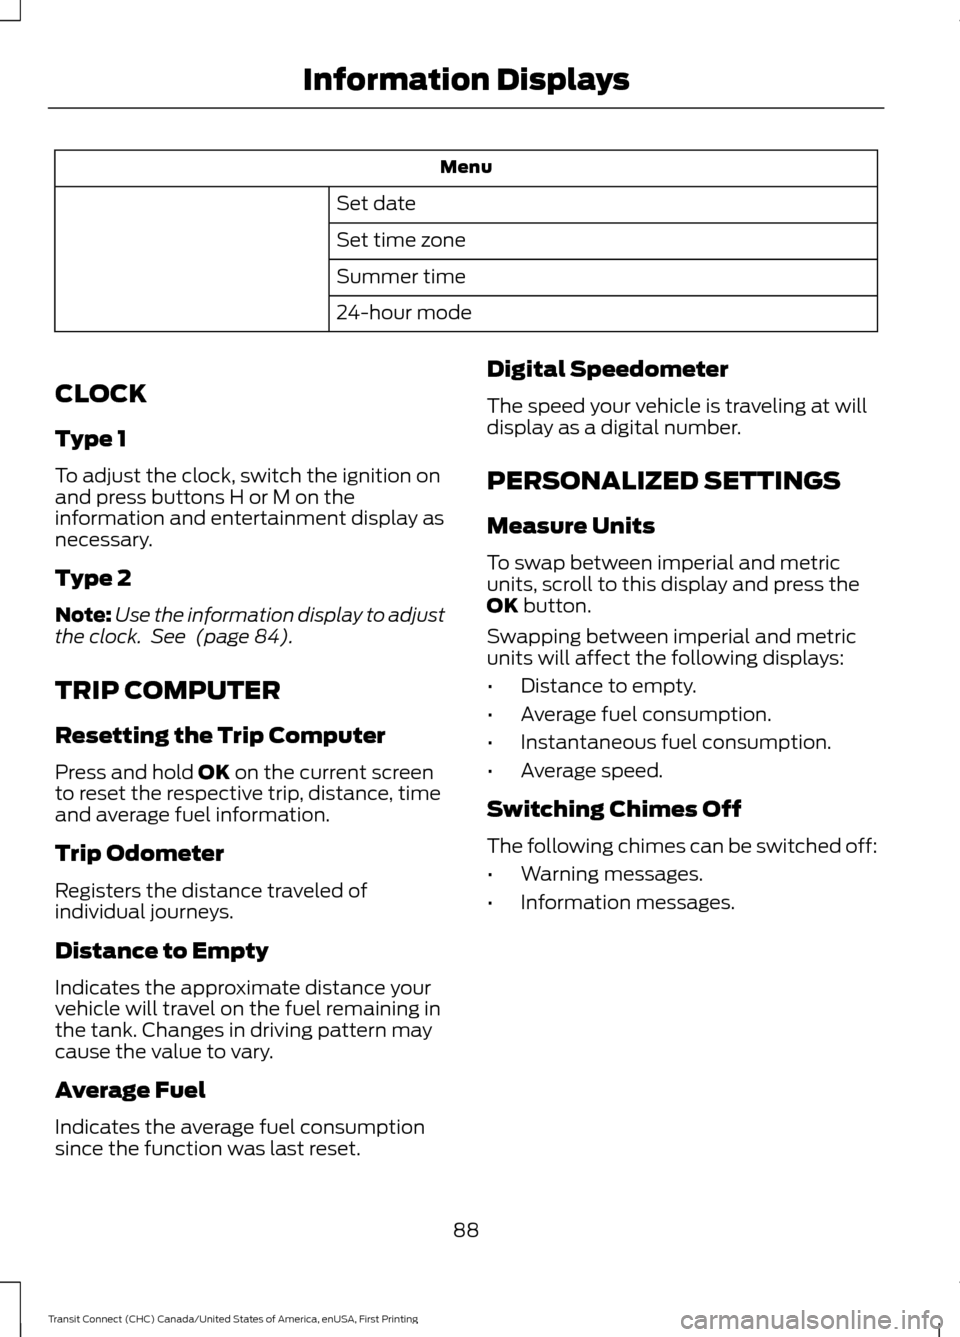
Menu
Set date
Set time zone
Summer time
24-hour mode
CLOCK
Type 1
To adjust the clock, switch the ignition on
and press buttons H or M on the
information and entertainment display as
necessary.
Type 2
Note: Use the information display to adjust
the clock. See (page 84).
TRIP COMPUTER
Resetting the Trip Computer
Press and hold
OK on the current screen
to reset the respective trip, distance, time
and average fuel information.
Trip Odometer
Registers the distance traveled of
individual journeys.
Distance to Empty
Indicates the approximate distance your
vehicle will travel on the fuel remaining in
the tank. Changes in driving pattern may
cause the value to vary.
Average Fuel
Indicates the average fuel consumption
since the function was last reset. Digital Speedometer
The speed your vehicle is traveling at will
display as a digital number.
PERSONALIZED SETTINGS
Measure Units
To swap between imperial and metric
units, scroll to this display and press the
OK
button.
Swapping between imperial and metric
units will affect the following displays:
• Distance to empty.
• Average fuel consumption.
• Instantaneous fuel consumption.
• Average speed.
Switching Chimes Off
The following chimes can be switched off:
• Warning messages.
• Information messages.
88
Transit Connect (CHC) Canada/United States of America, enUSA, First Printing Information Displays
Page 92 of 428
INFORMATION MESSAGES
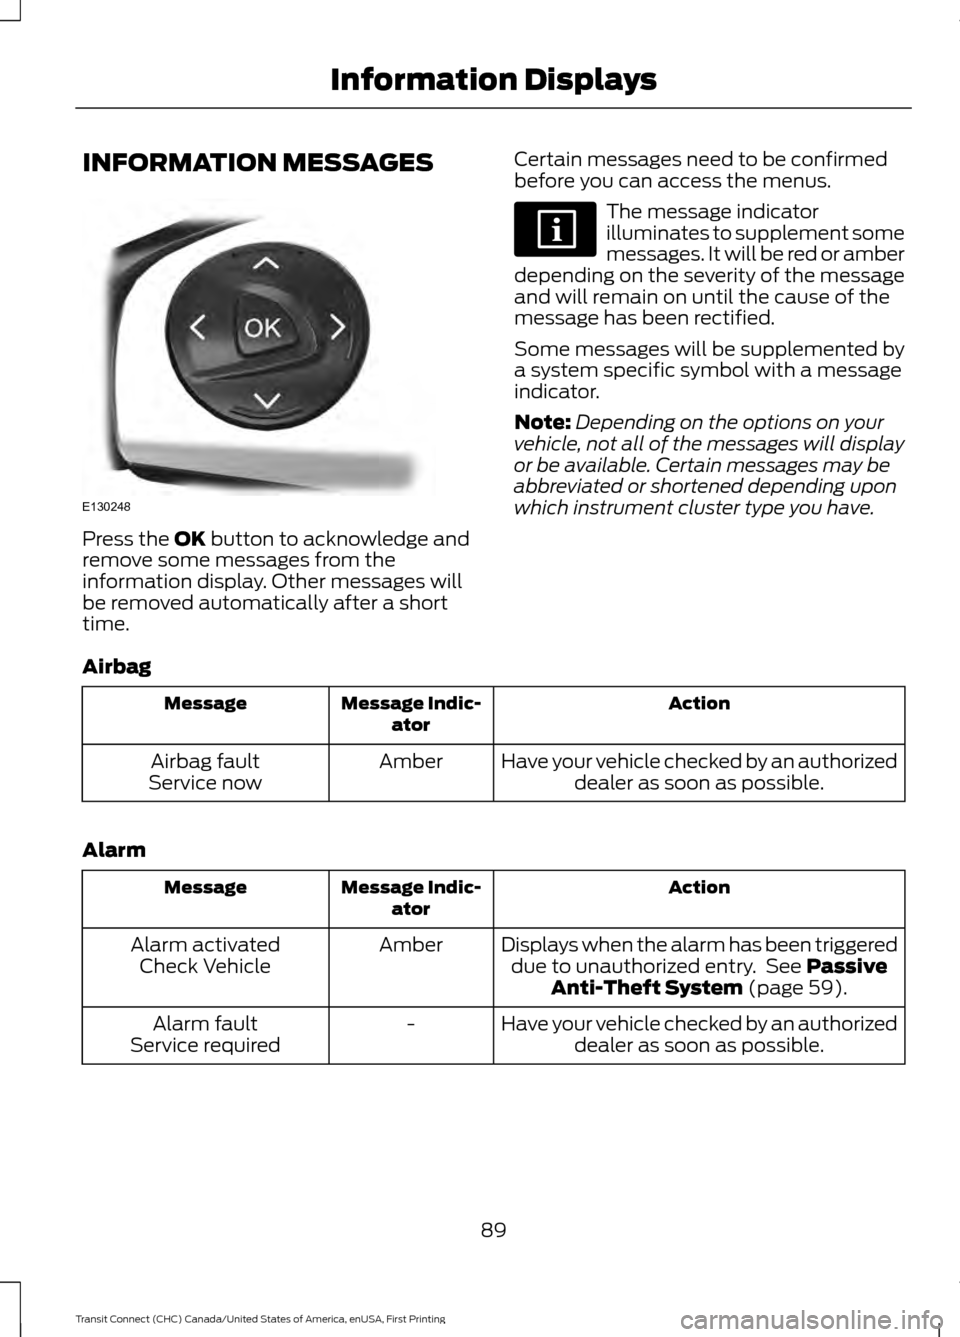
Press the OK button to acknowledge and
remove some messages from the
information display. Other messages will
be removed automatically after a short
time. Certain messages need to be confirmed
before you can access the menus. The message indicator
illuminates to supplement some
messages. It will be red or amber
depending on the severity of the message
and will remain on until the cause of the
message has been rectified.
Some messages will be supplemented by
a system specific symbol with a message
indicator.
Note: Depending on the options on your
vehicle, not all of the messages will display
or be available. Certain messages may be
abbreviated or shortened depending upon
which instrument cluster type you have.
Airbag Action
Message Indic-
ator
Message
Have your vehicle checked by an authorizeddealer as soon as possible.
Amber
Airbag fault
Service now
Alarm Action
Message Indic-
ator
Message
Displays when the alarm has been triggereddue to unauthorized entry. See
Passive
Anti-Theft System (page 59).
Amber
Alarm activated
Check Vehicle
Have your vehicle checked by an authorizeddealer as soon as possible.
-
Alarm fault
Service required
89
Transit Connect (CHC) Canada/United States of America, enUSA, First Printing Information DisplaysE130248
Page 93 of 428
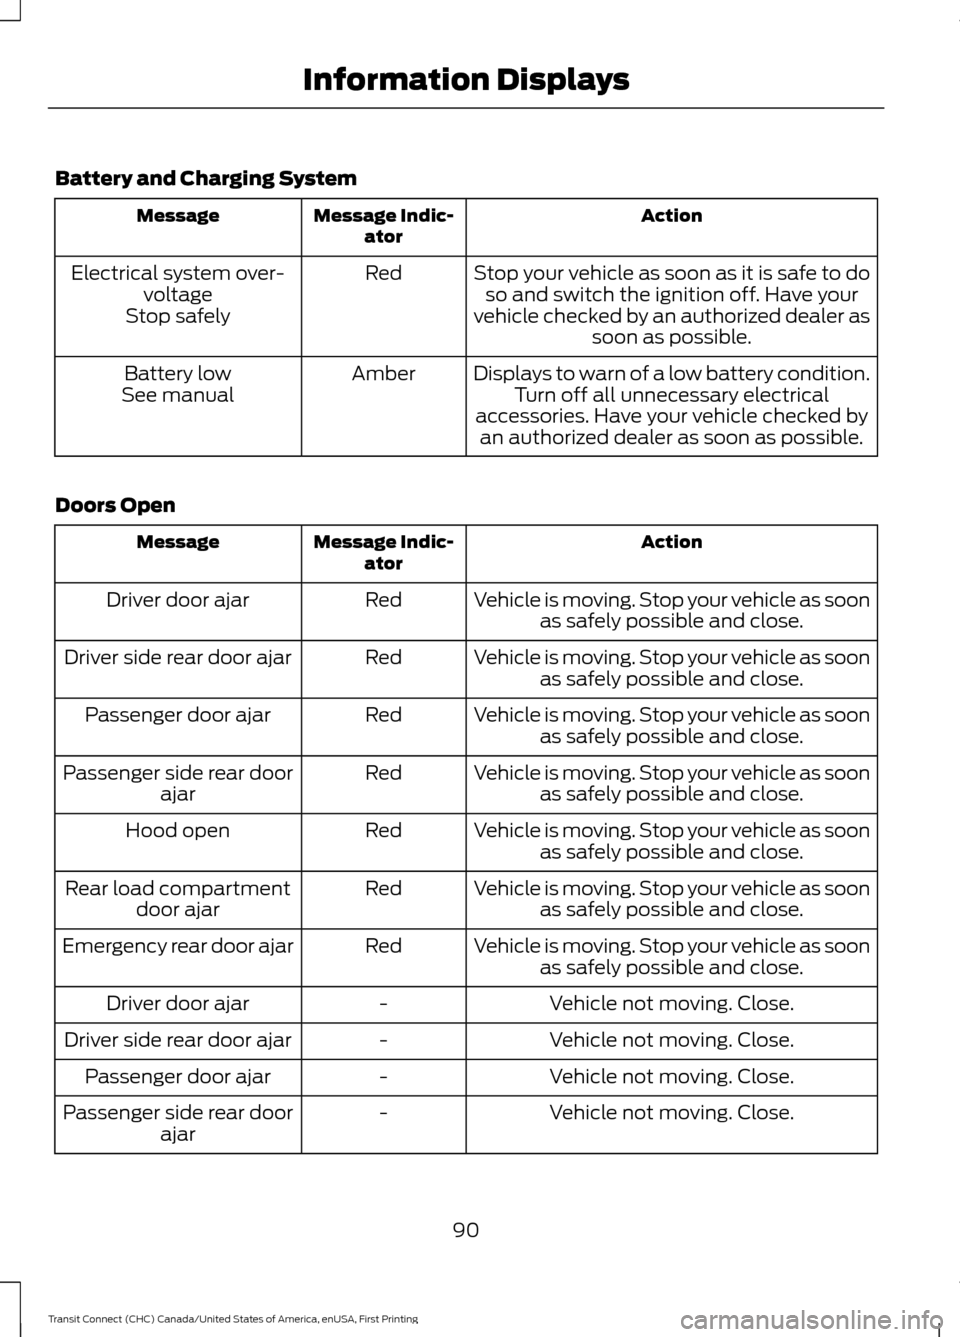
Battery and Charging System
Action
Message Indic-
ator
Message
Stop your vehicle as soon as it is safe to doso and switch the ignition off. Have your
vehicle checked by an authorized dealer as soon as possible.
Red
Electrical system over-
voltage
Stop safely
Displays to warn of a low battery condition.Turn off all unnecessary electrical
accessories. Have your vehicle checked by an authorized dealer as soon as possible.
Amber
Battery low
See manual
Doors Open Action
Message Indic-
ator
Message
Vehicle is moving. Stop your vehicle as soonas safely possible and close.
Red
Driver door ajar
Vehicle is moving. Stop your vehicle as soonas safely possible and close.
Red
Driver side rear door ajar
Vehicle is moving. Stop your vehicle as soonas safely possible and close.
Red
Passenger door ajar
Vehicle is moving. Stop your vehicle as soonas safely possible and close.
Red
Passenger side rear door
ajar
Vehicle is moving. Stop your vehicle as soonas safely possible and close.
Red
Hood open
Vehicle is moving. Stop your vehicle as soonas safely possible and close.
Red
Rear load compartment
door ajar
Vehicle is moving. Stop your vehicle as soonas safely possible and close.
Red
Emergency rear door ajar
Vehicle not moving. Close.
-
Driver door ajar
Vehicle not moving. Close.
-
Driver side rear door ajar
Vehicle not moving. Close.
-
Passenger door ajar
Vehicle not moving. Close.
-
Passenger side rear door
ajar
90
Transit Connect (CHC) Canada/United States of America, enUSA, First Printing Information Displays
Page 94 of 428
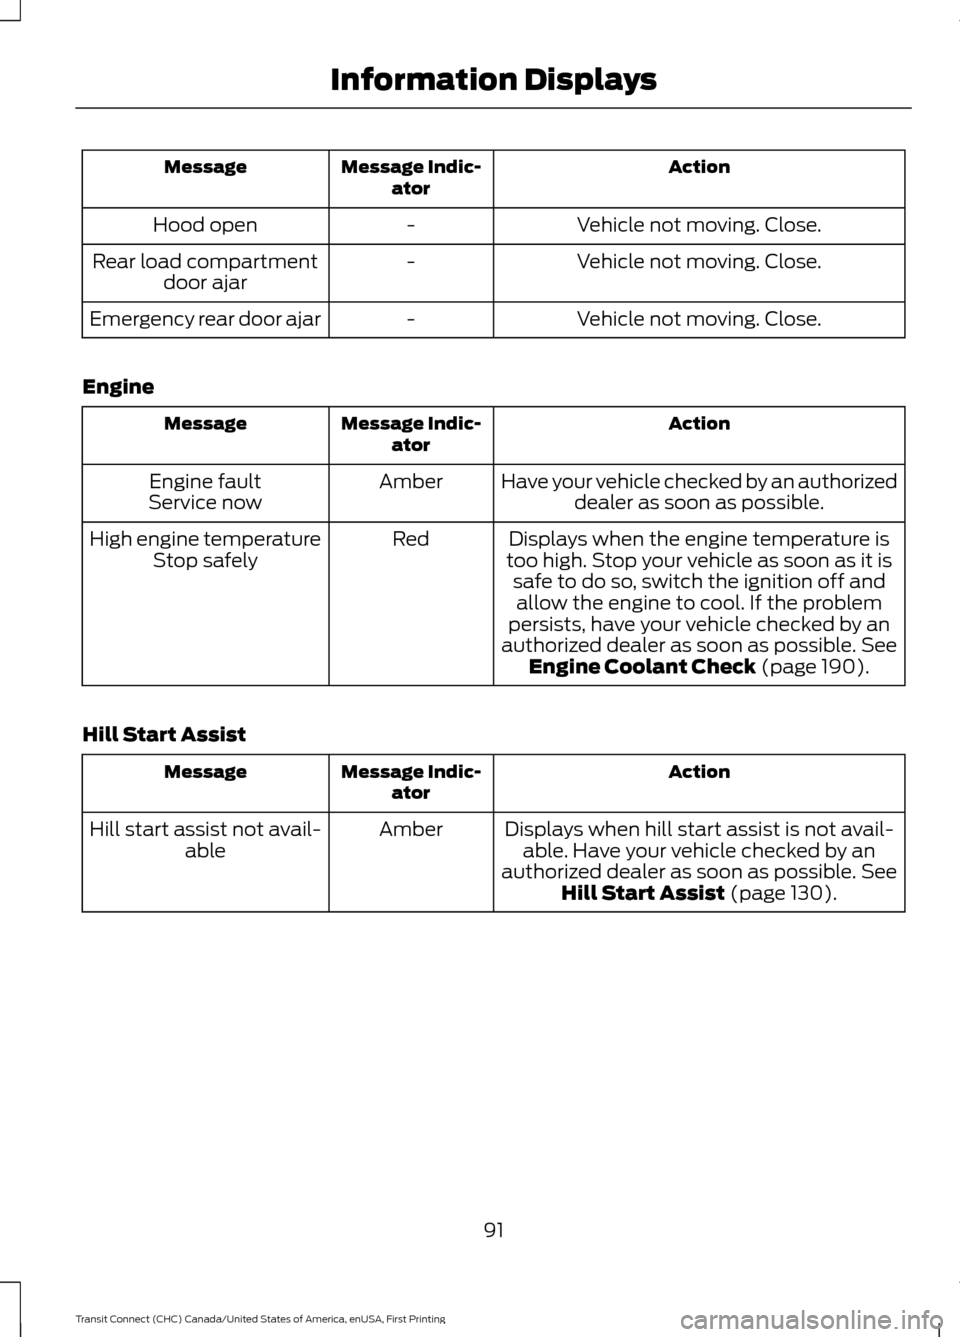
Action
Message Indic-
ator
Message
Vehicle not moving. Close.
-
Hood open
Vehicle not moving. Close.
-
Rear load compartment
door ajar
Vehicle not moving. Close.
-
Emergency rear door ajar
Engine Action
Message Indic-
ator
Message
Have your vehicle checked by an authorizeddealer as soon as possible.
Amber
Engine fault
Service now
Displays when the engine temperature is
too high. Stop your vehicle as soon as it is safe to do so, switch the ignition off andallow the engine to cool. If the problem
persists, have your vehicle checked by an
authorized dealer as soon as possible. See
Engine Coolant Check (page 190).
Red
High engine temperature
Stop safely
Hill Start Assist Action
Message Indic-
ator
Message
Displays when hill start assist is not avail-able. Have your vehicle checked by an
authorized dealer as soon as possible.
See
Hill Start Assist (page 130).
Amber
Hill start assist not avail-
able
91
Transit Connect (CHC) Canada/United States of America, enUSA, First Printing Information Displays
Page 95 of 428
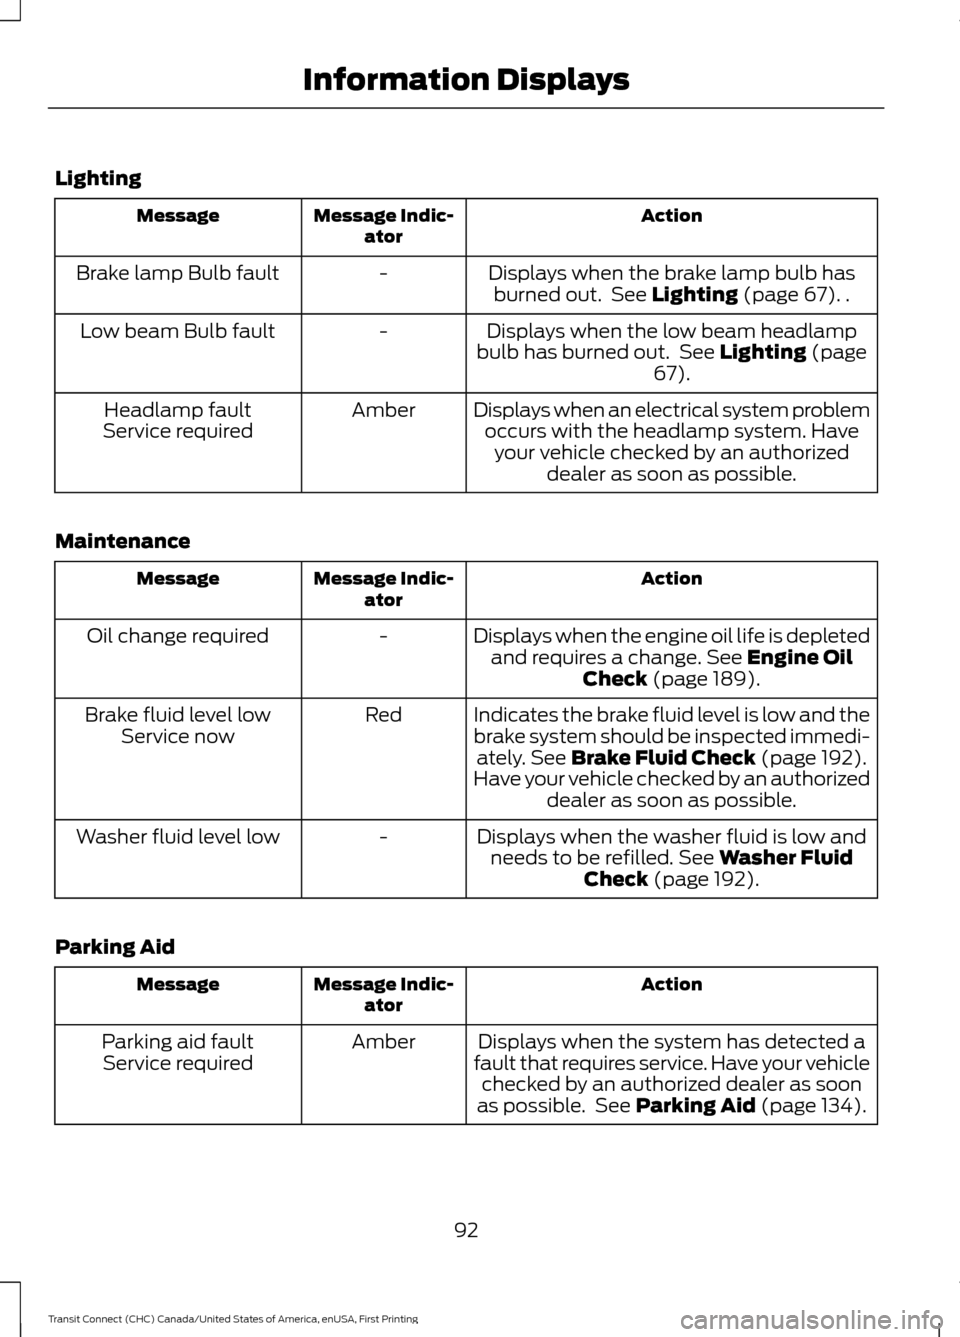
Lighting
Action
Message Indic-
ator
Message
Displays when the brake lamp bulb hasburned out. See Lighting (page 67). .
-
Brake lamp Bulb fault
Displays when the low beam headlamp
bulb has burned out. See
Lighting (page
67).
-
Low beam Bulb fault
Displays when an electrical system problemoccurs with the headlamp system. Haveyour vehicle checked by an authorized dealer as soon as possible.
Amber
Headlamp fault
Service required
Maintenance Action
Message Indic-
ator
Message
Displays when the engine oil life is depletedand requires a change.
See Engine Oil
Check (page 189).
-
Oil change required
Indicates the brake fluid level is low and the
brake system should be inspected immedi-ately.
See Brake Fluid Check (page 192).
Have your vehicle checked by an authorized dealer as soon as possible.
Red
Brake fluid level low
Service now
Displays when the washer fluid is low andneeds to be refilled.
See Washer Fluid
Check (page 192).
-
Washer fluid level low
Parking Aid Action
Message Indic-
ator
Message
Displays when the system has detected a
fault that requires service. Have your vehicle checked by an authorized dealer as soon
as possible. See
Parking Aid (page 134).
Amber
Parking aid fault
Service required
92
Transit Connect (CHC) Canada/United States of America, enUSA, First Printing Information Displays
Page 96 of 428
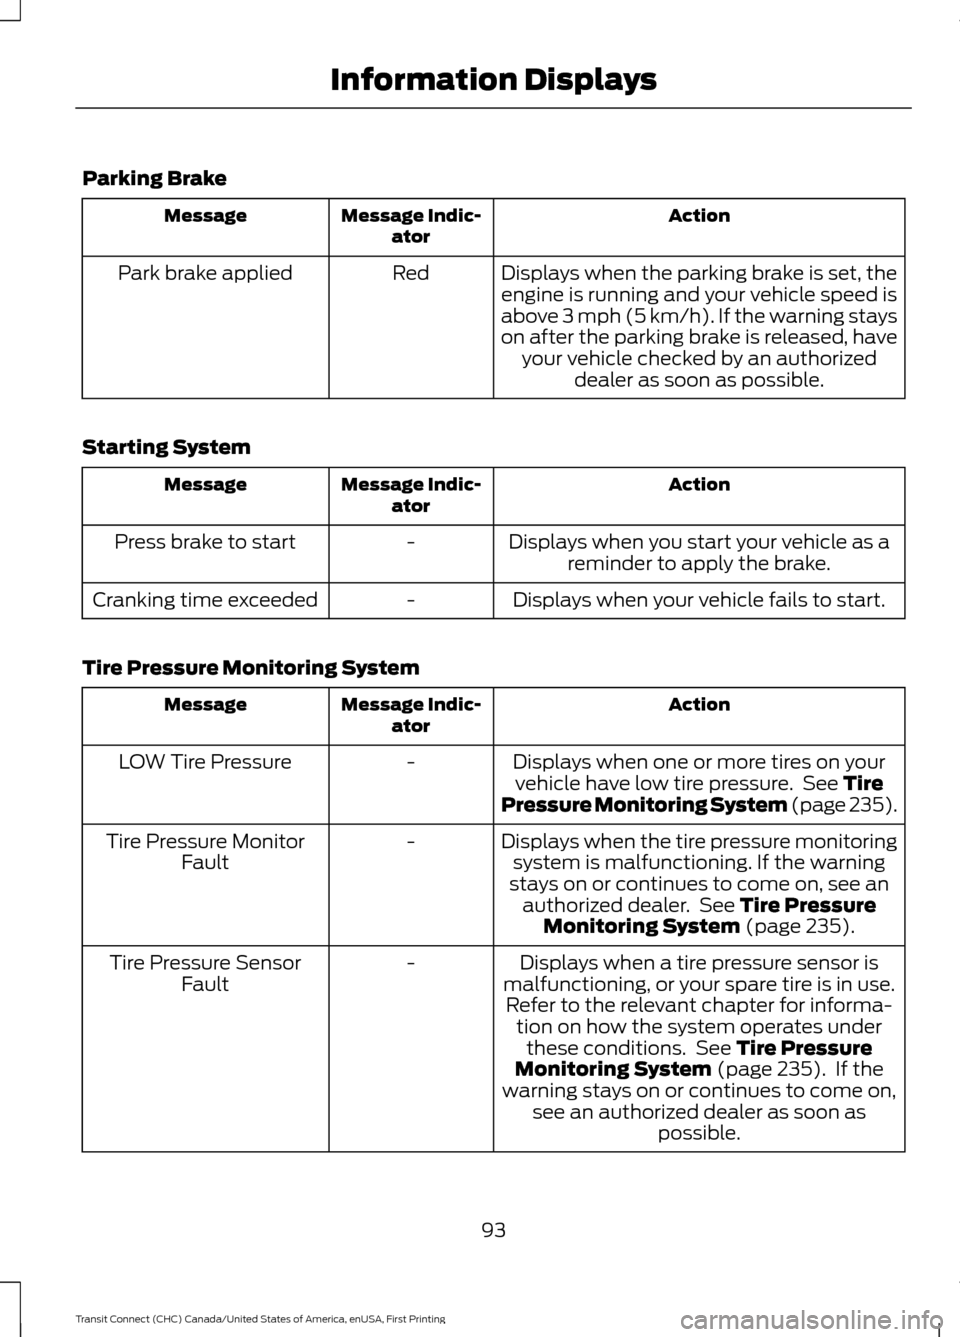
Parking Brake
Action
Message Indic-
ator
Message
Displays when the parking brake is set, theengine is running and your vehicle speed is
above 3 mph (5 km/h). If the warning stays
on after the parking brake is released, have your vehicle checked by an authorized dealer as soon as possible.
Red
Park brake applied
Starting System Action
Message Indic-
ator
Message
Displays when you start your vehicle as areminder to apply the brake.
-
Press brake to start
Displays when your vehicle fails to start.
-
Cranking time exceeded
Tire Pressure Monitoring System Action
Message Indic-
ator
Message
Displays when one or more tires on yourvehicle have low tire pressure. See Tire
Pressure Monitoring System (page 235).
-
LOW Tire Pressure
Displays when the tire pressure monitoringsystem is malfunctioning. If the warning
stays on or continues to come on, see an authorized dealer. See
Tire Pressure
Monitoring System (page 235).
-
Tire Pressure Monitor
Fault
Displays when a tire pressure sensor is
malfunctioning, or your spare tire is in use. Refer to the relevant chapter for informa- tion on how the system operates underthese conditions. See
Tire Pressure
Monitoring System (page 235). If the
warning stays on or continues to come on, see an authorized dealer as soon as possible.
-
Tire Pressure Sensor
Fault
93
Transit Connect (CHC) Canada/United States of America, enUSA, First Printing Information Displays
Page 97 of 428
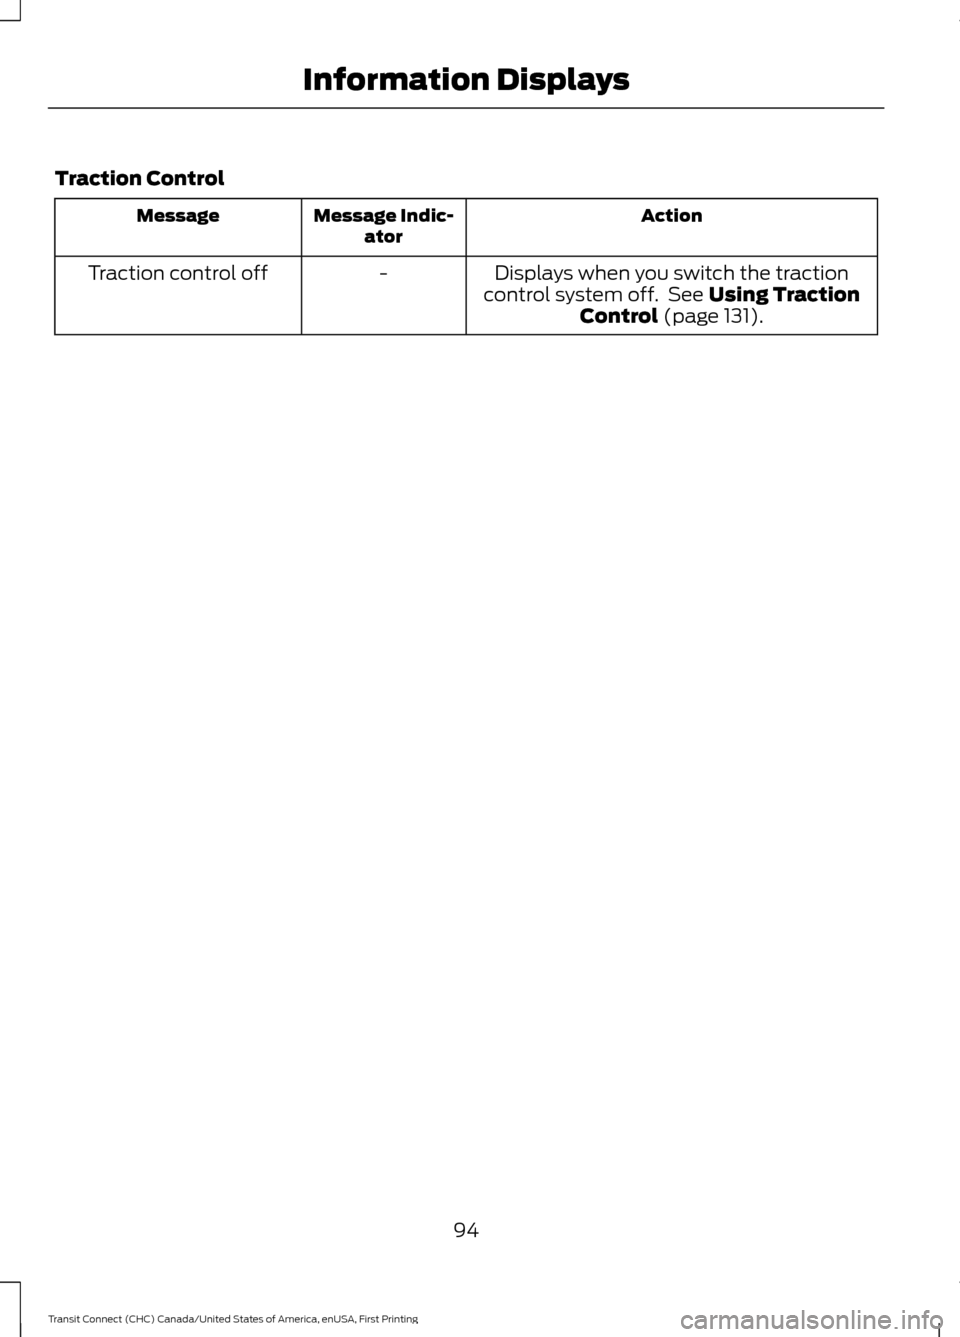
Traction Control
Action
Message Indic-
ator
Message
Displays when you switch the traction
control system off. See Using Traction
Control (page 131).
-
Traction control off
94
Transit Connect (CHC) Canada/United States of America, enUSA, First Printing Information Displays
Page 101 of 428
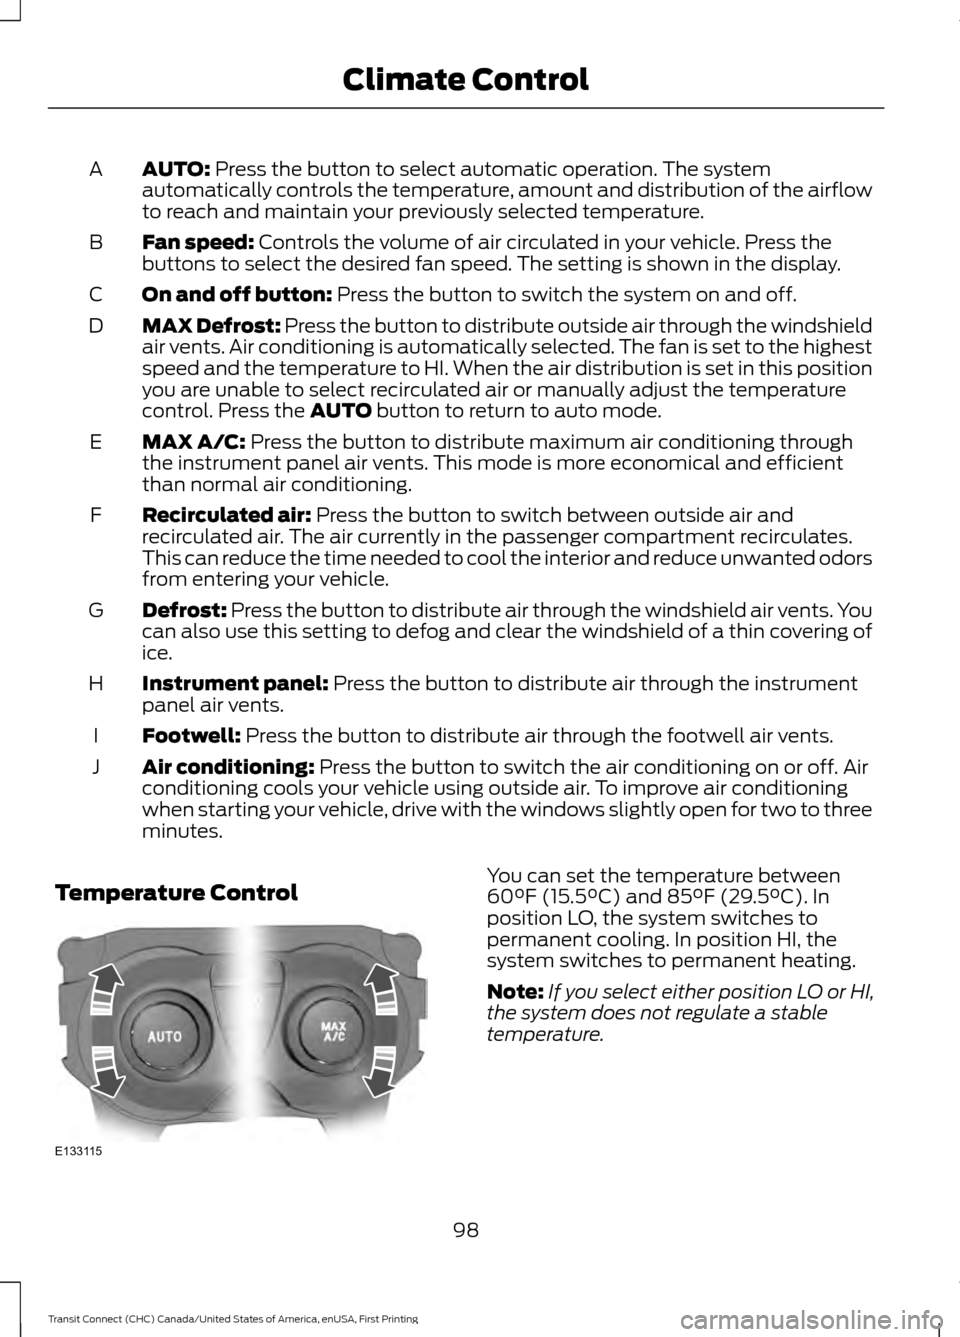
AUTO: Press the button to select automatic operation. The system
automatically controls the temperature, amount and distribution of the airflow
to reach and maintain your previously selected temperature.
A
Fan speed:
Controls the volume of air circulated in your vehicle. Press the
buttons to select the desired fan speed. The setting is shown in the display.
B
On and off button:
Press the button to switch the system on and off.
C
MAX Defrost:
Press the button to distribute outside air through the windshield
air vents. Air conditioning is automatically selected. The fan is set to the highest
speed and the temperature to HI. When the air distribution is set in this position
you are unable to select recirculated air or manually adjust the temperature
control. Press the
AUTO button to return to auto mode.
D
MAX A/C:
Press the button to distribute maximum air conditioning through
the instrument panel air vents. This mode is more economical and efficient
than normal air conditioning.
E
Recirculated air:
Press the button to switch between outside air and
recirculated air. The air currently in the passenger compartment recirculates.
This can reduce the time needed to cool the interior and reduce unwanted odors
from entering your vehicle.
F
Defrost:
Press the button to distribute air through the windshield air vents. You
can also use this setting to defog and clear the windshield of a thin covering of
ice.
G
Instrument panel:
Press the button to distribute air through the instrument
panel air vents.
H
Footwell:
Press the button to distribute air through the footwell air vents.
I
Air conditioning:
Press the button to switch the air conditioning on or off. Air
conditioning cools your vehicle using outside air. To improve air conditioning
when starting your vehicle, drive with the windows slightly open for two to three
minutes.
J
Temperature Control You can set the temperature between
60°F (15.5°C) and 85°F (29.5°C). In
position LO, the system switches to
permanent cooling. In position HI, the
system switches to permanent heating.
Note:
If you select either position LO or HI,
the system does not regulate a stable
temperature.
98
Transit Connect (CHC) Canada/United States of America, enUSA, First Printing Climate ControlE133115
Page 102 of 428
Mono Mode
In this mode, the temperature settings for
both the driver side and passenger side are
linked. If you adjust the setting using the
rotary control on the driver side, the system
adjusts the temperature to the same
setting on the passenger side.
Switching Mono Mode Off
Select a temperature for the passenger
side using the rotary control on the
passenger side. Mono mode automatically
switches off. The temperature on the driver
side remains unchanged. You can now
adjust the driver side and passenger side
temperatures independently. The
temperature settings for each side are
shown in the display.
Switching Mono Mode Back On
Press and hold the AUTO button. The
passenger side temperature is adjusted to
the driver side temperature setting.
HINTS ON CONTROLLING THE
INTERIOR CLIMATE
General Hints
Note: Prolonged use of recirculated air may
cause the windows to fog up.
Note: A small amount of air may be felt
from the footwell air vents regardless of the
air distribution setting.
Note: To reduce humidity build-up inside
your vehicle, do not drive with the system
switched off or with recirculated air always
switched on.
Note: Do not place objects under the front
seats as this may interfere with the airflow
to the rear seats. Note:
Keep the air intakes in front of the
windshield free from obstruction (such as
snow or leaves) to allow the climate control
system to function effectively.
Note: To reduce fogging of the windshield
during humid weather, adjust the air
distribution control to the windshield air
vents position. Increase the temperature
and fan speed and press the A/C button to
improve clearing, if required.
Heating the Interior Quickly
• Adjust the fan speed to the highest
speed setting.
• Adjust the temperature control to the
highest setting.
• Adjust the air distribution control to the
footwell air vents position.
Recommended Settings for
Heating
• Adjust the fan speed to the second
speed setting.
• Adjust the temperature control to the
midway point of the hot settings.
• Adjust the air distribution control to the
footwell and windshield air vents
position.
Cooling the Interior Quickly
• Adjust the fan speed to the highest
speed setting.
• Adjust the temperature control to the
MAX A/C
position.
• Adjust the air distribution control to the
instrument panel air vents position.
99
Transit Connect (CHC) Canada/United States of America, enUSA, First Printing Climate Control
Page 130 of 428
To use SelectShift, move the gearshift
lever into S (Sport). Use the +/- buttons
on the side of your gearshift lever to
manually change gears.
•
Press the (+) button to upshift.
• Press the (-) button to downshift.
Note: After you have assumed manual
control with SelectShift your vehicle will
remain in this mode until you return the
gearshift lever from (S) Sport, back to (D)
Drive.
Upshift to the recommended shift speeds
according to the following chart: Upshifts when accelerating (recom-
mended for best fuel economy)
Shift from:15 mph (24 km/h)
1 - 2
25 mph (40 km/h)
2 - 3
40 mph (64 km/h)
3 - 4
45 mph (72 km/h)
4 - 5
50 mph (80 km/h)
5 - 6
The instrument cluster will display the
selected gear that you are currently in and
a shift indicator arrow to assist in
optimizing shifting.
SelectShift will automatically make some
shifts for you in the event that your engine
speed is running at too high, or to low an
RPM.
Note: Engine damage may occur if
excessive engine revving is held without
shifting.
Brake-Shift Interlock WARNINGS
Do not drive your vehicle until you
verify that the brake lamps are
working. WARNINGS
When doing this procedure, you will
be taking the vehicle out of park
which means the vehicle can roll
freely. To avoid unwanted vehicle
movement, always fully set the parking
brake prior to doing this procedure. Use
wheel chocks if appropriate. If the parking brake is fully released,
but the brake warning lamp remains
illuminated, the brakes may not be
working properly. See your authorized
dealer. Use the brake shift interlock lever to move
the gearshift lever from the park position
in the event of an electrical malfunction or
if your vehicle has a dead battery.
Apply the parking brake and turn the
ignition off before performing this
procedure.
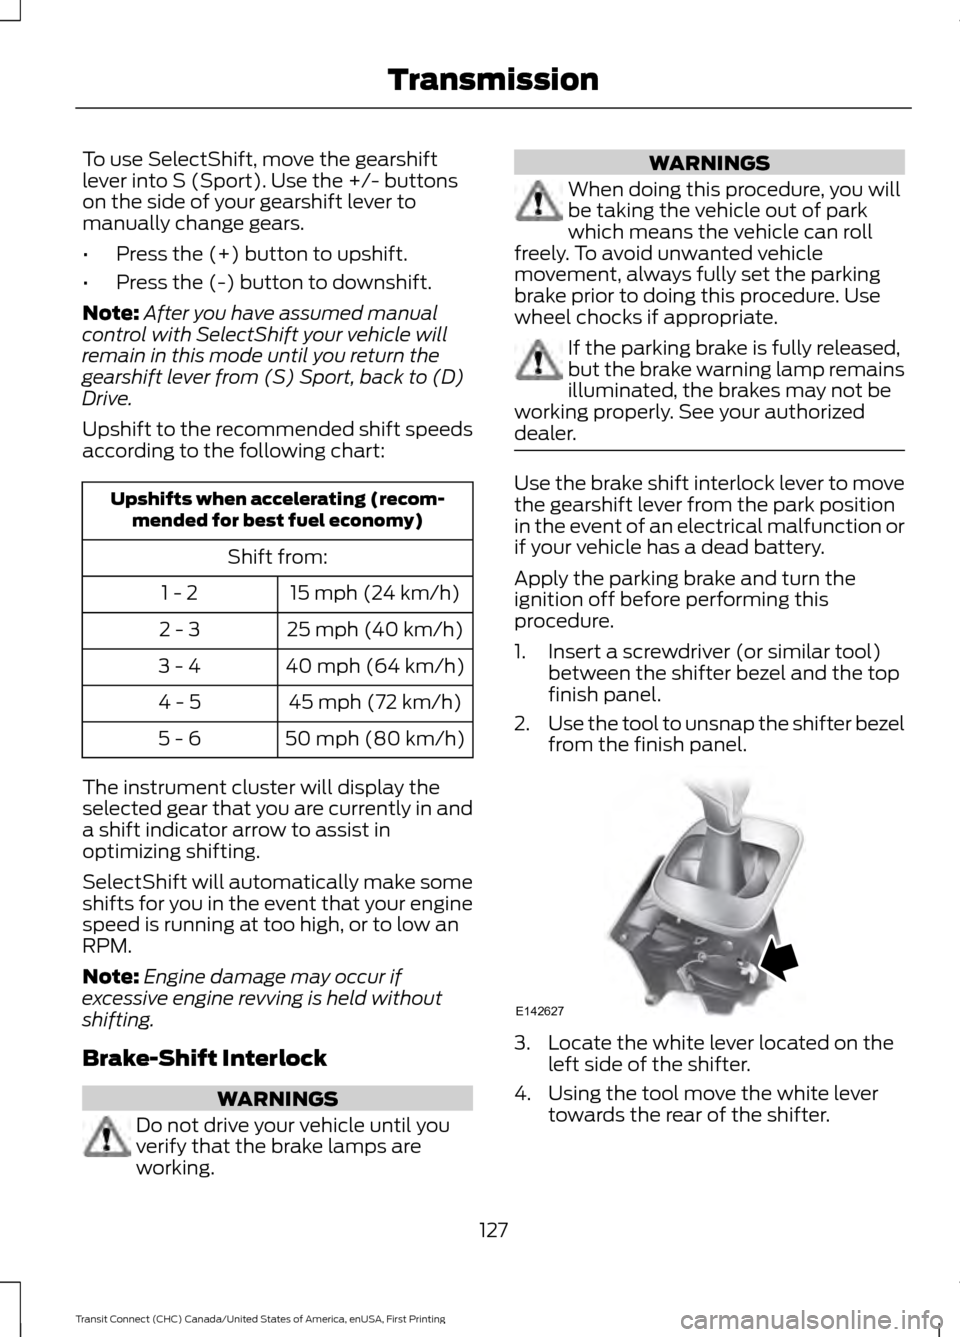
1. Insert a screwdriver (or similar tool)
between the shifter bezel and the top
finish panel.
2. Use the tool to unsnap the shifter bezel
from the finish panel. 3. Locate the white lever located on the
left side of the shifter.
4. Using the tool move the white lever towards the rear of the shifter.
127
Transit Connect (CHC) Canada/United States of America, enUSA, First Printing TransmissionE142627