display FORD TRANSIT CONNECT 2015 2.G User Guide
[x] Cancel search | Manufacturer: FORD, Model Year: 2015, Model line: TRANSIT CONNECT, Model: FORD TRANSIT CONNECT 2015 2.GPages: 428, PDF Size: 6.27 MB
Page 71 of 428
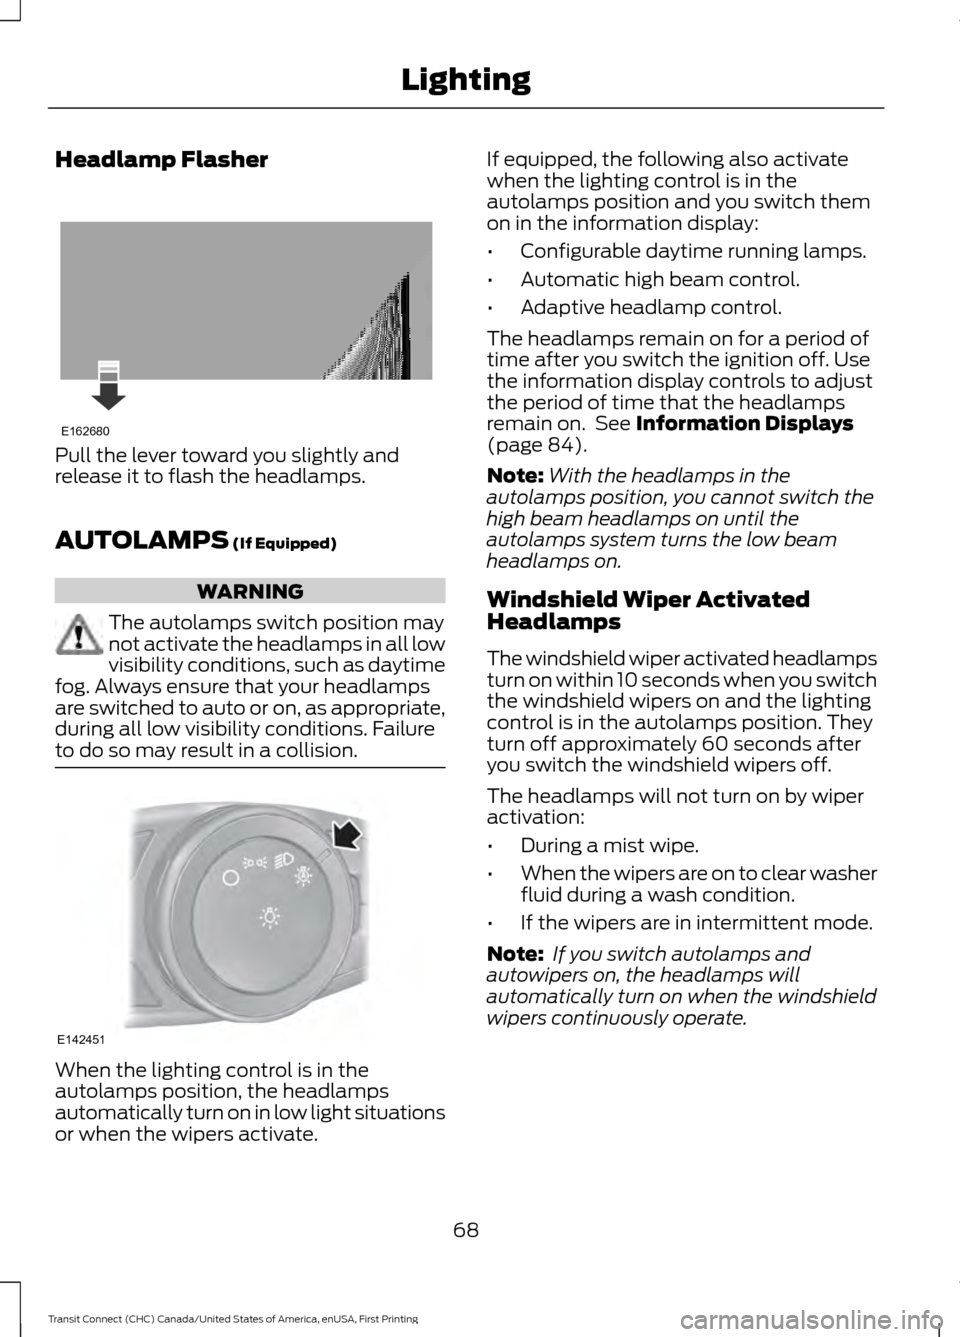
Headlamp Flasher
Pull the lever toward you slightly and
release it to flash the headlamps.
AUTOLAMPS (If Equipped)
WARNING
The autolamps switch position may
not activate the headlamps in all low
visibility conditions, such as daytime
fog. Always ensure that your headlamps
are switched to auto or on, as appropriate,
during all low visibility conditions. Failure
to do so may result in a collision. When the lighting control is in the
autolamps position, the headlamps
automatically turn on in low light situations
or when the wipers activate. If equipped, the following also activate
when the lighting control is in the
autolamps position and you switch them
on in the information display:
•
Configurable daytime running lamps.
• Automatic high beam control.
• Adaptive headlamp control.
The headlamps remain on for a period of
time after you switch the ignition off. Use
the information display controls to adjust
the period of time that the headlamps
remain on. See
Information Displays
(page 84).
Note: With the headlamps in the
autolamps position, you cannot switch the
high beam headlamps on until the
autolamps system turns the low beam
headlamps on.
Windshield Wiper Activated
Headlamps
The windshield wiper activated headlamps
turn on within 10 seconds when you switch
the windshield wipers on and the lighting
control is in the autolamps position. They
turn off approximately 60 seconds after
you switch the windshield wipers off.
The headlamps will not turn on by wiper
activation:
• During a mist wipe.
• When the wipers are on to clear washer
fluid during a wash condition.
• If the wipers are in intermittent mode.
Note: If you switch autolamps and
autowipers on, the headlamps will
automatically turn on when the windshield
wipers continuously operate.
68
Transit Connect (CHC) Canada/United States of America, enUSA, First Printing LightingE162680 E142451
Page 72 of 428
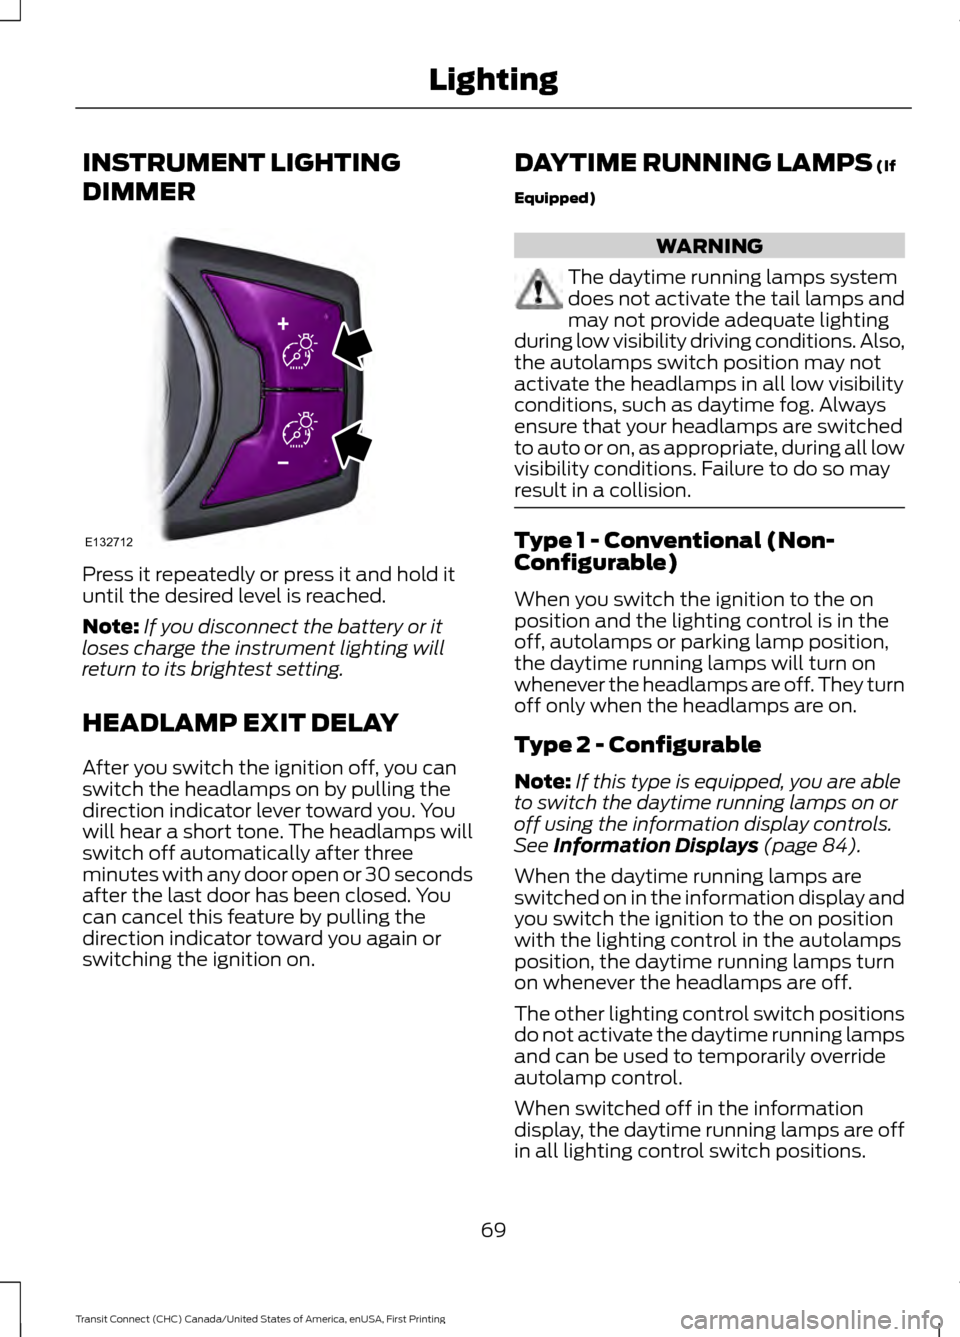
INSTRUMENT LIGHTING
DIMMER
Press it repeatedly or press it and hold it
until the desired level is reached.
Note:
If you disconnect the battery or it
loses charge the instrument lighting will
return to its brightest setting.
HEADLAMP EXIT DELAY
After you switch the ignition off, you can
switch the headlamps on by pulling the
direction indicator lever toward you. You
will hear a short tone. The headlamps will
switch off automatically after three
minutes with any door open or 30 seconds
after the last door has been closed. You
can cancel this feature by pulling the
direction indicator toward you again or
switching the ignition on. DAYTIME RUNNING LAMPS (If
Equipped) WARNING
The daytime running lamps system
does not activate the tail lamps and
may not provide adequate lighting
during low visibility driving conditions. Also,
the autolamps switch position may not
activate the headlamps in all low visibility
conditions, such as daytime fog. Always
ensure that your headlamps are switched
to auto or on, as appropriate, during all low
visibility conditions. Failure to do so may
result in a collision. Type 1 - Conventional (Non-
Configurable)
When you switch the ignition to the on
position and the lighting control is in the
off, autolamps or parking lamp position,
the daytime running lamps will turn on
whenever the headlamps are off. They turn
off only when the headlamps are on.
Type 2 - Configurable
Note:
If this type is equipped, you are able
to switch the daytime running lamps on or
off using the information display controls.
See
Information Displays (page 84).
When the daytime running lamps are
switched on in the information display and
you switch the ignition to the on position
with the lighting control in the autolamps
position, the daytime running lamps turn
on whenever the headlamps are off.
The other lighting control switch positions
do not activate the daytime running lamps
and can be used to temporarily override
autolamp control.
When switched off in the information
display, the daytime running lamps are off
in all lighting control switch positions.
69
Transit Connect (CHC) Canada/United States of America, enUSA, First Printing LightingE132712
Page 82 of 428
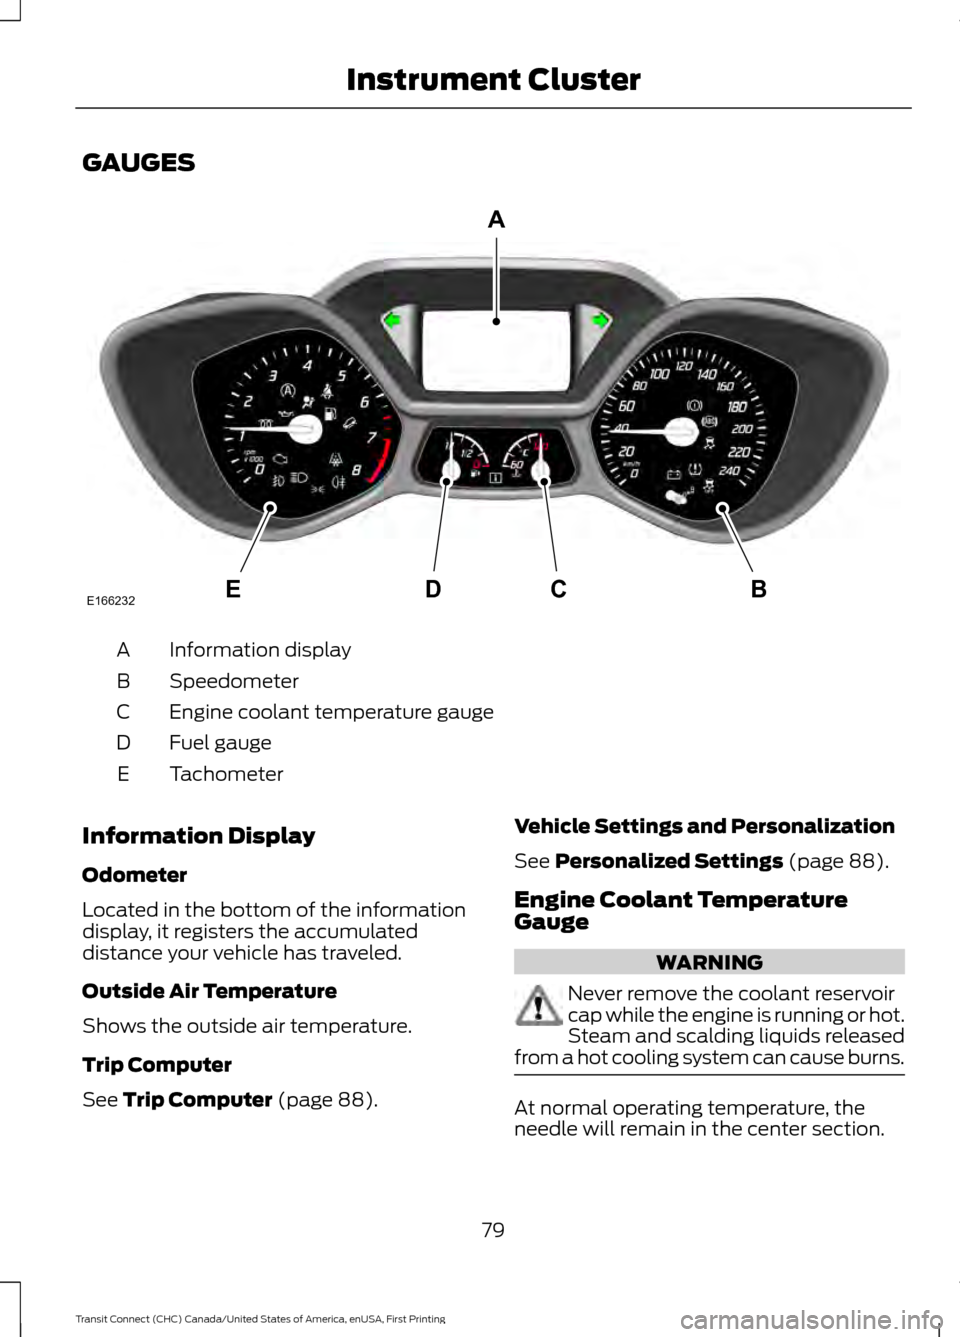
GAUGES
Information display
A
Speedometer
B
Engine coolant temperature gauge
C
Fuel gauge
D
Tachometer
E
Information Display
Odometer
Located in the bottom of the information
display, it registers the accumulated
distance your vehicle has traveled.
Outside Air Temperature
Shows the outside air temperature.
Trip Computer
See Trip Computer (page 88). Vehicle Settings and Personalization
See
Personalized Settings (page 88).
Engine Coolant Temperature
Gauge WARNING
Never remove the coolant reservoir
cap while the engine is running or hot.
Steam and scalding liquids released
from a hot cooling system can cause burns. At normal operating temperature, the
needle will remain in the center section.
79
Transit Connect (CHC) Canada/United States of America, enUSA, First Printing Instrument ClusterE166232CD
A
BE
Page 83 of 428
If the needle enters the red section, the
engine is overheating. Stop the engine,
switch the ignition off and determine the
cause once the engine has cooled down.
See Engine Coolant Check (page 190).
Note: Do not restart the engine until the
cause of overheating has been resolved.
Fuel Gauge
Switch the ignition on. The fuel gauge will
indicate approximately how much remains
in the fuel tank. The fuel gauge may vary
slightly when your vehicle is moving or on
a gradient. The arrow adjacent to the fuel
pump symbol indicates on which side of
the vehicle the fuel filler door is located.
WARNING LAMPS AND
INDICATORS
The following warning lamps and
indicators will alert you to a vehicle
condition that may become serious. Some
lamps will illuminate when you start your
vehicle to make sure they work. If any
lamps remain on after starting your vehicle,
refer to the respective system warning
lamp for further information.
Note: Some warning indicators appear in
the information display and function the
same as a warning lamp but do not display
when you start your vehicle.
Airbag - Front If it fails to illuminate when you
start your vehicle, continues to
flash or remains on, it indicates
a malfunction. Have the system checked
by your authorized dealer. Anti-Lock Braking System If it illuminates when you are
driving, this indicates a
malfunction. You will continue
to have the normal braking system
(without ABS) unless the brake system
warning lamp is also illuminated. Have the
system checked by your authorized dealer.
Battery If it illuminates while driving, it
indicates a malfunction. Switch
off all unnecessary electrical
equipment and have the system checked
by your authorized dealer immediately.
Brake System It will illuminate when you
engage the parking brake with
the ignition on.
If it illuminates when you are driving, check
that the parking brake is not engaged. If
the parking brake is not engaged, this
indicates low brake fluid level or a brake
system malfunction. Have the system
checked immediately by your authorized
dealer. WARNING
Driving your vehicle with the warning
lamp on is dangerous. A significant
decrease in braking performance
may occur. It will take you longer to stop
your vehicle. Have your vehicle checked by
your authorized dealer immediately. Driving
extended distances with the parking brake
engaged can cause brake failure and the
risk of personal injury. Cruise Control
(If Equipped)
It will illuminate when you switch
this feature on. See
Using
Cruise Control (page 139).
80
Transit Connect (CHC) Canada/United States of America, enUSA, First Printing Instrument Cluster E138644 E71340
Page 84 of 428
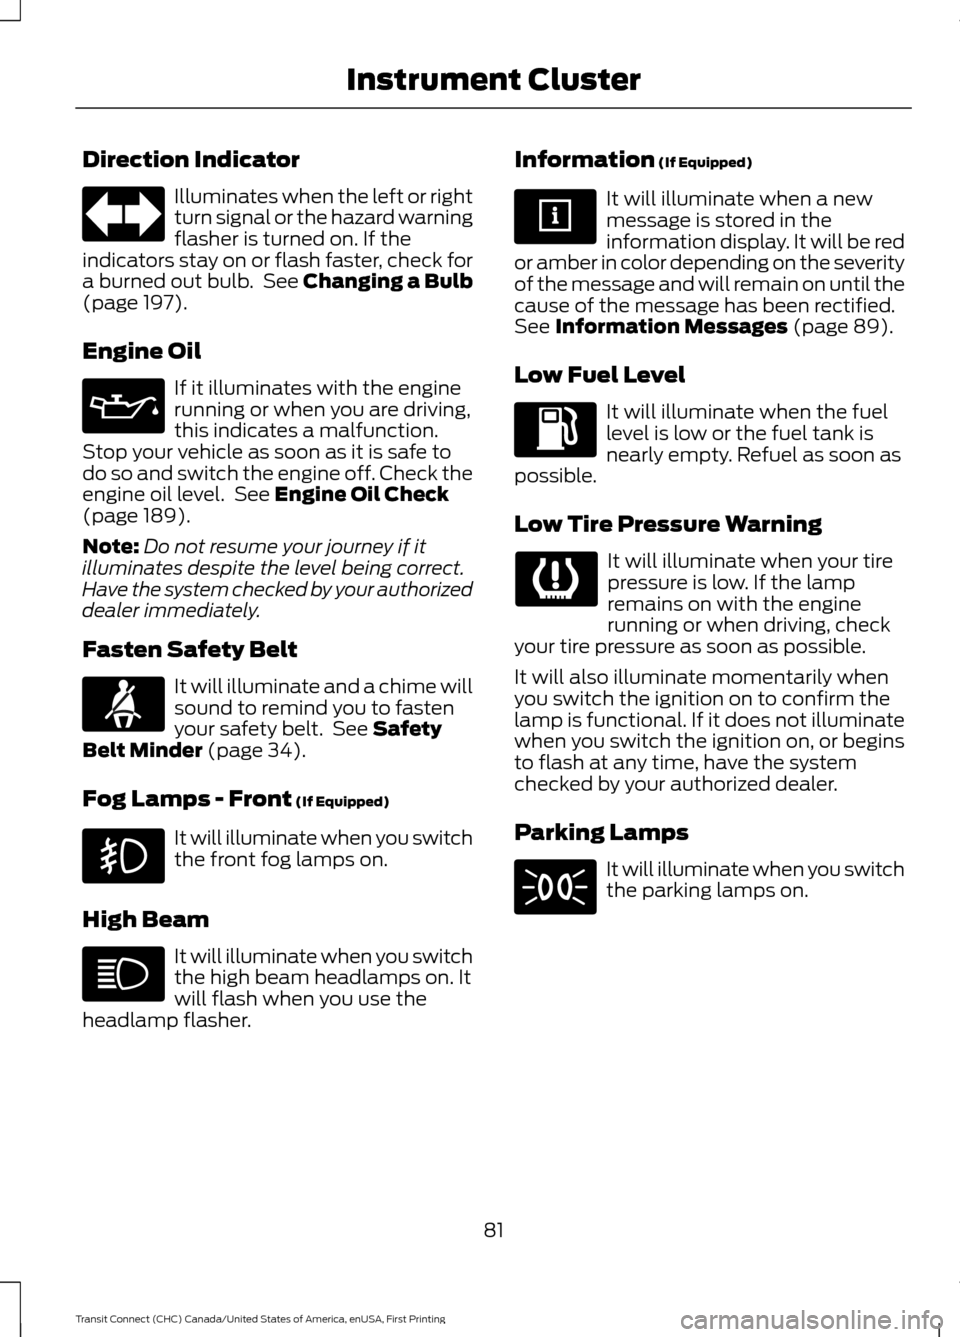
Direction Indicator
Illuminates when the left or right
turn signal or the hazard warning
flasher is turned on. If the
indicators stay on or flash faster, check for
a burned out bulb. See Changing a Bulb
(page 197).
Engine Oil If it illuminates with the engine
running or when you are driving,
this indicates a malfunction.
Stop your vehicle as soon as it is safe to
do so and switch the engine off. Check the
engine oil level. See
Engine Oil Check
(page 189).
Note: Do not resume your journey if it
illuminates despite the level being correct.
Have the system checked by your authorized
dealer immediately.
Fasten Safety Belt It will illuminate and a chime will
sound to remind you to fasten
your safety belt. See
Safety
Belt Minder (page 34).
Fog Lamps - Front
(If Equipped) It will illuminate when you switch
the front fog lamps on.
High Beam It will illuminate when you switch
the high beam headlamps on. It
will flash when you use the
headlamp flasher. Information
(If Equipped) It will illuminate when a new
message is stored in the
information display. It will be red
or amber in color depending on the severity
of the message and will remain on until the
cause of the message has been rectified.
See
Information Messages (page 89).
Low Fuel Level It will illuminate when the fuel
level is low or the fuel tank is
nearly empty. Refuel as soon as
possible.
Low Tire Pressure Warning It will illuminate when your tire
pressure is low. If the lamp
remains on with the engine
running or when driving, check
your tire pressure as soon as possible.
It will also illuminate momentarily when
you switch the ignition on to confirm the
lamp is functional. If it does not illuminate
when you switch the ignition on, or begins
to flash at any time, have the system
checked by your authorized dealer.
Parking Lamps It will illuminate when you switch
the parking lamps on.
81
Transit Connect (CHC) Canada/United States of America, enUSA, First Printing Instrument Cluster
Page 86 of 428
Automatic Transmission Warning
Chime
Sounds when you have not moved the
transmission selector lever to park. A
message will be shown in the display.
83
Transit Connect (CHC) Canada/United States of America, enUSA, First Printing Instrument Cluster
Page 87 of 428
GENERAL INFORMATION
WARNING
Driving while distracted can result in
loss of vehicle control, crash and
injury. We strongly recommend that
you use extreme caution when using any
device that may take your focus off the
road. Your primary responsibility is the safe
operation of your vehicle. We recommend
against the use of any handheld device
while driving and encourage the use of
voice-operated systems when possible.
Make sure you are aware of all applicable
local laws that may affect the use of
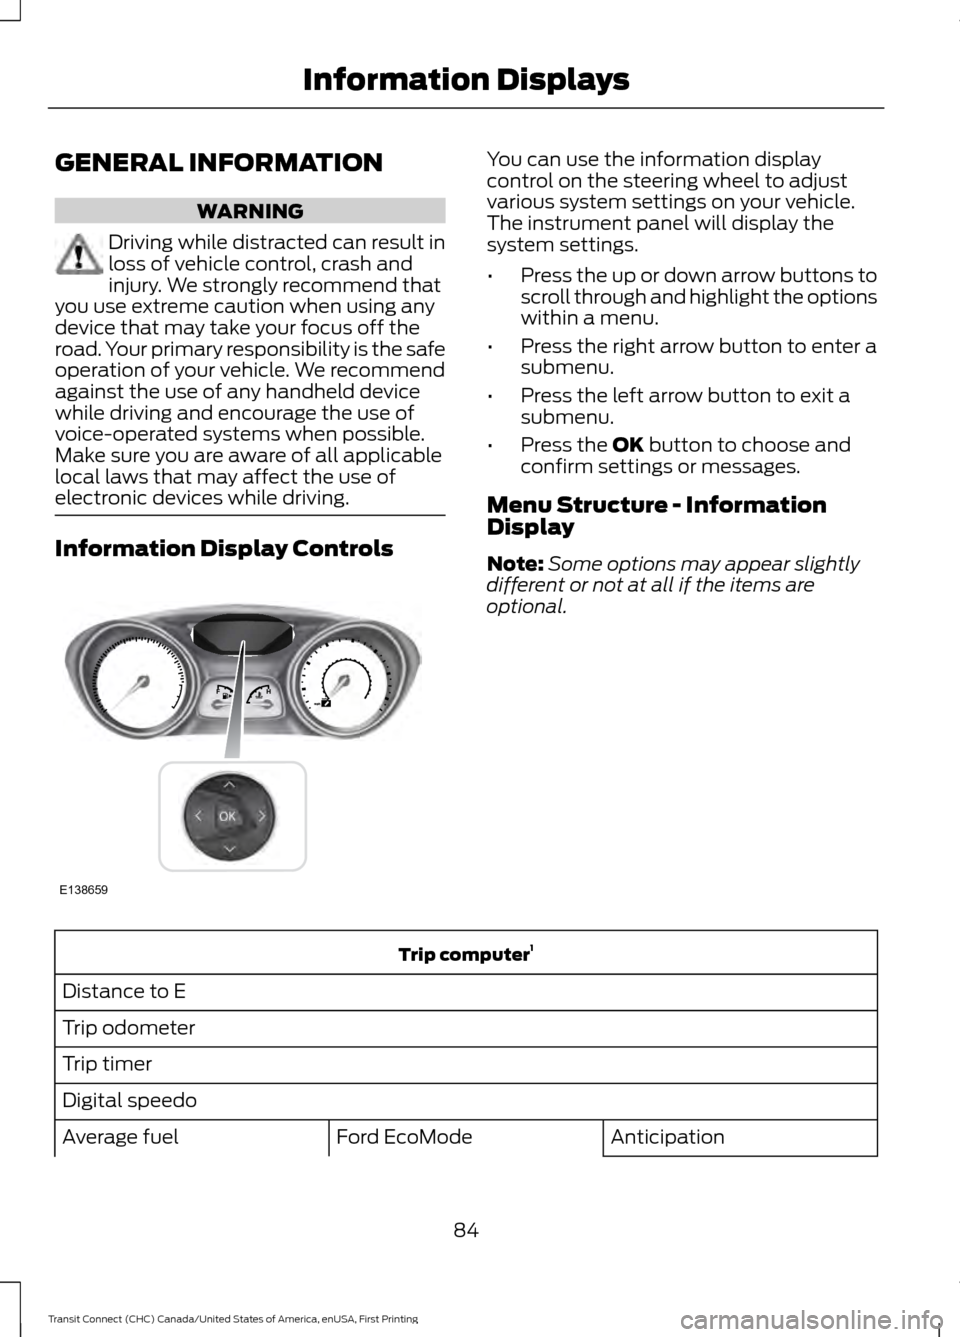
electronic devices while driving. Information Display Controls You can use the information display
control on the steering wheel to adjust
various system settings on your vehicle.
The instrument panel will display the
system settings.
•
Press the up or down arrow buttons to
scroll through and highlight the options
within a menu.
• Press the right arrow button to enter a
submenu.
• Press the left arrow button to exit a
submenu.
• Press the OK button to choose and
confirm settings or messages.
Menu Structure - Information
Display
Note: Some options may appear slightly
different or not at all if the items are
optional. Trip computer
1
Distance to E
Trip odometer
Trip timer
Digital speedo Anticipation
Ford EcoMode
Average fuel
84
Transit Connect (CHC) Canada/United States of America, enUSA, First Printing Information DisplaysE138659
Page 88 of 428
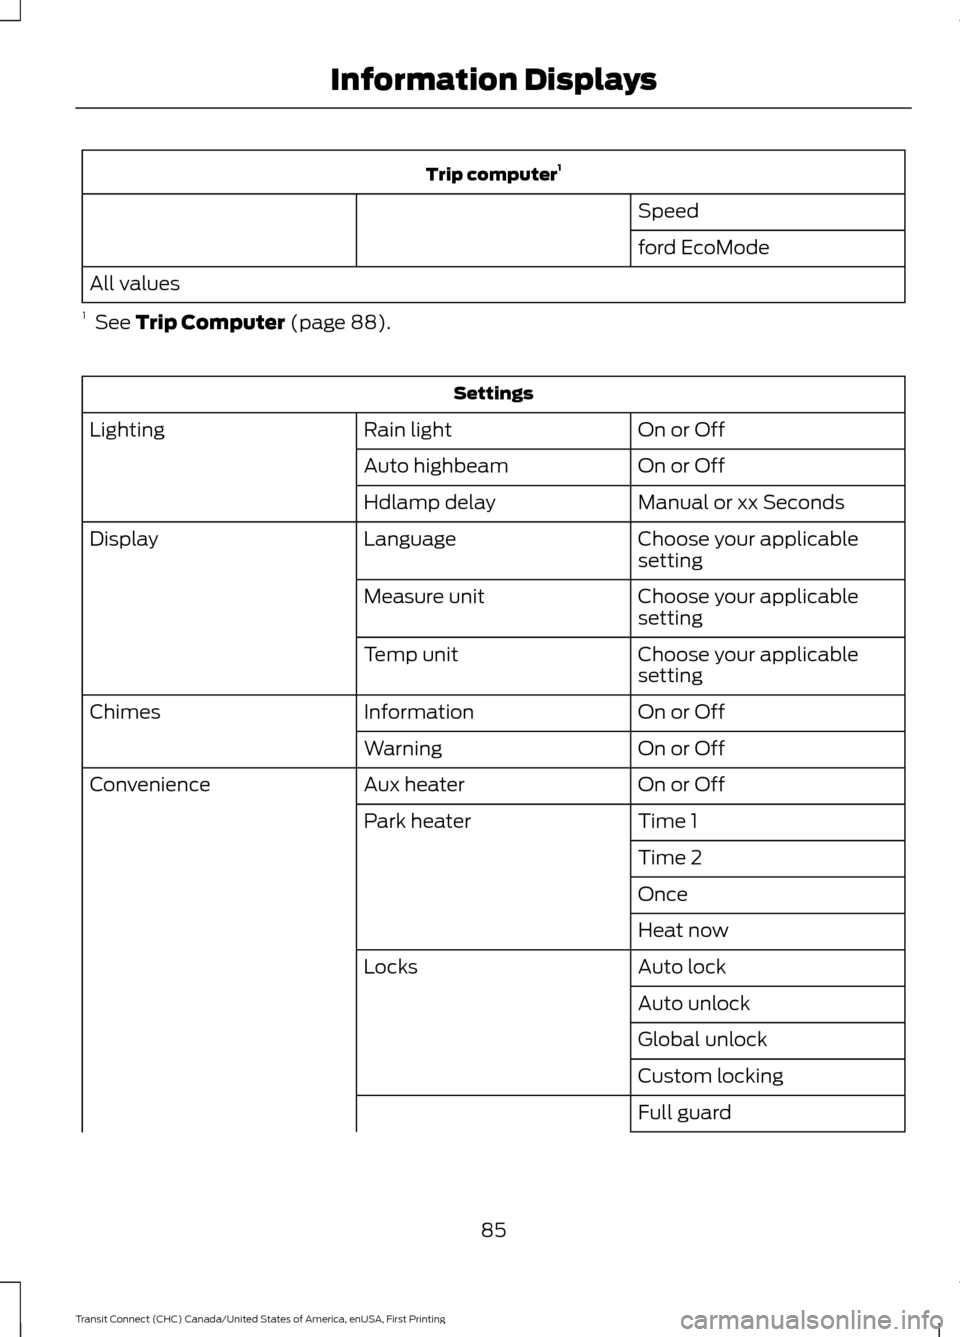
Trip computer
1
Speed
ford EcoMode
All values
1 See Trip Computer (page 88). Settings
On or Off
Rain light
Lighting
On or Off
Auto highbeam
Manual or xx Seconds
Hdlamp delay
Choose your applicable
setting
Language
Display
Choose your applicable
setting
Measure unit
Choose your applicable
setting
Temp unit
On or Off
Information
Chimes
On or Off
Warning
On or Off
Aux heater
Convenience
Time 1
Park heater
Time 2
Once
Heat now
Auto lock
Locks
Auto unlock
Global unlock
Custom locking
Full guard
85
Transit Connect (CHC) Canada/United States of America, enUSA, First Printing Information Displays
Page 89 of 428
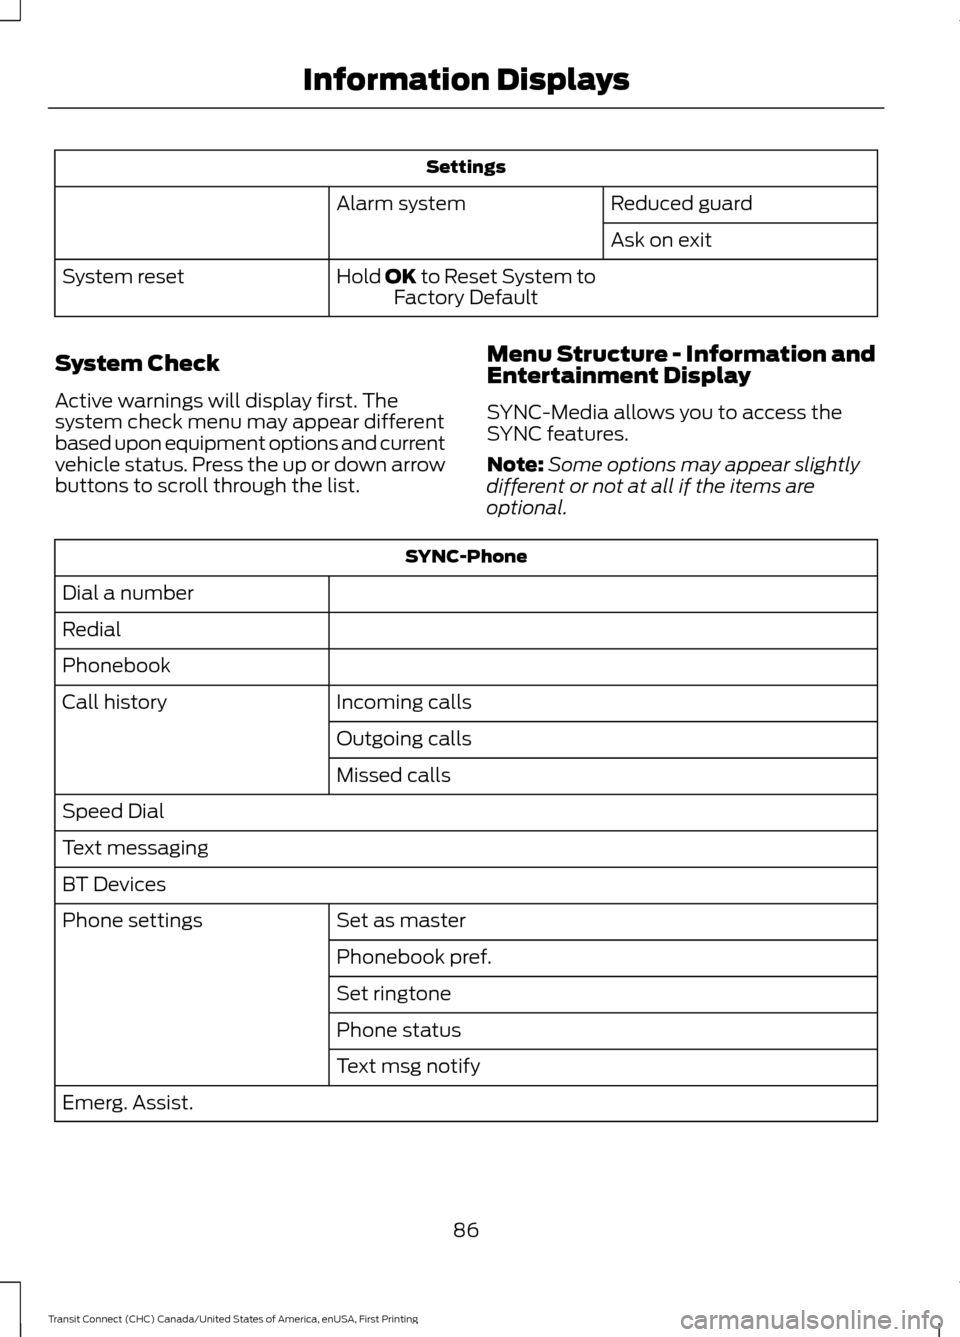
Settings
Reduced guard
Alarm system
Ask on exit
Hold OK to Reset System to Factory Default
System reset
System Check
Active warnings will display first. The
system check menu may appear different
based upon equipment options and current
vehicle status. Press the up or down arrow
buttons to scroll through the list. Menu Structure - Information and
Entertainment Display
SYNC-Media allows you to access the
SYNC features.
Note:
Some options may appear slightly
different or not at all if the items are
optional. SYNC-Phone
Dial a number
Redial
Phonebook Incoming calls
Call history
Outgoing calls
Missed calls
Speed Dial
Text messaging
BT Devices Set as master
Phone settings
Phonebook pref.
Set ringtone
Phone status
Text msg notify
Emerg. Assist.
86
Transit Connect (CHC) Canada/United States of America, enUSA, First Printing Information Displays
Page 90 of 428
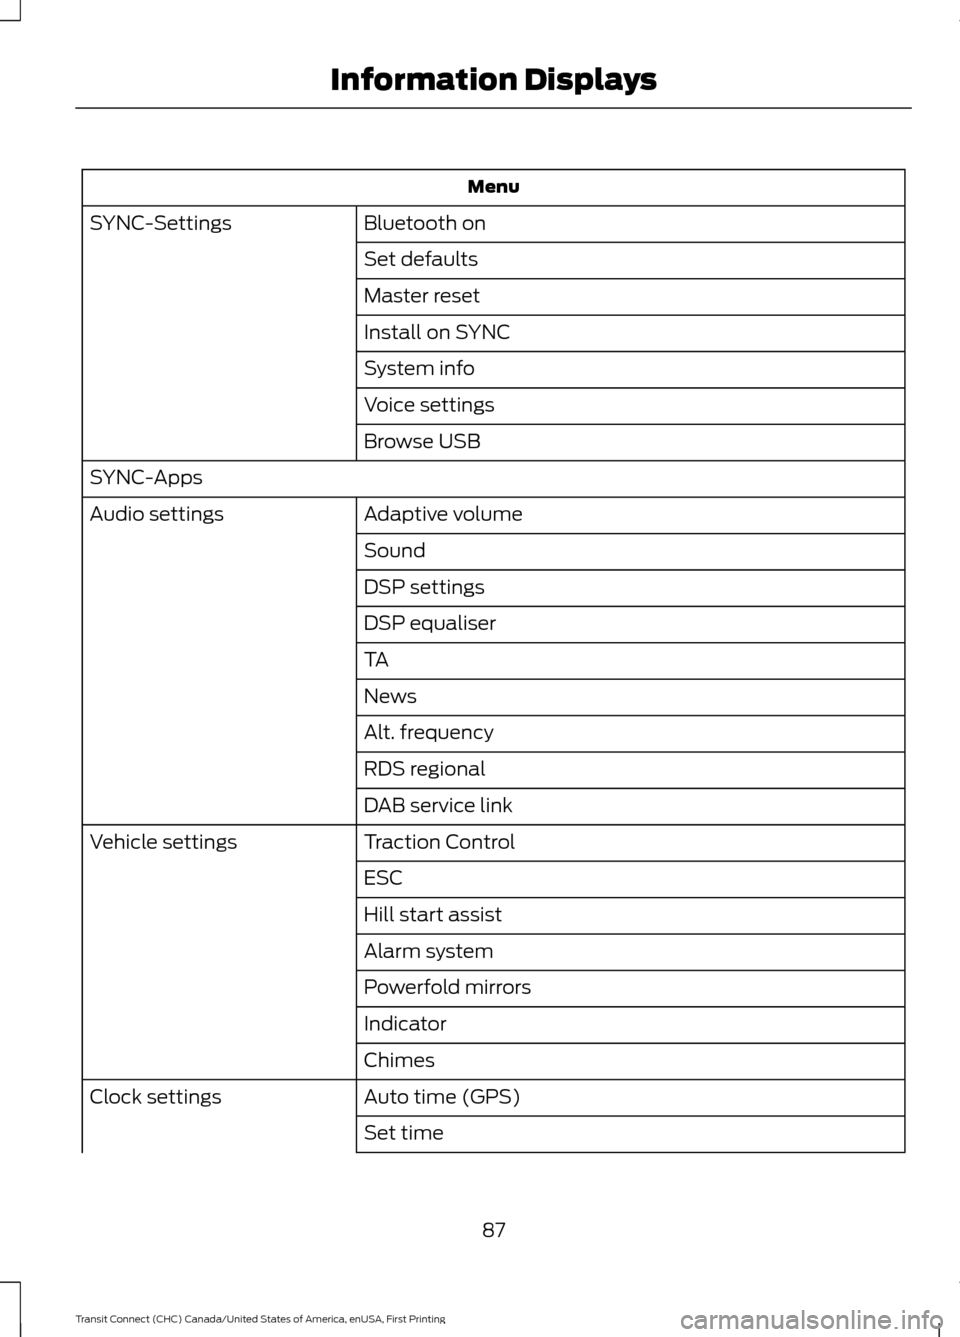
Menu
Bluetooth on
SYNC-Settings
Set defaults
Master reset
Install on SYNC
System info
Voice settings
Browse USB
SYNC-Apps Adaptive volume
Audio settings
Sound
DSP settings
DSP equaliser
TA
News
Alt. frequency
RDS regional
DAB service link
Traction Control
Vehicle settings
ESC
Hill start assist
Alarm system
Powerfold mirrors
Indicator
Chimes
Auto time (GPS)
Clock settings
Set time
87
Transit Connect (CHC) Canada/United States of America, enUSA, First Printing Information Displays