warning FORD TRANSIT CONNECT 2015 2.G Manual PDF
[x] Cancel search | Manufacturer: FORD, Model Year: 2015, Model line: TRANSIT CONNECT, Model: FORD TRANSIT CONNECT 2015 2.GPages: 428, PDF Size: 6.27 MB
Page 132 of 428
GENERAL INFORMATION
Note:
Occasional brake noise is normal. If
a metal-to-metal, continuous grinding or
continuous squeal sound is present, the
brake linings may be worn-out. Have the
system checked by an authorized dealer. If
your vehicle has continuous vibration or
shudder in the steering wheel while braking,
have it checked by an authorized dealer.
Note: Brake dust may accumulate on the
wheels, even under normal driving
conditions. Some dust is inevitable as the
brakes wear and does not contribute to
brake noise. See Cleaning the Alloy
Wheels (page 215). See
Warning Lamps and
Indicators (page 80).
Wet brakes result in reduced braking
efficiency. Gently press the brake pedal a
few times when driving from a car wash or
standing water to dry the brakes.
Brake Over Accelerator
In the event the accelerator pedal
becomes stuck or entrapped, apply steady
and firm pressure to the brake pedal to
slow the vehicle and reduce engine power.
If you experience this condition, apply the
brakes and bring your vehicle to a safe
stop. Move the transmission to park (P),
switch the engine off and apply the parking
brake. Inspect the accelerator pedal for
any interference. If none are found and the
condition persists, have your vehicle towed
to the nearest authorized dealer.
Brake Assist
Brake assist detects when you brake
rapidly by measuring the rate at which you
press the brake pedal. It provides
maximum braking efficiency as long as you
press the pedal, and can reduce stopping
distances in critical situations. Anti-lock Brake System
This system helps you maintain steering
control during emergency stops by keeping
the brakes from locking. This lamp momentarily
illuminates when you turn the
ignition on. If the light does not
illuminate during start up, remains on or
flashes, the system may be disabled. Have
the system checked by an authorized
dealer. If the anti-lock brake system is
disabled, normal braking is still effective. If the brake warning lamp
illuminates when you release the
parking brake, have the system
checked by an authorized dealer.
HINTS ON DRIVING WITH
ANTI-LOCK BRAKES
Note: When the system is operating, the
brake pedal will pulse and may travel
further. Maintain pressure on the brake
pedal. You may also hear a noise from the
system. This is normal.
The anti-lock braking system will not
eliminate the risks when:
• You drive too closely to the vehicle in
front of you.
• Your vehicle is hydroplaning.
• You take corners too fast.
• The road surface is poor.
PARKING BRAKE WARNING
Always set the parking brake fully
and leave your vehicle with the
transmission selector lever in
position
P. 129
Transit Connect (CHC) Canada/United States of America, enUSA, First Printing BrakesE144522 E144522
Page 133 of 428
Note:
Do not press the release button while
pulling the lever up.
To apply the parking brake:
1. Press the foot brake pedal firmly.
2. Pull the parking brake lever up to its fullest extent.
Note: If you park your vehicle on a hill and
facing uphill, move the transmission selector
lever to position P and turn the steering
wheel away from the curb.
Note: If you park your vehicle on a hill and
facing downhill, move the transmission
selector lever to
P and turn the steering
wheel toward the curb.
To release the parking brake:
1. Press the brake pedal firmly.
2. Pull the lever up slightly.
3. Press the release button and push the lever down.
HILL START ASSIST WARNINGS
The system does not replace the
parking brake. When you leave your
vehicle, always apply the parking
brake. Failure to leave your vehicle securely
parked may lead to a crash or injury. See
Parking Brake
(page 129). You must remain in your vehicle once
the system activates. Failure to
follow this warning could result in
serious personal injury or death. During all times, you are responsible
for controlling your vehicle,
supervising the system and
intervening, if required. Failure to take care
may result in the loss of control of your
vehicle, serious personal injury or death. WARNINGS
The system will turn off if a
malfunction is apparent or if you rev
the engine excessively. Failure to
take care may result in the loss of control
of your vehicle, serious personal injury or
death. The system makes it easier to pull away
when your vehicle is on a slope without the
need to use the parking brake.
When the system is active, your vehicle will
remain stationary on the slope for two to
three seconds after you release the brake
pedal. This allows time to move your foot
from the brake to the accelerator pedal.
The brakes are released automatically
once the engine has developed sufficient
drive to prevent your vehicle from rolling
down the slope. This is an advantage when
pulling away on a slope, for example from
a car park ramp, traffic lights or when
reversing uphill into a parking space.
The system will turn on automatically on
any slope which can result in significant
vehicle rollback.
Using Hill Start Assist
1. Press the brake pedal to bring your
vehicle to a complete standstill. Keep
the brake pedal pressed.
2. If the sensors detect that your vehicle is on a slope, the system will activate
automatically.
3. When you remove your foot from the brake pedal, your vehicle will remain
on the slope without rolling away for
approximately two to three seconds.
This hold time will automatically be
extended if you are in the process of
driving off.
4. Drive off in the normal manner. The brakes will be released automatically.
130
Transit Connect (CHC) Canada/United States of America, enUSA, First Printing Brakes
Page 134 of 428
PRINCIPLE OF OPERATION
The traction control system helps avoid
drive wheel spin and loss of traction.
If your vehicle begins to slide, the system
applies the brakes to individual wheels
and, when needed, reduces engine power
at the same time. If the wheels spin when
accelerating on slippery or loose surfaces,
the system reduces engine power in order
to increase traction.
USING TRACTION CONTROL
In certain situations for example, stuck in
snow or mud, turning the traction control
off may be beneficial as this allows the
wheels to spin with full engine power.
Depending on the type of system you have
on your vehicle, you can either turn the
system off using the information display
or by pressing the button.
Switching the System Off Using
the Information Display Controls
(If Equipped)
Your vehicle comes with this feature
already enabled. If required, you can switch
this feature off using the information
display controls. See (page 84).
Switching the System Off Using a
Switch
(If Equipped)
The button is located in the instrument
panel.
Press the button. You will see a message
in conjunction with an illuminated icon in
the display. Press the button again to
return the system to normal mode.
When you switch the traction control
system off, stability control remains fully
active. System Indicator Lights and
Messages WARNING
If a failure has been detected within
the AdvanceTrac system, the
stability control light will illuminate
steadily. Verify that the AdvanceTrac
system was not manually disabled through
the information display. If the stability
control light still illuminates steadily, have
the system serviced by an authorized
dealer immediately. Operating your vehicle
with AdvanceTrac disabled could lead to
an increased risk of loss of vehicle control,
vehicle rollover, personal injury and death. The stability control light
temporarily illuminates on
engine start-up and flashes
when a driving condition activates the
stability system. The stability control off light
temporarily illuminates on
engine start-up and stays on
when you turn the traction control system
off.
When you turn the traction control system
off or on, a message appears in the
information display showing system status.
131
Transit Connect (CHC) Canada/United States of America, enUSA, First Printing Traction ControlE138639
Page 135 of 428
PRINCIPLE OF OPERATION
WARNINGS
Vehicle modifications involving
braking system, aftermarket roof
racks, suspension, steering system,
tire construction and wheel and tire size
may change the handling characteristics
of your vehicle and may adversely affect
the performance of the AdvanceTrac
system. In addition, installing any stereo
loudspeakers may interfere with and
adversely affect the AdvanceTrac system.
Install any aftermarket stereo loudspeaker
as far as possible from the front center
console, the tunnel, and the front seats in
order to minimize the risk of interfering with
the AdvanceTrac sensors. Reducing the
effectiveness of the AdvanceTrac system
could lead to an increased risk of loss of
vehicle control, vehicle rollover, personal
injury and death. Remember that even advanced
technology cannot defy the laws of
physics. It’
s always possible to lose
control of a vehicle due to inappropriate
driver input for the conditions. Aggressive
driving on any road condition can cause
you to lose control of your vehicle
increasing the risk of personal injury or
property damage. Activation of the
AdvanceTrac system is an indication that
at least some of the tires have exceeded
their ability to grip the road; this could
reduce the operator ’s ability to control the
vehicle potentially resulting in a loss of
vehicle control, vehicle rollover, personal
injury and death. If your AdvanceTrac
system activates, SLOW DOWN. The AdvanceTrac with Roll Stability
Control system helps you keep control of
your vehicle when on a slippery surface.
The electronic stability control portion of
the system helps avoid skids and lateral
slides and roll stability control helps avoid
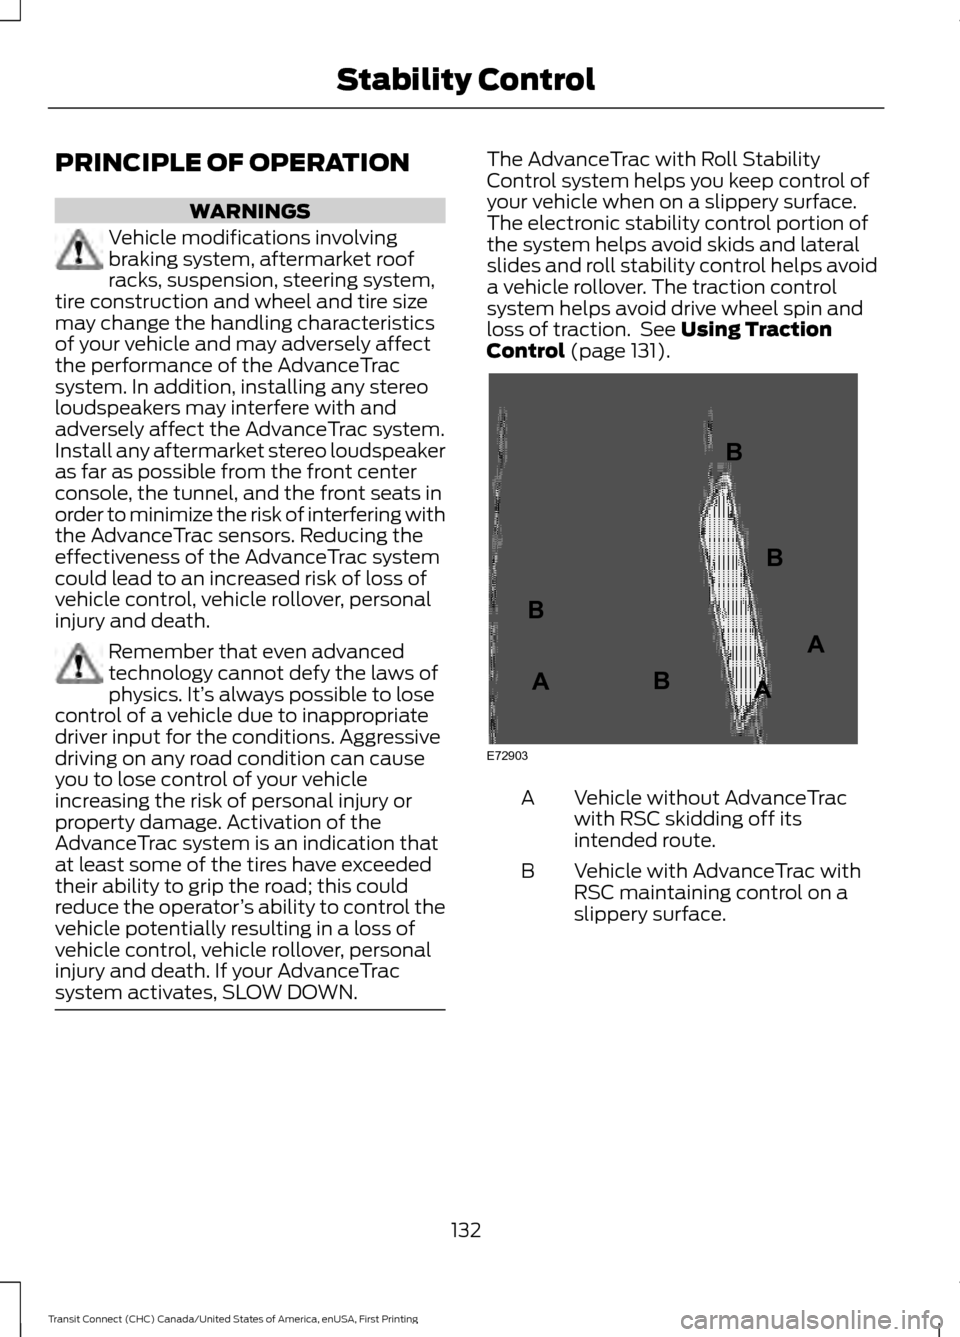
a vehicle rollover. The traction control
system helps avoid drive wheel spin and
loss of traction. See Using Traction
Control (page 131). Vehicle without AdvanceTrac
with RSC skidding off its
intended route.
A
Vehicle with AdvanceTrac with
RSC maintaining control on a
slippery surface.
B
132
Transit Connect (CHC) Canada/United States of America, enUSA, First Printing Stability ControlE72903A
AA
B
BB
B
Page 137 of 428
PRINCIPLE OF OPERATION
WARNINGS
The system does not relieve you of
your responsibility to drive with due
care and attention.
If your vehicles has a non-Ford
approved trailer tow module the
system may not correctly detect
objects. The sensors may not detect objects
in heavy rain or other conditions that
cause disruptive reflections.
The sensors may not detect objects
with surfaces that absorb ultrasonic
waves.
The system does not detect objects
that are moving away from your
vehicle. They will only be detected
shortly after they start to move toward
your vehicle. Take particular care when reversing
with a tow ball arm or a rear fitted
accessory. For example, a bicycle
carrier. The rear parking aid will only
indicate the approximate distance from
the rear bumper to an object. If you use a high pressure spray to
wash your vehicle, only spray the
sensors briefly from a distance not
less than eight inches (20 centimeters). Note:
If your vehicle has a tow ball arm, the
system is turned off automatically when
trailer lamps (or lighting boards) are
connected to the 13-pin socket through a
Ford approved trailer tow module.
Note: Keep the sensors free from dirt, ice
or snow. Do not clean with sharp objects.
Note: The system may emit false alerts if
it detects a signal using the same frequency
as the sensors or if your vehicle is fully
loaded. Note:
The outer sensors may detect the
side walls of a garage. If the distance
between the outer sensors and the side wall
remains constant for three seconds, the
alert will turn off. As you continue the inner
sensors will detect objects directly behind
your vehicle.
PARKING AID WARNINGS
Sensing is only an aid to detect some
objects when moving forward or
backward at low speeds. Traffic
control systems, inclement weather or an
external motor and fan can affect the
sensors; this may include reduced
performance or false activation. To help
avoid personal injury you must read and
understand the limitations of the system
detailed in this section. The parking aid system may not
prevent contact with small or moving
objects that are close to the ground.
The parking aid system gives an audible
warning when it detects a large object
helping to avoid damage to your vehicle.
To help avoid personal injury you must take
care when using the parking aid system. Note:
Some add-on equipment can cause
reduced performance or false activation.
For example, large trailer hitches, bike or
surfboard racks.
Note: The parking aid system sensors must
be kept clean and free from snow or ice to
avoid reduced performance or false
activation. Do not clean the sensors with
sharp objects.
Note: If the parking aid sensors are
misaligned due to vehicle bumper damage
it will cause reduced performance or false
activation.
134
Transit Connect (CHC) Canada/United States of America, enUSA, First Printing Parking Aids
Page 138 of 428
The parking aid system gives an audible
warning and reduces the radio volume
when it detects a large object within a
limited range of your vehicle
’s bumpers.
Note: When the parking aid system no
longer detects a large object the radio
volume will return to the previous level.
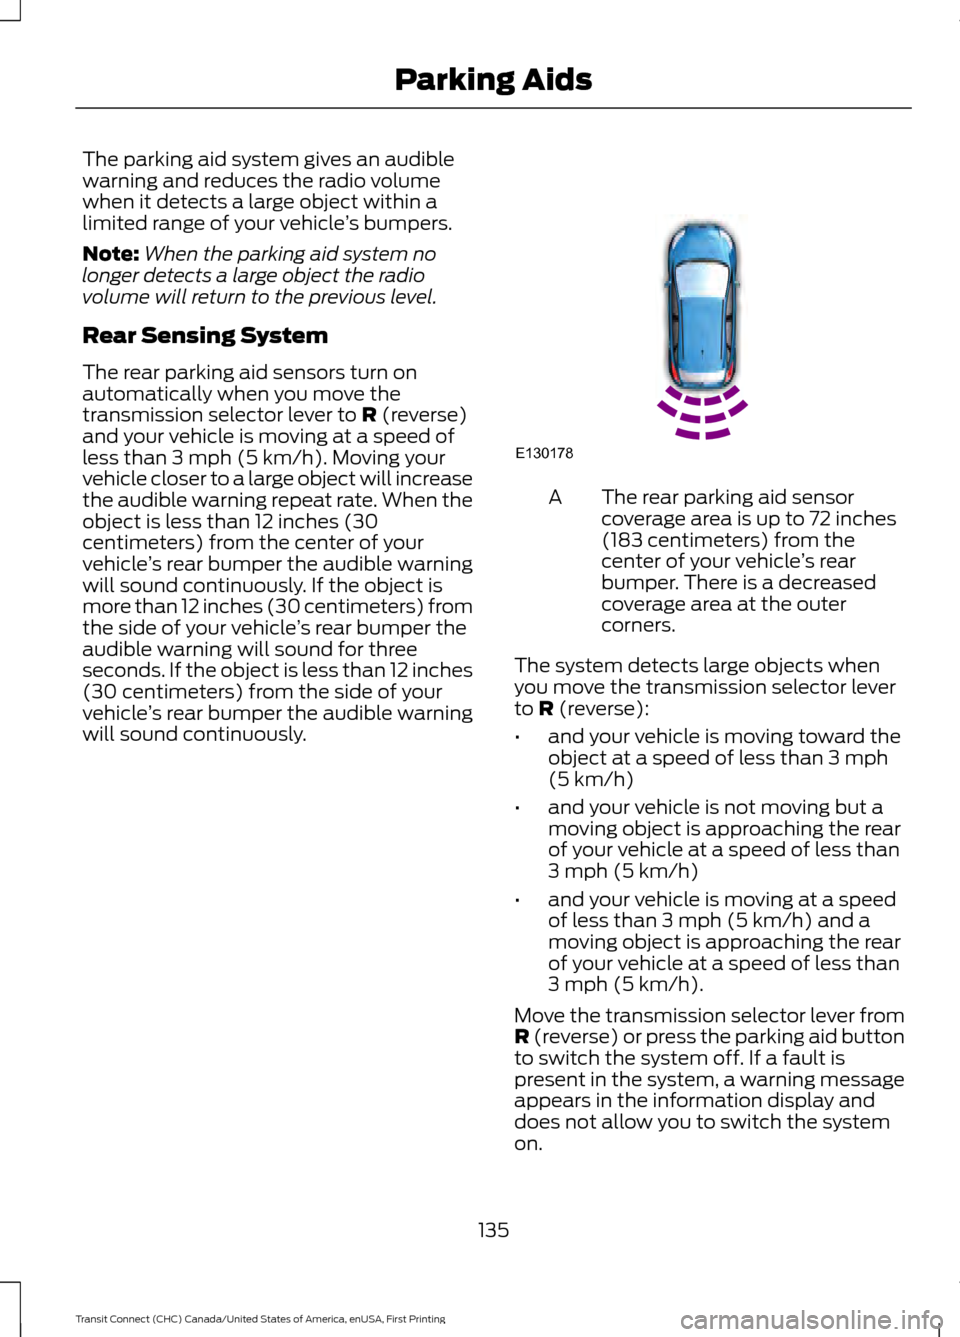
Rear Sensing System
The rear parking aid sensors turn on
automatically when you move the
transmission selector lever to R (reverse)
and your vehicle is moving at a speed of
less than 3 mph (5 km/h). Moving your
vehicle closer to a large object will increase
the audible warning repeat rate. When the
object is less than 12 inches (30
centimeters) from the center of your
vehicle ’s rear bumper the audible warning
will sound continuously. If the object is
more than 12 inches (30 centimeters) from
the side of your vehicle ’s rear bumper the
audible warning will sound for three
seconds. If the object is less than 12 inches
(30 centimeters) from the side of your
vehicle ’s rear bumper the audible warning
will sound continuously. The rear parking aid sensor
coverage area is up to 72 inches
(183 centimeters) from the
center of your vehicle
’s rear
bumper. There is a decreased
coverage area at the outer
corners.
A
The system detects large objects when
you move the transmission selector lever
to
R (reverse):
• and your vehicle is moving toward the
object at a speed of less than 3 mph
(5 km/h)
• and your vehicle is not moving but a
moving object is approaching the rear
of your vehicle at a speed of less than
3 mph (5 km/h)
• and your vehicle is moving at a speed
of less than 3 mph (5 km/h) and a
moving object is approaching the rear
of your vehicle at a speed of less than
3 mph (5 km/h).
Move the transmission selector lever from
R
(reverse) or press the parking aid button
to switch the system off. If a fault is
present in the system, a warning message
appears in the information display and
does not allow you to switch the system
on.
135
Transit Connect (CHC) Canada/United States of America, enUSA, First Printing Parking AidsE130178
Page 139 of 428
Front and Rear Sensing System
The front and rear parking aid sensors turn
on automatically when you move the
transmission selector lever to R (reverse),
D (drive) or S (sport) and your vehicle is
moving at a speed of less than 7 mph (12
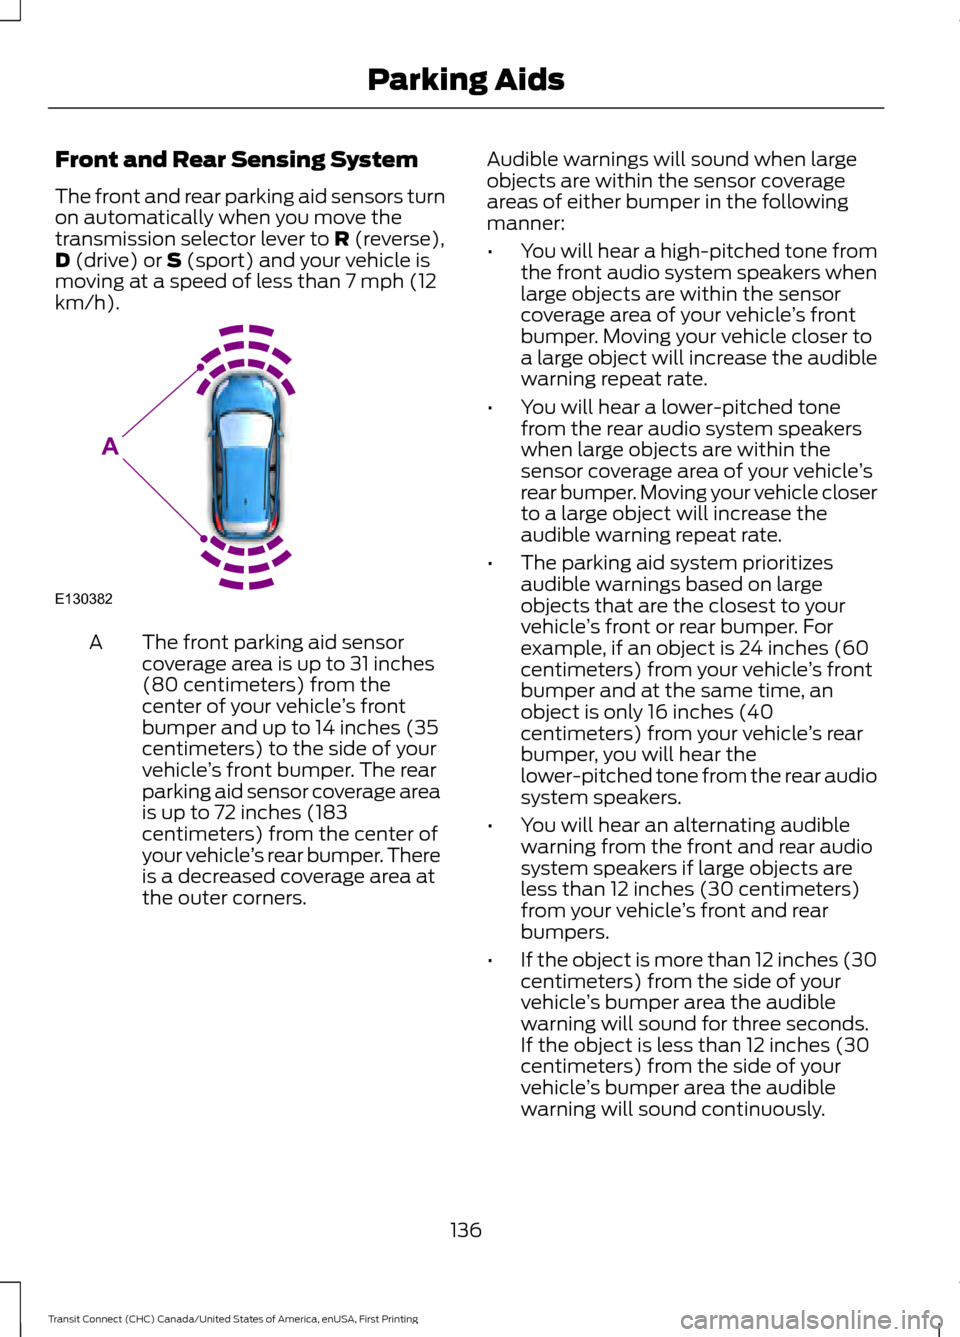
km/h). The front parking aid sensor
coverage area is up to 31 inches
(80 centimeters) from the
center of your vehicle
’s front
bumper and up to 14 inches (35
centimeters) to the side of your
A
vehicle ’s front bumper. The rear
parking aid sensor coverage area
is up to 72 inches (183
centimeters) from the center of
your vehicle ’s rear bumper. There
is a decreased coverage area at
the outer corners. Audible warnings will sound when large
objects are within the sensor coverage
areas of either bumper in the following
manner:
•
You will hear a high-pitched tone from
the front audio system speakers when
large objects are within the sensor
coverage area of your vehicle ’s front
bumper. Moving your vehicle closer to
a large object will increase the audible
warning repeat rate.
• You will hear a lower-pitched tone
from the rear audio system speakers
when large objects are within the
sensor coverage area of your vehicle ’s
rear bumper. Moving your vehicle closer
to a large object will increase the
audible warning repeat rate.
• The parking aid system prioritizes
audible warnings based on large
objects that are the closest to your
vehicle ’s front or rear bumper. For
example, if an object is 24 inches (60
centimeters) from your vehicle ’s front
bumper and at the same time, an
object is only 16 inches (40
centimeters) from your vehicle ’s rear
bumper, you will hear the
lower-pitched tone from the rear audio
system speakers.
• You will hear an alternating audible
warning from the front and rear audio
system speakers if large objects are
less than 12 inches (30 centimeters)
from your vehicle ’s front and rear
bumpers.
• If the object is more than 12 inches (30
centimeters) from the side of your
vehicle ’s bumper area the audible
warning will sound for three seconds.
If the object is less than 12 inches (30
centimeters) from the side of your
vehicle ’s bumper area the audible
warning will sound continuously.
136
Transit Connect (CHC) Canada/United States of America, enUSA, First Printing Parking AidsE130382
A
Page 140 of 428
Move the transmission selector lever from
R (reverse),
D (drive),S (sport) or move
away from large objects as you drive off,
or press the parking aid button to switch
the system off. If a fault is present in the
system, a warning message appears in the
information display and does not allow you
to switch the system on.
REAR VIEW CAMERA WARNINGS
The rear view camera system is a
reverse aid supplement device that
still requires the driver to use it in
conjunction with the interior and exterior
mirrors for maximum coverage. The camera may not detect objects
that are very close to your vehicle.
Back up as slow as possible since
higher speeds might limit your
reaction time to stop the vehicle.
Note:
The operation of the camera may
vary depending on the ambient temperature,
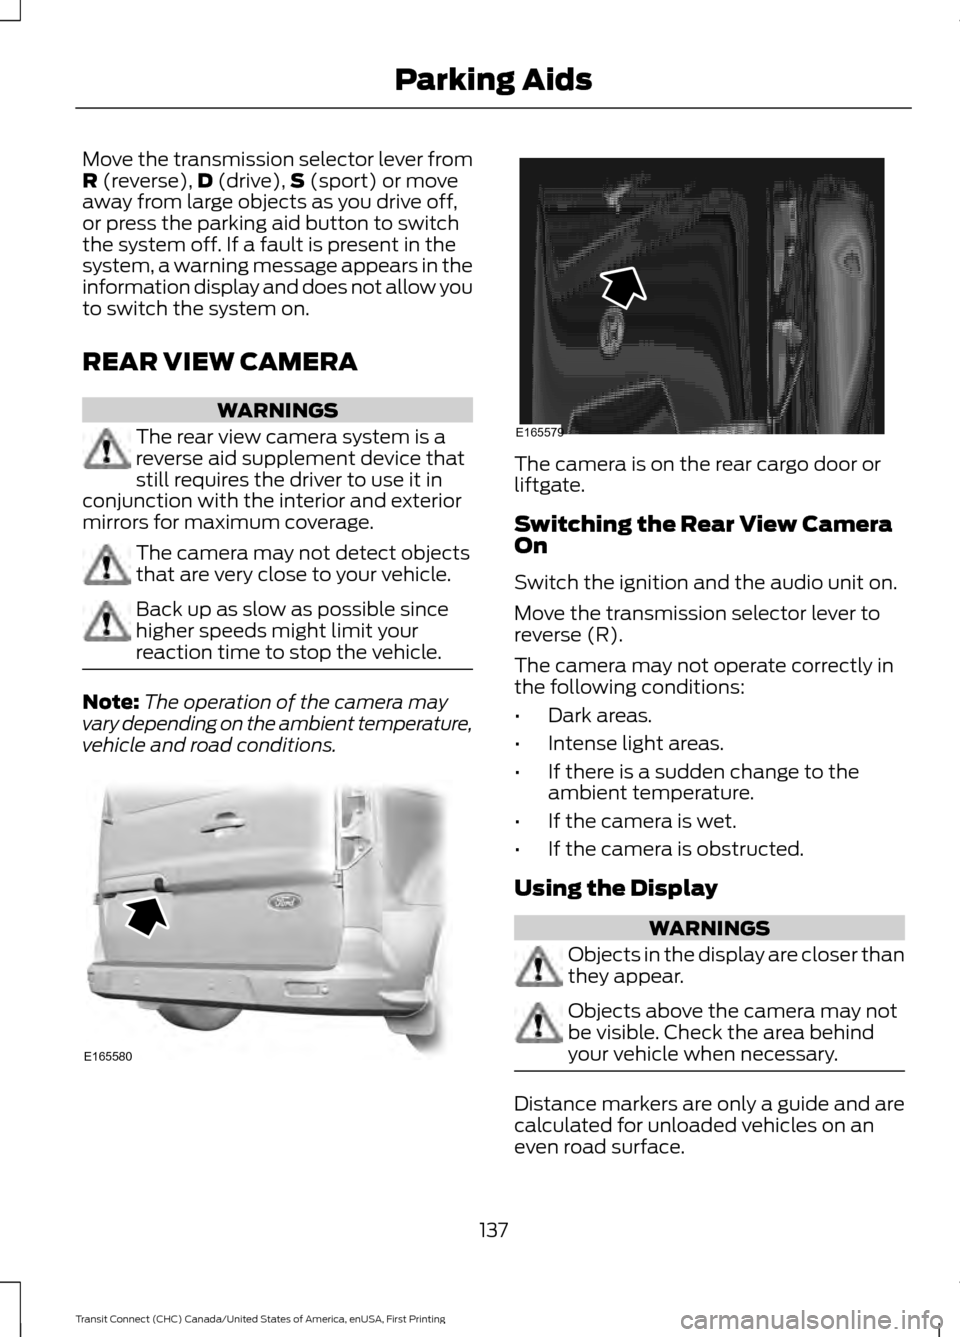
vehicle and road conditions. The camera is on the rear cargo door or
liftgate.
Switching the Rear View Camera
On
Switch the ignition and the audio unit on.
Move the transmission selector lever to
reverse (R).
The camera may not operate correctly in
the following conditions:
•
Dark areas.
• Intense light areas.
• If there is a sudden change to the
ambient temperature.
• If the camera is wet.
• If the camera is obstructed.
Using the Display WARNINGS
Objects in the display are closer than
they appear.
Objects above the camera may not
be visible. Check the area behind
your vehicle when necessary.
Distance markers are only a guide and are
calculated for unloaded vehicles on an
even road surface.
137
Transit Connect (CHC) Canada/United States of America, enUSA, First Printing Parking AidsE165580 E165579
Page 142 of 428
PRINCIPLE OF OPERATION
Cruise control lets you maintain a set
speed without keeping your foot on the
accelerator pedal. You can use cruise
control when your vehicle speed is greater
than 20 mph (30 km/h).
USING CRUISE CONTROL WARNINGS
Do not use cruise control in heavy
traffic, on winding roads or when the
road surface is slippery. This could
result in loss of vehicle control, serious
injury or death. When you are going downhill, your
vehicle speed may increase above
the set speed. The system will not
apply the brakes. Change down a gear to
assist the system in maintaining the set
speed. Failure to do so could result in loss
of vehicle control, serious injury or death. Note:
Cruise control will disengage if your
vehicle speed decreases more than 10 mph
(16 km/h) below your set speed while
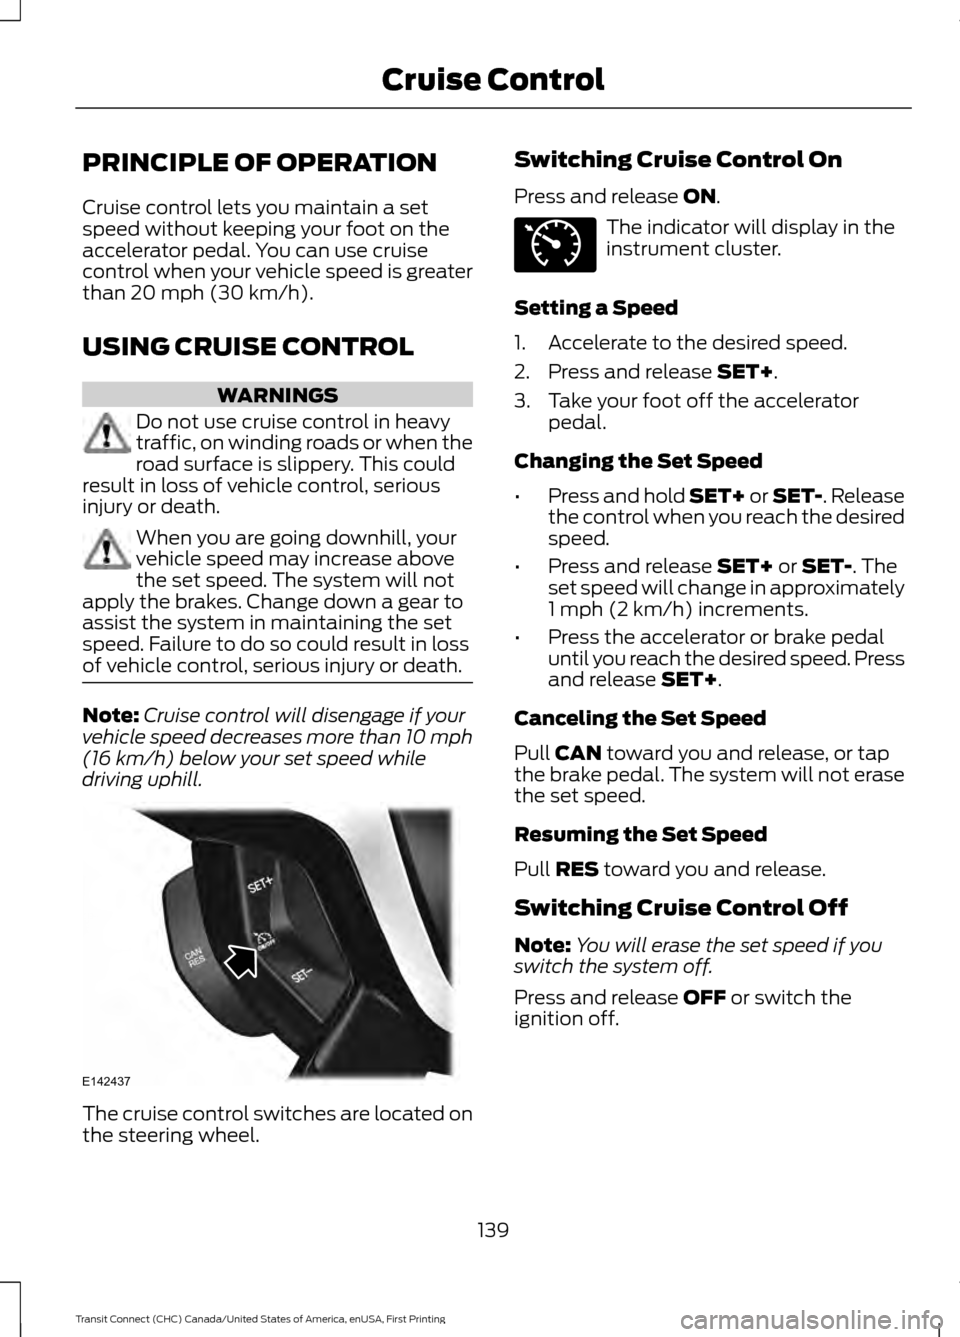
driving uphill. The cruise control switches are located on
the steering wheel. Switching Cruise Control On
Press and release
ON. The indicator will display in the
instrument cluster.
Setting a Speed
1. Accelerate to the desired speed.
2. Press and release
SET+.
3. Take your foot off the accelerator pedal.
Changing the Set Speed
• Press and hold SET+ or SET-. Release
the control when you reach the desired
speed.
• Press and release
SET+ or SET-. The
set speed will change in approximately
1 mph (2 km/h) increments.
• Press the accelerator or brake pedal
until you reach the desired speed. Press
and release
SET+.
Canceling the Set Speed
Pull
CAN toward you and release, or tap
the brake pedal. The system will not erase
the set speed.
Resuming the Set Speed
Pull
RES toward you and release.
Switching Cruise Control Off
Note: You will erase the set speed if you
switch the system off.
Press and release
OFF or switch the
ignition off.
139
Transit Connect (CHC) Canada/United States of America, enUSA, First Printing Cruise ControlE142437 E71340
Page 143 of 428
STEERING
Electric Power Steering
WARNING
The electric power steering system
has diagnostic checks that
continuously monitor the system. If
a fault is detected, a message displays in
the information display. Stop your vehicle
as soon as it is safe to do so. Switch the
ignition off. After at least 10 seconds,
switch the ignition on and watch the
information display for a steering system
warning message. If a steering system
warning message returns, have the system
checked by an authorized dealer. Your vehicle has an electric power steering
system. There is no fluid reservoir. No
maintenance is required.
If your vehicle loses electrical power while
you are driving, electric power steering
assistance is lost. The steering system still
operates and you can steer your vehicle
manually. Manually steering your vehicle
requires more effort.
Extreme continuous steering may increase
the effort required for you to steer your
vehicle. This increased effort prevents
overheating and permanent damage to
the steering system. You do not lose the
ability to steer your vehicle manually.
Typical steering and driving maneuvers
allow the system to cool and return to
normal operation.
Steering Tips
If the steering wanders or pulls, check for:
•
Correct tire pressures.
• Uneven tire wear.
• Loose or worn suspension
components. •
Loose or worn steering components.
• Improper vehicle alignment.
Note: A high crown in the road or high
crosswinds may also make the steering
seem to wander or pull.
Adaptive Learning
The electronic power steering system
adaptive learning helps correct road
irregularities and improves overall handling
and steering feel. It communicates with
the brake system to help operate
advanced stability control and accident
avoidance systems. Additionally, whenever
the battery is disconnected or a new
battery installed, you must drive your
vehicle a short distance before the system
relearns the strategy and reactivates all
systems.
140
Transit Connect (CHC) Canada/United States of America, enUSA, First Printing Driving Aids