buttons FORD TRANSIT CONNECT 2019 Owners Manual
[x] Cancel search | Manufacturer: FORD, Model Year: 2019, Model line: TRANSIT CONNECT, Model: FORD TRANSIT CONNECT 2019Pages: 493, PDF Size: 7.43 MB
Page 21 of 493
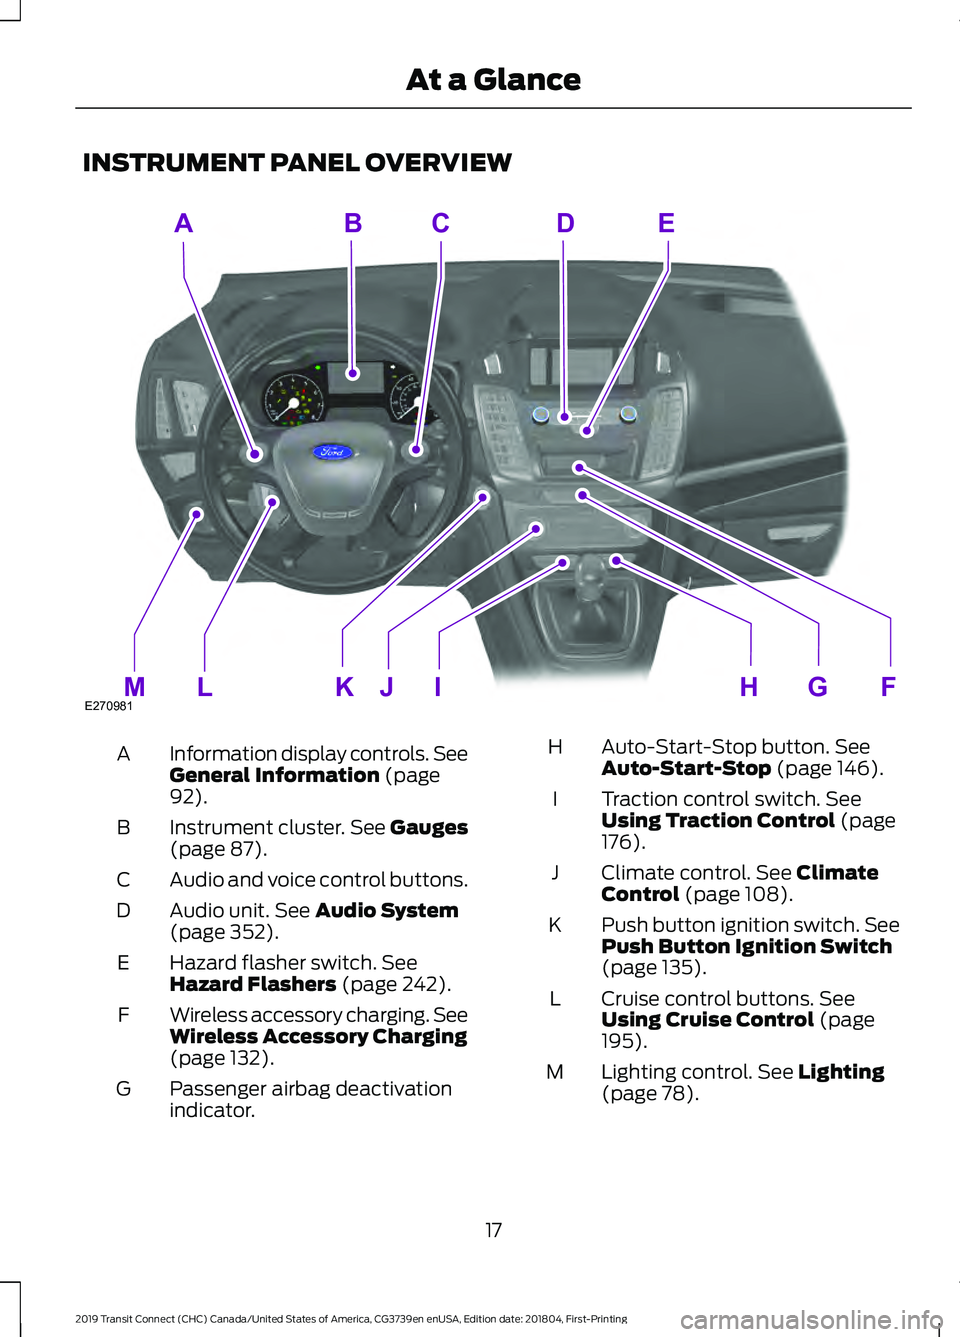
INSTRUMENT PANEL OVERVIEW
Information display controls. See
General Information (page
92).
A
Instrument cluster.
See Gauges
(page 87).
B
Audio and voice control buttons.
C
Audio unit.
See Audio System
(page 352).
D
Hazard flasher switch.
See
Hazard Flashers (page 242).
E
Wireless accessory charging. See
Wireless Accessory Charging
(page
132).
F
Passenger airbag deactivation
indicator.
G Auto-Start-Stop button.
See
Auto-Start-Stop (page 146).
H
Traction control switch.
See
Using Traction Control (page
176).
I
Climate control.
See Climate
Control (page 108).
J
Push button ignition switch. See
Push Button Ignition Switch
(page
135).
K
Cruise control buttons.
See
Using Cruise Control (page
195).
L
Lighting control.
See Lighting
(page 78).
M
17
2019 Transit Connect (CHC) Canada/United States of America, CG3739en enUSA, Edition date: 201804, First-Printing At a GlanceABCED
FGHIJKLME270981
Page 58 of 493
REMOTE CONTROL - VEHICLES
WITH: REMOTE FLIP KEY
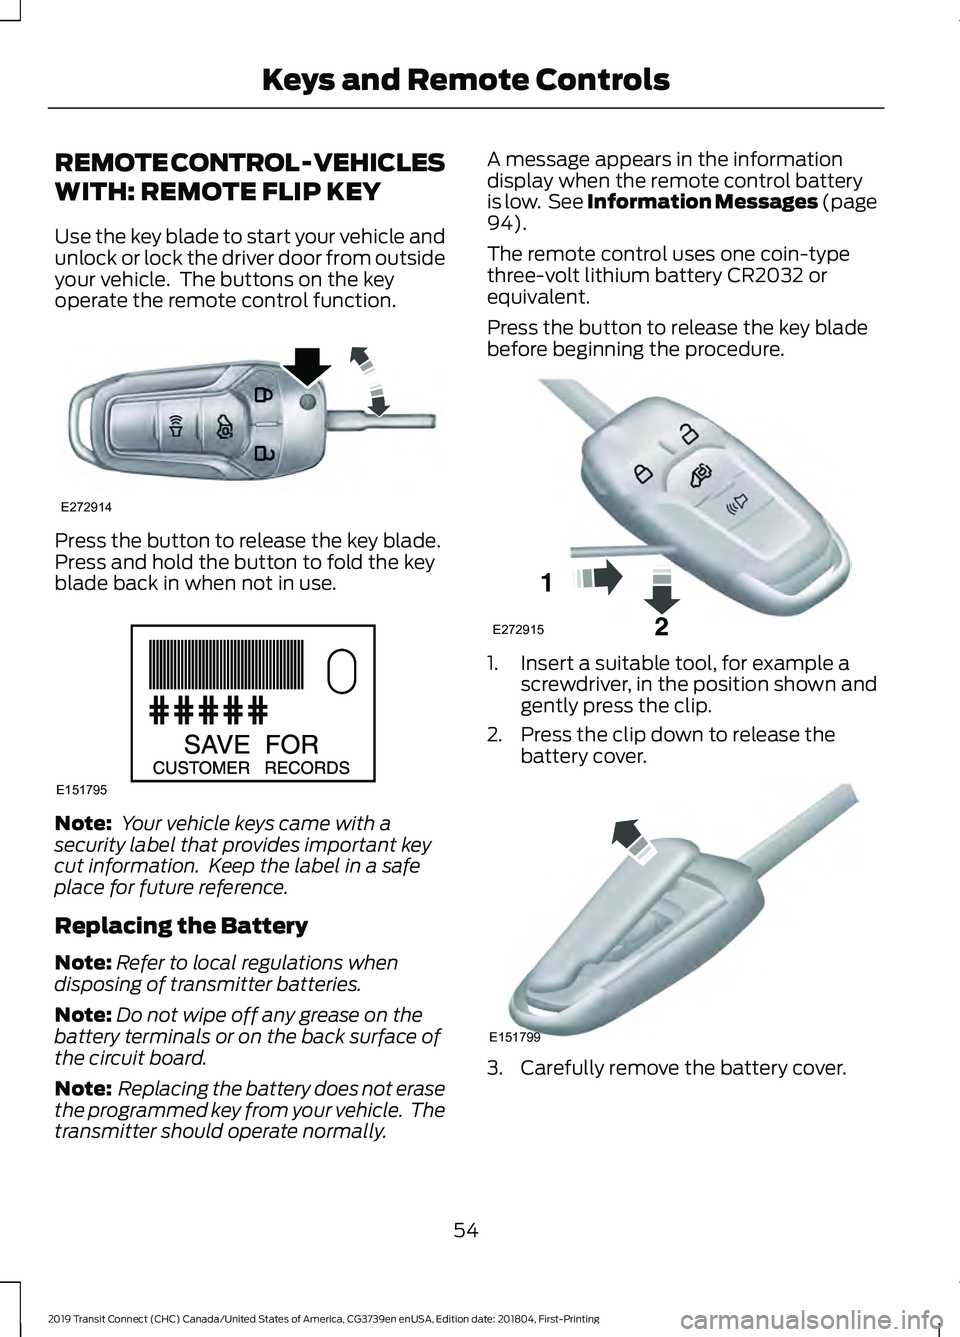
Use the key blade to start your vehicle and
unlock or lock the driver door from outside
your vehicle. The buttons on the key
operate the remote control function.
Press the button to release the key blade.
Press and hold the button to fold the key
blade back in when not in use.
Note:
Your vehicle keys came with a
security label that provides important key
cut information. Keep the label in a safe
place for future reference.
Replacing the Battery
Note: Refer to local regulations when
disposing of transmitter batteries.
Note: Do not wipe off any grease on the
battery terminals or on the back surface of
the circuit board.
Note: Replacing the battery does not erase
the programmed key from your vehicle. The
transmitter should operate normally. A message appears in the information
display when the remote control battery
is low. See Information Messages (page
94).
The remote control uses one coin-type
three-volt lithium battery CR2032 or
equivalent.
Press the button to release the key blade
before beginning the procedure. 1. Insert a suitable tool, for example a
screwdriver, in the position shown and
gently press the clip.
2. Press the clip down to release the battery cover. 3. Carefully remove the battery cover.
54
2019 Transit Connect (CHC) Canada/United States of America, CG3739en enUSA, Edition date: 201804, First-Printing Keys and Remote ControlsE272914 E151795 E272915 E151799
Page 59 of 493
Note:
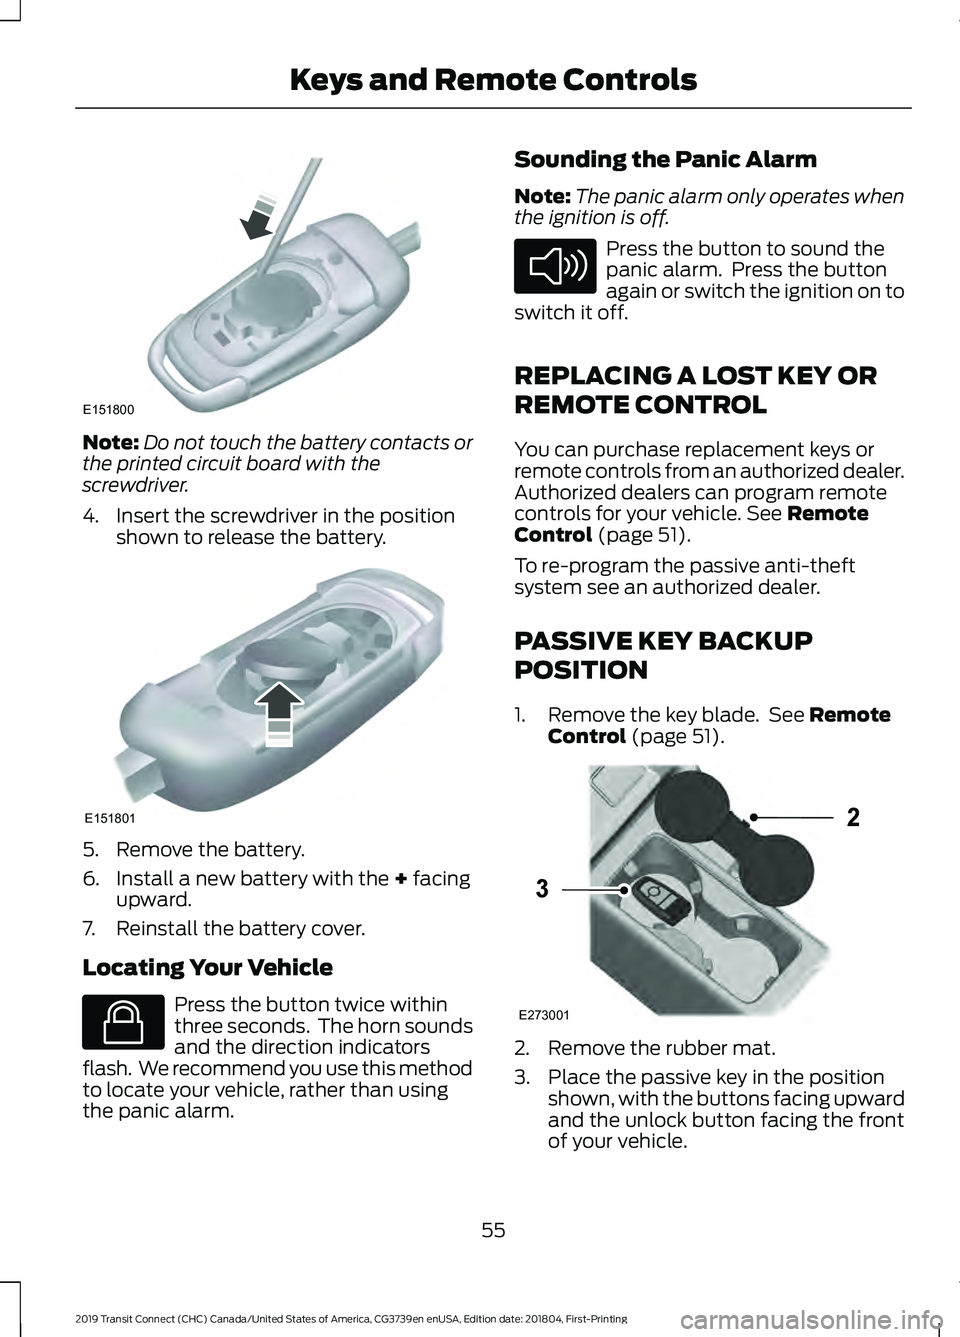
Do not touch the battery contacts or
the printed circuit board with the
screwdriver.
4. Insert the screwdriver in the position shown to release the battery. 5. Remove the battery.
6. Install a new battery with the + facing
upward.
7. Reinstall the battery cover.
Locating Your Vehicle Press the button twice within
three seconds. The horn sounds
and the direction indicators
flash. We recommend you use this method
to locate your vehicle, rather than using
the panic alarm. Sounding the Panic Alarm
Note:
The panic alarm only operates when
the ignition is off. Press the button to sound the
panic alarm. Press the button
again or switch the ignition on to
switch it off.
REPLACING A LOST KEY OR
REMOTE CONTROL
You can purchase replacement keys or
remote controls from an authorized dealer.
Authorized dealers can program remote
controls for your vehicle.
See Remote
Control (page 51).
To re-program the passive anti-theft
system see an authorized dealer.
PASSIVE KEY BACKUP
POSITION
1. Remove the key blade. See
Remote
Control (page 51). 2. Remove the rubber mat.
3. Place the passive key in the position
shown, with the buttons facing upward
and the unlock button facing the front
of your vehicle.
55
2019 Transit Connect (CHC) Canada/United States of America, CG3739en enUSA, Edition date: 201804, First-Printing Keys and Remote ControlsE151800 E151801 E138623 E138624 E273001
2
3
Page 67 of 493
LOCKING AND UNLOCKING
Remote Control
You can use the remote control at any
time.
Unlocking the Doors
The position lamps illuminate when you
unlock the doors. When you switch the
ignition on, they automatically turn off.
Note:
You can unlock the driver door with
the key. Use the key when the remote
control is not functioning.
Note: When you leave your vehicle
unattended for several weeks, the remote
control turns off. Your vehicle must be
unlocked and the engine started using the
key. Unlocking and starting your vehicle
once enables the remote control.
One-Stage Unlocking Press the button to unlock all
doors. The direction indicators
will flash.
Two-Stage Unlocking Press the button to unlock the
front doors. Press the button
again within three seconds to
unlock all doors. The direction indicators
will flash.
Reprogramming the Unlocking
Function
When you press the unlock button only the
driver and passenger doors unlock.
Pressing the unlock button again unlocks
all doors.
You can reprogram the unlocking function
so that all doors unlock when you press
the unlock button once.
1. Switch the ignition off. 2. Press and hold both the lock and
unlock buttons on the remote control
until the direction indicators flash twice
to confirm the change.
To return to the original unlocking function,
repeat the process.
Locking the Doors Press the button to lock all
doors. The direction indicators
will flash.
Press the button again within three
seconds to confirm that all the doors are
closed. The doors will lock again, the horn
will sound and the direction indicators will
flash if all the doors and the liftgate are
closed.
Note: If any door or the litigate is open, or
if the hood is open on vehicles with an
anti-theft alarm or remote start, the horn
does not sound.
Locking and Unlocking the Doors
From Inside
The power door lock control is on the driver
and front passenger door panels. Press the button to lock or
unlock all the doors. The lamp
illuminates with the doors
locked.
Opening the Double Rear Doors
Note: If there is a ladder fitted to the rear
cargo door, do not open the door fully if the
side-loading door is open.
63
2019 Transit Connect (CHC) Canada/United States of America, CG3739en enUSA, Edition date: 201804, First-Printing Doors and Locks E102566
Page 75 of 493
Note:
Keep the doors closed throughout
the procedure.
2. Switch the ignition off.
Note: Do not press the brake pedal or
accelerator pedal throughout the procedure.
3. Insert the first programmed key into the ignition.
4. Switch the ignition on.
5. Wait five seconds.
6. Switch the ignition off and remove the
key from the ignition.
7. Within 10 seconds, insert the second programmed key into the ignition.
8. Switch the ignition on.
9. Wait five seconds.
10. Switch the ignition off and remove the key from the ignition.
11. Within 10 seconds, insert the unprogrammed key into the ignition.
12. Switch the ignition on.
13. Wait five seconds.
14. Switch the ignition off and remove the key from the ignition.
Check that the remote control functions
operate and your vehicle starts with the
new key.
Note: Wait 10 seconds and repeat the
procedure if the remote control functions
do not operate and you cannot start the
engine.
Wait 20 seconds and repeat the procedure
to program an additional key.
Programming a Passive Key
The procedure programs both the vehicle
immobilizer keycode and the remote entry
portion of the remote control to your
vehicle. To program a new key, you require two
programmed keys and one unprogrammed
key with you in your vehicle.
We recommend that you contact an
authorized dealer to have the key
programmed if you do not have two
programmed keys.
Make sure that you complete the
procedure within 30 seconds.
Stop and wait for at least one minute
before you start again if you miss a step.
Note:
You can program a maximum of four
keys to your vehicle.
Read the entire procedure before you
begin.
1. Close all the doors.
Note: Keep the doors closed throughout
the procedure.
2. Switch the ignition off.
Note: Do not press the brake pedal or
accelerator throughout the procedure.
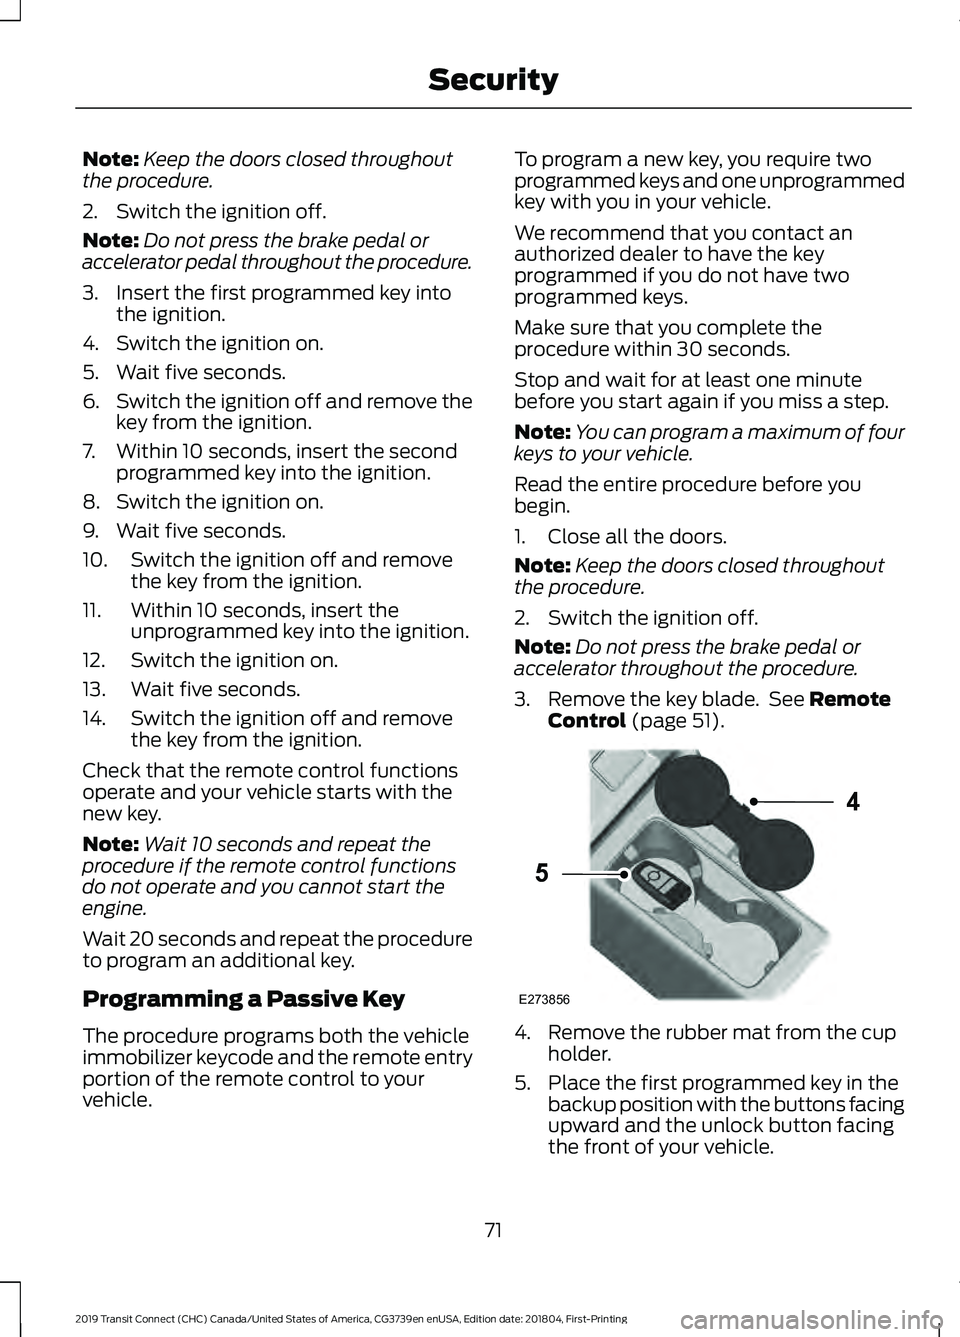
3. Remove the key blade. See Remote
Control (page 51). 4. Remove the rubber mat from the cup
holder.
5. Place the first programmed key in the backup position with the buttons facing
upward and the unlock button facing
the front of your vehicle.
71
2019 Transit Connect (CHC) Canada/United States of America, CG3739en enUSA, Edition date: 201804, First-Printing SecurityE273856
4
5
Page 83 of 493
Push the lever away from you to switch
the high beam on.
Push the lever forward again or pull the
lever toward you to switch the high beams
off.
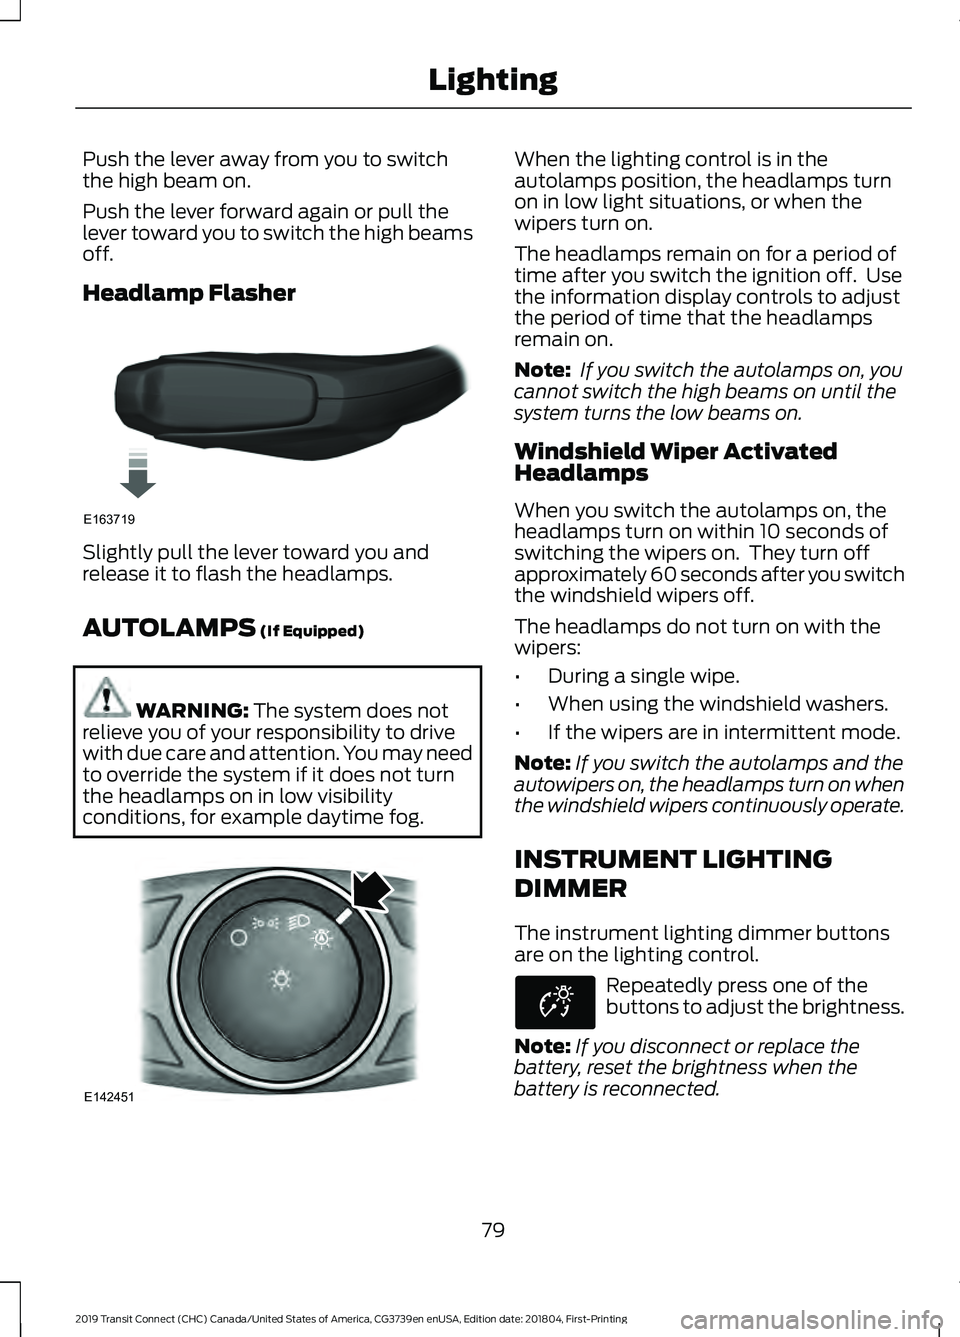
Headlamp Flasher
Slightly pull the lever toward you and
release it to flash the headlamps.
AUTOLAMPS (If Equipped)
WARNING:
The system does not
relieve you of your responsibility to drive
with due care and attention. You may need
to override the system if it does not turn
the headlamps on in low visibility
conditions, for example daytime fog. When the lighting control is in the
autolamps position, the headlamps turn
on in low light situations, or when the
wipers turn on.
The headlamps remain on for a period of
time after you switch the ignition off. Use
the information display controls to adjust
the period of time that the headlamps
remain on.
Note:
If you switch the autolamps on, you
cannot switch the high beams on until the
system turns the low beams on.
Windshield Wiper Activated
Headlamps
When you switch the autolamps on, the
headlamps turn on within 10 seconds of
switching the wipers on. They turn off
approximately 60 seconds after you switch
the windshield wipers off.
The headlamps do not turn on with the
wipers:
• During a single wipe.
• When using the windshield washers.
• If the wipers are in intermittent mode.
Note: If you switch the autolamps and the
autowipers on, the headlamps turn on when
the windshield wipers continuously operate.
INSTRUMENT LIGHTING
DIMMER
The instrument lighting dimmer buttons
are on the lighting control. Repeatedly press one of the
buttons to adjust the brightness.
Note: If you disconnect or replace the
battery, reset the brightness when the
battery is reconnected.
79
2019 Transit Connect (CHC) Canada/United States of America, CG3739en enUSA, Edition date: 201804, First-Printing LightingE163719 E142451 E253500
Page 98 of 493
Settings
Menu Item
Information
Display
Driver Assistance
Vehicle Settings
Vehicle Maintenance
MyKey
CLOCK
Type 1
To adjust the clock, switch the ignition on
and press buttons H or M on the
information and entertainment display as
necessary.
Type 2
Note: Use the information display to adjust
the clock. See General Information (page
92).
TRIP COMPUTER
Resetting the Trip Computer
Press and hold
OK on the current screen
to reset the respective trip, distance, time
and average fuel information.
Trip Odometer
Registers the distance traveled of
individual journeys. Distance to Empty
Indicates the approximate distance your
vehicle will travel on the fuel remaining in
the tank. Changes in driving pattern may
cause the value to vary.
Average Fuel
Indicates the average fuel consumption
since the function was last reset.
Digital Speedometer
The speed your vehicle is traveling at will
display as a digital number.
PERSONALIZED SETTINGS
Measure Units
To swap between imperial and metric
units, scroll to this display and press the
OK
button.
Swapping between imperial and metric
units will affect the following displays:
• Distance to empty.
• Average fuel consumption.
• Instantaneous fuel consumption.
• Average speed.
Switching Chimes Off
The following chimes can be switched off:
• Warning messages.
• Information messages.
INFORMATION MESSAGES 94
2019 Transit Connect (CHC) Canada/United States of America, CG3739en enUSA, Edition date: 201804, First-Printing Information Displays
Page 121 of 493
Lowering the Head Restraint
1. Press and hold button C.
2. Push the head restraint down.
Removing the Head Restraint
1. Pull the head restraint up until it
reaches its highest position.
2. Press and hold buttons C and D.
3. Pull the head restraint up.
Installing the Head Restraint
Align the steel stems into the guide sleeves
and push the head restraint down until it
locks.
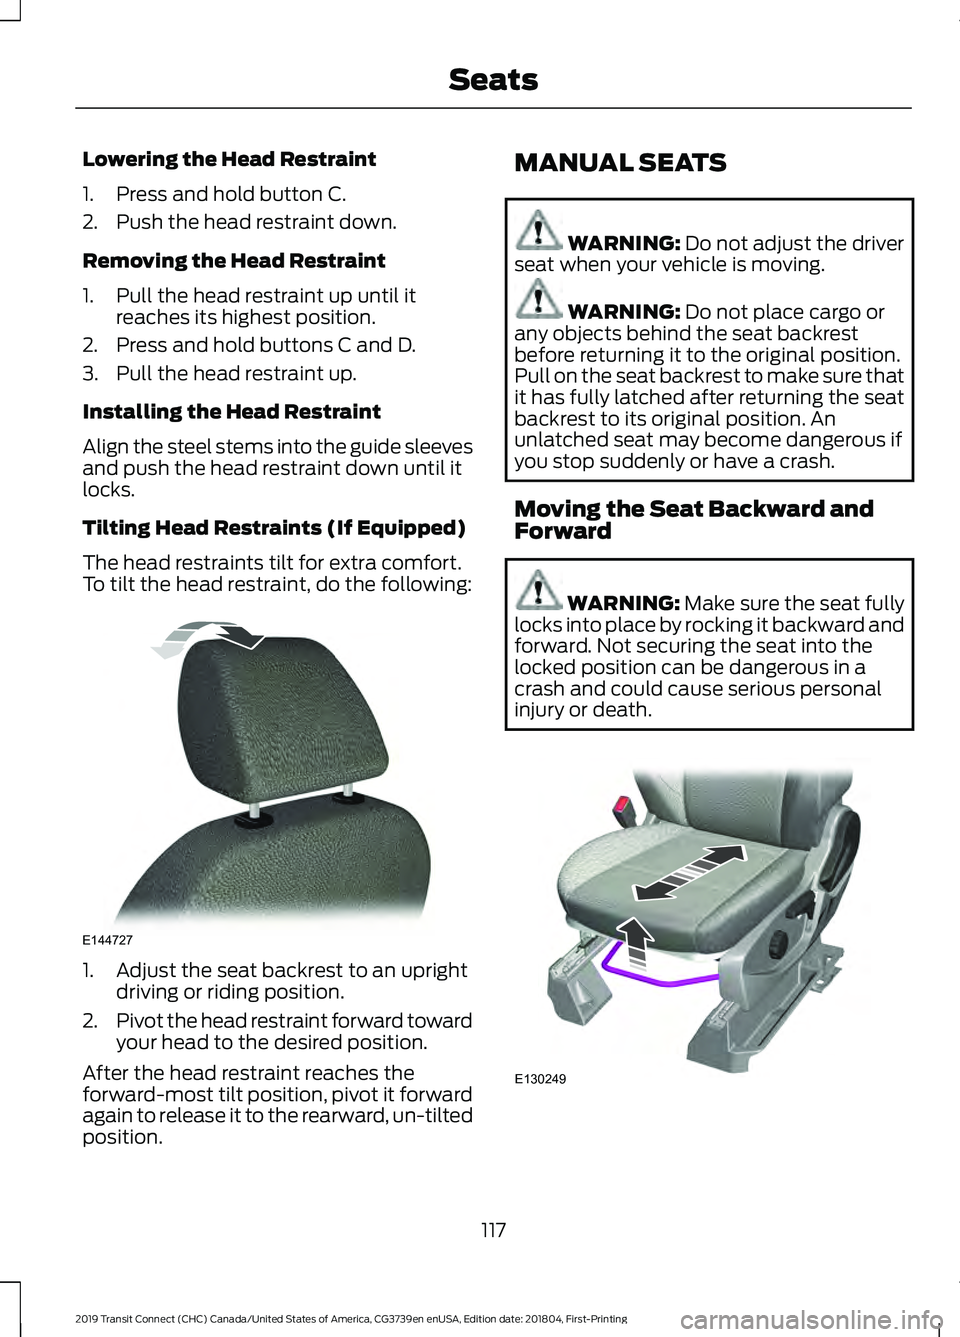
Tilting Head Restraints (If Equipped)
The head restraints tilt for extra comfort.
To tilt the head restraint, do the following: 1. Adjust the seat backrest to an upright
driving or riding position.
2. Pivot the head restraint forward toward
your head to the desired position.
After the head restraint reaches the
forward-most tilt position, pivot it forward
again to release it to the rearward, un-tilted
position. MANUAL SEATS WARNING: Do not adjust the driver
seat when your vehicle is moving. WARNING:
Do not place cargo or
any objects behind the seat backrest
before returning it to the original position.
Pull on the seat backrest to make sure that
it has fully latched after returning the seat
backrest to its original position. An
unlatched seat may become dangerous if
you stop suddenly or have a crash.
Moving the Seat Backward and
Forward WARNING: Make sure the seat fully
locks into place by rocking it backward and
forward. Not securing the seat into the
locked position can be dangerous in a
crash and could cause serious personal
injury or death. 117
2019 Transit Connect (CHC) Canada/United States of America, CG3739en enUSA, Edition date: 201804, First-Printing SeatsE144727 E130249
Page 173 of 493
AUTOMATIC TRANSMISSION
- 6-SPEED AUTOMATIC
TRANSMISSION
WARNING: Do not apply the brake
pedal and accelerator pedal
simultaneously. Applying both pedals
simultaneously for more than a few
seconds will limit engine performance,
which may result in difficulty maintaining
speed in traffic and could lead to serious
injury.
Selector Lever Positions
The instrument cluster displays the current
gear.
Park (P)
In park (P), power is not transmitted to the
driven wheels and the transmission is
locked. You can start the engine with the
transmission in this position.
Shift into park (P) only when your vehicle
is stationary.
Reverse (R)
Shift into reverse (R) only when your
vehicle is stationary and the engine is at
idle speed.
Neutral (N)
In neutral (N), power is not transmitted to
the driven wheels but the transmission is
not locked. You can start the engine with
the transmission in this position.
Drive (D)
Drive (D) is the normal position for driving.
Sport (S)
In sport (S), the transmission selects the
optimum gear for best performance. SelectShift™
(If Equipped)
About SelectShift™
Use this feature to upshift or downshift
using the buttons on the selector lever.
Using SelectShift™
Shift into sport (S). Press the
+ button to
switch the feature on.
• Press the
+ button to upshift.
• Press the
– button to downshift.
Shift into another gear to switch the
feature off.
Brake Shift Interlock
About Brake Shift Interlock
Brake shift interlock prevents you from
shifting out of park (P) when you have
switched the ignition on and not pressed
the brake pedal.
Shifting Out of Park (P) WARNING: Do not drive your vehicle
until you verify that the stoplamps are
working. WARNING:
If the parking brake is
fully released, but the brake warning lamp
remains illuminated, the brakes may not
be working properly. Have your vehicle
checked as soon as possible.
Use the brake shift interlock lever to move
the selector lever out of park (P) if you
cannot start the engine.
In the event of an electrical malfunction,
it is possible that a fuse has blown or the
stoplamps are not working. See
Fuse
Specification Chart (page 254).
169
2019 Transit Connect (CHC) Canada/United States of America, CG3739en enUSA, Edition date: 201804, First-Printing Transmission
Page 175 of 493
AUTOMATIC TRANSMISSION
- 8-SPEED AUTOMATIC
TRANSMISSION
WARNING: Do not apply the brake
pedal and accelerator pedal
simultaneously. Applying both pedals
simultaneously for more than a few
seconds will limit engine performance,
which may result in difficulty maintaining
speed in traffic and could lead to serious
injury.
Selector Lever Positions
The instrument cluster displays the current
gear.
Park (P)
In park (P), power is not transmitted to the
driven wheels and the transmission is
locked. You can start the engine with the
transmission in this position.
Shift into park (P) only when your vehicle
is stationary.
Reverse (R)
Shift into reverse (R) only when your
vehicle is stationary and the engine is at
idle speed.
Neutral (N)
In neutral (N), power is not transmitted to
the driven wheels but the transmission is
not locked. You can start the engine with
the transmission in this position.
Drive (D)
Drive (D) is the normal position for driving. Manual (M)
In manual (M), you can upshift or
downshift using the buttons on the
selector lever.
SelectShift™
About SelectShift™
Use this feature to upshift or downshift
using the buttons on the selector lever.
Using SelectShift™
Shift into manual (M) to switch the feature
on.
•
Press the
+ button to upshift.
• Press the
– button to downshift.
Shift into another gear to switch the
feature off.
Brake Shift Interlock
About Brake Shift Interlock
Brake shift interlock prevents you from
shifting out of park (P) when you have
switched the ignition on and not pressed
the brake pedal.
Shifting Out of Park (P) WARNING: Do not drive your vehicle
until you verify that the stoplamps are
working. WARNING:
If the parking brake is
fully released, but the brake warning lamp
remains illuminated, the brakes may not
be working properly. Have your vehicle
checked as soon as possible.
Use the brake shift interlock lever to move
the selector lever out of park (P) if you
cannot start the engine.
171
2019 Transit Connect (CHC) Canada/United States of America, CG3739en enUSA, Edition date: 201804, First-Printing Transmission