brake fluid GEELY CK 2008 User Guide
[x] Cancel search | Manufacturer: GEELY, Model Year: 2008, Model line: CK, Model: GEELY CK 2008Pages: 392, PDF Size: 38.86 MB
Page 178 of 392

171Chapter 3 Combination Meter SystemSection 1 Circuit Diagram of Combination Meter and Location of
Multi-pin Plug-in TerminalI. CIRCUIT DIAGRAM OF CONBINATION METERSpeed Signal
Ground The Sensor
Revolution SignalWater Temperature SignaFuel Level GaugeTachometer
SpeedometerWater
Temperature Gauge
Feul Level Gauge
OdometerHigh Beam Lamp
Rear Defrost Lamp
Rear Defog Lamp
Backlight
Water Temperature WarningPower Steering
Fuel WarningCharge
Brake Fluid
Oil Pressure
Engine Malfunction
Driver's seat belt
Park Brake
SRS(main)
SRS(sub)
Page 180 of 392

1732. DEFINITION OF MULTIPIN PLUG-IN TERMINALDefinition of Terminal Color of Harness
1Empty
2EPS VG
3Empty
4Empty
5Empty
6Empty
7Empty
8 Combination switch (Position lamp P
9 Speed sensor groun B
10 Speed sensor power sourc RY
11 Speed sensor signal outpu YR
12 Fuel senso B
13 Alte rna tor WR
14 Brake fluid level switc GR
15 Oil pressure switc YG
16 Re a r de frost YB
1 Rear fog lamp Gr
2 Engine ma lfunc tion GY
3 S e a t be lt s w it c h R
4 P owe r sourc e Y
5 Engine coolant temperature senso YW
6 Park switch G
7 Power source groun B
8 Power source groun B
9ABS R
10 SRS (Ma in) RY
11 Engine re volution signa l BBl
12 Live wire (Fire wire) WG
13 High be am la mp + RB
14 Low bea m - RW
15 SRS (Sub) RG
16 Empty Terminal No.
A
B
Page 194 of 392

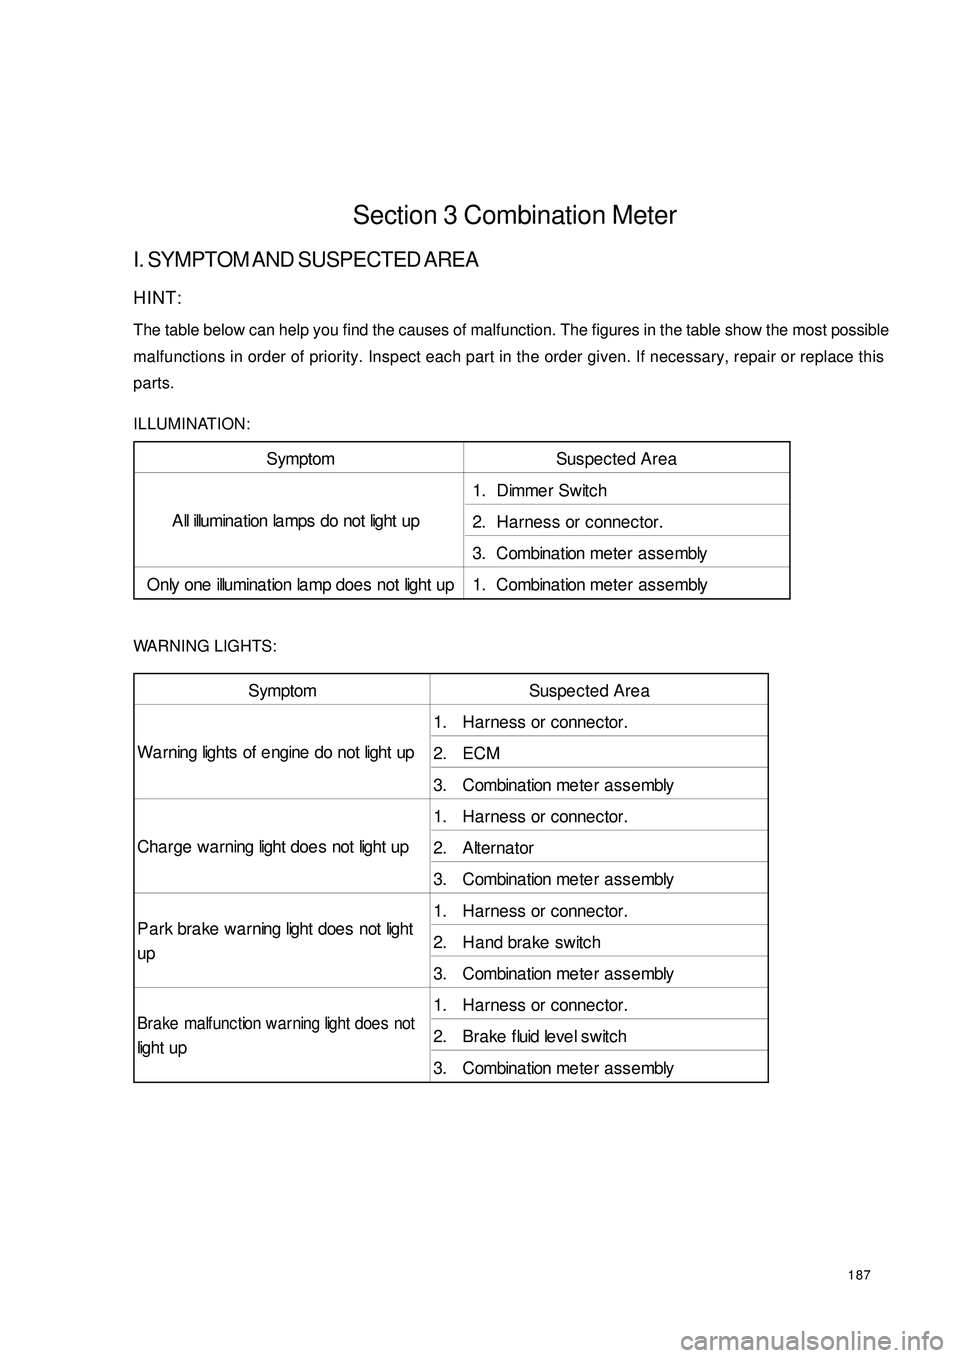
187Section 3 Combination MeterI. SYMPTOM AND SUSPECTED AREAHINT:
The table below can help you find the causes of malfunction. The figures in the table show the most possible
malfunctions in order of priority. Inspect each part in the order given. If necessary, repair or replace this
parts.
ILLUMINATION:
WARNING LIGHTS:Symptom Suspected Area
1. Dimmer Switch
2. Harness or connector.
3. Combina tion me te r a s se mbly
Only one illumina tion la mp doe s not light up 1. Combina tion me ter asse mblyA ll illumina t ion la mps do not light upSymptom Suspected Area
1. Ha rness or connec tor.
2. ECM
3. Combination me te r a sse mbly
1. Ha rness or connec tor.
2. Alterna tor
3. Combination me te r a sse mbly
1. Ha rness or connec tor.
2. Hand brake switch
3. Combination me te r a sse mbly
1. Ha rness or connec tor.
2. Bra ke fluid le ve l switc h
3. Combination me te r a sse mbly Wa rning lights of e ngine do not light up
Cha rge wa rning light doe s not light up
P a rk bra ke wa rning light does not light
upBrake malfunc tion warning light doe s notlight up
Page 199 of 392

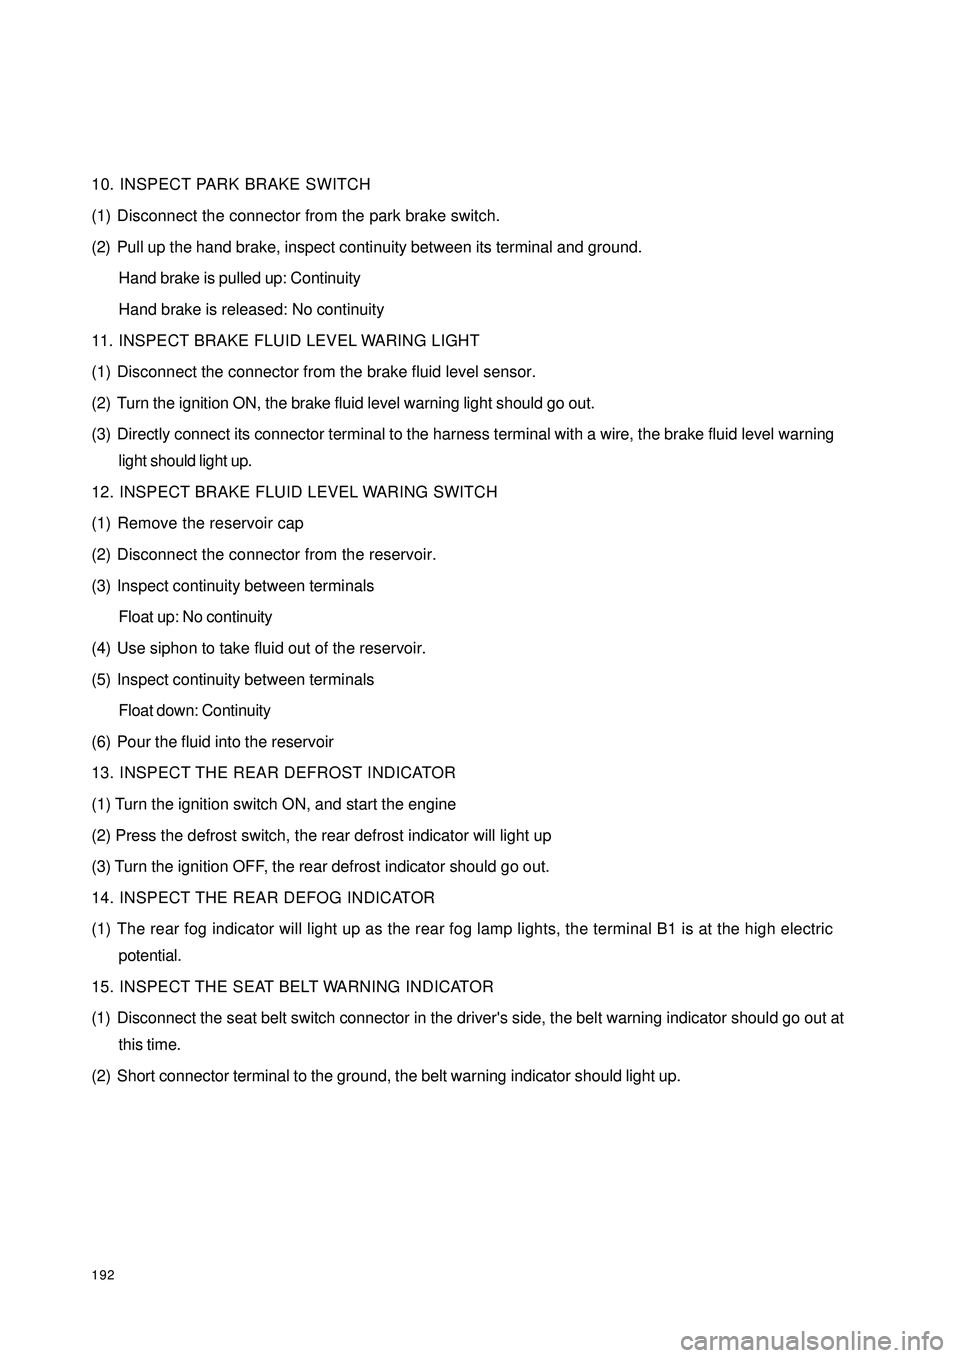
19210. INSPECT PARK BRAKE SWITCH
(1) Disconnect the connector from the park brake switch.
(2) Pull up the hand brake, inspect continuity between its terminal and ground.
Hand brake is pulled up: Continuity
Hand brake is released: No continuity
11. INSPECT BRAKE FLUID LEVEL WARING LIGHT
(1) Disconnect the connector from the brake fluid level sensor.
(2) Turn the ignition ON, the brake fluid level warning light should go out.
(3) Directly connect its connector terminal to the harness terminal with a wire, the brake fluid level warning
light should light up.
12. INSPECT BRAKE FLUID LEVEL WARING SWITCH
(1) Remove the reservoir cap
(2) Disconnect the connector from the reservoir.
(3) Inspect continuity between terminals
Float up: No continuity
(4) Use siphon to take fluid out of the reservoir.
(5) Inspect continuity between terminals
Float down: Continuity
(6) Pour the fluid into the reservoir
13. INSPECT THE REAR DEFROST INDICATOR
(1) Turn the ignition switch ON, and start the engine
(2) Press the defrost switch, the rear defrost indicator will light up
(3) Turn the ignition OFF, the rear defrost indicator should go out.
14. INSPECT THE REAR DEFOG INDICATOR
(1) The rear fog indicator will light up as the rear fog lamp lights, the terminal B1 is at the high electric
potential.
15. INSPECT THE SEAT BELT WARNING INDICATOR
(1) Disconnect the seat belt switch connector in the driver's side, the belt warning indicator should go out at
this time.
(2) Short connector terminal to the ground, the belt warning indicator should light up.
Page 293 of 392
![GEELY CK 2008 User Guide 286 4 Exce s s ive ly long brak e pe dal s trok e Lik e ly Caus e s
[De s cription]
Visually inspect whether there
is leakage or mechanical fault. Use bleeding
method to check whether there is a GEELY CK 2008 User Guide 286 4 Exce s s ive ly long brak e pe dal s trok e Lik e ly Caus e s
[De s cription]
Visually inspect whether there
is leakage or mechanical fault. Use bleeding
method to check whether there is a](/img/58/57159/w960_57159-292.png)
286 4 Exce s s ive ly long brak e pe dal s trok e Lik e ly Caus e s
[De s cription]
Visually inspect whether there
is leakage or mechanical fault. Use bleeding
method to check whether there is air in the
system. Use the HCU function of the scan
meter to test whether the normally-closed valve
is le a king.�z Brake fluid leakage
�z Air in the system
�z Brake disc severely worn
�z B r a ke f luid le ve l s w it c h f a ult yTighten the pipe connector as
specifiedVisually inspect whether the hydraulic pipe connector is
leaking Check the brake disc wearReplace the brake disc Abn. Ok Abn. Check the brake fluid level switchOk Bleed and checkOk Use the scan meter HCU to diagnose and check the nor-
mally-closed valve sealOkReplace the brake fluid level
switch Abn.Re-bleed the system Abn.Replace the HCU Abn.
Page 299 of 392

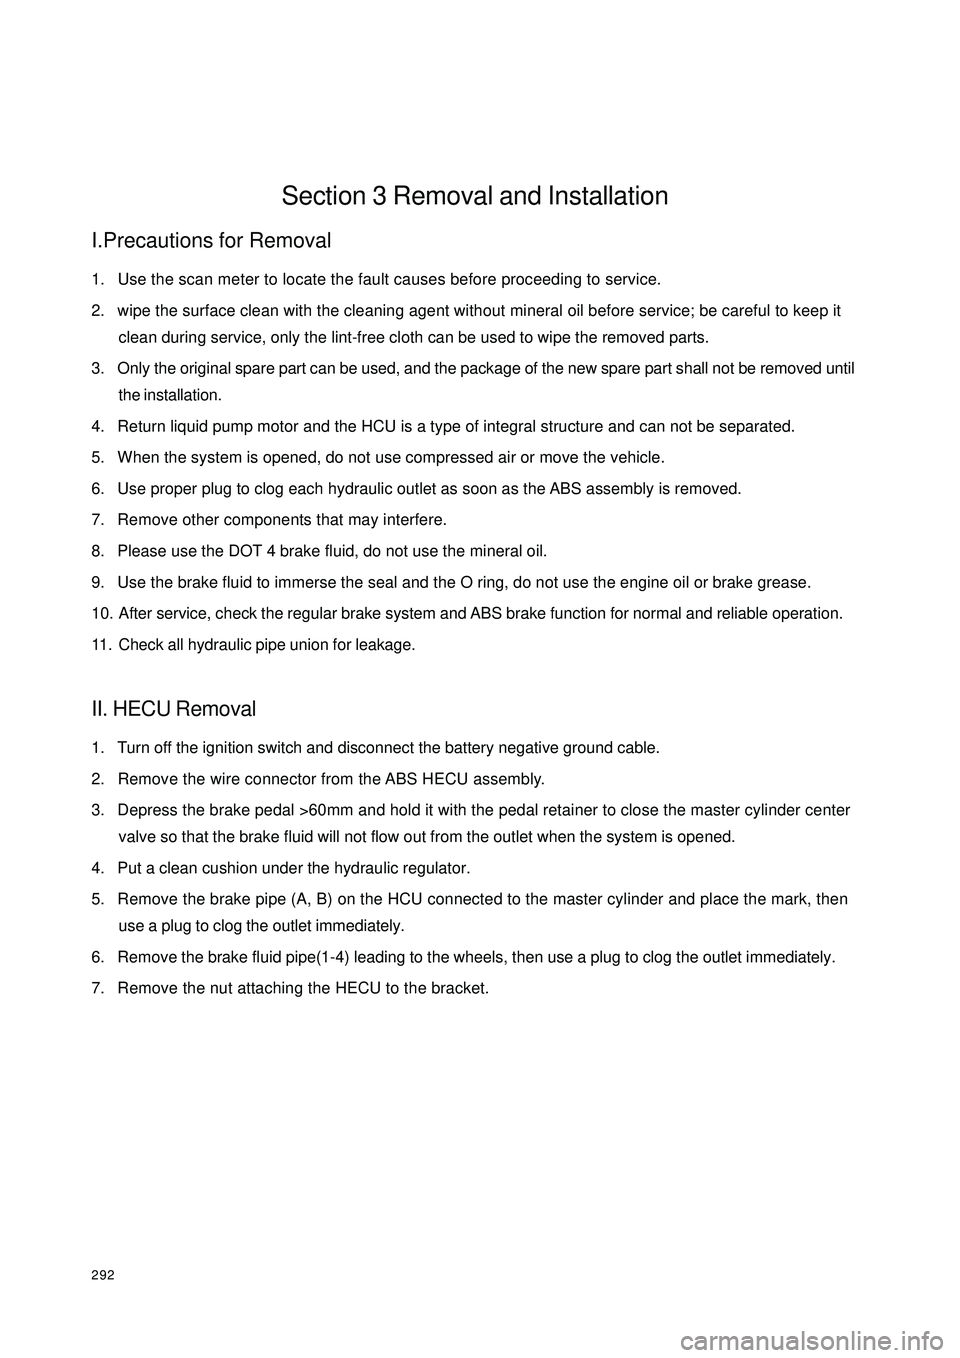
292Section 3 Removal and InstallationI.Precautions for Removal1. Use the scan meter to locate the fault causes before proceeding to service.
2. wipe the surface clean with the cleaning agent without mineral oil before service; be careful to keep it
clean during service, only the lint-free cloth can be used to wipe the removed parts.
3. Only the original spare part can be used, and the package of the new spare part shall not be removed until
the installation.
4. Return liquid pump motor and the HCU is a type of integral structure and can not be separated.
5. When the system is opened, do not use compressed air or move the vehicle.
6. Use proper plug to clog each hydraulic outlet as soon as the ABS assembly is removed.
7. Remove other components that may interfere.
8. Please use the DOT 4 brake fluid, do not use the mineral oil.
9. Use the brake fluid to immerse the seal and the O ring, do not use the engine oil or brake grease.
10. After service, check the regular brake system and ABS brake function for normal and reliable operation.
11. Check all hydraulic pipe union for leakage.II. HECU Removal1. Turn off the ignition switch and disconnect the battery negative ground cable.
2. Remove the wire connector from the ABS HECU assembly.
3. Depress the brake pedal >60mm and hold it with the pedal retainer to close the master cylinder center
valve so that the brake fluid will not flow out from the outlet when the system is opened.
4. Put a clean cushion under the hydraulic regulator.
5. Remove the brake pipe (A, B) on the HCU connected to the master cylinder and place the mark, then
use a plug to clog the outlet immediately.
6. Remove the brake fluid pipe(1-4) leading to the wheels, then use a plug to clog the outlet immediately.
7. Remove the nut attaching the HECU to the bracket.
Page 302 of 392

295V. ABS Assembly ReinstallationNote: the plug of the ABS assembly hydraulic outlet can only be removed after the brake pipe is
installed, lest the foreign object will enter the brake system.1. Install the ABS assembly to the bracket, tighten the torque: 20+4Nm.
2. Remove the plug of the hydraulic outlet, installed the brake pipe. Make sure that the brake pipe is
correctly installed.
3. Install the brake pipe connected to the master cylinder.
4. The brake pipe torque is 12+4Nm (M10 x 1) and 15+3Nm (M12 x 1).
5. Fill the new brake fluid into the reservoir until the liquid level reach the MAX and bleed it as specified.
6. With the ignition switch ON, ABS Warning Light must goes on for 1.7 seconds then goes off.
7. Clear the DTC memory, check if there is DTC again.
8. Drive the vehicle to confirm the ABS function (you must feel that the pedal rebound).VI. ECU ProgramNote: when replacing the HECU or ECU, you shall program the new ECU, otherwise the ABS
Warning Light flashes and the system can not operate normally.Use the scan meter to program the ECU based on the following procedure:Connect the scan meter with the diagnostic interfaceSelect function 07, Press OK button to confirmEnter code 01901 and Press OK button to confirmSelect function 07, Press OK button to confirm, quit the diagnosticEnd
Page 303 of 392

296VII. Fill the liquid and bleedAfter replacing the HECU, bleed the second HECU circuit in addition to the filling and bleeding of the regular
brake system. Use the scan meter to perform the following procedure:Fill the fluid and bleed based on the regular brake system
until there is no air bubble in the transparent hoseConnect the scan meter with the diagnostic interfaceSelect function 04, Press OK button to confirmDepress the brake pedal and keep the hydraulic cylinder pushrod reboundRelease the brake pedal, loosen the left and right brake caliperbleeder screw, press "" buttonDepress the brake pedal 10 times, tighten the left and right
brake caliper bleeder screw, press "" buttonRepeat the above I II III steps 7 times and press "" buttonThe screen display the end of the bleed, press
"" button to return to "function selection" menuSelect function 06, Press OK button to confirm, quit the
diagnostic modeEnd →↑
↑
↑