diagram GEELY FC 2008 Owner's Guide
[x] Cancel search | Manufacturer: GEELY, Model Year: 2008, Model line: FC, Model: GEELY FC 2008Pages: 419, PDF Size: 13.87 MB
Page 82 of 419

Cooling - Temperature regulator componentsReplacement1. Remove engine right bottom shield.
2. Discharge engine coolant.
3. Remove drive belt.Slowly turn drive belt tensioner clockwise to loosen the belt;
then remove drive belt and put back the tensioner slowly to
completely loosen it.4. Remove alternator components.(a) Remove rubber cover and nuts.
(b) Uncouple alternator joint.
(c) Remove 2 bolts and alternator.5. Remove water inlet pipe.
6. Remove temperature regulator.
7. Install temperature regulator.(a) Install new gasket to temperature regulator.
(b) As shown in the diagram, install temperature regulator with
inching valve toward upward.8. Install water inlet pipe and joint.Torque: 9. Install alternator installation components.Torque: 12mm bolt head: m
14mm bolt head: 10. Refill engine coolant.
11. Check there is leakage with coolant.
71Temperature regulator components
Page 90 of 419

Starting and charging - Starting systemStarting and chargingStarting systemInspection1. Starter installation componentsNote: this test must be finished within 3 to 5 seconds to
avoid burning out coil.
(a) Remove nut at C terminal to uncouple wire of field coil.
(b) As shown in the diagram, connect battery wire to electro-
magnetic switch, and check drive pinion is pushed outside,
(pull-in coil and hold-in coil).
(c) As shown in the diagram, uncouple negative wire from ter-
minal C after the above connections, and check drive pin-
ion is still at the state of being pushed outside.(Hold-in coil)
(d) Push drive pinion toward armature side, and measure the
clearance between drive pinion end and stop ring.
Standard clearance: 1.0~5.0mm
(e) Uncouple negative wire from electromagnetic switch
housing, and check drive pinion returns back to original
position toward inside.79Terminal C
Terminal 50Terminal C
Terminal 50Terminal C
Terminal 50
Page 91 of 419

Starting and charging - Starting system(f) Connect magnetic field coil wire to terminal C.
(h) Torque: (i) Clamp starter with jaw vice.
(j) As shown in the diagram, connect battery with ampere
meter.
(k) Read current value displayed on ampere meter.
(l) Current value specification: 90 A or lower at 11.5 V.2. Starter relay80Terminal 50Terminal 30Ampere
meter Specified
conditions
Normal stateConductionConductionTerminal connected
by three-use meter Conditions
Supply battery voltage
to No. 1 and No. 2
terminals
Page 93 of 419

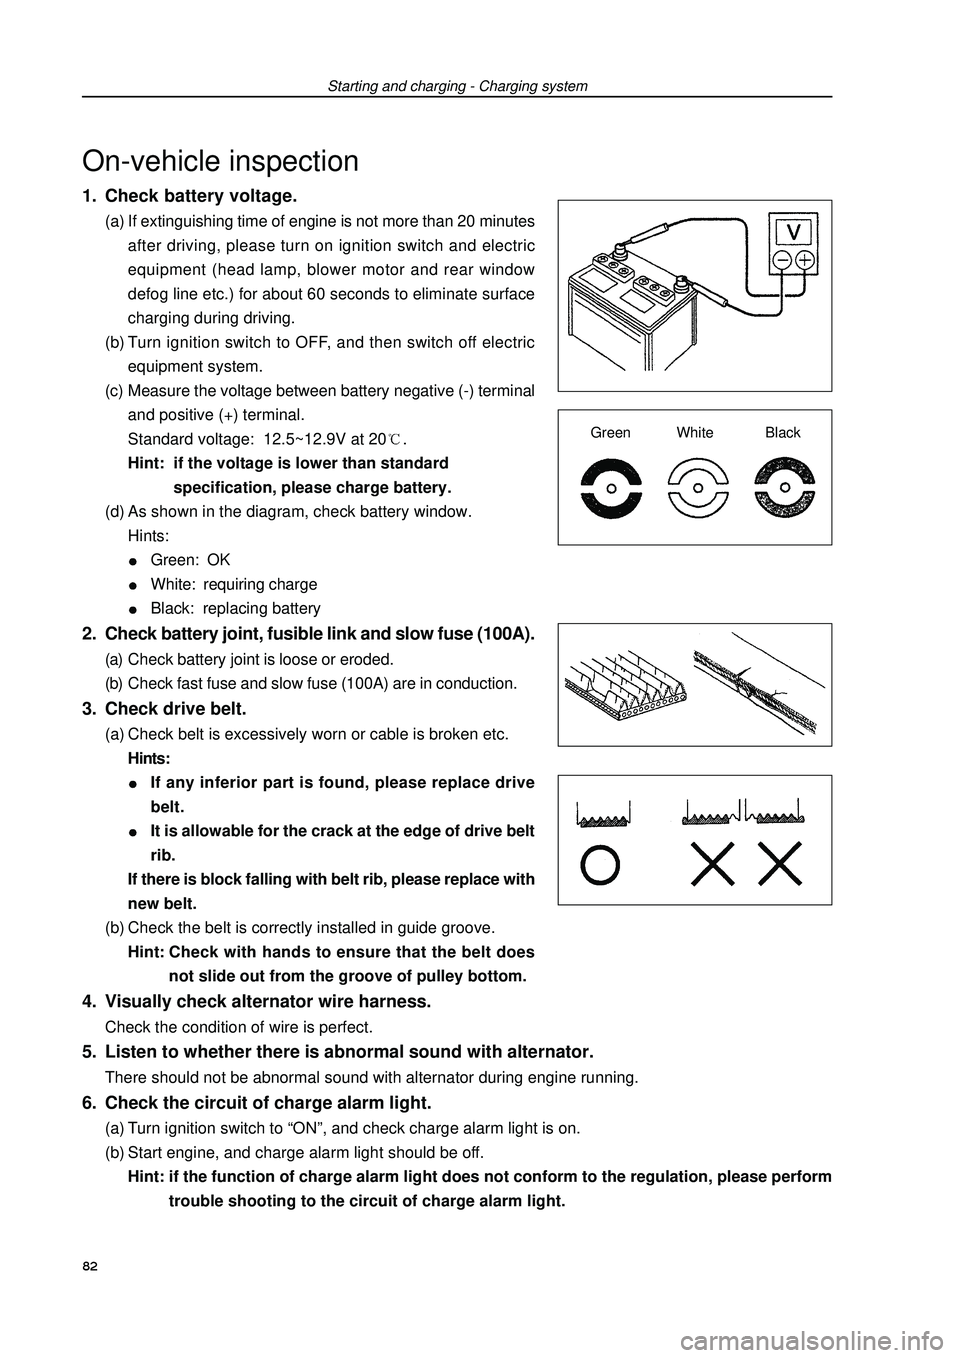
1. Check battery voltage.(a) If extinguishing time of engine is not more than 20 minutes
after driving, please turn on ignition switch and electric
equipment (head lamp, blower motor and rear window
defog line etc.) for about 60 seconds to eliminate surface
charging during driving.
(b) Turn ignition switch to OFF, and then switch off electric
equipment system.
(c) Measure the voltage between battery negative (-) terminal
and positive (+) terminal.
Standard voltage: 12.5~12.9V at 20.
Hint: if the voltage is lower than standard
specification, please charge battery.
(d) As shown in the diagram, check battery window.
Hints:Green: OKWhite: requiring chargeBlack: replacing battery2. Check battery joint, fusible link and slow fuse (100A).(a) Check battery joint is loose or eroded.
(b) Check fast fuse and slow fuse (100A) are in conduction.3. Check drive belt.(a) Check belt is excessively worn or cable is broken etc.
Hints:If any inferior part is found, please replace drive
belt.It is allowable for the crack at the edge of drive belt
rib.
If there is block falling with belt rib, please replace with
new belt.
(b) Check the belt is correctly installed in guide groove.
Hint:Check with hands to ensure that the belt does
not slide out from the groove of pulley bottom.4. Visually check alternator wire harness.Check the condition of wire is perfect.Starting and charging - Charging systemOn-vehicle inspectionGreen White Black5. Listen to whether there is abnormal sound with alternator.There should not be abnormal sound with alternator during engine running.6. Check the circuit of charge alarm light.(a) Turn ignition switch to “ON”, and check charge alarm light is on.
(b) Start engine, and charge alarm light should be off.
Hint: if the function of charge alarm light does not conform to the regulation, please perform
trouble shooting to the circuit of charge alarm light.82
Page 103 of 419

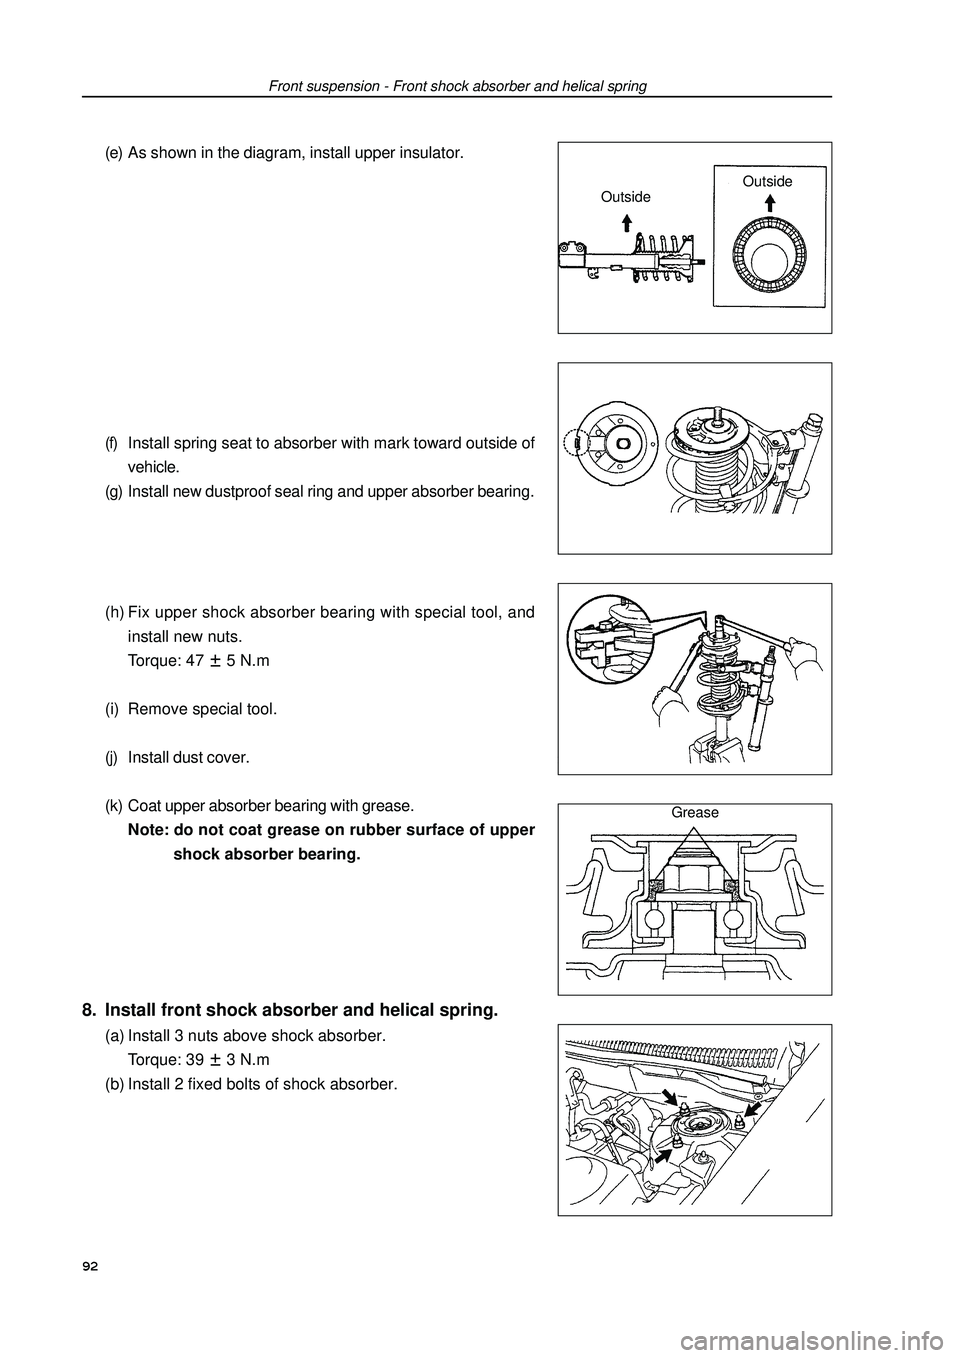
Front suspension - Front shock absorber and helical spring(e) As shown in the diagram, install upper insulator.
(f) Install spring seat to absorber with mark toward outside of
vehicle.
(g) Install new dustproof seal ring and upper absorber bearing.
(h) Fix upper shock absorber bearing with special tool, and
install new nuts.
Torque: 475 N.m
(i) Remove special tool.
(j) Install dust cover.
(k) Coat upper absorber bearing with grease.
Note: do not coat grease on rubber surface of upper
shock absorber bearing.8. Install front shock absorber and helical spring.(a) Install 3 nuts above shock absorber.
Torque: 393 N.m
(b) Install 2 fixed bolts of shock absorber.Outside
Grease92Outside
Page 104 of 419

Front suspension - Front shock absorber and helical springHandling1. Handle front left absorber assembly.(a) Completely pull out absorber piston rod.
(b) As shown in the diagram, drill a small hole on cylinder body
between two lines with electric drill to make inside gas flow
out
Notes:Iron chip may fly out during drilling, please be care-
ful in operating.The gas is colorless, odorless and nontoxic.93(c) Install 2 nuts to lower end of absorber.
Torque: 15310 N.m
Hint: coat oil on thread of nuts.
(d) Install brake hose and ABS speed sensor wire harness
bracket with bolts.
Torque: 19N.m9. Install front left stabilizer link assembly [64000097].Install stabilizer link with nuts.
Torque: 745 N.m
Hint: if ball joint rotates with nuts, please fix bolts with
hexagonal wrench (6mm).10. Install front wheels.Torque: 10310 N.m11. Check and adjust front wheel alignment
(see Page 87).
Page 107 of 419

Front suspension - Front stabilizer barFront stabilizer barOverhaul1. Remove dust cap inside steering column (see Page 194).
2. Separate steering sliding shaft assembly (see Page 205)
3. Remove front wheels.
4. Remove right engine bottom shield.
5. Remove left engine bottom shield.
6. Remove front left stabilizer link assembly
[64000097].Remove 2 nuts and take down stabilizer link.
Hint: if ball joint rotates with nuts, please fix bolts with
hexagonal wrench (6mm).7. Remove front right stabilizer link assembly
[64000097].Hint: the removal procedures of right side are the same
as that of left side.8. Check front left stabilizer link assembly.(a) As shown in the diagram, before installing nuts, shake joint
bolts forward and backward 5 times.
(b) Shake nuts continuously with torque wrench at the speed
of one circle per 24 s, and then read out torque value at
the 5th circle.
Rotating torque: 0.05~1.0 N.m9. Separate left side transversal lever assembly (see Page 113).
10. Separate right side transversal lever assembly (see Page 113).
11. Separate oil pipe assembly (see Page 205).
12. Separate steering gear oil return pipe (see Page 205).
13. Separate lower left control arm assembly [64000091] (see Page 94).
14. Separate lower right control arm assembly [64000092] (see Page 94).
15. Remove sub frame assembly [64000087] (see Page 205).
96
Page 110 of 419

Front suspension - Front left lower control arm ball joint assemblyFront left lower control arm ball joint assemblyReplacementHint: the replacement procedures of right side are the same as that of left side.1. Remove front wheels.
2. Remove front left shaft hub nuts (see Page 123).
3. Disassemble front left speed sensor assembly [67000020] (see Page 123).
4. Disassemble front left brake wheel pump assembly and brake block (see Page 141).
5. Remove front left brake assembly [64000134] (see Page 141).
6. Disassemble left side transversal lever assembly (see Page 123).
7. Disassemble lower left control arm assembly [64000091] (see Page 94).
8. Remove front left shaft hub assembly (see Page 123).
9. Remove lower left control arm ball joint assembly [64000093] (see Page 123).
10. Check lower left control arm ball joint assembly [64000093].(a) As shown in the diagram, before installing nuts, shake
joint bolts forward and backward 5 times.
(b) Shake nuts continuously with torque wrench at the
speed of one circle per 2~4 s, and then read out torque
value at the 5th circle.
Rotating torque: 1.0~4.9 N.m11. Install lower left control arm ball joint assembly
[64000093] (see Page 123).
12. Install front left shaft hub assembly
(see Page 123).
13. Install lower left control arm assembly [64000091] (see Page 123).
14. Install left side transversal lever assembly (see Page 123).
15. Install front left brake assembly [64000134] (see Page 141).
16. Install front left brake wheel pump assembly and brake block (see Page 141).
17. Install front shaft hub nuts (see Page 123).
18. Install front wheels.Torque: 10310 N.m19. Check and adjust front wheel alignment (see Page 87).
20. Check ABS sensor signal.99
Page 114 of 419

Rear suspension - Rear strut assemblySpecial
tool103(b) Fix piston rod with a hexagonal wrench of 6mm, and remove
nuts.
(c) Remove bracket plate, washer, spring bracket, upper
separator, suspension pedestal, spring absorber and heli-
cal spring.8.[64000098]Press in and pull out absorber piston rod, and check there is
abnormal resistance or abnormal sound.
If anything unusual occurs, please replace absorber.
Note:When abandoning absorber, please refer to
Page 97.9. Install rear left strut assembly [64000098].(a) Compress helical spring with special tool.
Note: do not use pneumatic wrench, or the special
tool will be damaged.
(b) Install helical spring to absorber.
Hint: install lower end of helical spring into notch of
lower spring seat.
(c) Install spring absorber and suspension bracket.
(d) Encase upper separator into spring bracket.
(e) As shown in the diagram, it is the position of upper
separator encased into spring bracket.
(f) Install washer and bracket plate.
(g) Temporarily lock up new center nuts.
(h) Remove special tool.
(i) Check spring bracket direction again.
Page 115 of 419

(j) Fix piston rod with a hexagonal wrench of 6mm, and tighten
nuts.
Torque: .m10. Temporarily lock up rear strut assembly.(a) Install rear strut, and temporarily lock up nuts and gasket.
(b) Install 2 nuts and bolts.
Torque: 11. Install real left seat backrest assembly [68010078].
12. Align suspension.(a) Lay down vehicle from the lift after installing rear wheels.
Torque: (b) Align suspension components by means of lifting
vehicle several times.13. Completely lock up rear strut assembly.Completely tighten nuts.
Torque:.m14. Check rear wheel alignment (see Page 101).Handling1. Handle rear left strut assembly [64000098].(a) Completely pull out shock absorber piston rod.
(b) As shown in the diagram, drill a small hole on cylinder body
between two lines with electric drill to make inside gas flow
out.
Notes�z
Iron chip may fly out during drilling, please be care-
ful in operating. �z The gas is colorless, odorless and nontoxic.Rear suspension - Rear strut assembly104