key GEELY MK 2008 Owner's Guide
[x] Cancel search | Manufacturer: GEELY, Model Year: 2008, Model line: MK, Model: GEELY MK 2008Pages: 416, PDF Size: 25.19 MB
Page 375 of 416

It is mainly used to install the pipes and accessories of the brake system and clutch system.
5. Front wall upper assembly
The front wall upper assembly includes left/right hinge base mounting plate big assembly, front wall upper
front cover big assembly, VIN number mounting plate, and front wall upper rear cover big assembly etc.
It forms a high-stiffness frame structure together with the engine compartment assembly and the front wall
lower plate assembly. It can generate strong resistant to the transverse collision and rolling deformation. It can also
separate the engine compartment form the cabin, preventing the odor entering into the cabin. Consequently, it can
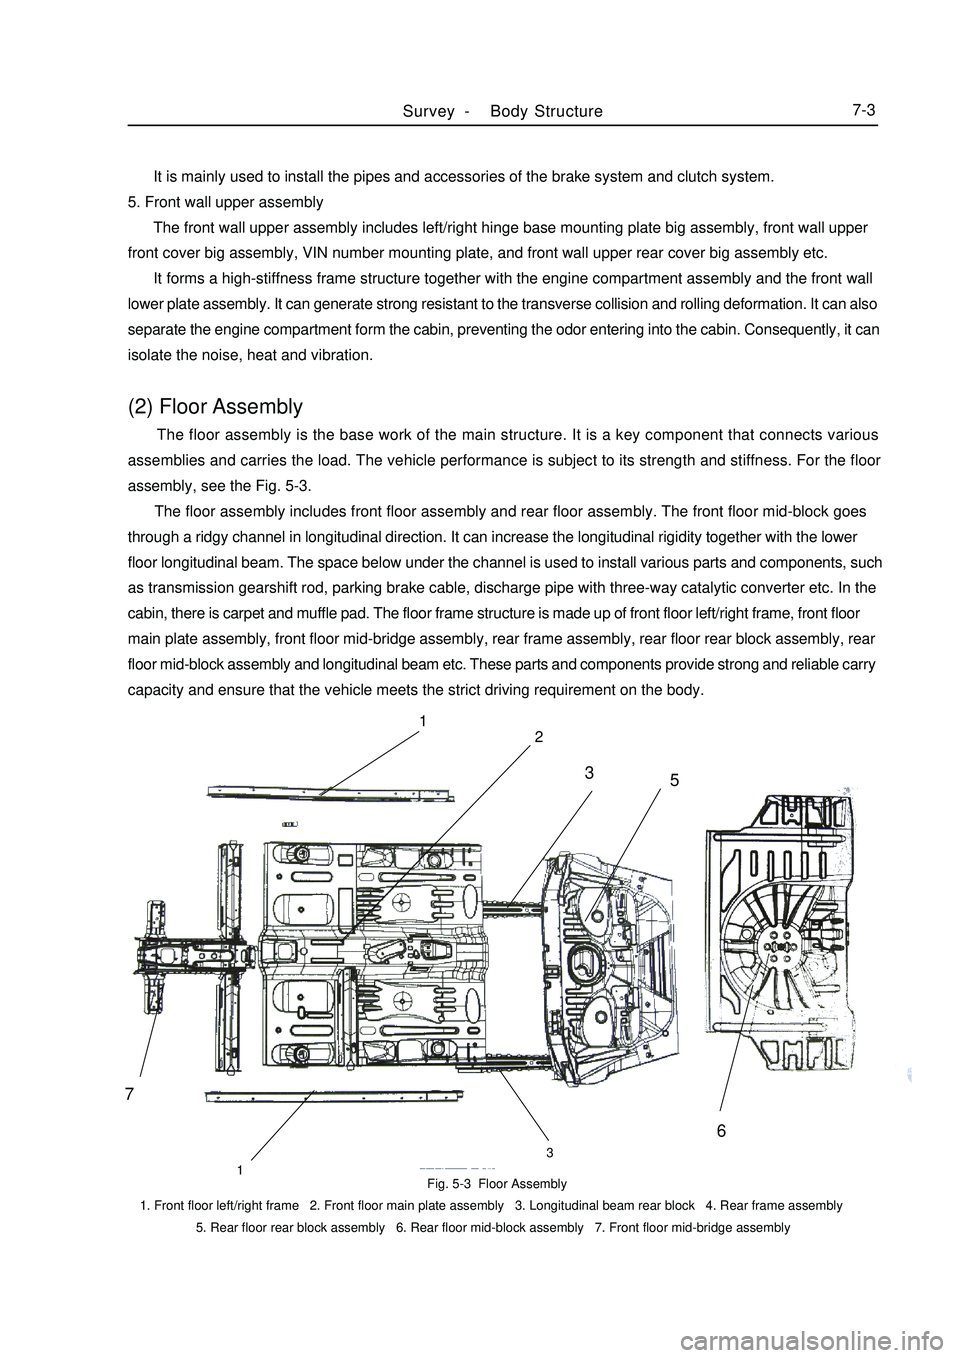
isolate the noise, heat and vibration.(2) Floor Assembly The floor assembly is the base work of the main structure. It is a key component that connects various
assemblies and carries the load. The vehicle performance is subject to its strength and stiffness. For the floor
assembly, see the Fig. 5-3.
The floor assembly includes front floor assembly and rear floor assembly. The front floor mid-block goes
through a ridgy channel in longitudinal direction. It can increase the longitudinal rigidity together with the lower
floor longitudinal beam. The space below under the channel is used to install various parts and components, such
as transmission gearshift rod, parking brake cable, discharge pipe with three-way catalytic converter etc. In the
cabin, there is carpet and muffle pad. The floor frame structure is made up of front floor left/right frame, front floor
main plate assembly, front floor mid-bridge assembly, rear frame assembly, rear floor rear block assembly, rear
floor mid-block assembly and longitudinal beam etc. These parts and components provide strong and reliable carry
capacity and ensure that the vehicle meets the strict driving requirement on the body.Fig. 5-3 Floor Assembly
1. Front floor left/right frame 2. Front floor main plate assembly 3. Longitudinal beam rear block 4. Rear frame assembly
5. Rear floor rear block assembly 6. Rear floor mid-block assembly 7. Front floor mid-bridge assemblySurvey -Body Structure7-371
2
133
5
6
Page 396 of 416

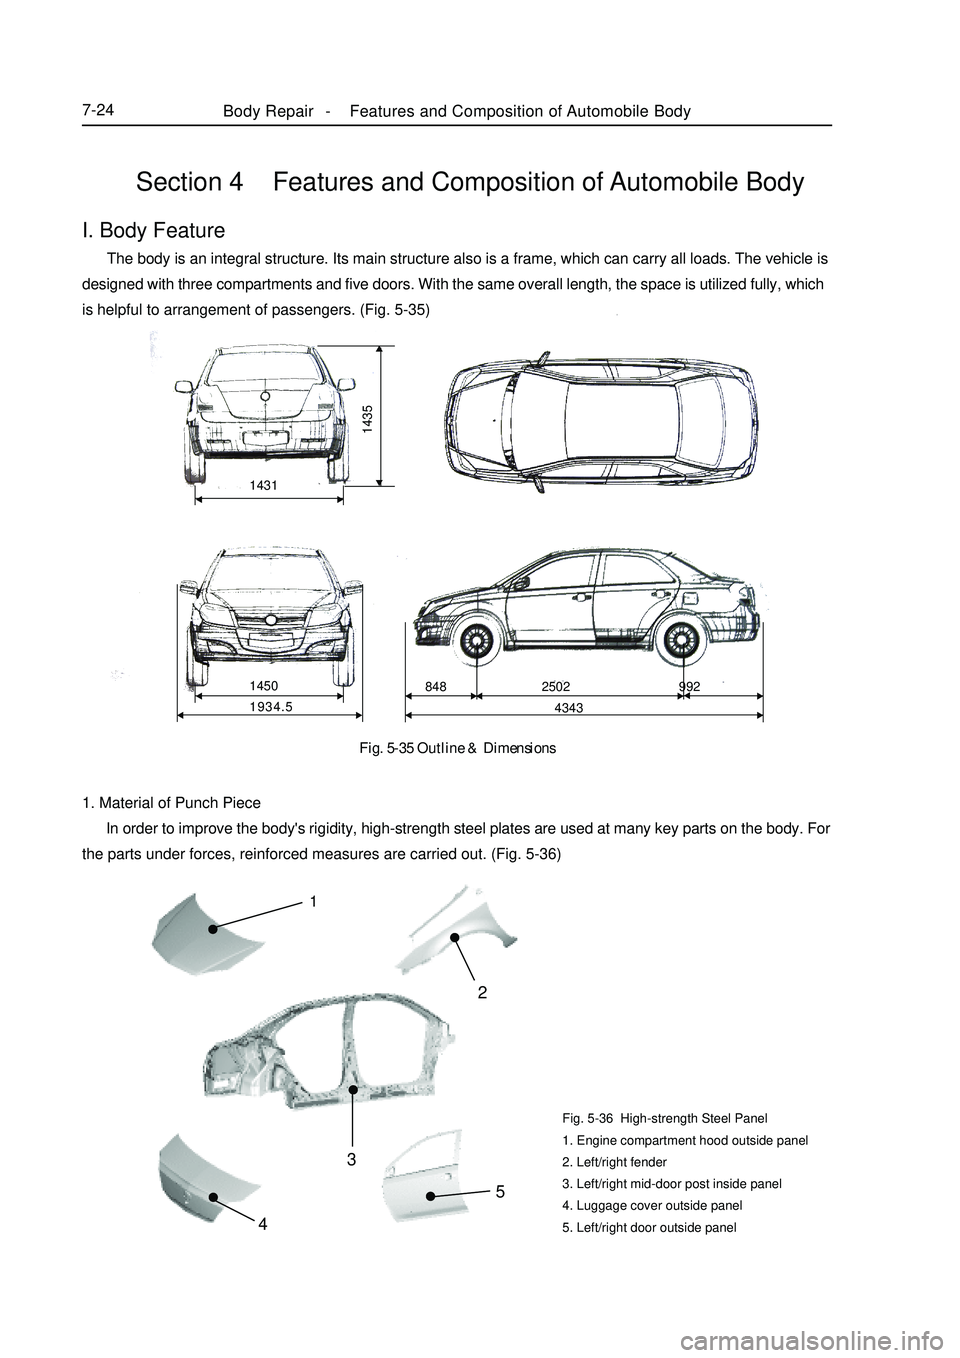
1. Material of Punch Piece
In order to improve the body's rigidity, high-strength steel plates are used at many key parts on the body. For
the parts under forces, reinforced measures are carried out. (Fig. 5-36)Fig. 5-36 High-strength Steel Panel
1. Engine compartment hood outside panel
2. Left/right fender
3. Left/right mid-door post inside panel
4. Luggage cover outside panel
5. Left/right door outside panel12
3
45Body Repair -Features and Composition of Automobile Body7-24Fig. 5-35 Outline & DimensionsSection 4 Features and Composition of Automobile BodyI. Body Feature The body is an integral structure. Its main structure also is a frame, which can carry all loads. The vehicle is
designed with three compartments and five doors. With the same overall length, the space is utilized fully, which
is helpful to arrangement of passengers. (Fig. 5-35)
14351431
1934.5 1450
4343 848 2502 992
Page 410 of 416

Appendix: Body Key Dimensions1. Engine CompartmentAppendix-Body Key Dimensions7-38
(mm)
Item Description
Diameter of Hole
XY Z
A,a
Front fender installetion hole(Front)
7(M6 nut) -336.18 +/-652.5 580.69
B,b
Front absorber spring support hole(Inside)
10 1.09 +/-519.51 641.4
C,c
Front fender installetion hole(Rear)
7(M6 nut) 62.3 +/-661.71 665.72
D Cowl panel drip charnel fixing hole 7(M6 nut) 66.13 -1.2 648.7
E,e Collision sensor installation hole 9(M8 nut) -445.74 +/-436.17 273.26
F Braking pipe instaltion hole 7(M6 nut) -49 -418.74 309.12
f
ABS actuator installatim hole(front)
9(M8 nut) -48.64 417.53 291
G,g
Radiator upper crossmermber installation hole(front)
7(M6 nut) -589.94 +/-397 452.84
H,h
Radiator side insulation gasket installation hole
10x8-621.82 +/-403.33 94.99
I Hood lock bracket installation hole 7(M6 nut) -662.61 0 36.34
J,j
FR bumper horizontal installation hole
9(M8 nut) -651.68 -487.41 275.57
K,k
Windscreen fastener installation hole
11.5x8.7-849.35 +/-357.86 111.07
L,l
Radiator uppor crossmenber installation hole
7(M6 nut) -553.26 +/-392.02 502.18
M,m Hood hinge hole(Rear) 9(M8 nut) 149.64 +/-668.27 678.44
N,n Front fender support hole 10 -368.55 +/-704.84 379.94
O,o
Joint between side outerpanel and roof panel
£ 202.21 +/-636.33 736.57
P,p
Joint between side outer panel and dash panel
- 851.59 +/-508.37 1092.37
A-D 771±2.5
4
a-D 771±2.5
B-c 1183±2.5
4
b-C 1183±2.5
B-D 522±2.5
4
b-D 552±2.5
C-M 89±2.5
c-m 89±2.5
D-E 771±2.5
4
D-e 777±2.5
D-L 746±2.5
4
D-l 746±2.5
N-O 1410±2.5
A-c 1376±2.5
4
a-C 1376±2.5
I-j 547±2.5
4
I-J 547±2.5
I-H 410±2.5
4
I-h 410±2.5
O-p 1360±2.5
4
o-P 1360±2.5
A-o 1408±2.5
4
a-O 1408±2.5
I-g 580±2.5
4
i-G 580±2.5
F-b 997±2.5
f-B 1088±2.5
L-c 1231±2.5
4
l-C 1231±2.5
Measuring
point
Value
ToleranceMeasuring
point
Value
ToleranceMeasuring
point
Value
Tolerance
Measuring
point
Value
Tolerance
Page 411 of 416

2. Left/Right Side Wall PartsAppendix-
Body Key Dimensions7-39
Item Description
Diameter of Hole
XY Z
A,a
Lower joint between side outer panel ane roof panel
£ 202.21 +/-636.33 736.57
B,b Taillamp installation hole 5 2190.8 +/-679.49 632.24
S,s
Joint between side outer panel and taillamp panel
£ 3154.87 +/-516.76 784.2
G-n 1710±2.5
4
g-N 1710±2.5
I-o 1208±2.5
4
i-O 1208±2.5
M-n 1548±2.5
4
m-N 1548±2.5
M-q 1568±2.5
4
m-Q 1568±2.5
Q-r 1423±2.5
4
q-R 1423±2.5
E-f 1464±2.5
4
e-F 1464±2.5
H-i 1583±2.5
4
h-I 1583±2.5
M-r 1545±2.5
4
m-R 1545±2.5
N-o 1567±2.5
4
n-O 1567±2.5
I-h 1583±2.5
4
i-H 1583±2.5
E-b 2840±2.5
4
e-B 2840±2.5
T-s 2540±2.5
4
t-S 2540±2.5
Capital letter shows points in the right side and small letter show ones in the left side.Left and right are symmetrical
Item Description
Diameter of Hole
XY Z
C,c
FR upper door hinge installation hole
13(M8 nut) 316.9 +/-742.96 569.3
D,d
FR Lower door hinge installation hole
13(M8 nut) 327.8 +/-759.62 257.8
E,e A-pillar upper assembling mark 681.96 +/-615.09 945.67
F,f A-pillar lower assembling mark 443.19 +/-686.75 219.43
G,g
Upper joint between side outer panel and roof panel
851.588 +/-508.37 1092.37
H,h FR door sill assembling mark 913.56 +/-682 120
I,i Roof side panel assembling mark 1154.83 +/-539.8 1097.59
J,j B-pillar front assembling mark 1369.03 +/-664.67 833.91
K,k
RR upper door hinge installation hole
15(M8 nut) 1401.94 +/-748.88 596.46
L,l
RR lower door ringe installation hole
15(M8 nut) 1354.63 +/-767.12 272.82
M,m B-pillar rear assembling mark 1493.1 +/-672.96 812.59
N,n RR door sill assembling mark 1774.79 +/-682 120
O,o Roof side panel assembling mark 1711.65 +/-531.82 1108.55
P,p Roof side panel assembling mark 2241.04 +/-604.31 940.02
Q,q Rear fender assembling mark 2315.25 +/-658.16 712.07
R,r Rear fender assembling mark 2044.43 +/-682 316.52
E-e F-f F-g/H-h I-i J-j
1230±2.5 1374±2.5 1364±2.5 1080±2.5 1329±2.5
M-m N-n O-o P-p Q-q R-r
1346±2.5 1364±2.5 1064±2.5 1029±2.5 1316±2.5 1364±2.5
Measuring
point
Value
E-h 1555±2.5
4
e-H 1555±2.5
E-j 1457±2.5
4
e-J 1457±2.5
F-j 1717±2.5
4
f-J 1717±2.5
Measuring
point
Value
ToleranceTolerance
Page 412 of 416

3. Body Opening Part (Back View)
A-d 1504±2.5
4
a-D 1504±2.5
C-d 1191±2.5
4
c-D 1191±2.5
f-G 1217±2.5
4
F-g 1217±2.5
e-B 1599±2.5
4
E-b 1599±2.5
h-I 1003±2.5
4
H-i 1003±2.5
(mm)
Item Description
Diameter of Hole
XYZ
A,a
Back window glass fastener installation hole
11.5¡Á8.52327.46 +/-374.49 1118.41
B,b
Rear absorber spring support hole
18 2506.99 +/-534.81 550.09
C,c Tall lamp installation hole 5 3190.8 +/-679.49 632.24
D,d Rear bumperinstallation bole 15 3202.45 +/-428.13 195.64
E,e B-pillar rear assembly mark - 1493.1 +/-672.96 812.59
F,f
Rear joint between side outer panel and roof panel
- 2310.74 +/-598.88 1106.12
G,g
Joint between side outer panel and luggage compartment
- 2816.19 +/-569.92 831.4
H,h
Joint between side outer panel and tail lmap panel
- 2987.01 +/-569.92 798.34
I,i
Rear joint between side outer panel and rear end panel
- 3327.63 +/-325.23 500.2Appendix-Body Key Dimensions7-40
Measuring
point
Value
Tolerance