key GEELY MK 2008 Workshop Manual
[x] Cancel search | Manufacturer: GEELY, Model Year: 2008, Model line: MK, Model: GEELY MK 2008Pages: 416, PDF Size: 25.19 MB
Page 9 of 416
Chapter 14 Outside Rearview Mirror................................................................................. 6-37
Chapter 15 Door Protecting Stripe.................................................................................... 6-38
Chapter 16 Carpet and Insulator....................................................................................... 6-39
Chapter 17 Moonroof Assembly (Optional)...................................................................... 6-40
Chapter 18 Plug List........................................................................................................... 6-42Part 7 BodyChapter 1 Survey................................................................................................................ 7-1
Section 1 Body Structure ................................................................................................ 7-1
Chapter 2 Body Repair....................................................................................................... 7-9
Section 1 Body Damage Forms and Requirements for Repair ...................................... 7-9
Section 2 Typical Technique of Body Panel Repair ....................................................... 7-16
Section 3 Repair After Body Damage ............................................................................ 7-16
Section 4 Features and Composition of Automobile Body ............................................ 7-24
Section 5 Painting Techniques After Body Repair ......................................................... 7-35
Section 6 Service Data For for Body .............................................................................. 7-36Attachment: Body Key Dimensions
Appendix: Torque Table of the Fasteners for Important AssemblyTable of Contents VI
Page 25 of 416
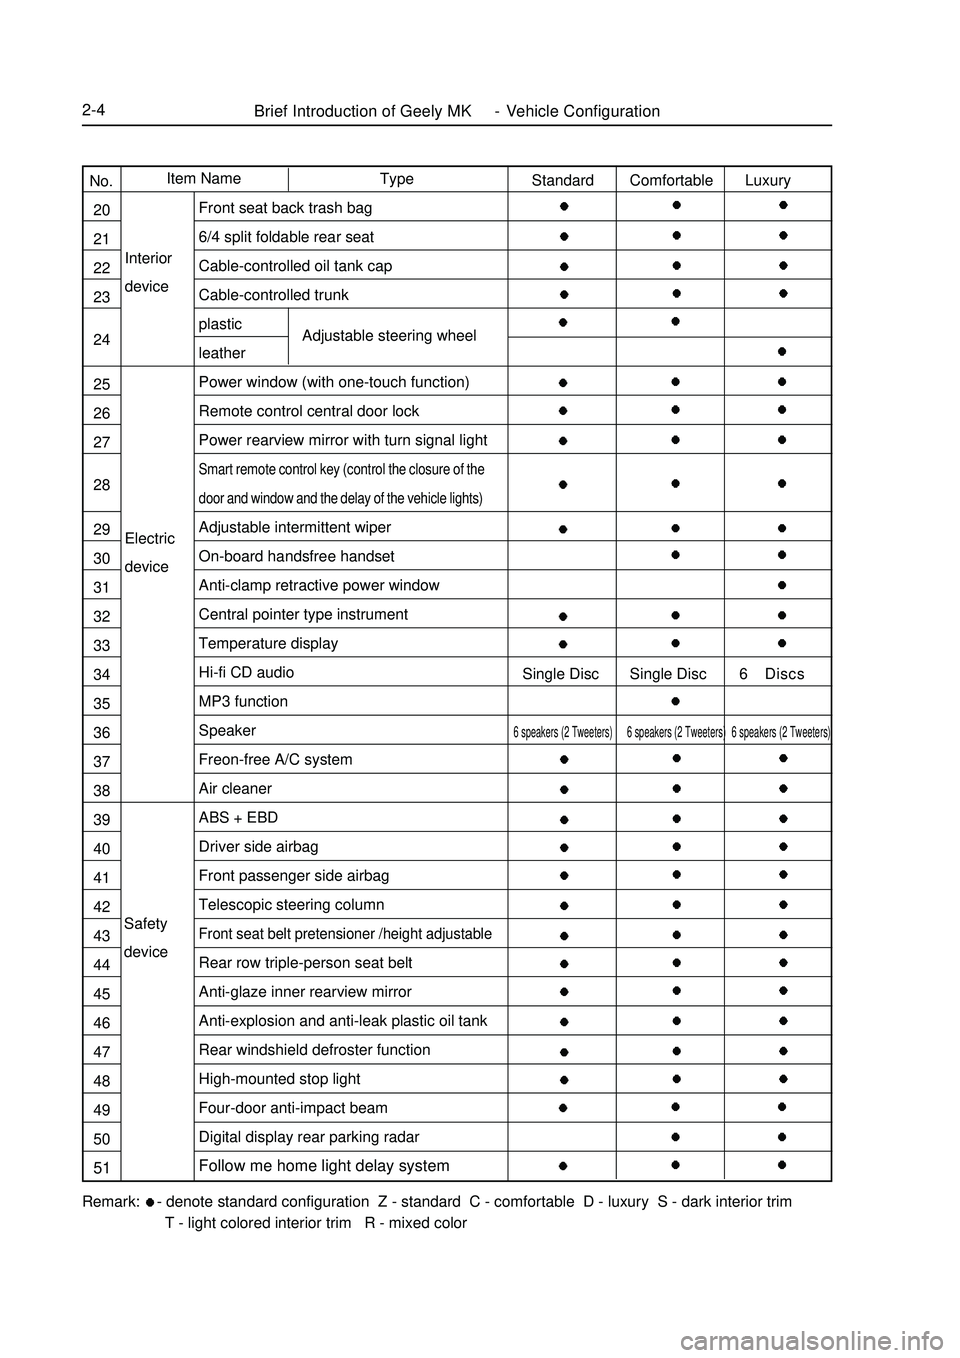
Brief Introduction of Geely MK - Vehicle Configuration2-4Electric
deviceInterior
deviceAdjustable steering wheelRemark: - denote standard configuration Z - standard C - comfortable D - luxury S - dark interior trim
T - light colored interior trim R - mixed colorType Item Name
No.
20
21
22
23
24
25
26
27
28
29
30
31
32
33
34
35
36
37
38
39
40
41
42
43
44
45
46
47
48
49
50
51Standard Comfortable Luxury
Single Disc Single Disc 6 Discs6 speakers (2 Tweeters) 6 speakers (2 Tweeters) 6 speakers (2 Tweeters)Front seat back trash bag
6/4 split foldable rear seat
Cable-controlled oil tank cap
Cable-controlled trunk
plastic
leather
Power window (with one-touch function)
Remote control central door lock
Power rearview mirror with turn signal lightSmart remote control key (control the closure of the
door and window and the delay of the vehicle lights)Adjustable intermittent wiper
On-board handsfree handset
Anti-clamp retractive power window
Central pointer type instrument
Temperature display
Hi-fi CD audio
MP3 function
Speaker
Freon-free A/C system
Air cleaner
ABS + EBD
Driver side airbag
Front passenger side airbag
Telescopic steering columnFront seat belt pretensioner /height adjustableRear row triple-person seat belt
Anti-glaze inner rearview mirror
Anti-explosion and anti-leak plastic oil tank
Rear windshield defroster function
High-mounted stop light
Four-door anti-impact beam
Digital display rear parking radar
Follow me home light delay systemSafety
device
Page 28 of 416
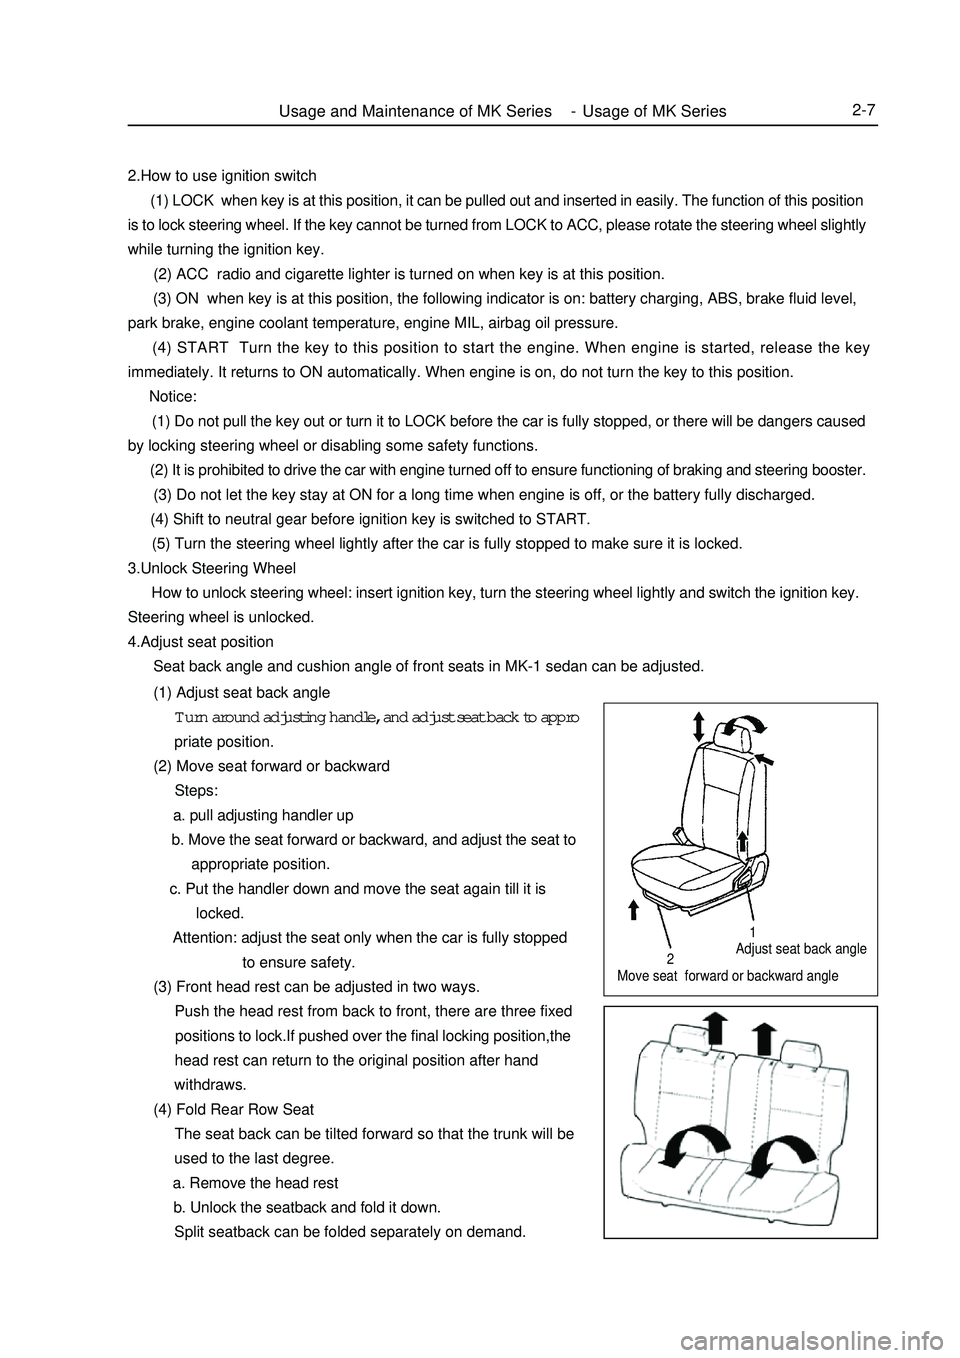
Adjust seat back angle
Move seat forward or backward angleUsage and Maintenance of MK Series - Usage of MK Series2-7212.How to use ignition switch
(1) LOCK when key is at this position, it can be pulled out and inserted in easily. The function of this position
is to lock steering wheel. If the key cannot be turned from LOCK to ACC, please rotate the steering wheel slightly
while turning the ignition key.
(2) ACC radio and cigarette lighter is turned on when key is at this position.
(3) ON when key is at this position, the following indicator is on: battery charging, ABS, brake fluid level,
park brake, engine coolant temperature, engine MIL, airbag oil pressure.
(4) START Turn the key to this position to start the engine. When engine is started, release the key
immediately. It returns to ON automatically. When engine is on, do not turn the key to this position.
Notice:
(1) Do not pull the key out or turn it to LOCK before the car is fully stopped, or there will be dangers caused
by locking steering wheel or disabling some safety functions.
(2) It is prohibited to drive the car with engine turned off to ensure functioning of braking and steering booster.
(3) Do not let the key stay at ON for a long time when engine is off, or the battery fully discharged.
(4) Shift to neutral gear before ignition key is switched to START.
(5) Turn the steering wheel lightly after the car is fully stopped to make sure it is locked.
3.Unlock Steering Wheel
How to unlock steering wheel: insert ignition key, turn the steering wheel lightly and switch the ignition key.
Steering wheel is unlocked.
4.Adjust seat position
Seat back angle and cushion angle of front seats in MK-1 sedan can be adjusted.
(1) Adjust seat back angle
Turn around adjusting handle, and adjust seat back to appro
priate position.
(2) Move seat forward or backward
Steps:
a. pull adjusting handler up
b. Move the seat forward or backward, and adjust the seat to
appropriate position.
c. Put the handler down and move the seat again till it is
locked.
Attention: adjust the seat only when the car is fully stopped
to ensure safety.
(3) Front head rest can be adjusted in two ways.
Push the head rest from back to front, there are three fixed
positions to lock.If pushed over the final locking position,the
head rest can return to the original position after hand
withdraws.
(4) Fold Rear Row Seat
The seat back can be tilted forward so that the trunk will be
used to the last degree.
a. Remove the head rest
b. Unlock the seatback and fold it down.
Split seatback can be folded separately on demand.
Page 31 of 416
2-10 must be running at medium speed without load. Increase the speed and load gradually with the
accumulation of breaking-in mileage.
b. Because the brake plat is not broken in on a new vehicle,in order to ensure safety and reduce wear,avoid
harsh brake, and brake for multiple times to break in the brake plate faster.
c. It is better to avoid driving vehicle on steep roads or in bad conditions during breaking-in period.
d. Pay special attention to engine coolant temperature meter and oil pressure meter.Check engine oil level
frequently and make sure engine works in normal temperature and good lubrication.
e. Maintain the vehicle strictly according to first-time maintenance requirements to bring the vehicle into
normal usage life under good condition.
7.vehicle towing
There are towing facilities both in the front and rear end of MK-1 sedan for towing other vehicles and being towed.
To ensure safety, pay attention to the following instructions when towing.
(1) Towing car Towing car should be started and shifted steadily.The speed should be no more than 40km/h.
(2) Follow the instructions below when being towed:
a. Steering system of the vehicle being towed works well.
b. Braking system of the vehicle being towed works well or it cannot be towed with a rope and must be
towed with the towing shaft instead.
c. Release park brake and shift the transmission to neutral gear when the vehicle is being towed.
d. Turn the ignition switch to ACC to allow turning signal lights,braking indicator to be turned on when
necessary.
e. The towing rope must be tensioned in the towing process.
f. If the purpose of towing is to start the engine, shift the transmission to the 2nd or 3rd gear to increase
engine speed. It is good for starting the engine.
8. Instructions to save fuel when using the vehicle
(1) Reasonable load Do not store useless articles in luggage compartment because they consumes fuel for
nothing.
(2) Correct driving style Instructions as follows:
a. When engine is started, do not heat it but press the accelerator pedal slightly, drive the vehicle slowly
and accelerate gradually.
b. Shift to higher gears when driving to allow the engine to work at appropriate engine speed and avoid
running the engine at low or high speed. The engine speed should be higher than 2500r/min when
driving, and higher than 3000r/min when up-shifting.
c. Keep the vehicle speed stable, and avoid harsh acceleration and frequent braking.
d. Pay attention to vehicle speed. Drive at high speed results in excessive fuel consumption.
(3) Organize vehicle usage well Pay attention to the following two instructions.
a. Organize vehicle usage time and avoid short trips. Because at the beginning when the vehicle is started
(around 1km), the engine has not reached its efficiency point, and the fuel consumption doubles
compared to regular.
b. Select a good driving route, avoid driving through the city or blocks with heavy traffic.
(4) Keep the vehicle under good work condition Strictly follow instructions to maintain the vehicle to make
sure the vehicle is under good technical working condition, and inspect and replace key parts that affect vehicle
fuel consumptions. For example:Usage and Maintenance of MK Series - Usage of MK Series
Page 40 of 416
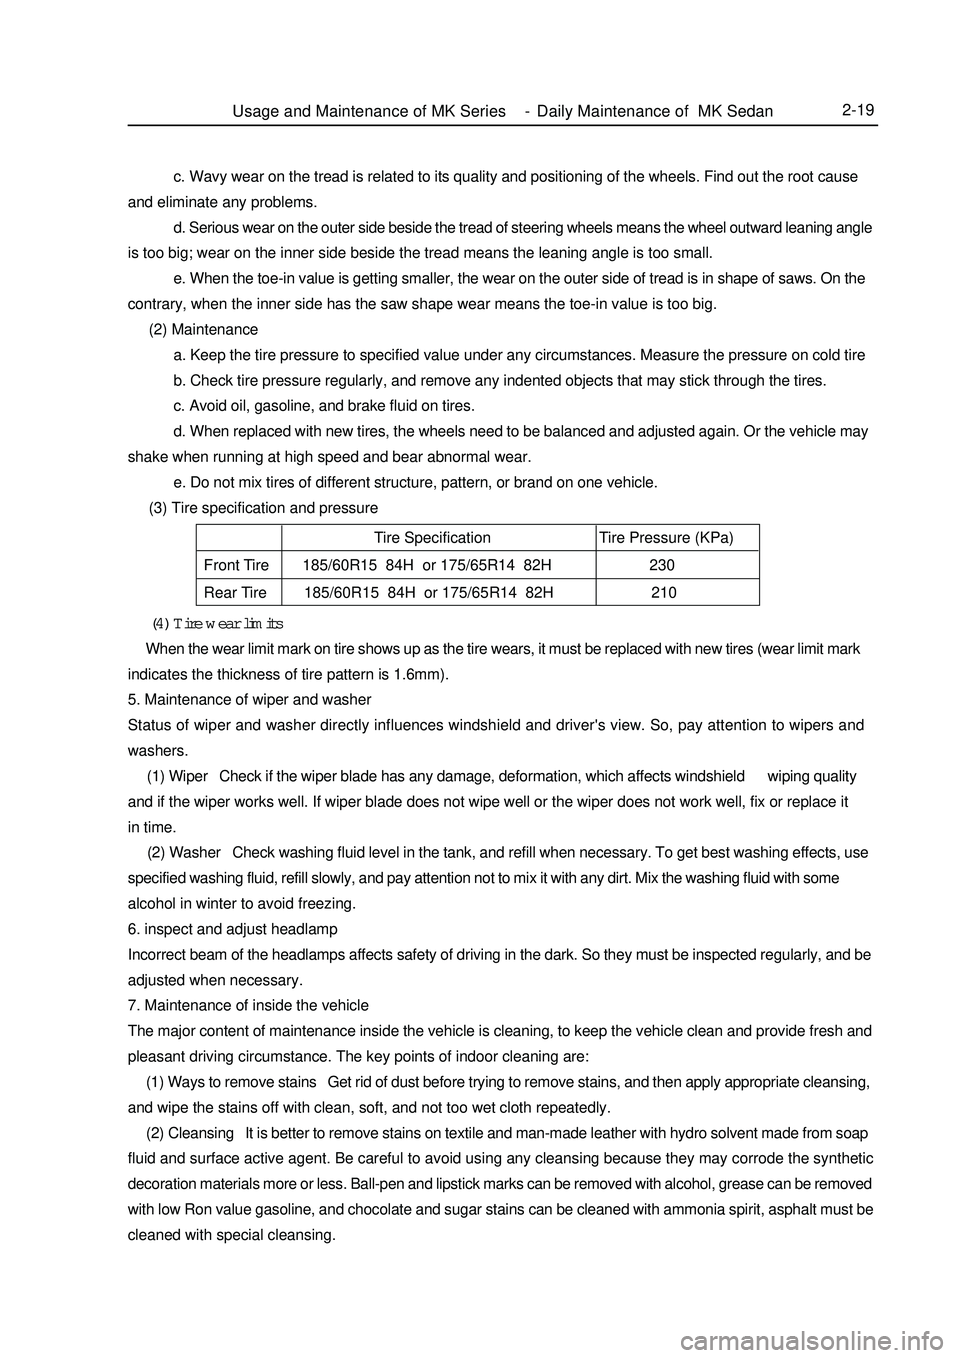
2-19 (4) Tire wear limits When the wear limit mark on tire shows up as the tire wears, it must be replaced with new tires (wear limit mark
indicates the thickness of tire pattern is 1.6mm).
5. Maintenance of wiper and washer
Status of wiper and washer directly influences windshield and driver's view. So, pay attention to wipers and
washers.
(1) Wiper Check if the wiper blade has any damage, deformation, which affects windshield wiping quality
and if the wiper works well. If wiper blade does not wipe well or the wiper does not work well, fix or replace it
in time.
(2) Washer Check washing fluid level in the tank, and refill when necessary. To get best washing effects, use
specified washing fluid, refill slowly, and pay attention not to mix it with any dirt. Mix the washing fluid with some
alcohol in winter to avoid freezing.
6. inspect and adjust headlampIncorrect beam of the headlamps affects safety of driving in the dark. So they must be inspected regularly, and be
adjusted when necessary.
7. Maintenance of inside the vehicle
The major content of maintenance inside the vehicle is cleaning, to keep the vehicle clean and provide fresh and
pleasant driving circumstance. The key points of indoor cleaning are:
(1) Ways to remove stains Get rid of dust before trying to remove stains, and then apply appropriate cleansing,and wipe the stains off with clean, soft, and not too wet cloth repeatedly.
(2) Cleansing It is better to remove stains on textile and man-made leather with hydro solvent made from soap
fluid and surface active agent. Be careful to avoid using any cleansing because they may corrode the synthetic
decoration materials more or less. Ball-pen and lipstick marks can be removed with alcohol, grease can be removed
with low Ron value gasoline, and chocolate and sugar stains can be cleaned with ammonia spirit, asphalt must be
cleaned with special cleansing.Tire Specification Tire Pressure (KPa)
Front Tire 185/60R15 84H or 175/65R14 82H 230
Rear Tire 185/60R15 84H or 175/65R14 82H 210c. Wavy wear on the tread is related to its quality and positioning of the wheels. Find out the root cause
and eliminate any problems.
d. Serious wear on the outer side beside the tread of steering wheels means the wheel outward leaning angle
is too big; wear on the inner side beside the tread means the leaning angle is too small.
e. When the toe-in value is getting smaller, the wear on the outer side of tread is in shape of saws. On the
contrary, when the inner side has the saw shape wear means the toe-in value is too big.
(2) Maintenance
a. Keep the tire pressure to specified value under any circumstances. Measure the pressure on cold tire
b. Check tire pressure regularly, and remove any indented objects that may stick through the tires.
c. Avoid oil, gasoline, and brake fluid on tires.
d. When replaced with new tires, the wheels need to be balanced and adjusted again. Or the vehicle may
shake when running at high speed and bear abnormal wear.
e. Do not mix tires of different structure, pattern, or brand on one vehicle.
(3) Tire specification and pressureUsage and Maintenance of MK Series - Daily Maintenance of MK Sedan
Page 41 of 416
2-20 (3) Long time exposure to sun damages interior. So it is better to use covers on upper seat backs, and rear
separation board that are exposed to sun.
8. Maintenance of body exterior
Body exterior is to keep body cleanness and brightness to give the impression of beauty and comfort, and to avoid
rust and abnormal paint peeling off. The key points of body maintenances are:
(1) Wash body using the method below:
a. Wash the dirty things off the body by pressurized water, and then clean the body with
soft cloth of sponge from up to down.
b. Dry body surface with good white cloth. Apply brake pedal several times when driving
after the car is washed to get rid of water in braking system.
c. Do not wipe the body when it is dry. Do not clean paint surface and glass with gasoline,
coal oil, narkosid, strong lye or alcohol.
(2) Cleaning windshield glass
Do not use silicon-bronze radical products. To get better cleaning effects, use special glass cleanser.
(3) Cleaning asphalt on the body
Do not peel the asphalt off from body or bumper, but use special cleanser
(4) Paint
Scratches or slight damages can be fixed with special paint spray. It dries in the air.
(5) Cleaning exterior decoration parts and aluminum parts. Wash with water with soap fluid or cleanser, and wash with clean water. To keep the gloss of painted surface,
wax on the surface after it is dry. (6) Polish and wax the body paint polishing and waxing keeps the body bright and pretty, and protects the paint
as well.
a. Polish in winter. Make sure the vehicle body is absolutely clean and dry before
polishing, polish with fluid or milky wax.
b. Vehicle body must be absolutely dry and clean before waxing. Use waxing tools (soft
table tissue or smooth cotton cloth) to cover the body paint surface evenly with wax.
Check if the vehicle body is covered by wax: spray some water onto the paint surface,
if water drops are formed, that surface is waxed, otherwise, clean the surface and wax
it again. Attention: do not wax under sun, or in cold weather.
Attention
1) When using high pressure washing machine, do not point the washing sprayer to transmission, steering
mechanism and other rubber protection parts, or exterior decoration parts, roof welding lines, heat radiator
or engine compartment.
2) The bottom of vehicle body is made of anti-corrosion material,and has been through anti-corrosion process.
After the vehicle has been running frequently on roads de-frozen with salt for some time, clean engine
compartment and lower part of vehicle body and take some protection actions.Usage and Maintenance of MK Series - Daily Maintenance of MK Sedan
Page 84 of 416

Transmission ControlAutomatic Transmission Shift Mechanism4-7Section 4 Automatic Transmission Shift MechanismComponent ViewConsole Panel Upper
Cover Assembly E Clip
Console Panel Lower
Cover Assembly
Cup Holder
Park Brake Cover Plate
E Clip
Console Assembly
Automatic Shifter Assembly121212 Shift Cable Key Retaining Cable E Clip
Specified Torque -
Page 85 of 416
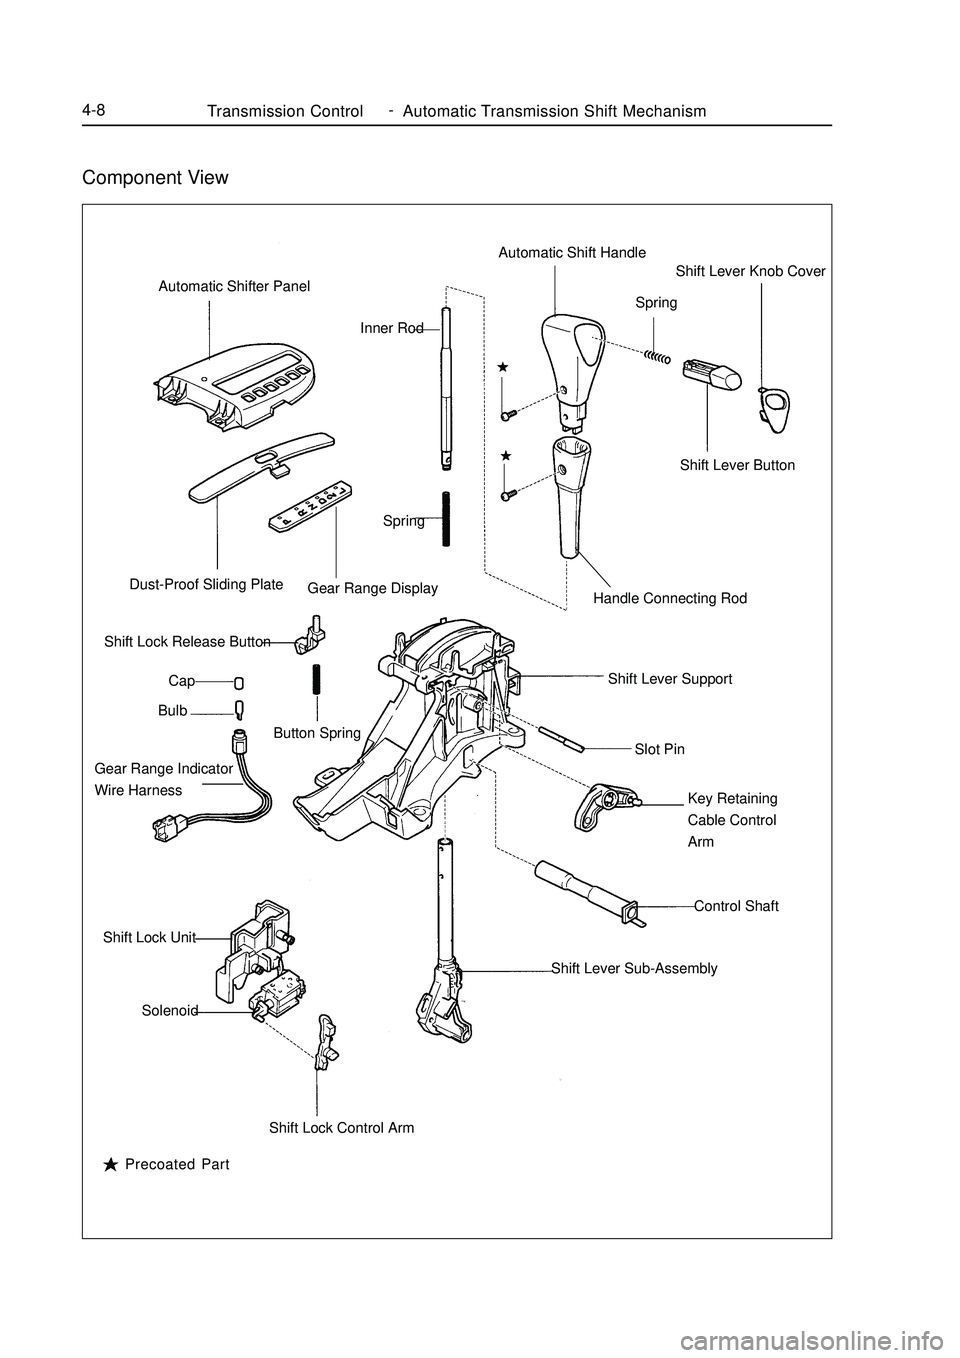
Transmission ControlAutomatic Transmission Shift Mechanism4-8Component ViewAutomatic Shifter Panel
Dust-Proof Sliding Plate
Gear Range Display
Shift Lock Release Button
Cap
Bulb
Button Spring
Gear Range Indicator
Wire Harness
Shift Lock Unit
Solenoid
Shift Lock Control ArmShift Lever Sub-AssemblyControl Shaft Key Retaining
Cable Control
Arm Slot Pin Shift Lever SupportHandle Connecting RodShift Lever Button Shift Lever Knob Cover
Spring Automatic Shift Handle
Spring Inner Rod
Precoated Part -
Page 86 of 416

Transmission ControlAutomatic Transmission Shift Mechanism4-9Replacement1. Remove CD cover
2. Remove console panel lower cover assembly
3. Remove cup holder
4. Remove console assembly
5. Remove key retaining cable.
(1) loosen the adjustment locking cap.
Tip:
Face the vehicle front and turn rotate it clockwise by 90°.
(2) Use screwdriver to remove the key retaining cable
6. Disconnect shift cable assembly
(1) Remove the nut, disconnect the shift cable from the shifter
assembly
(2) Use screwdriver to disconnect the shift cable from the shift
lever tray.
7. Remove automatic shifter assembly
(1) Remove the four bolts.
(2) Disconnect the two connectors.
(3) Remove the shifter assembly. -
Page 87 of 416
4-108. Install the automatic shifter assembly
Install it in place in the reverse order of removal.
9. Check and adjust the shift lever position
(1) Check that the starter works only when the shift lever is in P position, but doesn't work in other positions.
(2) Move the shift lever, check whether the display of the gear range indicator is consistent with the actual gear
range.
(3) Check that the key can be pulled out in P position.
(4) Except the P position, the ignition key can not be turned to LOCK position with the shift lever in other
positions.
(5) Check that when shift release button is pressed down, the shift lever can be transferred to other positions
from the P position.
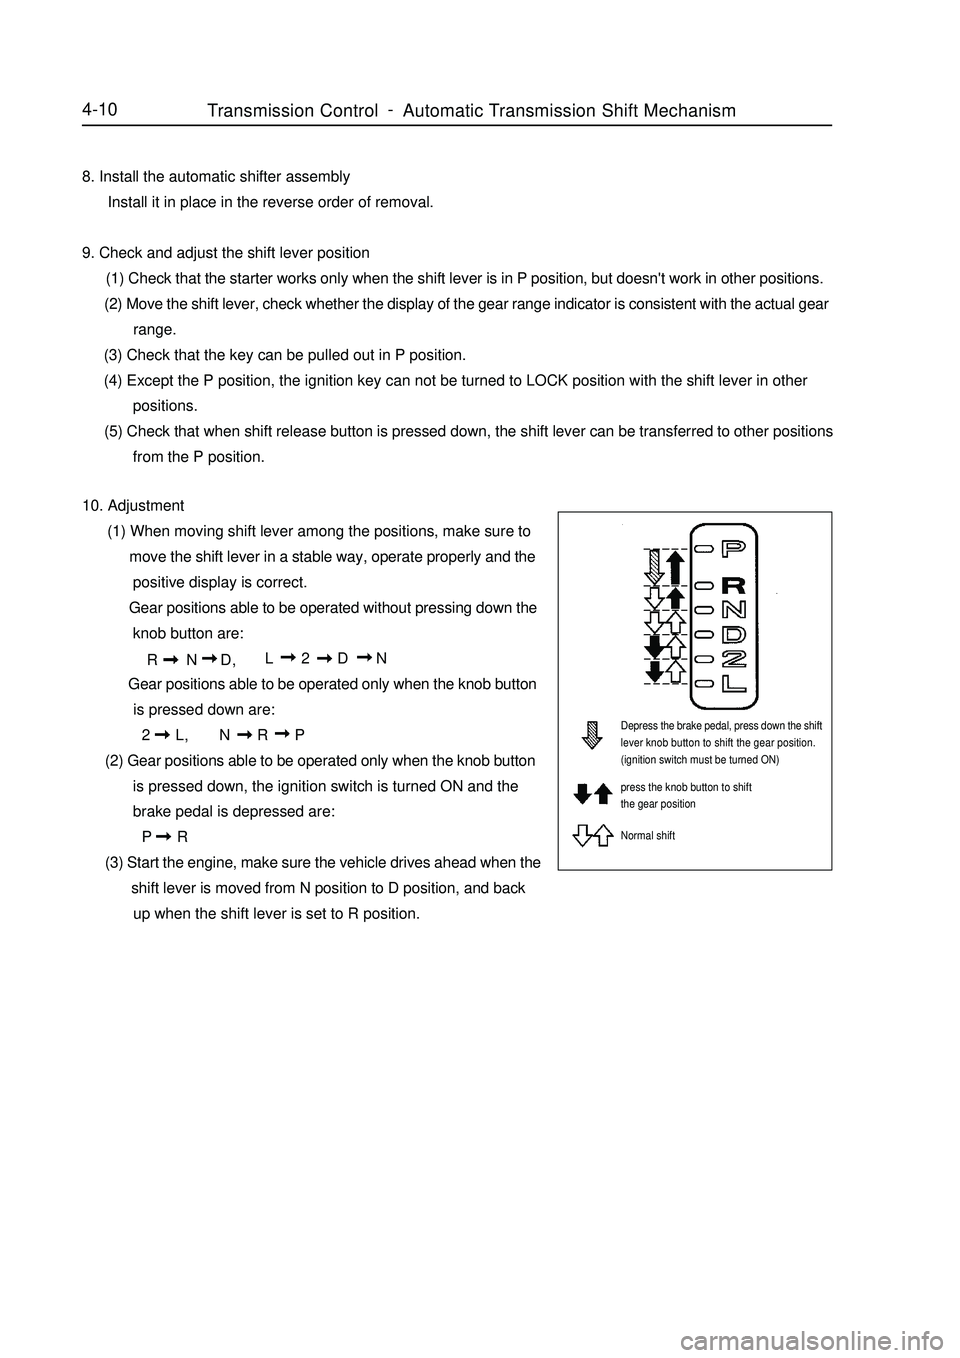
10. Adjustment
(1) When moving shift lever among the positions, make sure to
move the shift lever in a stable way, operate properly and the
positive display is correct.
Gear positions able to be operated without pressing down the
knob button are:
R N D,L 2 D N
Gear positions able to be operated only when the knob button
is pressed down are:
2 L,N R P
(2) Gear positions able to be operated only when the knob button
is pressed down, the ignition switch is turned ON and the
brake pedal is depressed are:
P R
(3) Start the engine, make sure the vehicle drives ahead when the
shift lever is moved from N position to D position, and back
up when the shift lever is set to R position.Depress the brake pedal, press down the shift
lever knob button to shift the gear position.
(ignition switch must be turned ON)
press the knob button to shift
the gear position
Normal shiftTransmission ControlAutomatic Transmission Shift Mechanism -