washer fluid GEELY MK 2008 Workshop Manual
[x] Cancel search | Manufacturer: GEELY, Model Year: 2008, Model line: MK, Model: GEELY MK 2008Pages: 416, PDF Size: 25.19 MB
Page 29 of 416
2-85. Actions to ensure vehicle working condition and safe driving.
(1) To make sure of driving safety, execute the following inspections before driving.
a. Inspect fuel level, and add fuel when necessary.
b. Inspect illuminating lights, turning signal lights, braking signal lights to see if they work.
c.Check the position of rearview mirrors.
d.Check if breaking system functions well.
e.Check if glass of all the lights, windshield is clean.
(2) Regular inspection Perform the following regular inspections to ensure the vehicle work condition and
driving safety.
a. Check engine oil level. Park the vehicle on flat road; check the oil level with engine oil level indicator
at least 10 minutes after the engine is stopped. The oil level should be between the two marks. If it is
lower than "L" mark, add some oil; if it is higher than "F" mark, there is excessive oil, so release it.
Or investigate the cause of high oil level.
The volume between the lowest oil level ("L") and highest oil level ("F") is 1.4L.
b. Check engine coolant level. Check the level when the engine is cool. The coolant level should be between
LOW and FULL. If it is lower than "LOW", add coolant. If the coolant is much lower than Min (every
coolant fill is more than 1L) or the vehicle requires frequent fills,investigate if there is any problem with
the cooling system.
To keep the function of coolant, replace coolant every two years at the beginning of cold winter.
c. Check brake and clutch fluid level (sharing a reservoir). Brake fluid level should between the Max and
Min marks. And it is better to keep it close to the Max mark. Add fluid in time when there is not enough
fluid.
d. Check power steering fluid tank. The level should be between Max and Min marks. Refill when there
is not enough steering fluid to avoid pump stuck. It is strictly prohibited to run the vehicle without
steering fluid in any circumstances.
e. Check the charging status of battery and if the connection of battery wires is good.
f. Check tire status and pressure
g. Check the status of wipers.
(3) Observe warning lights and indicators on instrument panel.
a. There are various warning lights and indicators on the instrument panel of MK-1 sedans to indicate and
warn abnormal operations of engine, braking, and charging systems.
b. Pay attention to these lights when driving.When the warning lights or indicators are on,stop the vehicle,
check the vehicle and resolve the causes to make sure the vehicle works well or drives safely.
6. Correct ways to use new cars
Reliability and stability of components in new cars and recently repaired cars still need to be confirmed, and
relative parts are not broken-in, so they must be used carefully to ensure driving safety, to avoid abnormal damage,
and to extend the useful life of the car.
(1) Before driving inspection The following inspections must be performed on the new car to ensure car safety
and reliable operation:
a. Check if instrument panel, warning lights, and indicator, front and rear wiper and washer, and switches
work.
b. Check if the fastening of driveline, steering, suspension, wheels and other connection parts is good.Usage and Maintenance of MK Series - Usage of MK Series
Page 37 of 416
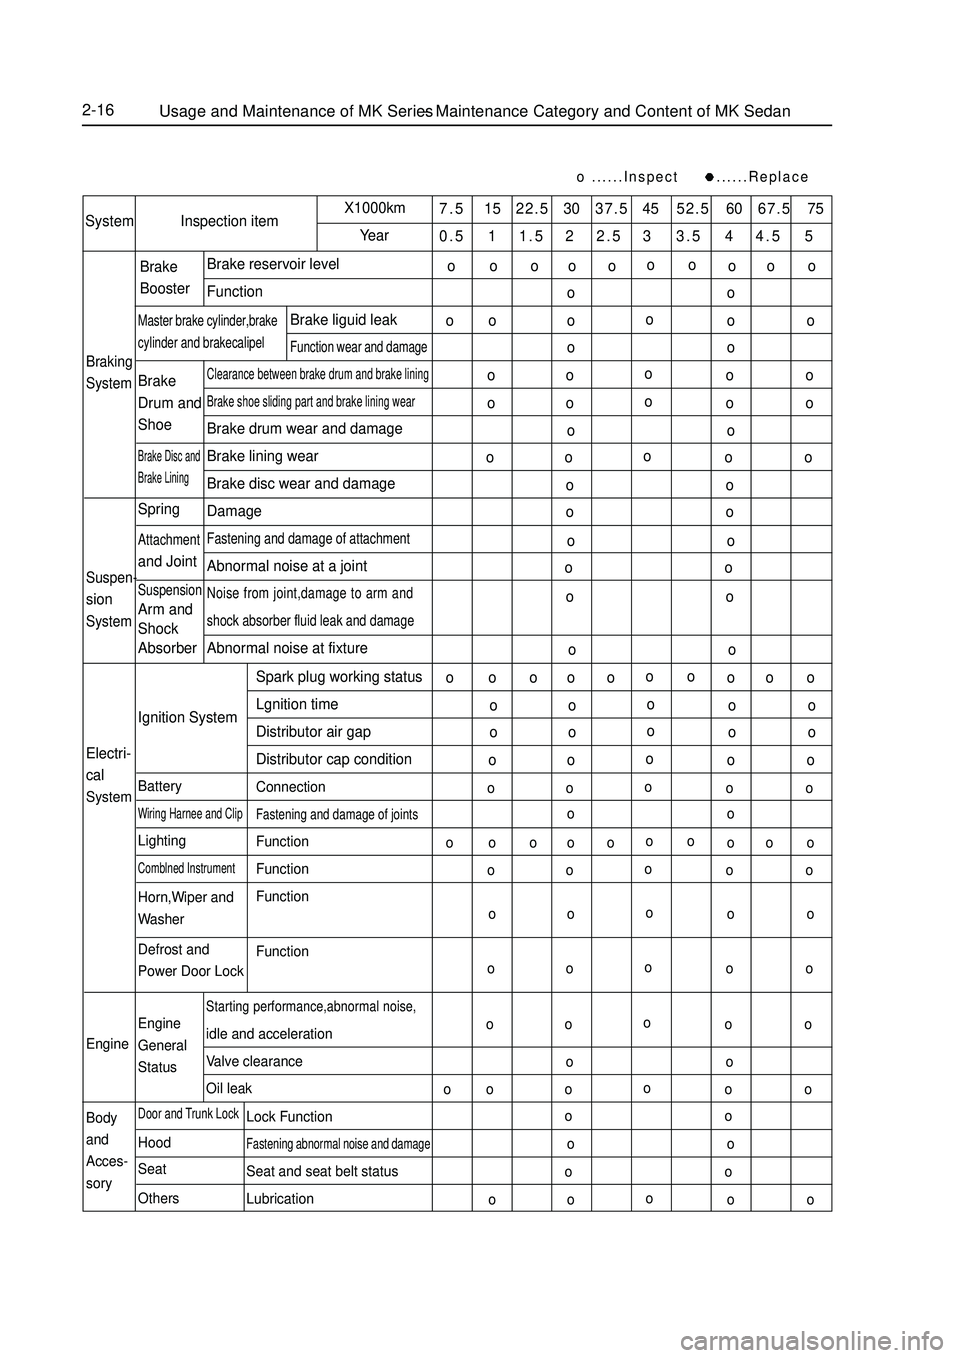
2-16......Inspect ......Replace7.5 15 22.5 30 37.5 45 52.5 60 67.5 75
0.5 1 1.5 2 2.5 3 3.5 4 4.5 5System Inspection itemX1000km
YearBraking
SystemBrake reservoir level
FunctionClearance between brake drum and brake liningBrake shoe sliding part and brake lining wearBrake drum wear and damage
Brake lining wear
Brake disc wear and damage
DamageFastening and damage of attachmentAbnormal noise at a jointNoise from joint,damage to arm and
shock absorber fluid leak and damageAbnormal noise at fixtureBrake
BoosterMaster brake cylinder,brakecylinder and brakecalipelBrake liguid leakFunction wear and damageBrake
Drum and
ShoeBrake Disc and
Brake LiningSuspen-sionSystemSpringAttachmentand JointSuspensionArm and
Shock
Absorber
Electri-
cal
SystemEngine
Body
and
Acces-
soryIgnition System
BatteryWiring Harnee and ClipLightingComblned InstrumentHorn,Wiper and
Washer
Defrost and
Power Door Lock
Engine
General
StatusDoor and Trunk LockHood
Seat
OthersStarting performance,abnormal noise,idle and acceleration
Valve clearance
Oil leakSpark plug working status
Lgnition time
Distributor air gap
Distributor cap condition
ConnectionFastening and damage of jointsFunction
Function
Function
FunctionLock FunctionFastening abnormal noise and damageSeat and seat belt status
LubricationUsage and Maintenance of MK Series - Maintenance Category and Content of MK Sedano
oo
o o o
o
o o ooo o
o o
ooo o
o o
o o
oo o
o o
oo o
o o
oo oo o
o o
o o
o o
o o
o o
o o
oo o o
o o ooo o
o o
oo o
o o
oo o
o o
oo o
o o
oo o
o o
oo o o
o o ooo o
o o
oo o
o o
oo o
o o
oo o
o o
oo o
o o
o o
ooo o
o o
oo oo oo oo o
Page 40 of 416
2-19 (4) Tire wear limits When the wear limit mark on tire shows up as the tire wears, it must be replaced with new tires (wear limit mark
indicates the thickness of tire pattern is 1.6mm).
5. Maintenance of wiper and washer
Status of wiper and washer directly influences windshield and driver's view. So, pay attention to wipers and
washers.
(1) Wiper Check if the wiper blade has any damage, deformation, which affects windshield wiping quality
and if the wiper works well. If wiper blade does not wipe well or the wiper does not work well, fix or replace it
in time.
(2) Washer Check washing fluid level in the tank, and refill when necessary. To get best washing effects, use
specified washing fluid, refill slowly, and pay attention not to mix it with any dirt. Mix the washing fluid with some
alcohol in winter to avoid freezing.
6. inspect and adjust headlampIncorrect beam of the headlamps affects safety of driving in the dark. So they must be inspected regularly, and be
adjusted when necessary.
7. Maintenance of inside the vehicle
The major content of maintenance inside the vehicle is cleaning, to keep the vehicle clean and provide fresh and
pleasant driving circumstance. The key points of indoor cleaning are:
(1) Ways to remove stains Get rid of dust before trying to remove stains, and then apply appropriate cleansing,and wipe the stains off with clean, soft, and not too wet cloth repeatedly.
(2) Cleansing It is better to remove stains on textile and man-made leather with hydro solvent made from soap
fluid and surface active agent. Be careful to avoid using any cleansing because they may corrode the synthetic
decoration materials more or less. Ball-pen and lipstick marks can be removed with alcohol, grease can be removed
with low Ron value gasoline, and chocolate and sugar stains can be cleaned with ammonia spirit, asphalt must be
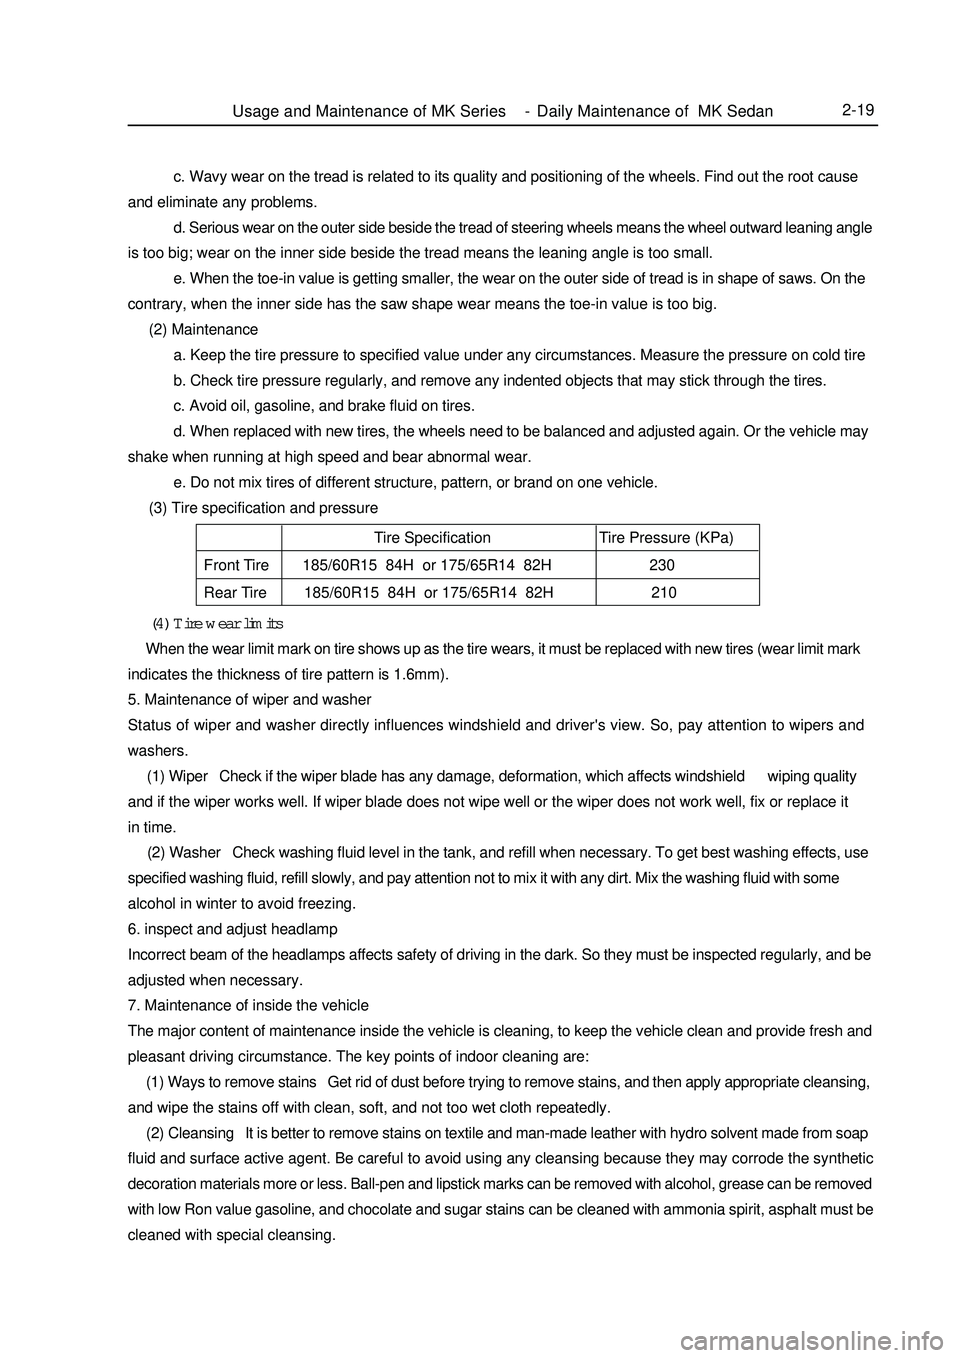
cleaned with special cleansing.Tire Specification Tire Pressure (KPa)
Front Tire 185/60R15 84H or 175/65R14 82H 230
Rear Tire 185/60R15 84H or 175/65R14 82H 210c. Wavy wear on the tread is related to its quality and positioning of the wheels. Find out the root cause
and eliminate any problems.
d. Serious wear on the outer side beside the tread of steering wheels means the wheel outward leaning angle
is too big; wear on the inner side beside the tread means the leaning angle is too small.
e. When the toe-in value is getting smaller, the wear on the outer side of tread is in shape of saws. On the
contrary, when the inner side has the saw shape wear means the toe-in value is too big.
(2) Maintenance
a. Keep the tire pressure to specified value under any circumstances. Measure the pressure on cold tire
b. Check tire pressure regularly, and remove any indented objects that may stick through the tires.
c. Avoid oil, gasoline, and brake fluid on tires.
d. When replaced with new tires, the wheels need to be balanced and adjusted again. Or the vehicle may
shake when running at high speed and bear abnormal wear.
e. Do not mix tires of different structure, pattern, or brand on one vehicle.
(3) Tire specification and pressureUsage and Maintenance of MK Series - Daily Maintenance of MK Sedan
Page 163 of 416

Component ViewBrake System -Brake Master Cylinder Assembly4-86With ABS:
Cover
Brake fluid reservoir
Strainer
Automatic Transmission
O-ring
Retaining ring
Pin
Straight pinPiston guide
block
Cup
Washer
#1 piston & Spring
#2 piston
Spring Hole connectorHole
connector
Master cylinder
Without ABS
Cover
Strainer
PinManual Transmission
O-ring
Retaining ring
Hole connector
Piston guide block
Cup
#1 piston & Spring
#2 piston & Spring
Washer
Piston limit bolt Master cylinder Hole connectorSpecified torque
Non-reusable parts
Lithium soap base glycol lube
Page 166 of 416
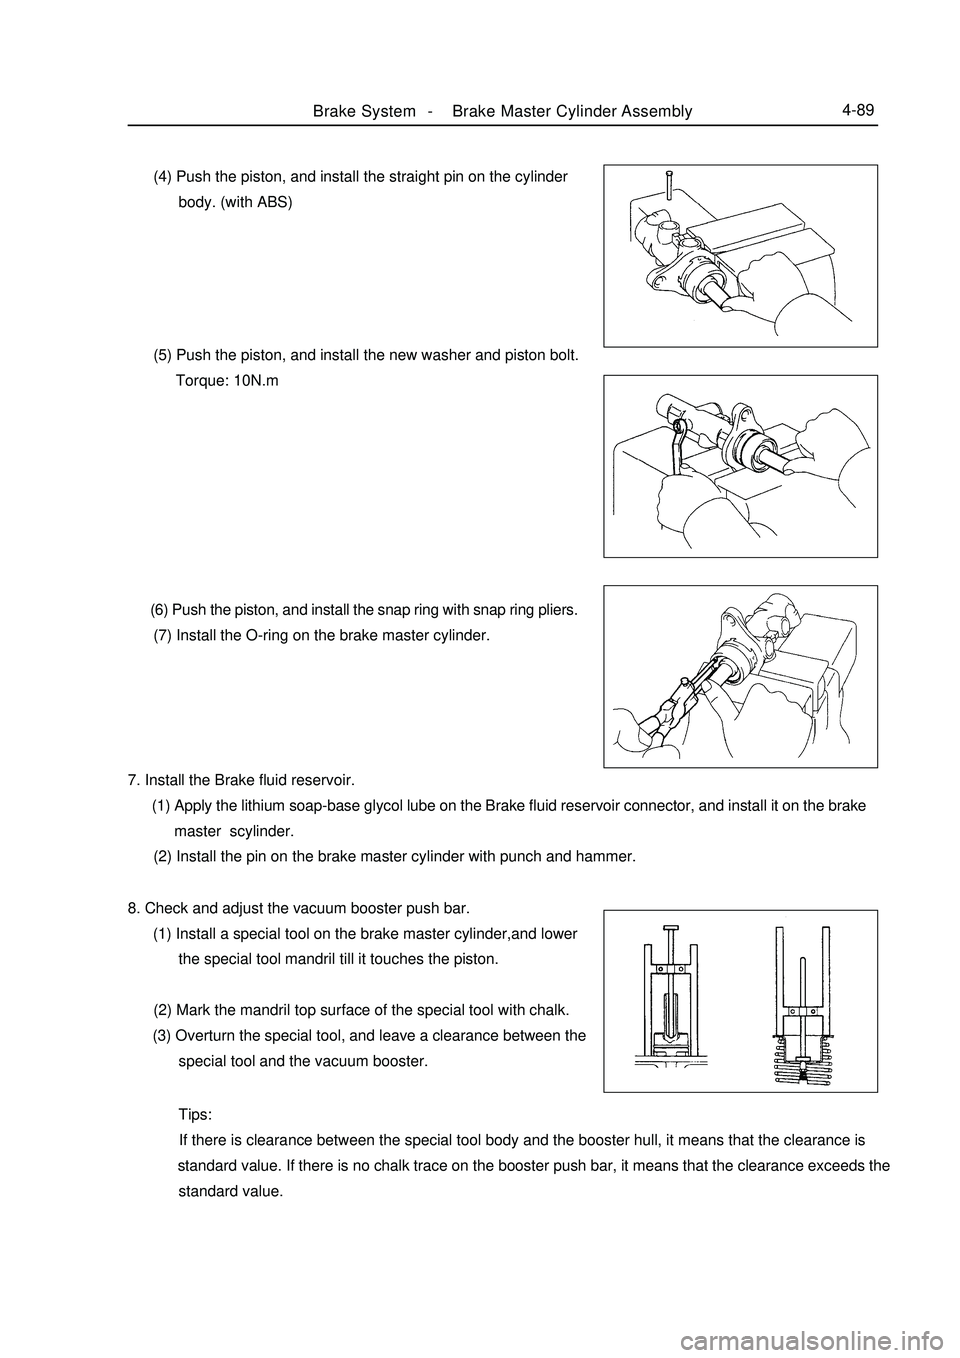
Brake System -Brake Master Cylinder Assembly4-89 (4) Push the piston, and install the straight pin on the cylinder
body. (with ABS)
(5) Push the piston, and install the new washer and piston bolt.
Torque: 10N.m
(6) Push the piston, and install the snap ring with snap ring pliers.
(7) Install the O-ring on the brake master cylinder.
7. Install the Brake fluid reservoir.
(1) Apply the lithium soap-base glycol lube on the Brake fluid reservoir connector, and install it on the brake
master scylinder.
(2) Install the pin on the brake master cylinder with punch and hammer.
8. Check and adjust the vacuum booster push bar.
(1) Install a special tool on the brake master cylinder,and lower
the special tool mandril till it touches the piston.
(2) Mark the mandril top surface of the special tool with chalk.
(3) Overturn the special tool, and leave a clearance between the
special tool and the vacuum booster.
Tips:
If there is clearance between the special tool body and the booster hull, it means that the clearance is
standard value. If there is no chalk trace on the booster push bar, it means that the clearance exceeds the
standard value.
Page 170 of 416
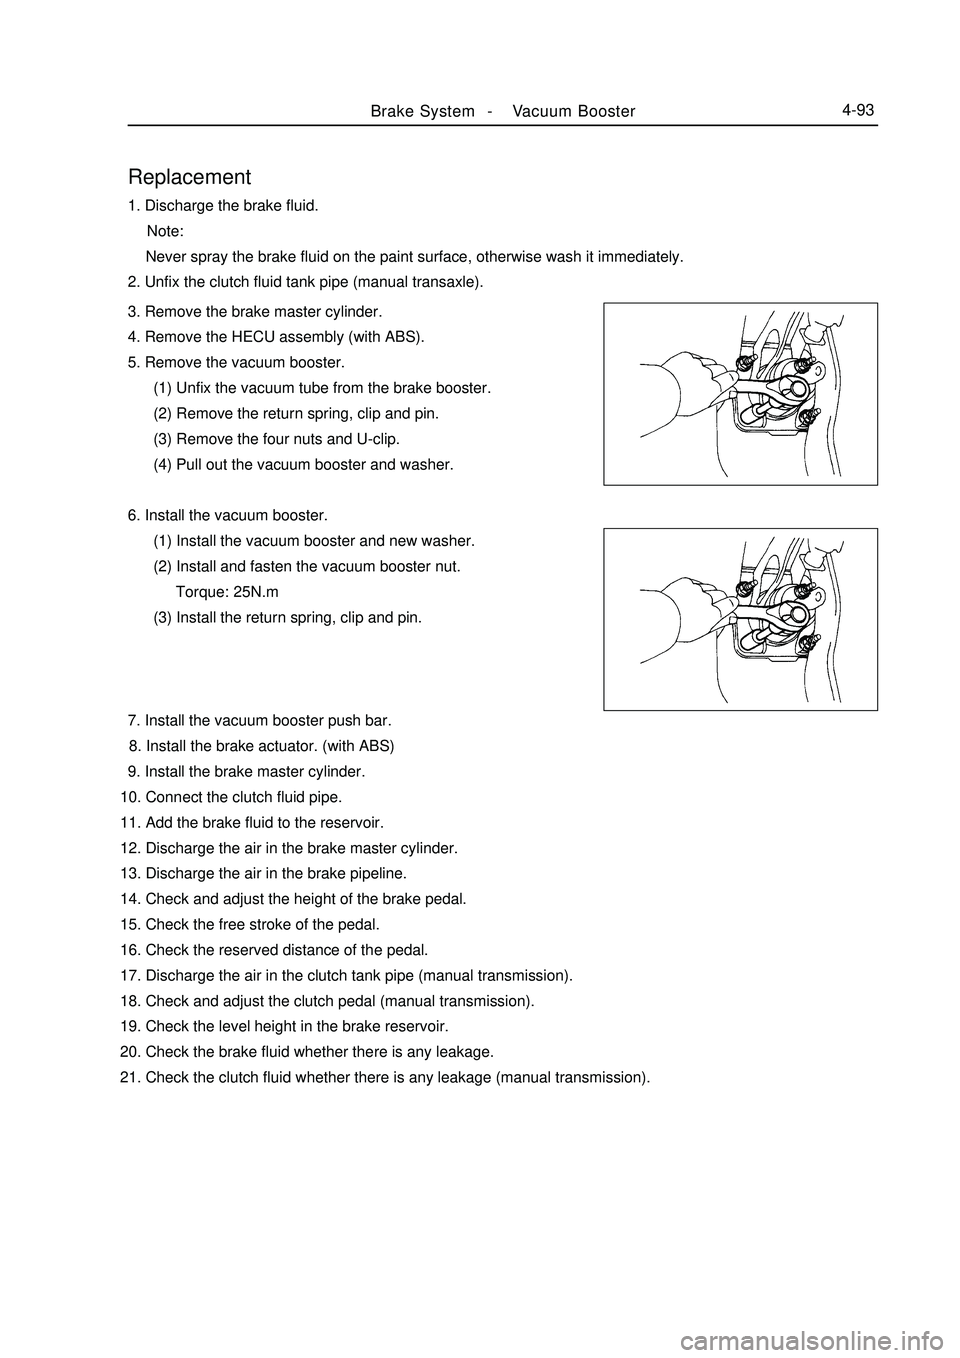
Brake System -Vacuum Booster4-93Replacement1. Discharge the brake fluid.
Note:
Never spray the brake fluid on the paint surface, otherwise wash it immediately.
2. Unfix the clutch fluid tank pipe (manual transaxle).
3. Remove the brake master cylinder.
4. Remove the HECU assembly (with ABS).
5. Remove the vacuum booster.
(1) Unfix the vacuum tube from the brake booster.
(2) Remove the return spring, clip and pin.
(3) Remove the four nuts and U-clip.
(4) Pull out the vacuum booster and washer.
6. Install the vacuum booster.
(1) Install the vacuum booster and new washer.
(2) Install and fasten the vacuum booster nut.
Torque: 25N.m
(3) Install the return spring, clip and pin.
7. Install the vacuum booster push bar.
8. Install the brake actuator. (with ABS)
9. Install the brake master cylinder.
10. Connect the clutch fluid pipe.
11. Add the brake fluid to the reservoir.
12. Discharge the air in the brake master cylinder.
13. Discharge the air in the brake pipeline.
14. Check and adjust the height of the brake pedal.
15. Check the free stroke of the pedal.
16. Check the reserved distance of the pedal.
17. Discharge the air in the clutch tank pipe (manual transmission).
18. Check and adjust the clutch pedal (manual transmission).
19. Check the level height in the brake reservoir.
20. Check the brake fluid whether there is any leakage.
21. Check the clutch fluid whether there is any leakage (manual transmission).
Page 172 of 416
Repair1. Remove the front wheel.
2. Discharge the brake fluid.
Note:
Never spray the brake fluid on the paint surface, otherwise wash it immediately.Brake System -Front Brake Disc4-95Sliding Pin Dust Shields3. Remove the front disc brake cylinder.
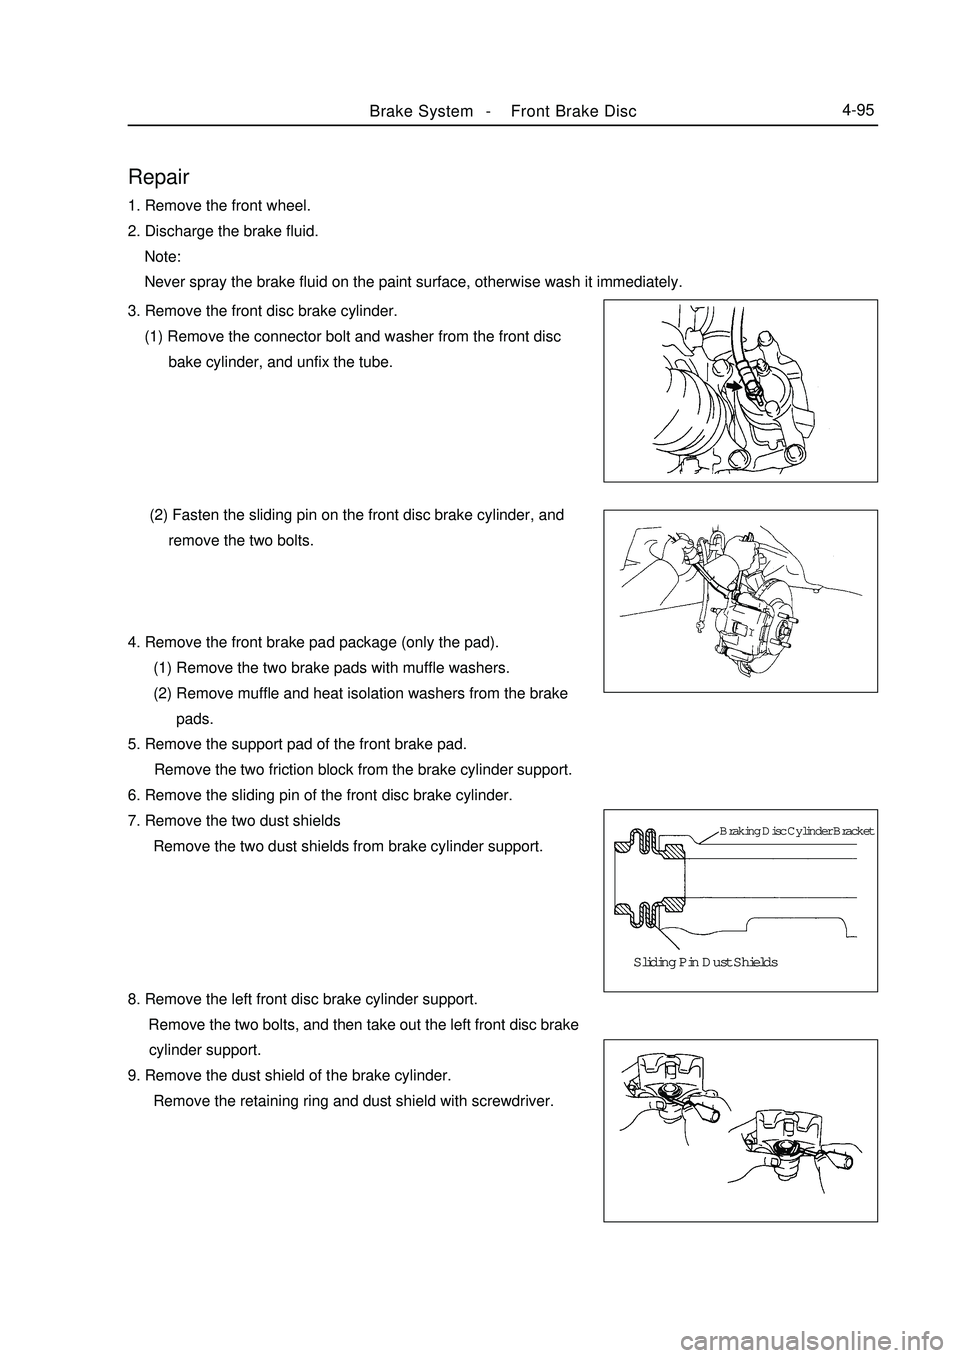
(1) Remove the connector bolt and washer from the front disc
bake cylinder, and unfix the tube.
(2) Fasten the sliding pin on the front disc brake cylinder, and
remove the two bolts.
4. Remove the front brake pad package (only the pad).
(1) Remove the two brake pads with muffle washers.
(2) Remove muffle and heat isolation washers from the brake
pads.
5. Remove the support pad of the front brake pad.
Remove the two friction block from the brake cylinder support.
6. Remove the sliding pin of the front disc brake cylinder.
7. Remove the two dust shields
Remove the two dust shields from brake cylinder support.
8. Remove the left front disc brake cylinder support.
Remove the two bolts, and then take out the left front disc brake
cylinder support.
9. Remove the dust shield of the brake cylinder.
Remove the retaining ring and dust shield with screwdriver.Braking Disc Cylinder Bracket
Page 175 of 416
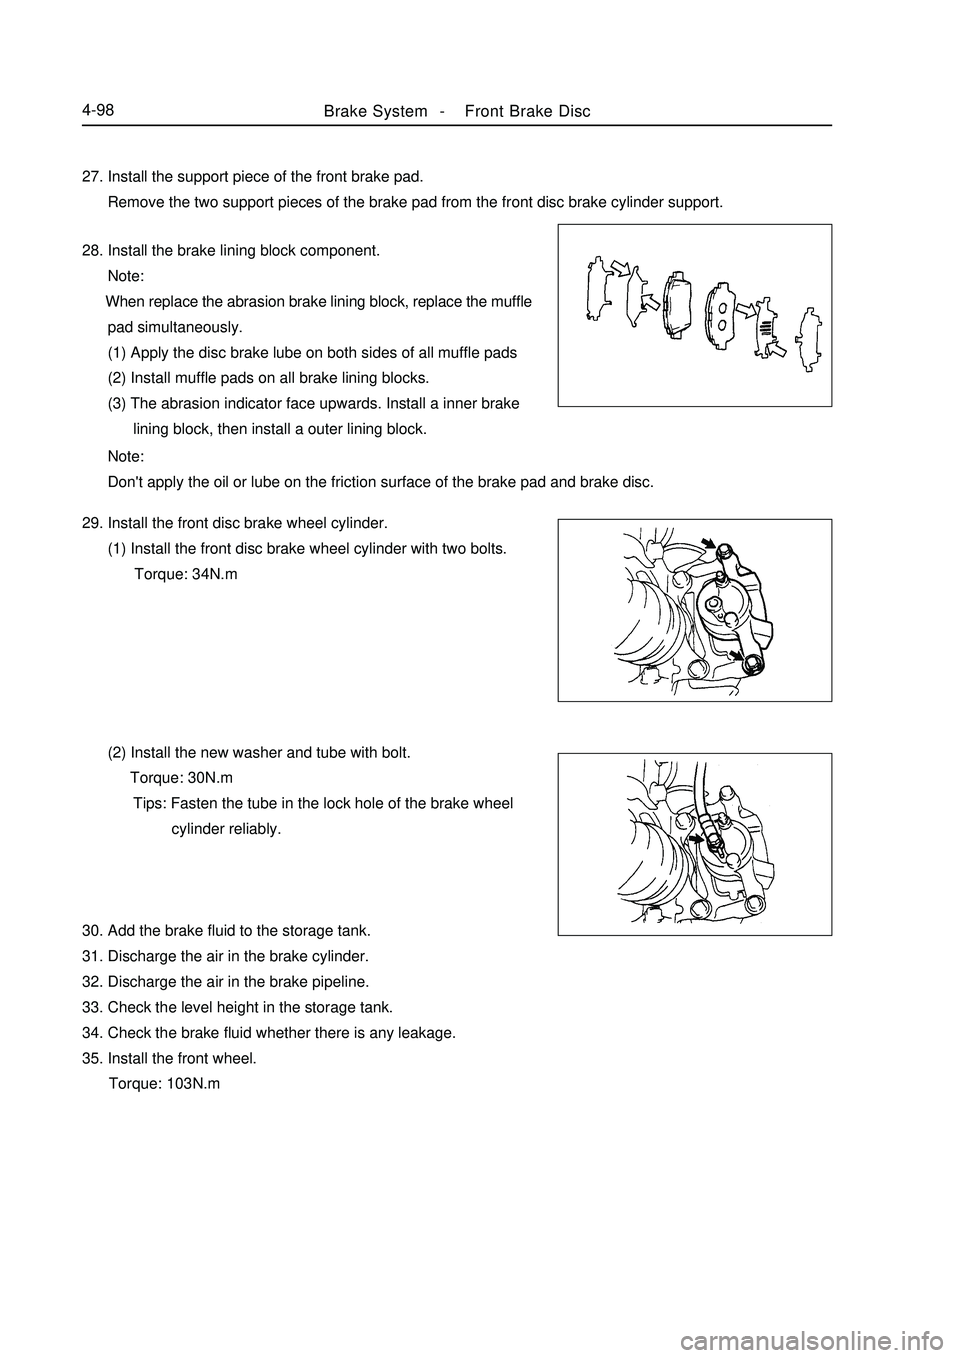
Brake System -Front Brake Disc4-9827. Install the support piece of the front brake pad.
Remove the two support pieces of the brake pad from the front disc brake cylinder support.
28. Install the brake lining block component.
Note:
When replace the abrasion brake lining block, replace the muffle
pad simultaneously.
(1) Apply the disc brake lube on both sides of all muffle pads
(2) Install muffle pads on all brake lining blocks.
(3) The abrasion indicator face upwards. Install a inner brake
lining block, then install a outer lining block.
Note:
Don't apply the oil or lube on the friction surface of the brake pad and brake disc.
29. Install the front disc brake wheel cylinder.
(1) Install the front disc brake wheel cylinder with two bolts.
Torque: 34N.m
(2) Install the new washer and tube with bolt.
Torque: 30N.m
Tips: Fasten the tube in the lock hole of the brake wheel
cylinder reliably.
30. Add the brake fluid to the storage tank.
31. Discharge the air in the brake cylinder.
32. Discharge the air in the brake pipeline.
33. Check the level height in the storage tank.
34. Check the brake fluid whether there is any leakage.
35. Install the front wheel.
Torque: 103N.m
Page 208 of 416

Chapter 3 Wiper and Washer SystemSection 1 Wiper and Washer System Inspection5-21Remark:
The table below can help you find the causes of malfunction. These figures show the most possible
malfunctions in order of priority. Inspect each part in the order given. If necessary, repair or replace these parts.
Symptom
Front wiper does not work.
Front wiper in intermittent shift does not work.
Front washer motor does not work
When the washer switch is placed ON, front
wiper does not work
Washer fluid dose not jet out
1. When the washer switch places on OFF, wiper
blade can not return, or stay in a wrong place.
2. The wiper blade scratches the bodySuspected Area
1. Wiper fuse
2. Wiper switch assembly
3. Harness
1. Wiper switch assembly
2. Wiper motor assembly
3. Harness
4. Central controller
1. Wiper fuse
2. Wiper switch assembly
3. Wiper motor assembly
4. Harness
1. Wiper switch assembly
2. Wiper motor assembly
3. Harness
4. Central controller
1. Washer hose and nozzle
1.Wiper motor assembly (The position of wiper arm)II. Trouble shooting1. Check work of washer pump
(1) Install washer pump on tank system, pour cleaning fluid into
the tank.
(2) Disconnect connector of washer pump.
(3) As shown in the figure below, connect No. 1 terminal of
washer pump with positive pole (+) of storage battery; con
nect No. 2 terminal with negative pole (-) of storage battery.
Check whether cleaning fluid flows from tank.
(4) If there is no outflow, replace washer pump.Wiper and Washer System -Wiper and Washer System Inspection
Page 211 of 416
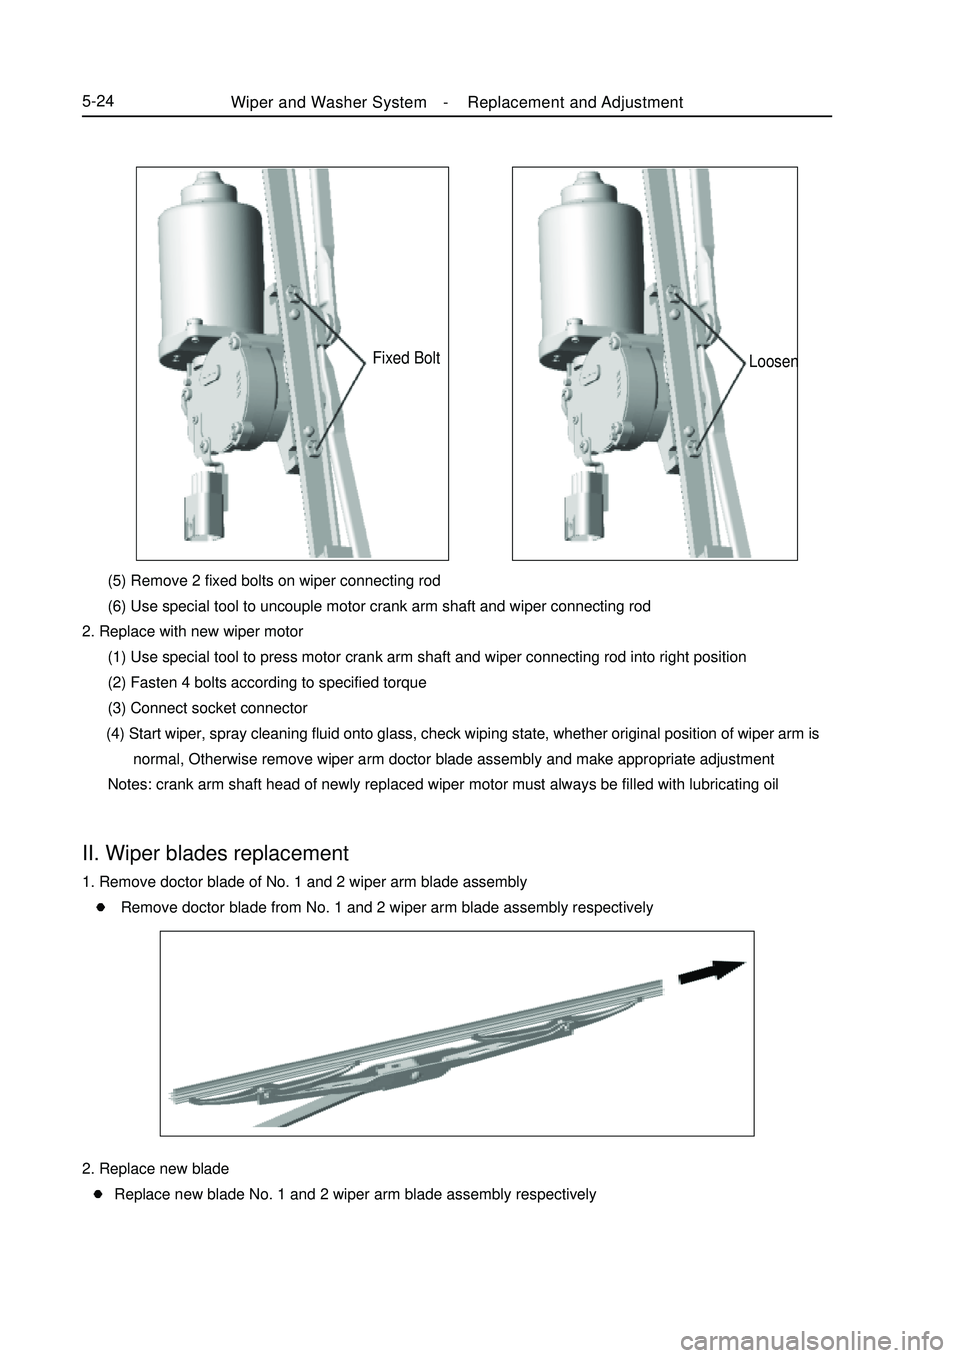
Fixed Bolt (5) Remove 2 fixed bolts on wiper connecting rod
(6) Use special tool to uncouple motor crank arm shaft and wiper connecting rod
2. Replace with new wiper motor
(1) Use special tool to press motor crank arm shaft and wiper connecting rod into right position
(2) Fasten 4 bolts according to specified torque
(3) Connect socket connector
(4) Start wiper, spray cleaning fluid onto glass, check wiping state, whether original position of wiper arm is
normal, Otherwise remove wiper arm doctor blade assembly and make appropriate adjustment
Notes: crank arm shaft head of newly replaced wiper motor must always be filled with lubricating oilII. Wiper blades replacement1. Remove doctor blade of No. 1 and 2 wiper arm blade assembly
Remove doctor blade from No. 1 and 2 wiper arm blade assembly respectivelyLoosenWiper and Washer System -Replacement and Adjustment5-242. Replace new blade
Replace new blade No. 1 and 2 wiper arm blade assembly respectively