P release GENESIS G70 2021 Owner's Guide
[x] Cancel search | Manufacturer: GENESIS, Model Year: 2021, Model line: G70, Model: GENESIS G70 2021Pages: 516, PDF Size: 12.84 MB
Page 140 of 516

3-55
Convenient features of your vehicle
3
Information
• The Smart Trunk function will not
work if any of the following occurs:
- The smart key is close to a radio
transmitter such as a radio station
or an airport which can interfere
with normal operation of the
transmitter.
- The smart key is near a mobile two
way radio system or a cellular
phone.
- Another vehicle's smart key is
being operated close to your vehi-
cle.
• The detecting range may decrease
or increase when :
- One side of the tire is raised to
replace a tire or to inspect the vehi-
cle.
- The vehicle is slantingly parked on
a slope or unpaved road, etc.
Fuel Filler Door
Opening the fuel filler door
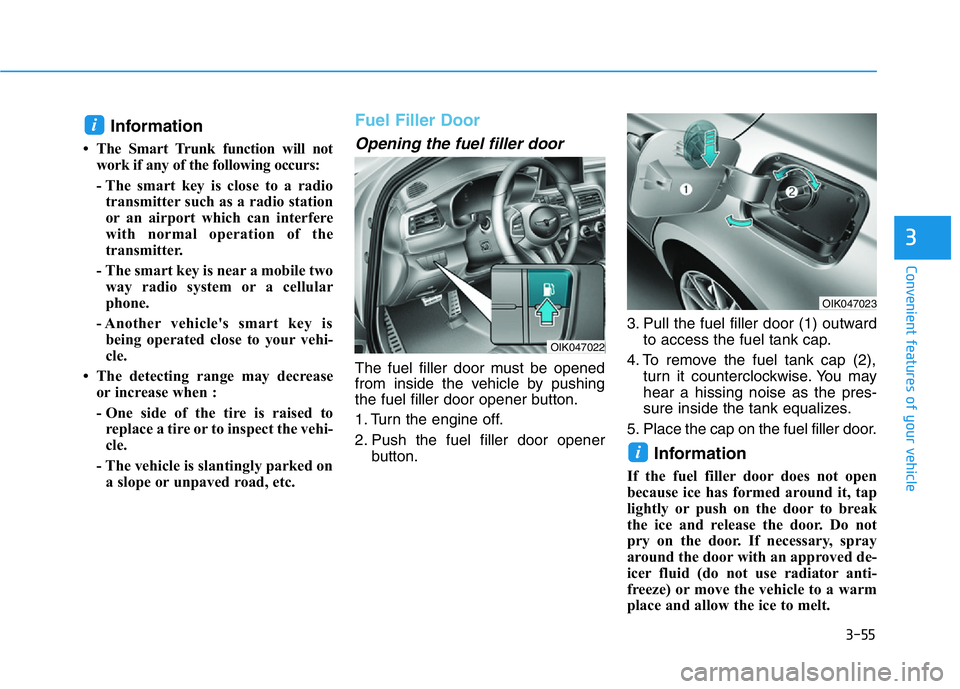
The fuel filler door must be opened
from inside the vehicle by pushing
the fuel filler door opener button.
1. Turn the engine off.
2. Push the fuel filler door opener
button.3. Pull the fuel filler door (1) outward
to access the fuel tank cap.
4. To remove the fuel tank cap (2),
turn it counterclockwise. You may
hear a hissing noise as the pres-
sure inside the tank equalizes.
5. Place the cap on the fuel filler door.
Information
If the fuel filler door does not open
because ice has formed around it, tap
lightly or push on the door to break
the ice and release the door. Do not
pry on the door. If necessary, spray
around the door with an approved de-
icer fluid (do not use radiator anti-
freeze) or move the vehicle to a warm
place and allow the ice to melt.
i
i
OIK047023
OIK047022
Page 142 of 516

3-57
Convenient features of your vehicle
3
Information
Make sure to refuel your
vehicle according to the "Fuel
Requirements" suggested in the
Introduction chapter.
• Do not spill fuel on the exterior
surfaces of the vehicle. Any type
of fuel spilled on painted sur-
faces may damage the paint.
• If the fuel filler cap requires
replacement, use only a Genesis
cap or the equivalent specified
for your vehicle. An incorrect
fuel filler cap can result in a seri-
ous malfunction of the fuel sys-
tem or emission control system.
Emergency fuel filler door release
If the fuel filler door does not open
using the remote fuel filler door
release button, you can open it man-
ually. Pull the handle of the release
located on the left side of the lug-
gage compartment outward slightly.
NOTICE
i
OIK047024N
•Do not over-fill or top-off your
vehicle tank, which can cause
gasoline spillage.
•If a fire breaks out during refu-
eling, leave the vicinity of the
vehicle, and immediately con-
tact the manager of the gas
station and then contact the
local fire department. Follow
any safety instructions they
provide.
•If pressurized fuel sprays out,
it can cover your clothes or
skin and thus subject you to
the risk of fire and burns.
Always remove the fuel cap
carefully and slowly. If the cap
is venting fuel or if you hear a
hissing sound, wait until the
condition stops before com-
pletely removing the cap.
•Always check that the fuel cap
is installed securely to pre-
vent fuel spillage in the event
of an accident.
Page 150 of 516

3-65
Convenient features of your vehicle
3
Warning and Indicator Lights
Information
Make sure that all warning lights are
OFF after starting the engine. If any
light is still ON, this indicates a situa-
tion that needs attention.
Seat Belt Warning Light
This warning light informs the driver
that the seat belt is not fastened.
For more details, refer to "Seat
Belts" in chapter 2.
Air Bag Warning Light
This warning light illuminates:
• When you press the Engine
Start/Stop button to the ON posi-
tion.
- It illuminates for approximately 6
seconds and then goes off.
• When there is a malfunction with
the SRS.
In this case, have the vehicle
inspected by an authorized retailer
of Genesis Branded products.
Parking Brake & Brake
Fluid Warning Light
This warning light illuminates:
• When you pressthe Engine
Start/Stop button to the ON posi-
tion.
- It illuminates for approximately 3
seconds.
- It remains on if the parking brake
is applied.
• When the parking brake is applied.
• When the brake fluid level in the
reservoir is low.
- If the warning light illuminates
with the parking brake released, it
indicates the brake fluid level in
the reservoir is low.
i
Page 151 of 516

3-66
Convenient features of your vehicle
If the brake fluid level in the reser-
voir is low:
1. Drive carefully to the nearest safe
location and stop your vehicle.
2.
With the engine stopped, check
the brake fluid level immediately
and add fluid as required (For
more details, refer to "Brake
Fluid" in chapter 7). After adding
brake fluid, check all brake compo-
nents for fluid leaks. If a brake fluid
leak is found, or if the warning light
remains on, or if the brakes do not
operate properly, do not drive the
vehicle. Have the vehicle inspect-
ed by an authorized retailer of
Genesis Branded products.
Dual-diagonal braking system
Your vehicle is equipped with dual-
diagonal braking systems. This
means you still have braking on two
wheels even if one of the dual sys-
tems should fail.
With only one of the dual systems
working, more than normal pedal
travel and greater pedal pressure is
required to stop the vehicle.Also, the vehicle will not stop in as
short a distance with only a portion
of the brake system working.
If the brakes fail while you are driv-
ing, shift to a lower gear for addition-
al engine braking and stop the vehi-
cle as soon as it is safe to do so.
Anti-lock Brake System
(ABS) Warning Light
This warning light illuminates:
• When you press the Engine
Start/Stop button to the ON posi-
tion.
- It illuminates for approximately 3
seconds and then goes off.
• Whenever there is a malfunction
with the ABS.
Note that the hydraulic braking
system will still be operational even
if there is a malfunction with the
ABS.
In this case, have the vehicle
inspected by an authorized retailer
of Genesis Branded products.
Parking Brake & Brake Fluid
Warning Light
Driving the vehicle with a warn-
ing light ON is dangerous. If the
Parking Brake & Brake Fluid
Warning Light illuminates with
the parking brake released, it
indicates that the brake fluid
level is low.
In this case, have the vehicle
inspected by an authorized
retailer of Genesis Branded
products.
WARNING
Page 190 of 516

3-105
Convenient features of your vehicle
3
To flash the high beam headlamp,
pull the lever towards you, then
release the lever. The high beams
will remain ON as long as you hold
the lever towards you.
High Beam Assist (HBA) system
(if equipped)
The High Beam Assist (HBA) is a
system that automatically adjusts the
headlamp range (switches between
high beam and low beam) according
to the brightness of other vehicles
and road conditions.
Operating condition
1. Place the light switch in the AUTO
position.
2. Turn on the high beam by pushing
the lever away from you.
The High Beam Assist (HBA) ( )
indicator will illuminate.3. The High Beam Assist (HBA) will
turn on when vehicle speed is
above 25 mph (40 km/h).
• If the light switch is pushed away
when the High Beam Assist (HBA)
is operating, the High Beam Assist
(HBA) will turn off and the high
beam will be on continuously.
• If the light switch is pulled towards
you when the high beam is off, the
high beam will turn on without the
High Beam Assist (HBA) can-
celed. When you let go of the light
switch, the lever will move to the
middle and the high beam will turn
off.
• If the light switch is pulled towards
you when the high beam is on by
the High Beam Assist (HBA), the
low beam will be on and the High
Beam Assist (HBA) will turn off.
• If the light switch is placed to the
headlamp ON position, the High
Beam Assist (HBA) will turn off
and the low beam will be on con-
tinuously.
OIG046414
OIK047090
Page 193 of 516

3-108
Convenient features of your vehicle
Turn signals and lane change
signals
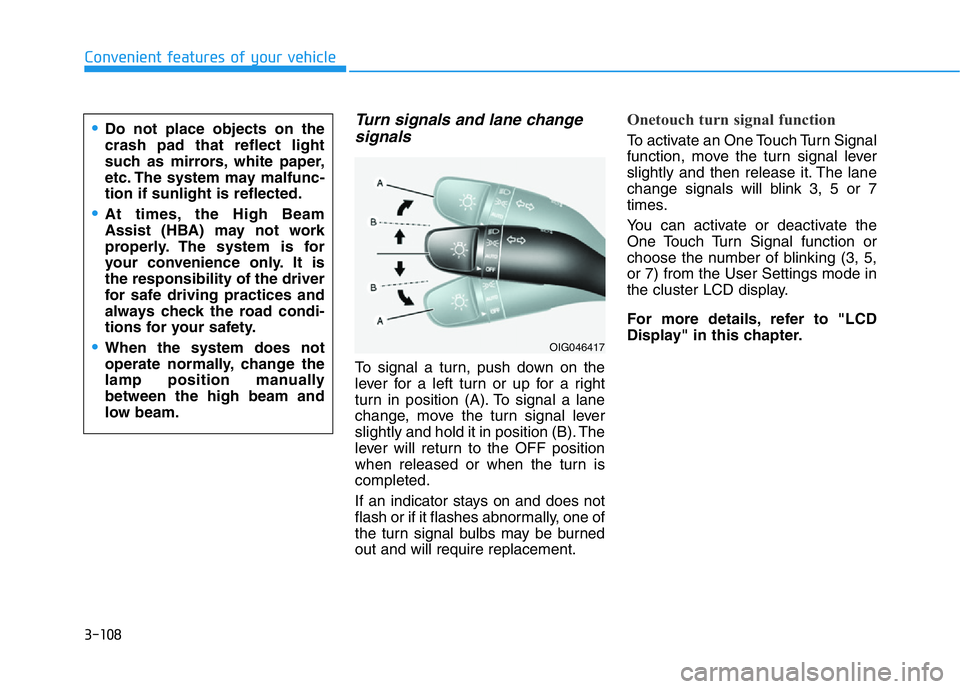
To signal a turn, push down on the
lever for a left turn or up for a right
turn in position (A). To signal a lane
change, move the turn signal lever
slightly and hold it in position (B). The
lever will return to the OFF position
when released or when the turn is
completed.
If an indicator stays on and does not
flash or if it flashes abnormally, one of
the turn signal bulbs may be burned
out and will require replacement.
Onetouch turn signal function
To activate an One Touch Turn Signal
function, move the turn signal lever
slightly and then release it. The lane
change signals will blink 3, 5 or 7
times.
You can activate or deactivate the
One Touch Turn Signal function or
choose the number of blinking (3, 5,
or 7) from the User Settings mode in
the cluster LCD display.
For more details, refer to "LCD
Display" in this chapter.•Do not place objects on the
crash pad that reflect light
such as mirrors, white paper,
etc. The system may malfunc-
tion if sunlight is reflected.
•At times, the High Beam
Assist (HBA) may not work
properly. The system is for
your convenience only. It is
the responsibility of the driver
for safe driving practices and
always check the road condi-
tions for your safety.
•When the system does not
operate normally, change the
lamp position manually
between the high beam and
low beam.OIG046417
Page 201 of 516

3-116
Convenient features of your vehicle
A : Wiper speed control
· MIST – Single wipe
· OFF – Off
· INT - Intermittent wipe
· AUTO – Automatic control wipe
(if equipped)
· LO – Low wiper speed
· HI – High wiper speed
B : Intermittent control wipe time
adjustment/Auto control wipe
time adjustment (if equipped)
C : Wash with brief wipes
Windshield Wipers
Operates as follows when the Engine
Start/Stop button is in the ON position.
MIST : For a single wiping cycle,
push the lever upward and
release. The wipers will oper-
ate continuously if the lever is
held in this position.
OFF : Wiper is not in operation.
INT : Wiper operates intermittently at
the same wiping intervals. To
vary the speed setting, move
the speed control lever. The top
most setting will run the wipers
most frequently (for more rain).
The bottom setting will run the
wipers the least frequently (for
less rain).
LO : The wiper runs at a lower speed.
HI : The wiper runs at a higher speed.
Information
If there is heavy accumulation of snow
or ice on the windshield, defrost the
windshield for about 10 minutes, or
until the snow and/or ice is removed
before using the windshield wipers to
ensure proper operation.
If you do not remove the snow and/ or
ice before using the wiper and washer,
it may damage the wiper and washer
system.
i
WIPERS AND WASHERS
OAD046437L
Page 203 of 516

3-118
Convenient features of your vehicle
Windshield Washers
In the OFF position, pull the lever
gently toward you to spray washer
fluid on the windshield and to run the
wipers 1-3 cycles. The spray and
wiper operation will continue until
you release the lever. If the washer
does not work, you may need to add
washer fluid to the washer fluid
reservoir.• To prevent possible damage to
the washer pump, do not oper-
ate the washer when the fluid
reservoir is empty.
• To prevent possible damage to
the wipers or windshield, do not
operate the wipers when the
windshield is dry.
• To prevent damage to the wiper
arms and other components, do
not attempt to move the wipers
manually.
• To prevent possible damage to
the wipers and washer system,
use anti-freezing washer fluids
in the winter season or cold
weather.
NOTICE
OIG046419
When the outside temperature
is below freezing, ALWAYS
warm the windshield using the
defroster to prevent the washer
fluid from freezing on the wind-
shield and obscuring your
vision which could result in an
accident and serious injury or
death.
WARNING
Page 239 of 516

3-154
Convenient features of your vehicle
• Keep your drinks sealed while
driving to prevent spilling your
drink. If liquid spills, it may get
into the vehicle's electrical/elec-
tronic system and damage elec-
trical/electronic parts.
• When cleaning spilled liquids do
not use hot air to blow out or dry
the cup holder. This may damage
the interior.
Sunvisor
To use the sunvisor, pull it down-
ward.
To use the sunvisor to block the sun
from the side window, pull it down-
ward, release it from the bracket (1)
and swing it to the side towards the
window (2).
To use the vanity mirror, pull down
the sunvisor and slide the mirror
cover (3).
Adjust the sunvisor forward or back-
ward (4) as needed. Use the ticket
holder (5) to hold tickets.
NOTICE
ODH047359
Keep cans or bottles out of
direct sun light and do not put
them in a hot vehicle. It may
explode.
WARNING
•Avoid abrupt starting and
braking when the cup holder
is in use to prevent spilling
your drink. If hot liquid spills,
you could be burned. Such a
burn to the driver could cause
loss of vehicle control result-
ing in an accident.
•Do not place uncovered or
unsecured cups, bottles,
cans, etc., in the cup holder
containing hot liquid while the
vehicle is in motion. Injuries
may result in the event of sud-
den stop or collision.
•Only use soft cups in the cup
holders. Hard objects can
injure you in an accident.
WARNING
Page 248 of 516

4-3
Infotainment system
4
• Do not clean the inside of the
rear window glass with a cleaner
or scraper to remove foreign
deposits as this may cause dam-
age to the antenna elements.
• To prevent damage to the rear
glass antenna, never use sharp
instruments or window cleaner
containing abrasives to clean
the window. Clean the inside
surface of the rear glass window
with a piece of soft cloth.
• Avoid adding metallic coatings
such as Ni, Cd, and so on. These
can degrade the receiving AM
and FM broadcast signals.
• When putting a sticker on the
inside surface of the rear win-
dow, be careful not to damage
the rear glass antenna.
• Do not put sharp instruments
nearby the rear glass antenna.
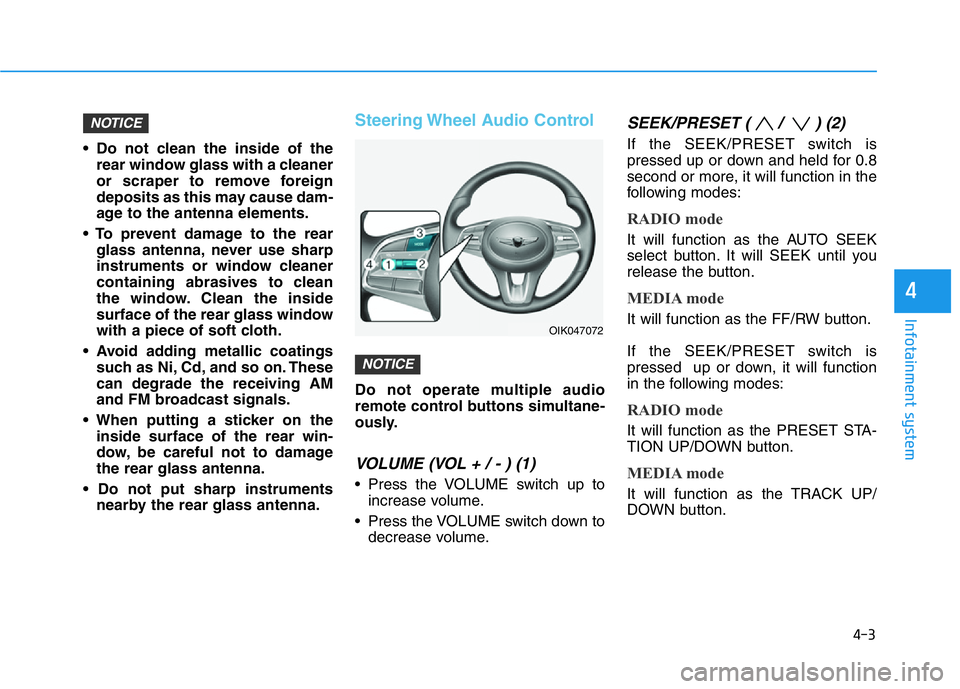
Steering Wheel Audio Control
Do not operate multiple audio
remote control buttons simultane-
ously.
VOLUME (VOL + / - ) (1)
• Press the VOLUME switch up to
increase volume.
• Press the VOLUME switch down to
decrease volume.
SEEK/PRESET ( / ) (2)
If the SEEK/PRESET switch is
pressed up or down and held for 0.8
second or more, it will function in the
following modes:
RADIO mode
It will function as the AUTO SEEK
select button. It will SEEK until you
release the button.
MEDIA mode
It will function as the FF/RW button.
If the SEEK/PRESET switch is
pressed up or down, it will function
in the following modes:
RADIO mode
It will function as the PRESET STA-
TION UP/DOWN button.
MEDIA mode
It will function as the TRACK UP/
DOWN button.
NOTICE
NOTICE
OIK047072