chapter 6 GENESIS G90 2021 Service Manual
[x] Cancel search | Manufacturer: GENESIS, Model Year: 2021, Model line: G90, Model: GENESIS G90 2021Pages: 538, PDF Size: 13.02 MB
Page 398 of 538
5-146
Driving your vehicle
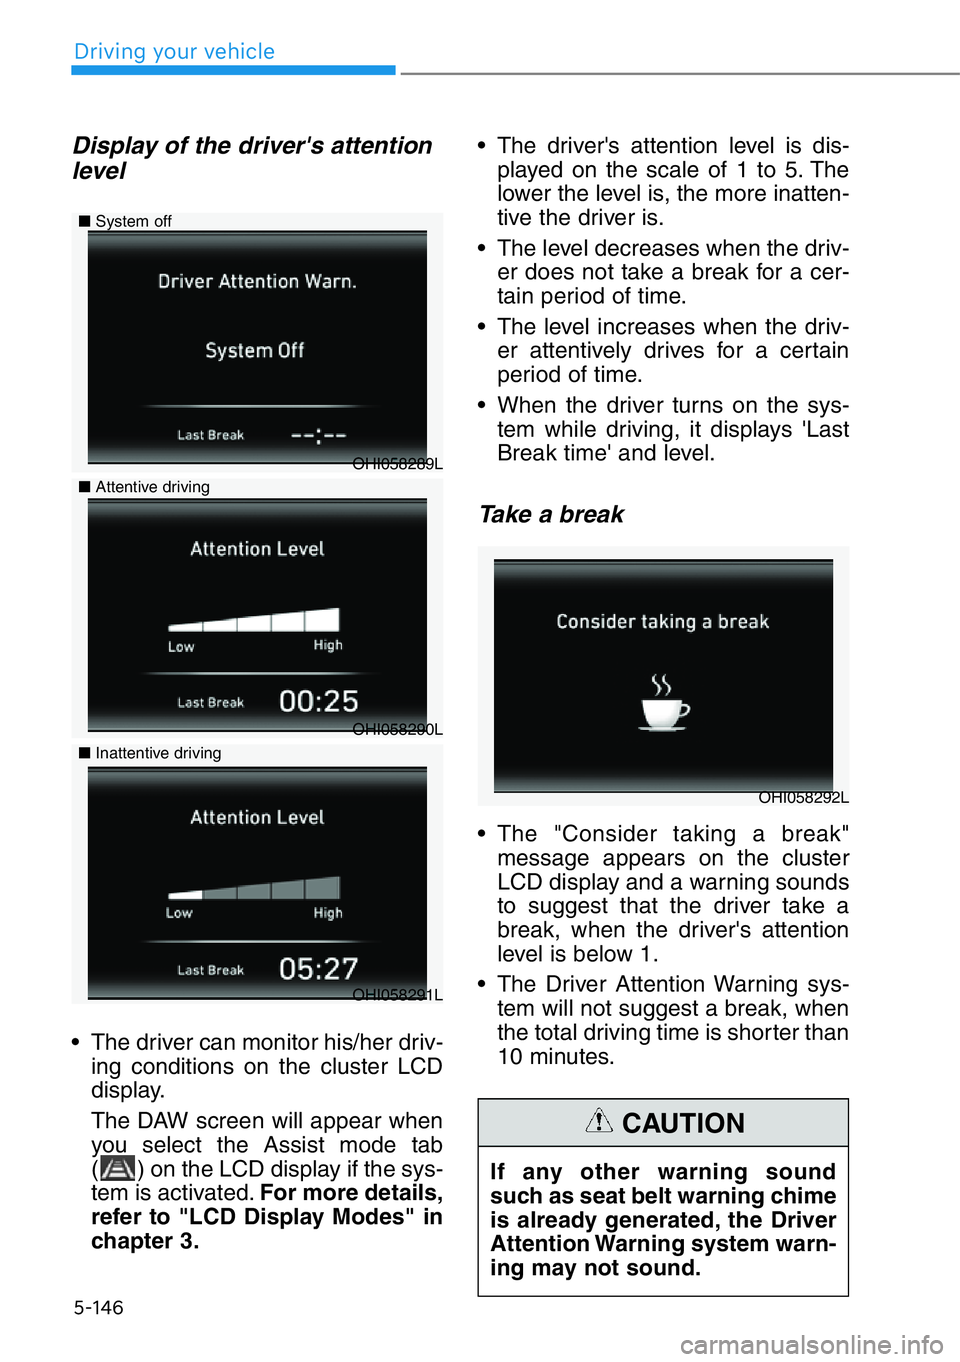
Display of the driver's attention
level
• The driver can monitor his/her driv-
ing conditions on the cluster LCD
display.
The DAW screen will appear when
you select the Assist mode tab
( ) on the LCD display if the sys-
tem is activated.For more details,
refer to "LCD Display Modes" in
chapter 3.• The driver's attention level is dis-
played on the scale of 1 to 5. The
lower the level is, the more inatten-
tive the driver is.
• The level decreases when the driv-
er does not take a break for a cer-
tain period of time.
• The level increases when the driv-
er attentively drives for a certain
period of time.
• When the driver turns on the sys-
tem while driving, it displays 'Last
Break time' and level.
Take a break
• The "Consider taking a break"
message appears on the cluster
LCD display and a warning sounds
to suggest that the driver take a
break, when the driver's attention
level is below 1.
• The Driver Attention Warning sys-
tem will not suggest a break, when
the total driving time is shorter than
10 minutes.
OHI058289L ■System off
■Attentive driving
OHI058290L
■Inattentive driving
OHI058291L
OHI058292L
If any other warning sound
such as seat belt warning chime
is already generated, the Driver
Attention Warning system warn-
ing may not sound.
CAUTION
Page 400 of 538

5-148
Driving your vehicle
Information
The system may suggest a break
according to the driver's driving pat-
tern or habits even if the driver doesn't
feel fatigue.
The Driver Attention Warning sys-
tem utilizes the camera sensor on
the front windshield for its opera-
tion. To keep the camera sensor in
the best condition, you should
observe the followings:
• Never install any accessories or
stickers on the front windshield,
or tint the front windshield.
• NEVER place any reflective
objects (i.e. white paper, mirror)
over the dashboard. Any light
reflection may prevent the sys-
tem from functioning properly.
• Pay extreme caution to keep the
camera sensor dry.
• Never disassemble the camera
assembly, or apply any impact
on the camera assembly.
If the sensor is forcibly moved
out of proper alignment, the sys-
tem may not operate correctly.
Take your vehicle to an author-
ized retailer of Genesis Branded
products and have the system
checked for calibration.
NOTICE
i
The Driver Attention Warning
system may not provide alerts in
the following situations:
• The lane detection perform-
ance is limited. For more
information, refer to "Lane
Keeping Assist system" in
this chapter.
CAUTION
• The vehicle is erratically driv-
en or is abruptly turned for
obstacle avoidance (e.g. con-
struction area, other vehicles,
fallen objects, bumpy road).
• Forward drivability of the
vehicle is severely under-
mined (possibly due to wide
variation in tire pressures,
uneven tire wear-out, toe-
in/toe-out alignment).
• The vehicle drives on a curvy
road.
• The vehicle drives through a
windy area.
• The vehicle drives on a
bumpy road.
• The vehicle is controlled by
the following driving assist
systems:
- Forward Collision-avoidance
Assist
- Blind-Spot Collision Warning
/Blind-Spot Collision Assist
- Smart Cruise Control
- Lane Following Assist
- Lane Keeping Assist
Playing the vehicle audio sys-
tem at high volume may prevent
occupants from hearing the
Driver Attention Warning sys-
tem warning sounds.
CAUTION
Page 403 of 538
5-151
05
Information
The ESC system must be turned OFF
before rocking the vehicle.
If you are still stuck after rocking
the vehicle a few times, have the
vehicle pulled out by a tow vehicle
to avoid engine overheating, pos-
sible damage to the transmission,
and tire damage. See "Towing" in
chapter 6.
Smooth Cornering
Avoid braking or gear changing in
corners, especially when roads are
wet. Ideally, corners should always
be taken under gentle acceleration.
Driving at Night
Night driving presents more hazards
than driving in the daylight. Here are
some important tips to remember:
• Slow down and keep more dis-
tance between you and other vehi-
cles, as it may be more difficult to
see at night, especially in areas
where there may not be any street
lights.
• Adjust your mirrors to reduce the
glare from other driver's head-
lamps.
• Keep your headlamps clean and
properly aimed. Dirty or improperly
aimed headlamps will make it
much more difficult to see at night.
• Avoid staring directly at the head-
lamps of oncoming vehicles. You
could be temporarily blinded, and it
will take several seconds for your
eyes to readjust to the darkness.
Driving in the Rain
Rain and wet roads can make driving
dangerous. Here are a few things to
consider when driving in the rain or
on slick pavement:
• Slow down and allow extra follow-
ing distance. A heavy rainfall
makes it harder to see and increas-
es the distance needed to stop
your vehicle.
• Turn OFF your Cruise Control.
• Replace your windshield wiper
blades when they show signs of
streaking or missing areas on the
windshield.
• Be sure your tires have enough
tread. If your tires do not have
enough tread, making a quick stop
on wet pavement can cause a skid
and possibly lead to an accident.
See "Tire Replacement" in chap-
ter 7.
• Turn on your headlamps to make it
easier for others to see you.
• Driving too fast through large pud-
dles can affect your brakes. If you
must go through puddles, try to
drive through them slowly.
• If you believe your brakes may be
wet, apply them lightly while driv-
ing until normal braking operation
returns.
Hydroplaning
If the road is wet enough and you are
going fast enough, your vehicle may
have little or no contact with the road
surface and actually ride on the
water. The best advice is SLOW
DOWN when the road is wet.
The risk of hydroplaning increases
as the depth of tire tread decreas-
es, refer to "Tire Replacement" in
chapter 7.
NOTICE
i
Page 407 of 538
5-155
05
Chain Installation
When installing AutoSock®(fabric
snow chain), follow the manufactur-
er's instructions and mount them as
tightly as possible. Drive slowly (less
than 20 mph (30 km/h)) with
AutoSock
®installed. If you hear the
fabric snow chains contacting the
body or chassis, stop and tighten
them. If they still make contact, slow
down until the noise stops. Remove
the AutoSock
®(fabric snow chain) as
soon as you begin driving on cleared
roads.
When mounting AutoSock
®(fabric
snow chain), park the vehicle on
level ground away from traffic.
Turn on the vehicle Hazard Warning
Flasher and place a triangular emer-
gency warning device behind the
vehicle (if available).
Always place the vehicle in P (Park),
apply the parking brake and turn off
the engine before installing
AutoSock
®.
When using AutoSock
®(fabric
snow chain):
• Wrong size fabric snow chains
or improperly installed fabric
snow chains can damage your
vehicle's brake lines, suspen-
sion, body and wheels.
• If you hear noise caused by fabric
snow chains contacting the body,
retighten the chain to prevent
contact with the vehicle body.
• To prevent body damage,
retighten the fabric snow chains
after driving 0.3~0.6 miles
(0.5~1.0 km).
AutoSock
®is a Registered trade-
mark of AutoSock.
Winter Precautions
Use high quality ethylene glycol
coolant
Your vehicle is delivered with high
quality ethylene glycol coolant in the
cooling system. It is the only type of
coolant that should be used because
it helps prevent corrosion in the cool-
ing system, lubricates the water
pump and prevents freezing. Be sure
to replace or replenish your coolant
in accordance with the maintenance
schedule in chapter 7. Before winter,
have your coolant tested to assure
that its freezing point is sufficient for
the temperatures anticipated during
the winter.
Change to "winter weight" oil if
necessary
In some climates it is recommended
that a lower viscosity "winter weight"
oil be used during cold weather. See
chapter 8 for recommendations. If
you aren't sure what weight oil you
should use, consult an authorized
retailer of Genesis Branded prod-
ucts.
Check battery and cables
Winter puts additional burdens on
the battery system. Visually inspect
the battery and cables as described
in chapter 7. The level of charge in
your battery can be checked by an
authorized retailer of Genesis
Branded products or a service sta-
tion.
NOTICE
Page 408 of 538

5-156
Driving your vehicle
Check spark plugs and ignition
system
Inspect your spark plugs as
described in chapter 7 and replace
them if necessary. Also check all
ignition wiring and components to be
sure they are not cracked, worn or
damaged in any way.
Use approved window washer
anti-freeze in system
To keep the water in the window
washer system from freezing, add an
approved window washer anti-freeze
solution in accordance with instruc-
tions on the container. Window wash-
er anti-freeze is available from an
authorized retailer of Genesis
Branded products and most auto
parts outlets. Do not use engine
coolant or other types of anti-freeze
as these may damage the paint fin-
ish.
Do not let your parking brake
freeze
Under some conditions your parking
brake can freeze in the engaged
position. This is most likely to happen
when there is an accumulation of
snow or ice around or near the rear
brakes or if the brakes are wet. If
there is a risk the parking brake may
freeze, apply it only temporarily while
you put the gear in P and block the
rear wheels so the car cannot roll.
Then release the parking brake.
Do not let ice and snow accu-
mulate underneath
Under some conditions, snow and
ice can build up under the fenders
and interfere with the steering. When
driving in severe winter conditions
where this may happen, you should
periodically check underneath the
car to be sure the movement of the
front wheels and the steering compo-
nents is not obstructed.
Don't place foreign objects or
materials in the engine com-
partment
Placement of foreign object or mate-
rials which prevent cooling of the
engine, in the engine compartment,
may cause a failure or combustion.
The manufacturer is not responsible
for the damage caused by such
placement.
To keep locks from freezing
To keep the locks from freezing,
squirt an approved de-icer fluid or
glycerine into the key opening. If a
lock is covered with ice, squirt it with
an approved de-icing fluid to remove
the ice. If the lock is frozen internally,
you may be able to thaw it out by
using a heated key. Handle the heat-
ed key with care to avoid injury.
Page 417 of 538
6-3
06
If you Have a Flat Tire While
Driving
If a tire goes flat while you are driv-
ing:
• Take your foot off the accelerator
pedal and let the vehicle slow
down while driving straight ahead.
Do not apply the brakes immedi-
ately or attempt to pull off the road
as this may cause loss of vehicle
control resulting in an accident.
When the vehicle has slowed to
such a speed that it is safe to do
so, brake carefully and pull off the
road. Drive off the road as far as
possible and park on firm, level
ground. If you are on a divided
highway, do not park in the median
area between the two traffic lanes.
• When the vehicle is stopped, press
the hazard warning flasher button,
shift the gear to P (Park), apply the
parking brake, and press the
Engine Start/Stop button to the
OFF position.
• Have all passengers get out of the
vehicle. Be sure they all get out on
the side of the vehicle that is away
from traffic.
• When changing a flat tire, follow
the instructions provided later in
this chapter.If the Engine Doesn't Turn
Over or Turns Over Slowly
• Be sure to shift the gear to N
(Neutral) or P (Park). The engine
starts only when the gear is in N
(Neutral) or P (Park).
• Turn on the interior light. If the light
dims or goes out when you operate
the starter, the battery is drained.
Do not push or pull the vehicle to
start it. This could cause damage to
your vehicle.See instructions for
"Jump Starting" provided in this
chapter.
Push or pull starting the vehicle
may cause the catalytic converter
to overload which can lead to
damage to the emission control
system.
If the Engine Turns Over
Normally but Doesn't Start
Check the fuel level and add fuel if
necessary.
If the engine still does not start, have
your vehicle checked by an author-
ized retailer of Genesis Branded
products.
NOTICE
IF THE ENGINE WILL NOT
START
Page 420 of 538

6-6
What to do in an emergency
9. Connect the second jumper cable
to the black, negative (-) battery/
chassis ground of the assisting
vehicle (3).
10. Connect the other end of the sec-
ond jumper cable to the black,
negative (-) chassis ground of
your vehicle (4).
Do not allow the jumper cables to
contact anything except the cor-
rect battery or jumper terminals
or the correct ground. Do not
lean over the battery when mak-
ing connections.
11. Start the engine of the assisting
vehicle and let it run at approxi-
mately 2,000 rpm for a few min-
utes. Then start your vehicle.
12. Keep your vehicle operating for at
least 30 minutes at idle or driving
to assure your battery receives
enough charge to be able to start
on its own after the vehicle is
shut off. A complete dead battery
may require as long as 60 min-
utes runtime to fully recharge it. If
vehicle is run for less, the battery
may not restart. If you continue to
have problem, have your author-
ized retailer of Genesis Branded
products test the battery.
If your vehicle will not start after a
few attempts, it probably requires
servicing. In this event please seek
qualified assistance. If the cause of
your battery discharging is not
apparent, have your vehicle checked
by an authorized retailer of Genesis
Branded products.Disconnect the jumper cables in the
exact reverse order you connected
them:
1. Disconnect the jumper cable from
the black, negative (-) chassis
ground of your vehicle (4).
2. Disconnect the other end of the
jumper cable from the black, neg-
ative (-) battery/chassis ground of
the assisting vehicle (3).
3. Disconnect the second jumper
cable from the red, positive (+)
battery/jumper terminal of the
assisting vehicle (2).
4. Disconnect the other end of the
jumper cable from the red, positive
(+) jumper terminal of your vehicle
(1).
Push-Starting
Vehicles equipped with automatic
transmission cannot be push-start-
ed.
Follow the directions in this chapter
for jump-starting.
Page 423 of 538

6-9
06
(1) Low Tire Pressure / TPMS
Malfunction Indicator Lamp
(2) Low Tire Pressure /
Tire Pressure Monitor /
TPMS Malfunction Display
(shown on the cluster LCD dis-
play)
Check Tire Pressure
• You can check the tire pressure in
the Assist mode on the cluster.
Refer to the "LCD Display
Modes" in chapter 3.
• Tire pressure is displayed after a
few minutes of driving after initial
engine start up.
• If tire pressure is not displayed
when the vehicle is stopped, "Drive
to display" message will appear.
After driving, check the tire pres-
sure.
• The displayed tire pressure values
may differ from those measured
with a tire pressure gauge.
• You can change the tire pressure
unit from the Settings menu in the
AVN system screen. Select:
- Setup →General Settings →Unit
→Tire Air Pressure Unit →psi /
kpa / bar
For detailed information, scan
the QR code in a separately sup-
plied simple manual.
TIRE PRESSURE MONITORING SYSTEM (TPMS)
OHI068008
OHI048129L
OHI048160L
Page 432 of 538
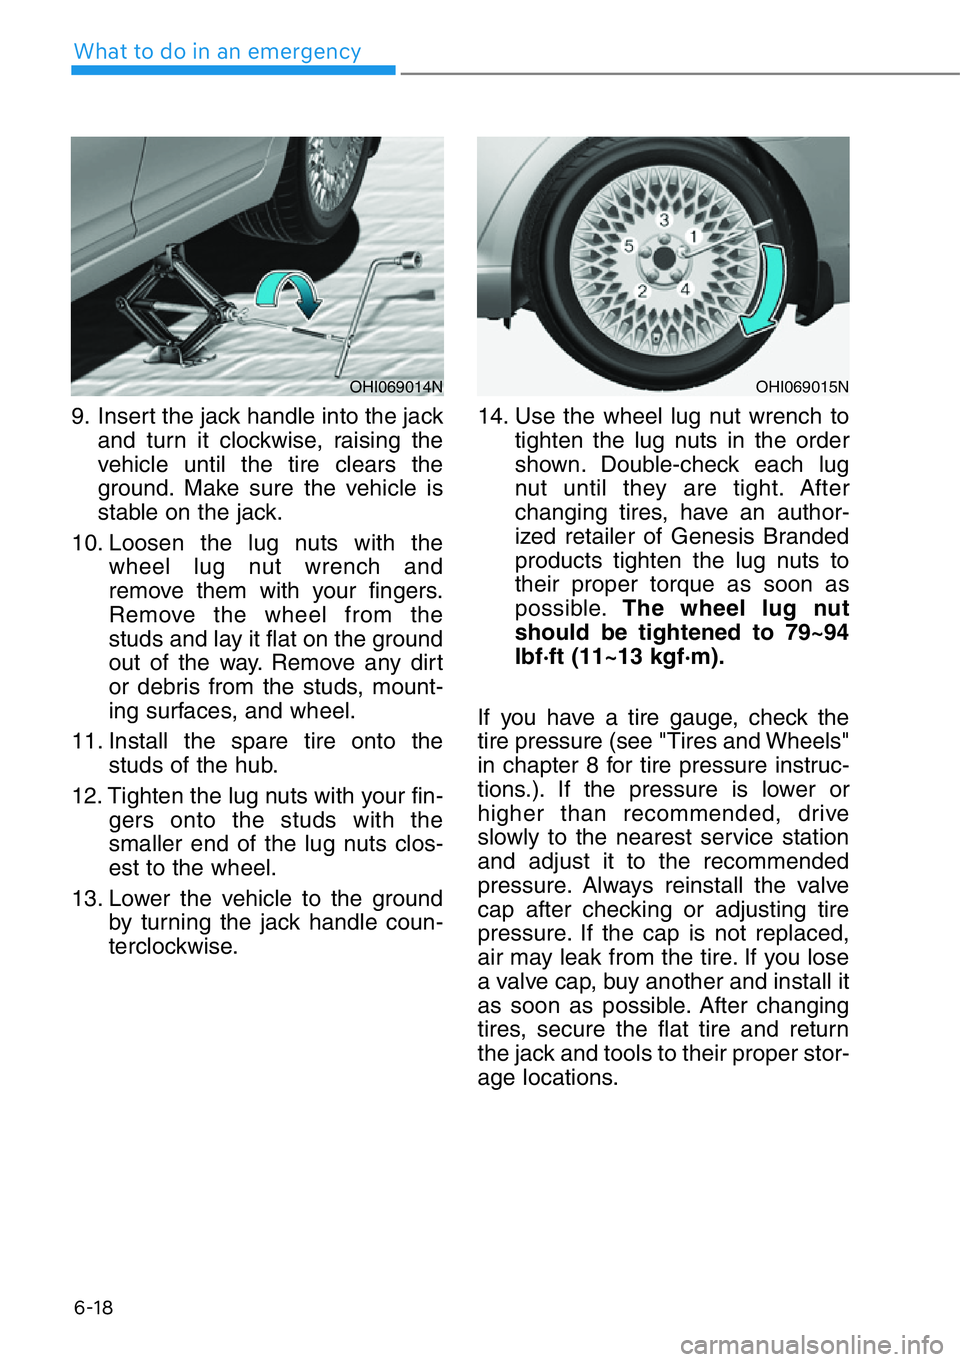
6-18
What to do in an emergency
9. Insert the jack handle into the jack
and turn it clockwise, raising the
vehicle until the tire clears the
ground. Make sure the vehicle is
stable on the jack.
10. Loosen the lug nuts with the
wheel lug nut wrench and
remove them with your fingers.
Remove the wheel from the
studs and lay it flat on the ground
out of the way. Remove any dirt
or debris from the studs, mount-
ing surfaces, and wheel.
11. Install the spare tire onto the
studs of the hub.
12. Tighten the lug nuts with your fin-
gers onto the studs with the
smaller end of the lug nuts clos-
est to the wheel.
13. Lower the vehicle to the ground
by turning the jack handle coun-
terclockwise.14. Use the wheel lug nut wrench to
tighten the lug nuts in the order
shown. Double-check each lug
nut until they are tight. After
changing tires, have an author-
ized retailer of Genesis Branded
products tighten the lug nuts to
their proper torque as soon as
possible.The wheel lug nut
should be tightened to 79~94
lbf·ft (11~13 kgf·m).
If you have a tire gauge, check the
tire pressure (see "Tires and Wheels"
in chapter 8 for tire pressure instruc-
tions.). If the pressure is lower or
higher than recommended, drive
slowly to the nearest service station
and adjust it to the recommended
pressure. Always reinstall the valve
cap after checking or adjusting tire
pressure. If the cap is not replaced,
air may leak from the tire. If you lose
a valve cap, buy another and install it
as soon as possible. After changing
tires, secure the flat tire and return
the jack and tools to their proper stor-
age locations.
OHI069014NOHI069015N
Page 437 of 538

6-23
06
• Do not tow the vehicle with the
rear wheels on the ground as
this may cause damage to the
vehicle.
• Do not tow with sling-type equip-
ment. Use a wheel lift or flatbed
equipment.When towing your vehicle in an
emergency without wheel dollies:
1. Release EPB before turning off
the engine.
2. Press the Engine Start/Stop but-
ton to the OFF position.
3. Change the gear to N (Neutral) by
pressing the P release button
(need to remove cap-cover) while
pressing the brake pedal.
For more details, refer to
"Automatic Transmission –
When the Battery is Discharged"
in chapter 5.
Failure to place the shift lever in N
(Neutral) when being towed with
the front wheels on the ground
can cause internal damage to the
transmission.
NOTICE
NOTICE
If your vehicle is equipped with
a rollover sensor, place the
Engine Start/Stop button in the
OFF position. The side impact
and curtain air bag may deploy
if the sensor detects the situa-
tion as a rollover.
WARNING
OHI068019
OHI068018