GENESIS GV70 2023 Owners Manual
Manufacturer: GENESIS, Model Year: 2023, Model line: GV70, Model: GENESIS GV70 2023Pages: 637
Page 551 of 637
Emergency Situations
8-14
OJX1089026OJX1089026
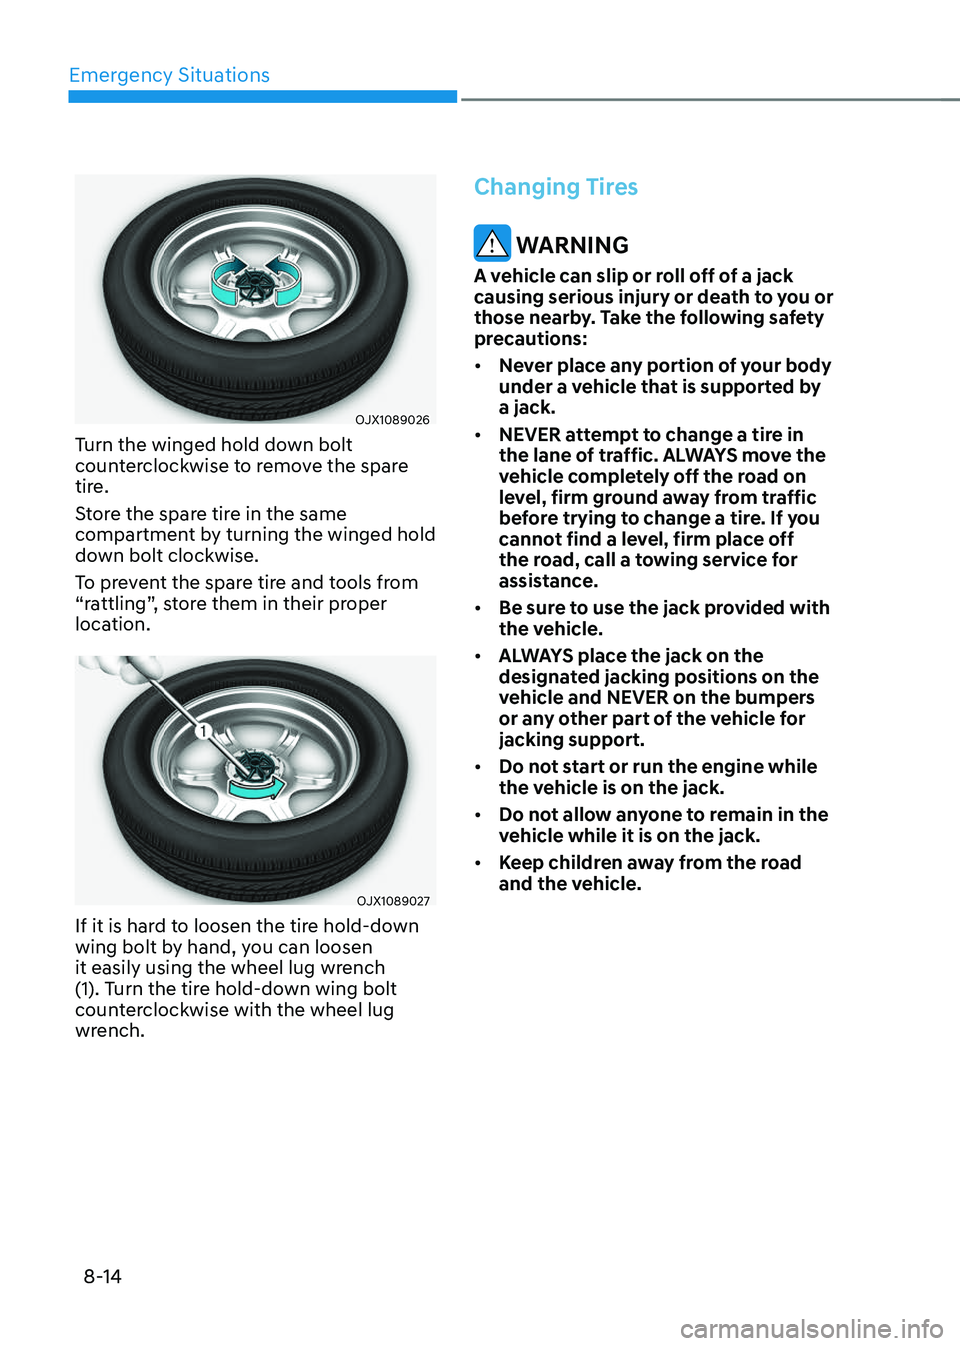
Turn the winged hold down bolt
counterclockwise to remove the spare
tire.
Store the spare tire in the same
compartment by turning the winged hold
down bolt clockwise.
To prevent the spare tire and tools from
“rattling”, store them in their proper
location.
OJX1089027OJX1089027
If it is hard to loosen the tire hold-down
wing bolt by hand, you can loosen
it easily using the wheel lug wrench
(1). Turn the tire hold-down wing bolt
counterclockwise with the wheel lug
wrench.
Changing Tires
WARNING
A vehicle can slip or roll off of a jack
causing serious injury or death to you or
those nearby. Take the following safety
precautions:
• Never place any portion of your body
under a vehicle that is supported by
a jack.
• NEVER attempt to change a tire in
the lane of traffic. ALWAYS move the
vehicle completely off the road on
level, firm ground away from traffic
before trying to change a tire. If you
cannot find a level, firm place off
the road, call a towing service for
assistance.
• Be sure to use the jack provided with
the vehicle.
• ALWAYS place the jack on the
designated jacking positions on the
vehicle and NEVER on the bumpers
or any other part of the vehicle for
jacking support.
• Do not start or run the engine while
the vehicle is on the jack.
• Do not allow anyone to remain in the
vehicle while it is on the jack.
• Keep children away from the road
and the vehicle.
Page 552 of 637
08
8-15
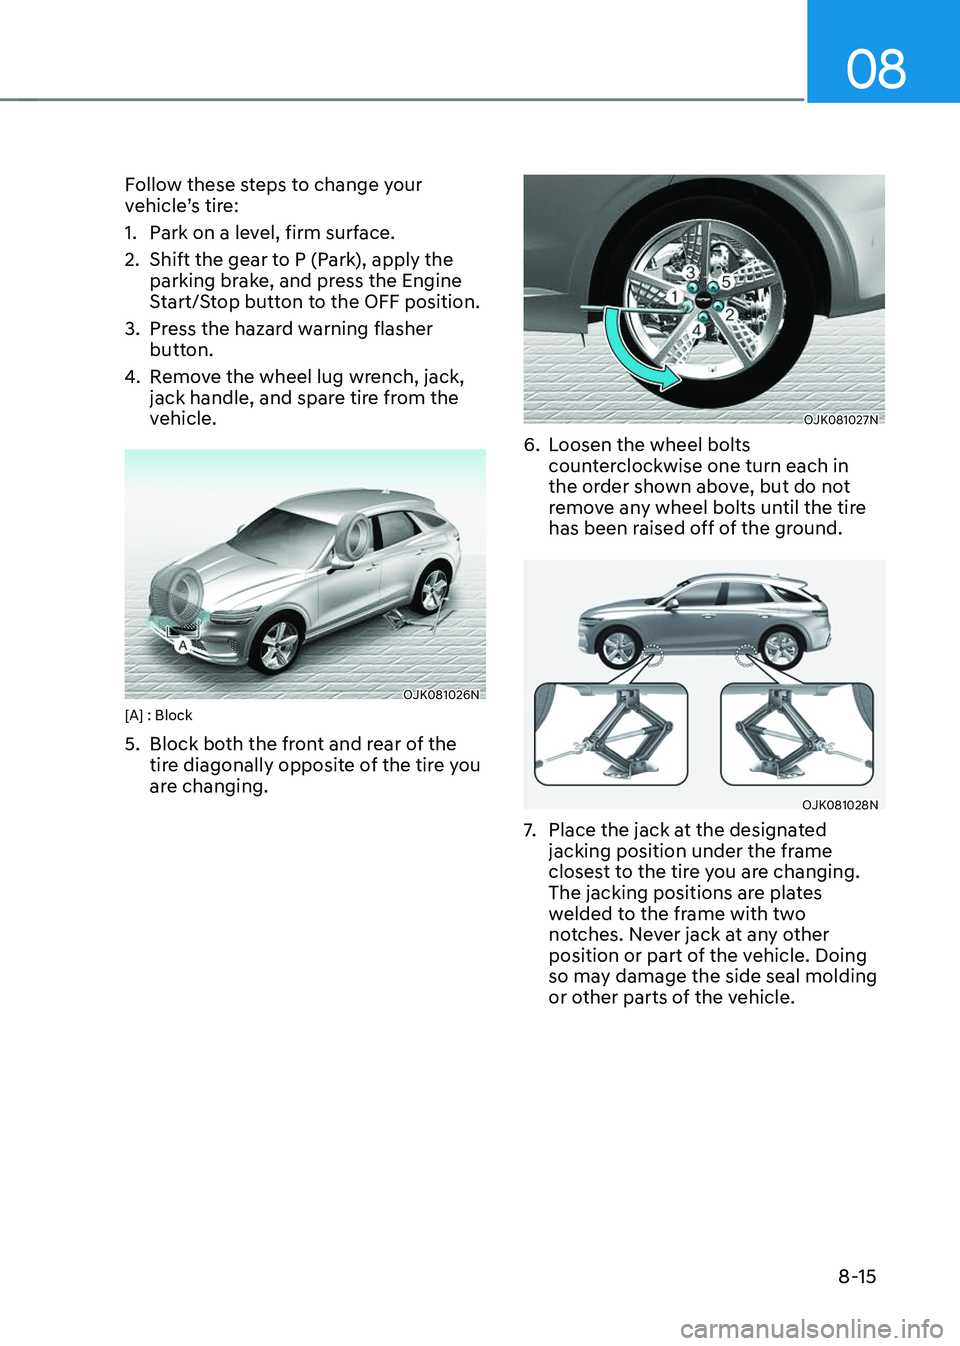
Follow these steps to change your
vehicle’s tire:
1. Park on a level, firm surface.
2. Shift the gear to P (Park), apply the
parking brake, and press the Engine
Start/Stop button to the OFF position.
3. Press the hazard warning flasher
button.
4. Remove the wheel lug wrench, jack,
jack handle, and spare tire from the
vehicle.
OJK081026NOJK081026N[A] : Block
5. Block both the front and rear of the
tire diagonally opposite of the tire you
are changing.
OJK081027NOJK081027N
6. Loosen the wheel bolts
counterclockwise one turn each in
the order shown above, but do not
remove any wheel bolts until the tire
has been raised off of the ground.
OJK081028NOJK081028N
7. Place the jack at the designated
jacking position under the frame
closest to the tire you are changing.
The jacking positions are plates
welded to the frame with two
notches. Never jack at any other
position or part of the vehicle. Doing
so may damage the side seal molding
or other parts of the vehicle.
Page 553 of 637
Emergency Situations
8-16
OJK081029NOJK081029N
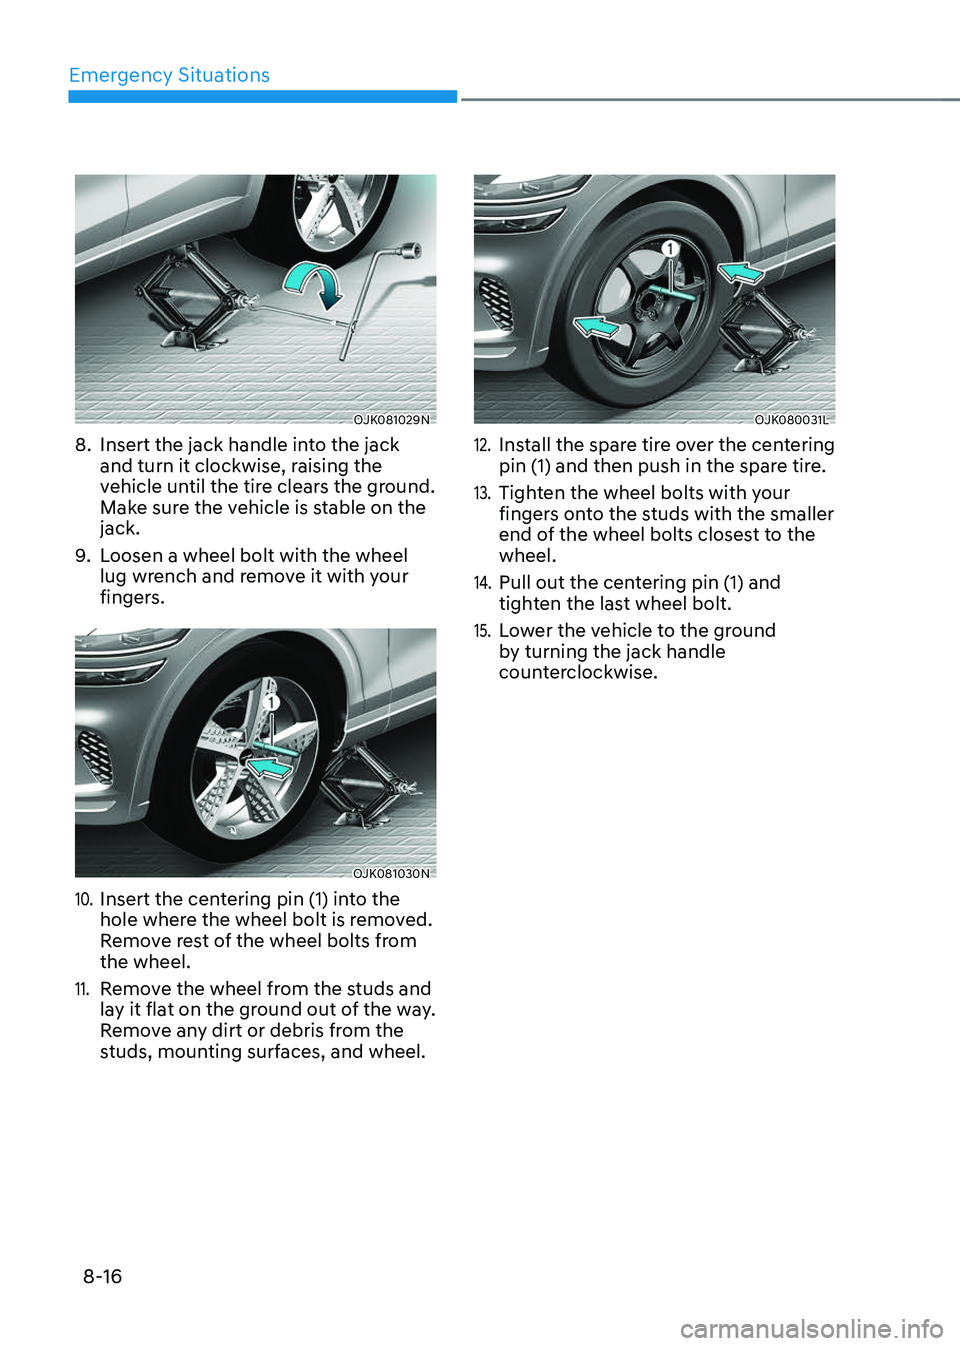
8. Insert the jack handle into the jack
and turn it clockwise, raising the
vehicle until the tire clears the ground.
Make sure the vehicle is stable on the
jack.
9. Loosen a wheel bolt with the wheel
lug wrench and remove it with your
fingers.
OJK081030NOJK081030N
10. Insert the centering pin (1) into the
hole where the wheel bolt is removed.
Remove rest of the wheel bolts from
the wheel.
11. Remove the wheel from the studs and
lay it flat on the ground out of the way.
Remove any dirt or debris from the
studs, mounting surfaces, and wheel.
OJK080031LOJK080031L
12. Install the spare tire over the centering
pin (1) and then push in the spare tire.
13. Tighten the wheel bolts with your
fingers onto the studs with the smaller
end of the wheel bolts closest to the
wheel.
14. Pull out the centering pin (1) and
tighten the last wheel bolt.
15. Lower the vehicle to the ground
by turning the jack handle
counterclockwise.
Page 554 of 637
08
8-17
OJX1089013OJX1089013
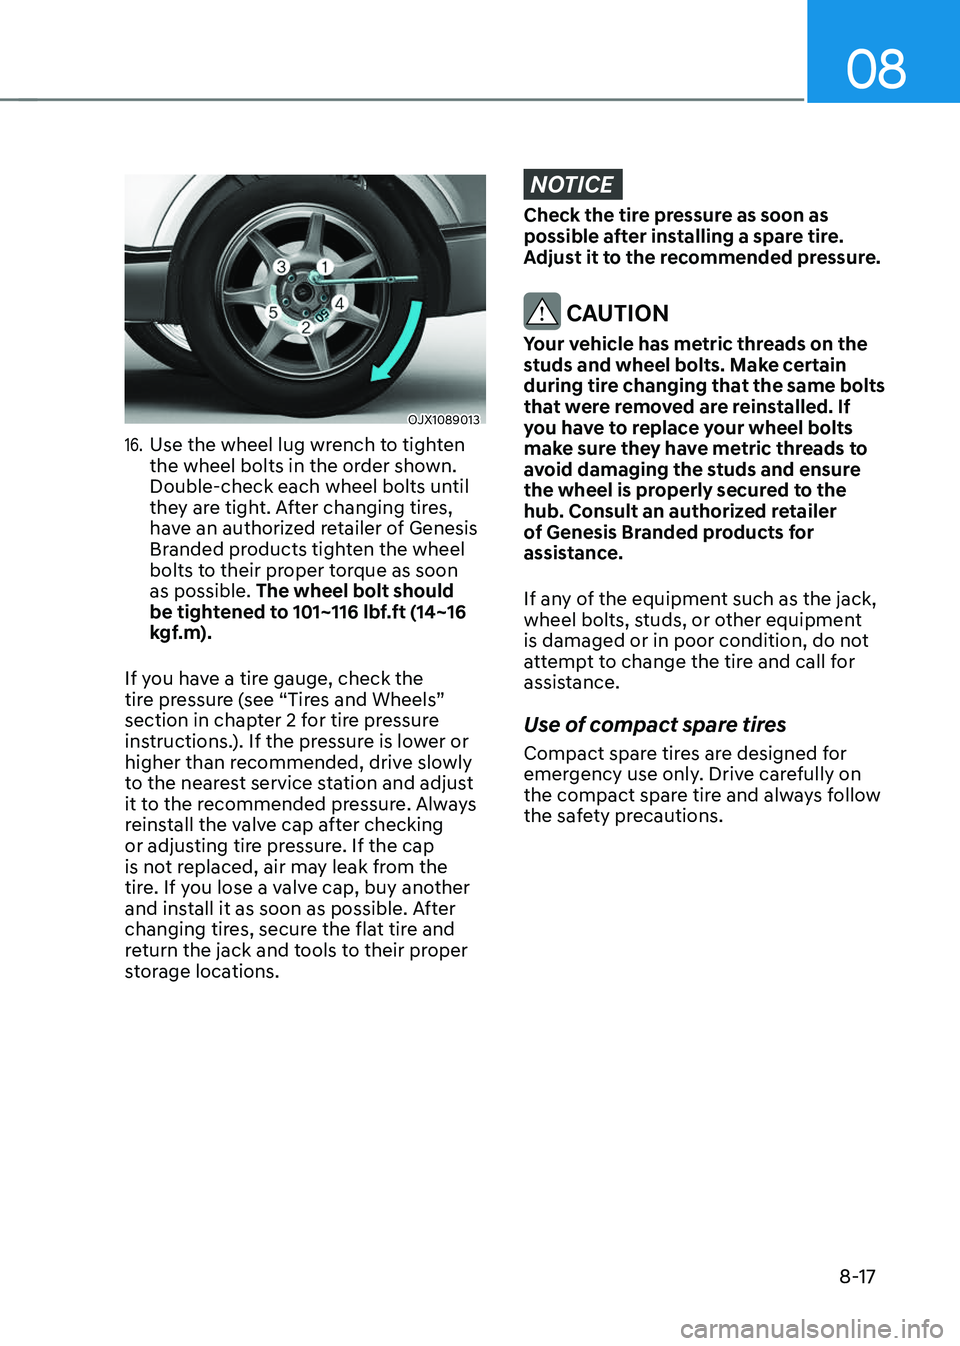
16. Use the wheel lug wrench to tighten
the wheel bolts in the order shown.
Double-check each wheel bolts until
they are tight. After changing tires,
have an authorized retailer of Genesis
Branded products tighten the wheel
bolts to their proper torque as soon
as possible. The wheel bolt should
be tightened to 101~116 lbf.ft (14~16
kgf.m).
If you have a tire gauge, check the
tire pressure (see “Tires and Wheels”
section in chapter 2 for tire pressure
instructions.). If the pressure is lower or
higher than recommended, drive slowly
to the nearest service station and adjust
it to the recommended pressure. Always
reinstall the valve cap after checking
or adjusting tire pressure. If the cap
is not replaced, air may leak from the
tire. If you lose a valve cap, buy another
and install it as soon as possible. After
changing tires, secure the flat tire and
return the jack and tools to their proper
storage locations.
NOTICE
Check the tire pressure as soon as
possible after installing a spare tire.
Adjust it to the recommended pressure.
CAUTION
Your vehicle has metric threads on the
studs and wheel bolts. Make certain
during tire changing that the same bolts
that were removed are reinstalled. If
you have to replace your wheel bolts
make sure they have metric threads to
avoid damaging the studs and ensure
the wheel is properly secured to the
hub. Consult an authorized retailer
of Genesis Branded products for
assistance.
If any of the equipment such as the jack,
wheel bolts, studs, or other equipment
is damaged or in poor condition, do not
attempt to change the tire and call for
assistance.
Use of compact spare tires
Compact spare tires are designed for
emergency use only. Drive carefully on
the compact spare tire and always follow
the safety precautions.
Page 555 of 637
Emergency Situations
8-18
WARNING
To prevent compact spare tire failure
and loss of control possibly resulting in
an accident:
• Use the compact spare tire only in an
emergency.
• NEVER operate your vehicle over 50
mph (80 km/h).
• Do not exceed the vehicle’s
maximum load rating or the load
carrying capacity shown on the
sidewall of the compact spare tire.
• Do not use the compact spare tire
continuously. Repair or replace the
original tire as soon as possible to
avoid failure of the compact spare
tire.
When driving with the compact spare tire
mounted to your vehicle:
• Check the tire pressure after installing
the compact spare tire. The compact
spare tire should be inflated to 60 psi
(420 kPa).
• Do not take this vehicle through
an automatic car wash while the
compact spare tire is installed.
• Do not use the compact spare tire on
any other vehicle because this tire
has been designed especially for your
vehicle.
• The compact spare tire’s tread life is
shorter than a regular tire. Inspect
your compact spare tire regularly and
replace worn compact spare tires with
the same size and design, mounted on
the same wheel.
• Do not use more than one compact
spare tire at a time.
• Do not tow a trailer while the compact
spare tire is installed.
Information
When the original tire and wheel are
repaired and reinstalled on the vehicle, the
wheel bolt torque must be set correctly.
The correct wheel bolt tightening torque is
101~116 lbf.ft (14~16 kgf.m).
NOTICE
To prevent damaging the compact
spare tire and your vehicle:
• Drive slowly enough for the road
conditions to avoid all hazards, such
as a potholes or debris.
• Avoid driving over obstacles. The
compact spare tire diameter is
smaller than the diameter of a
conventional tire and reduces the
ground clearance approximately 1
inch (25 mm).
• Do not use tire chains on the
compact spare tire. Because of the
smaller size, a tire chain will not fit
properly.
• Do not use the compact spare tire
on any other wheels, nor should
standard tires, snow tires, wheel
covers or trim rings be used with the
compact spare wheel.
• Do not suddenly accelerate or
decelerate (0 - 25 mph (0 - 40 km/h))
in any driving mode. It may cause
leakage of transfer oil.
Page 556 of 637
08
8-19
Jack Label
OHYK065011OHYK065011
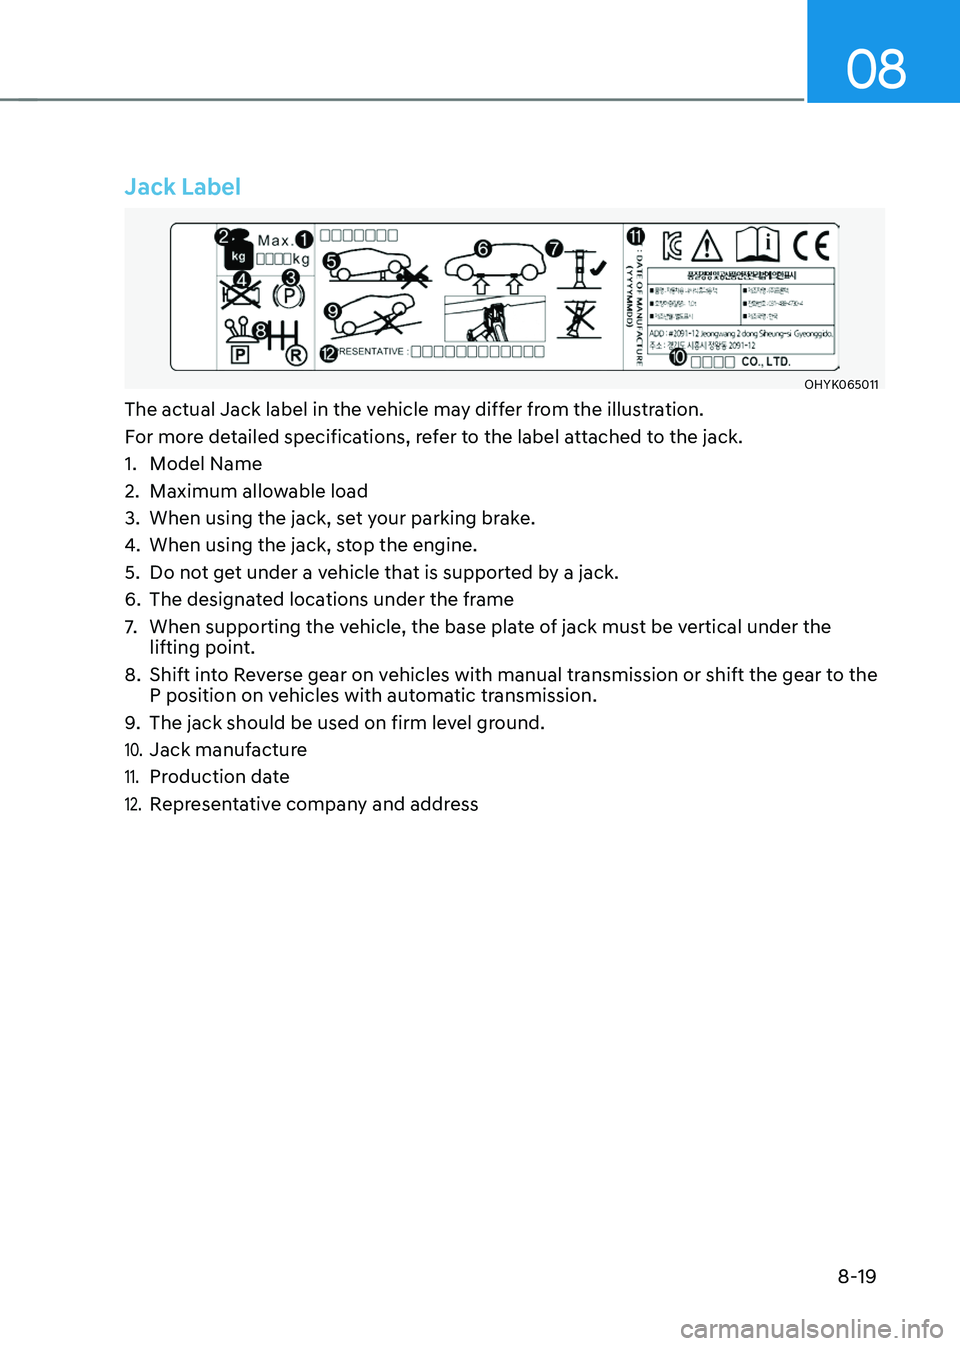
The actual Jack label in the vehicle may differ from the illustration.
For more detailed specifications, refer to the label attached to the jack.
1. Model Name
2. Maximum allowable load
3. When using the jack, set your parking brake.
4. When using the jack, stop the engine.
5. Do not get under a vehicle that is supported by a jack.
6. The designated locations under the frame
7. When supporting the vehicle, the base plate of jack must be vertical under the
lifting point.
8. Shift into Reverse gear on vehicles with manual transmission or shift the gear to the
P position on vehicles with automatic transmission.
9. The jack should be used on firm level ground.
10. Jack manufacture
11. Production date
12. Representative company and address
Page 557 of 637
Emergency Situations
8-20
Towing Service
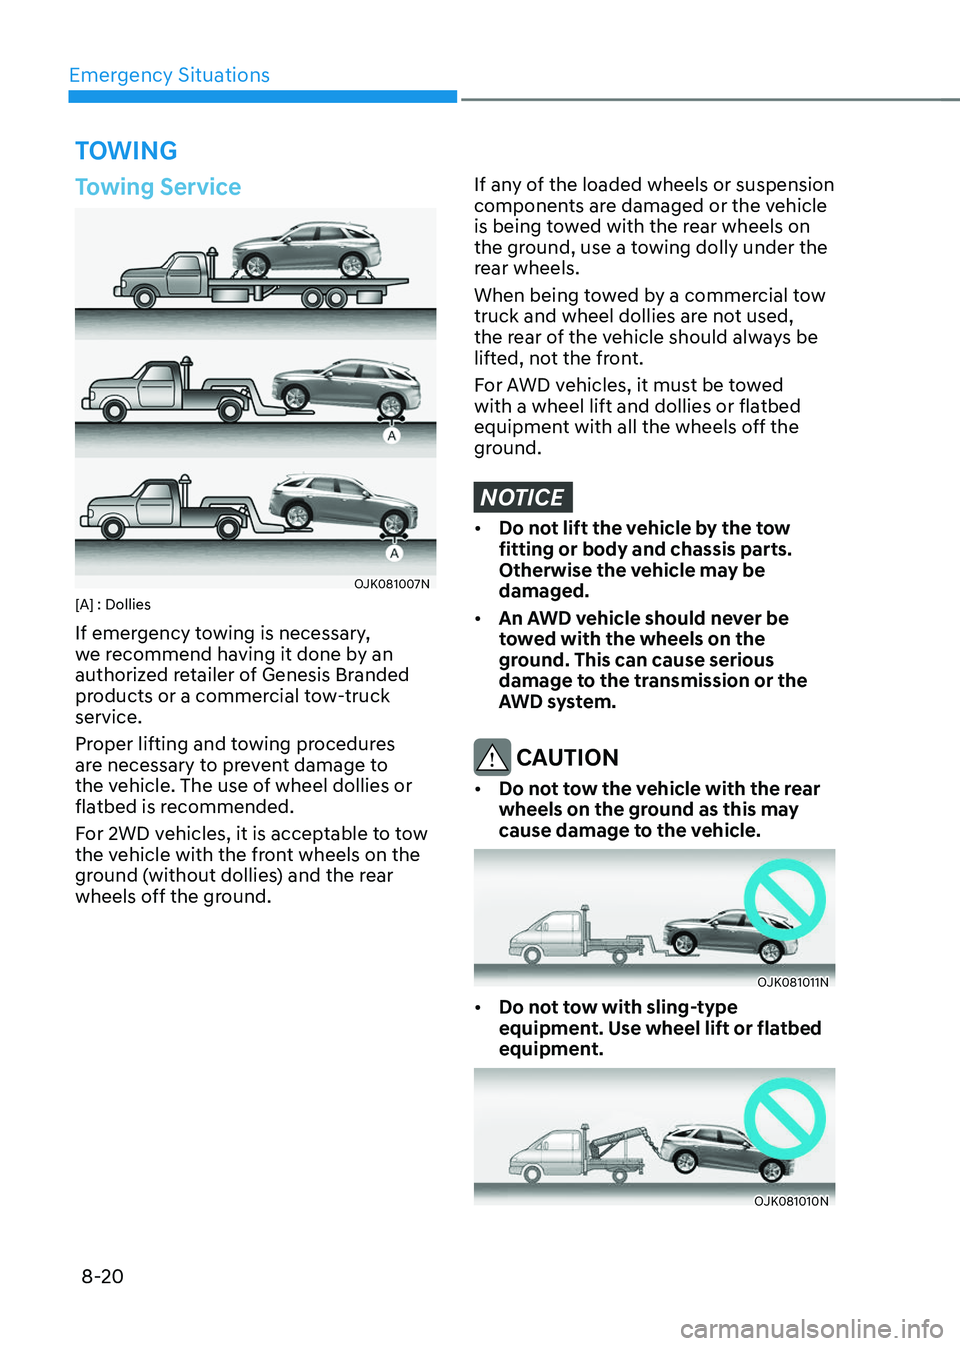
OJK081007NOJK081007N[A] : Dollies
If emergency towing is necessary,
we recommend having it done by an
authorized retailer of Genesis Branded
products or a commercial tow-truck
service.
Proper lifting and towing procedures
are necessary to prevent damage to
the vehicle. The use of wheel dollies or
flatbed is recommended.
For 2WD vehicles, it is acceptable to tow
the vehicle with the front wheels on the
ground (without dollies) and the rear
wheels off the ground.
If any of the loaded wheels or suspension
components are damaged or the vehicle
is being towed with the rear wheels on
the ground, use a towing dolly under the
rear wheels.
When being towed by a commercial tow
truck and wheel dollies are not used,
the rear of the vehicle should always be
lifted, not the front.
For AWD vehicles, it must be towed
with a wheel lift and dollies or flatbed
equipment with all the wheels off the
ground.
NOTICE
• Do not lift the vehicle by the tow
fitting or body and chassis parts.
Otherwise the vehicle may be
damaged.
• An AWD vehicle should never be
towed with the wheels on the
ground. This can cause serious
damage to the transmission or the
AWD system.
CAUTION
• Do not tow the vehicle with the rear
wheels on the ground as this may
cause damage to the vehicle.
OJK081011NOJK081011N
• Do not tow with sling-type
equipment. Use wheel lift or flatbed
equipment.
OJK081010NOJK081010N
TOWING
Page 558 of 637
08
8-21
When towing your vehicle in an
emergency without wheel dollies:
1. Release EPB before turning off the
engine.
2. Press the Engine Start/Stop button to
the OFF position.
3. Change the gear to N (Neutral) by
pressing the P release button (need to
remove cap-cover) while pressing the
brake pedal. For more details, refer to
“Automatic Transmission” section in
chapter 6.
4. Press the Engine Start/Stop button to
the ACC position.
CAUTION
Failure to shift the gear to N (Neutral)
may cause internal damage to the
transmission.
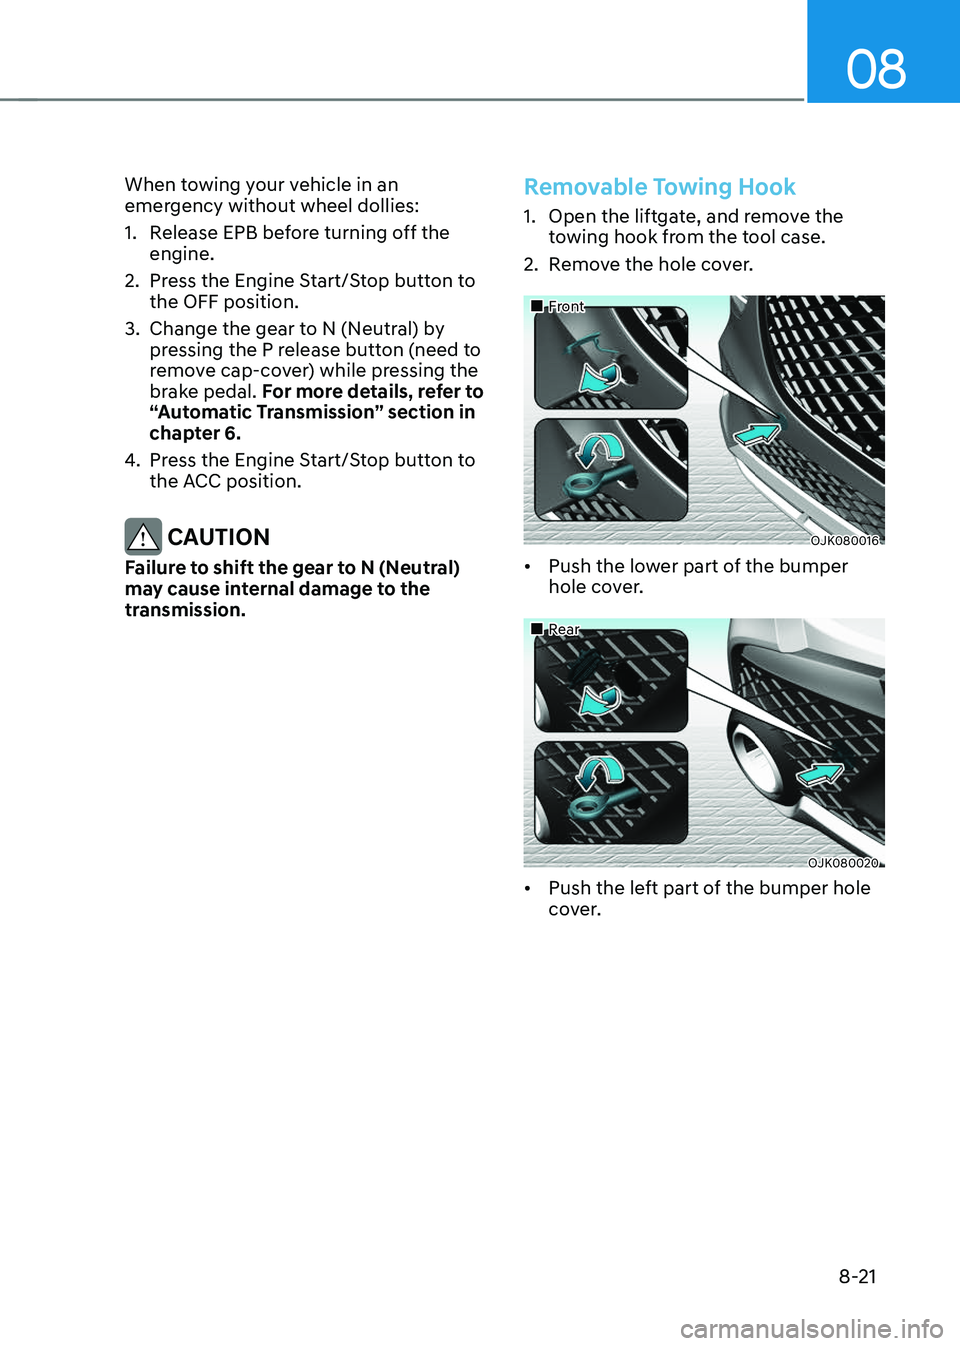
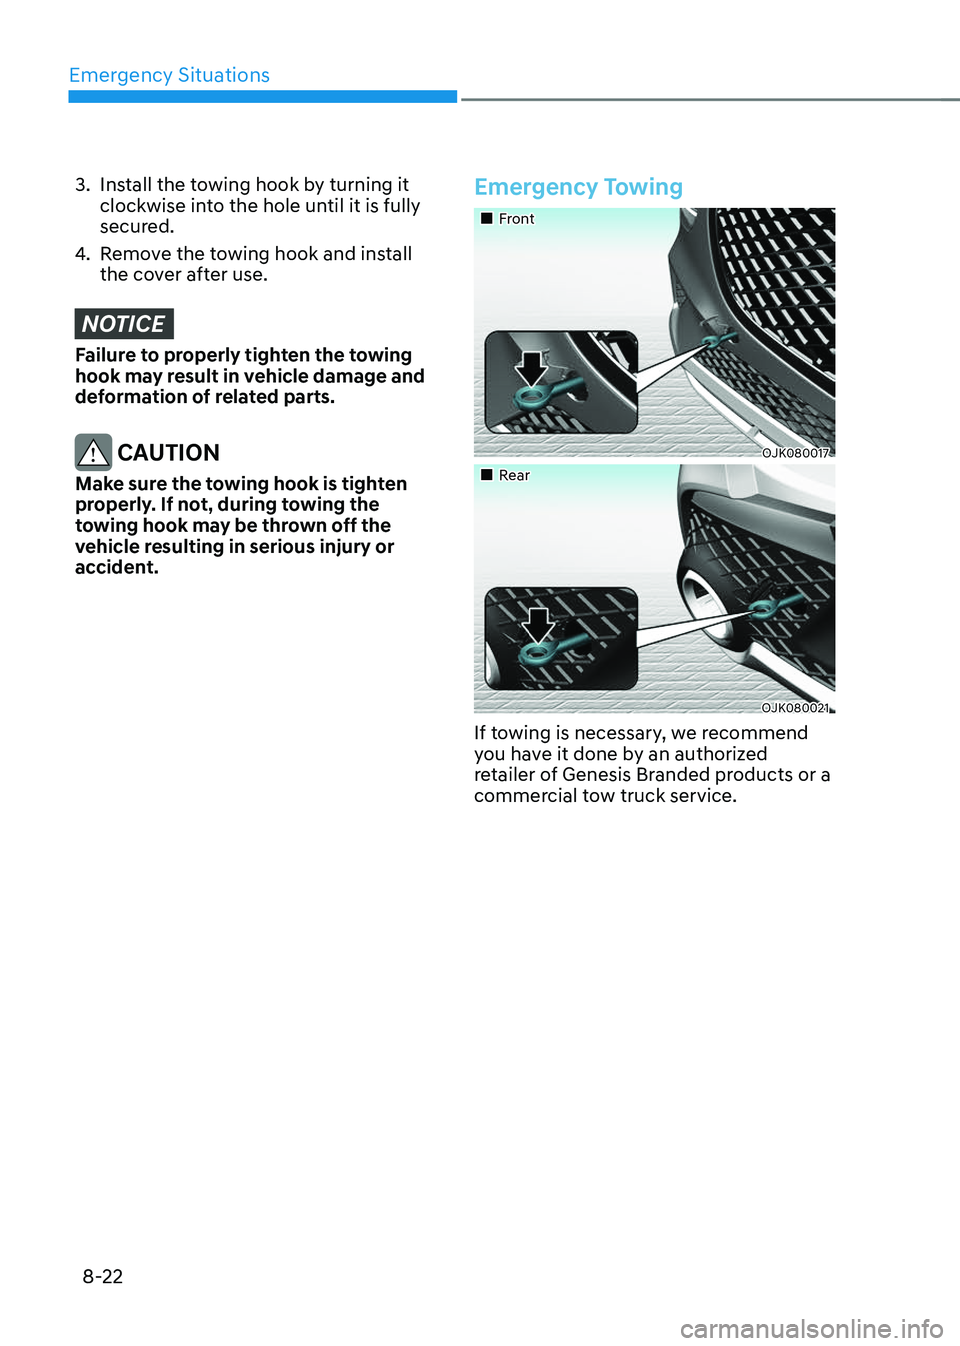
Removable Towing Hook
1. Open the liftgate, and remove the
towing hook from the tool case.
2. Remove the hole cover.
Page 559 of 637
Emergency Situations
8-22
3. Install the towing hook by turning it
clockwise into the hole until it is fully
secured.
4. Remove the towing hook and install
the cover after use.
NOTICE
Failure to properly tighten the towing
hook may result in vehicle damage and
deformation of related parts.
CAUTION
Make sure the towing hook is tighten
properly. If not, during towing the
towing hook may be thrown off the
vehicle resulting in serious injury or
accident.
Emergency Towing
Page 560 of 637
08
8-23
If towing service is not available in
an emergency, your vehicle may be
temporarily towed using a cable or chain
secured to the emergency towing hook
at the front (or rear) of the vehicle.
Use extreme caution when towing the
vehicle with a cable or chain. A driver
must be in the vehicle to steer it and
operate the brakes.
Towing in this manner may be done
only on hard-surfaced roads for a short
distance and at low speeds. Also, the
wheels, axles, power train, steering
and brakes must all be in good working
condition.
CAUTION
The driver must be in the vehicle for
steering and braking operations when
the vehicle is being towed. Passengers
other than the driver must not be in the
vehicle.Always follow these emergency towing
precautions:
• Press the Engine Start/Stop button
to the ACC position so the steering
wheel is not locked.
• Shift the gear to N (Neutral).
• Release the parking brake.
• Depress the brake pedal with more
force than normal as you will have
reduced braking performance.
• More steering effort will be required
because the power steering system
will be disabled.
• Use a vehicle heavier than your own to
tow your vehicle.
• The drivers of both vehicles should
communicate with each other
frequently.
• Before emergency towing, check that
the hook is not broken or damaged.
• Fasten the towing cable or chain
securely to the hook.
• Do not jerk the hook. Apply steady
and even force.