brake light GMC CANYON 2008 Owner's Guide
[x] Cancel search | Manufacturer: GMC, Model Year: 2008, Model line: CANYON, Model: GMC CANYON 2008Pages: 428, PDF Size: 5.82 MB
Page 300 of 428
Brake Wear
Your vehicle has front disc brakes and rear drum
brakes.
Disc brake pads have built-in wear indicators that make
a high-pitched warning sound when the brake pads
are worn and new pads are needed. The sound
can come and go or be heard all the time your vehicle
is moving, except when you are pushing on the
brake pedal �rmly.
{CAUTION:
The brake wear warning sound means that
soon the brakes will not work well. That
could lead to an accident. When you hear
the brake wear warning sound, have your
vehicle serviced.Notice:Continuing to drive with worn-out brake
pads could result in costly brake repair.
Some driving conditions or climates can cause a
brake squeal when the brakes are �rst applied or
lightly applied. This does not mean something is
wrong with the brakes.
Properly torqued wheel nuts are necessary to help
prevent brake pulsation. When tires are rotated,
inspect brake pads for wear and evenly tighten wheel
nuts in the proper sequence to torque speci�cations
inCapacities and Specifications on page 5-116.
Rear drum brakes do not have wear indicators, but if
you ever hear a rear brake rubbing noise, have the
rear brake linings inspected immediately. Also, the rear
brake drums should be removed and inspected each
time the tires are removed for rotation or changing.
When you have the front brake pads replaced, have
the rear brakes inspected, too.
Brake linings should always be replaced as complete
axle sets.
5-40
Page 303 of 428
Notice:Ignoring these steps could result in costly
damage to your vehicle that would not be covered
by your warranty.
Trying to start your vehicle by pushing or pulling it
will not work, and it could damage your vehicle.
1. Check the other vehicle. It must have a 12-volt
battery with a negative ground system.
Notice:If the other vehicle’s system is not a 12-volt
system with a negative ground, both vehicles can
be damaged. Only use vehicles with 12-volt systems
with negative grounds to jump start your vehicle.
2. Get the vehicles close enough so the jumper cables
can reach, but be sure the vehicles are not touching
each other. If they are, it could cause a ground
connection you do not want. You would not be able
to start your vehicle, and the bad grounding could
damage the electrical systems.To avoid the possibility of the vehicles rolling, set the
parking brake �rmly on both vehicles involved in the
jump start procedure. Put an automatic transmission
in PARK (P) or a manual transmission in NEUTRAL
before setting the parking brake. If you have a
four-wheel-drive vehicle, be sure the transfer case
is not in NEUTRAL.
Notice:If you leave your radio or other accessories
on during the jump starting procedure, they could
be damaged. The repairs would not be covered
by your warranty. Always turn off your radio and
other accessories when jump starting your vehicle.
3. Turn off the ignition on both vehicles. Unplug
unnecessary accessories plugged into the cigarette
lighter or the accessory power outlets. Turn off
the radio and all lamps that are not needed.
This will avoid sparks and help save both batteries.
And it could save the radio!
5-43
Page 329 of 428
The TPMS sensor matching procedure is outlined below:
1. Set the parking brake.
2. Turn the ignition switch to ON/RUN with the
engine off.
3. Turn the exterior lamp switch from AUTO to OFF
four times within three seconds. A double horn
chirp will sound and the TPMS low tire warning light
starts �ashing. The double horn chirp and �ashing
TPMS warning light indicates the TPMS matching
process has started. The TPMS warning light
should continue �ashing throughout the matching
procedure. The LOW TIRE message displays on
the Driver Information Center (DIC).
4. Start with the driver side front tire.
5. Remove the valve cap from the valve cap stem.
Activate the TPMS sensor by increasing or
decreasing the tire’s air pressure for 10 seconds,
then stop and listen for a single horn chirp.
The single horn chirp should sound within
15 seconds, con�rming that the sensor identi�cation
code has been matched to this tire and wheel
position. If you do not hear the con�rming single
horn chirp, turn the ignition switch to LOCK and
start over beginning with Step 2.6. Proceed to the passenger side front tire, and repeat
the procedure in Step 5.
7. Proceed to the passenger side rear tire, and repeat
the procedure in Step 5.
8. Proceed to the driver side rear tire, and repeat the
procedure in Step 5.
9. After hearing the con�rming horn chirp for the driver
side rear tire, check to see if the TPMS low tire
warning light and the DIC LOW TIRE messages
have turned off. If yes, the TPMS sensors have
been relearned. Turn the ignition switch to
LOCK/OFF.
If the low tire warning light and the SERV TPM
message on the DIC are on after completing
Step 5 for the driver side rear tire, the sensor
relearn process has not been successful.
Turn the ignition switch to LOCK/OFF and repeat
the matching process beginning with Step 2.
10. Set all four tires to the recommended air pressure
level as indicated on the Tire and Loading
Information label.
11. Put the valve caps back on the valve stems.
5-69
Page 334 of 428
Different Size Tires and Wheels
If you add wheels or tires that are a different size than
your original equipment wheels and tires, this may
affect the way your vehicle performs, including its
braking, ride and handling characteristics, stability,
and resistance to rollover. Additionally, if your vehicle
has electronic systems such as, anti-lock brakes,
traction control, and electronic stability control, the
performance of these systems can be affected.
{CAUTION:
If you add different sized wheels, your
vehicle may not provide an acceptable
level of performance and safety if tires not
recommended for those wheels are selected.
You may increase the chance that you will
crash and suffer serious injury. Only use
GM speci�c wheel and tire systems developed
for your vehicle, and have them properly
installed by a GM certi�ed technician.
SeeBuying New Tires on page 5-72andAccessories
and Modifications on page 5-3for additional information.
Uniform Tire Quality Grading
Quality grades can be found where applicable
on the tire sidewall between tread shoulder
and maximum section width. For example:
Treadwear 200 Traction AA Temperature A
The following information relates to the system
developed by the United States National
Highway Traffic Safety Administration (NHTSA),
which grades tires by treadwear, traction, and
temperature performance. This applies only
to vehicles sold in the United States. The grades
are molded on the sidewalls of most passenger
car tires. The Uniform Tire Quality Grading
(UTQG) system does not apply to deep tread,
winter-type snow tires, space-saver, or temporary
use spare tires, tires with nominal rim diameters
of 10 to 12 inches (25 to 30 cm), or to some
limited-production tires.
While the tires available on General Motors
passenger cars and light trucks may vary with
respect to these grades, they must also conform
to federal safety requirements and additional
General Motors Tire Performance Criteria (TPC)
standards.
5-74
Page 373 of 428
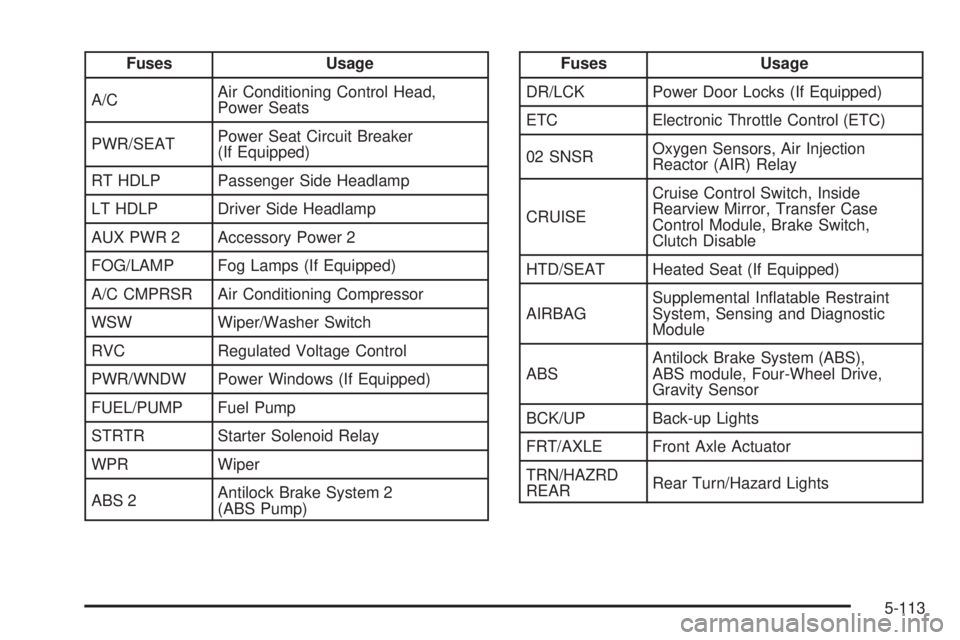
Fuses Usage
A/CAir Conditioning Control Head,
Power Seats
PWR/SEATPower Seat Circuit Breaker
(If Equipped)
RT HDLP Passenger Side Headlamp
LT HDLP Driver Side Headlamp
AUX PWR 2 Accessory Power 2
FOG/LAMP Fog Lamps (If Equipped)
A/C CMPRSR Air Conditioning Compressor
WSW Wiper/Washer Switch
RVC Regulated Voltage Control
PWR/WNDW Power Windows (If Equipped)
FUEL/PUMP Fuel Pump
STRTR Starter Solenoid Relay
WPR Wiper
ABS 2Antilock Brake System 2
(ABS Pump)Fuses Usage
DR/LCK Power Door Locks (If Equipped)
ETC Electronic Throttle Control (ETC)
02 SNSROxygen Sensors, Air Injection
Reactor (AIR) Relay
CRUISECruise Control Switch, Inside
Rearview Mirror, Transfer Case
Control Module, Brake Switch,
Clutch Disable
HTD/SEAT Heated Seat (If Equipped)
AIRBAGSupplemental In�atable Restraint
System, Sensing and Diagnostic
Module
ABSAntilock Brake System (ABS),
ABS module, Four-Wheel Drive,
Gravity Sensor
BCK/UP Back-up Lights
FRT/AXLE Front Axle Actuator
TRN/HAZRD
REARRear Turn/Hazard Lights
5-113
Page 374 of 428
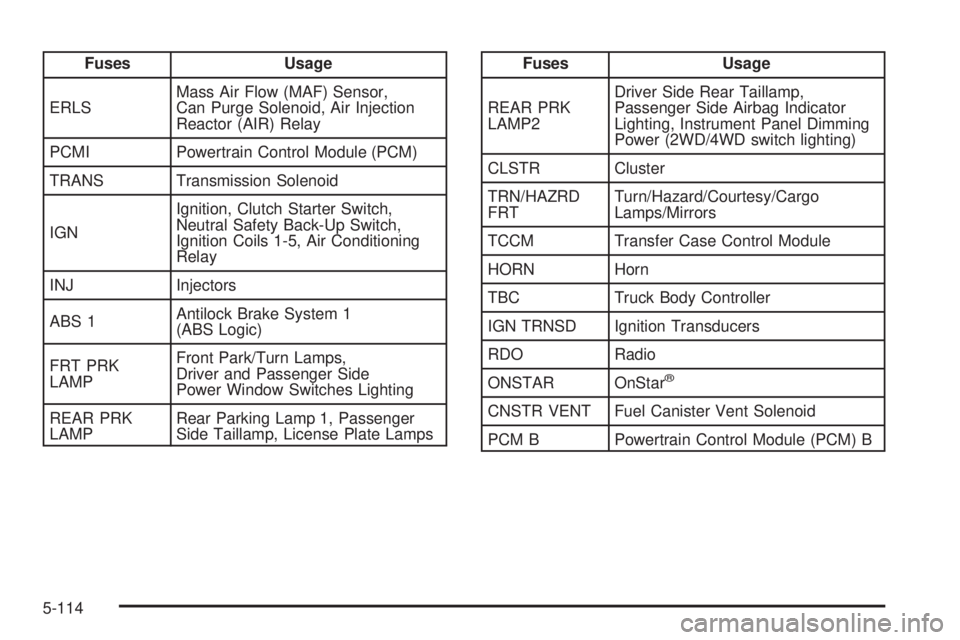
Fuses Usage
ERLSMass Air Flow (MAF) Sensor,
Can Purge Solenoid, Air Injection
Reactor (AIR) Relay
PCMI Powertrain Control Module (PCM)
TRANS Transmission Solenoid
IGNIgnition, Clutch Starter Switch,
Neutral Safety Back-Up Switch,
Ignition Coils 1-5, Air Conditioning
Relay
INJ Injectors
ABS 1Antilock Brake System 1
(ABS Logic)
FRT PRK
LAMPFront Park/Turn Lamps,
Driver and Passenger Side
Power Window Switches Lighting
REAR PRK
LAMPRear Parking Lamp 1, Passenger
Side Taillamp, License Plate LampsFuses Usage
REAR PRK
LAMP2Driver Side Rear Taillamp,
Passenger Side Airbag Indicator
Lighting, Instrument Panel Dimming
Power (2WD/4WD switch lighting)
CLSTR Cluster
TRN/HAZRD
FRTTurn/Hazard/Courtesy/Cargo
Lamps/Mirrors
TCCM Transfer Case Control Module
HORN Horn
TBC Truck Body Controller
IGN TRNSD Ignition Transducers
RDO Radio
ONSTAR OnStar
®
CNSTR VENT Fuel Canister Vent Solenoid
PCM B Powertrain Control Module (PCM) B
5-114
Page 385 of 428
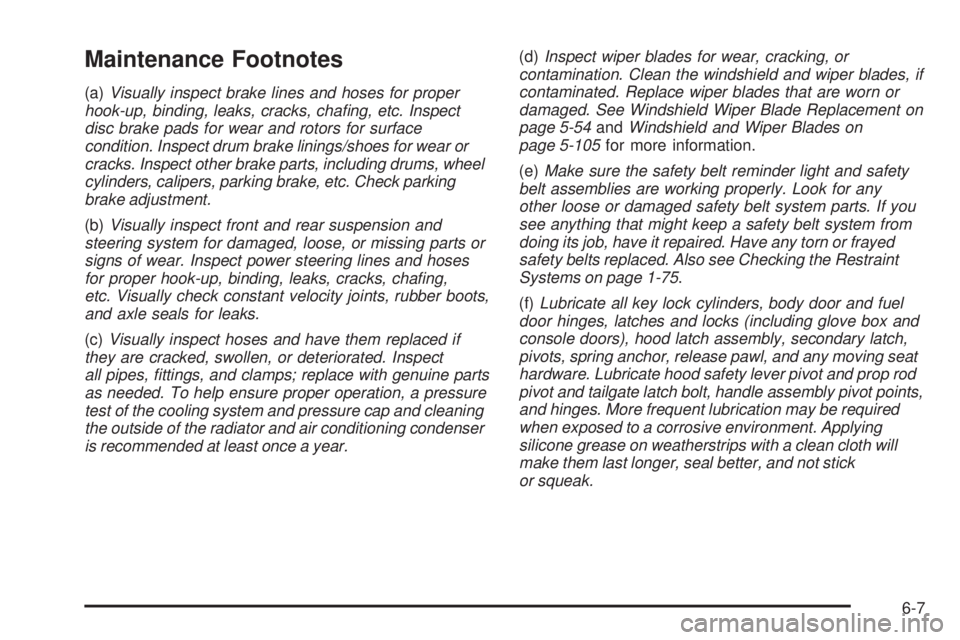
Maintenance Footnotes
(a)Visually inspect brake lines and hoses for proper
hook-up, binding, leaks, cracks, chafing, etc. Inspect
disc brake pads for wear and rotors for surface
condition. Inspect drum brake linings/shoes for wear or
cracks. Inspect other brake parts, including drums, wheel
cylinders, calipers, parking brake, etc. Check parking
brake adjustment.
(b)Visually inspect front and rear suspension and
steering system for damaged, loose, or missing parts or
signs of wear. Inspect power steering lines and hoses
for proper hook-up, binding, leaks, cracks, chafing,
etc. Visually check constant velocity joints, rubber boots,
and axle seals for leaks.
(c)Visually inspect hoses and have them replaced if
they are cracked, swollen, or deteriorated. Inspect
all pipes, fittings, and clamps; replace with genuine parts
as needed. To help ensure proper operation, a pressure
test of the cooling system and pressure cap and cleaning
the outside of the radiator and air conditioning condenser
is recommended at least once a year.(d)Inspect wiper blades for wear, cracking, or
contamination. Clean the windshield and wiper blades, if
contaminated. Replace wiper blades that are worn or
damaged. See Windshield Wiper Blade Replacement on
page 5-54andWindshield and Wiper Blades on
page 5-105for more information.
(e)Make sure the safety belt reminder light and safety
belt assemblies are working properly. Look for any
other loose or damaged safety belt system parts. If you
see anything that might keep a safety belt system from
doing its job, have it repaired. Have any torn or frayed
safety belts replaced. Also see Checking the Restraint
Systems on page 1-75.
(f)Lubricate all key lock cylinders, body door and fuel
door hinges, latches and locks (including glove box and
console doors), hood latch assembly, secondary latch,
pivots, spring anchor, release pawl, and any moving seat
hardware. Lubricate hood safety lever pivot and prop rod
pivot and tailgate latch bolt, handle assembly pivot points,
and hinges. More frequent lubrication may be required
when exposed to a corrosive environment. Applying
silicone grease on weatherstrips with a clean cloth will
make them last longer, seal better, and not stick
or squeak.
6-7
Page 415 of 428
A
Accessories and Modi�cations............................ 5-3
Adding Equipment to Your Airbag-Equipped
Vehicle.......................................................1-74
Additives, Fuel................................................. 5-6
Add-On Electrical Equipment...........................5-110
Air Cleaner/Filter, Engine.................................5-19
Air Conditioning..............................................3-20
Airbag
Passenger Status Indicator...........................3-28
Readiness Light..........................................3-27
Airbag System................................................1-60
What Will You See After an Airbag In�ates?....1-68
When Should an Airbag In�ate?....................1-65
Where Are the Airbags?...............................1-63
Airbag Systems
Adding Equipment to Your Airbag-Equipped
Vehicle...................................................1-74
How Does an Airbag Restrain?......................1-67
Passenger Sensing System...........................1-69
Servicing Your Airbag-Equipped Vehicle..........1-74
What Makes an Airbag In�ate?......................1-67
Antenna, Fixed Mast........................................3-70
Antenna, XM™ Satellite Radio Antenna System.....3-70
Antilock Brake System (ABS)............................. 4-4
Antilock Brake, System Warning Light................3-32Appearance Care
Aluminum or Chrome-Plated Wheels.............5-106
Care of Safety Belts...................................5-103
Chemical Paint Spotting..............................5-107
Cleaning Exterior Lamps/Lenses..................5-104
Fabric/Carpet............................................5-101
Finish Care...............................................5-104
Finish Damage..........................................5-107
Instrument Panel, Vinyl, and Other
Plastic Surfaces.....................................5-102
Interior Cleaning..........................................5-99
Leather....................................................5-102
Sheet Metal Damage..................................5-107
Tires........................................................
5-107
Underbody Maintenance.............................5-107
Vehicle Care/Appearance Materials...............5-108
Washing Your Vehicle.................................5-103
Weatherstrips............................................5-103
Windshield and Wiper Blades......................5-105
Appointments, Scheduling Service....................... 7-9
Ashtray.........................................................3-19
Assist Handles...............................................2-51
Audio System.................................................3-46
Chime Level Adjustment...............................3-70
Fixed Mast Antenna.....................................3-70
Radio Reception..........................................3-69
Setting the Time..........................................3-47
1
Page 416 of 428
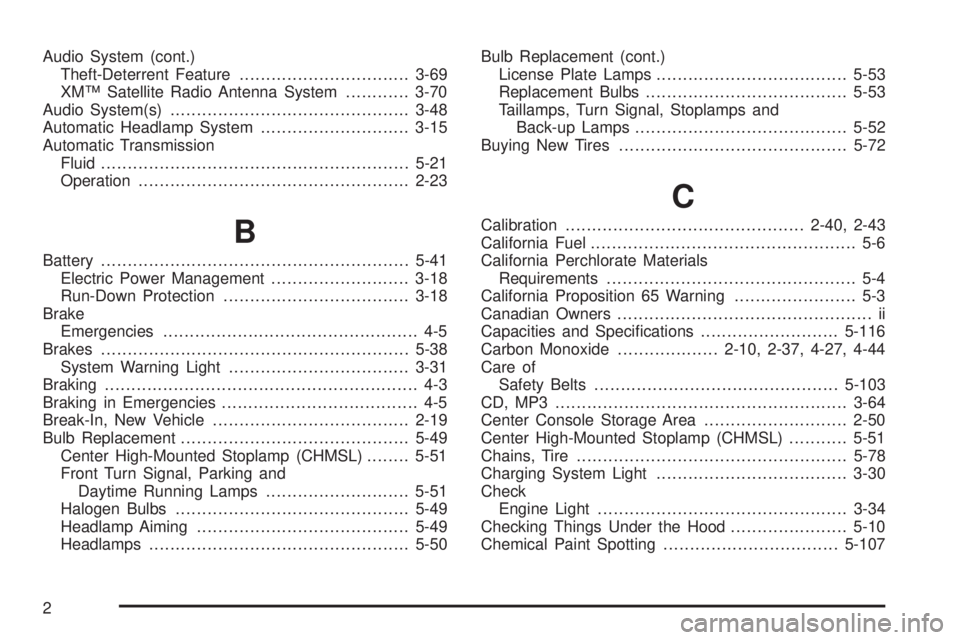
Audio System (cont.)
Theft-Deterrent Feature................................3-69
XM™ Satellite Radio Antenna System............3-70
Audio System(s).............................................3-48
Automatic Headlamp System............................3-15
Automatic Transmission
Fluid..........................................................5-21
Operation...................................................2-23
B
Battery..........................................................5-41
Electric Power Management..........................3-18
Run-Down Protection...................................3-18
Brake
Emergencies................................................ 4-5
Brakes..........................................................5-38
System Warning Light..................................3-31
Braking........................................................... 4-3
Braking in Emergencies..................................... 4-5
Break-In, New Vehicle.....................................2-19
Bulb Replacement...........................................5-49
Center High-Mounted Stoplamp (CHMSL)........5-51
Front Turn Signal, Parking and
Daytime Running Lamps...........................5-51
Halogen Bulbs............................................5-49
Headlamp Aiming........................................5-49
Headlamps.................................................5-50Bulb Replacement (cont.)
License Plate Lamps....................................5-53
Replacement Bulbs......................................5-53
Taillamps, Turn Signal, Stoplamps and
Back-up Lamps........................................5-52
Buying New Tires...........................................5-72
C
Calibration.............................................2-40, 2-43
California Fuel.................................................. 5-6
California Perchlorate Materials
Requirements............................................... 5-4
California Proposition 65 Warning....................... 5-3
Canadian Owners................................................ ii
Capacities and Speci�cations..........................5-116
Carbon Monoxide...................2-10, 2-37, 4-27, 4-44
Care of
Safety Belts..............................................5-103
CD, MP3 .......................................................3-64
Center Console Storage Area...........................2-50
Center High-Mounted Stoplamp (CHMSL)...........5-51
Chains, Tire...................................................5-78
Charging System Light....................................3-30
Check
Engine Light...............................................3-34
Checking Things Under the Hood......................5-10
Chemical Paint Spotting.................................5-107
2
Page 421 of 428
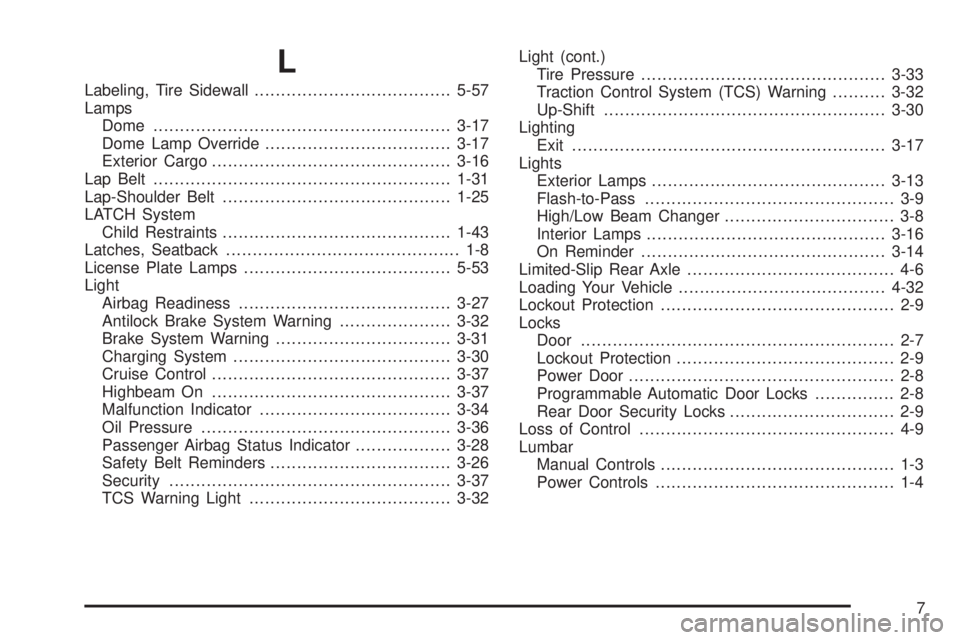
L
Labeling, Tire Sidewall.....................................5-57
Lamps
Dome........................................................3-17
Dome Lamp Override...................................3-17
Exterior Cargo.............................................3-16
Lap Belt........................................................1-31
Lap-Shoulder Belt...........................................1-25
LATCH System
Child Restraints...........................................1-43
Latches, Seatback............................................ 1-8
License Plate Lamps.......................................5-53
Light
Airbag Readiness........................................3-27
Antilock Brake System Warning.....................3-32
Brake System Warning.................................3-31
Charging System.........................................3-30
Cruise Control.............................................3-37
Highbeam On.............................................3-37
Malfunction Indicator....................................3-34
Oil Pressure...............................................3-36
Passenger Airbag Status Indicator..................3-28
Safety Belt Reminders..................................3-26
Security.....................................................3-37
TCS Warning Light......................................3-32Light (cont.)
Tire Pressure..............................................3-33
Traction Control System (TCS) Warning..........3-32
Up-Shift.....................................................3-30
Lighting
Exit...........................................................3-17
Lights
Exterior Lamps............................................3-13
Flash-to-Pass............................................... 3-9
High/Low Beam Changer................................ 3-8
Interior Lamps.............................................3-16
On Reminder..............................................3-14
Limited-Slip Rear Axle....................................... 4-6
Loading Your Vehicle.......................................4-32
Lockout Protection............................................ 2-9
Locks
Door........................................................... 2-7
Lockout Protection......................................... 2-9
Power Door.................................................. 2-8
Programmable Automatic Door Locks............... 2-8
Rear Door Security Locks............................... 2-9
Loss of Control................................................ 4-9
Lumbar
Manual Controls............................................ 1-3
Power Controls............................................. 1-4
7