horn GMC SAVANA 2021 Owner's Manual
[x] Cancel search | Manufacturer: GMC, Model Year: 2021, Model line: SAVANA, Model: GMC SAVANA 2021Pages: 292, PDF Size: 6.38 MB
Page 6 of 292

GMC Savana Owner Manual (GMNA-Localizing-U.S./Canada-14583543) -
2021 - crc - 7/10/20
Introduction 5
1.Air Vents 0123.
2. Driver Information Center (DIC) Buttons (Out of View). See Driver Information
Center (DIC) 081.
3. Turn Signal Lever. See Turn and
Lane-Change Signals 092.
Windshield Wiper/Washer 067.
4. Horn 067.
5. Hazard Warning Flashers 092.
6. Instrument Cluster 071.
7. Shift Lever. See Automatic Transmission
0 142.
Manual Mode 0144 (If Equipped).
8. Climate Control Systems 0119.
9. Infotainment. See Overview (AM-FM
Radio) 097 or
Overview (Radio with CD/MP3) 099. 10.
Power Outlets 069.
11. USB Port (If Equipped). See Auxiliary
Devices 0108.
12. Power Outlet 110/120 Volt Alternating Current. See Power Outlets 069.
13. Rear Heating System 0121 (If Equipped).
Lane Departure Warning (LDW) 0157 (If
Equipped).
Forward Collision Alert (FCA) System
0 154 (If Equipped).
14. Passenger Airbag On-Off Switch (If Equipped). See Airbag On-Off Switch
0 42.
15. Traction Control/Electronic Stability
Control 0147.
16. Tow/Haul Mode Button (If Equipped). See Tow/Haul Mode 0145.
17. Steering Wheel Controls 066 (If
Equipped).
18. Steering Wheel Adjustment 065 (Out of
View), (If Equipped). 19. Parking Brake Release. See
Parking Brake
0 146.
20. Cruise Control 0149 (If Equipped).
Fast Idle System 0138 (If Equipped).
21. Parking Brake 0146.
22. Data Link Connector (DLC) (Out of View). SeeMalfunction Indicator Lamp (Check
Engine Light) 076.
23. Instrument Panel Illumination Control
093.
Dome Lamp Override. See Dome Lamps
0 93.
24. Exterior Lamp Controls 090.
Page 9 of 292
GMC Savana Owner Manual (GMNA-Localizing-U.S./Canada-14583543) -
2021 - crc - 7/10/20
8 Keys, Doors, and Windows
With an active OnStar or connected service
plan, an OnStar Advisor may remotely
unlock the vehicle. SeeOnStar Overview
0 273.
Remote Keyless Entry (RKE)
System
Do not make changes or modifications to
the Remote Keyless Entry (RKE). This could
void authorization to use this equipment.
See Radio Frequency Statement 0270.
If there is a decrease in the RKE operating
range:
.Check the distance. The transmitter may
be too far from the vehicle.
.Check the location. Other vehicles or
objects may be blocking the signal.
.Check the transmitter's battery. See
“Battery Replacement” later in this
section.
.If the transmitter is still not working
correctly, see your dealer or a qualified
technician for service.
Remote Keyless Entry (RKE)
System Operation
If equipped, the RKE transmitter functions
work up to 60 m (197 ft) away from the
vehicle.
Other conditions can affect the performance
of the transmitter. See Remote Keyless Entry
(RKE) System 08.
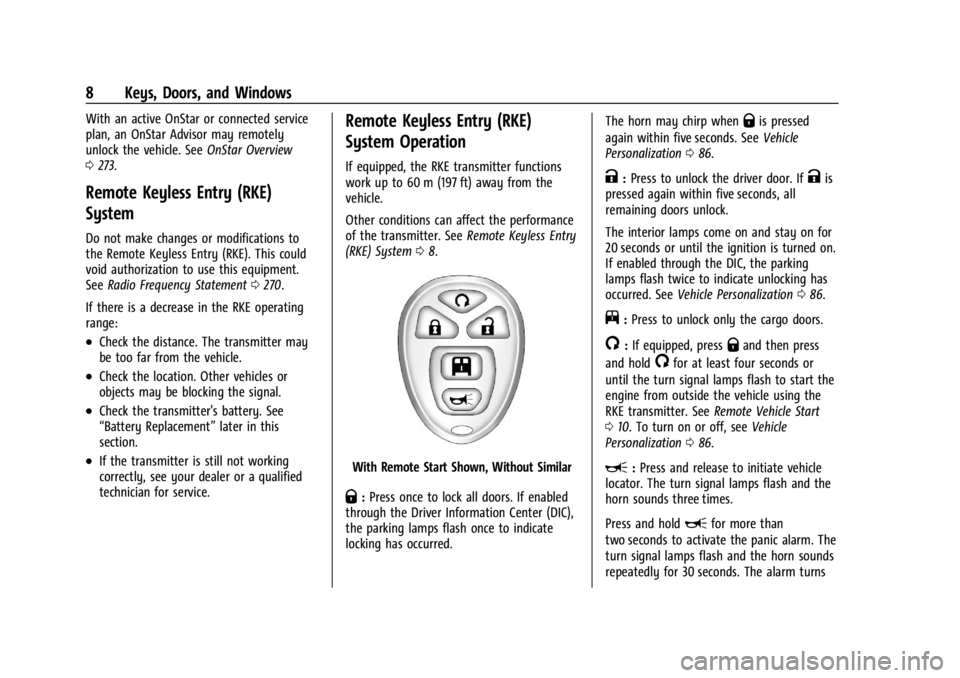
With Remote Start Shown, Without Similar
Q:Press once to lock all doors. If enabled
through the Driver Information Center (DIC),
the parking lamps flash once to indicate
locking has occurred. The horn may chirp when
Qis pressed
again within five seconds. See Vehicle
Personalization 086.
K:Press to unlock the driver door. IfKis
pressed again within five seconds, all
remaining doors unlock.
The interior lamps come on and stay on for
20 seconds or until the ignition is turned on.
If enabled through the DIC, the parking
lamps flash twice to indicate unlocking has
occurred. See Vehicle Personalization 086.
j:Press to unlock only the cargo doors.
/:If equipped, pressQand then press
and hold
/for at least four seconds or
until the turn signal lamps flash to start the
engine from outside the vehicle using the
RKE transmitter. See Remote Vehicle Start
0 10. To turn on or off, see Vehicle
Personalization 086.
L:Press and release to initiate vehicle
locator. The turn signal lamps flash and the
horn sounds three times.
Press and hold
Lfor more than
two seconds to activate the panic alarm. The
turn signal lamps flash and the horn sounds
repeatedly for 30 seconds. The alarm turns
Page 13 of 292
GMC Savana Owner Manual (GMNA-Localizing-U.S./Canada-14583543) -
2021 - crc - 7/10/20
12 Keys, Doors, and Windows
Delayed Locking
When locking the doors with the power lock
switch and a door open, the doors will lock
five seconds after the last door is closed. The
horn chirps to signal that the delayed
locking feature is in use.
Pressing
eorQon the RKE transmitter
will override the delayed locking feature and
immediately lock all the doors.
This feature will not operate if the key is in
the ignition.
This feature can be programmed using the
Driver Information Center (DIC). See “DELAY
DOOR LOCK” inVehicle Personalization 086.
Automatic Door Locks
The vehicle may have an automatic lock/
unlock feature. This feature can be
programmed using the Driver Information
Center (DIC). See Vehicle Personalization
0 86.
Lockout Protection
This feature protects you from locking the
key in the vehicle when the key is in the
ignition and a door is open. If the power lock switch is pressed when
either the driver, passenger, or rear door is
open, all the doors will lock and then the
driver door will unlock. This feature does not
include the side cargo door.
If the vehicle has an ambulance package,
this feature is disabled.
Safety Locks
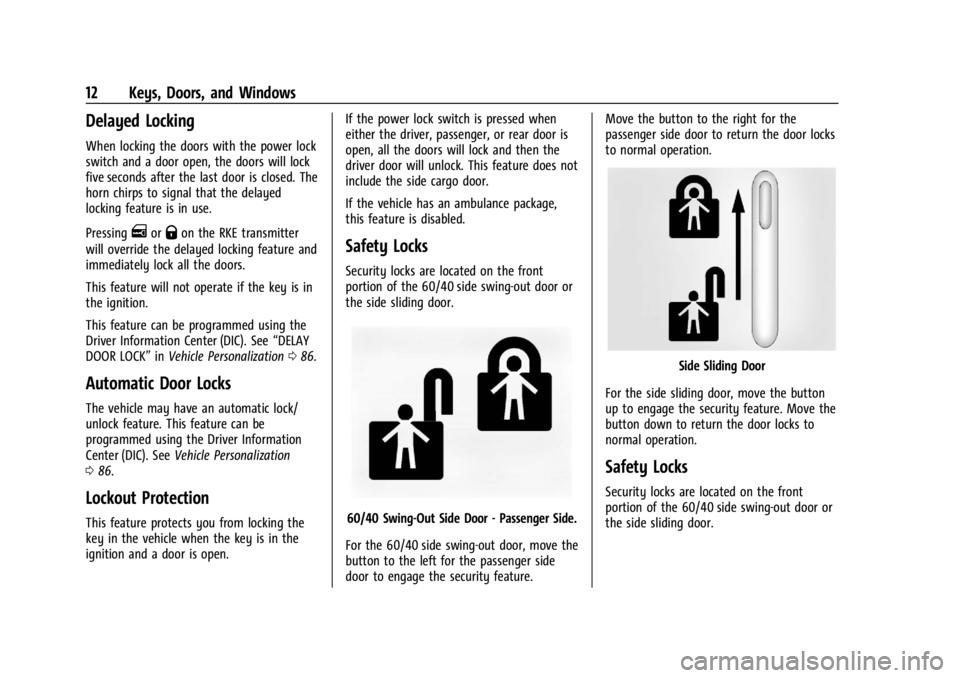
Security locks are located on the front
portion of the 60/40 side swing-out door or
the side sliding door.
60/40 Swing-Out Side Door - Passenger Side.
For the 60/40 side swing-out door, move the
button to the left for the passenger side
door to engage the security feature. Move the button to the right for the
passenger side door to return the door locks
to normal operation.
Side Sliding Door
For the side sliding door, move the button
up to engage the security feature. Move the
button down to return the door locks to
normal operation.
Safety Locks
Security locks are located on the front
portion of the 60/40 side swing-out door or
the side sliding door.
Page 17 of 292
GMC Savana Owner Manual (GMNA-Localizing-U.S./Canada-14583543) -
2021 - crc - 7/10/20
16 Keys, Doors, and Windows
Arming the Alarm System
1. Close the side door/rear doors and thehood. Turn off the vehicle.
2. Lock the vehicle in one of two ways:
.Use the RKE transmitter.
.With a door open, press the
inside
Q.
3. After 30 seconds the alarm system will arm. Pressing
Qon the RKE transmitter
a second time will bypass the 30-second
delay and immediately arm the alarm
system.
The vehicle alarm system will not arm if the
doors are locked with the key or the manual
door lock.
The alarm will also be activated if a
passenger door, side door, rear door, or the
hood is opened without first disarming the
system. When the alarm is activated, the
turn signals flash and the horn sounds for
about 30 seconds. The alarm system will
then re-arm to monitor for the next
unauthorized event.
Disarming the Alarm System
To disarm the alarm system or turn off the
alarm if it has been activated:
.PressKon the RKE transmitter.
.Start the vehicle.
To avoid setting off the alarm by accident:
.Lock the vehicle after all occupants have
left the vehicle and all doors are closed.
.Always unlock a door with the RKE
transmitter.
Unlocking the driver door with the key will
not disarm the system or turn off the alarm.
How to Detect a Tamper Condition
IfKis pressed and the horn chirps and the
lights flash three times, the alarm was
activated while the alarm system was
armed.
If the alarm system has been activated, and
allowed to complete an event
(approximately one minute), a message will
appear on the Driver Information Center
(DIC) the next time the vehicle is started.
Theft Alarm Notification
To enable e-mail or text notification, see
“Theft Alarm Notification” in OnStarSecurity
0 274.
Testing the Alarm
To test the alarm:
1. Lower the driver window and open the driver door.
2. Press
Qon the RKE transmitter.
3. Close the door and wait for a few seconds.
4. Reach in through the open window, unlock the door with the manual door
lock, and open the door.
This should set off the alarm.
If the alarm does not sound when it
should but the lamps flash, check to see
if the horn works. The horn fuse may be
blown. To replace the fuse, see Fuses and
Circuit Breakers 0205.
Immobilizer
See Radio Frequency Statement 0270.
Immobilizer Operation
This vehicle is equipped with the
PASS-Key®III+ (Personalized Automotive
Security System) theft-deterrent system.
PASS-Key III+ is a passive theft deterrent
system.
Page 66 of 292
GMC Savana Owner Manual (GMNA-Localizing-U.S./Canada-14583543) -
2021 - crc - 7/10/20
Instruments and Controls 65
Instruments and Controls
Controls
Steering Wheel Adjustment . . . . . . . . . . . . 65
Steering Wheel Controls . . . . . . . . . . . . . . . 66
Horn . . . . . . . . . . . . . . . . . . . . . . . . . . . . . . . . . . . 67
Windshield Wiper/Washer . . . . . . . . . . . . . . 67
Compass . . . . . . . . . . . . . . . . . . . . . . . . . . . . . . . 67
Clock . . . . . . . . . . . . . . . . . . . . . . . . . . . . . . . . . . . 69
Power Outlets . . . . . . . . . . . . . . . . . . . . . . . . . . 69
Cigarette Lighter . . . . . . . . . . . . . . . . . . . . . . . 70
Ashtrays . . . . . . . . . . . . . . . . . . . . . . . . . . . . . . . . 70
Warning Lights, Gauges, and Indicators
Warning Lights, Gauges, andIndicators . . . . . . . . . . . . . . . . . . . . . . . . . . . . . 70
Instrument Cluster . . . . . . . . . . . . . . . . . . . . . . 71
Speedometer . . . . . . . . . . . . . . . . . . . . . . . . . . . . 71
Odometer . . . . . . . . . . . . . . . . . . . . . . . . . . . . . . . 71
Trip Odometer . . . . . . . . . . . . . . . . . . . . . . . . . . 71
Fuel Gauge . . . . . . . . . . . . . . . . . . . . . . . . . . . . . 71
Engine Oil Pressure Gauge . . . . . . . . . . . . . . 72
Engine Coolant Temperature Gauge . . . . 73
Voltmeter Gauge . . . . . . . . . . . . . . . . . . . . . . . 73
Seat Belt Reminders . . . . . . . . . . . . . . . . . . . . 74
Airbag Readiness Light . . . . . . . . . . . . . . . . . 74
Airbag On-Off Light . . . . . . . . . . . . . . . . . . . . . 75
Charging System Light . . . . . . . . . . . . . . . . . 76
Malfunction Indicator Lamp (Check Engine Light) . . . . . . . . . . . . . . . . . . . . . . . . . 76 Brake System Warning Light . . . . . . . . . . . . 77
Antilock Brake System (ABS) Warning
Light . . . . . . . . . . . . . . . . . . . . . . . . . . . . . . . . . . 78
Tow/Haul Mode Light . . . . . . . . . . . . . . . . . . 78
Lane Departure Warning (LDW) Light . . . 79
Vehicle Ahead Indicator . . . . . . . . . . . . . . . . 79
StabiliTrak OFF Light . . . . . . . . . . . . . . . . . . . . 79
Traction Control System (TCS)/StabiliTrak Light . . . . . . . . . . . . . . . . . . . . . . . . . . . . . . . . . . 79
Tire Pressure Light . . . . . . . . . . . . . . . . . . . . . 80
Engine Oil Pressure Light . . . . . . . . . . . . . . . 80
Low Fuel Warning Light . . . . . . . . . . . . . . . . 80
Security Light . . . . . . . . . . . . . . . . . . . . . . . . . . . 81
High-Beam On Light . . . . . . . . . . . . . . . . . . . . 81
Cruise Control Light . . . . . . . . . . . . . . . . . . . . . 81
Information Displays
Driver Information Center (DIC) . . . . . . . . . 81
Vehicle Messages
Vehicle Messages . . . . . . . . . . . . . . . . . . . . . . . 85
Engine Power Messages . . . . . . . . . . . . . . . . 85
Vehicle Speed Messages . . . . . . . . . . . . . . . . 86
Vehicle Personalization
Vehicle Personalization . . . . . . . . . . . . . . . . . 86
Controls
Steering Wheel Adjustment
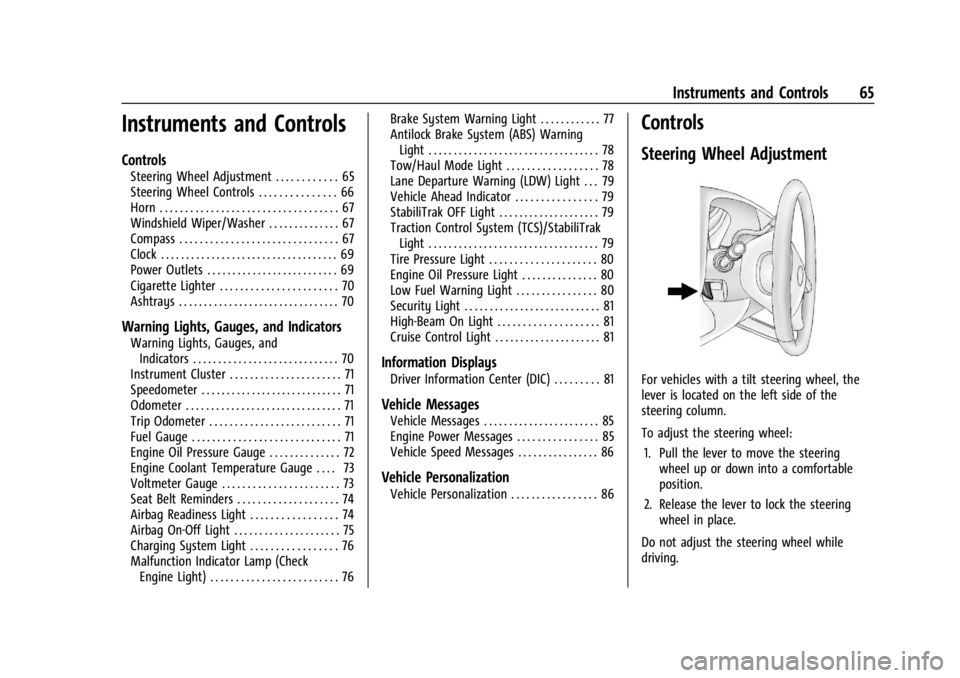
For vehicles with a tilt steering wheel, the
lever is located on the left side of the
steering column.
To adjust the steering wheel:
1. Pull the lever to move the steering wheel up or down into a comfortable
position.
2. Release the lever to lock the steering wheel in place.
Do not adjust the steering wheel while
driving.
Page 68 of 292
GMC Savana Owner Manual (GMNA-Localizing-U.S./Canada-14583543) -
2021 - crc - 7/10/20
Instruments and Controls 67
While listening to a CD, press and hold¨to
quickly move forward through the tracks.
Release to stop on the desired track.
+
e: Press to increase volume.
−
e: Press to decrease volume.
Horn
Press the horn symbol on the steering
wheel to sound the horn.
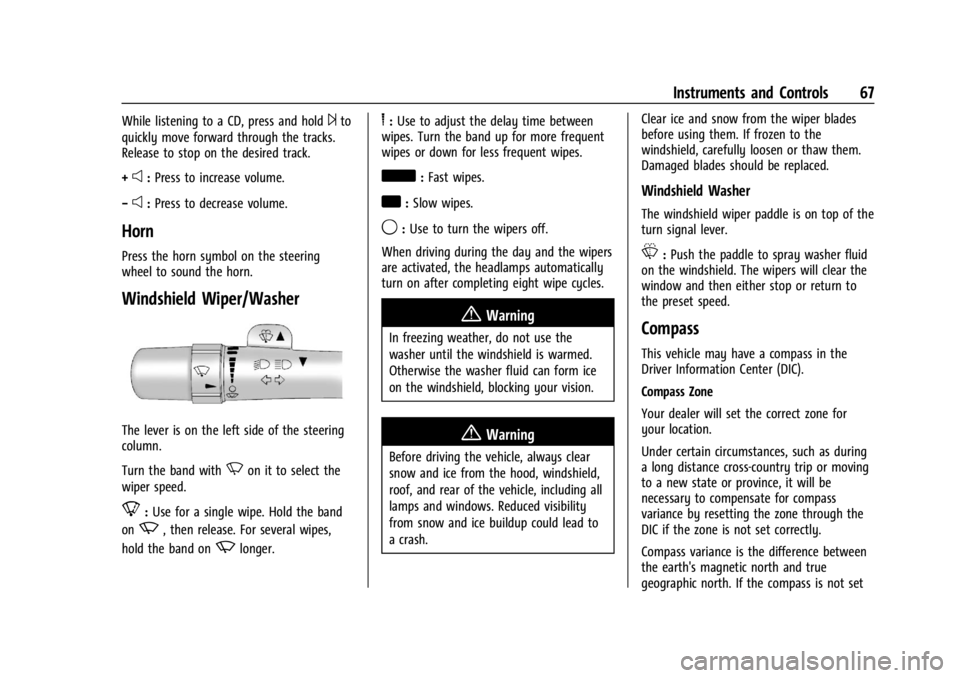
Windshield Wiper/Washer
The lever is on the left side of the steering
column.
Turn the band with
Non it to select the
wiper speed.
8: Use for a single wipe. Hold the band
on
z, then release. For several wipes,
hold the band on
zlonger.
6: Use to adjust the delay time between
wipes. Turn the band up for more frequent
wipes or down for less frequent wipes.
d: Fast wipes.
a:Slow wipes.
9:Use to turn the wipers off.
When driving during the day and the wipers
are activated, the headlamps automatically
turn on after completing eight wipe cycles.
{Warning
In freezing weather, do not use the
washer until the windshield is warmed.
Otherwise the washer fluid can form ice
on the windshield, blocking your vision.
{Warning
Before driving the vehicle, always clear
snow and ice from the hood, windshield,
roof, and rear of the vehicle, including all
lamps and windows. Reduced visibility
from snow and ice buildup could lead to
a crash. Clear ice and snow from the wiper blades
before using them. If frozen to the
windshield, carefully loosen or thaw them.
Damaged blades should be replaced.
Windshield Washer
The windshield wiper paddle is on top of the
turn signal lever.
L:
Push the paddle to spray washer fluid
on the windshield. The wipers will clear the
window and then either stop or return to
the preset speed.
Compass
This vehicle may have a compass in the
Driver Information Center (DIC).
Compass Zone
Your dealer will set the correct zone for
your location.
Under certain circumstances, such as during
a long distance cross-country trip or moving
to a new state or province, it will be
necessary to compensate for compass
variance by resetting the zone through the
DIC if the zone is not set correctly.
Compass variance is the difference between
the earth's magnetic north and true
geographic north. If the compass is not set
Page 88 of 292
GMC Savana Owner Manual (GMNA-Localizing-U.S./Canada-14583543) -
2021 - crc - 7/10/20
Instruments and Controls 87
AUTO DOOR LOCK
This feature allows you to select when the
doors will automatically lock.
Press
Uuntil AUTO DOOR LOCK appears on
the DIC display. Press
Vonce to access the
settings for this feature. Then press
Uto
scroll through the following settings:
SHIFT OUT OF PARK (default) : The doors
will automatically lock when the vehicle is
shifted out of P (Park).
AT VEHICLE SPEED : The doors will
automatically lock when the vehicle speed is
above 13 km/h (8 mph) for three seconds.
NO CHANGE : No change will be made to
this feature. The current setting will remain.
To select a setting, press
Vwhile the
desired setting is displayed on the DIC.
AUTO DOOR UNLOCK
This feature allows you to select whether or
not to turn off the automatic door unlocking
feature. It also allows you to select which
doors and when the doors will automatically
unlock. Press
Uuntil AUTO DOOR UNLOCK appears
on the DIC display. Press
Vonce to access
the settings for this feature. Then press
U
to scroll through the following settings:
OFF : None of the doors will automatically
unlock.
DRIVER AT KEY OUT : Only the driver door
will unlock when the key is taken out of the
ignition.
DRIVER IN PARK : Only the driver door will
unlock when the vehicle is shifted into
P (Park).
ALL AT KEY OUT : All of the doors will
unlock when the key is taken out of the
ignition.
ALL IN PARK (default) : All of the doors will
unlock when the vehicle is shifted into
P (Park).
NO CHANGE : No change will be made to
this feature. The current setting will remain.
To select a setting, press
Vwhile the
desired setting is displayed on the DIC.
REMOTE DOOR LOCK
This feature allows you to select the type of
feedback you will receive when locking the
vehicle with the Remote Keyless Entry (RKE) transmitter. You will not receive feedback
when locking the vehicle with the RKE
transmitter if the doors are open. See
Remote Keyless Entry (RKE) System
Operation
08.
Press
Uuntil REMOTE DOOR LOCK appears
on the DIC display. Press
Vonce to access
the settings for this feature. Then press
U
to scroll through the following settings:
OFF : There will be no feedback when you
press
Qon the RKE transmitter.
LIGHTS ONLY : The exterior lamps will flash
when you press
Qon the RKE transmitter.
HORN ONLY : The horn will sound on the
second press of
Qon the RKE transmitter.
HORN & LIGHTS (default) : The exterior
lamps will flash when you press
Qon the
RKE transmitter, and the horn will sound
when
Qis pressed again within five seconds
of the previous command.
NO CHANGE : No change will be made to
this feature. The current setting will remain.
To select a setting, press
Vwhile the
desired setting is displayed on the DIC.
Page 208 of 292

GMC Savana Owner Manual (GMNA-Localizing-U.S./Canada-14583543) -
2021 - crc - 7/10/20
Vehicle Care 207
FusesUsage
1 ABS motor
2 ABS module
3 Right trailer stoplamp/ Turn signal lamp
4 –
5 –
6 Fuel system control module/Ignition
7 Body control module 5
8 Body control module 7
9 Body control module 4
10 Instrument cluster 11 Trailer wiring
12 –
13 Interior rear vision camera module
14 Windshield washer
16 Horn 17 Transmission
18 A/C Fuses
Usage
19 Engine control module battery
20 Left stop/turn cutaway lamp
21 Left stop/turn trailer lamp
22 Right stop/turn cutaway lamp
23 NOX Sensor (Diesel only)
24 Fuel pump 25 Auxiliary power outlet
26 Body control module 3 27 Special equipment option
28 Airbag
29 Steering wheel sensor
30 Engine control module ignition
31 Transmission control module Ignition
32 Transmission control module 1 battery Fuses
Usage
33 Rear parking aid module
34 NOX Sensor (Diesel only)
35 Fuel heater control module (Diesel only)
36 Fuel system control module battery
41 Transmission control module 2, battery
signal
42 Trailer wiring
43 Electro viscous fan clutch (Diesel only)
44 Starter solenoid 45 Engine control module, powertrain signal 2
46 DC-AC inverter 47 –
51 Left high-beam headlamp
52 Right high-beam headlamp
Page 220 of 292
GMC Savana Owner Manual (GMNA-Localizing-U.S./Canada-14583543) -
2021 - crc - 7/10/20
Vehicle Care 219
.One or more TPMS sensors are missing or
damaged. The malfunction light and the
DIC message should go off when the
TPMS sensors are installed and the sensor
matching process is performed
successfully. See your dealer for service.
.Replacement tires or wheels do not match
the original equipment tires or wheels.
Tires and wheels other than those
recommended could prevent the TPMS
from functioning properly. SeeBuying
New Tires 0222.
.Operating electronic devices or being near
facilities using radio wave frequencies
similar to the TPMS could cause the TPMS
sensors to malfunction.
If the TPMS is not functioning properly, it
cannot detect or signal a low tire pressure
condition. See your dealer for service if the
TPMS malfunction light and DIC message
come on and stay on.
TPMS Sensor Matching Process
Each TPMS sensor has a unique
identification code. The identification code
needs to be matched to a new tire/wheel
position after rotating the vehicle’s tires or
replacing one or more of the TPMS sensors.
Also, the TPMS sensor matching process should be performed after replacing a spare
tire with a road tire containing the TPMS
sensor. The malfunction light and the DIC
message should go off at the next ignition
cycle. The sensors are matched to the tire/
wheel positions, using a TPMS relearn tool,
in the following order: driver side front tire,
passenger side front tire, passenger side rear
tire, and driver side rear. See your dealer for
service or to purchase a relearn tool.
A TPMS relearn tool can also be purchased.
See Tire Pressure Monitor Sensor Activation
Tool at www.gmtoolsandequipment.com or
call 1-800-GM TOOLS (1-800-468-6657).
There are two minutes to match the first
tire/wheel position, and five minutes overall
to match all four tire/wheel positions. If it
takes longer, the matching process stops
and must be restarted.
The TPMS sensor matching process is:
1. Set the parking brake.
2. Turn the ignition on without starting the vehicle. See Ignition Positions 0135.
3. Press the Remote Keyless Entry (RKE) transmitter's
QandKbuttons at the
same time for approximately
five seconds. The horn sounds twice to signal the receiver is in relearn mode
and TIRE LEARNING ACTIVE message
displays on the DIC screen.
If the vehicle does not have RKE, press
the Driver Information Center (DIC)
vehicle information button until the
PRESS
VTO RELEARN TIRE POSITIONS
message displays. The horn sounds twice
to signal the receiver is in relearn mode
and TIRE LEARNING ACTIVE message
displays on the DIC screen.
4. Start with the driver side front tire.
5. Place the relearn tool against the tire sidewall, near the valve stem. Then press
the button to activate the TPMS sensor.
A horn chirp confirms that the sensor
identification code has been matched to
this tire and wheel position.
6. Proceed to the passenger side front tire, and repeat the procedure in Step 5.
7. Proceed to the passenger side rear tire, and repeat the procedure in Step 5.
8. Proceed to the driver side rear tire, and repeat the procedure in Step 5. The horn
sounds two times to indicate the sensor
identification code has been matched to
the driver side rear tire, and the TPMS
sensor matching process is no longer
Page 280 of 292
GMC Savana Owner Manual (GMNA-Localizing-U.S./Canada-14583543) -
2021 - crc - 7/10/20
Connected Services 279
PressQ, then ask the Advisor to download
directions to the vehicle’s navigation system,
if equipped. After the call ends, the
navigation screen will provide prompts to
begin driving directions. Routes that are sent
to the navigation screen can only be
canceled through the navigation system.
See www.onstar.com (U.S.) or www.onstar.ca
(Canada).
Connections
The following services help with staying
connected.
For coverage maps, see www.onstar.com
(U.S.) or www.onstar.ca (Canada).
Ensuring Security
.Change the default passwords for the
Wi-Fi hotspot and myGMC mobile
application. Make these passwords
different from each other and use a
combination of letters and numbers to
increase the security.
.Change the default name of the SSID
(Service Set Identifier). This is your
network’s name that is visible to other
wireless devices. Choose a unique name
and avoid family names or vehicle
descriptions. Wi-Fi Hotspot (If Equipped)
The vehicle may have a built-in Wi-Fi
hotspot that provides access to the Internet
and web content at 4G LTE speed. Up to
seven mobile devices can be connected.
A data plan is required. Use the in-vehicle
controls only when it is safe to do so.
1. To retrieve Wi-Fi hotspot information, press
=to open the OnStar app on the
infotainment display, then select Wi-Fi
Hotspot. On some vehicles, touch Wi-Fi
or Wi-Fi Settings on the screen.
2. The Wi-Fi settings will display the Wi-Fi hotspot name (SSID), password, and on
some vehicles, the connection type (no
Internet connection, 3G, 4G, 4G LTE), and
signal quality (poor, good, excellent). The
LTE icon shows connection to Wi-Fi. It is
possible that the icon may not illuminate
even though the vehicle has an active
connection.
3. To change the SSID or password, press
Qor call 1-888-4ONSTAR to connect
with an Advisor. On some vehicles, the
SSID and password can be changed in
the Wi-Fi Hotspot menu. After initial set-up, your vehicle’s Wi-Fi
hotspot will connect automatically to your
mobile devices. Manage data usage by
turning Wi-Fi on or off on your mobile
device, using the myGMC mobile app, or by
contacting an OnStar Advisor. On some
vehicles, Wi-Fi can also be managed from
the Wi-Fi Hotspot menu.
MyGMC Mobile App (If Available)
Download the myGMC mobile app to
compatible Apple and Android smartphones.
GMC users can access the following services
from a smartphone:
.Remotely start/stop the vehicle,
if factory-equipped.
.Lock/unlock doors, if equipped with
automatic locks.
.Activate the horn and lamps.
.Check the vehicle’s fuel level, oil life,
or tire pressure, if factory-equipped with
the Tire Pressure Monitor System.
.Send destinations to the vehicle.
.Locate the vehicle on a map (U.S.
market only).
.Turn the vehicle's Wi-Fi hotspot on/off,
manage settings, and monitor data
consumption, if equipped.
.Locate a dealer and schedule service.