air conditioning GMC SIERRA 2008 Owner's Manual
[x] Cancel search | Manufacturer: GMC, Model Year: 2008, Model line: SIERRA, Model: GMC SIERRA 2008Pages: 578, PDF Size: 6.47 MB
Page 99 of 578
Battery Replacement
Replace the battery if the REPLACE BATTERY IN
REMOTE KEY message displays in the DIC. See
“REPLACE BATTERY IN REMOTE KEY” underDIC
Warnings and Messages on page 3-63for additional
information.
Notice:When replacing the battery, use care not to
touch any of the circuitry. Static from your body
transferred to these surfaces may damage the
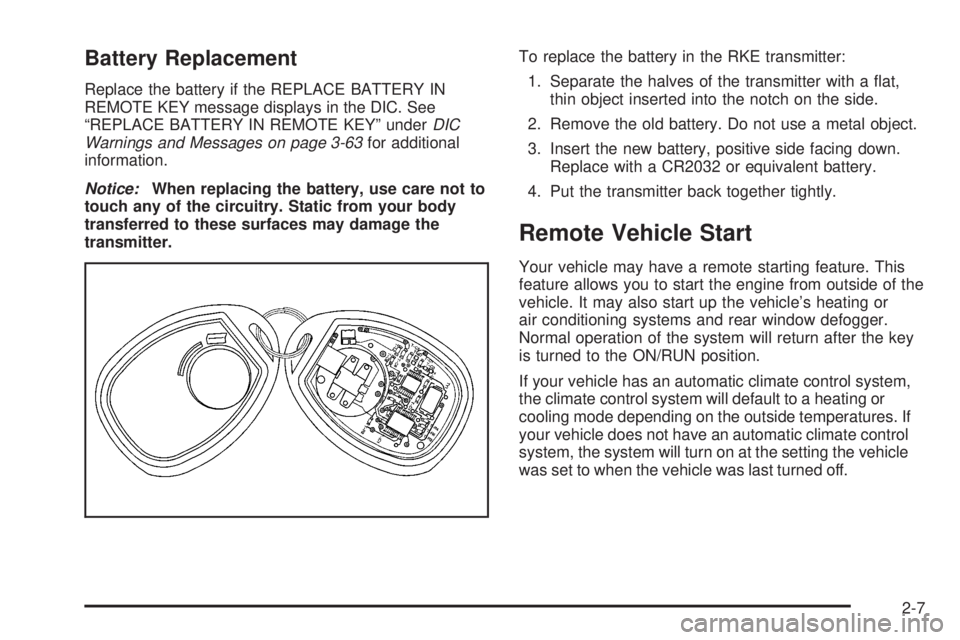
transmitter.To replace the battery in the RKE transmitter:
1. Separate the halves of the transmitter with a �at,
thin object inserted into the notch on the side.
2. Remove the old battery. Do not use a metal object.
3. Insert the new battery, positive side facing down.
Replace with a CR2032 or equivalent battery.
4. Put the transmitter back together tightly.
Remote Vehicle Start
Your vehicle may have a remote starting feature. This
feature allows you to start the engine from outside of the
vehicle. It may also start up the vehicle’s heating or
air conditioning systems and rear window defogger.
Normal operation of the system will return after the key
is turned to the ON/RUN position.
If your vehicle has an automatic climate control system,
the climate control system will default to a heating or
cooling mode depending on the outside temperatures. If
your vehicle does not have an automatic climate control
system, the system will turn on at the setting the vehicle
was set to when the vehicle was last turned off.
2-7
Page 173 of 578
Instrument Panel Overview...............................3-4
Instrument Panel Overview
(Base/Uplevel version).................................3-4
Instrument Panel Overview
(Premium version).......................................3-6
Hazard Warning Flashers................................3-8
Other Warning Devices...................................3-8
Horn.............................................................3-8
Tilt Wheel.....................................................3-9
Turn Signal/Multifunction Lever.........................3-9
Turn and Lane-Change Signals.......................3-10
Headlamp High/Low-Beam Changer.................3-11
Flash-to-Pass...............................................3-11
Windshield Wipers........................................3-12
Rainsense™ II Wipers...................................3-12
Windshield Washer.......................................3-13
Cruise Control..............................................3-14
Exterior Lamps.............................................3-17
Headlamps on Reminder................................3-18
Daytime Running Lamps (DRL).......................3-18
Automatic Headlamp System..........................3-19
Puddle Lamps..............................................3-20
Fog Lamps..................................................3-20
Auxiliary Roof Mounted Lamp.........................3-20Instrument Panel Brightness...........................3-21
Dome Lamps...............................................3-21
Dome Lamp Override....................................3-21
Entry Lighting...............................................3-21
Exit Lighting.................................................3-21
Reading Lamps............................................3-22
Cargo Lamp.................................................3-22
Electric Power Management...........................3-22
Battery Run-Down Protection..........................3-23
Accessory Power Outlet(s).............................3-23
Ashtray(s) and Cigarette Lighter......................3-24
Climate Controls............................................3-25
Climate Control System
(With Air Conditioning)...............................3-25
Climate Control System (Heater Only)..............3-27
Dual Automatic Climate Control System...........3-28
Outlet Adjustment.........................................3-33
Warning Lights, Gages, and Indicators............3-34
Instrument Panel Cluster................................3-35
Speedometer and Odometer...........................3-36
Trip Odometer..............................................3-36
Tachometer.................................................3-36
Safety Belt Reminders...................................3-37
Section 3 Instrument Panel
3-1
Page 177 of 578
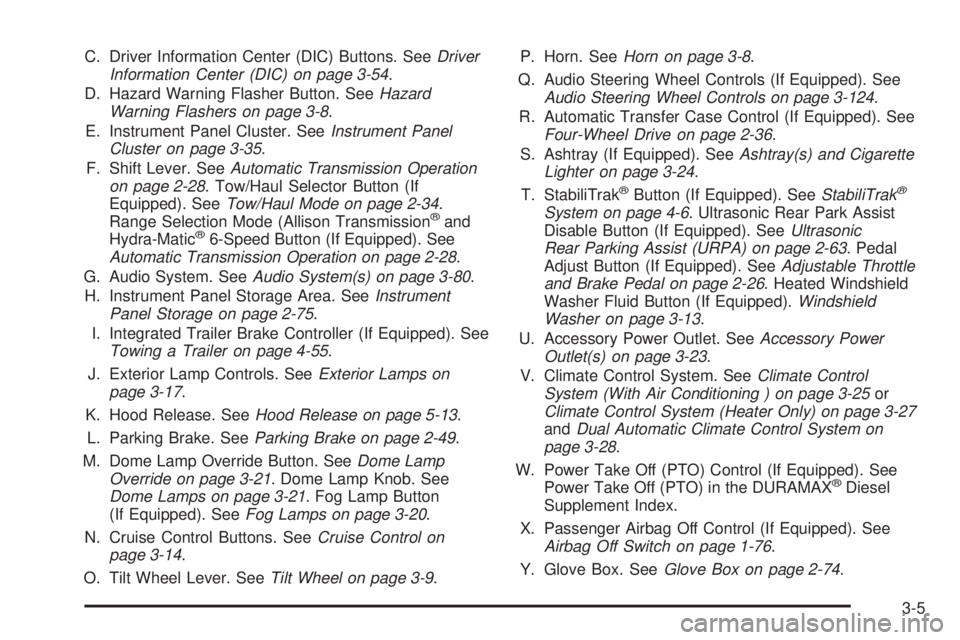
C. Driver Information Center (DIC) Buttons. SeeDriver
Information Center (DIC) on page 3-54.
D. Hazard Warning Flasher Button. SeeHazard
Warning Flashers on page 3-8.
E. Instrument Panel Cluster. SeeInstrument Panel
Cluster on page 3-35.
F. Shift Lever. SeeAutomatic Transmission Operation
on page 2-28. Tow/Haul Selector Button (If
Equipped). SeeTow/Haul Mode on page 2-34.
Range Selection Mode (Allison Transmission
®and
Hydra-Matic®6-Speed Button (If Equipped). See
Automatic Transmission Operation on page 2-28.
G. Audio System. SeeAudio System(s) on page 3-80.
H. Instrument Panel Storage Area. SeeInstrument
Panel Storage on page 2-75.
I. Integrated Trailer Brake Controller (If Equipped). See
Towing a Trailer on page 4-55.
J. Exterior Lamp Controls. SeeExterior Lamps on
page 3-17.
K. Hood Release. SeeHood Release on page 5-13.
L. Parking Brake. SeeParking Brake on page 2-49.
M. Dome Lamp Override Button. SeeDome Lamp
Override on page 3-21. Dome Lamp Knob. See
Dome Lamps on page 3-21. Fog Lamp Button
(If Equipped). SeeFog Lamps on page 3-20.
N. Cruise Control Buttons. SeeCruise Control on
page 3-14.
O. Tilt Wheel Lever. SeeTilt Wheel on page 3-9.P. Horn. SeeHorn on page 3-8.
Q. Audio Steering Wheel Controls (If Equipped). See
Audio Steering Wheel Controls on page 3-124.
R. Automatic Transfer Case Control (If Equipped). See
Four-Wheel Drive on page 2-36.
S. Ashtray (If Equipped). SeeAshtray(s) and Cigarette
Lighter on page 3-24.
T. StabiliTrak
®Button (If Equipped). SeeStabiliTrak®
System on page 4-6. Ultrasonic Rear Park Assist
Disable Button (If Equipped). SeeUltrasonic
Rear Parking Assist (URPA) on page 2-63. Pedal
Adjust Button (If Equipped). SeeAdjustable Throttle
and Brake Pedal on page 2-26. Heated Windshield
Washer Fluid Button (If Equipped).Windshield
Washer on page 3-13.
U. Accessory Power Outlet. SeeAccessory Power
Outlet(s) on page 3-23.
V. Climate Control System. SeeClimate Control
System (With Air Conditioning ) on page 3-25or
Climate Control System (Heater Only) on page 3-27
andDual Automatic Climate Control System on
page 3-28.
W. Power Take Off (PTO) Control (If Equipped). See
Power Take Off (PTO) in the DURAMAX
®Diesel
Supplement Index.
X. Passenger Airbag Off Control (If Equipped). See
Airbag Off Switch on page 1-76.
Y. Glove Box. SeeGlove Box on page 2-74.
3-5
Page 179 of 578
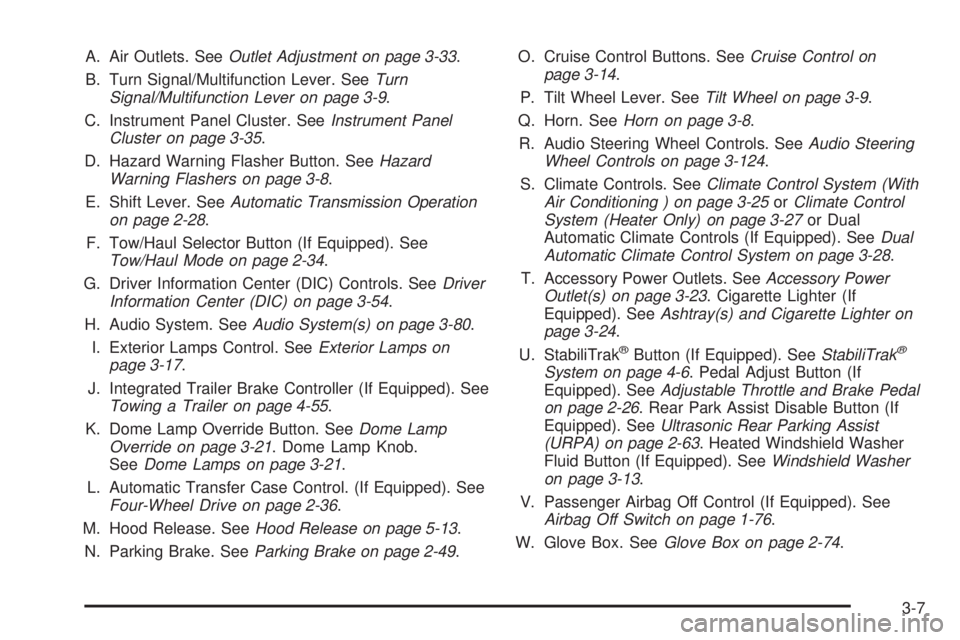
A. Air Outlets. SeeOutlet Adjustment on page 3-33.
B. Turn Signal/Multifunction Lever. SeeTurn
Signal/Multifunction Lever on page 3-9.
C. Instrument Panel Cluster. SeeInstrument Panel
Cluster on page 3-35.
D. Hazard Warning Flasher Button. SeeHazard
Warning Flashers on page 3-8.
E. Shift Lever. SeeAutomatic Transmission Operation
on page 2-28.
F. Tow/Haul Selector Button (If Equipped). See
Tow/Haul Mode on page 2-34.
G. Driver Information Center (DIC) Controls. SeeDriver
Information Center (DIC) on page 3-54.
H. Audio System. SeeAudio System(s) on page 3-80.
I. Exterior Lamps Control. SeeExterior Lamps on
page 3-17.
J. Integrated Trailer Brake Controller (If Equipped). See
Towing a Trailer on page 4-55.
K. Dome Lamp Override Button. SeeDome Lamp
Override on page 3-21. Dome Lamp Knob.
SeeDome Lamps on page 3-21.
L. Automatic Transfer Case Control. (If Equipped). See
Four-Wheel Drive on page 2-36.
M. Hood Release. SeeHood Release on page 5-13.
N. Parking Brake. SeeParking Brake on page 2-49.O. Cruise Control Buttons. SeeCruise Control on
page 3-14.
P. Tilt Wheel Lever. SeeTilt Wheel on page 3-9.
Q. Horn. SeeHorn on page 3-8.
R. Audio Steering Wheel Controls. SeeAudio Steering
Wheel Controls on page 3-124.
S. Climate Controls. SeeClimate Control System (With
Air Conditioning ) on page 3-25orClimate Control
System (Heater Only) on page 3-27or Dual
Automatic Climate Controls (If Equipped). SeeDual
Automatic Climate Control System on page 3-28.
T. Accessory Power Outlets. SeeAccessory Power
Outlet(s) on page 3-23. Cigarette Lighter (If
Equipped). SeeAshtray(s) and Cigarette Lighter on
page 3-24.
U. StabiliTrak
®Button (If Equipped). SeeStabiliTrak®
System on page 4-6. Pedal Adjust Button (If
Equipped). SeeAdjustable Throttle and Brake Pedal
on page 2-26. Rear Park Assist Disable Button (If
Equipped). SeeUltrasonic Rear Parking Assist
(URPA) on page 2-63. Heated Windshield Washer
Fluid Button (If Equipped). SeeWindshield Washer
on page 3-13.
V. Passenger Airbag Off Control (If Equipped). See
Airbag Off Switch on page 1-76.
W. Glove Box. SeeGlove Box on page 2-74.
3-7
Page 197 of 578
Climate Controls
Climate Control System (With Air
Conditioning)
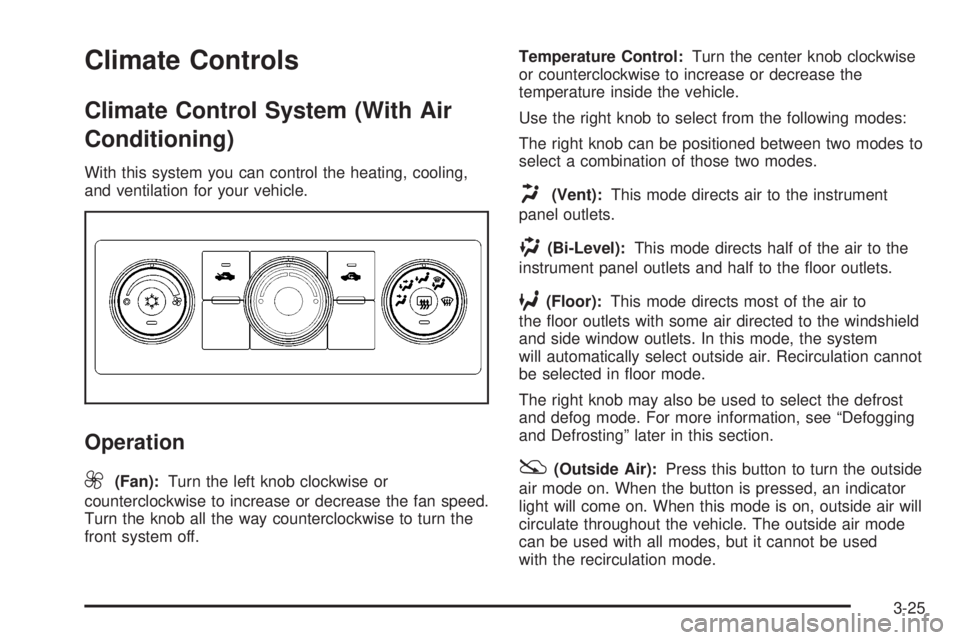
With this system you can control the heating, cooling,
and ventilation for your vehicle.
Operation
9
(Fan):Turn the left knob clockwise or
counterclockwise to increase or decrease the fan speed.
Turn the knob all the way counterclockwise to turn the
front system off.Temperature Control:Turn the center knob clockwise
or counterclockwise to increase or decrease the
temperature inside the vehicle.
Use the right knob to select from the following modes:
The right knob can be positioned between two modes to
select a combination of those two modes.
H(Vent):This mode directs air to the instrument
panel outlets.
)(Bi-Level):This mode directs half of the air to the
instrument panel outlets and half to the �oor outlets.
6(Floor):This mode directs most of the air to
the �oor outlets with some air directed to the windshield
and side window outlets. In this mode, the system
will automatically select outside air. Recirculation cannot
be selected in �oor mode.
The right knob may also be used to select the defrost
and defog mode. For more information, see “Defogging
and Defrosting” later in this section.
:(Outside Air):Press this button to turn the outside
air mode on. When the button is pressed, an indicator
light will come on. When this mode is on, outside air will
circulate throughout the vehicle. The outside air mode
can be used with all modes, but it cannot be used
with the recirculation mode.
3-25
Page 198 of 578
?(Recirculation):Press this button to turn the
recirculation mode on. When the button is pressed, an
indicator light will come on.
This mode keeps outside air from entering the vehicle.
It can be used to reduce outside air and prevent
odors from entering the vehicle. Recirculation may also
help cool the air inside the vehicle more quickly once
the temperature inside the vehicle is less than the
outside temperature.
The recirculation mode cannot be used with �oor, defog
or defrost modes. If recirculation is selected with one
of these modes, the indicator light will �ash three times
and then turn off. While in recirculation mode the
windows may fog when the weather is cold and damp.
To clear the fog, select either the defog or defrost
mode and increase the fan speed.
The recirculation mode can be turned off by pressing
the outside air button, or by turning off the ignition.
#(Air Conditioning):Press this button to turn the air
conditioning system on or off. When this button is
pressed, an indicator light on the button will come on to
let you know the air conditioning is activated. The air
conditioning can be selected in any mode as long as the
fan switch is on.
The air conditioning system removes moisture from the
air, so you may sometimes notice a small amount of
water dripping underneath your vehicle while idling
or after turning off the engine. This is normal.
Defogging and Defrosting
Fog or frost on the inside of windows is a result of high
humidity (moisture) condensing on the cool window
glass. This can be minimized if the climate control
system is used properly. To avoid fogging windows on
rainy and humid days at temperatures above freezing,
run the air conditioning compressor. It is best to
avoid the use of the recirculation mode, except when
maximum A/C performance is needed or for short times
to avoid exterior odors.
Turn the right knob to select the defog or defrost mode.
-(Defog):This mode clears the windows of fog or
moisture and warm the passengers. The air is directed to
the windshield, �oor outlets, and side window vents.
0(Defrost):This mode removes fog or frost from the
windshield more quickly. A portion of the air is directed
to the windshield and the side window vents, with some
air directed to the �oor vents. The system will
automatically force outside air into the vehicle.
The recirculation mode cannot be selected in the defog
or defrost mode. When either mode is selected, the
system runs the air conditioning compressor, unless the
outside temperature is close to freezing. Do not drive
the vehicle until all the windows are clear.
3-26
Page 201 of 578
Driver and Passenger Side Temperature
Controls
The driver and passenger side temperature buttons are
used to adjust the temperature of the air coming
through the system on the driver or passenger’s side of
the vehicle. The temperature can be adjusted even if
the system is turned off. This is possible since outside
air always �ows through the system as the vehicle
is moving forward unless it is set to recirculation mode.
See “Recirculation” later in this section.
Press the + or−buttons to increase or decrease the
cabin temperature. The driver side or passenger
side temperature display shows the temperature setting
decreasing or increasing.
The passenger’s temperature setting can be set to
match the driver’s temperature setting by pressing the
PASS button and turning off the PASS indicator.
When the passenger’s temperature setting is set
different than the driver’s setting, the indicator on the
PASS button illuminates and both the driver’s side and
passenger’s side temperature displays are shown.
Automatic Operation
AUTO (Automatic):When automatic operation is
active the system controls the inside temperature, the
air delivery, and the fan speed.Use the steps below to place the entire system in
automatic mode:
1. Press the AUTO button.
When AUTO is selected, the display changes to
show the current temperature(s) and AUTO is lit on
the display. The current air delivery mode and
fan speed are also displayed for about 5 seconds.
When AUTO is selected, the air conditioning
operation and air inlet are automatically controlled.
The air conditioning compressor may run when
the outside temperature is above freezing. The air
inlet will normally be set to outside air. If it is
hot outside, the air inlet may automatically switch to
the recirculate mode to help quickly cool down
the air inside the vehicle. The light on the button
comes on in recirculation.
2. Set the driver’s and passenger’s temperature.
To �nd your comfort setting, start with a 74°F (23°C)
temperature setting and allow about 20 minutes
for the system to regulate. Use the driver’s or
passenger’s temperature buttons to adjust the
temperature setting as necessary. If you choose the
temperature setting of 60°F (15°C), the system
remains at the maximum cooling setting. If
you choose the temperature setting of 90°F (32°C),
the system remains at the maximum heat setting.
Choosing either maximum setting will not cause the
vehicle to heat or cool any faster.
3-29
Page 202 of 578

Be careful not to cover the solar sensor located on the
top of the instrument panel near the windshield. This
sensor regulates air temperature based on sun load. For
more information on the solar sensor, see “Sensors”
later in this section.
To avoid blowing cold air in cold weather, the system
delays turning the fan on until warm air is available. The
length of delay depends on the engine coolant
temperature. Pressing the fan switch overrides this
delay and changes the fan to a selected speed.
O(On/Off):Press this button to turn off the climate
control system. Outside air still enters the vehicle, and is
directed to the �oor. This direction can be changed by
pressing the mode button. Recirculation can be selected
once you have selected vent or bi-level mode. The
temperature can also be adjusted using either
temperature button. If the air delivery mode or
temperature settings are adjusted with the system off,
the display illuminates brie�y to show the settings
and then returns to off. Press the on/off button or the up
down arrows on the fan switch, the defrost button,
AUTO button, or the air conditioning button to turn the
system on when it is off.
Manual Operation
The air delivery mode or fan speed can be manually
adjusted.
DC(Fan):These buttons let you manually adjust the
fan speed. Press
Dto increase fan speed andC
to decrease fan speed.
Pressing either fan button while the system is off turns
the system on. Pressing either fan button while in
automatic control places the fan under manual control.
The fan setting remains displayed and the AUTO
light turns off. The air delivery mode remains under
automatic control.
HG(Mode):PressHandGto manually change the
direction of the air�ow in the vehicle. Repeatedly
press either button until the desired mode appears on
the display. Pressing either mode button while the
system is off changes the air delivery mode without
turning the system on. Pressing either mode button
while in automatic control places the mode under
manual control.
The air delivery mode setting is displayed and the
AUTO light turns off. The fan remains under automatic
control.
H(Vent):Air is directed to the instrument panel
outlets.
3-30
Page 203 of 578
)(Bi-Level):Air is directed partly to the instrument
panel outlets and to the �oor outlets. A little air is
directed towards the windshield and side window outlets.
Cooler air is directed to the upper outlets and warmer
air to the �oor outlets.
6(Floor):Air is directed to the �oor outlets, with
some to the windshield, side window outlets, and
second row �oor outlets. In this mode, the system will
automatically select outside air.
-(Defog):See “Defogging and Defrosting” later in
this section.
@(Recirculation):Press this button to turn the
recirculation mode on. When the button is pressed, an
indicator light comes on.
This mode keeps outside air from entering the vehicle.
It can be used to reduce outside air and prevent
odors from entering the vehicle. Recirculation may also
help cool the air inside the vehicle more quickly once
the temperature inside the vehicle is less than the
outside temperature.
The recirculation mode cannot be used with �oor, defog,
or defrost modes. If recirculation is selected with one
of those modes, the indicator light �ashes three
times and then turns off. The air conditioning
compressor also comes on when this mode is activated.While in recirculation mode the windows may fog when
the weather is cold and damp. To clear the fog,
select either the defog or defrost mode and increase the
fan speed.
The recirculation mode can be turned off by pressing
the outside air button, or by turning off the ignition.
;(Outside Air):Press this button to turn on
the outside air mode. When this mode is selected, air
from outside the vehicle circulates throughout the
vehicle. An indicator light on the button comes on to
show that it is activated. The outside air mode can be
used with all modes, but it cannot be used with the
recirculation mode.
Air Conditioning
#
(Air Conditioning):Press this button to turn the
air conditioning (A/C) compressor on and off. When
air conditioning is selected, an indicator light comes on
to show that the air conditioning has been activated.
Pressing this button when the outside temperature is too
cool for air conditioning makes the air conditioning
indicator �ash three times and then turn off to let you
know the air conditioning mode is not available. If the air
conditioning is on and the outside temperature drops
below a temperature which is too cool for air conditioning
to be effective, the air conditioning light turns off to show
that the air conditioning mode has been canceled.
3-31
Page 204 of 578
On hot days, open the windows long enough to let hot
inside air escape. This helps to reduce the time it
takes for the vehicle to cool down. It also helps the
system to operate more efficiently.
The air conditioning system removes moisture from the
air, so a small amount of water might drip underneath
the vehicle while idling or after turning off the engine.
This is normal.
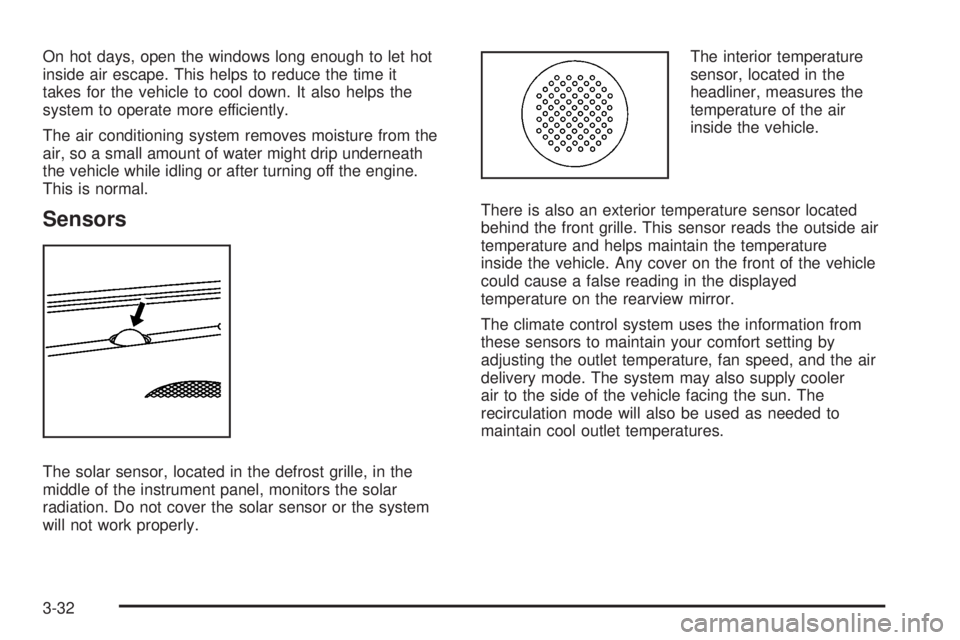
Sensors
The solar sensor, located in the defrost grille, in the
middle of the instrument panel, monitors the solar
radiation. Do not cover the solar sensor or the system
will not work properly.The interior temperature
sensor, located in the
headliner, measures the
temperature of the air
inside the vehicle.
There is also an exterior temperature sensor located
behind the front grille. This sensor reads the outside air
temperature and helps maintain the temperature
inside the vehicle. Any cover on the front of the vehicle
could cause a false reading in the displayed
temperature on the rearview mirror.
The climate control system uses the information from
these sensors to maintain your comfort setting by
adjusting the outlet temperature, fan speed, and the air
delivery mode. The system may also supply cooler
air to the side of the vehicle facing the sun. The
recirculation mode will also be used as needed to
maintain cool outlet temperatures.
3-32