headlamp GMC SIERRA 2023 Owners Manual
[x] Cancel search | Manufacturer: GMC, Model Year: 2023, Model line: SIERRA, Model: GMC SIERRA 2023Pages: 430, PDF Size: 18.76 MB
Page 7 of 430
GMC Sierra/Sierra Denali 2500 HD/3500 HD Owner Manual (GMNA-
Localizing-U.S./Canada-16504257) - 2023 - CRC - 5/9/22
6 Introduction
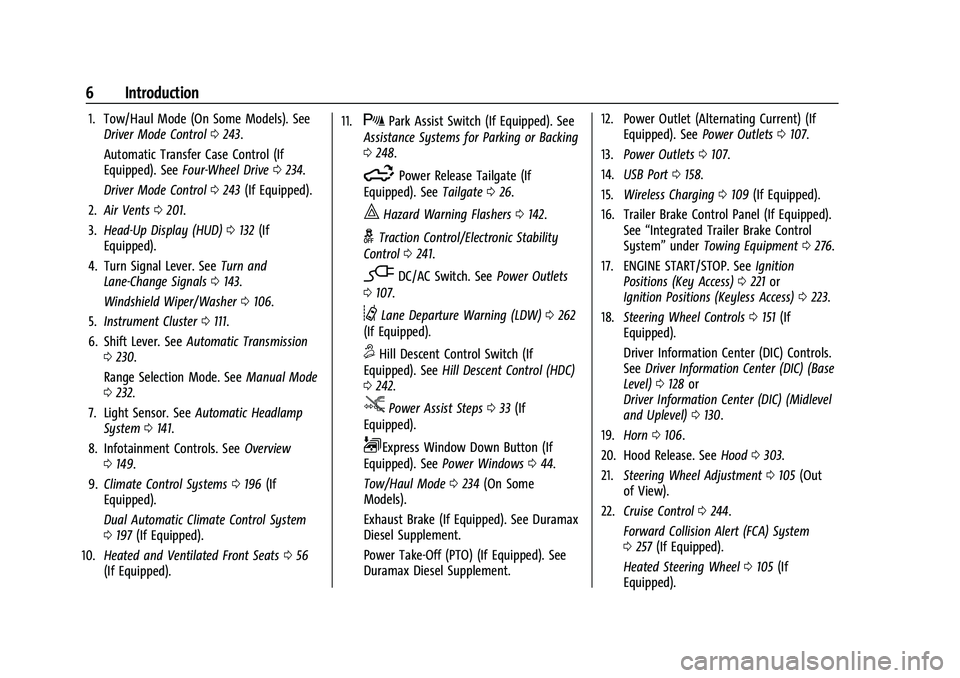
1. Tow/Haul Mode (On Some Models). SeeDriver Mode Control 0243.
Automatic Transfer Case Control (If
Equipped). See Four-Wheel Drive 0234.
Driver Mode Control 0243 (If Equipped).
2. Air Vents 0201.
3. Head-Up Display (HUD) 0132 (If
Equipped).
4. Turn Signal Lever. See Turn and
Lane-Change Signals 0143.
Windshield Wiper/Washer 0106.
5. Instrument Cluster 0111.
6. Shift Lever. See Automatic Transmission
0 230.
Range Selection Mode. See Manual Mode
0 232.
7. Light Sensor. See Automatic Headlamp
System 0141.
8. Infotainment Controls. See Overview
0 149.
9. Climate Control Systems 0196 (If
Equipped).
Dual Automatic Climate Control System
0 197 (If Equipped).
10. Heated and Ventilated Front Seats 056
(If Equipped). 11.XPark Assist Switch (If Equipped). See
Assistance Systems for Parking or Backing
0 248.
5Power Release Tailgate (If
Equipped). See Tailgate026.
|Hazard Warning Flashers 0142.
gTraction Control/Electronic Stability
Control 0241.
-DC/AC Switch. See Power Outlets
0 107.
@Lane Departure Warning (LDW) 0262
(If Equipped).
5Hill Descent Control Switch (If
Equipped). See Hill Descent Control (HDC)
0 242.
jPower Assist Steps 033 (If
Equipped).
LExpress Window Down Button (If
Equipped). See Power Windows 044.
Tow/Haul Mode 0234 (On Some
Models).
Exhaust Brake (If Equipped). See Duramax
Diesel Supplement.
Power Take-Off (PTO) (If Equipped). See
Duramax Diesel Supplement. 12. Power Outlet (Alternating Current) (If
Equipped). See Power Outlets0107.
13. Power Outlets 0107.
14. USB Port 0158.
15. Wireless Charging 0109 (If Equipped).
16. Trailer Brake Control Panel (If Equipped). See“Integrated Trailer Brake Control
System” underTowing Equipment 0276.
17. ENGINE START/STOP. See Ignition
Positions (Key Access) 0221 or
Ignition Positions (Keyless Access) 0223.
18. Steering Wheel Controls 0151 (If
Equipped).
Driver Information Center (DIC) Controls.
See Driver Information Center (DIC) (Base
Level) 0128 or
Driver Information Center (DIC) (Midlevel
and Uplevel) 0130.
19. Horn 0106.
20. Hood Release. See Hood0303.
21. Steering Wheel Adjustment 0105 (Out
of View).
22. Cruise Control 0244.
Forward Collision Alert (FCA) System
0 257 (If Equipped).
Heated Steering Wheel 0105 (If
Equipped).
Page 40 of 430
GMC Sierra/Sierra Denali 2500 HD/3500 HD Owner Manual (GMNA-
Localizing-U.S./Canada-16504257) - 2023 - CRC - 5/9/22
Keys, Doors, and Windows 39
Folding Mirrors
Manual Folding Mirrors
If equipped, push the mirror toward the
vehicle to fold. Push the mirror outward to
return to its original position.
Manually fold the mirrors inward to prevent
damage when going through an automatic
car wash.
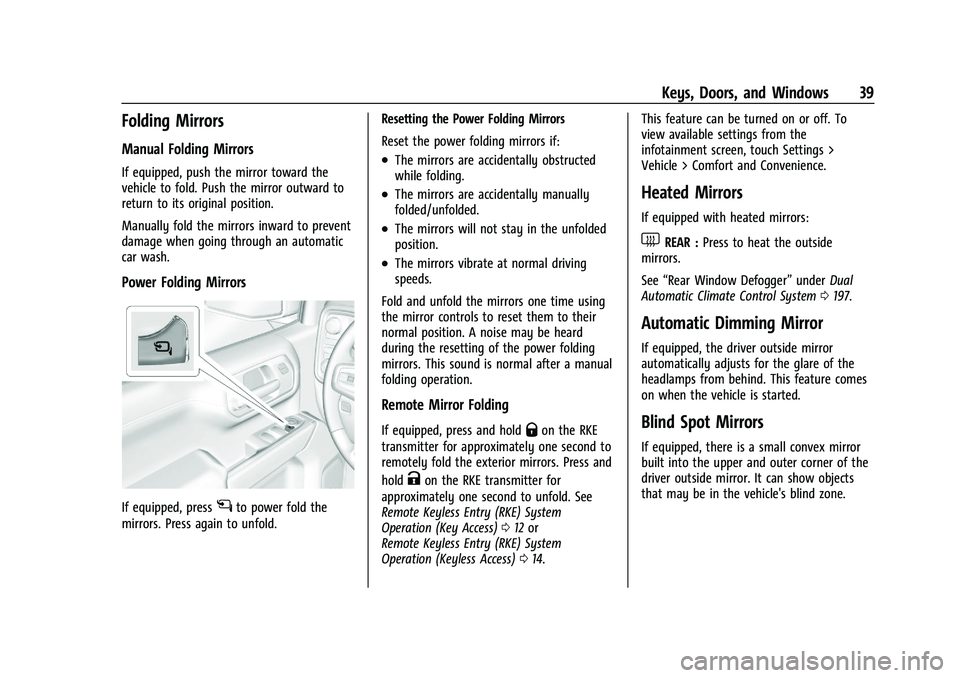
Power Folding Mirrors
If equipped, pressgto power fold the
mirrors. Press again to unfold. Resetting the Power Folding Mirrors
Reset the power folding mirrors if:
.The mirrors are accidentally obstructed
while folding.
.The mirrors are accidentally manually
folded/unfolded.
.The mirrors will not stay in the unfolded
position.
.The mirrors vibrate at normal driving
speeds.
Fold and unfold the mirrors one time using
the mirror controls to reset them to their
normal position. A noise may be heard
during the resetting of the power folding
mirrors. This sound is normal after a manual
folding operation.
Remote Mirror Folding
If equipped, press and holdQon the RKE
transmitter for approximately one second to
remotely fold the exterior mirrors. Press and
hold
Kon the RKE transmitter for
approximately one second to unfold. See
Remote Keyless Entry (RKE) System
Operation (Key Access) 012 or
Remote Keyless Entry (RKE) System
Operation (Keyless Access) 014. This feature can be turned on or off. To
view available settings from the
infotainment screen, touch Settings >
Vehicle > Comfort and Convenience.
Heated Mirrors
If equipped with heated mirrors:
1REAR :
Press to heat the outside
mirrors.
See “Rear Window Defogger” underDual
Automatic Climate Control System 0197.
Automatic Dimming Mirror
If equipped, the driver outside mirror
automatically adjusts for the glare of the
headlamps from behind. This feature comes
on when the vehicle is started.
Blind Spot Mirrors
If equipped, there is a small convex mirror
built into the upper and outer corner of the
driver outside mirror. It can show objects
that may be in the vehicle's blind zone.
Page 42 of 430
GMC Sierra/Sierra Denali 2500 HD/3500 HD Owner Manual (GMNA-
Localizing-U.S./Canada-16504257) - 2023 - CRC - 5/9/22
Keys, Doors, and Windows 41
Manual Rearview Mirror
If equipped, push the tab forward for
daytime use and pull it rearward for
nighttime use to avoid glare from the
headlamps from behind.
Automatic Dimming Rearview
Mirror
If equipped, the mirror will automatically
reduce the glare of the headlamps from
behind. The dimming feature comes on each
time the vehicle is started.
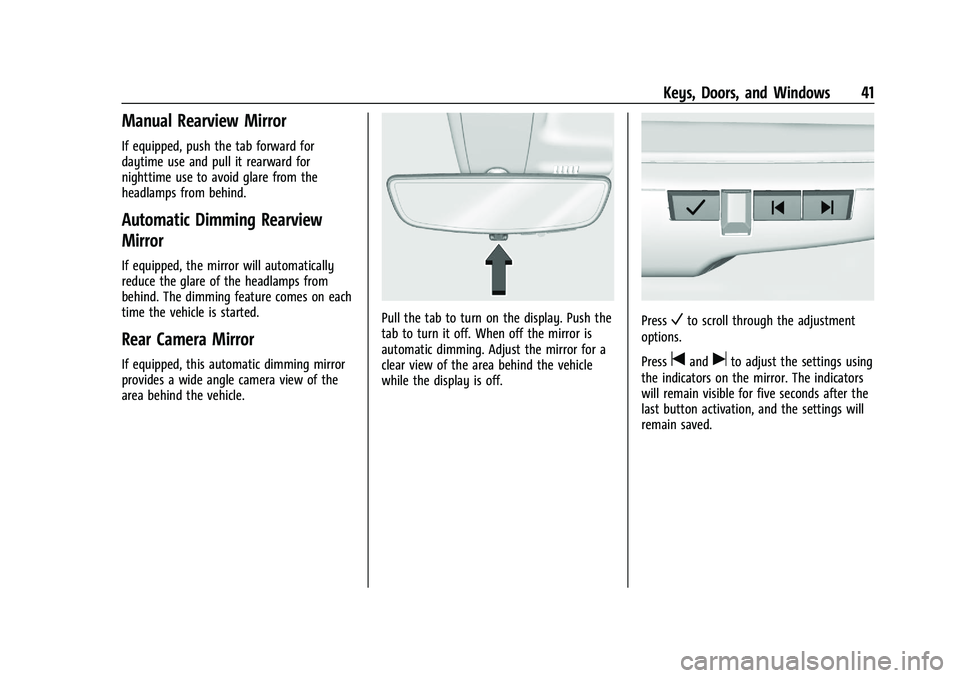
Rear Camera Mirror
If equipped, this automatic dimming mirror
provides a wide angle camera view of the
area behind the vehicle.
Pull the tab to turn on the display. Push the
tab to turn it off. When off the mirror is
automatic dimming. Adjust the mirror for a
clear view of the area behind the vehicle
while the display is off.PressVto scroll through the adjustment
options.
Press
tanduto adjust the settings using
the indicators on the mirror. The indicators
will remain visible for five seconds after the
last button activation, and the settings will
remain saved.
Page 44 of 430
GMC Sierra/Sierra Denali 2500 HD/3500 HD Owner Manual (GMNA-
Localizing-U.S./Canada-16504257) - 2023 - CRC - 5/9/22
Keys, Doors, and Windows 43
See your dealer for service if a blue screen
and
3are displayed in the mirror, and
the display shuts off. Also, push the tab as
indicated to return to the automatic
dimming mode.
The Rear Camera Mirror may not work
properly or display a clear image if:
.There is glare from the sun or headlamps.
This may obstruct objects from view.
If needed, push the tab to turn off the
display.
.Dirt, snow, or other debris blocks the
camera lens. Clean the lens with a soft
damp cloth.
.The camera’s mounting on the vehicle has
been damaged, and/or the position or the
mounting angle of the camera has
changed.
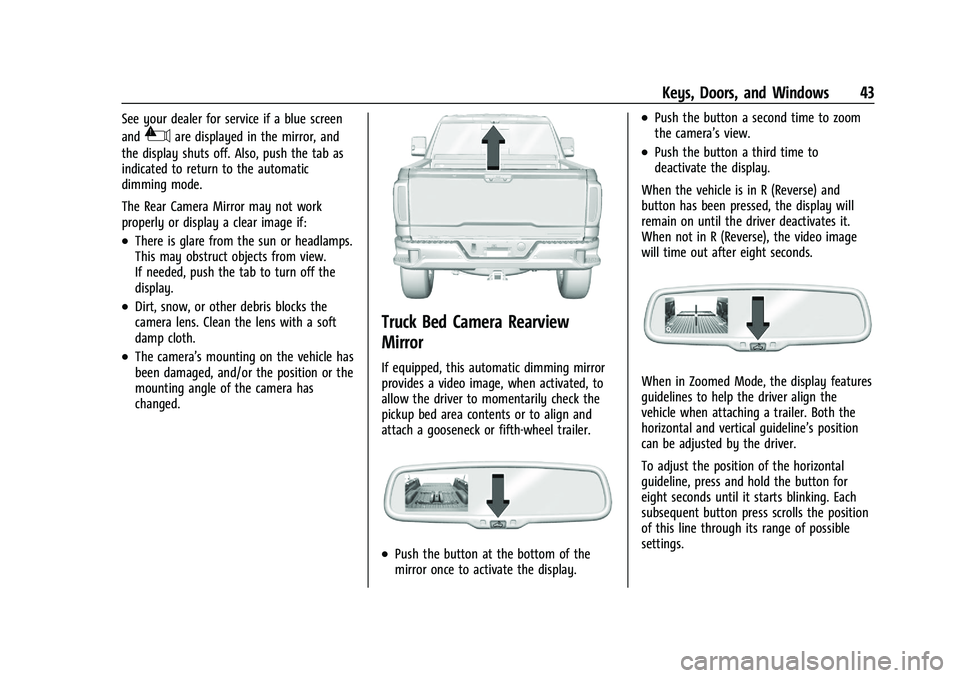
Truck Bed Camera Rearview
Mirror
If equipped, this automatic dimming mirror
provides a video image, when activated, to
allow the driver to momentarily check the
pickup bed area contents or to align and
attach a gooseneck or fifth-wheel trailer.
.Push the button at the bottom of the
mirror once to activate the display.
.Push the button a second time to zoom
the camera’s view.
.Push the button a third time to
deactivate the display.
When the vehicle is in R (Reverse) and
button has been pressed, the display will
remain on until the driver deactivates it.
When not in R (Reverse), the video image
will time out after eight seconds.
When in Zoomed Mode, the display features
guidelines to help the driver align the
vehicle when attaching a trailer. Both the
horizontal and vertical guideline’s position
can be adjusted by the driver.
To adjust the position of the horizontal
guideline, press and hold the button for
eight seconds until it starts blinking. Each
subsequent button press scrolls the position
of this line through its range of possible
settings.
Page 128 of 430

GMC Sierra/Sierra Denali 2500 HD/3500 HD Owner Manual (GMNA-
Localizing-U.S./Canada-16504257) - 2023 - CRC - 5/9/22
Instruments and Controls 127
This light should come on briefly when the
engine starts. When the engine is off and
the vehicle is on, the light should remain
illuminated. If it does not come on under
either condition, contact your dealer.
If the light comes on and stays on when the
engine is running, it may not have adequate
oil pressure. The oil level may be low or
there may be some other oil system
problem. Turn the engine off when it is safe
to do so and contact your dealer.
Low Fuel Warning Light
A Low Fuel Warning Light near the fuel
gauge comes on briefly when the ignition is
turned on as a check to show it is working.It also comes on when the fuel gauge
indicator nears empty. The light turns off
when fuel is added. If it does not, have the
vehicle serviced.
Security Light
The security light should come on briefly as
the engine is started. If it does not come on,
have the vehicle serviced by your dealer.
If the system is working normally, the
indicator light turns off.
If the light stays on and the engine does
not start, there could be a problem with the
theft-deterrent system. See
Immobilizer
Operation 035.
High-Beam On Light
This light comes on when the high-beam
headlamps are in use. See Headlamp High/
Low-Beam Changer 0141.
IntelliBeam Light
This light comes on when the IntelliBeam
system, if equipped, is enabled. See Exterior
Lamp Controls 0139.
Page 140 of 430
GMC Sierra/Sierra Denali 2500 HD/3500 HD Owner Manual (GMNA-
Localizing-U.S./Canada-16504257) - 2023 - CRC - 5/9/22
Lighting 139
Lighting
Exterior Lighting
Exterior Lamp Controls . . . . . . . . . . . . . . . . 139
Exterior Lamps Off Reminder . . . . . . . . . . . 141
Headlamp High/Low-Beam Changer . . . . 141
Flash-to-Pass . . . . . . . . . . . . . . . . . . . . . . . . . . . 141
Daytime Running Lamps (DRL) . . . . . . . . . 141
Automatic Headlamp System . . . . . . . . . . 141
Hazard Warning Flashers . . . . . . . . . . . . . . 142
Turn and Lane-Change Signals . . . . . . . . . 143
Fog Lamps . . . . . . . . . . . . . . . . . . . . . . . . . . . . . 143
Task Lighting . . . . . . . . . . . . . . . . . . . . . . . . . . 144
Auxiliary Roof-Mounted Lamp . . . . . . . . . 144
Exterior Cargo Lamps . . . . . . . . . . . . . . . . . . 144
Interior Lighting
Instrument Panel IlluminationControl . . . . . . . . . . . . . . . . . . . . . . . . . . . . . . 145
Dome Lamps . . . . . . . . . . . . . . . . . . . . . . . . . . 145
Reading Lamps . . . . . . . . . . . . . . . . . . . . . . . . 146
Lighting Features
Entry Lighting . . . . . . . . . . . . . . . . . . . . . . . . . 146
Exit Lighting . . . . . . . . . . . . . . . . . . . . . . . . . . . 146
Battery Load Management . . . . . . . . . . . . 147
Battery Power Protection . . . . . . . . . . . . . . 147
Exterior Lighting Battery Saver . . . . . . . . 147
Exterior Lighting
Exterior Lamp Controls
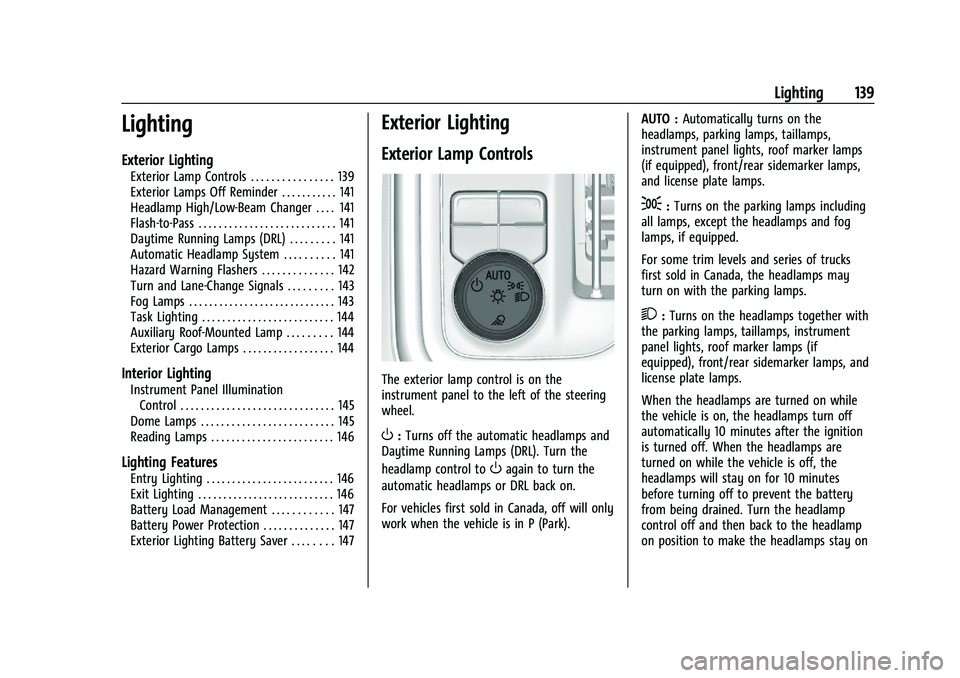
The exterior lamp control is on the
instrument panel to the left of the steering
wheel.
O: Turns off the automatic headlamps and
Daytime Running Lamps (DRL). Turn the
headlamp control to
Oagain to turn the
automatic headlamps or DRL back on.
For vehicles first sold in Canada, off will only
work when the vehicle is in P (Park). AUTO :
Automatically turns on the
headlamps, parking lamps, taillamps,
instrument panel lights, roof marker lamps
(if equipped), front/rear sidemarker lamps,
and license plate lamps.
;: Turns on the parking lamps including
all lamps, except the headlamps and fog
lamps, if equipped.
For some trim levels and series of trucks
first sold in Canada, the headlamps may
turn on with the parking lamps.
2: Turns on the headlamps together with
the parking lamps, taillamps, instrument
panel lights, roof marker lamps (if
equipped), front/rear sidemarker lamps, and
license plate lamps.
When the headlamps are turned on while
the vehicle is on, the headlamps turn off
automatically 10 minutes after the ignition
is turned off. When the headlamps are
turned on while the vehicle is off, the
headlamps will stay on for 10 minutes
before turning off to prevent the battery
from being drained. Turn the headlamp
control off and then back to the headlamp
on position to make the headlamps stay on
Page 141 of 430
GMC Sierra/Sierra Denali 2500 HD/3500 HD Owner Manual (GMNA-
Localizing-U.S./Canada-16504257) - 2023 - CRC - 5/9/22
140 Lighting
for an additional 10 minutes. To keep the
lamps on for more than 10 minutes, the
ignition must be on or in ACC/ACCESSORY.
K:If equipped, turns on the task
lighting. See Task Lighting 0144.
IntelliBeam System
If equipped, this system turns the vehicle's
high-beam headlamps on and off according
to surrounding traffic conditions.
The system turns the high-beam headlamps
on when it is dark enough and there is no
other traffic present.
This light
bcomes on in the instrument
cluster when the IntelliBeam system is
enabled.
Turning On and Enabling IntelliBeam
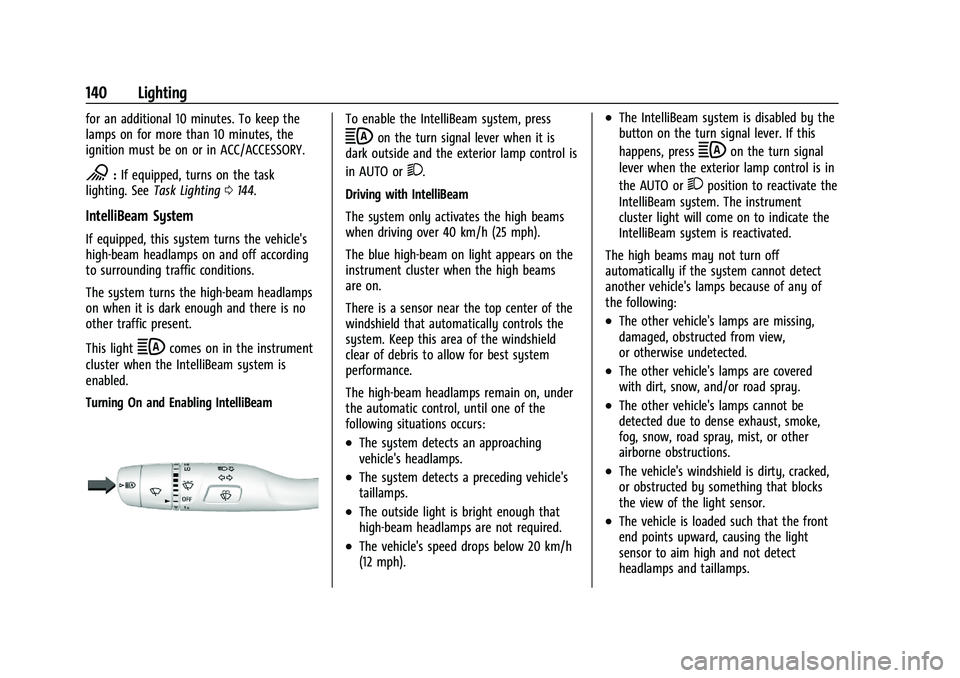
To enable the IntelliBeam system, press
bon the turn signal lever when it is
dark outside and the exterior lamp control is
in AUTO or
2.
Driving with IntelliBeam
The system only activates the high beams
when driving over 40 km/h (25 mph).
The blue high-beam on light appears on the
instrument cluster when the high beams
are on.
There is a sensor near the top center of the
windshield that automatically controls the
system. Keep this area of the windshield
clear of debris to allow for best system
performance.
The high-beam headlamps remain on, under
the automatic control, until one of the
following situations occurs:
.The system detects an approaching
vehicle's headlamps.
.The system detects a preceding vehicle's
taillamps.
.The outside light is bright enough that
high-beam headlamps are not required.
.The vehicle's speed drops below 20 km/h
(12 mph).
.The IntelliBeam system is disabled by the
button on the turn signal lever. If this
happens, press
bon the turn signal
lever when the exterior lamp control is in
the AUTO or
2position to reactivate the
IntelliBeam system. The instrument
cluster light will come on to indicate the
IntelliBeam system is reactivated.
The high beams may not turn off
automatically if the system cannot detect
another vehicle's lamps because of any of
the following:
.The other vehicle's lamps are missing,
damaged, obstructed from view,
or otherwise undetected.
.The other vehicle's lamps are covered
with dirt, snow, and/or road spray.
.The other vehicle's lamps cannot be
detected due to dense exhaust, smoke,
fog, snow, road spray, mist, or other
airborne obstructions.
.The vehicle's windshield is dirty, cracked,
or obstructed by something that blocks
the view of the light sensor.
.The vehicle is loaded such that the front
end points upward, causing the light
sensor to aim high and not detect
headlamps and taillamps.
Page 142 of 430
GMC Sierra/Sierra Denali 2500 HD/3500 HD Owner Manual (GMNA-
Localizing-U.S./Canada-16504257) - 2023 - CRC - 5/9/22
Lighting 141
.Driving on winding or hilly roads.
The automatic high-beam headlamps may
need to be disabled if any of the above
conditions exist.
Exterior Lamps Off Reminder
A reminder chime sounds when the
headlamps or parking lamps are manually
turned on, the vehicle is turned off, and a
door is open. To disable the chime, turn the
lamps off.
Headlamp High/Low-Beam
Changer
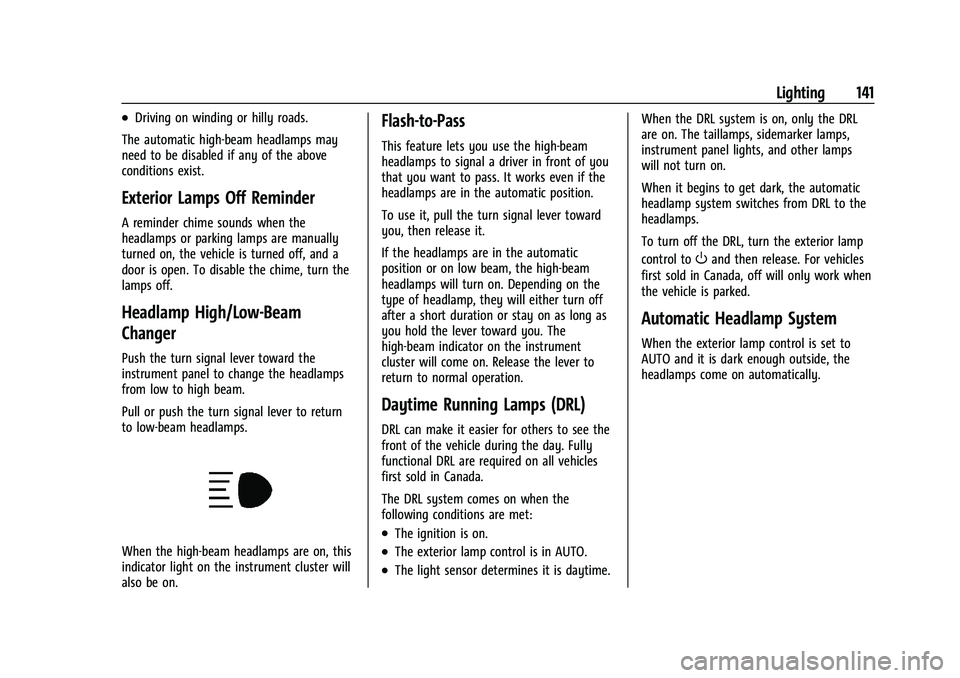
Push the turn signal lever toward the
instrument panel to change the headlamps
from low to high beam.
Pull or push the turn signal lever to return
to low-beam headlamps.
When the high-beam headlamps are on, this
indicator light on the instrument cluster will
also be on.
Flash-to-Pass
This feature lets you use the high-beam
headlamps to signal a driver in front of you
that you want to pass. It works even if the
headlamps are in the automatic position.
To use it, pull the turn signal lever toward
you, then release it.
If the headlamps are in the automatic
position or on low beam, the high-beam
headlamps will turn on. Depending on the
type of headlamp, they will either turn off
after a short duration or stay on as long as
you hold the lever toward you. The
high-beam indicator on the instrument
cluster will come on. Release the lever to
return to normal operation.
Daytime Running Lamps (DRL)
DRL can make it easier for others to see the
front of the vehicle during the day. Fully
functional DRL are required on all vehicles
first sold in Canada.
The DRL system comes on when the
following conditions are met:
.The ignition is on.
.The exterior lamp control is in AUTO.
.The light sensor determines it is daytime. When the DRL system is on, only the DRL
are on. The taillamps, sidemarker lamps,
instrument panel lights, and other lamps
will not turn on.
When it begins to get dark, the automatic
headlamp system switches from DRL to the
headlamps.
To turn off the DRL, turn the exterior lamp
control to
Oand then release. For vehicles
first sold in Canada, off will only work when
the vehicle is parked.
Automatic Headlamp System
When the exterior lamp control is set to
AUTO and it is dark enough outside, the
headlamps come on automatically.
Page 143 of 430
GMC Sierra/Sierra Denali 2500 HD/3500 HD Owner Manual (GMNA-
Localizing-U.S./Canada-16504257) - 2023 - CRC - 5/9/22
142 Lighting
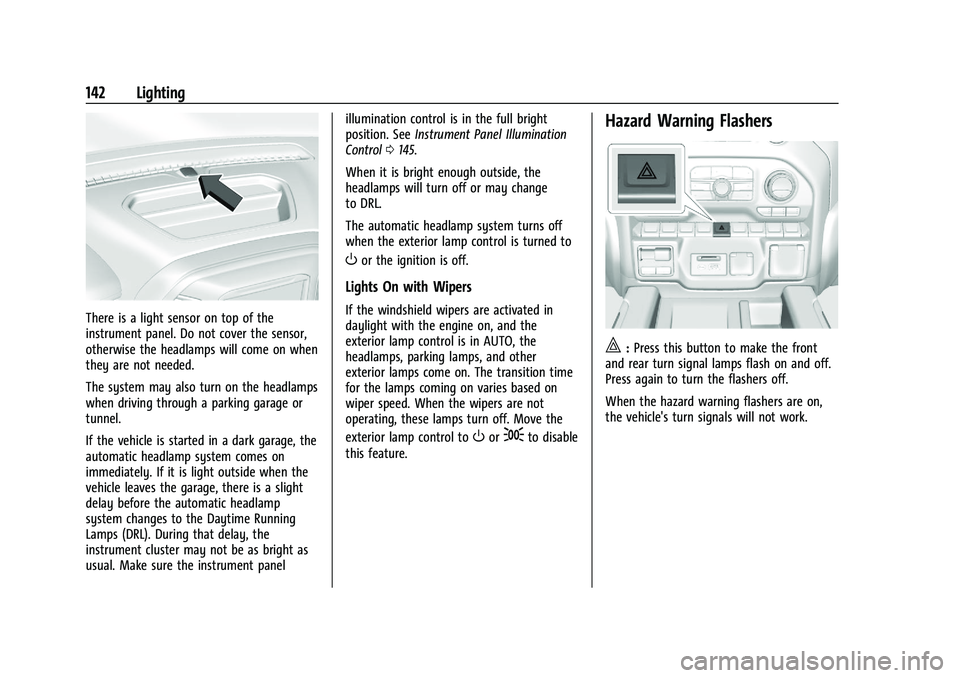
There is a light sensor on top of the
instrument panel. Do not cover the sensor,
otherwise the headlamps will come on when
they are not needed.
The system may also turn on the headlamps
when driving through a parking garage or
tunnel.
If the vehicle is started in a dark garage, the
automatic headlamp system comes on
immediately. If it is light outside when the
vehicle leaves the garage, there is a slight
delay before the automatic headlamp
system changes to the Daytime Running
Lamps (DRL). During that delay, the
instrument cluster may not be as bright as
usual. Make sure the instrument panelillumination control is in the full bright
position. See
Instrument Panel Illumination
Control 0145.
When it is bright enough outside, the
headlamps will turn off or may change
to DRL.
The automatic headlamp system turns off
when the exterior lamp control is turned to
Oor the ignition is off.
Lights On with Wipers
If the windshield wipers are activated in
daylight with the engine on, and the
exterior lamp control is in AUTO, the
headlamps, parking lamps, and other
exterior lamps come on. The transition time
for the lamps coming on varies based on
wiper speed. When the wipers are not
operating, these lamps turn off. Move the
exterior lamp control to
Oor;to disable
this feature.
Hazard Warning Flashers
|: Press this button to make the front
and rear turn signal lamps flash on and off.
Press again to turn the flashers off.
When the hazard warning flashers are on,
the vehicle's turn signals will not work.
Page 144 of 430
GMC Sierra/Sierra Denali 2500 HD/3500 HD Owner Manual (GMNA-
Localizing-U.S./Canada-16504257) - 2023 - CRC - 5/9/22
Lighting 143
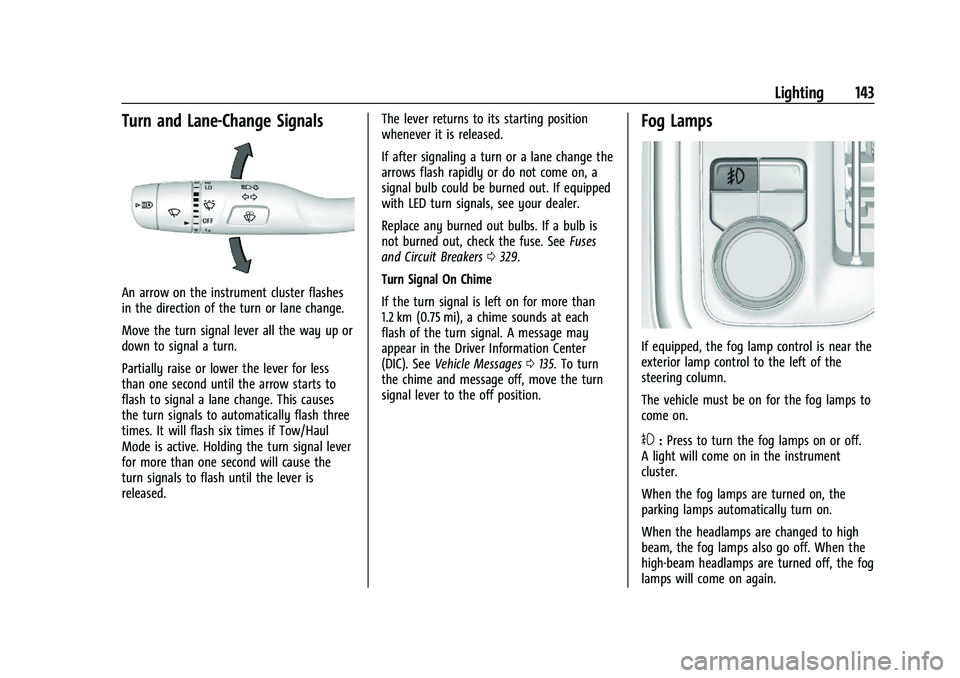
Turn and Lane-Change Signals
An arrow on the instrument cluster flashes
in the direction of the turn or lane change.
Move the turn signal lever all the way up or
down to signal a turn.
Partially raise or lower the lever for less
than one second until the arrow starts to
flash to signal a lane change. This causes
the turn signals to automatically flash three
times. It will flash six times if Tow/Haul
Mode is active. Holding the turn signal lever
for more than one second will cause the
turn signals to flash until the lever is
released.The lever returns to its starting position
whenever it is released.
If after signaling a turn or a lane change the
arrows flash rapidly or do not come on, a
signal bulb could be burned out. If equipped
with LED turn signals, see your dealer.
Replace any burned out bulbs. If a bulb is
not burned out, check the fuse. See
Fuses
and Circuit Breakers 0329.
Turn Signal On Chime
If the turn signal is left on for more than
1.2 km (0.75 mi), a chime sounds at each
flash of the turn signal. A message may
appear in the Driver Information Center
(DIC). See Vehicle Messages 0135. To turn
the chime and message off, move the turn
signal lever to the off position.
Fog Lamps
If equipped, the fog lamp control is near the
exterior lamp control to the left of the
steering column.
The vehicle must be on for the fog lamps to
come on.
#: Press to turn the fog lamps on or off.
A light will come on in the instrument
cluster.
When the fog lamps are turned on, the
parking lamps automatically turn on.
When the headlamps are changed to high
beam, the fog lamps also go off. When the
high-beam headlamps are turned off, the fog
lamps will come on again.