engine GMC TERRAIN 2010 Manual Online
[x] Cancel search | Manufacturer: GMC, Model Year: 2010, Model line: TERRAIN, Model: GMC TERRAIN 2010Pages: 410, PDF Size: 2.55 MB
Page 294 of 410
9-20 Vehicle Care
Engine Overheating
The vehicle has an indicator to warn
of engine overheating. There is an
engine coolant temperature warning
light on the vehicle's instrument
panel. SeeEngine Coolant
Temperature Gauge on page 4‑14.
The decision may be made not
to lift the hood when this warning
appears, but instead get service
help right away. See Roadside
Assistance Program on page 12‑6.
If the decision to lift the hood is
made, make sure the vehicle is
parked on a level surface.
Then check to see if the engine
cooling fans are running. If the
engine is overheating, both fans
should be running. If they are not,
do not continue to run the engine
and have the vehicle serviced.
Notice: Engine damage from
running the engine without
coolant is not covered by the
warranty.
If Steam Is Coming From The
Engine Compartment
{WARNING
Steam from an overheated engine
can burn you badly, even if you
just open the hood. Stay away
from the engine if you see or hear
steam coming from it. Just turn it
off and get everyone away from
the vehicle until it cools down.
Wait until there is no sign of
steam or coolant before you open
the hood.
If you keep driving when your
engine is overheated, the liquids
in it can catch fire. You or others
could be badly burned. Stop your
engine if it overheats, and get out
of the vehicle until the engine
is cool.
If No Steam Is Coming From
The Engine Compartment
If an engine overheat warning is
displayed but no steam can be seen
or heard, the problem may not be
too serious. Sometimes the engine
can get a little too hot when the
vehicle:
.Climbs a long hill on a hot day.
.Stops after high-speed driving.
.Idles for long periods in traffic.
.Tows a trailer.
If the overheat warning is displayed
with no sign of steam:
1. Turn the air conditioning off.
2. Turn the heater on to the highest temperature and to the highest
fan speed. Open the windows as
necessary.
3. In heavy traffic, let the engine idle in N (Neutral) while stopped.
If it is safe to do so, pull off
the road, shift to P (Park) or
N (Neutral) and let the
engine idle.
Page 295 of 410
Vehicle Care 9-21
If the temperature overheat gauge
is no longer in the overheat zone
or an overheat warning no longer
displays, the vehicle can be driven.
Continue to drive the vehicle slow
for about 10 minutes. Keep a safe
vehicle distance from the car in front
of you. If the warning does not come
back on, continue to drive normally.
If the warning continues, pull over,
stop, and park the vehicle
right away.
If there is no sign of steam, idle the
engine for three minutes while
parked. If the warning is still
displayed, turn off the engine
until it cools down.
Power Steering Fluid
(2.4L L4 Engine)
The vehicle has electric power
steering and does not use power
steering fluid.
Power Steering Fluid
(3.0L V6 Engine)
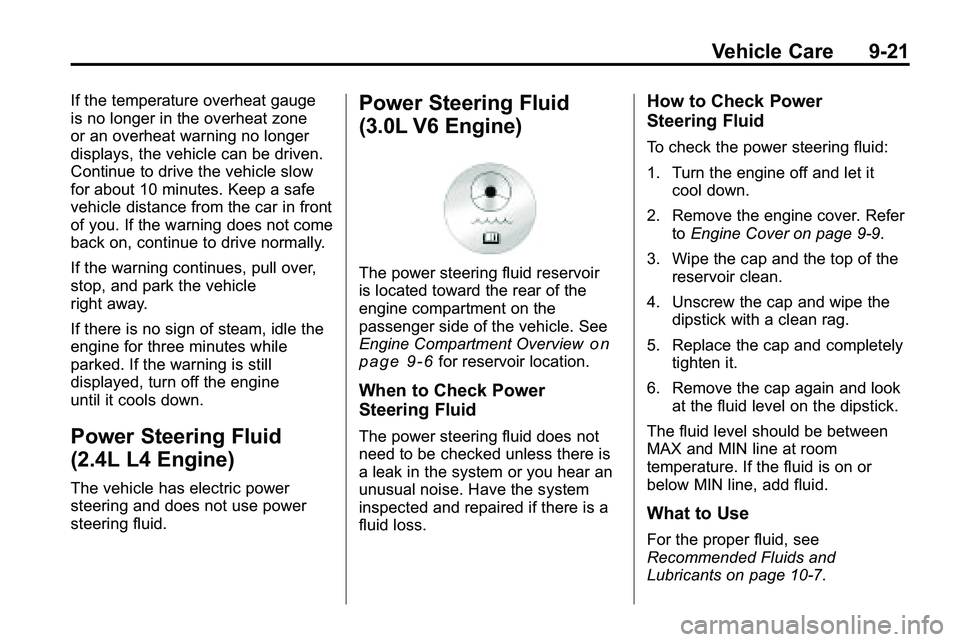
The power steering fluid reservoir
is located toward the rear of the
engine compartment on the
passenger side of the vehicle. See
Engine Compartment Overview
on
page 9‑6for reservoir location.
When to Check Power
Steering Fluid
The power steering fluid does not
need to be checked unless there is
a leak in the system or you hear an
unusual noise. Have the system
inspected and repaired if there is a
fluid loss.
How to Check Power
Steering Fluid
To check the power steering fluid:
1. Turn the engine off and let it cool down.
2. Remove the engine cover. Refer toEngine Cover on page 9‑9.
3. Wipe the cap and the top of the reservoir clean.
4. Unscrew the cap and wipe the dipstick with a clean rag.
5. Replace the cap and completely tighten it.
6. Remove the cap again and look at the fluid level on the dipstick.
The fluid level should be between
MAX and MIN line at room
temperature. If the fluid is on or
below MIN line, add fluid.
What to Use
For the proper fluid, see
Recommended Fluids and
Lubricants on page 10‑7.
Page 298 of 410

9-24 Vehicle Care
Brake Fluid
The brake master cylinder reservoir
is filled with DOT 3 brake fluid as
indicated on the reservoir cap. See
Engine Compartment Overview
on
page 9‑6for the location of the
reservoir.
There are only two reasons why the
brake fluid level in the reservoir
might go down:
.The brake fluid level goes down
because of normal brake lining
wear. When new linings are
installed, the fluid level goes
back up.
.A fluid leak in the brake
hydraulic system can also cause
a low fluid level. Have the brake
hydraulic system fixed, since a
leak means that sooner or later
the brakes will not work well.
Do not top off the brake fluid.
Adding fluid does not correct a leak.
If fluid is added when the linings are
worn, there will be too much fluid
when new brake linings are
installed. Add or remove brake fluid,
as necessary, only when work is
done on the brake hydraulic system.
{WARNING
If too much brake fluid is added, it
can spill on the engine and burn,
if the engine is hot enough. You
or others could be burned, and
the vehicle could be damaged.
Add brake fluid only when work is
done on the brake hydraulic
system. When the brake fluid falls to a low
level, the brake warning light comes
on. See
Brake System Warning
Light on page 4‑19.
What to Add
Use only new DOT 3 brake fluid
from a sealed container. See
Recommended Fluids and
Lubricants on page 10‑7.
Always clean the brake fluid
reservoir cap and the area around
the cap before removing it. This
helps keep dirt from entering the
reservoir.{WARNING
With the wrong kind of fluid in the
brake hydraulic system, the
brakes might not work well. This
could cause a crash. Always use
the proper brake fluid.
Page 299 of 410

Vehicle Care 9-25
Notice:
.Using the wrong fluid can
badly damage brake
hydraulic system parts. For
example, just a few drops of
mineral-based oil, such as
engine oil, in the brake
hydraulic system can
damage brake hydraulic
system parts so badly that
they will have to be replaced.
Do not let someone put in
the wrong kind of fluid.
.If brake fluid is spilled on
the vehicle's painted
surfaces, the paint finish can
be damaged. Be careful not
to spill brake fluid on the
vehicle. If you do, wash it off
immediately.
Battery
Refer to the replacement number on
the original battery label when a
new battery is needed.
{DANGER
Battery posts, terminals, and
related accessories contain lead
and lead compounds, chemicals
known to the State of California to
cause cancer and reproductive
harm. Wash hands after handling.
Vehicle Storage
{WARNING
Batteries have acid that can burn
you and gas that can explode.
You can be badly hurt if you are
not careful. See Jump Starting
on
page 9‑78
for tips on working
around a battery without
getting hurt.
Infrequent Usage: Remove the
black, negative (−) cable from the
battery to keep the battery from
running down.
Extended Storage: Remove the
black, negative (−) cable from the
battery or use a battery trickle
charger.
Page 300 of 410

9-26 Vehicle Care
All-Wheel Drive
Transfer Case
When to Check and Change
Lubricant
Refer to the Maintenance Schedule
to determine how often to check the
lubricant and when to change it.
SeeScheduled Maintenance
on
page 10‑2.
How to Check Lubricant
To get an accurate reading, the
vehicle should be on a level
surface. If the level is below the bottom of
the filler plug hole, located on the
transfer case, you will need to add
some lubricant. Add enough
lubricant to raise the level to the
bottom of the filler plug hole. A fluid
loss could indicate a problem; check
and have it repaired, if needed.
What to Use
Refer to the Maintenance Schedule
to determine what kind of lubricant
to use. See
Recommended Fluids
and Lubricants on page 10‑7.
Starter Switch Check
{WARNING
When you are doing this
inspection, the vehicle could
move suddenly. If the vehicle
moves, you or others could be
injured.
1. Before starting this check, be sure there is enough room
around the vehicle.
2. Firmly apply both the parking brake and the regular brake.
See Parking Brake
on
page 8‑40.
Do not use the accelerator
pedal, and be ready to turn off
the engine immediately if it
starts.
Page 301 of 410

Vehicle Care 9-27
3. Try to start the engine in eachgear. The vehicle should start
only in P (Park) or N (Neutral).
If the vehicle starts in any other
position, contact your dealer/
retailer for service.
Automatic Transmission
Shift Lock Control
System Check
{WARNING
When you are doing this
inspection, the vehicle could
move suddenly. If the vehicle
moves, you or others could be
injured.
1. Before starting this check, be sure there is enough room
around the vehicle. It should be
parked on a level surface. 2. Firmly apply the parking brake.
See Parking Brake
on
page 8‑40.
Be ready to apply the regular
brake immediately if the vehicle
begins to move.
3. With the engine off, turn the ignition to ON/RUN, but do not
start the engine. Without
applying the regular brake, try to
move the shift lever out of
P (Park) with normal effort. If the
shift lever moves out of P (Park),
contact your dealer/retailer for
service.
Ignition Transmission
Lock Check
While parked, and with the parking
brake set, try to turn the ignition to
LOCK/OFF in each shift lever
position.
.The ignition should turn to
LOCK/OFF only when the shift
lever is in P (Park).
.The ignition key should come
out only in LOCK/OFF.
Contact your dealer/retailer if
service is required.
Page 302 of 410
9-28 Vehicle Care
Park Brake and P (Park)
Mechanism Check
{WARNING
When you are doing this check,
the vehicle could begin to move.
You or others could be injured
and property could be damaged.
Make sure there is room in front
of the vehicle in case it begins to
roll. Be ready to apply the regular
brake at once should the vehicle
begin to move.Park on a fairly steep hill, with the
vehicle facing downhill. Keeping
your foot on the regular brake, set
the parking brake.
.To check the parking brake's
holding ability: With the engine
running and the transmission in
N (Neutral), slowly remove foot
pressure from the regular brake
pedal. Do this until the vehicle is
held by the parking brake only.
.To check the P (Park)
mechanism's holding ability:
With the engine running, shift to
P (Park). Then release the
parking brake followed by the
regular brake.
Contact your dealer/retailer if
service is required.
Wiper Blade Replacement
Windshield wiper blades should be
inspected for wear and cracking.
See Scheduled Maintenance
on
page 10‑2for more information.
Replacement blades come in
different types and are removed in
different ways. For proper type
and length, see Maintenance
Replacement Parts on page 10‑9.
Notice: Allowing the wiper blade
arm to touch the windshield when
no wiper blade is installed could
damage the windshield. Any
damage that occurs would not be
covered by your warranty. Do not
allow the wiper blade arm to
touch the windshield.
Page 312 of 410

9-38 Vehicle Care
7. Turn the lamp assembly into theliftgate engaging the clip side
first.
8. Push on the lamp side opposite the clip until the lamp assembly
snaps into place.
Replacement Bulbs
Exterior Lamp Bulb
Number
Auxiliary Taillamp 161
Back-Up Lamp 921
Fog Lamp H11
Headlamp
High Beam HB3Exterior Lamp
Bulb
Number
Headlamp
Low Beam H11
License Plate Lamp W5WLL
Parking Lamp/Turn
Signal Front 7444NA
Sidemarker Front 194
Taillamp/Turn Signal
Lamp/Stop Lamp/
Sidemarker 3057K
For replacement bulbs not listed
here, contact your dealer/retailer.
Electrical System
Fuses
The wiring circuits in the vehicle
are protected from short circuits by
fuses. This greatly reduces the
chance of damage caused by
electrical problems.
Look at the silver-colored band
inside the fuse. If the band is broken
or melted, replace the fuse. Be sure
to replace a bad fuse with a new
one of the identical size and rating.
There are two fuse blocks in the
vehicle: one in the engine
compartment and one in the
instrument panel.
There is a fuse puller located in the
engine compartment fuse block.
See Engine Compartment Fuse
Block
on page 9‑39. It can be used
to easily remove fuses from the fuse
block.
Page 313 of 410
Vehicle Care 9-39
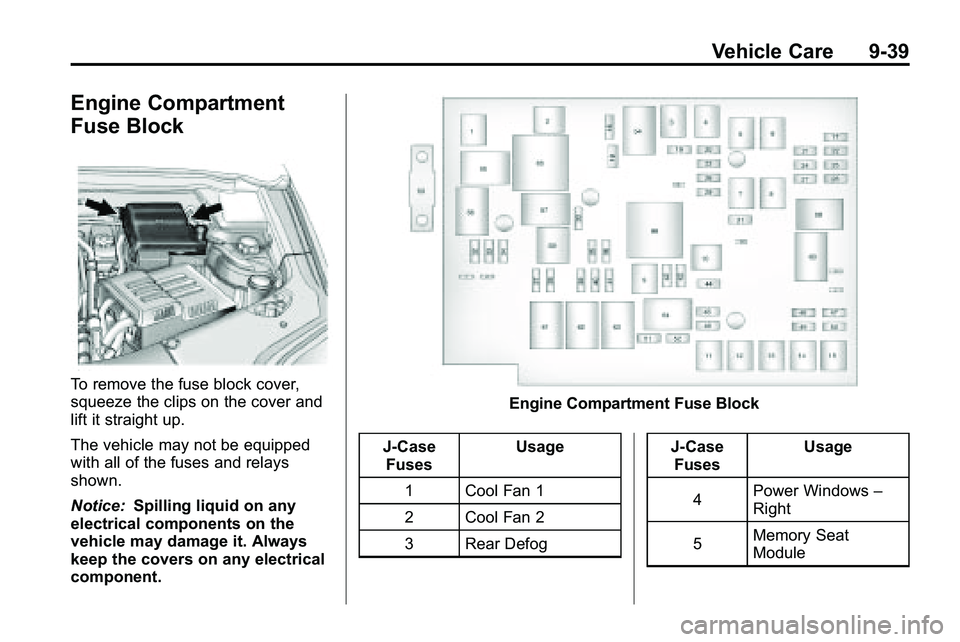
Engine Compartment
Fuse Block
To remove the fuse block cover,
squeeze the clips on the cover and
lift it straight up.
The vehicle may not be equipped
with all of the fuses and relays
shown.
Notice:Spilling liquid on any
electrical components on the
vehicle may damage it. Always
keep the covers on any electrical
component.
Engine Compartment Fuse Block
J-Case Fuses Usage
1 Cool Fan 1
2 Cool Fan 2
3 Rear Defog J-Case
Fuses Usage
4 Power Windows
–
Right
5 Memory Seat
Module
Page 314 of 410
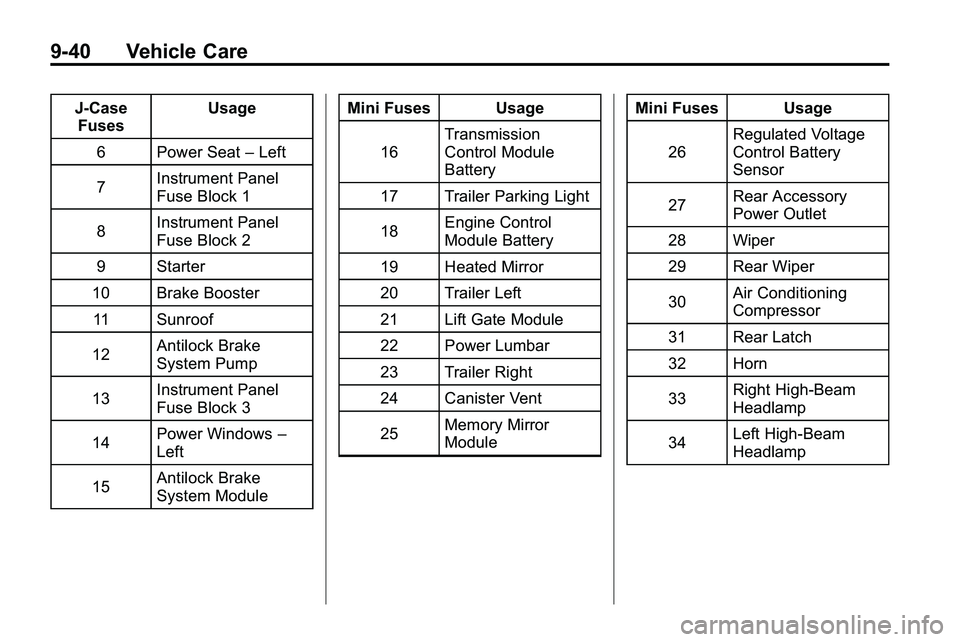
9-40 Vehicle Care
J-CaseFuses Usage
6 Power Seat –Left
7 Instrument Panel
Fuse Block 1
8 Instrument Panel
Fuse Block 2
9 Starter
10 Brake Booster 11 Sunroof
12 Antilock Brake
System Pump
13 Instrument Panel
Fuse Block 3
14 Power Windows
–
Left
15 Antilock Brake
System Module Mini Fuses Usage
16 Transmission
Control Module
Battery
17 Trailer Parking Light
18 Engine Control
Module Battery
19 Heated Mirror
20 Trailer Left
21 Lift Gate Module
22 Power Lumbar
23 Trailer Right
24 Canister Vent
25 Memory Mirror
Module Mini Fuses Usage
26 Regulated Voltage
Control Battery
Sensor
27 Rear Accessory
Power Outlet
28 Wiper
29 Rear Wiper
30 Air Conditioning
Compressor
31 Rear Latch
32 Horn
33 Right High‐Beam
Headlamp
34 Left High‐Beam
Headlamp