GMC YUKON HYBRID 2010 Manual Online
Manufacturer: GMC, Model Year: 2010, Model line: YUKON HYBRID, Model: GMC YUKON HYBRID 2010Pages: 120, PDF Size: 1.03 MB
Page 81 of 120
4. Press the release tab, if bulb socket has one, andturn the bulb socket counterclockwise to remove it
from the taillamp assembly.
5. Pull the old bulb straight out from the bulb socket.
6. Press a new bulb into the bulb socket and insert it into the taillamp assembly. Turn the bulb socket
clockwise into the taillamp assembly until it clicks.
7. Reinstall the taillamp assembly. When reinstalling, make sure to line up the pins on the taillamp
assembly with the vehicle. If this is not done the
taillamp assembly cannot be correctly installed.
Replacement Bulbs
Exterior Lamp Bulb Number
Back-up Lamp and Rear Turn
Signal Lamp 3156
Sidemarker Lamp 194
For replacement bulbs not listed here, contact your
dealer/retailer.
Electrical System
High Voltage Devices and Wiring
{WARNING:
Exposure to high voltage can cause shock, burns,
and even death. The high voltage systems in your
vehicle can only be serviced by technicians with
special training.
High voltage devices are identified by labels.
Do not remove, open, take apart, or modify
these devices. High voltage cable or wiring has
orange covering. Do not probe, tamper with, cut,
or modify high voltage cable or wiring.
6-25
Page 82 of 120
Fuses and Circuit Breakers
The wiring circuits in the vehicle are protected from
short circuits by a combination of fuses, circuit breakers
and fusible thermal links. This greatly reduces the
chance of fires caused by electrical problems.
Be sure you replace a bad fuse with a new one of the
identical size and rating.
If you ever have a problem on the road and do not
have a spare fuse, you can borrow one that has the
same amperage. Just pick some feature of the vehicle
that you can get along without, like the radio or cigarette
lighter, and use its fuse, if it is the correct amperage.
Replace it as soon as you can.
The vehicle also has a special fuse in the battery box
for the 300-volt batteries. If this fuse has failed and
needs to be replaced, the vehicle will be disabled and
you will need to have the vehicle repaired by your
dealer/retailer. Do not attempt to self-service this fuse.
Underhood Fuse Block
Hybrid Auxiliary Underhood Fuse Block
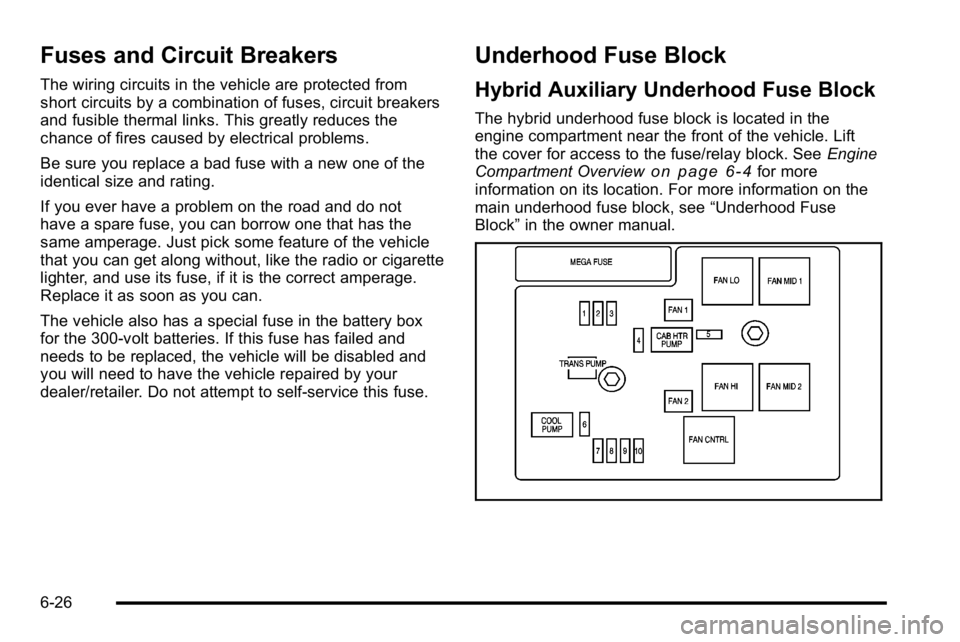
The hybrid underhood fuse block is located in the
engine compartment near the front of the vehicle. Lift
the cover for access to the fuse/relay block. SeeEngine
Compartment Overview
on page 6‑4for more
information on its location. For more information on the
main underhood fuse block, see “Underhood Fuse
Block” in the owner manual.
6-26
Page 83 of 120
FusesUsage
1ACPO
2 BECM FAN
3 ACCM
4 CAB HTR PMP
5 EMPTY
6 COOL PUMP
7 EPS
8 Drive Motor/Generator
Control Module 1
9 Drive Motor/Generator
Control Module 2
10 BECM
J‐Case Usage
FAN 1Cooling Fan 1
TRANS PUMP Auxiliary Transmission
Fluid Pump
FAN 2 Cooling Fan 2
CAB HTR PMP Cab Heater Pump
Relays Usage
FAN LOW Cooling Fan Low Speed Relay
FAN MID 1 Cooling Fan Mid 1 FAN HI Cooling Fan High Speed Relay
FAN MID 2 Cooling Fan Mid 2
FAN CNTRL Cooling Fan Control
6-27
Page 84 of 120
Tires
Inflation - Tire Pressure
Tires need the correct amount of air pressure to operate
effectively.
Notice:
Do not let anyone tell you that
under‐inflation or over‐inflation is all right.
It is not. If your tires do not have enough air
(under‐inflation), you can get the following:
.Too much flexing
.Too much heat
.Tire overloading
.Premature or irregular wear
.Poor handling
.Reduced fuel economy
If your tires have too much air (over‐inflation),
you can get the following:
.Unusual wear
.Poor handling
.Rough ride
.Needless damage from road hazards
A vehicle specific Tire and Loading Information label is
attached to your vehicle. This label shows your
vehicle's original equipment tires and the correct
inflation pressures for your tires when they are cold.
The recommended cold tire inflation pressure, shown
on the label, is the minimum amount of air pressure
needed to support your vehicle's maximum load
carrying capacity.
For additional information regarding how much weight
your vehicle can carry, and an example of the Tire and
Loading Information label, see “Loading Your Vehicle”in
the Index of the owner manual. How you load your
vehicle affects vehicle handling and ride comfort. Never
load your vehicle with more weight than it was designed
to carry.
6-28
Page 85 of 120
When to Check
Check your tires once a month or more.
How to Check
Use a good quality pocket-type gage to check tire
pressure. You cannot tell if your tires are properly
inflated simply by looking at them. Radial tires may look
properly inflated even when they're underinflated.
Check the tire's inflation pressure when the tires are
cold. Cold means your vehicle has been sitting for at
least three hours or driven no more than 1 mile (1.6 km).
Remove the valve cap from the tire valve stem. Press
the tire gage firmly onto the valve to get a pressure
measurement. If the cold tire inflation pressure matches
the recommended pressure on the tire and loading
information label, no further adjustment is necessary.
If the pressure is low, add air until you reach the
recommended amount.
If you overfill the tire, release air by pushing on the
metal stem in the center of the tire valve. Recheck the
tire pressure with the tire gage.
Be sure to put the valve caps back on the valve stems.
They help prevent leaks by keeping out dirt and
moisture.
Tire Pressure Monitor Operation
This vehicle may have a Tire Pressure Monitor System
(TPMS). The TPMS is designed to warn the driver when
a low tire pressure condition exists. TPMS sensors are
mounted onto each tire and wheel assembly. The TPMS
sensors monitor the air pressure in the vehicle's tires
and transmit the tire pressure readings to a receiver
located in the vehicle.
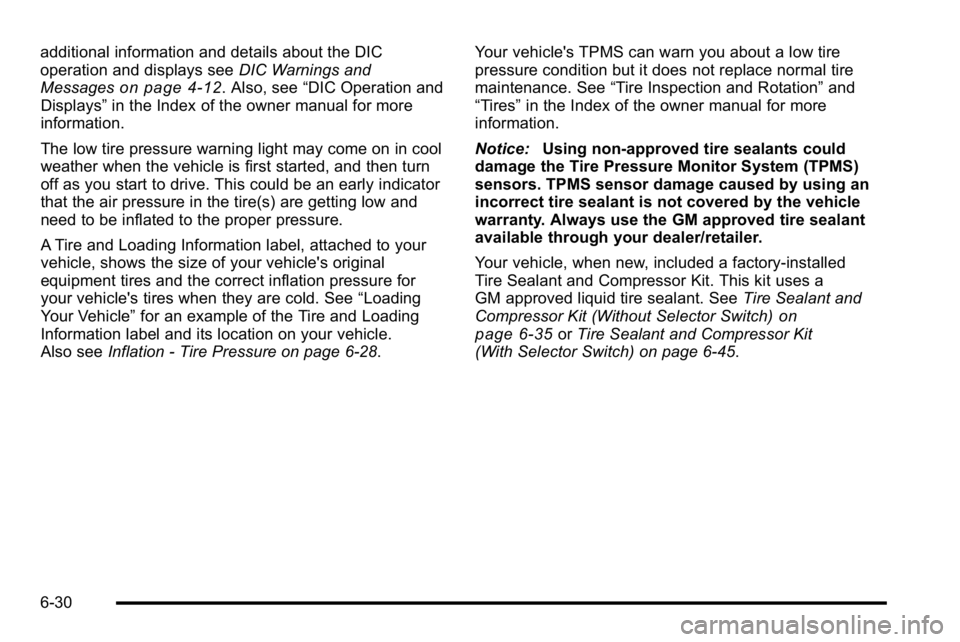
When a low tire pressure
condition is detected, the
TPMS will illuminate the
low tire pressure warning
symbol located on the
instrument panel cluster.
At the same time a message to check the pressure
in a specific tire appears on the Driver Information
Center (DIC) display. The low tire pressure warning
light and the DIC warning message come on at
each ignition cycle until the tires are inflated to
the correct inflation pressure. Using the DIC, tire
pressure levels can be viewed by the driver. For
6-29
Page 86 of 120
additional information and details about the DIC
operation and displays seeDIC Warnings and
Messages
on page 4‑12. Also, see “DIC Operation and
Displays” in the Index of the owner manual for more
information.
The low tire pressure warning light may come on in cool
weather when the vehicle is first started, and then turn
off as you start to drive. This could be an early indicator
that the air pressure in the tire(s) are getting low and
need to be inflated to the proper pressure.
A Tire and Loading Information label, attached to your
vehicle, shows the size of your vehicle's original
equipment tires and the correct inflation pressure for
your vehicle's tires when they are cold. See “Loading
Your Vehicle” for an example of the Tire and Loading
Information label and its location on your vehicle.
Also see Inflation - Tire Pressure on page 6‑28. Your vehicle's TPMS can warn you about a low tire
pressure condition but it does not replace normal tire
maintenance. See
“Tire Inspection and Rotation” and
“Tires” in the Index of the owner manual for more
information.
Notice: Using non‐approved tire sealants could
damage the Tire Pressure Monitor System (TPMS)
sensors. TPMS sensor damage caused by using an
incorrect tire sealant is not covered by the vehicle
warranty. Always use the GM approved tire sealant
available through your dealer/retailer.
Your vehicle, when new, included a factory‐installed
Tire Sealant and Compressor Kit. This kit uses a
GM approved liquid tire sealant. See Tire Sealant and
Compressor Kit (Without Selector Switch)
on
page 6‑35or Tire Sealant and Compressor Kit
(With Selector Switch) on page 6‑45.
6-30
Page 87 of 120
TPMS Malfunction Light and Message
The TPMS will not function properly if one or more of
the TPMS sensors are missing or inoperable. When the
system detects a malfunction, the low tire warning light
flashes for about one minute and then stays on for the
remainder of the ignition cycle. A DIC warning message
is also displayed. The low tire warning light and DIC
warning message come on at each ignition cycle until
the problem is corrected. Some of the conditions that
can cause the malfunction light and DIC message to
come on are:
.The TPMS sensor matching process was started
but not completed or not completed successfully
after rotating the vehicle's tires. The DIC message
and TPMS malfunction light should go off once the
TPMS sensor matching process is performed
successfully. See“TPMS Sensor Matching
Process” later in this section.
.One or more TPMS sensors are missing or
damaged. The DIC message and the TPMS
malfunction light should go off when the TPMS
sensors are installed and the sensor matching
process is performed successfully. See your
dealer/retailer for service.
.Replacement tires or wheels do not match your
vehicle's original equipment tires or wheels.
Tires and wheels other than those recommended
for your vehicle could prevent the TPMS from
functioning properly. See “Buying New Tires”in
the Index of the owner manual.
.Operating electronic devices or being near facilities
using radio wave frequencies similar to the TPMS
could cause the TPMS sensors to malfunction.
If the TPMS is not functioning it cannot detect or signal
a low tire condition. See your dealer/retailer for service
if the TPMS malfunction light and DIC message comes
on and stays on.
6-31
Page 88 of 120
TPMS Sensor Matching Process
Each TPMS sensor has a unique identification code.
Any time you rotate your vehicle's tires or replace one
or more of the TPMS sensors, the identification codes
will need to be matched to the new tire/wheel position.
The sensors are matched to the tire/wheel positions in
the following order: driver side front tire, passenger
side front tire, passenger side rear tire, and driver side
rear tire using a TPMS diagnostic tool. See your
dealer/retailer for service.
The TPMS sensors can also be matched to each
tire/wheel position by increasing or decreasing the
tire's air pressure. If increasing the tire's air pressure,
do not exceed the maximum inflation pressure indicated
on the tire's sidewall.
To decrease air-pressure out of a tire you can use the
pointed end of the valve cap, a pencil-style air pressure
gage, or a key.
You have two minutes to match the first tire/wheel
position, and five minutes overall to match all four
tire/wheel positions. If it takes longer than two minutes,
to match the first tire and wheel, or more than
five minutes to match all four tire and wheel positions
the matching process stops and you need to start over.The TPMS sensor matching process is outlined below:
1. Set the parking brake.
2. Turn the ignition switch to ON/RUN with the engine off.
3. Press
QandKon the Remote Keyless Entry
(RKE) transmitter at the same time for
approximately five seconds. The horn sounds
twice to signal the receiver is in relearn mode and
TIRE LEARNING ACTIVE message displays on
the DIC screen.
4. Start with the driver side front tire.
5. Remove the valve cap from the valve cap stem. Activate the TPMS sensor by increasing or
decreasing the tire's air pressure for five seconds,
or until a horn chirp sounds. The horn chirp, which
may take up to 30 seconds to sound, confirms that
the sensor identification code has been matched to
this tire and wheel position.
6. Proceed to the passenger side front tire, and repeat the procedure in Step 5.
7. Proceed to the passenger side rear tire, and repeat the procedure in Step 5.
6-32
Page 89 of 120
8. Proceed to the driver side rear tire, and repeat theprocedure in Step 5. The horn sounds two times to
indicate the sensor identification code has been
matched to the driver side rear tire, and the TPMS
sensor matching process is no longer active.
The TIRE LEARNING ACTIVE message on the
DIC display screen goes off.
9. Turn the ignition switch to LOCK/OFF.
10. Set all four tires to the recommended air pressure level as indicated on the Tire and Loading
Information label.
11. Put the valve caps back on the valve stems.
Tire Inspection and Rotation
Tires should be rotated every 5,000 to 8,000 miles
(8 000 to 13 000 km).
Any time you notice unusual wear, rotate your tires as
soon as possible and check wheel alignment. Also
check for damaged tires or wheels. See “When It Is
Time for New Tires” and“Wheel Replacement” in the
Index of the owner manual for more information.
The purpose of regular rotation is to achieve more
uniform wear for all tires on the vehicle. The first
rotation is the most important. See “Scheduled
Maintenance” in the Index of the owner manual.
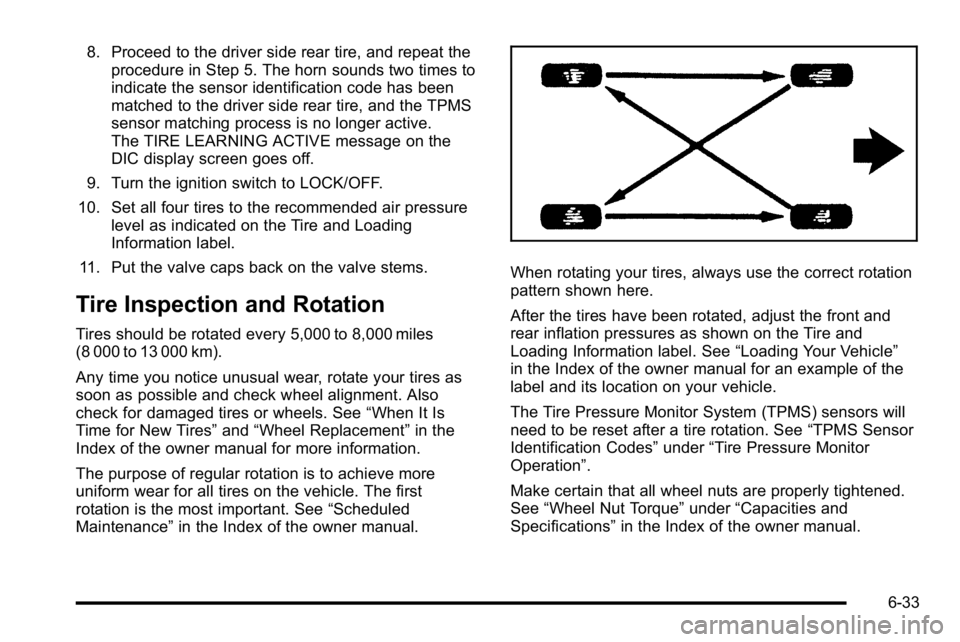
When rotating your tires, always use the correct rotation
pattern shown here.
After the tires have been rotated, adjust the front and
rear inflation pressures as shown on the Tire and
Loading Information label. See “Loading Your Vehicle”
in the Index of the owner manual for an example of the
label and its location on your vehicle.
The Tire Pressure Monitor System (TPMS) sensors will
need to be reset after a tire rotation. See “TPMS Sensor
Identification Codes” under“Tire Pressure Monitor
Operation”.
Make certain that all wheel nuts are properly tightened.
See “Wheel Nut Torque” under“Capacities and
Specifications” in the Index of the owner manual.
6-33
Page 90 of 120
Tire Chains
{WARNING:
Do not use tire chains. There is not enough
clearance. Tire chains used on a vehicle without
the proper amount of clearance can cause
damage to the brakes, suspension, or other
vehicle parts. The area damaged by the tire
chains could cause you to lose control of the
vehicle and you or others may be injured in a
crash. Use another type of traction device
only if its manufacturer recommends it for use
on the vehicle and tire size combination and
road conditions. Follow that manufacturer's
instructions. To help avoid damage to the vehicle,
drive slowly, re‐adjust or remove the device if it
is contacting the vehicle, and do not spin the
wheels. If you do find traction devices that will fit,
install them on the rear tires.
If a Tire Goes Flat
Your vehicle has a tire inflator kit. There is no spare tire,
no tire changing equipment, and no place to store a tire.
It is unusual for a tire to blow out while you are driving,
especially if you maintain your tires properly. If air goes
out of a tire, it is much more likely to leak out slowly.
But, if you should ever have a blow out, here are a
few tips about what to expect and what to do:
If a front tire fails, the flat tire creates a drag that pulls
the vehicle toward that side. Take your foot off the
accelerator pedal and grip the steering wheel firmly.
Steer to maintain lane position, and then gently brake to
a stop well out of the traffic lane.
A rear blow out, particularly on a curve, acts much like a
skid and may require the same correction you would
use in a skid. In any rear blow out, remove your foot
from the accelerator pedal. Get the vehicle under
control by steering the way you want the vehicle to go.
It may be very bumpy and noisy, but you can still steer.
Gently brake to a stop, well off the road if possible.
6-34