oil level GREAT WALL FLORID 2008 Service Manual
[x] Cancel search | Manufacturer: GREAT WALL, Model Year: 2008, Model line: FLORID, Model: GREAT WALL FLORID 2008Pages: 281, PDF Size: 43.97 MB
Page 16 of 281
Downloaded from www.Manualslib.com manuals search engine 9Overview
General Repair Methods and Operations
1. If a jack is needed, please kindly comply to the safety procedures liste\
d below.
2. Park the vehicle on a flat surface, stablize the front and the back wheels using any fixed object or tool,
jack up the vehicle, support it with the chassis, and then start the mai\
ntenance.
3. Disconnect the battery's negative cable before maintenance, in order to reduce the possibility of
damaging and burning out the cable due to a short circuit.
4. Cover the vehicle body, seats, and floor to prevent them from being damaged and polluted.
5. Handle brake fluid and antifreeze fluid carefully, because it may damage the vehicle's surface paint
and its surroundings.
6. Using the proper tools or basic tools that have been recommended and are purchasable is very
important in guaranteeing an effective and reliable maintenance result.
7. Dispose the used dowel pins, gaskets, O-rings, oil seals, lock washers, and self-locking nuts. Prepare
new parts for installation. Normal functions are not guaranteed if these\
parts are reused.
8. Store the removed parts in order and in groups to make reassembly more c\
onvenient.
9. Store bolts and nuts separately, because their hardness levels and designs are different according to
the installation locations.
10. Clean parts before they are inspected or reassembled. In addition, parts that come in contact with
engine oil also need to be cleaned, as well as checked for blockage by u\
sing compressed air.
11. Before installation, use engine oil or grease to lubricate the rotating and sliding sides of the necessary
parts.
12. When necessary, use sealant on gaskets to avoid leakage.
13. Please carefully comply to all tightening torque specifications of b\
olts and nuts.
14. After maintenance, check to make sure whether the repairs were performed correctly and whether the
malfunctions have been fixed.
Vehicle Lifting/Lowering Procedures
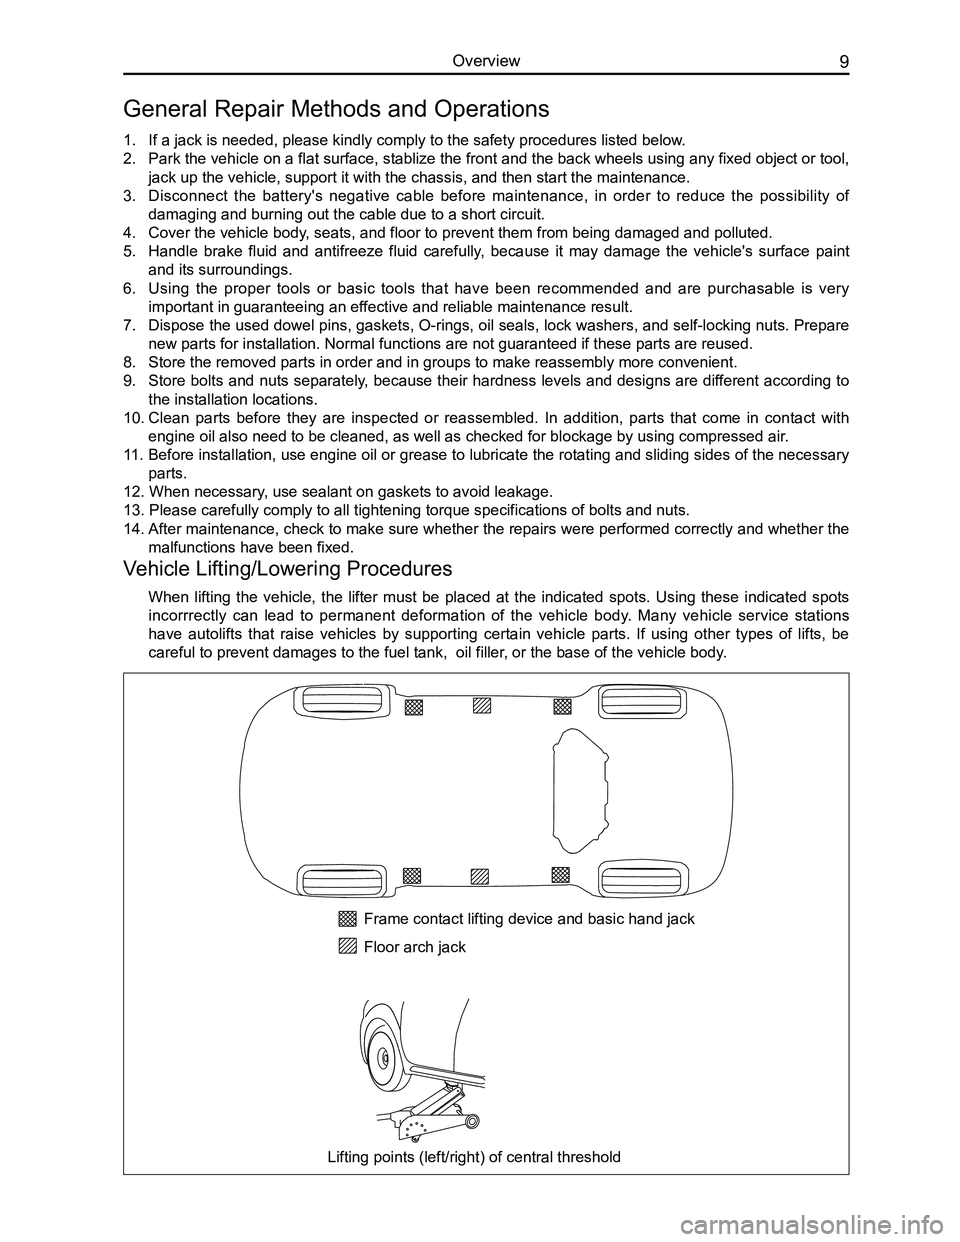
When lifting the vehicle, the lifter must be placed at the indicated spots. Using these indicated spots
incorrrectly can lead to permanent deformation of the vehicle body. Many vehicle service stations
have autolifts that raise vehicles by supporting certain vehicle parts. If using other types of lifts, be
careful to prevent damages to the fuel tank, oil filler, or the base of the vehicle body.
Frame contact lifting device and basic hand jack
Floor arch jack
Lifting points (left/right) of central threshold
Page 38 of 281
Downloaded from www.Manualslib.com manuals search engine 31Fuel Supply and Exhaust System
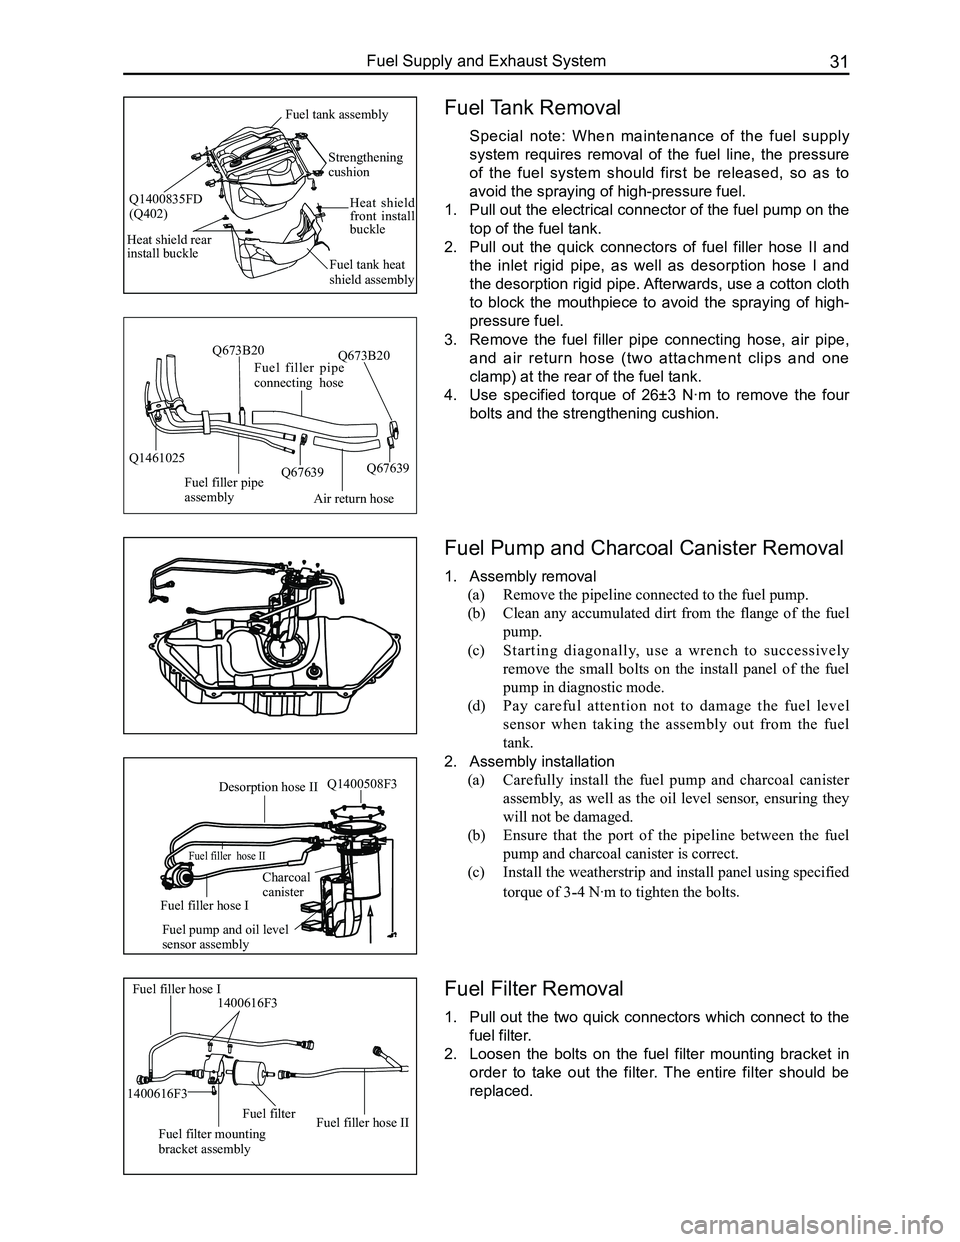
Fuel Tank Removal
Special note: When maintenance of the fuel supply
system requires removal of the fuel line, the pressure
of the fuel system should first be released, so as to
avoid the spraying of high-pressure fuel.
1. Pull out the electrical connector of the fuel pump on the
top of the fuel tank.
2. Pull out the quick connectors of fuel filler hose II and
the inlet rigid pipe, as well as desorption hose I and
the desorption rigid pipe. Afterwards, use a cotton cloth
to block the mouthpiece to avoid the spraying of high-
pressure fuel.
3. Remove the fuel filler pipe connecting hose, air pipe,
and air return hose (two attachment clips and one
clamp) at the rear of the fuel tank.
4. Use specified torque of 26±3 N·m to remove the four
bolts and the strengthening cushion.
Fuel Pump and Charcoal Canister Removal
1. Assembly removal
(a) Remove the pipeline connected to the fuel pump.
(b) Clean any accumulated dirt from the flange of the fuel
pump.
(c) Starting diagonally, use a wrench to successively
remove the small bolts on the install panel of the fuel
pump in diagnostic mode.
(d) Pay careful attention not to damage the fuel level
sensor when taking the assembly out from the fuel
tank.
2. Assembly installation
(a) Carefully install the fuel pump and charcoal canister
assembly, as well as the oil level sensor, ensuring they
will not be damaged.
(b) Ensure that the port of the pipeline between the fuel
pump and charcoal canister is correct.
(c) Install the weatherstrip and install panel using specified
torque of 3-4 N·m to tighten the bolts.
Fuel Filter Removal
1. Pull out the two quick connectors which connect to the
fuel filter.
2. Loosen the bolts on the fuel filter mounting bracket in
order to take out the filter. The entire filter should be
replaced.
Air return hose
Fuel filler pipe connecting hose
Fuel filler pipe assembly
Q1461025Q67639
Q673B20
Q67639
Q673B20
Fuel filler hose I1400616F3
Fuel filter mounting bracket assembly
Fuel filterFuel filler hose II
1400616F3
Desorption hose II
Fuel filler hose II
Fuel filler hose I
Charcoalcanister
Fuel pump and oil level sensor assembly
Q1400508F3
Strengthening cushion
Heat shield front install buckle
Fuel tank heat shield assembly
Heat shield rear install buckle
Fuel tank assembly
Q1400835FD(Q402)
Page 44 of 281
Downloaded from www.Manualslib.com manuals search engine 37Clutch Operational System
Areas of Importance
1. Clutch Rigid Pipe Installation
Before installing, check to make sure that the rigid pipe flare contact area is in good condition, the pipeline is
clean, and that there is no foreign materials.
2. Clutch Hose Installation
Check the surface of the clutch hose to make sure that there is no scuffing and that the pipeline is clean.
3. Coat grease on the U-joint of the pedal and the master cylinder.
4. Strictly adhere to the set torque guidelines when tightening the pipe fittings.
Rigid pipe and the master cylinder: M10 16±2 N·m
Clutch rigid pipe and hose: M10 16±2 N·m
5. While the clutch system is undergoing the exhausting process, make sure that all the air bubbles in
the pipeline are cleared out. Then check the brake fluid level in the reservoir, it should be between
MIN and MAX.
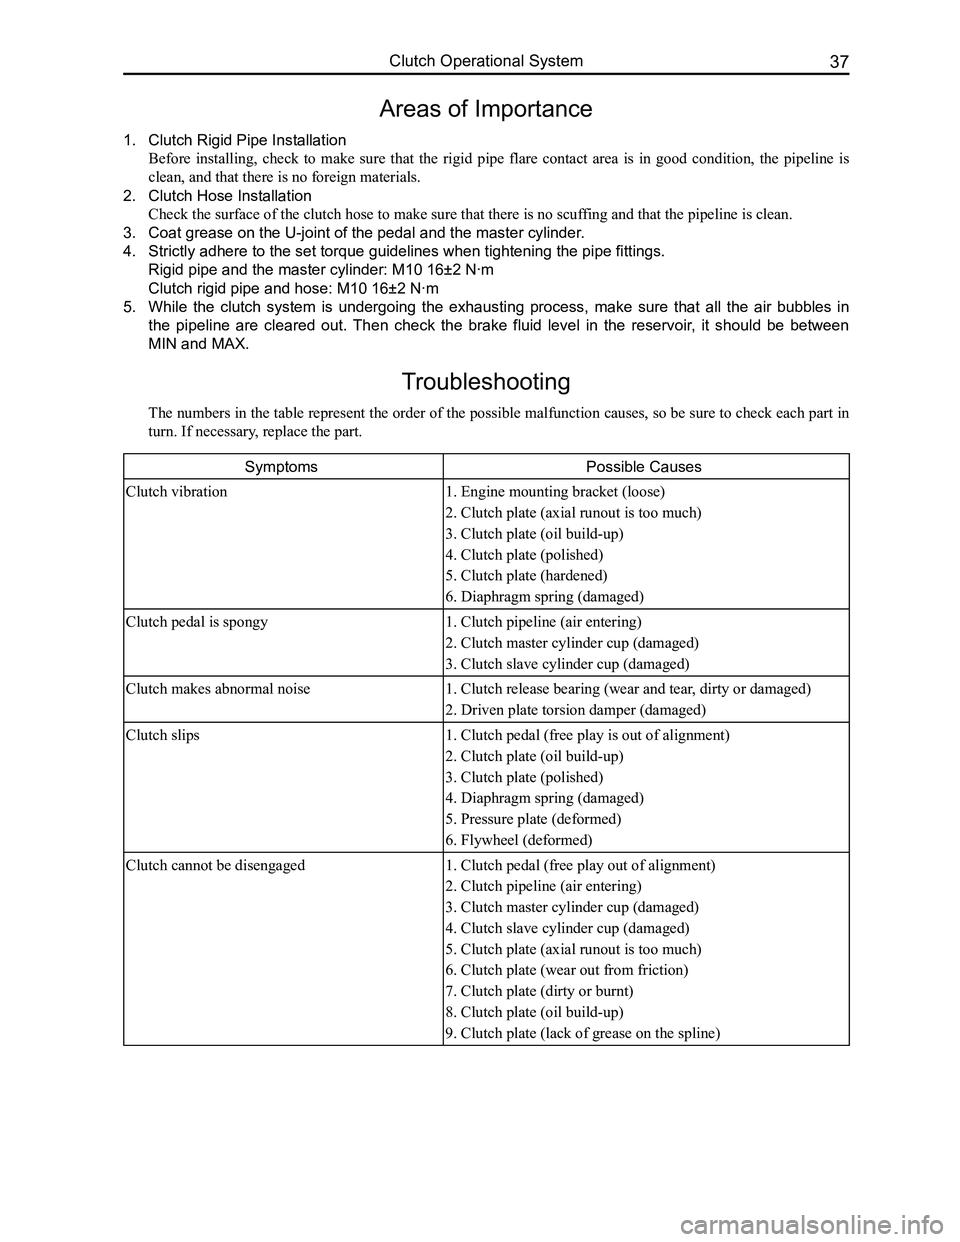
Troubleshooting
The numbers in the table represent the order of the possible malfunction causes, so be sure to check each part in
turn. If necessary, replace the part.
SymptomsPossible Causes
Clutch vibration1. Engine mounting bracket (loose)
2. Clutch plate (axial runout is too much)
3. Clutch plate (oil build-up)
4. Clutch plate (polished)
5. Clutch plate (hardened)
6. Diaphragm spring (damaged)
Clutch pedal is spongy1. Clutch pipeline (air entering)
2. Clutch master cylinder cup (damaged)
3. Clutch slave cylinder cup (damaged)
Clutch makes abnormal noise1. Clutch release bearing (wear and tear, dirty or damaged)
2. Driven plate torsion damper (damaged)
Clutch slips1. Clutch pedal (free play is out of alignment)
2. Clutch plate (oil build-up)
3. Clutch plate (polished)
4. Diaphragm spring (damaged)
5. Pressure plate (deformed)
6. Flywheel (deformed)
Clutch cannot be disengaged1. Clutch pedal (free play out of alignment)
2. Clutch pipeline (air entering)
3. Clutch master cylinder cup (damaged)
4. Clutch slave cylinder cup (damaged)
5. Clutch plate (axial runout is too much)
6. Clutch plate (wear out from friction)
7. Clutch plate (dirty or burnt)
8. Clutch plate (oil build-up)
9. Clutch plate (lack of grease on the spline)
Page 51 of 281
Downloaded from www.Manualslib.com manuals search engine GWFLORID Maintenance Manual44
Transmission's Proper Use and Care
1. Transmission's proper operation
1.1 Shift the gear gently, not excessively.
1.2 Do not start with high speed.
1.3 To avoid premature abrasion of the gear shift fork, do not rest your hand on the \
gear lever while driving.
2. Model number of the lubricant to be used:
GL-4 80W-90 (For China domestic model)
GL-4 75W-90 (For alpine region model)
GL-5 140 (For high-temperature region model)
Caution: Please only use the lubricant with model numbers specified by t\
he Great Wall Motor Co., Ltd.
Do not mix lubricants with different model numbers. Only fill with clean lubricant.
3. Areas of importance for new vehicle usage:
3.1 Before using a new vehicle, be sure to check the transmission and all exposed connectors and fastening
pieces, so as to avoid failure due to faulty installation or loose conne\
ctions.
3.2 Since the new vehicle is still in the run-in period, the transmission's lubricant should be replaced after 5000 km
distance.
4. Transmission three-level maintenance:
4.1 Transmission level-one maintenance: During the first level of maintenance, the liquid level of the lubricant
should be checked to ensure that it is up to the oil-filling mouth. Add more if insufficient. Excessive low
oil level can lead to ineffective lubrication, as well as burning of the bearings and gears. Excessive high oil
level, however, can overheat the transmission or cause oil to leak. In addition, during the first level of main-
tenance, the breather plug should be checked and cleaned. If the breather plug is clogged, internal pressure
will build up and oil will leak from the transmission.
4.2 Transmission level-two maintenance: The transmission's lubricant should be replaced the first time that the
vehicle undergoes the second level of maintenance. Clean the transmission with kerosene. The quality of the
lubricant should be inspected during the future second level of maintenance practises. The lubricant should
be replaced if diluted, gummy, or dirty.
4.3 Transmission level-three maintenance: During the third level of maintenance, it should be removed for in-
spection, cleaning, and oil changing.
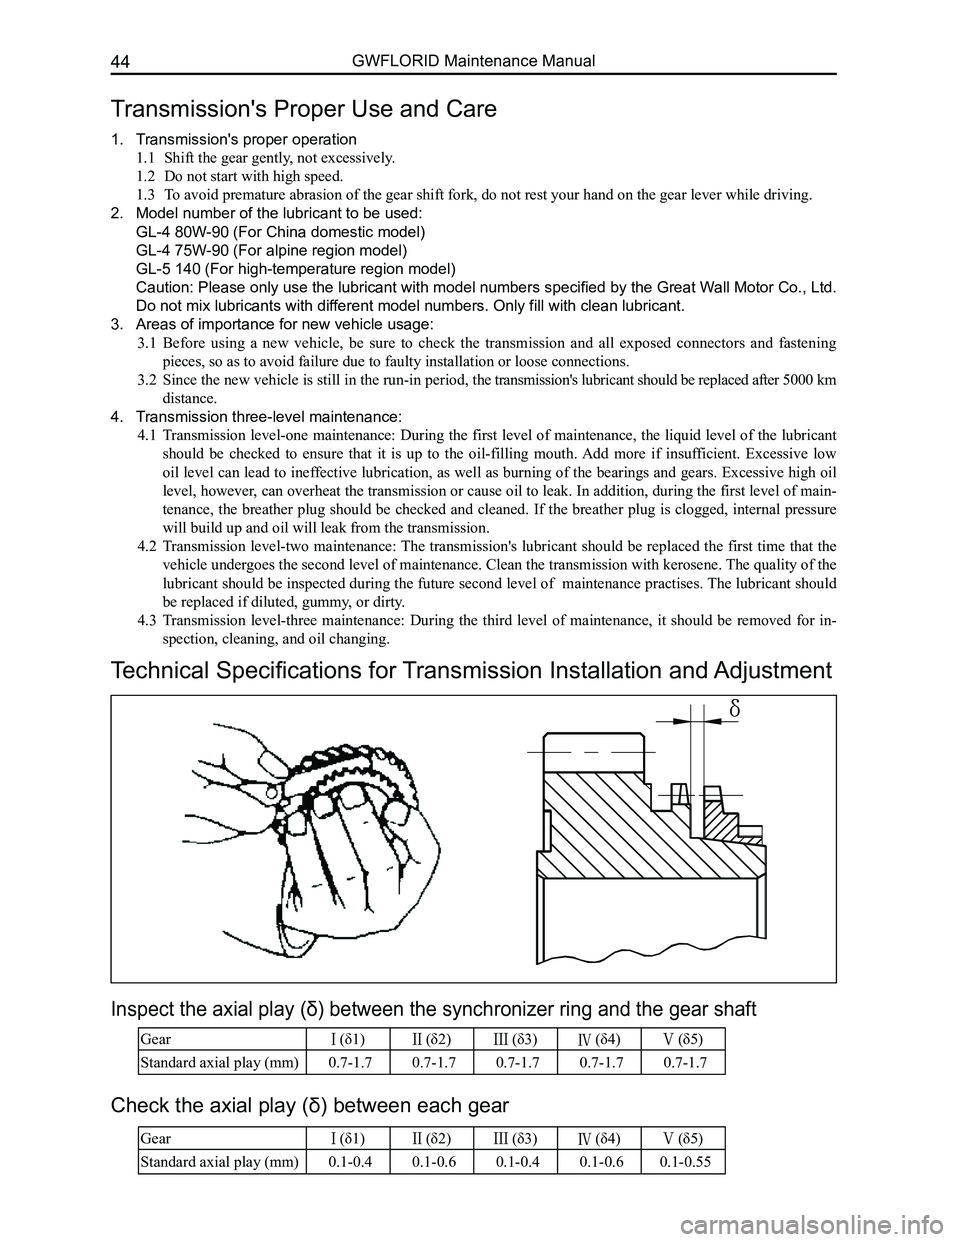
Technical Specifications for Transmission Installation and Adjustment
Inspect the axial play (δ) between the synchronizer ring and the gear shaft
Gear (δ1) (δ2) (δ3) (δ4) (δ5)
Standard axial play (mm)0.7-1.70.7-1.70.7-1.70.7-1.70.7-1.7
Gear (δ1) (δ2) (δ3) (δ4) (δ5)
Standard axial play (mm)0.1-0.40.1-0.60.1-0.40.1-0.60.1-0.55
Check the axial play (δ) between each gear
Page 53 of 281
Downloaded from www.Manualslib.com manuals search engine GWFLORID Maintenance Manual46
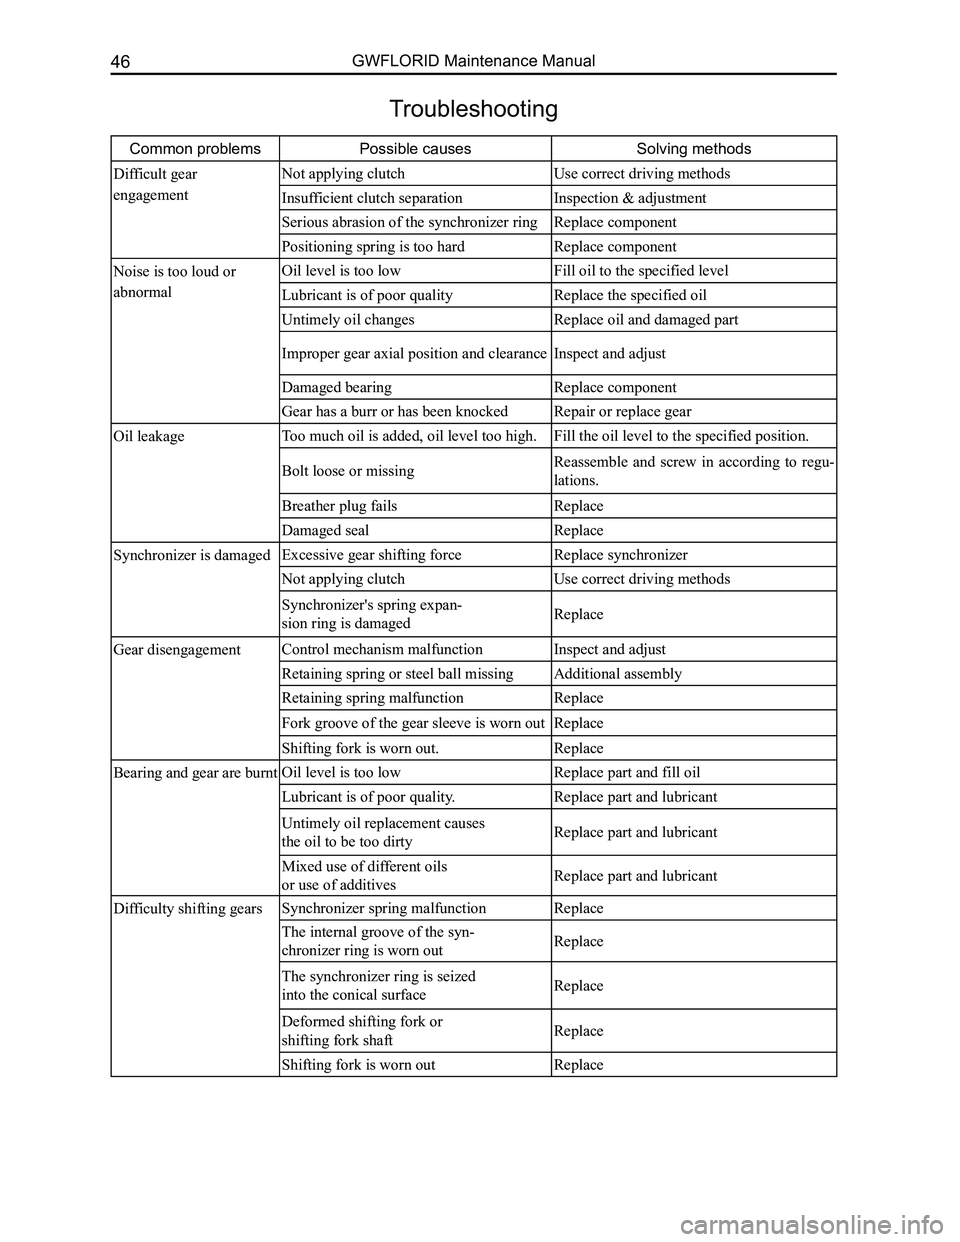
Troubleshooting
Common problemsPossible causesSolving methods
Difficult gear
engagement
Not applying clutchUse correct driving methods
Insufficient clutch separation Inspection & adjustment
Serious abrasion of the synchronizer ringReplace component
Positioning spring is too hardReplace component
Noise is too loud or
abnormal
Oil level is too lowFill oil to the specified level
Lubricant is of poor qualityReplace the specified oil
Untimely oil changesReplace oil and damaged part
Improper gear axial position and clearanceInspect and adjust
Damaged bearingReplace component
Gear has a burr or has been knockedRepair or replace gear
Oil leakageToo much oil is added, oil level too high.Fill the oil level to the specified position.
Bolt loose or missingReassemble and screw in according to regu-
lations.
Breather plug failsReplace
Damaged sealReplace
Synchronizer is damagedExcessive gear shifting force Replace synchronizer
Not applying clutchUse correct driving methods
Synchronizer's spring expan-
sion ring is damagedReplace
Gear disengagementControl mechanism malfunctionInspect and adjust
Retaining spring or steel ball missingAdditional assembly
Retaining spring malfunctionReplace
Fork groove of the gear sleeve is worn outReplace
Shifting fork is worn out.Replace
Bearing and gear are burntOil level is too lowReplace part and fill oil
Lubricant is of poor quality.Replace part and lubricant
Untimely oil replacement causes
the oil to be too dirtyReplace part and lubricant
Mixed use of different oils
or use of additivesReplace part and lubricant
Difficulty shifting gearsSynchronizer spring malfunctionReplace
The internal groove of the syn-
chronizer ring is worn outReplace
The synchronizer ring is seized
into the conical surfaceReplace
Deformed shifting fork or
shifting fork shaftReplace
Shifting fork is worn outReplace
Page 96 of 281
Downloaded from www.Manualslib.com manuals search engine 89Suspension System
Wheel and Tire
Tire
Remark
This vehicle's tire is of the tubeless type. The optimal design condition is met when the inflation pressure is at
the recommended value, and the tire is under full load. Maintaining suitable tire pressure and proper driving
habits greatly influence the tire's use life. For the vehicle, it improves riding comfort, stability, and handling. For
the tire, it reduces tread wear, damage to the tire and extends tire life. Overloading, speeding, and unnecessary
emergency braking will all add to the tire's wear and tear.
Tire pressure measurements should be taken under normal temperature. If the tire pressure rises due to motion
generated heat when driving, cooling it will return to the normal temperature. Therefore, do not deflate the tire
when the air pressure has risen to this point. The tire's air pressure will naturally and slowly decrease when used
under normal conditions. Hence please inspect the air pressure regularly (suggested once a month). The spare
tire should be kept in a useable condition at all times.
Inspect the tire pressure when it is cool monthly or before a long drive. Adjust the tire pressure to the recom-
mended level. The air pressure will normally rise because the tire warms up due to movement. Therefore, after
driving, you absolutely must not deflate or reduce the tire's air pressure, as deflating could reduce the cool tire's
air pressure.
Tire inflation
During a new tire's initial stage of use, warning due to bending motions will cause the tire to swell, and thus
reduce the corresponding air pressure. After 24 hours or 2000-3000 km worth of drive, charge the air pressure.
After inflating, check if the air nozzle core is leaking air with soapy \
water, then lock on the cap.
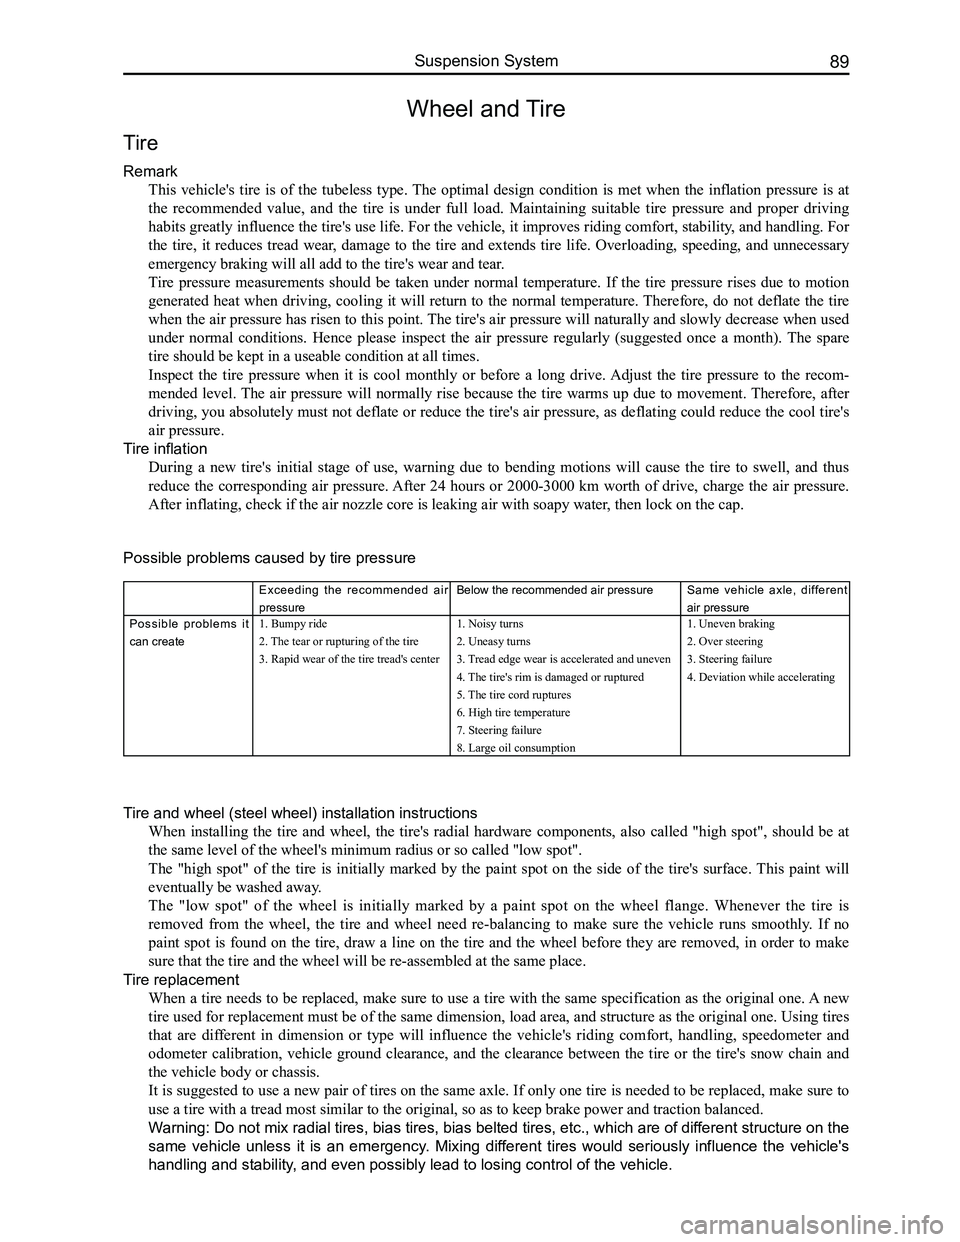
Possible problems caused by tire pressure
Exceeding the recommended air
pressure
Below the recommended air pressureSame vehicle axle, different
air pressure
Possible problems it
can create
1. Bumpy ride
2. The tear or rupturing of the tire
3. Rapid wear of the tire tread's center
1. Noisy turns
2. Uneasy turns
3. Tread edge wear is accelerated and uneven
4. The tire's rim is damaged or ruptured
5. The tire cord ruptures
6. High tire temperature
7. Steering failure
8. Large oil consumption
1. Uneven braking
2. Over steering
3. Steering failure
4. Deviation while accelerating
Tire and wheel (steel wheel) installation instructions
When installing the tire and wheel, the tire's radial hardware components, also called "high spot", should be at
the same level of the wheel's minimum radius or so called "low spot".
The "high spot" of the tire is initially marked by the paint spot on the side of the tire's surface. This paint will
eventually be washed away.
The "low spot" of the wheel is initially marked by a paint spot on the wheel flange. Whenever the tire is
removed from the wheel, the tire and wheel need re-balancing to make sure the vehicle runs smoothly. If no
paint spot is found on the tire, draw a line on the tire and the wheel before they are removed, in order to make
sure that the tire and the wheel will be re-assembled at the same place.\
Tire replacement
When a tire needs to be replaced, make sure to use a tire with the same specification as the original one. A new
tire used for replacement must be of the same dimension, load area, and structure as the original one. Using tires
that are different in dimension or type will influence the vehicle's riding comfort, handling, speedometer and
odometer calibration, vehicle ground clearance, and the clearance between the tire or the tire's snow chain and
the vehicle body or chassis.
It is suggested to use a new pair of tires on the same axle. If only one tire is needed to be replaced, make sure to
use a tire with a tread most similar to the original, so as to keep brak\
e power and traction balanced.
Warning: Do not mix radial tires, bias tires, bias belted tires, etc., which are of different structure on the
same vehicle unless it is an emergency. Mixing different tires would seriously influence the vehicle's
handling and stability, and even possibly lead to losing control of the vehicle.
Page 103 of 281
Downloaded from www.Manualslib.com manuals search engine GWFLORID Maintenance Manual96
Brake System Maintenance
Brake fluid inspection and replacement
Brake fluid directly influences the brake performance and the operating conditions and use life of the brake
system components. Brake fluid has very strong hygroscopic properties, and thus absorbs water easily,
which will then deteriorate the metal and rubber pieces. Polluted and deteriorated brake fluid or its mixture
would cause the brake fluid to boil and gasify, hence reduces braking efficiency. Therefore, pay attention to
the items below when filling or changing the brake fluid:
1. Containers used to hold brake fluid must be tightly closed and sealed
2. Brake fluid is poisonous and damaging to the paint. Hence if it gets on the vehicle surface, rub it
off at once
3. If water or other contaminates found in the brake fluid, and the brake master cylinder's piston seal
has been broken, then the brake fluid and all the rubber pieces inside the brake system including
the brake hose must be replaced
4. The correct brake fluid level in the reservoir must be between MAX and MIN. After the vehicle has
been driven for over 1000 km, check the brake fluid level in the reservoir. If the brake fluid level is
not up to regulation, more brake fluid should be added to the reservoir \
until it reaches MAX.
Hydraulic component inspection and system flushing
1. If the oil-based solvent gets into the hydraulic system, flush the whole system and change all of
the rubber pieces
2. Clean your hands before installing new rubber pieces or other components
3. Do not use regular solvents (kerosene, gas, etc.) when inspecting or cleaning hydraulic
components, instead use absorbing alcohol or brake fluid
4. After inspecting the components, drain the brake fluid from the system. Use new brake fluid to
flush the system. Afterwards, add new brake fluid to perform hydraulic system exhaust
5. Flushing completion sign: When the brake fluid flowing out of the dump valve is clear from any
contaminate.
Hydraulic pressure system drainage
If the brake fluid inside the whole hydraulic pressure system needs to be emptied, open all the bleed screws
with each connected to a hose, as to allow the brake fluid to flow into a container. Step on the pedal slowly
until only air flows out. During the whole procedure, make sure all the \
valves are open.
Hydraulic pressure system air bleeding
The hydraulic brake system must work under a vacuum environment. The air will cause spongy brake or
overall brake failure when it flows into the hydraulic system. It is extremely necessary to bleed system air
when performing any operation on the brake system or if any air inside t\
he brake system is suspected.
1. Air bleeding sequence
If air inside the brake master cylinder is suspected, first perform air bleeding.
(a) If numerous valves are equipped, air bleed each valve
(b) Another sequence principle is: Air bleed from the wheel brake furthest away from the master cylinder.
The air bleeding sequence for the LHD modules is: rear right wheel - left rear wheel - front right wheel
- front left wheel, Right rudder vehicles: rear right wheel - left rear wheel - front left wheel - front right
wheel.
2. Air bleeding method
(1) Manual air bleeding
Use the brake pedal or pump as the air bleeding power source. When the air bleed screws are open, vent the
brake fluid containing the bubbles from the system. Usually this is simultaneously done by two people. One
steps on the brake pedal and the other operates the air bleed screws. Important points to take note of when
performing the operation:
(a) Place the ignition switch to the off position and step on the pedal repeatedly to remove the
vacuum pressure or hydraulic pressure.
(b) Before and after air bleeding, add clean brake fluid into the master cylinder until it reaches
the correct (stated) level.
(c) Check the fluid level frequently to make sure that more than half of the reservoir's capacity is
available.
(d) Bleed screws should only be opened when the pedal is pressed down, and closed before the
pedal is loosened. Meanwhile, check if the vented brake fluid has bubble\
s inside.
Page 176 of 281
Downloaded from www.Manualslib.com manuals search engine 169Vehicle Body Electronic System
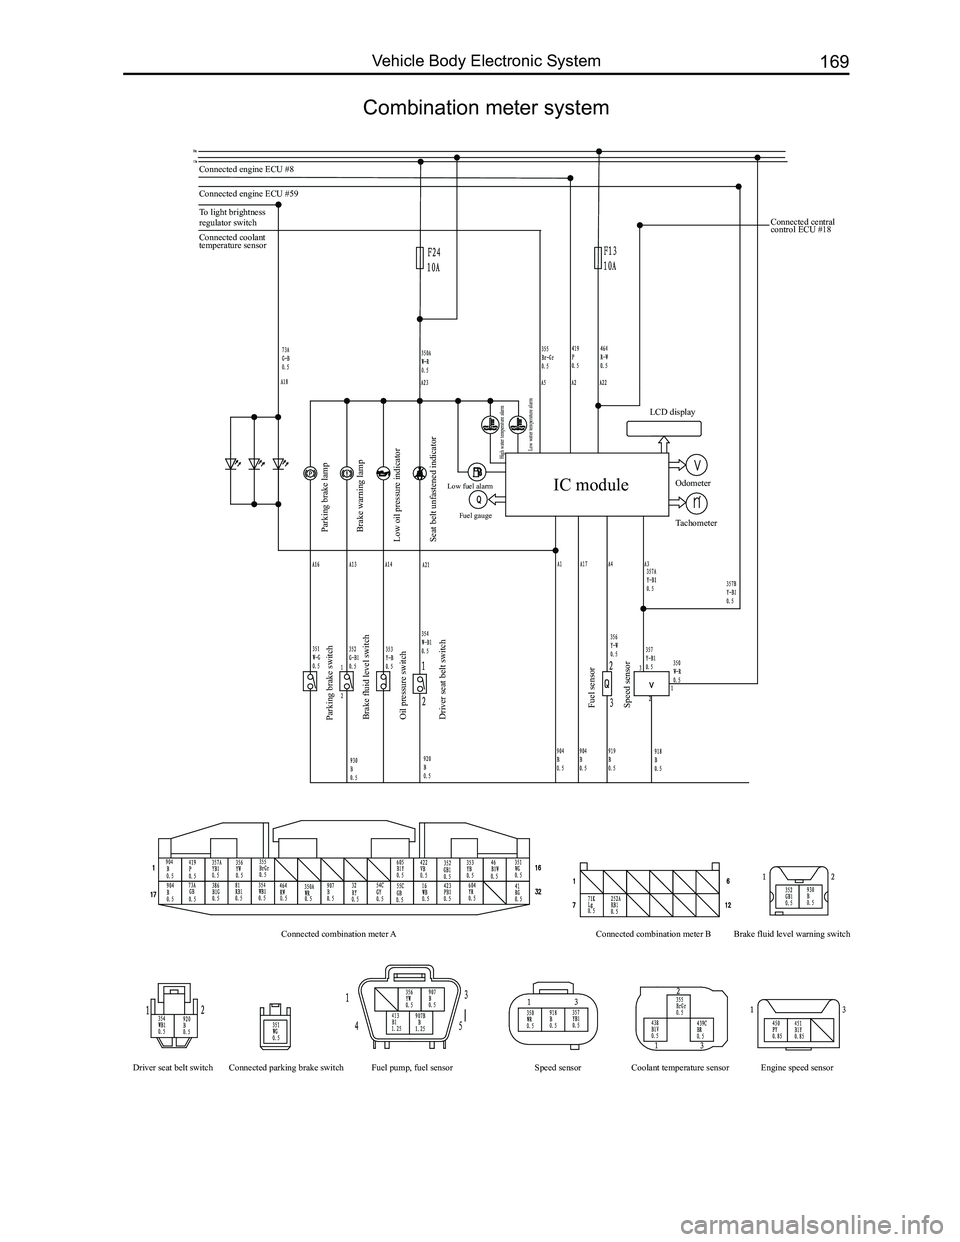
Combination meter system
Connected engine ECU #8
Connected engine ECU #59
To light brightness
regulator switch
Parking brake lamp
Parking brake switch
Brake fluid level switch
Oil pressure switch
Driver seat belt switch
Fuel sensor
Speed sensor
Connected combination meter A
Driver seat belt switch Connected parking brake switch Fuel pump, fuel sensor Coolant temperature sensor Engine speed sensor
Speed sensor Connected combination meter B
Brake fluid level warning switch
Brake warning lamp
Low oil pressure indicator
Seat belt unfastened indicator
Low fuel alarm Fuel gauge
High water temperature alarm
Low water temperature alarm
Connected coolant
temperature sensor Connected central
control ECU #18
IC module
LCD display
Odometer
Tachometer
Page 191 of 281
Downloaded from www.Manualslib.com manuals search engine GWFLORID Maintenance Manual184
Power Windows
The GWFLORID electric power window actuator consist of a motor and module. Its functions include: jam
protection, centralized control rise, soft-stop, characterized by easy control, long life, etc.
The functions of electric power window actuator
1. Jam protection
Power windows have an jam protection function when manually or automatically rising after it has been
initialized. There is no limit on the amount of jam protections. When room temperature is 25±5oC, wire
resistance 150 mΩ and 14.5 V working voltage, the jam protection force risen glass is less than 100 N. When the
window is manually or electrically rising, once it encounters a force greater than the jam protection force, the glass
will immediately stop rising and make the motor rotate in reverse. Rever\
se rotation distance is about 125 mm.
2. Centralized control rise
The central door lock controller provides four lifters with a low level signal. The power windows will close until
they are completely closed. This enables the two power window actuators to start separately, which can avoid
hitting peak currents if they start up at the same time. As long as the centralized controller's rising pin receives
the low level signal, the motor will close the window until it is comple\
tely closed.
3. Soft-stop
If the motor suffers from an impacting block when the window is rolled all the way up or all the way down, it
would shorten the power window actuator's use life. In order to avoid this, the soft-stop function must be used,
in which both manual and automatic rolling up and down should have this \
function.
(a) Soft close function:
When the window is about to get to the top, that is to say, when it's rising to the soft-stop point, the engine's
power will cut off to make the motor stop working, meanwhile the rising inertia will continue to roll the
window up to the top. The soft-stop point is about 2 mm under the top limiting position.
(b) When the window is about to lower to the bottom, that is to say, when it's lowering to the soft-stop point,
the engine's power will cut off to make it stop working, meanwhile the lowering inertia will continue to roll
the window down to the bottom. The soft-stop point is about 12 mm above the bottom limiting position.
(c) Zero position calibration: This position takes the top limiting position as the zero position. In order to
guarantee reliable and safer system operation while in use, the zero pos\
ition will need constant calibration.
Manual calibration: When the window stops at the rising soft-stop position after rising for a period,
press the rise button so it will rise to the limiting position. Zero cal\
ibration is then complete.
Automatic calibration: After the motor runs forward and reverse more than 20 times, it will undergo
zero position calibration one time. That is to say, when it completely starts or stops operating, the motor will
be blocked one time. Currently, there is no soft close or start-up function. Zero position calibration is com-
pleted when the window is completely closed to the limiting position.
4. Motor locked protection
The control module will cut off the power supply to stop the motor from working within 250 ms of the l\
ocking.
5. Motor temperature protection
When the control module is powered on, the initial temperature of the motor is set at 40oC. There are two
temperature limits for the motor's thermal protection function. If the temperature of the coil exceeds the first
temperature limit (170oC), the motor will not respond to any new operation input, but it will still complete the present
operation. If the motor's temperature exceeds the first temperature limit during its operation, it will keep working until
the temperature of the motor coil reaches the second temperature limit (190oC), then the motor will not be limited by
the second temperature's threshold while reversing, so as to guarantee the safety of the users. Once the temperature of
the motor has lowered below the temperature limit, the motor will work normally.
6. Self-diagnostic protection function
So as to guarantee the system's reliability while improving the system's average non-failure time, self-diagnostic
protection measures are used: If the power supply voltage exceeds 16 V, the control module will close the auto-
rising function.
(a) Switch contact point adhesion:
If it is detected that the switch contact point adhesion has reached up to 10 m input instructions will no
longer be received. If later the switch contact is detected to be disconnected again, it's function will return
to normal.
(b) Relay contact point adhesion:
The power window actuator is controlled by two contact point relays.
After a shutoff command is sent to one of the relays, if the system detects that this relay is still on, then
the system will choose this relay contact point for adhesion. Thereupon, the system will send out another
command to make the other electric relay switch on as well, so as to guarantee the motor's power supply is
Page 210 of 281
Downloaded from www.Manualslib.com manuals search engine 203Air Conditioning System
Areas of Importance
1. When putting in a new compressor, adjust the new compressor's inner lubricant to make it the same
level as of the old compressor's.
2. When the air conditioner malfunctions, if the pipeline, condenser or evaporator is the source of the
damage leading to its replacement, just add model number RS20 profession\
al lubricant 5-10 ml.
3. The compressor is a high speed operating component, the smallest impurity in the air conditioning
system can lead to the compressor's damage, therefore the entire air conditioning system must be
cleaned.
4. In order to avoid liquid damage to the compressor, pay careful attention when filling the refrigerant.
When the vehicle stopped, fill the liquid refrigerant from the high pressure side. When in operation, fill
the liquid refrigerant from the low pressure side.
5. When undergoing maintenance, pay attention that the amount of refrigerant being added is 510±10 g.
Observe through the check glass to determine if there is sufficient new refrigerant charge.
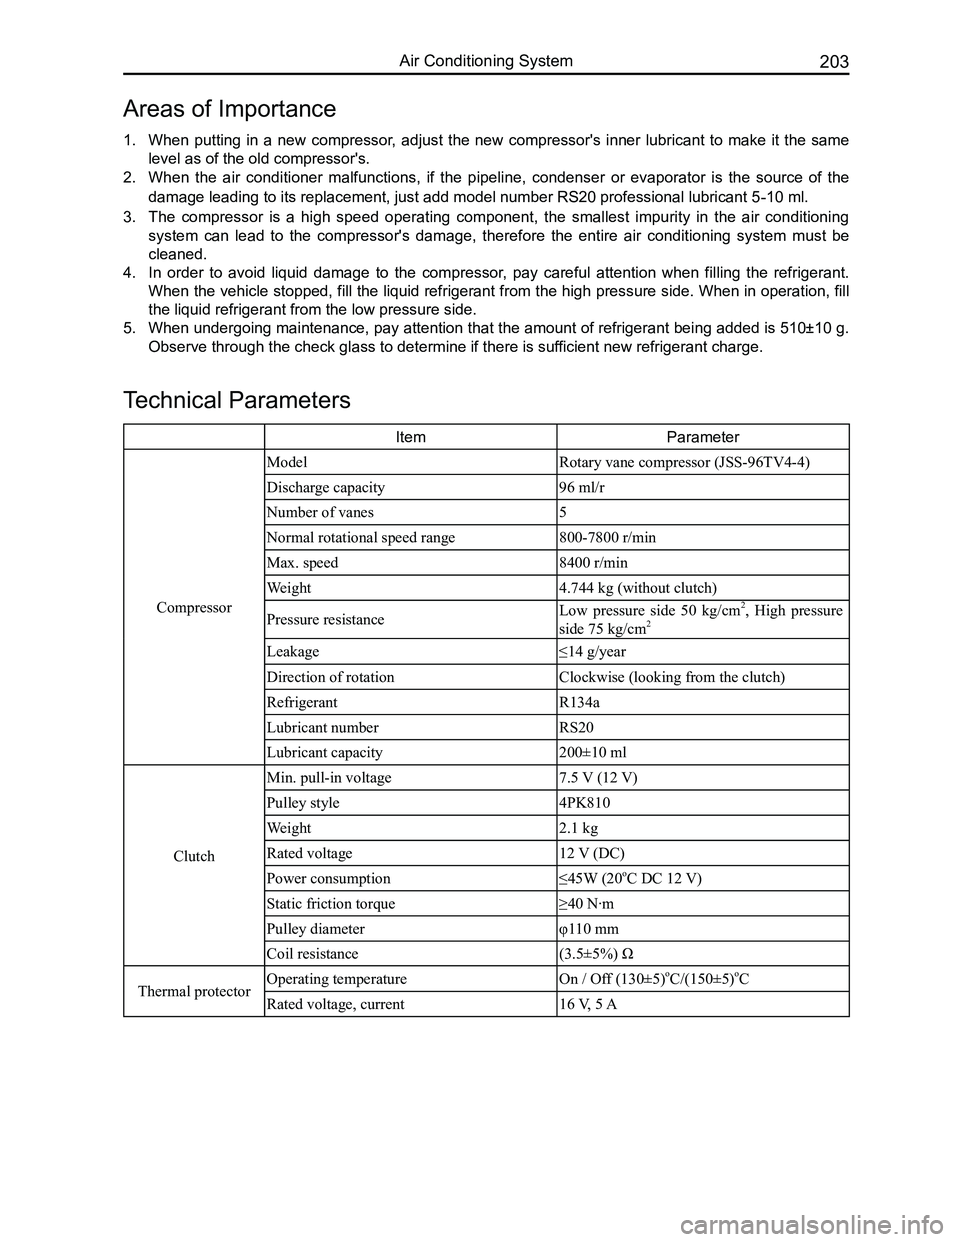
ItemParameter
Compressor
ModelRotary vane compressor (JSS-96TV4-4)
Discharge capacity96 ml/r
Number of vanes5
Normal rotational speed range800-7800 r/min
Max. speed8400 r/min
Weight4.744 kg (without clutch)
Pressure resistanceLow pressure side 50 kg/cm2, High pressure
side 75 kg/cm2
Leakage≤14 g/year
Direction of rotationClockwise (looking from the clutch)
RefrigerantR134a
Lubricant numberRS20
Lubricant capacity 200±10 ml
Clutch
Min. pull-in voltage7.5 V (12 V)
Pulley style 4PK810
Weight2.1 kg
Rated voltage12 V (DC)
Power consumption≤45W (20oC DC 12 V)
Static friction torque≥40 N·m
Pulley diameterφ110 mm
Coil resistance(3.5±5%) Ω
Thermal protectorOperating temperatureOn / Off (130±5)oC/(150±5)oC
Rated voltage, current16 V, 5 A
Technical Parameters