HONDA ACCORD COUPE 2014 9.G Owners Manual
Manufacturer: HONDA, Model Year: 2014, Model line: ACCORD COUPE, Model: HONDA ACCORD COUPE 2014 9.GPages: 593, PDF Size: 22.22 MB
Page 171 of 593
uuClimate Control System*uUsing Automatic Climate Control
170
Controls
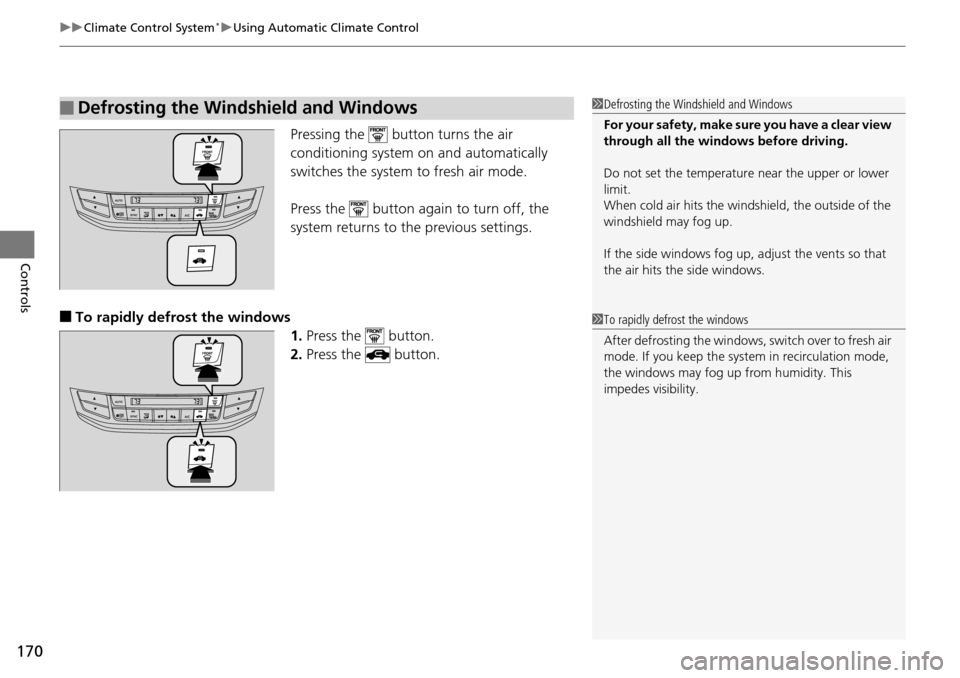
Pressing the button turns the air
conditioning system on and automatically
switches the system to fresh air mode.
Press the button again to turn off, the
system returns to the previous settings.
■To rapidly defrost the windows 1.Press the button.
2. Press the button.
■Defrosting the Windshield and Windows1Defrosting the Windshield and Windows
For your safety, make sure you have a clear view
through all the windows before driving.
Do not set the temperatur e near the upper or lower
limit.
When cold air hits the windshield, the outside of the
windshield may fog up.
If the side windows fog up, adjust the vents so that
the air hits th e side windows.
1To rapidly defrost the windows
After defrosting the windows, switch over to fresh air
mode. If you keep the syst em in recirculation mode,
the windows may fog up from humidity. This
impedes visibility.
Page 172 of 593
171
uuClimate Control System*uSynchronized Mode
Controls
Synchronized Mode
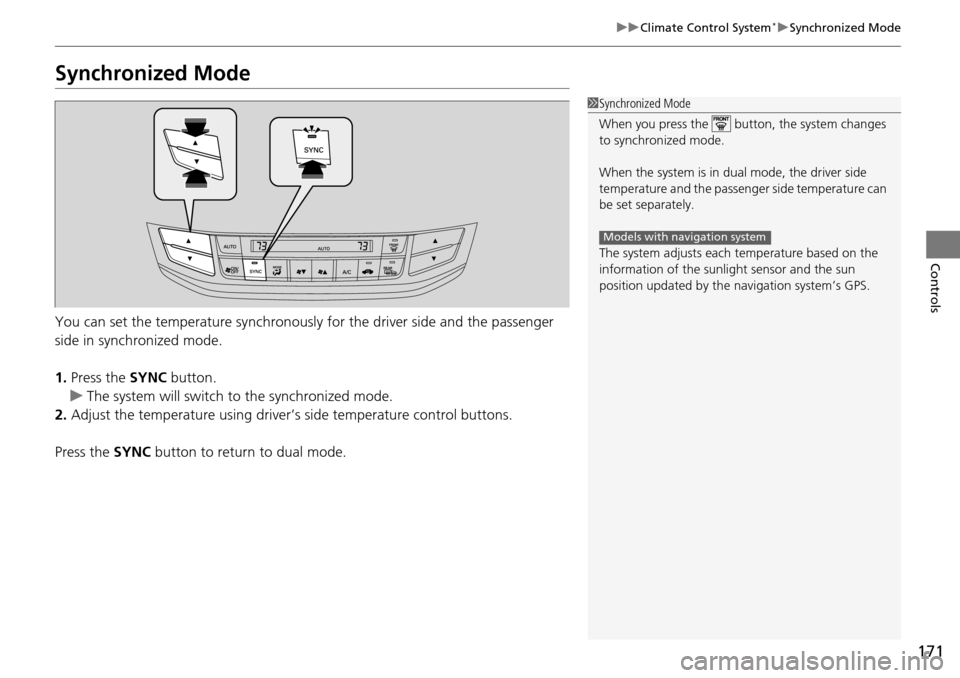
You can set the temperature synchronously for the driver side and the passenger
side in synchronized mode.
1. Press the SYNC button.
u The system will switch to the synchronized mode.
2. Adjust the temperature using driver’s side temperature control buttons.
Press the SYNC button to return to dual mode.
1Synchronized Mode
When you press the button, the system changes
to synchronized mode.
When the system is in dua l mode, the driver side
temperature and the passenger side temperature can
be set separately.
The system adjusts each temperature based on the
information of the sunli ght sensor and the sun
position updated by the na vigation system’s GPS.
Models with navigation system
Page 173 of 593
172
uuClimate Control System*uAutomatic Climate Control Sensors
Controls
Automatic Climate Control Sensors
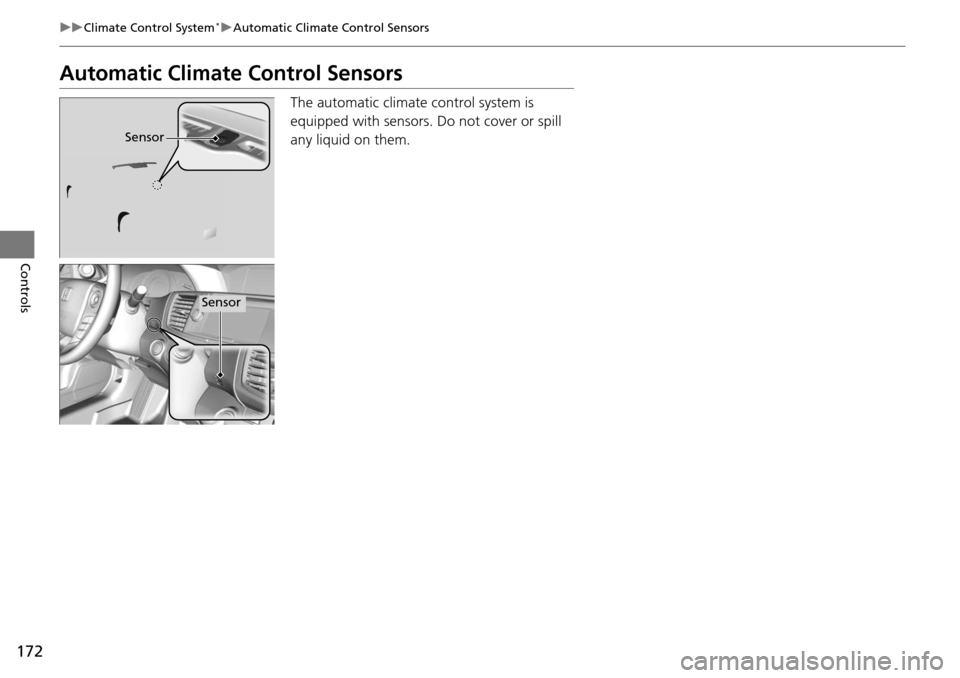
The automatic climate control system is
equipped with sensors. Do not cover or spill
any liquid on them.
Sensor
Sensor
Page 174 of 593
173
Features
This chapter describes how to operate technology features.
Audio SystemUSB Port .......................................... 175
Auxiliary Input Jack .......................... 176
Audio System Theft Protection
*....... 177
Region Setting ................................. 178
Audio Remote Controls .................... 179
Audio System Basic Operation ...... 180
Audio/Information Screen ................ 181
Display Setup ................................... 186
Playing AM/FM Radio ....................... 187
Playing a CD .................................... 189
Playing an iPod ................................ 192
Playing Internet Radio ...................... 195
Playing a USB Flash Drive ................. 197
Playing Bluetooth ® Audio ................. 200
Models with one display
Audio System Basic Operation ...... 202
Audio with Touch Screen ................. 203
Audio/Information Screen ................ 206
Display Setup ................................... 212
Playing AM/FM Radio ....................... 213
Playing XM ® Radio ........................... 217
Playing a CD .................................... 220
Playing an iPod ................................ 223
Playing Internet Radio ...................... 227
Playing a USB Flash Drive ................. 230
Playing Bluetooth ® Audio................. 233
Audio System Basic Operation ...... 235
Audio with Touch Screen ................. 236
Audio/Information Screen ................ 238Models with two displays
Models with navigation system
Display Setup ................................... 243
Voice Control Operation .................. 244
Playing AM/FM Radio....................... 252
Playing XM ® Radio ........................... 256
Playing a CD .................................... 259
Playing Hard Disc Drive (HDD) Audio..... 262Playing an iPod ................................ 272
Playing Internet Radio ...................... 280
Playing a USB Flash Drive ................. 283
Playing Bluetooth ® Audio ................ 286
Audio Error Messages ...................... 288
General Information on the Audio System.....294Customized Features........................ 298
HomeLink ® Universal Transceiver*.. 336
Bluetooth® HandsFreeLink® ..... 338, 375
Compass
*.......................................... 413
* Not available on all models
Page 175 of 593
174
Features
Audio System
About Your Audio System
See the Navigation System Manual for information on the navigation system.
The audio system features AM/FM radio and XM ® Radio service
*. It can also play
audio CDs, WMA/MP3/AAC files, Hard Disc Drive (HDD) audio*, USB flash drives,
and iPod, iPhone ® and Bluetooth ® devices.
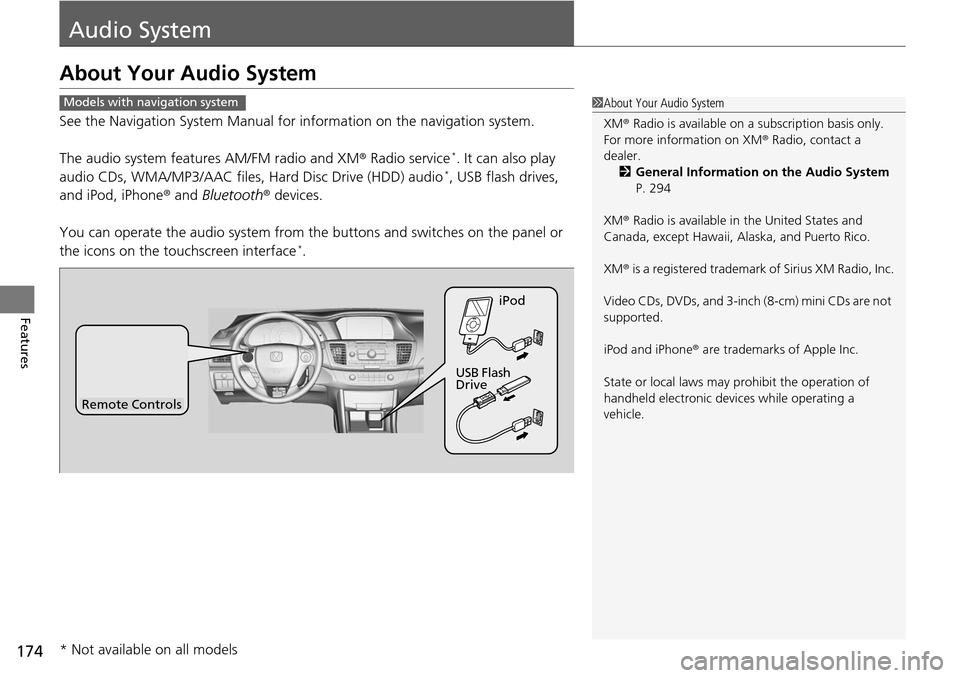
You can operate the audio system from the buttons and switches on the panel or
the icons on the touchscreen interface
*.
1 About Your Audio System
XM ® Radio is available on a subscription basis only.
For more information on XM ® Radio, contact a
dealer.
2 General Information on the Audio System
P. 294
XM ® Radio is available in the United States and
Canada, except Ha waii, Alaska, and Puerto Rico.
XM ® is a registered trademark of Sirius XM Radio, Inc.
Video CDs, DVDs, and 3-inch (8-cm) mini CDs are not
supported.
iPod and iPhone ® are trademarks of Apple Inc.
State or local laws may pr ohibit the operation of
handheld electronic devices while operating a
vehicle.Models with navigation system
Remote Controls iPod
USB Flash
Drive
* Not available on all models
Page 176 of 593
175
uuAudio System uUSB Port
Features
USB Port
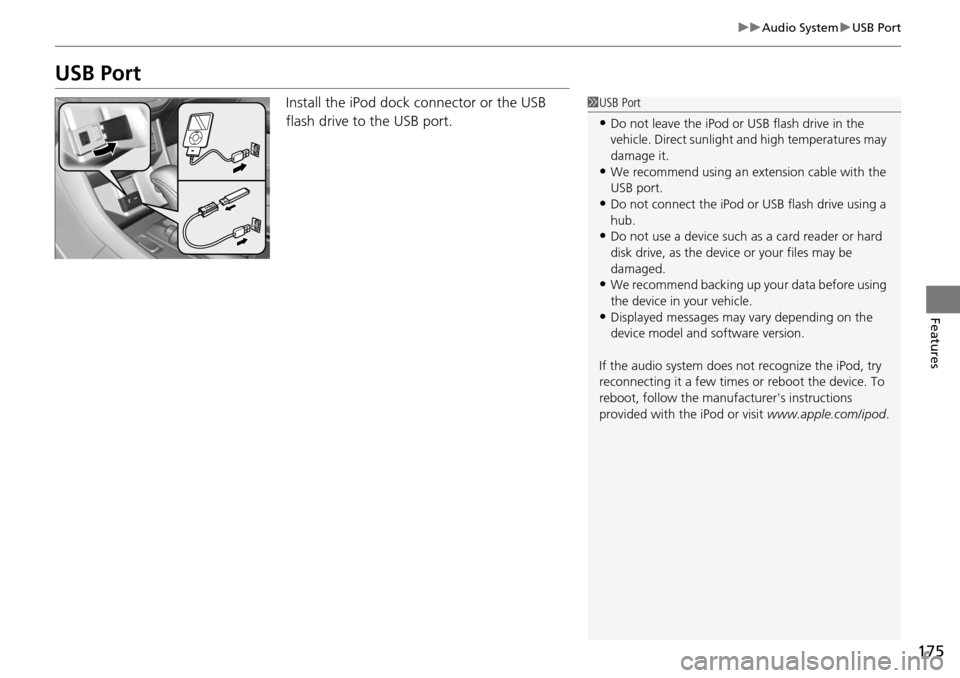
Install the iPod dock connector or the USB
flash drive to the USB port.1USB Port
•Do not leave the iPod or USB flash drive in the
vehicle. Direct sunlight and high temperatures may
damage it.
•We recommend using an ex tension cable with the
USB port.
•Do not connect the iPod or USB flash drive using a
hub.
•Do not use a device such as a card reader or hard
disk drive, as the device or your files may be
damaged.
•We recommend backing up yo ur data before using
the device in your vehicle.
•Displayed messages may vary depending on the
device model and software version.
If the audio system does not recognize the iPod, try
reconnecting it a few times or reboot the device. To
reboot, follow the manufac turer's instructions
provided with the iPod or visit www.apple.com/ipod.
Page 177 of 593
176
uuAudio System uAuxiliary Input Jack
Features
Auxiliary Input Jack
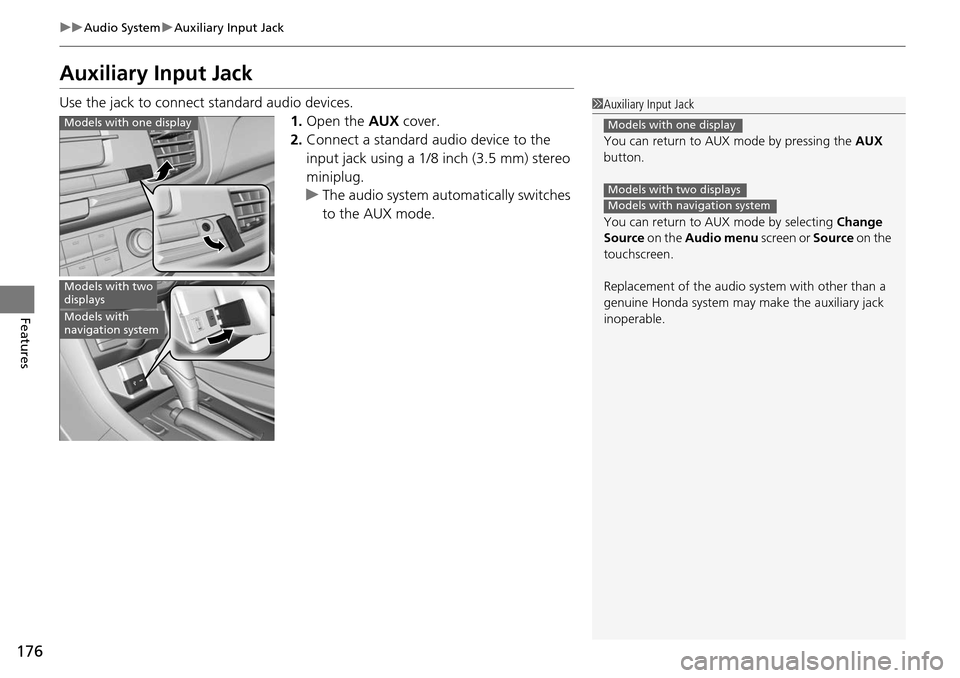
Use the jack to connect standard audio devices.
1.Open the AUX cover.
2. Connect a standard audio device to the
input jack using a 1/8 inch (3.5 mm) stereo
miniplug.
u The audio system automatically switches
to the AUX mode.1Auxiliary Input Jack
You can return to AUX mode by pressing the AUX
button.
You can return to AUX mode by selecting Change
Source on the Audio menu screen or Source on the
touchscreen.
Replacement of the audio sy stem with other than a
genuine Honda system may make the auxiliary jack
inoperable.
Models with one display
Models with two displaysModels with navigation system
Models with one display
Models with two
displays
Models with
navigation system
Page 178 of 593
177
uuAudio System uAudio System Theft Protection*
Features
Audio System Theft Protection*
The audio system is disabled when it is disconnected from the power source, such as
when the battery is disconnected or goes dead.
■Reactivating the audio system
1. Set the power mode to ON, and turn on the audio system.
u If you set the power mode to ACCESSORY , you will be requested to enter the
audio security code. See step 3.
2. Press and hold the power button again for more than two seconds.
u The audio system is reactivated when the system’s control unit recognizes that
the system is in your vehicle.
If the control unit fails to recognize, Enter PIN Code appears on the audio/
information screen.
3. If the two steps do not work, you can en ter the audio security code using the
touch screen. If you enter an incorrect digi t, continue to the last digit, then try
again. If you do not enter code correctl y after 10 tries, leave the system for one
hour before trying again, or visit a dealer to have the system reset.
1Audio System Theft Protection*
Find the audio system's se curity code and serial
number label in your owner’s manual kit.
We recommend that you write down the serial
number in this owner’s manual.
Do not store the label in your vehicle. If you lose the
label, you must first retrie ve the serial number, and
then obtain the code.
You can find out about your serial number and
security code from a dealer.
You can register the securi ty code at Owner Link
(owners.honda.com. ), and find information on how
to retrieve the serial num ber and obtain the code at
radio-navicode.honda.com .
U.S. models
* Not available on all models
Page 179 of 593
178
uuAudio System uRegion Setting
Features
Region Setting
The audio system’s region setting may be lost when the battery is disconnected or
goes dead.
If the Region Select screen appears, you need to set the region for the audio
system. Follow the steps below:
1. Press to select OK.
2. Rotate to select the region you live in, then press .
3. You will receive a confirmation message on the screen. Rotate to select Yes,
then press .
Models with two displays
1 Region Setting
The region setting is required only when the battery
power is tempor arily disconnected. It has been
usually set to your vehicl e’s region type beforehand.
You cannot change the setting once you have
completed the setting proced ure. Contact a dealer if
you selected an incorrect region.
Page 180 of 593
179
uuAudio System uAudio Remote Controls
Features
Audio Remote Controls
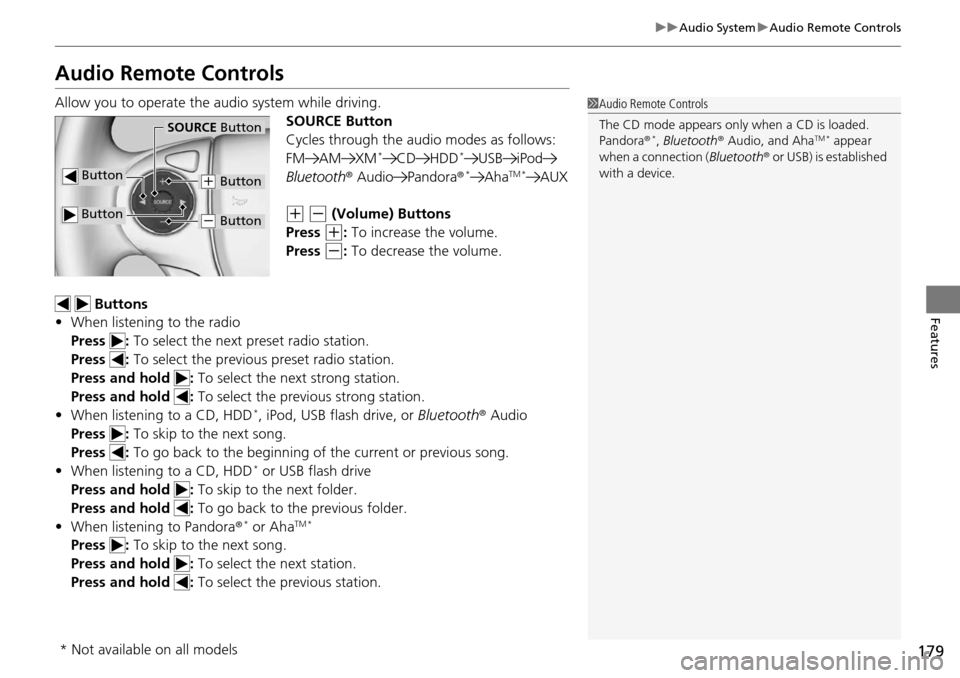
Allow you to operate the au dio system while driving.
SOURCE Button
Cycles through the audio modes as follows:
FM AM XM
*CD HDD*USB iPod
Bluetooth ® Audio Pandora ®*AhaTM *AUX
(+ (- (Volume) Buttons
Press
(+: To increase the volume.
Press
(-: To decrease the volume.
Buttons
• When listening to the radio
Press : To select the next preset radio station.
Press : To select the previous preset radio station.
Press and hold : To select the next strong station.
Press and hold : To select the previous strong station.
• When listening to a CD, HDD
*, iPod, USB flash drive, or Bluetooth® Audio
Press : To skip to the next song.
Press : To go back to the beginning of the current or previous song.
• When listening to a CD, HDD
* or USB flash drive
Press and hold : To skip to the next folder.
Press and hold : To go back to the previous folder.
• When listening to Pandora ®
* or AhaTM *
Press : To skip to the next song.
Press and hold : To select the next station.
Press and hold : To select the previous station.
1Audio Remote Controls
The CD mode appears only when a CD is loaded.
Pandora ®
*, Bluetooth ® Audio, and AhaTM * appear
when a connection ( Bluetooth® or USB) is established
with a device.
Button
SOURCE Button
Button
(+ Button
(- Button
* Not available on all models