ECU HONDA ACCORD COUPE 2016 9.G Quick Guide
[x] Cancel search | Manufacturer: HONDA, Model Year: 2016, Model line: ACCORD COUPE, Model: HONDA ACCORD COUPE 2016 9.GPages: 84, PDF Size: 19.4 MB
Page 53 of 84

98 || 99
DRIVINGDRIVING
Remote Engine Start*
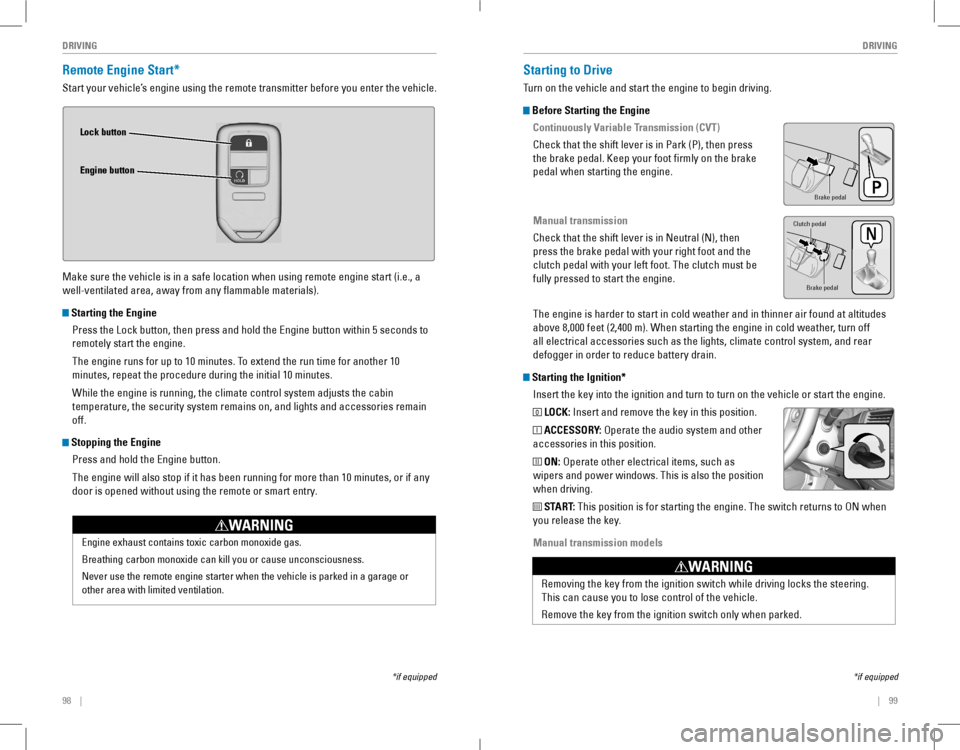
Start your vehicle’s engine using the remote transmitter before you enter the vehicle.
Make sure the vehicle is in a safe location when using remote engine start (i.e., a
well-ventilated area, away from any flammable materials).
Starting the Engine
Press the Lock button, then press and hold the Engine button within 5 seconds to
remotely start the engine.
The engine runs for up to 10 minutes. To extend the run time for another 10
minutes, repeat the procedure during the initial 10 minutes.
While the engine is running, the climate control system adjusts the cabin
temperature, the security system remains on, and lights and accessories remain
off.
Stopping the Engine
Press and hold the Engine button.
The engine will also stop if it has been running for more than 10 minutes, or if any
door is opened without using the remote or smart entry.
Engine exhaust contains toxic carbon monoxide gas.
Breathing carbon monoxide can kill you or cause unconsciousness.
Never use the remote engine starter when the vehicle is parked in a gara\
ge or
other area with limited ventilation.
WARNING
Lock button
Engine button
*if equipped
Starting to Drive
Turn on the vehicle and start the engine to begin driving.
Before Starting the Engine
Continuously Variable Transmission (CVT)
Check that the shift lever is in Park (P), then press
the brake pedal. Keep your foot firmly on the brake
pedal when starting the engine.
Manual transmission
Check that the shift lever is in Neutral (N), then
press the brake pedal with your right foot and the
clutch pedal with your left foot. The clutch must be
fully pressed to start the engine.
The engine is harder to start in cold weather and in thinner air found a\
t altitudes
above 8,000 feet (2,400 m). When starting the engine in cold weather, turn off
all electrical accessories such as the lights, climate control system, a\
nd rear
defogger in order to reduce battery drain.
Starting the Ignition*
Insert the key into the ignition and turn to turn on the vehicle or start the engine.
0 LOCK: Insert and remove the key in this position.
I ACCESSORY: operate the audio system and other
accessories in this position.
II ON: operate other electrical items, such as
wipers and power windows. This is also the position
when driving.
III START: This position is for starting the engine. The switch returns to oN when
you release the key.
Manual transmission models
*if equipped
Brake peda l
Brake pedal
Clutch pedal
removing the key from the ignition switch while driving locks the steerin\
g.
This can cause you to lose control of the vehicle.
remove the key from the ignition switch only when parked.
WARNING
Page 67 of 84

126 || 127
HANDLING THE UNEXPECTEDHANDLING THE UNEXPECTED
Replacing the Flat Tire
1. remove the wheel nuts and flat tire.
2. Mount the compact spare tire. replace the
wheel nuts, and lightly tighten them.
3. Lower the vehicle and remove the jack. Tighten
the wheel nuts in the order indicated in the
image. Go around, tightening the nuts, two to
three times in this order. Do not overtighten the
wheel nuts.
If you drive with the spare tire installed, the
low tire pressure/TPMS indicator appears. The
indicator stays on until a regular tire is installed.
Storing the Flat Tire
1. remove the center cap.
2. open the trunk. Place the flat tire face down in
the spare tire well.
3. Remove the spacer cone from the wing bolt, flip
it over, and insert it back on the bolt. Secure the
flat tire with the wing bolt.
4. Securely put the jack and wheel nut wrench back
in the tool case. Store the case in the trunk.
Spacer coneWing bolt
For
compact
spare tire For
full-size
tire
Loose items can fly around the interior in a crash and can seriously i\
njure the
occupants.
Store the wheel, jack, and tools securely before driving.
WARNING
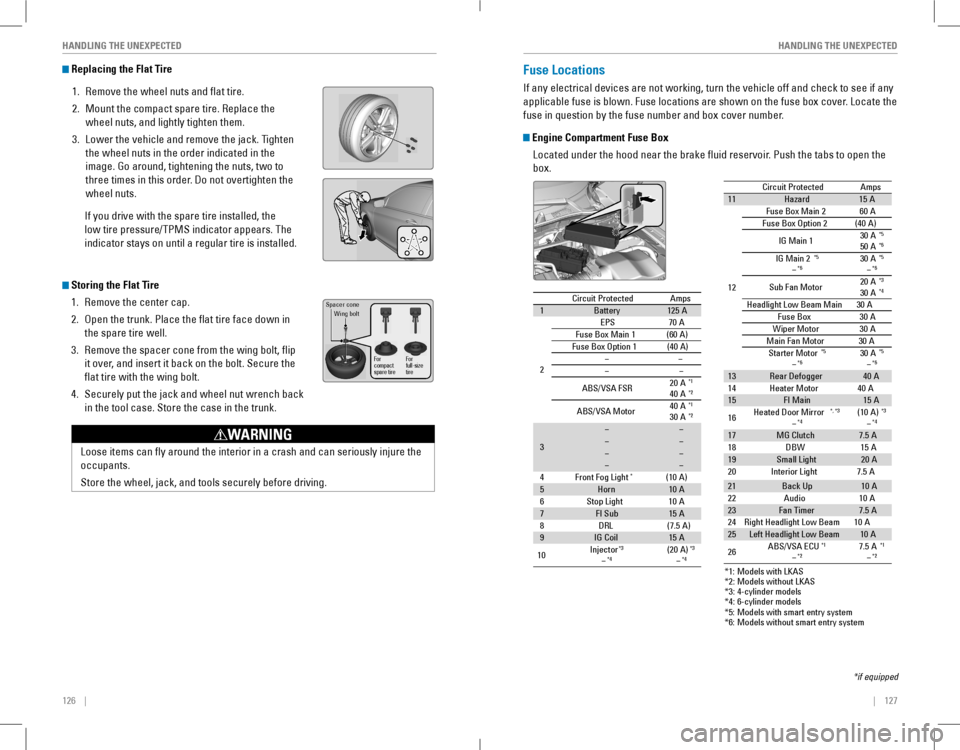
Fuse Locations
If any electrical devices are not working, turn the vehicle off and check to see if any
applicable fuse is blown. Fuse locations are shown on the fuse box cover. Locate the
fuse in question by the fuse number and box cover number.
Engine Compartment Fuse Box
Located under the hood near the brake fluid reservoir. Push the tabs to open the
box.
*if equipped*1
: Models with LKA S
*2 : Models without LKAS
*3 : 4-cylinder models
*4 : 6-cylinder models
Circuit ProtectedAmps1Battery125A
2
EPS70 A
Fuse Box Main 1(60 A)Fuse Box Option 1(40A )����
ABS/VSA FSR 20
A*1
40A*2
ABS/VSA Motor 40
A*1
30A*2
3
��������
4F ront Fog Ligh t*(10A )5Horn10A
6S top Light10A7FI Sub15A
8D RL(7.5A)
9IG Coi l15A
10 Injector*3
�*4(2
0A )*3
�*4
*5: M odels with smart entry syste m
*6: Models without smart entry system Circuit Protected
Amps
11 Hazard 15A
12 Fuse Box Main
260A
Fuse Box Option 2(40A)
IG Main 1 30
A
*5
50A*6
IG Main 2*5
�*630A*5
�*6
Sub Fan Moto r20
A*3
30A*4
Headlight Low Beam Main 30A
Fuse Bo x3 0A
Wiper Moto r3 0A
Main Fan Motor 30A
Starter Motor
*5
�*630 A*5
�*6
13 Rear Defogger 40A
14 Heater Moto r4 0A
15 FI Main 15A
16 Heated Door Mirror
*, *3
�*4(10
A)*3
�*4
17 MG Clutch 7.5A
18 DBW1 5A
19 Small Light 20A
20 Interior Light 7.5A
21 Back Up 10A
22 Audio1 0A
23 Fan Timer 7.5A
24 Right Headlight Low Beam 10A
25 Left Headlight Low Beam 10A
26 ABS/VSA EC
U
*1
�*27.5A*1
�*2
*1: Models with LKA S
*2 : Models without LKAS
*3 : 4-cylinder models
*4 : 6-cylinder models
Circuit Protected Amps
1 Battery 125A
2 EPS
70A
Fuse Box Main 1(60A)
Fuse Box Option 1(40A )
��
� �
ABS/VSA FSR 20
A
*1
40A*2
ABS/VSA Motor 40
A*1
30A*2
3 �
�
� �
� �
� �
4F ront Fog Ligh t
*(10A )
5 Horn 10A
6S top Light1 0A
7 FI Sub 15A
8D RL(7.5A)
9 IG Coil 15A
10 Injector
*3
�*4(2
0A )*3
�*4
*5: M odels with smart entry syste m
*6: Models without smart entry system
Circuit ProtectedAmps11Hazard15 A
12 Fuse Box Main 260A
Fuse Box Option 2(40A)
IG Main 1 30
A
*5
50A*6
IG Main 2*5
�*630A*5
�*6
Sub Fan Moto r20
A*3
30A*4
Headlight Low Beam Main 30A
Fuse Box30A
Wiper Motor30A
Main Fan Motor 30A
Starter Motor
*5
�*630 A*5
�*6
13Rear Defogger40A
14 Heater Motor40A15FI Main15A
16 Heated Door Mirror*, *3
�*4(10
A)*3
�*4
17MG Clutch7.5A
18 DBW15A19Small Light20A
20 Interior Light 7.5A
21Back Up10 A
22 Audio10A23Fan Timer7.5A
24 Right Headlight Low Beam 10A
25Left Headlight Low Beam10A
26 ABS/VSA EC
U*1
�*27.5A*1
�*2
Page 72 of 84

136 || 137
MAINTENANCEMAINTENANCE
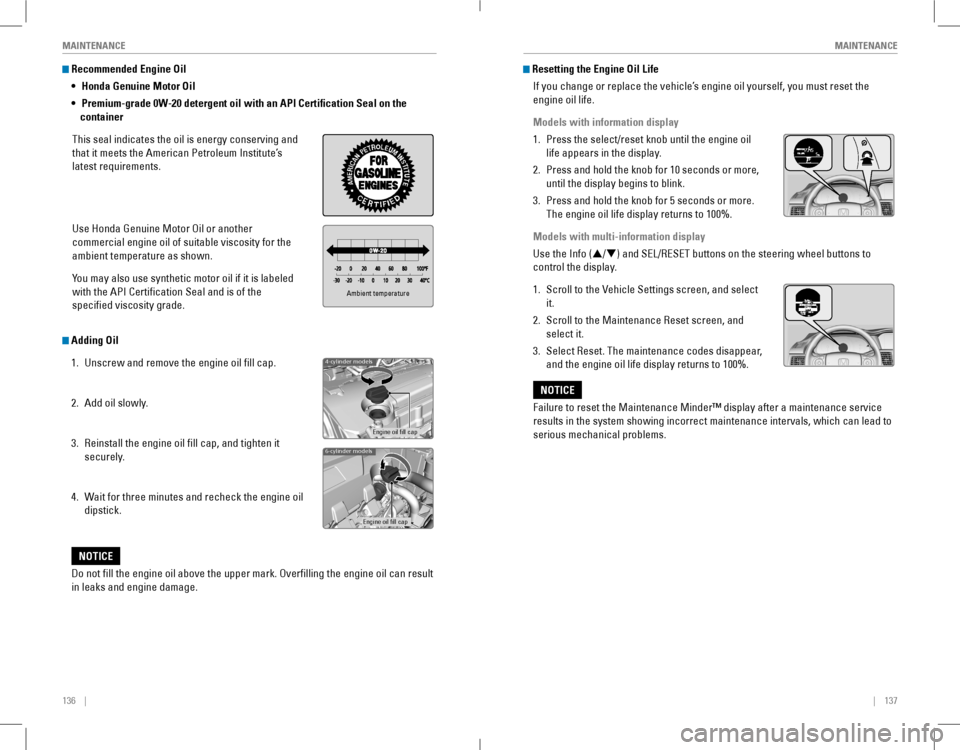
Recommended Engine Oil
• Honda Genuine Motor Oil
• Premium-grade 0W-20 detergent oil with an API Certification Seal on the
container
This seal indicates the oil is energy conserving and
that it meets the American Petroleum Institute’s
latest requirements.
Use Honda Genuine Motor oil or another
commercial engine oil of suitable viscosity for the
ambient temperature as shown.
You may also use synthetic motor oil if it is labeled
with the API Certification Seal and is of the
specified viscosity grade.
Do not fill the engine oil above the upper mark. Overfilling the engine oil can result
in leaks and engine damage.
NOTICE
Adding Oil
1. Unscrew and remove the engine oil fill cap.
2. Add oil slowly.
3. reinstall the engine oil fill cap, and tighten it
securely.
4. Wait for three minutes and recheck the engine oil
dipstick.
Ambient temperature
4-cylinder models
Engine oil �ll cap
6-cylinder models
Engine oil �ll cap
Resetting the Engine Oil Life
If you change or replace the vehicle’s engine oil yourself, you must reset the
engine oil life.
Models with information display
1. Press the select/reset knob until the engine oil
life appears in the display.
2. Press and hold the knob for 10 seconds or more,
until the display begins to blink.
3. Press and hold the knob for 5 seconds or more.
The engine oil life display returns to 100%.
Models with multi-information display
Use the Info (p/q) and SEL/RESET buttons on the steering wheel buttons to
control the display.
1. Scroll to the vehicle Settings screen, and select
it.
2. Scroll to the Maintenance reset screen, and
select it.
3. Select reset. The maintenance codes disappear,
and the engine oil life display returns to 100%.
Failure to reset the Maintenance Minder™ display after a maintenance \
service
results in the system showing incorrect maintenance intervals, which can\
lead to
serious mechanical problems.
NOTICE
Page 82 of 84

156 || 157
INDEXVOICE COMMAND INDEX
Audio Commands*
The system accepts these commands on most screens. Audio volume levels
cannot be controlled using voice commands.
FM/AM Radio Commands
• Audio on**
• Audio off**
• radio FM
• radio AM
• Radio tune to # FM (#: frequency,
e.g., 95.5)
• Radio tune to # AM (#: frequency,
e.g., 1020)
• radio FM preset # (#: 1 to 12)
• radio AM preset # (#: 1 to 6)
SiriusXM® Radio Commands
• radio SXM
• SXM channel # (#: 0 to 255)
• SXM channel (channel name)
• radio SXM preset # (#: 1 to 12)
Disc (CD) Commands
• Disc
• Disc play
• Disc play track # (#: 1 to 30)
USB Commands***
• USB
• USB play
• USB play track # (#: 1 to 30)
Pandora® Commands (U.S. only)***
• Pandora
• Pandora play
iPod® Commands***
• iPod
• iPod play
• iPod play track # (#: 1-30)
Bluetooth® Audio Commands
• Bluetooth audio play
(may not work on all phones)
AUX Commands
• Aux audio play
• Music search
• List album (specify album)
• List artist (specify artist)
• List composer (specify composer)
• List genre (specify genre)
• List playlist (specify playlist)
• Play album (specify album)
• Play artist (specify artist)
• Play composer (specify composer)
• Play genre (specify genre)
• Play playlist (specify playlist)
• Play song (specify song)
• What/Who am I listening to?
• Who is this?
• What’s playing?
• Who’s playing?
• What album is this?
Song By Voice™ Commands***
Available for tracks stored on an iPod® or USB device.
*models with navigation**These commands toggle the function on and off, so the command may not match your intended action.
INDEX
ABS .............................................................24ACC .............................................................26Accessory Power Socket ...............................49Adaptive Cruise Control (ACC) .........24, 26, 108Address .............................................................88Advanced Airbags .............................................8Aha™ radio ......................................................63Airbags ...............................................................8Airbag System Components .......................12Airbag System Indicators ...........................10Ambient Meter................................................106Android Auto .....................................................65Anti-Lock Brake System (ABS) ..............24, 105Apple CarPlay ...................................................64Apps .............................................................61Audio Commands ...........................................156Audio operation ...............................................49Accessory Power Socket ...........................49Aha™ radio ..................................................63Android Auto .................................................65Apple CarPlay ...............................................64Auxiliary Input Jack .....................................49Bluetooth® Audio ...................................58, 71Compact Disc (CD) .................................55, 68FM/AM Radio ..........................................54, 66HondaLink® ...................................................62iPod® .......................................................56, 69one Display Audio operation .....................53Pandora® .................................................59, 72SiriusXM® radio ...........................................67Sound .............................................................52Steering Wheel Controls .............................51Touchscreen operation ..............................60USB Flash Drive ......................................57, 70USB Port ........................................................49Wi-Fi Connection ..........................................63Wireless Charger .........................................50Auto High-Beam System.....................24, 26, 36Automatic Rain-Sensing Wipers ...................38Automatic Dimming rearview Mirror ...........44Automatic Transmission ...............................102Auxiliary Input Jack .........................................49Battery ...........................................................140Bluetooth® Audio .......................................58, 71Bluetooth® Audio Commands ......................156Bluetooth® HandsFreeLink® (HFL) .................73Call History ..............................................76, 82Dialing a Number ...................................75, 81e-Mail .............................................................83HFL Controls ............................................73, 78HondaLink® Assist .......................................84Making a Call ..........................................75, 81Pairing a Phone ......................................74, 80
Phonebook ..............................................76, 82Siri eyes Free ................................................85SMS Text Messaging ............................77, 83Speed Dial ...............................................75, 81Talk Button Tips ............................................79Brake Assist System......................................105Brake Fluid ......................................................139Brake system ..............................................23, 24Braking ...........................................................105Brightness Control ...........................................35Call History ..................................................76, 82Carbon Monoxide Gas.......................................4Changing a Flat Tire .......................................124Changing Settings ............................................47Charging system...............................................23Child Safety .......................................................14Child Seat ..........................................................16Adding Security with a Tether ...................19LATCH-Compatible Child Seat ....................17Climate Control Commands ..........................155Climate Control System ...................................46Clock .............................................................48Clutch Fluid......................................................139Collision Mitigation Braking System™ (CMBS™) ...................................24, 113Compact Disc (CD) .....................................55, 68Compact Disc (CD) Commands ....................156Condition Indicators ........................................25Contact Us .......................................................153Continuously Variable Transmission (CvT) .................................................100Cruise Control ...........................................26, 107Customer Information....................................152Customized Features .......................................47Dashboard and Other Controls ........................2Destination ........................................................88Dialing a Number .......................................75, 81Door Mirrors .....................................................44Door open ..........................................................25Doors .......................................................31, 32DoT Tire Quality Grading ..............................146Driving .............................................................93Adaptive Cruise Control (ACC) .................108Braking .........................................................105Collision Mitigation Braking System™ (CMBS™) .........................................113Continuously Variable Transmission (CvT) .................................................100Cruise Control .............................................107eco Assist System ......................................106ENGINE START/STOP button ...................100Ignition ...........................................................99Lane Keeping Assist System (LKAS) .......111