steering HONDA ACCORD HYBRID 2014 9.G Service Manual
[x] Cancel search | Manufacturer: HONDA, Model Year: 2014, Model line: ACCORD HYBRID, Model: HONDA ACCORD HYBRID 2014 9.GPages: 561, PDF Size: 20.3 MB
Page 428 of 561
427
uuWhen DrivinguAdaptive Cruise Control (ACC)*
Continued
Driving
Adaptive Cruise Control (ACC) *
Helps maintain a constant vehicle speed and a set following distance behind a
vehicle detected ahead of yours, without you having to keep your foot on the brake
or the accelerator.
1Adaptive Cruise Control (ACC) *
Important Reminder
As with any system, there are limits to ACC. Use the
brake pedal whenever necessary, and always keep a
safe distance between your vehicle and other
vehicles.
The radar sensor for ACC is shared with FCW
(Forward Collision Warning). 2 Forward Collision Warning (FCW) *
P. 435
3WARNING
Improper use of ACC can lead to a crash.
Use ACC only when traveling on open
highways in good weather.
3WARNING
ACC has limited braking capability.
When your vehicle speed drops below
22 mph (35 km/h), ACC will
automatically cancel and no longer will
apply your vehicle’s brakes.
Always be prepared to apply the brake
pedal when conditions require.
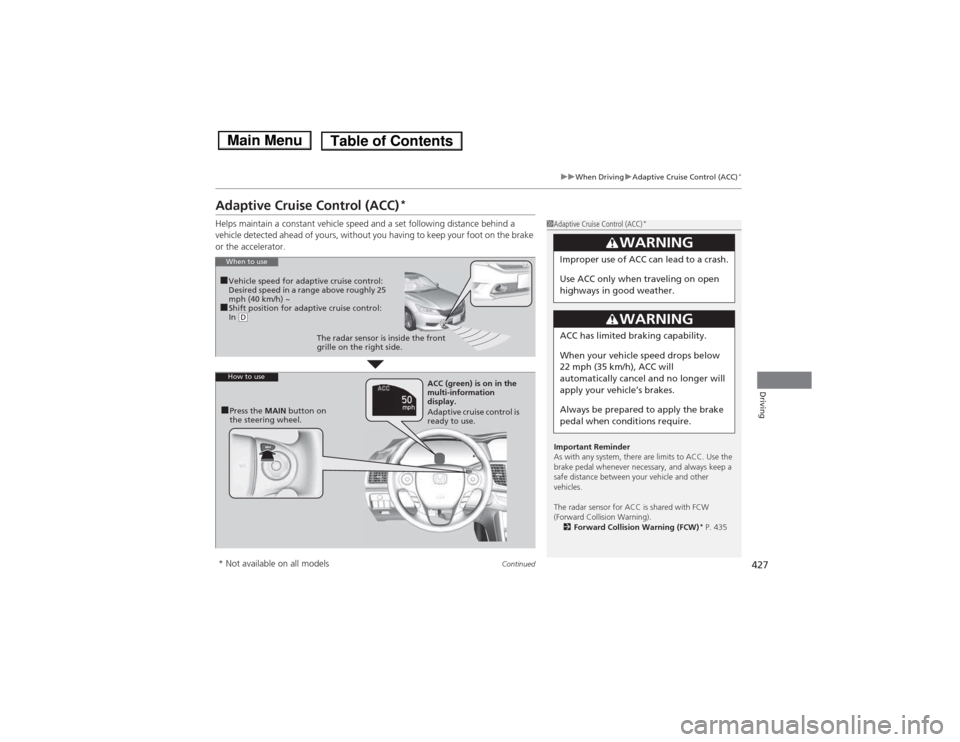
When to use
■ Vehicle speed for adaptive cruise control:
Desired speed in a range above roughly 25
mph (40 km/h) ~
■ Shift position for adaptive cruise control:
In
(D
The radar sensor is inside the front
grille on the right side.
How to use
■Press the MAIN button on
the steering wheel. ACC (green) is on in the
multi-information display.
Adaptive cruise control is ready to use.
* Not available on all models
Main MenuTable of Contents
Page 431 of 561
uuWhen DrivinguAdaptive Cruise Control (ACC)*
430
Driving
■ There is no vehicle ahead
Your vehicle cruises at the set speed. ■ A vehicle ahead is within ACC range and going slower than the set speed
Your vehicle slows down, and maintains the same speed as the speed of the vehicle
ahead to maintain the set following distance. ■ A vehicle ahead is within ACC range and going at a steady speed
Your vehicle follows the vehicle ahead of it, keeping a constant distance, without
going beyond the set speed. ■ A vehicle ahead goes out of range
ACC accelerates your vehicle to the set speed, and then maintains it.■ When you depress the accelerator pedal
You can temporarily increase the vehicle speed. In this case, there is no audible or
visual alerts even if a vehicle is in ACC range.
ACC stays on unless you cancel it. Once you release the accelerator pedal, the
system resumes the set speed.1When in Operation
Limitations
Be aware that ACC has limitations. For example, it is
not designed to operate when a vehicle ahead of
yours is going slower than 13 mph (20 km/h) or is
parked. Smaller vehicles, such as motorcycles, may
also be difficult for the system to detect depending
on their size.
You must always be prepared to use the brake pedal
to maintain a safe distance with other vehicles.
ACC may momentarily apply brakes or sound an alert
if there is a vehicle or building adjacent to your
vehicle and: • You make a sudden turn or are driving on a narrow road.
• You abruptly move the steering wheel.
• Your vehicle is unusually positioned within your
lane (e.g., at a slight diagonal to the lane direction).
Main MenuTable of Contents
Page 432 of 561
Continued431
uuWhen DrivinguAdaptive Cruise Control (ACC)*
Driving
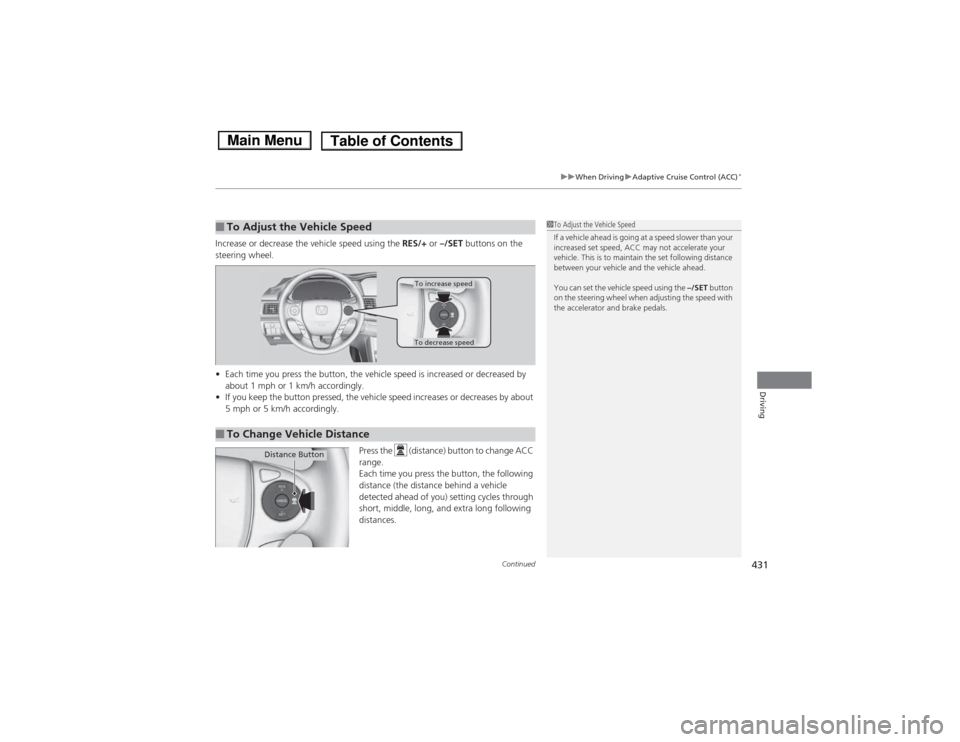
Increase or decrease the vehicle speed using the
RES/+ or –/SET buttons on the
steering wheel. • Each time you press the button, the vehicle speed is increased or decreased by
about 1 mph or 1 km/h accordingly.
• If you keep the button pressed, the vehicle speed increases or decreases by about
5 mph or 5 km/h accordingly.
Press the (distance) button to change ACC range.
Each time you press the button, the following
distance (the distance behind a vehicle
detected ahead of you) setting cycles through
short, middle, long, and extra long following
distances.
■To Adjust the Vehicle Speed1To Adjust the Vehicle Speed
If a vehicle ahead is going at a speed slower than your
increased set speed, ACC may not accelerate your
vehicle. This is to maintain the set following distance
between your vehicle and the vehicle ahead.
You can set the vehicle speed using the –/SET button
on the steering wheel when adjusting the speed with
the accelerator and brake pedals.
■To Change Vehicle Distance
To increase speed
To decrease speed
Distance Button
Main MenuTable of Contents
Page 434 of 561
Continued433
uuWhen DrivinguAdaptive Cruise Control (ACC)*
Driving
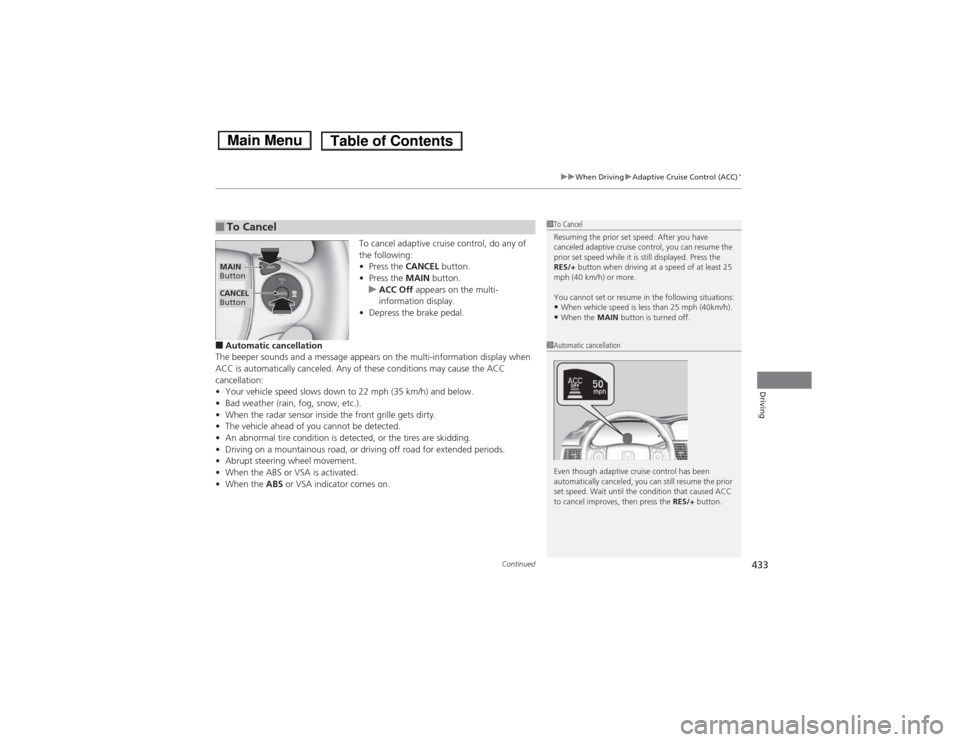
To cancel adaptive cruise control, do any of
the following: •
Press the CANCEL button.
• Press the MAIN button.
uACC Off appears on the multi-
information display.
• Depress the brake pedal.
■ Automatic cancellation
The beeper sounds and a message appears on the multi-information display when
ACC is automatically canceled. Any of these conditions may cause the ACC
cancellation:• Your vehicle speed slows down to 22 mph (35 km/h) and below.
• Bad weather (rain, fog, snow, etc.).
• When the radar sensor inside the front grille gets dirty.
• The vehicle ahead of you cannot be detected.
• An abnormal tire condition is detected, or the tires are skidding.
• Driving on a mountaino us road, or driving off road for extended periods.
• Abrupt steering wheel movement.
• When the ABS or VSA is activated.
• When the ABS or VSA indicator comes on.
■To Cancel1To Cancel
Resuming the prior set speed: After you have
canceled adaptive cruise control, you can resume the
prior set speed while it is still displayed. Press the
RES/+ button when driving at a speed of at least 25
mph (40 km/h) or more.
You cannot set or resume in the following situations: • When vehicle speed is less than 25 mph (40km/h).
• When the MAIN button is turned off.
CANCEL
Button
MAIN
Button
1Automatic cancellation
Even though adaptive cruise control has been
automatically canceled, you can still resume the prior
set speed. Wait until the condition that caused ACC
to cancel improves, then press the RES/+ button.
Main MenuTable of Contents
Page 448 of 561
447
uuWhen DrivinguTire Pressure Monitoring System (TPMS)
Continued
Driving
Tire Pressure Monitoring System (TPMS)
Instead of directly measuring the pressure in each tire, the TPMS on this vehicle
monitors and compares the rolling radius and rotational characteristics of each
wheel and tire while you are driving to determine if one or more tires are
significantly under-inflated. This will cause the low tire pressure/TPMS indicator to
come on and a message to appear on the multi-information display.
You must start TPMS calibration every time you: •Adjust the pressure in one or more tires.
• Rotate the tires.
• Replace one or more tires.
Before calibrating the TPMS:• Set the cold tire pressure in all four tires.
2 Checking Tires P. 493
Make sure:• The vehicle is at a complete stop.
• The shift lever is in
(P .
• The power mode is in ON.
■TPMS Calibration
1Tire Pressure Monitoring System (TPMS)
The system does not monitor the tires when driving at low speed.
Conditions such as low ambient temperature and
altitude change directly affect tire pressure and can
trigger the low tire pressure/TPMS indicator to come on.
Tire pressure checked and inflated in: •Warm weather can become under-inflated in
colder weather.
• Cold weather can become over-inflated in warmer weather.
The low tire pressure indicator will not come on as a
result of over inflation.
The TPMS may not function properly if tire type and
size are mixed. Make sure to use the same size and
type of tire. 2 Checking and Maintaining Tires P. 493
The low tire pressure/TPMS indicator may come on
with a delay or may not come on at all when:
• You rapidly accelerate, decelerate, or turn the
steering wheel.
• You drive on snowy or slippery roads.
• Snow chains are used.
The low tire pressure/TPMS indicator may come on
under the following conditions:• There is a heavier and uneven load on the tires than
the condition at calibration.
• Snow chains are used.
Main MenuTable of Contents
Page 454 of 561
453
uuBrakinguBrake System
Driving
Your vehicle is equipped with disc brakes at all four wheels. The brake assist system
increases the stopping force when you depress the brake pedal hard in an
emergency situation. The anti-lock brake system (ABS) helps you retain steering
control when braking very hard.2 Brake Assist System P. 455
2 Anti-lock Brake System (ABS) P. 454
■Foot Brake1Foot Brake
Check the brakes after driving through deep water,
or if there is a buildup of road surface water. If
necessary, dry the brakes by lightly depressing the
pedal several times.
If you hear a continuous metallic friction sound when
applying the brakes, the brake pads need to be
replaced. Have your vehicle checked by a dealer.
Constantly using the brake pedal while going down a
long hill builds up heat, which reduces the brake
effectiveness. Apply regenerative braking by taking
your foot off the accelerator pedal and shifting to .
Do not rest your foot on the brake pedal while
driving, as it will lightly apply the brakes and cause
them to lose effectiveness over time and reduce pad
life. It will also confuse drivers behind you.
When you depress the brake pedal, you may hear a
motor sound coming from the engine compartment
while the brake system activates. This is normal.
B
Main MenuTable of Contents
Page 455 of 561
454
uuBrakinguAnti-lock Brake System (ABS)
Driving
Anti-lock Brake System (ABS)
Helps prevent the wheels from locking up, and helps you retain steering control by
pumping the brakes rapidly, much faster than you.
The electronic brake distribution (EBD) system, which is part of the ABS, also
balances the front-to-rear braking distribution according to vehicle loading.
You should never pump the brake pedal. Let the ABS work for you by always
keeping firm, steady pressure on the brake pedal. This is sometimes referred to as “stomp and steer.” ■ABS operation
The brake pedal may pulsate slightly when the ABS is working. Keep holding the
pedal firmly down. On dry pavement, you will need to press on the brake pedal very
hard before the ABS activates. However, you may feel the ABS activate immediately
if you are trying to stop on snow or ice.
When the vehicle speed goes under 6 mph (10 km/h), the ABS stops.
■ABS1Anti-lock Brake System (ABS)
NOTICEThe ABS may not function correctly if you use an
incorrect tire type and size.
When the ABS indicator comes on while driving,
there may be a problem with the system.
While normal braking is not affected, there is a
possibility of the ABS not operating. Have your
vehicle checked by a dealer immediately.
The ABS does not reduce the time or distance it takes
to stop the vehicle. It only helps with steering control
during hard braking.
In the following cases, your vehicle may need more
stopping distance than a vehicle without the ABS: • When driving on rough road surfaces, including
when driving on uneven surfaces, such as gravel or
snow.
• When snow chains are installed.
You may hear a motor sound coming from the
engine compartment while system checks are being
performed immediately after turning the power
system on or while driving. This is normal.
Main MenuTable of Contents
Page 458 of 561
457
Driving
Multi-View Rear Camera
About Your Multi-View Rear Camera
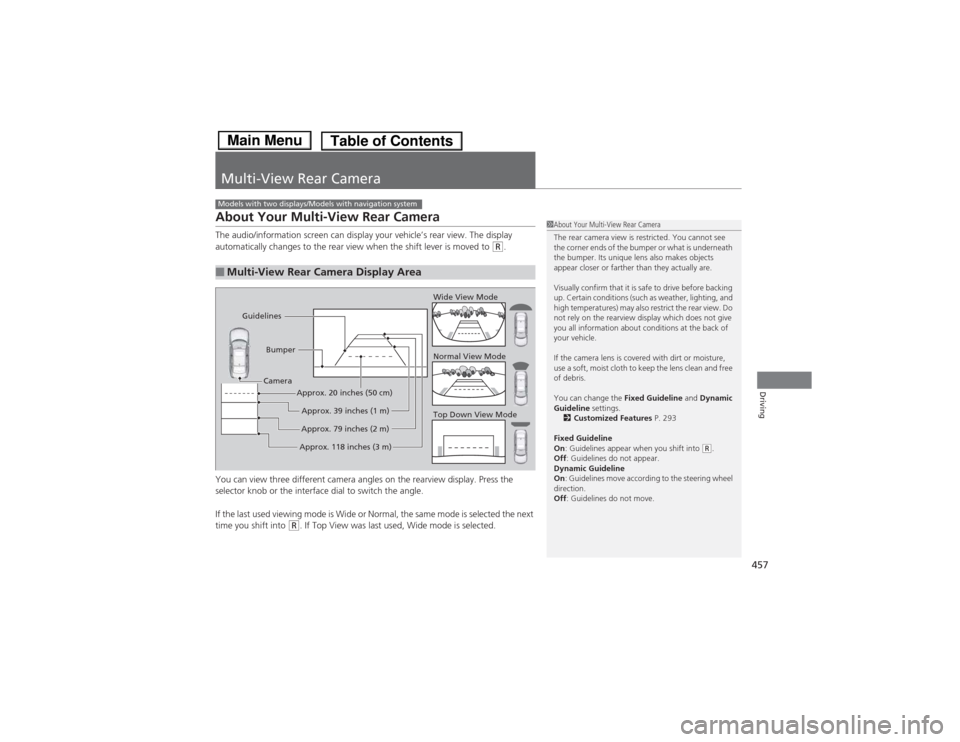
The audio/information screen can display your vehicle’s rear view. The display
automatically changes to the rear view when the shift lever is moved to
(R.
You can view three different camera angles on the rearview display. Press the
selector knob or the interface dial to switch the angle.
If the last used viewing mode is Wide or Normal, the same mode is selected the next
time you shift into
(R . If Top View was last used, Wide mode is selected.
■Multi-View Rear Camera Display Area
Models with two displays/Models with navigation system
1About Your Multi-View Rear Camera
The rear camera view is restricted. You cannot see
the corner ends of the bumper or what is underneath
the bumper. Its unique lens also makes objects
appear closer or farther than they actually are.
Visually confirm that it is safe to drive before backing
up. Certain conditions (such as weather, lighting, and
high temperatures) may also restrict the rear view. Do
not rely on the rearview display which does not give
you all information about conditions at the back of your vehicle.
If the camera lens is covered with dirt or moisture,
use a soft, moist cloth to keep the lens clean and free
of debris.
You can change the Fixed Guideline and Dynamic
Guideline settings.
2 Customized Features P. 293
Fixed Guideline On : Guidelines appear when you shift into
(R.
Off : Guidelines do not appear.
Dynamic Guideline On : Guidelines move according to the steering wheel
direction. Off : Guidelines do not move.
Top Down View Mode
Normal View Mode
Wide View Mode
Guidelines
Bumper
Camera
Approx. 118 inches (3 m)Approx. 79 inches (2 m)Approx. 39 inches (1 m)
Approx. 20 inches (50 cm)
Main MenuTable of Contents
Page 459 of 561
458
Driving
Rearview Camera
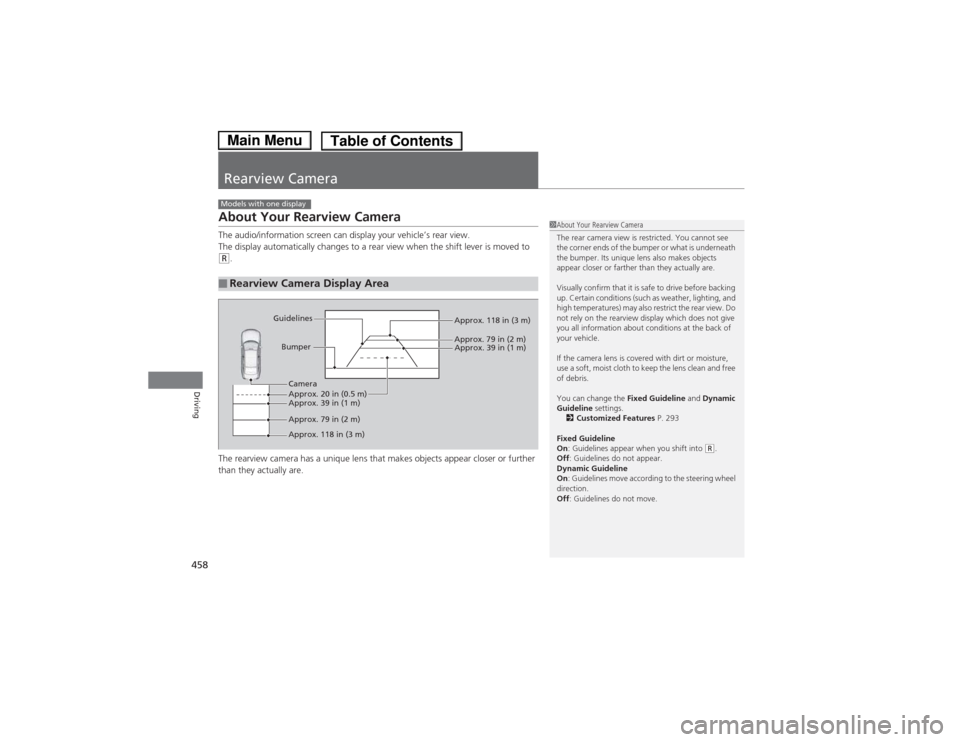
About Your Rearview Camera
The audio/information screen can display your vehicle’s rear view.
The display automatically changes to a rear view when the shift lever is moved to
(R.
The rearview camera has a unique lens that makes objects appear closer or further
than they actually are.
■Rearview Camera Display Area
Models with one display
1About Your Rearview Camera
The rear camera view is restricted. You cannot see
the corner ends of the bumper or what is underneath
the bumper. Its unique lens also makes objects
appear closer or farther than they actually are.
Visually confirm that it is safe to drive before backing
up. Certain conditions (such as weather, lighting, and
high temperatures) may also restrict the rear view. Do
not rely on the rearview display which does not give
you all information about conditions at the back of your vehicle.
If the camera lens is covered with dirt or moisture,
use a soft, moist cloth to keep the lens clean and free
of debris.
You can change the Fixed Guideline and Dynamic
Guideline settings.
2 Customized Features P. 293
Fixed Guideline On : Guidelines appear when you shift into
(R.
Off : Guidelines do not appear.
Dynamic Guideline On : Guidelines move according to the steering wheel
direction. Off : Guidelines do not move.
Bumper
Guidelines
Approx. 118 in (3 m)
Approx. 79 in (2 m) Approx. 39 in (1 m)
Approx. 20 in (0.5 m)
Approx. 118 in (3 m)
Approx. 79 in (2 m)
Approx. 39 in (1 m) Camera
Main MenuTable of Contents
Page 470 of 561
469
uuMaintenance MinderTMuTo Use Maintenance Minder TM
Continued
Maintenance
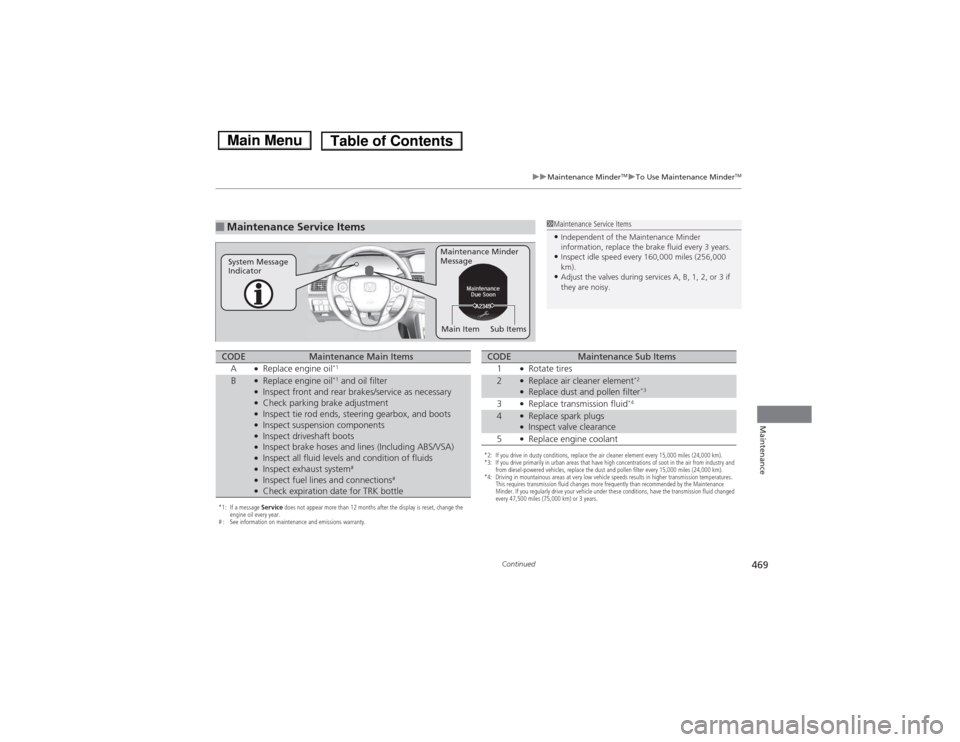
■Maintenance Service Items1Maintenance Service Items •
Independent of the Maintenance Minder
information, replace the brake fluid every 3 years.
• Inspect idle speed every 160,000 miles (256,000
km).
• Adjust the valves during services A, B, 1, 2, or 3 if
they are noisy.
Maintenance Minder
Message
System Message
Indicator
Sub Items
Main Item
*1: If a message Service does not appear more than 12 months after the display is reset, change the
engine oil every year.
# : See information on maintenance and emissions warranty.
CODEMaintenance Main Items
A ●
Replace engine oil *1
B●
Replace engine oil *1
and oil filter
● Inspect front and rear brakes/service as necessary
● Check parking brake adjustment
● Inspect tie rod ends, steering gearbox, and boots
● Inspect suspension components
● Inspect driveshaft boots
● Inspect brake hoses and lines (Including ABS/VSA)
● Inspect all fluid levels and condition of fluids
● Inspect exhaust system #
● Inspect fuel lines and connections #
● Check expiration date for TRK bottle
*2: If you drive in dusty conditions, replace the air cleaner element every 15,000 miles (24,000 km).
*3: If you drive primarily in urban areas that have high concentrations of soot in the air from industry and
from diesel-powered vehicles, replace the dust and pollen filter every 15,000 miles (24,000 km).
*4: Driving in mountainous areas at very low vehicle speeds results in higher transmission temperatures.
This requires transmission fluid changes more frequently than recommended by the Maintenance
Minder. If you regularly drive your vehicle under these conditions, have the transmission fluid changed
every 47,500 miles (75,000 km) or 3 years.
CODEMaintenance Sub Items
1 ●
Rotate tires
2●
Replace air cleaner element *2
● Replace dust and pollen filter *3
3 ●
Replace transmission fluid *4
4●
Replace spark plugs
● Inspect valve clearance
5 ●
Replace engine coolant
Main MenuTable of Contents