steering wheel HONDA ACCORD HYBRID 2014 9.G Service Manual
[x] Cancel search | Manufacturer: HONDA, Model Year: 2014, Model line: ACCORD HYBRID, Model: HONDA ACCORD HYBRID 2014 9.GPages: 561, PDF Size: 20.3 MB
Page 434 of 561
Continued433
uuWhen DrivinguAdaptive Cruise Control (ACC)*
Driving
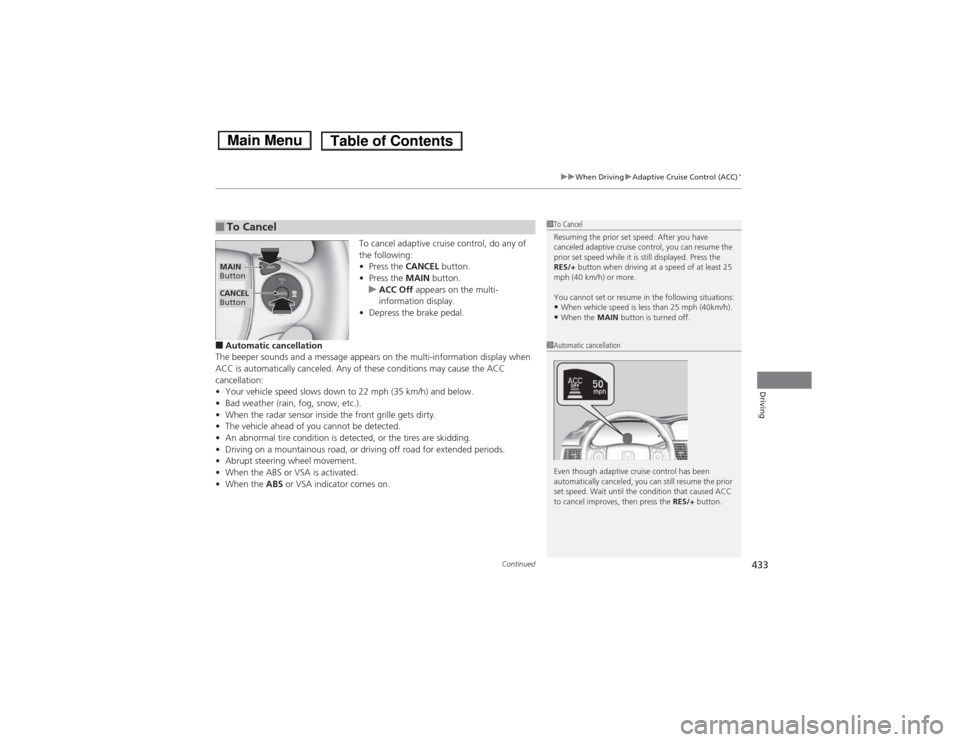
To cancel adaptive cruise control, do any of
the following: •
Press the CANCEL button.
• Press the MAIN button.
uACC Off appears on the multi-
information display.
• Depress the brake pedal.
■ Automatic cancellation
The beeper sounds and a message appears on the multi-information display when
ACC is automatically canceled. Any of these conditions may cause the ACC
cancellation:• Your vehicle speed slows down to 22 mph (35 km/h) and below.
• Bad weather (rain, fog, snow, etc.).
• When the radar sensor inside the front grille gets dirty.
• The vehicle ahead of you cannot be detected.
• An abnormal tire condition is detected, or the tires are skidding.
• Driving on a mountaino us road, or driving off road for extended periods.
• Abrupt steering wheel movement.
• When the ABS or VSA is activated.
• When the ABS or VSA indicator comes on.
■To Cancel1To Cancel
Resuming the prior set speed: After you have
canceled adaptive cruise control, you can resume the
prior set speed while it is still displayed. Press the
RES/+ button when driving at a speed of at least 25
mph (40 km/h) or more.
You cannot set or resume in the following situations: • When vehicle speed is less than 25 mph (40km/h).
• When the MAIN button is turned off.
CANCEL
Button
MAIN
Button
1Automatic cancellation
Even though adaptive cruise control has been
automatically canceled, you can still resume the prior
set speed. Wait until the condition that caused ACC
to cancel improves, then press the RES/+ button.
Main MenuTable of Contents
Page 448 of 561
447
uuWhen DrivinguTire Pressure Monitoring System (TPMS)
Continued
Driving
Tire Pressure Monitoring System (TPMS)
Instead of directly measuring the pressure in each tire, the TPMS on this vehicle
monitors and compares the rolling radius and rotational characteristics of each
wheel and tire while you are driving to determine if one or more tires are
significantly under-inflated. This will cause the low tire pressure/TPMS indicator to
come on and a message to appear on the multi-information display.
You must start TPMS calibration every time you: •Adjust the pressure in one or more tires.
• Rotate the tires.
• Replace one or more tires.
Before calibrating the TPMS:• Set the cold tire pressure in all four tires.
2 Checking Tires P. 493
Make sure:• The vehicle is at a complete stop.
• The shift lever is in
(P .
• The power mode is in ON.
■TPMS Calibration
1Tire Pressure Monitoring System (TPMS)
The system does not monitor the tires when driving at low speed.
Conditions such as low ambient temperature and
altitude change directly affect tire pressure and can
trigger the low tire pressure/TPMS indicator to come on.
Tire pressure checked and inflated in: •Warm weather can become under-inflated in
colder weather.
• Cold weather can become over-inflated in warmer weather.
The low tire pressure indicator will not come on as a
result of over inflation.
The TPMS may not function properly if tire type and
size are mixed. Make sure to use the same size and
type of tire. 2 Checking and Maintaining Tires P. 493
The low tire pressure/TPMS indicator may come on
with a delay or may not come on at all when:
• You rapidly accelerate, decelerate, or turn the
steering wheel.
• You drive on snowy or slippery roads.
• Snow chains are used.
The low tire pressure/TPMS indicator may come on
under the following conditions:• There is a heavier and uneven load on the tires than
the condition at calibration.
• Snow chains are used.
Main MenuTable of Contents
Page 454 of 561
453
uuBrakinguBrake System
Driving
Your vehicle is equipped with disc brakes at all four wheels. The brake assist system
increases the stopping force when you depress the brake pedal hard in an
emergency situation. The anti-lock brake system (ABS) helps you retain steering
control when braking very hard.2 Brake Assist System P. 455
2 Anti-lock Brake System (ABS) P. 454
■Foot Brake1Foot Brake
Check the brakes after driving through deep water,
or if there is a buildup of road surface water. If
necessary, dry the brakes by lightly depressing the
pedal several times.
If you hear a continuous metallic friction sound when
applying the brakes, the brake pads need to be
replaced. Have your vehicle checked by a dealer.
Constantly using the brake pedal while going down a
long hill builds up heat, which reduces the brake
effectiveness. Apply regenerative braking by taking
your foot off the accelerator pedal and shifting to .
Do not rest your foot on the brake pedal while
driving, as it will lightly apply the brakes and cause
them to lose effectiveness over time and reduce pad
life. It will also confuse drivers behind you.
When you depress the brake pedal, you may hear a
motor sound coming from the engine compartment
while the brake system activates. This is normal.
B
Main MenuTable of Contents
Page 455 of 561
454
uuBrakinguAnti-lock Brake System (ABS)
Driving
Anti-lock Brake System (ABS)
Helps prevent the wheels from locking up, and helps you retain steering control by
pumping the brakes rapidly, much faster than you.
The electronic brake distribution (EBD) system, which is part of the ABS, also
balances the front-to-rear braking distribution according to vehicle loading.
You should never pump the brake pedal. Let the ABS work for you by always
keeping firm, steady pressure on the brake pedal. This is sometimes referred to as “stomp and steer.” ■ABS operation
The brake pedal may pulsate slightly when the ABS is working. Keep holding the
pedal firmly down. On dry pavement, you will need to press on the brake pedal very
hard before the ABS activates. However, you may feel the ABS activate immediately
if you are trying to stop on snow or ice.
When the vehicle speed goes under 6 mph (10 km/h), the ABS stops.
■ABS1Anti-lock Brake System (ABS)
NOTICEThe ABS may not function correctly if you use an
incorrect tire type and size.
When the ABS indicator comes on while driving,
there may be a problem with the system.
While normal braking is not affected, there is a
possibility of the ABS not operating. Have your
vehicle checked by a dealer immediately.
The ABS does not reduce the time or distance it takes
to stop the vehicle. It only helps with steering control
during hard braking.
In the following cases, your vehicle may need more
stopping distance than a vehicle without the ABS: • When driving on rough road surfaces, including
when driving on uneven surfaces, such as gravel or
snow.
• When snow chains are installed.
You may hear a motor sound coming from the
engine compartment while system checks are being
performed immediately after turning the power
system on or while driving. This is normal.
Main MenuTable of Contents
Page 458 of 561
457
Driving
Multi-View Rear Camera
About Your Multi-View Rear Camera
The audio/information screen can display your vehicle’s rear view. The display
automatically changes to the rear view when the shift lever is moved to
(R.
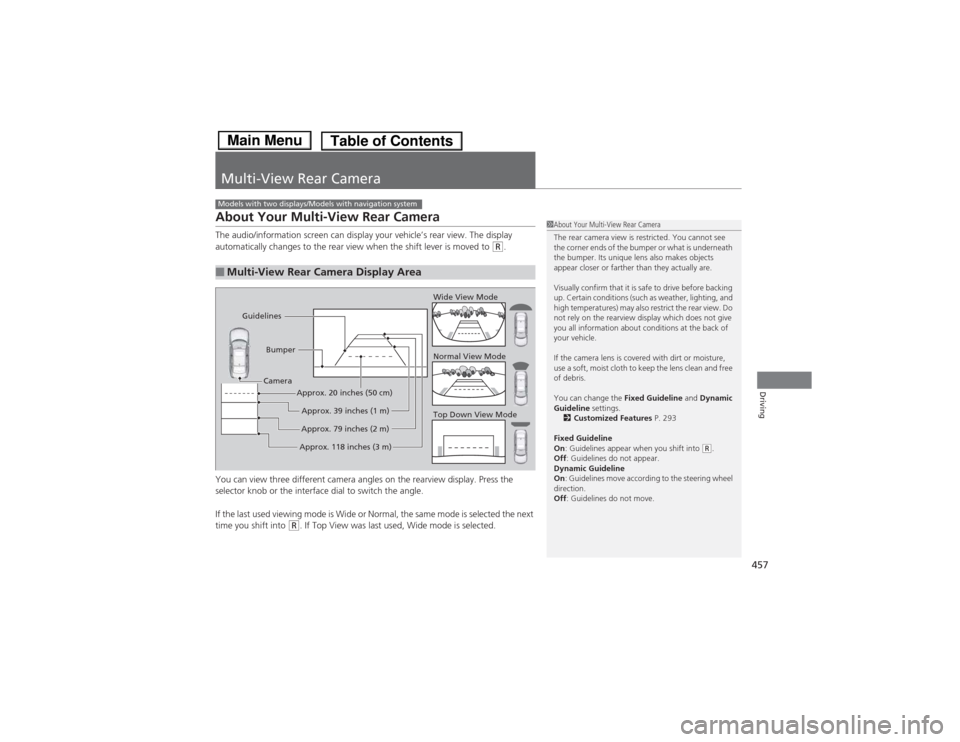
You can view three different camera angles on the rearview display. Press the
selector knob or the interface dial to switch the angle.
If the last used viewing mode is Wide or Normal, the same mode is selected the next
time you shift into
(R . If Top View was last used, Wide mode is selected.
■Multi-View Rear Camera Display Area
Models with two displays/Models with navigation system
1About Your Multi-View Rear Camera
The rear camera view is restricted. You cannot see
the corner ends of the bumper or what is underneath
the bumper. Its unique lens also makes objects
appear closer or farther than they actually are.
Visually confirm that it is safe to drive before backing
up. Certain conditions (such as weather, lighting, and
high temperatures) may also restrict the rear view. Do
not rely on the rearview display which does not give
you all information about conditions at the back of your vehicle.
If the camera lens is covered with dirt or moisture,
use a soft, moist cloth to keep the lens clean and free
of debris.
You can change the Fixed Guideline and Dynamic
Guideline settings.
2 Customized Features P. 293
Fixed Guideline On : Guidelines appear when you shift into
(R.
Off : Guidelines do not appear.
Dynamic Guideline On : Guidelines move according to the steering wheel
direction. Off : Guidelines do not move.
Top Down View Mode
Normal View Mode
Wide View Mode
Guidelines
Bumper
Camera
Approx. 118 inches (3 m)Approx. 79 inches (2 m)Approx. 39 inches (1 m)
Approx. 20 inches (50 cm)
Main MenuTable of Contents
Page 459 of 561
458
Driving
Rearview Camera
About Your Rearview Camera
The audio/information screen can display your vehicle’s rear view.
The display automatically changes to a rear view when the shift lever is moved to
(R.
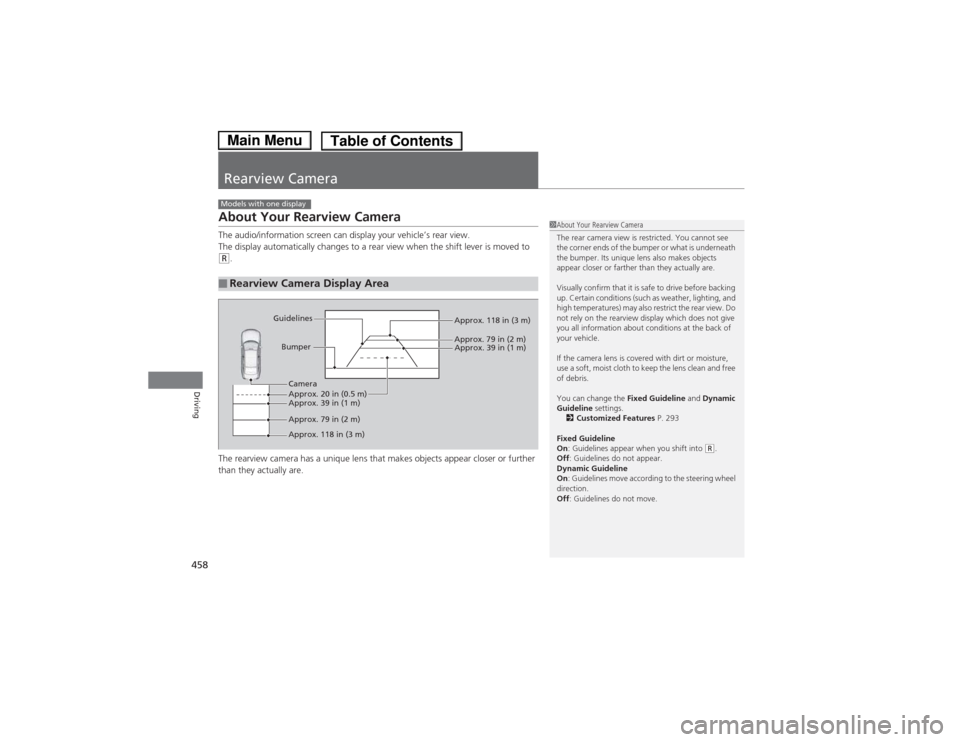
The rearview camera has a unique lens that makes objects appear closer or further
than they actually are.
■Rearview Camera Display Area
Models with one display
1About Your Rearview Camera
The rear camera view is restricted. You cannot see
the corner ends of the bumper or what is underneath
the bumper. Its unique lens also makes objects
appear closer or farther than they actually are.
Visually confirm that it is safe to drive before backing
up. Certain conditions (such as weather, lighting, and
high temperatures) may also restrict the rear view. Do
not rely on the rearview display which does not give
you all information about conditions at the back of your vehicle.
If the camera lens is covered with dirt or moisture,
use a soft, moist cloth to keep the lens clean and free
of debris.
You can change the Fixed Guideline and Dynamic
Guideline settings.
2 Customized Features P. 293
Fixed Guideline On : Guidelines appear when you shift into
(R.
Off : Guidelines do not appear.
Dynamic Guideline On : Guidelines move according to the steering wheel
direction. Off : Guidelines do not move.
Bumper
Guidelines
Approx. 118 in (3 m)
Approx. 79 in (2 m) Approx. 39 in (1 m)
Approx. 20 in (0.5 m)
Approx. 118 in (3 m)
Approx. 79 in (2 m)
Approx. 39 in (1 m) Camera
Main MenuTable of Contents
Page 487 of 561
uuReplacing Light BulbsuHeadlight Bulbs
486
Maintenance
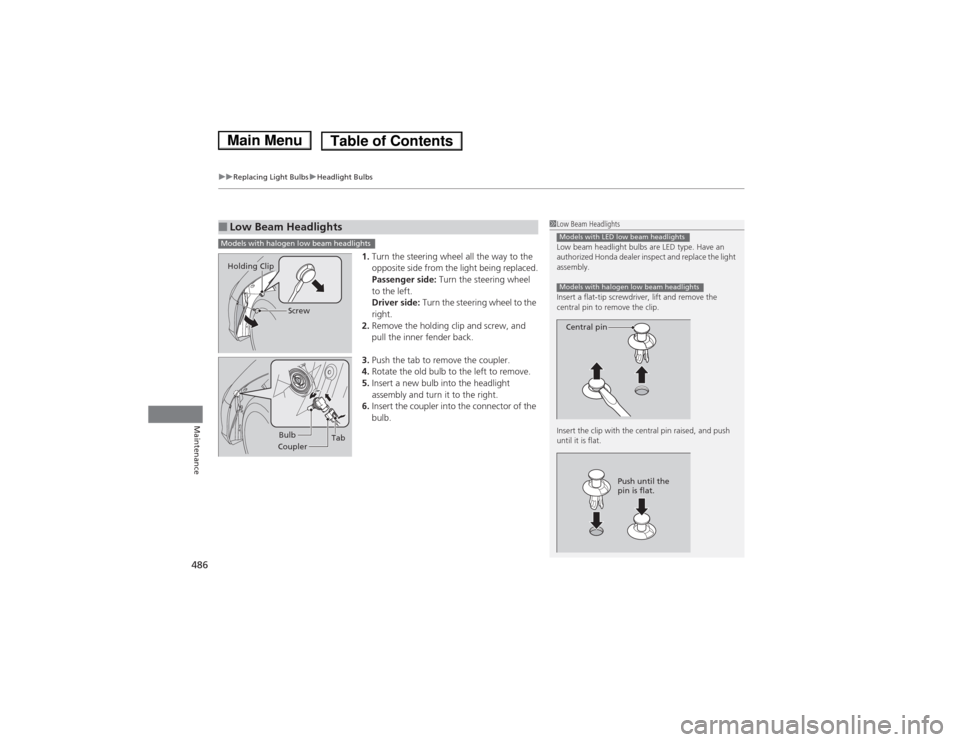
1. Turn the steering wheel all the way to the
opposite side from the light being replaced.
Passenger side: Turn the steering wheel
to the left.
Driver side: Turn the steering wheel to the
right.
2. Remove the holding clip and screw, and
pull the inner fender back.
3. Push the tab to remove the coupler.
4. Rotate the old bulb to the left to remove.
5. Insert a new bulb into the headlight
assembly and turn it to the right.
6. Insert the coupler into the connector of the
bulb.
■Low Beam Headlights1Low Beam Headlights
Low beam headlight bulbs are LED type. Have an
authorized Honda dealer inspect and replace the light
assembly.
Insert a flat-tip screwdriver, lift and remove the
central pin to remove the clip.
Insert the clip with the central pin raised, and push until it is flat.
Models with LED low beam headlights
Models with halogen low beam headlights
Central pin
Push until the
pin is flat.
Models with halogen low beam headlights
Screw
Holding Clip
Bulb
Coupler Tab
Main MenuTable of Contents
Page 488 of 561
487
uuReplacing Light BulbsuFront Turn Signal/Side Marker Light Bulbs
Maintenance
Front Turn Signal/Side Marker Light Bulbs
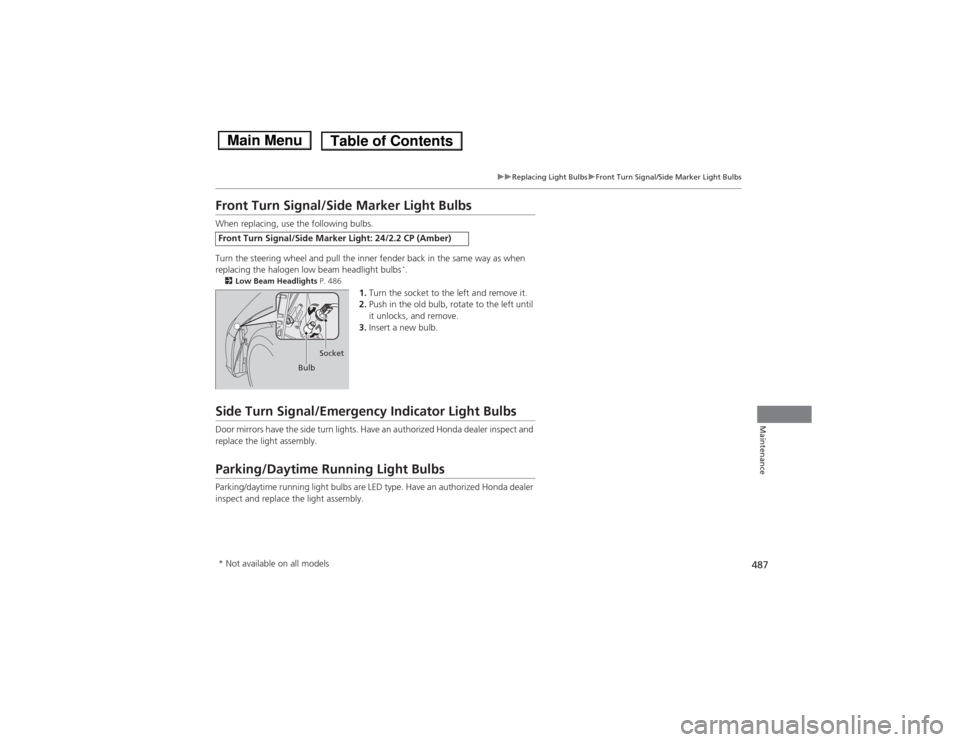
When replacing, use the following bulbs.
Turn the steering wheel and pull the inner fender back in the same way as when
replacing the halogen low beam headlight bulbs*
.
2 Low Beam Headlights P. 486
1.Turn the socket to the left and remove it.
2. Push in the old bulb, rotate to the left until
it unlocks, and remove.
3. Insert a new bulb.
Side Turn Signal/Emergency Indicator Light Bulbs
Door mirrors have the side turn lights. Have an authorized Honda dealer inspect and
replace the light assembly.
Parking/Daytime Running Light Bulbs
Parking/daytime running light bulbs are LED type. Have an authorized Honda dealer
inspect and replace the light assembly.
Front Turn Signal/Side Marker Light: 24/2.2 CP (Amber)
Bulb Socket
* Not available on all models
Main MenuTable of Contents
Page 502 of 561
501
uuChecking and Maintaining TiresuWinter Tires
Maintenance
Winter Tires
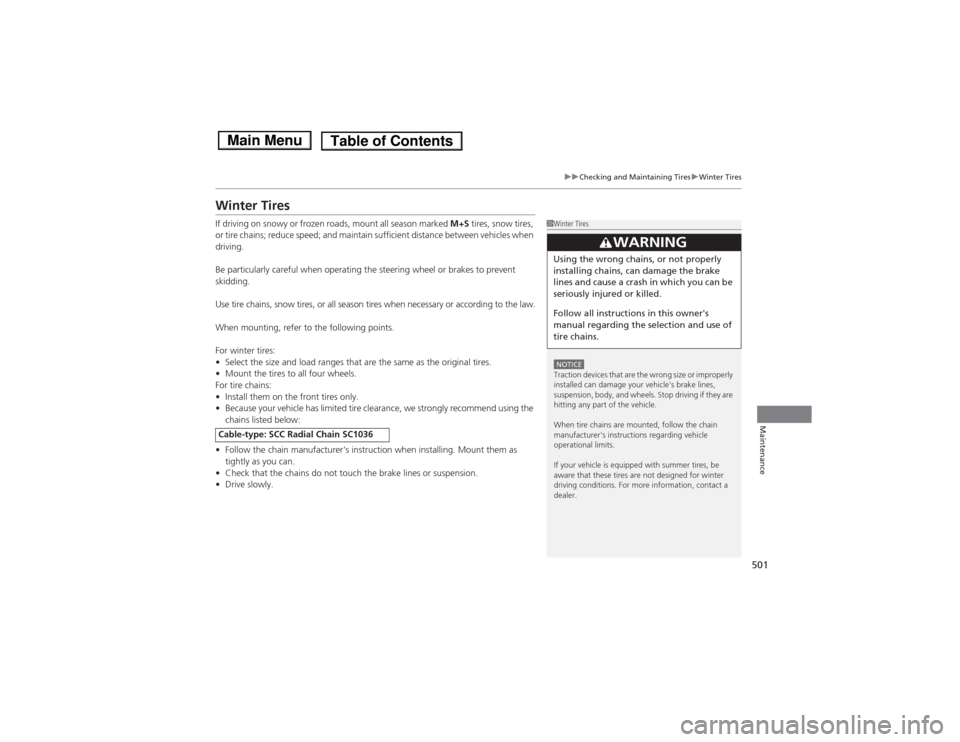
If driving on snowy or frozen roads, mount all season marked M+S tires, snow tires,
or tire chains; reduce speed; and maintain sufficient distance between vehicles when
driving.
Be particularly careful when operating the steering wheel or brakes to prevent
skidding.
Use tire chains, snow tires, or all season tires when necessary or according to the law.
When mounting, refer to the following points.
For winter tires: • Select the size and load ranges that are the same as the original tires.
• Mount the tires to all four wheels.
For tire chains:• Install them on the front tires only.
• Because your vehicle has limited tire clearance, we strongly recommend using the
chains listed below:
• Follow the chain manufacturer's instruction when installing. Mount them as
tightly as you can.
• Check that the chains do not touch the brake lines or suspension.
• Drive slowly.
Cable-type: SCC Radial Chain SC1036
1Winter Tires
NOTICETraction devices that are the wrong size or improperly
installed can damage your vehicle's brake lines,
suspension, body, and wheels. Stop driving if they are
hitting any part of the vehicle.
When tire chains are mounted, follow the chain
manufacturer's instructions regarding vehicle
operational limits.
If your vehicle is equipped with summer tires, be
aware that these tires are not designed for winter
driving conditions. For more information, contact a dealer.
3WARNING
Using the wrong chains, or not properly
installing chains, can damage the brake
lines and cause a crash in which you can be
seriously injured or killed.
Follow all instruction s in this owner's
manual regarding the selection and use of
tire chains.
Main MenuTable of Contents
Page 511 of 561
510
Handling the Unexpected
If a Tire Goes Flat
Temporarily Repairing a Flat Tire
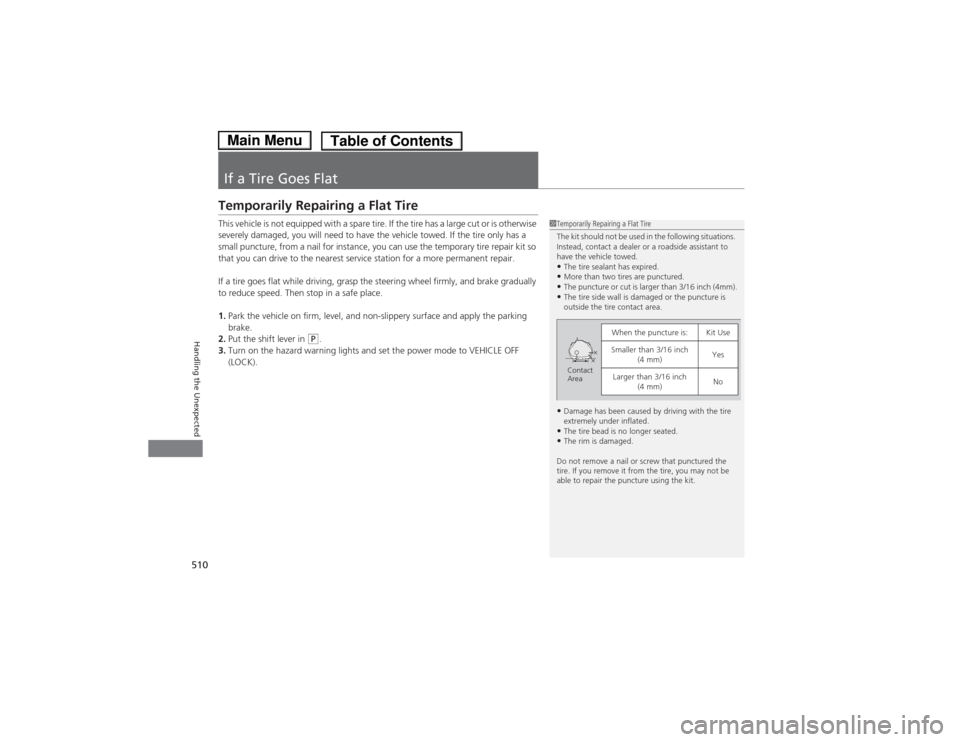
This vehicle is not equipped with a spare tire. If the tire has a large cut or is otherwise
severely damaged, you will need to have the vehicle towed. If the tire only has a
small puncture, from a nail for instance, you can use the temporary tire repair kit so
that you can drive to the nearest service station for a more permanent repair.
If a tire goes flat while driving, grasp the steering wheel firmly, and brake gradually
to reduce speed. Then stop in a safe place. 1.Park the vehicle on firm, level, and non-slippery surface and apply the parking brake.
2. Put the shift lever in
(P .
3. Turn on the hazard warning lights and set the power mode to VEHICLE OFF
(LOCK).
1Temporarily Repairing a Flat Tire
The kit should not be used in the following situations.
Instead, contact a dealer or a roadside assistant to
have the vehicle towed.•The tire sealant has expired.
• More than two tires are punctured.
• The puncture or cut is larger than 3/16 inch (4mm).
• The tire side wall is damaged or the puncture is
outside the tire contact area.
• Damage has been caused by driving with the tire
extremely under inflated.
• The tire bead is no longer seated.
• The rim is damaged.
Do not remove a nail or screw that punctured the
tire. If you remove it from the tire, you may not be
able to repair the puncture using the kit.
When the puncture is:Kit Use
Smaller than 3/16 inch (4 mm)Yes
Larger than 3/16 inch (4 mm)NoContact
Area
Main MenuTable of Contents