remove seats HONDA CIVIC 2002 7.G User Guide
[x] Cancel search | Manufacturer: HONDA, Model Year: 2002, Model line: CIVIC, Model: HONDA CIVIC 2002 7.GPages: 1139, PDF Size: 28.19 MB
Page 732 of 1139
Seats
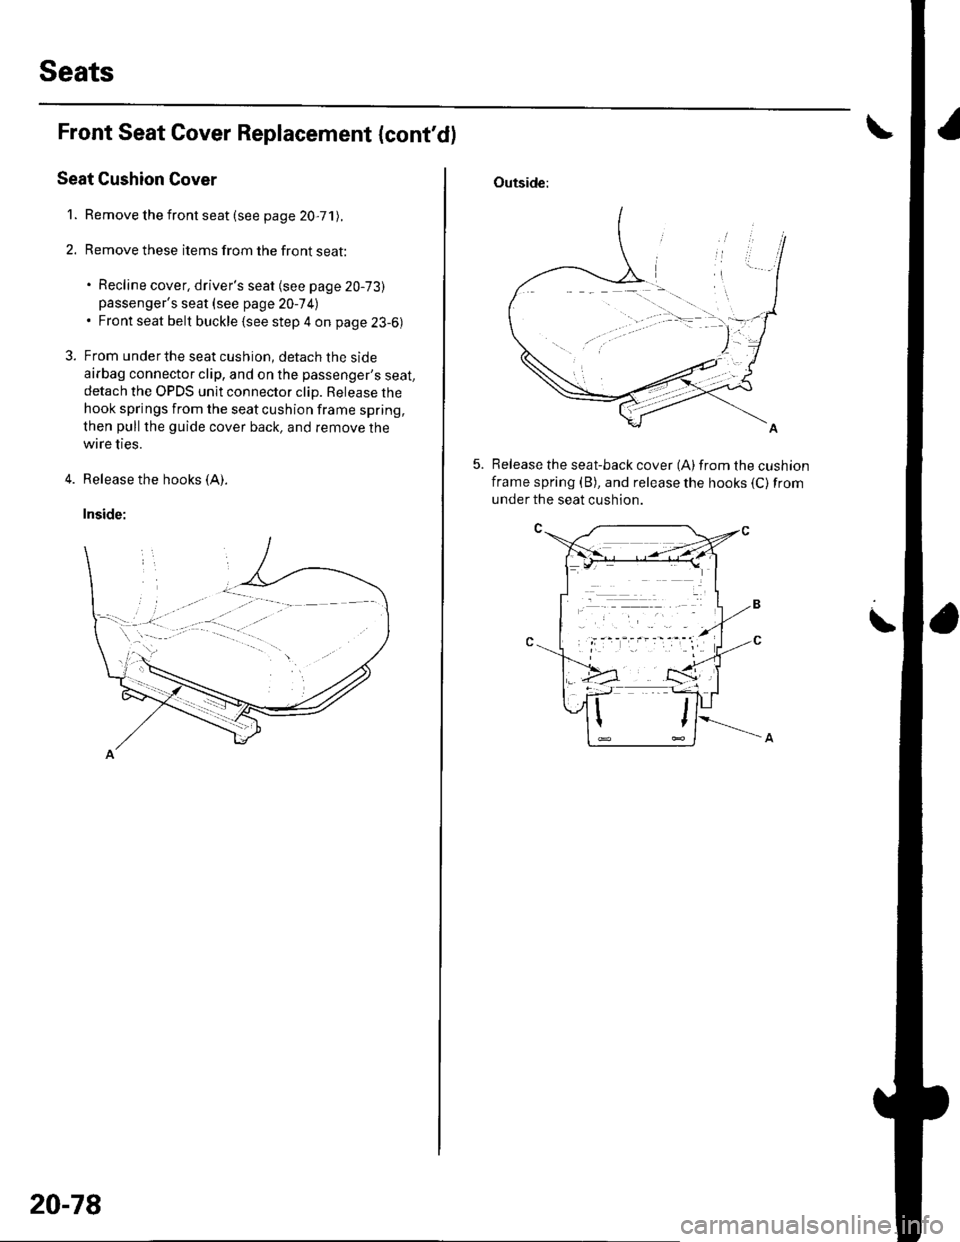
Front Seat Cover Replacement {cont'd)
Seat Cushion Cover
1. Remove the front seat (see page 20,71).
2. Remove these items from the front seat:
. Recline cover, driver's seat (see page 20-73)passenger's seat {see page 20-7 4l. Front seat belt buckle {see step 4 on page 23-6)
3. From underthe seat cushion, detach the side
airbag connector clip, and on the passenger's seat,detach the OPDS unit connector clip. Release the
hook springs from the seat cushion frame spring,
then pull the guide cover back, and remove the
wire ties.
4. Release the hooks (A).
Inside:
20-78
Outside:
Release the seat-back cover (A)from the cushion
frame spring (B), and release the hooks (C) from
under the seat cushion.
Page 734 of 1139
Seats
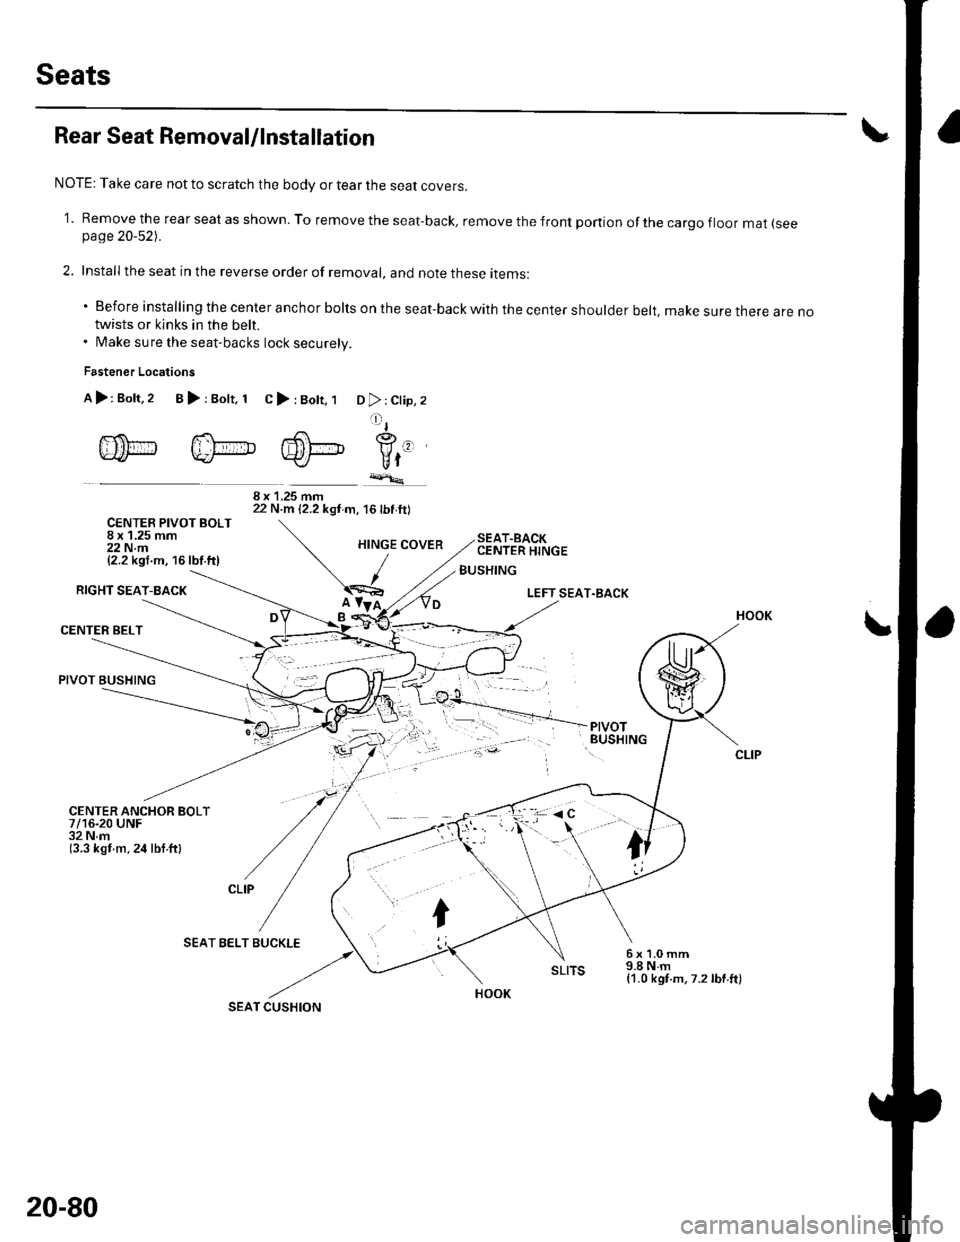
Rear Seat Removal/lnstallation
NOTE: Take care not to scratch the body or tear the seat covers.
'1. Remove the rear seat as shown. To remove the seat-back, remove the front portion of the cargo floor mar lseepage 20-52).
2. Install the seat in the reverse order of removal, and note these items:
'Beforeinstallingthecenteranchorboltsontheseat-backwiththecentershoulderbelt,makesurethereareno
twists or kinks in the belt.. Make sure the seat-backs lock securelv.
Fastener Locations
A>:Bolt,2 B>rBolt, 1 C>:Bott, 1D >: Clip, 2
lltl
agrf(1
Vt-r_r+*.
\'7
CUSHION
6x1.0mm9.8Nm{1.0 kgf.m,7.2lbf.ft)
/-<.{\.-- F.i\-- K\-|J].Pt-HAP
CENTER PIVOT BOLT8 x 1.25 mm22 N.m{2.2 kgf.m, 16lbf.ftl
RIGHT SEAT-BACK
CENTER BELT
PIVOT BUSHING
CENTER ANCHOR BOLT7/16-20 UNF32Nm(3.3 kgf m.24 lbt ftl
SEAT BELT BUCKLE
8 x 1.25 mm22 N.m 12.2 kgt m, 16lbf.ft)
SEAT.BACKCENTER HINGE
BUSHING
LEFT SEAT.BACK
PIVOTBUSHING
HOOK
20-80
SEAT
Page 736 of 1139
Seats
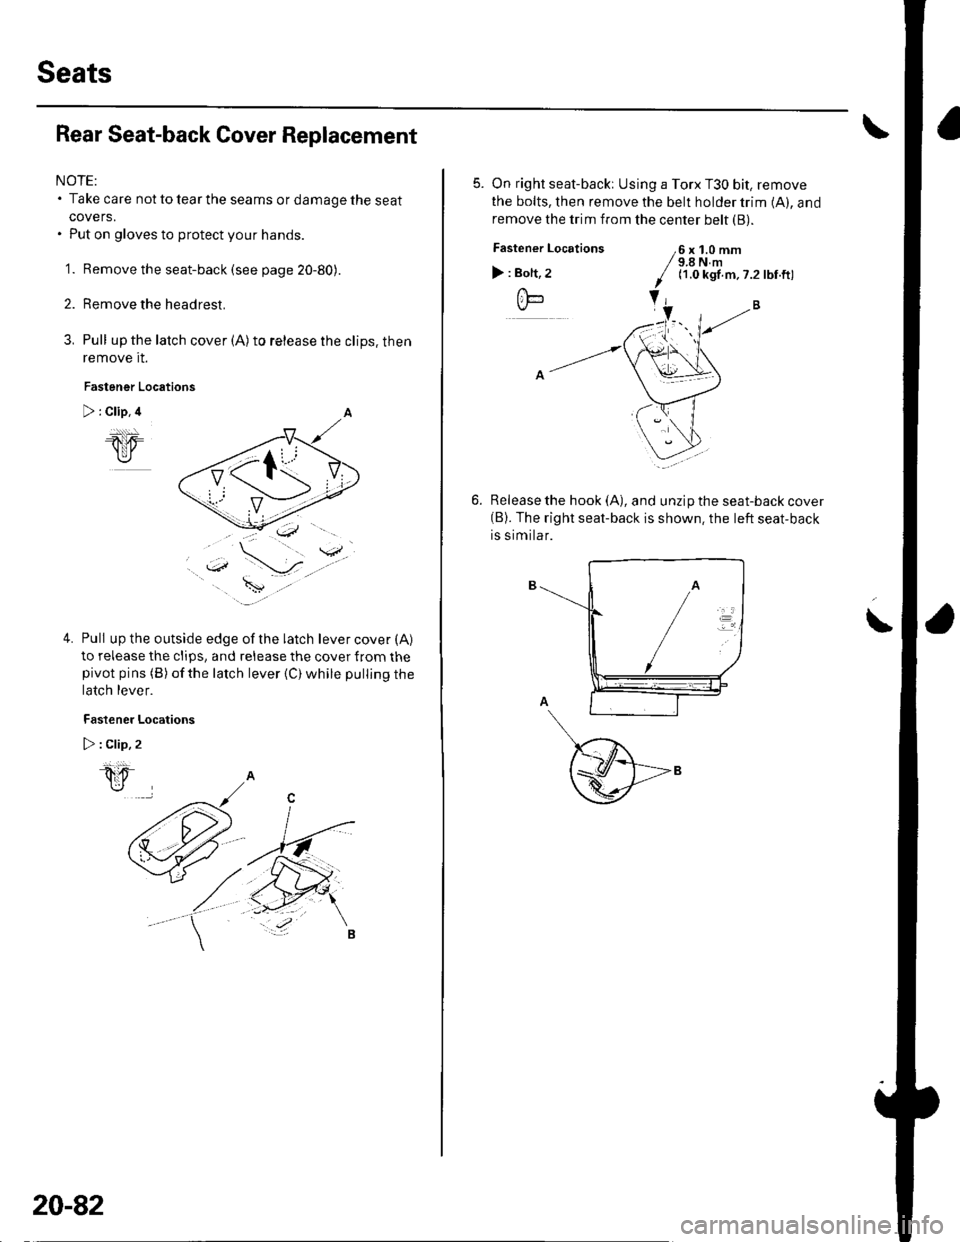
Rear Seat-back Cover Replacement
NOTE:. Take care not to tear the seams or damage the seat
covers.. Put on gloves to protect your hands.
'1. Remove the seat-back (see page 20-80).
Remove the headrest.
Pull up the latch cover (A) to telease the clips. then
remove it.
Fastener Locations
) : Clip, 4
1W
4.Pull up the outside edge of the latch lever cover (A)
to release the clips, and release the cover from thepivot pins (B) ofthe latch lever {C) while pulljng the
latch lever.
Fastener Locations
D : Clip, 2
i
*rJ
20-82
5. On right seat-backi Using a Torx T30 bit, remove
the bolts, then remove the belt holder trim (A), and
remove the trim from the center belt (B).
Fastener
) : Bolt,
A*-\./-
Locations6x1.0mm9.8Nm(1.0 kgf.m,7.2 lbf.ft)
Release the hook (A), and unzip the seat-back cover(B). The right seat-back is shown. the left seat-back
is similar.
\
Page 738 of 1139
Seats
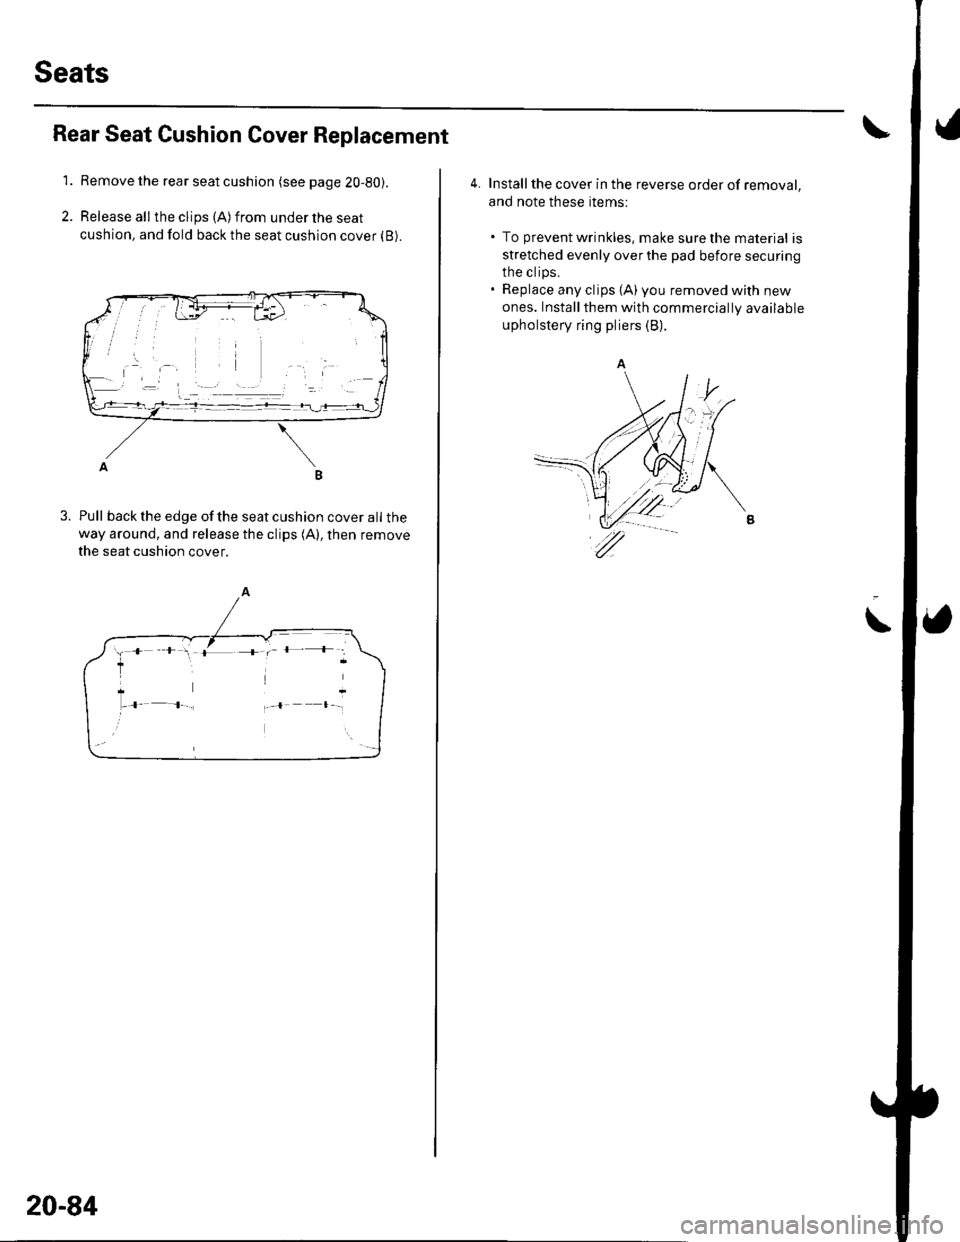
Rear Seat Cushion Cover Replacement
'1.Remove the rear seat cushion (see page 2O-80).
Release all the clips (A) from under the seat
cushion, and fold back the seat cushion cover (B).
B
Pull back the edge of the seat cushion cover all theway around, and release the clips (A), then remove
the seat cushion cover.
iw F 1., 1L +. ts+'
il1rl-,+ J ,+ l l
20-84
4. Installthe cover in the reverse order of removal,
and note these items;
. To prevent wrinkles, make sure the material is
stretched evenly over the pad before securing
the clips.. Replace any clips {A) you removed with new
ones. Install them with commercially available
upholstery ring pliers (B).
\
Page 1018 of 1139
Seat Belts
Inspection (cont'd)
RetraEtor, Rear Center
1. Before installing the retractor, check that the seat
belt can be pulled out freely.
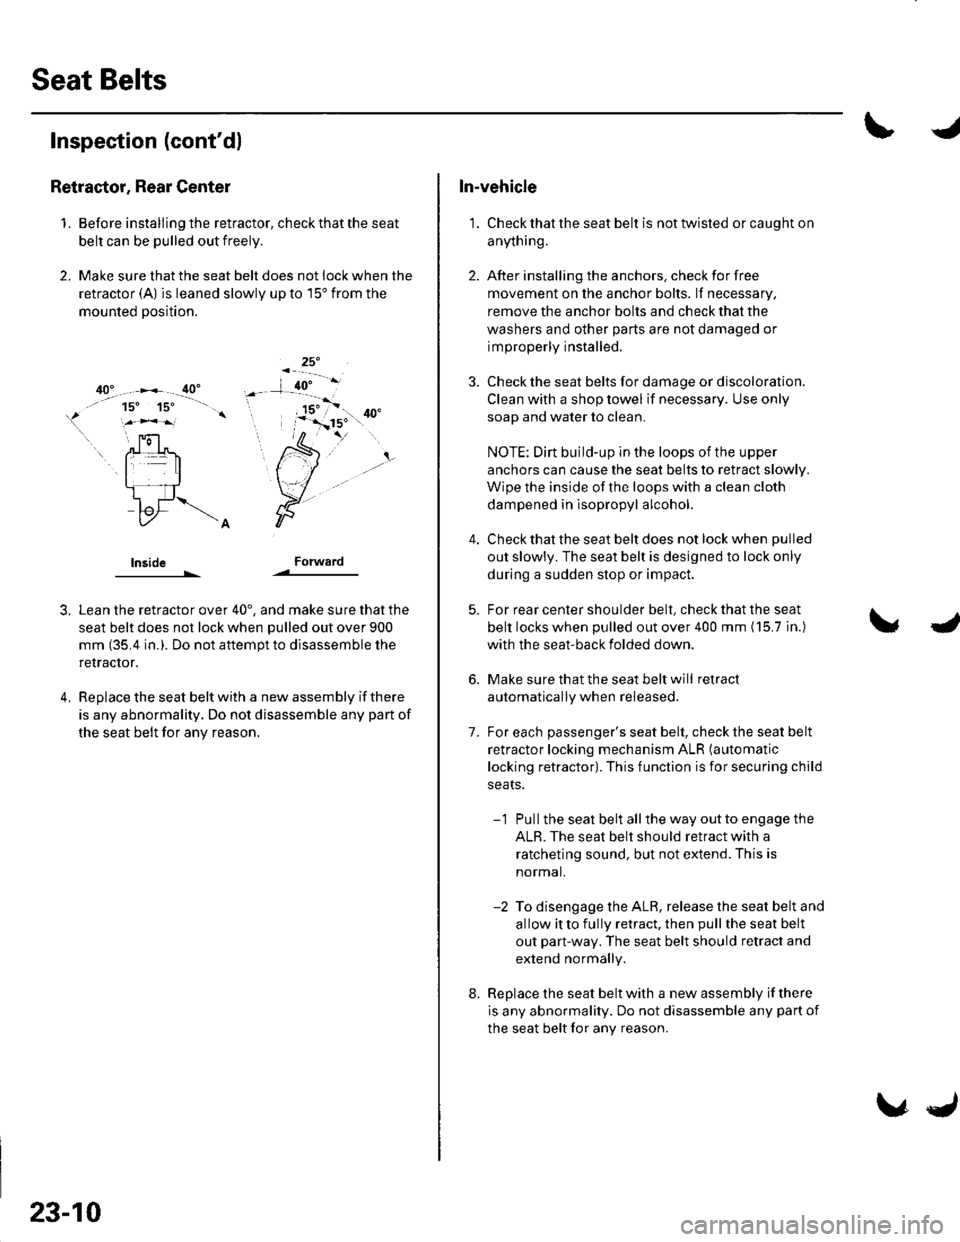
2, Make sure that the seat belt does not lock when the
retractor (A) is leaned slowly up to 15' from the
mounted position.
lnsideForward
3,
4.
Lean the retractor over 40', and make sure that the
seat belt does not lock when pulled out over 900
mm (35.4 in.). Do not aftempt to disassemble the
retractor.
Replace the seat belt with a new assembly if there
is any abnormality. Do not disassemble any part of
the seat belt for any reason.
23-10
\,J
In-vehicle
1. Check that the seat belt is not twisted or caught on
anything.
2. After installing the anchors. check for free
movement on the anchor bolts. lf necessary,
remove the anchor bolts and check that the
washers and other parts are not damaged or
improperly installed.
3. Check the seat belts for damage or discoloration.
Clean with a shop towel if necessary. Use only
soap and water to clean.
NOTE: Dirt build-up in the loops of the upper
anchors can cause the seat belts to retract slowly.
Wipe the inside of the loops with a clean cloth
dampened in lsopropyl alcohol.
Check that the seat belt does not lock when pulled
out slowly. The seat belt is designed to lock only
during a sudden stop or impact.
For rear center shoulder belt, check that the seat
belt locks when pulled out over 400 mm (15.7 in.)
with the seat-back folded down.
Make sure that the seat belt will retract
automatically when released.
For each passenger's seat belt, check the seat belt
retractor locking mechanism ALR (automatic
locking retractor). This function is for securing child
seats.
-1 Pullthe seat belt allthe way outto engage the
ALR. The seat belt should retract with a
ratcheting sound, but not extend. This is
normal.
-2 To disengage the ALR, release the seat belt and
allow itto fully retract, then pullthe seat belt
out part-way. The seat belt should retract and
extend normally.
Replace the seat belt with a new assembly if there
is any abnormality. Do not disassemble any part of
the seat belt for any reason.
7.
8.
Page 1026 of 1139

Backprobing Spring-loaded Lock Connectors
When checking voltage or resistance on this type of
connector the first time, you must remove the retainer
to insert the tester orobe from the wire side.
NOTE: lt is not necessary to reinstall the removed
retainer;the terminals will stay locked in the connector
housrno.
A
To remove the retainer (A), insert a flat-tip screwdriver
(B) between the connector body and the retainer, then
carefully pry out the retainer. Take care not to break the
connector.
Seats with Side Airbags
Seats with side airbags have a "SIDE AIRBAG" label on
the seat-back. Because the component pans (seat-back
cover, cushion, etc.) of seats with and without airbags
are different, make sure you install only the correct
replacement parts.
When cleaning, do notsaturatethe seatwith liquid,
and do not sDrav steam on the seal
Do not reoalr a torn or fraved seat-back cover.
ReDlace the seat-back cover.
After a collision in which the side airbag was
deployed, replace the side airbag with new parts. lf
the seat-back cushion is split, it must be replaced. lf
the seat-back frame is deformed, it must be replaced.
Never put aftermarket accessories on the seat {covers,
pads, seat heaters, lights, etc.).
(cont'd)
23-19
Page 1038 of 1139
ISystem Description
SRS Components
Airbags
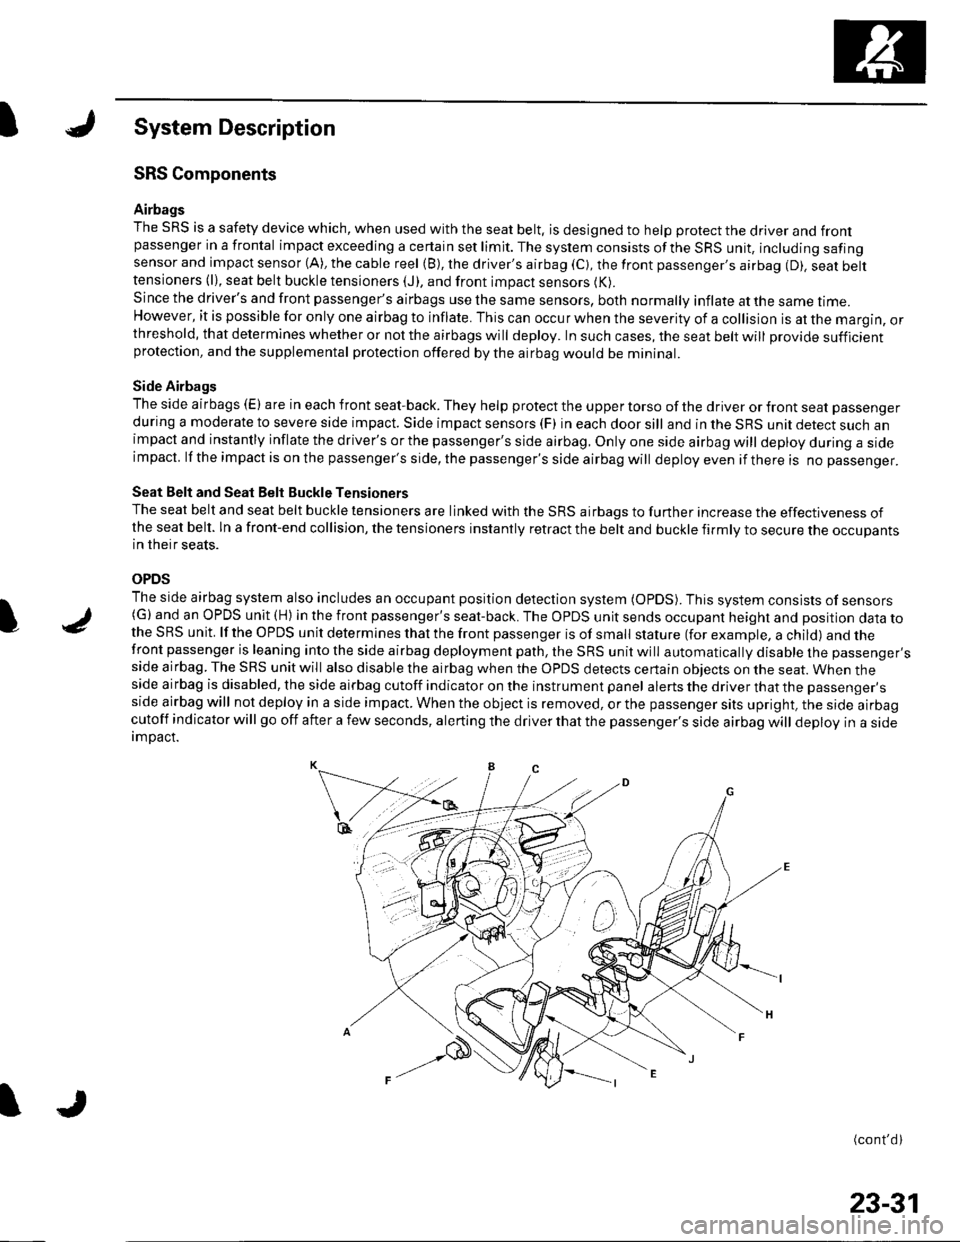
The SRS is a safety device which, when used with the seat belt, is designed to help protect the driver and frontpassenger in a frontal impact exceeding a certain set limit. The system consists ofthe SRS unit, including safingsensor and impact sensor (A), the cable reel (B), the driver's airbag (C), the front passenger,s airbag (D). seat belttensioners (l), seat belt buckle tensioners (J), and front impact sensors (K).
Since the driver's and front passenger's airbags use the same sensors, both normally inflate at the same ttme.However, it is possible for only one airbag to inflate. This can occur when the severity of a collision is at the margin, orthreshold, that determines whether or not the airbags will deploy. In such cases, the seat belt will provide sufficientprotection, and the supplemental protection offered by the airbag would be mininal.
Side Airbags
The side airbags (E) are in each front seat-back. They help protect the upper torso of the driver or front seat passenger
during a moderate to severe side impact. Side impact sensors (F) in each door sill and in the SRS unit detect such animpact and instantly inflate the driver's or the passenger's side airbag. Only one side airbag will deploy during a sideimpacl. lf the impact is on the passenger's side, the passenger's side airbag will deploy even if there is no passenger.
Seat Belt and Seat Belt Buckle Tensioners
The seat belt and seat belt buckle tensioners are linked with the SRS airbags to further increase the effectiveness ofthe seat belt. ln a front-end collision, the tensioners instantly retract the belt and buckle firmly to secure the occupantsin their seats.
OPDS
The side airbag system also includes an occupant position detection system (OpDS). This system consists of sensors(G)and an OPDS unit (H) in the front passenger's seat-back. The OPDS unit sends occupant heighl and position data tothe SRS unit. lf the OPDS unit determines that the front passenger is of small stature (for example, a child) and thefront passenger is leaning into the side airbag deployment path, the SRS unit will automatically disable the passenger'sside airbag. The SRS unit will also disable the airbag when the OPDS detects certain obiects on the seat. When theside airbag is disabled, the side airbag cutoff indicator on the instrument panel alerts the driver that the passenger'sside airbag will not deploy in a side impact. When the object is removed, or the passenger sits upright, the side airbagcutoff indicator will go off after a few seconds, alerting the driver that the passenger's side airbag will deploy in a sideimDact.
(cont'd)
I
23-31