EPS HONDA CIVIC 2002 7.G Repair Manual
[x] Cancel search | Manufacturer: HONDA, Model Year: 2002, Model line: CIVIC, Model: HONDA CIVIC 2002 7.GPages: 1139, PDF Size: 28.19 MB
Page 539 of 1139
EPS Components
I
12.
EPS Indicator Circuit Troubleshooting (cont'dl
Turn the ignition switch OFF.
Disconnect EPS control unit connector C (20P).
Turn the ignition switch ON (ll).
Does the EPS indicator come on?
YES-Repair short to ground in the YEUBLU wire
between the gauge assembly and the EPS control
unit, or replace the bulb circuit board in the gauge
assembly.l
NO-Go to step 15.
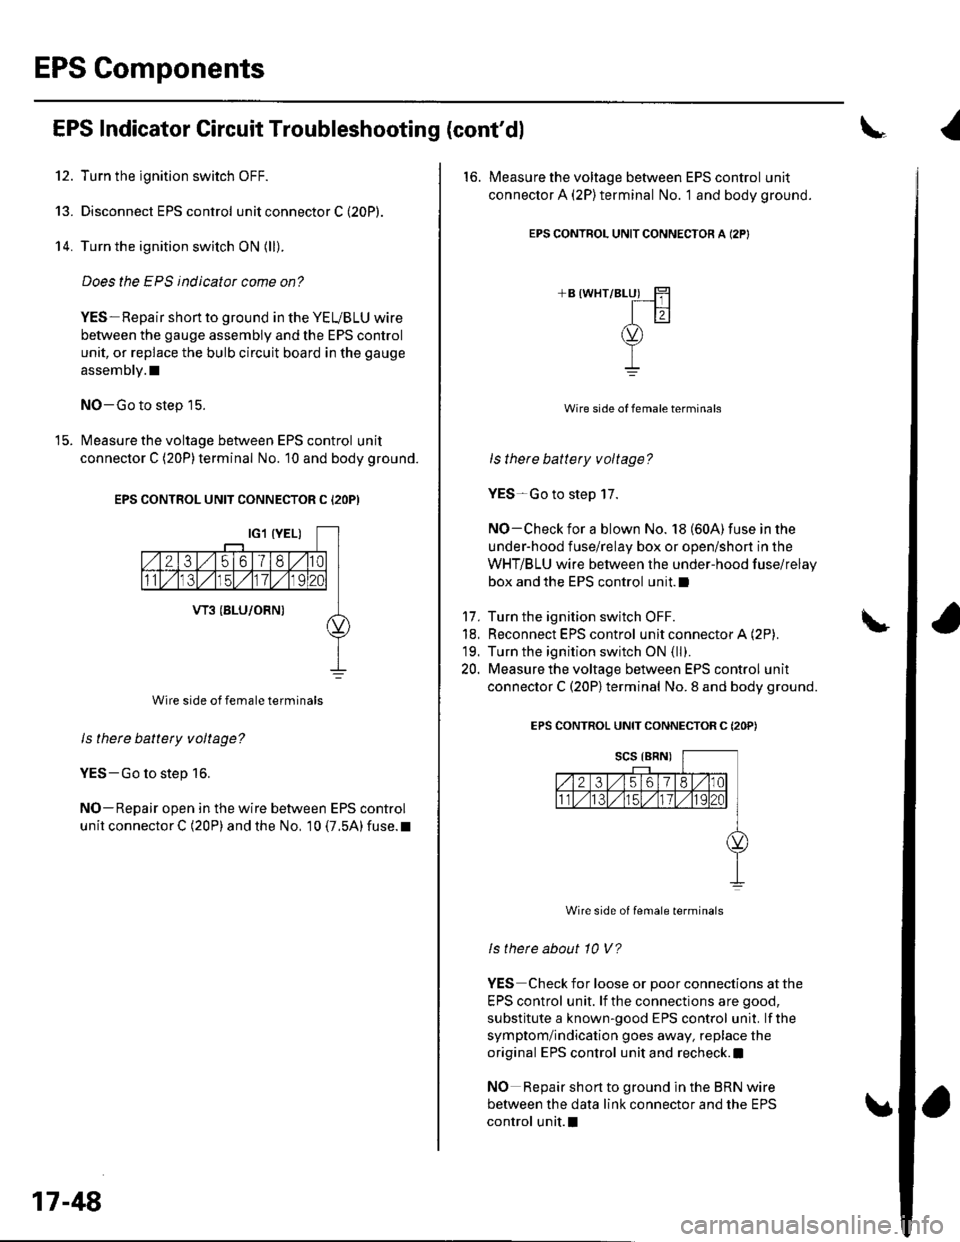
Measure the voltage between EPS control unit
connector C (20P)terminal No. 10 and body ground.
EPS CONTROL UNIT CONNECTOR C I2OP)
Wire side of female terminals
ls there battery voltage?
YES-Go to step 16.
NO-Repair open in the wire between EPS control
unit connector C (20P) and the No, 10 (7.5A) fuse. t
13.
14.
17-48
16. Measure the voltage between EPS control unit
connector A (2P)terminal No. '1 and body ground.
EPS CONTROL UNITCONNECTON A (2P}
+B (WHT/BLUI H
Itr
v-L
17.
18,
19.
20.
Wire side of female terminals
ls there battery voltage?
YES-Go to step 17.
NO-Check for a blown No. 18 (604) fuse in the
under-hood fuse/relay box or open/short in the
WHT/BLU wire between the under-hood fuse/relay
box and the EPS control unit.l
Turn the ignition switch OFF.
Reconnect EPS control unit connector A (2P).
Turn the ignition switch ON (ll).
Measure the voltage between EPS control unit
connector C (20P)terminal No. 8 and body ground.
EPS CONTROL UNIT CONNECTOR C (2OP)
Wire side of female terminals
ls therc about 10 V?
YES Check for loose or poor connections at the
EPS control unit. lf the connections are good,
substitute a known-good EPS control unit. lf the
symptom/indication goes away, replace the
original EPS control unit and recheck.l
NO Repair short to ground in the BRN wire
between the data link connector and the EPS
control unit.I
Page 541 of 1139
EPS Components
(Motor RemovaUlnstallation (cont'dl
lnsiallation
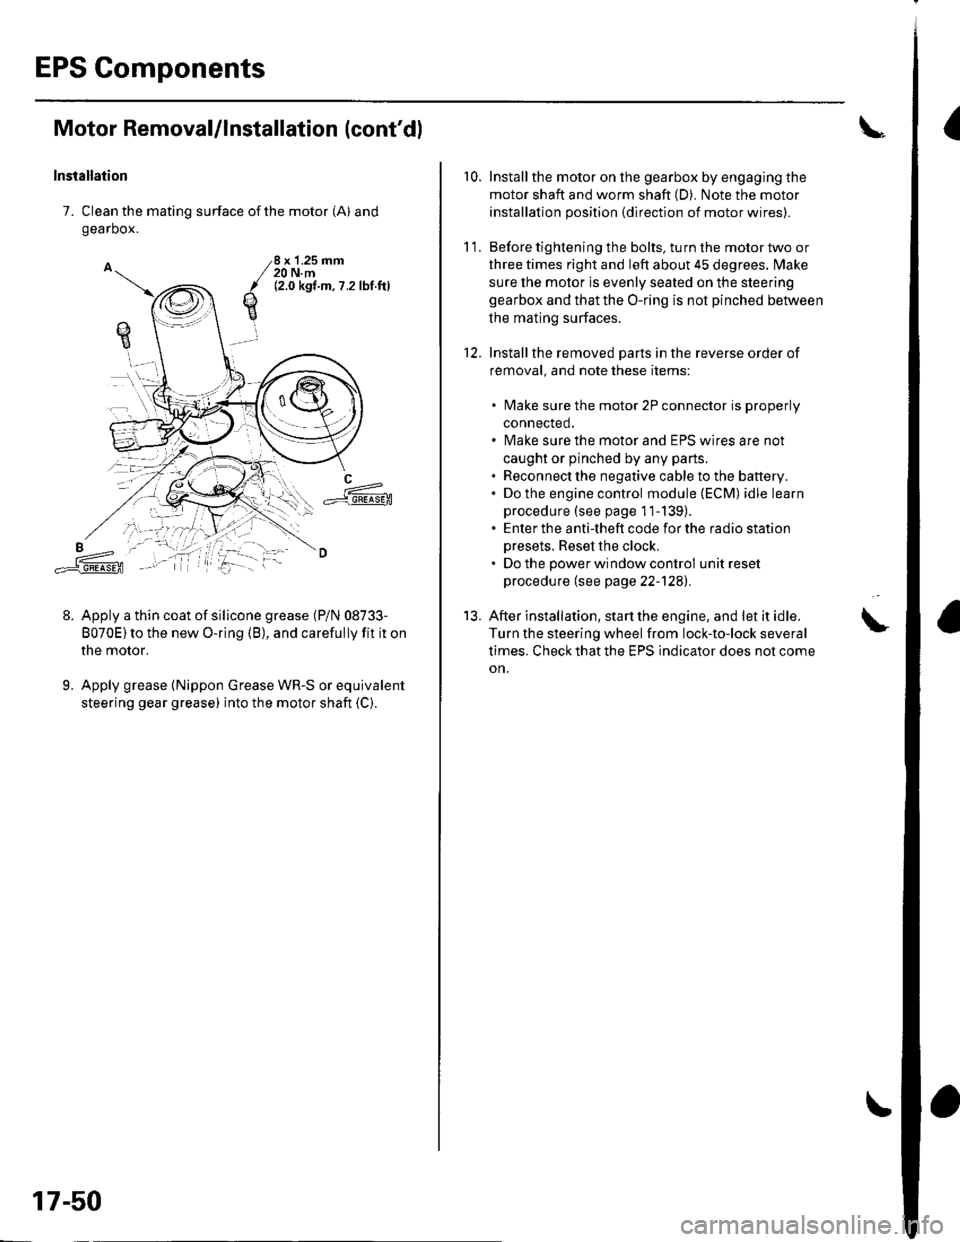
7. Clean the mating surface of the motor (A) and
gearbox.
Apply a thin coat of silicone grease (P/N 08733-
8070E)to the new O-ring (B), and carefully fit it on
the motor.
Apply grease {Nippon Grease WR-S or equivalent
steering gear grease) into the motor shaft (C).
qE
8 x '1.25 mm20 N.m12.0 kgt.m,7 .2lbl ftl
L==-c].E@
9.
17-50
r0.Install the motor on the gearbox by engaging the
motor shaft and worm shaft (D). Note the motor
installation position {direction of motor wires).
Before tightening the bolts, turn the motor two or
three times right and left about 45 degrees. lvlake
sure the motor is evenly seated on the steering
gearbox and that the O-ring is not pinched betlveen
the mating surfaces.
Installthe removed Darts in the reverse order of
removal. and note these items:
lvlake sure the motor 2P connector is properly
connected.
lvlake sure the motor and EPS wires are not
caught or pinched by any parts.
Reconnect the negative cable to the battery.
Do the engine control module (ECM) idle learn
procedure (see page 11-139).
Enter the anti-theft code for the radio station
Dresets. Reset the clock,
Do the oower window control unit reset
procedure (see page 22-1241.
After installation, start the engine, and let it idle.
Turn the steering wheel from lock-to-lock several
times. Check that the EPS indicator does not come
on.
11.
12.
13.
Page 543 of 1139
EPS Components
Steering Gearbox Removal (cont'd)
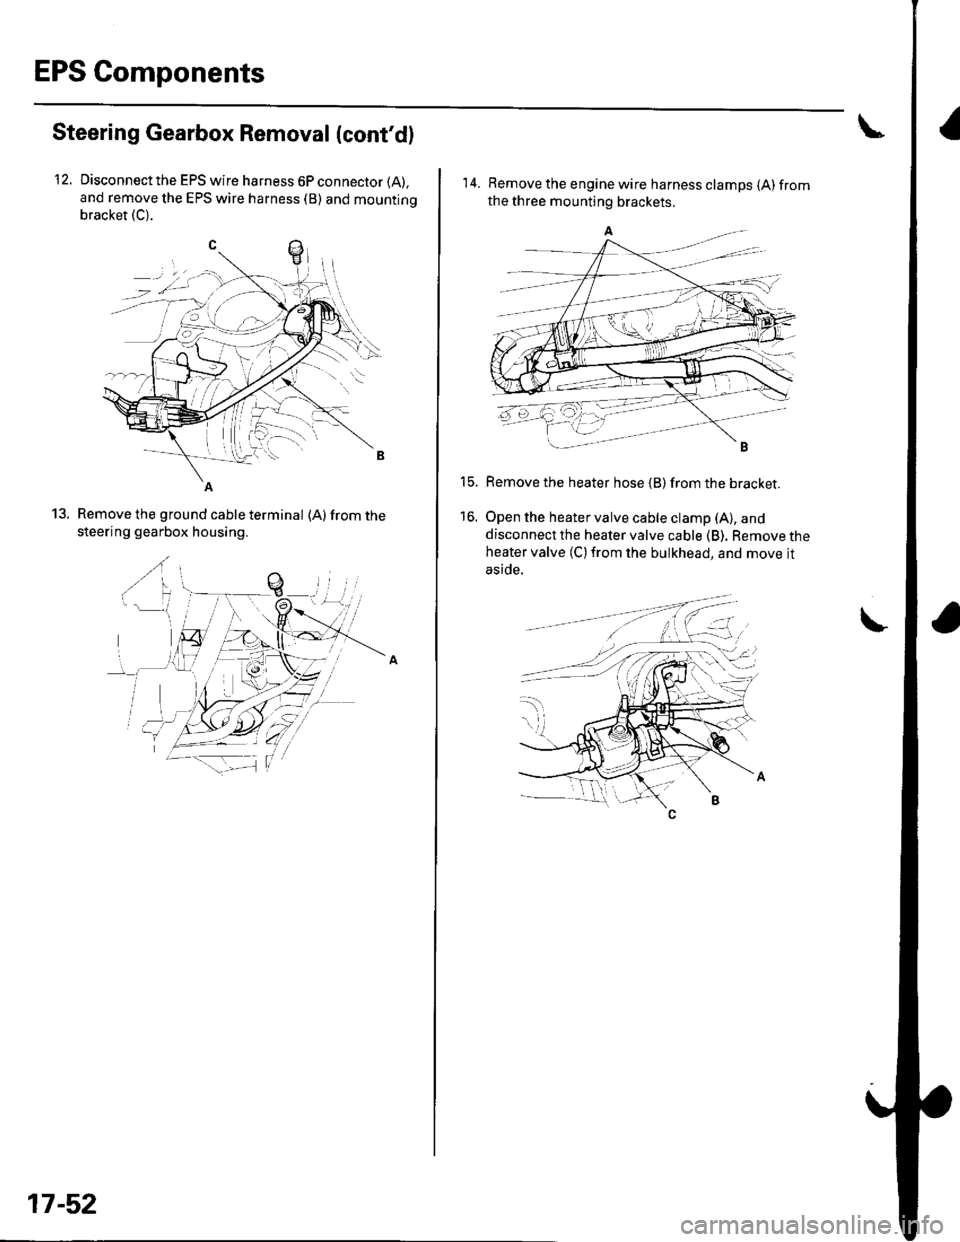
Disconnect the EPS wire harness 6P connector (A),
and remove the EPS wire harness (B) and mountino
bracket (C).
12.
Remove the ground cable terminal (A) from the
steering gearbox housing.
..(
.,/ a
b-H\
ry T,-.lt'^ \
'" \--
13.
_-1..1.-'
-a--zii F--_1
17-52
14. Remove the engine wire harness clamps {A)fromthe three mounting brackets.
Remove the heater hose {B) from the bracket.
Open the heater valve cable clamp (A), and
disconnect the heater valve cable (B). Remove theheater valve (C) from the bulkhead, and move jt
aside.
t5.
16.
I
Page 545 of 1139
EPS Components
Steering Gearbox Removal {cont'd)
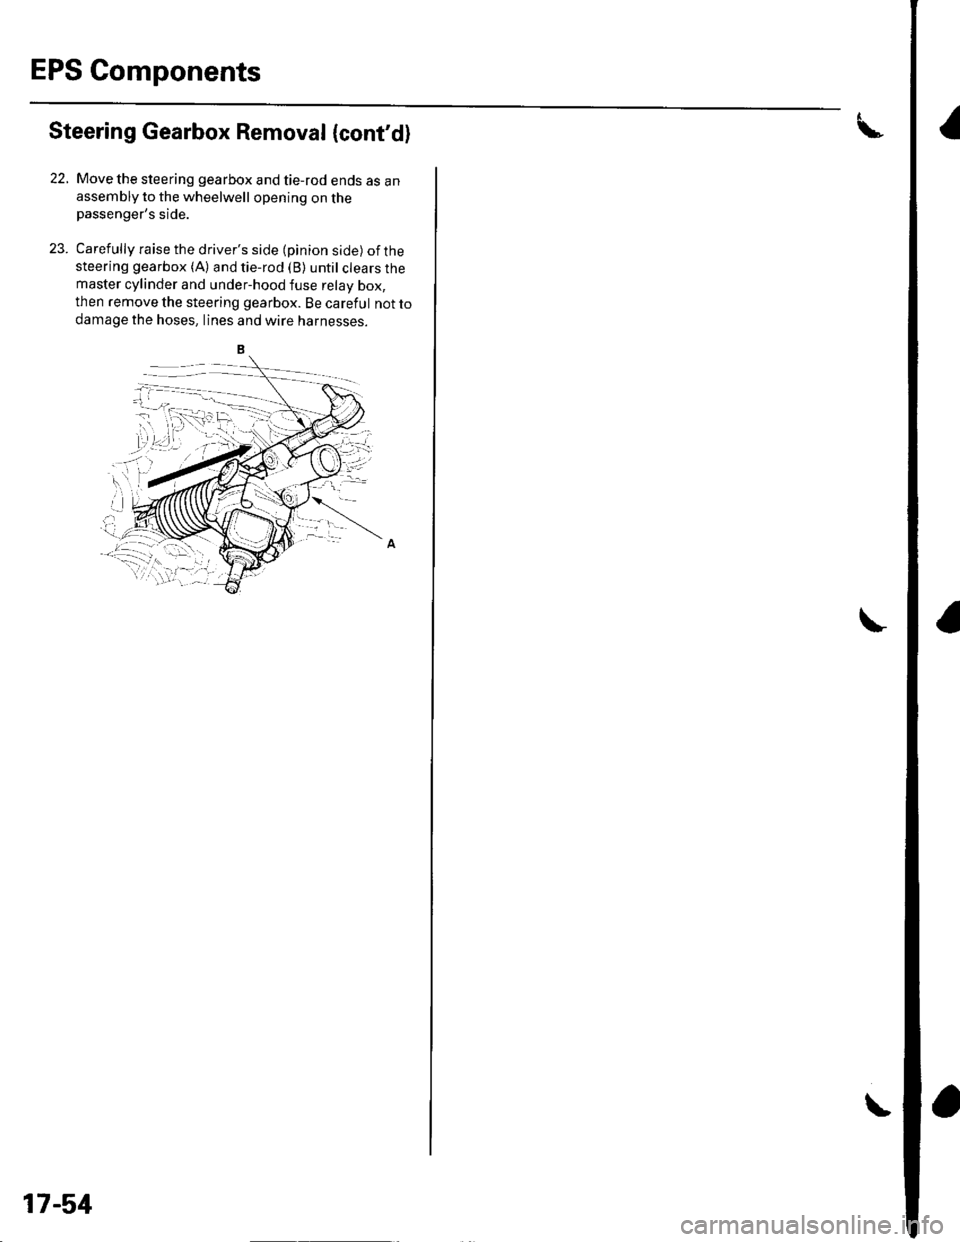
22. Move the steering gearbox and tie-rod ends as anassembly to the wheelwell opening on thepassenger's side.
23. Carefully raise the driver's side (pinion side) ofthesteering gearbox (A) and tie-rod (B) until clears themaster cylinder and under-hood fuse relay box,
then remove the steering gearbox. Be careful not to
damage the hoses, lines and wtre narnesses.
17-51
Page 547 of 1139
EPS Components
Steering Gearbox Overhaul (cont'dl
Special Tools Required. Locknut wrench 07ZAA-S5A0100. Pincers, Oetiker 1098 or equivalent, commercially
available.
NOTE:. Refer to the Exploded View as needed during thisprocedure.
. Do not allow dust, dirt, or other foreign materials toenter into the steering gearbox.
Eemoval
1, Remove the steering gearbox (see page 17-b1).
Disassembly
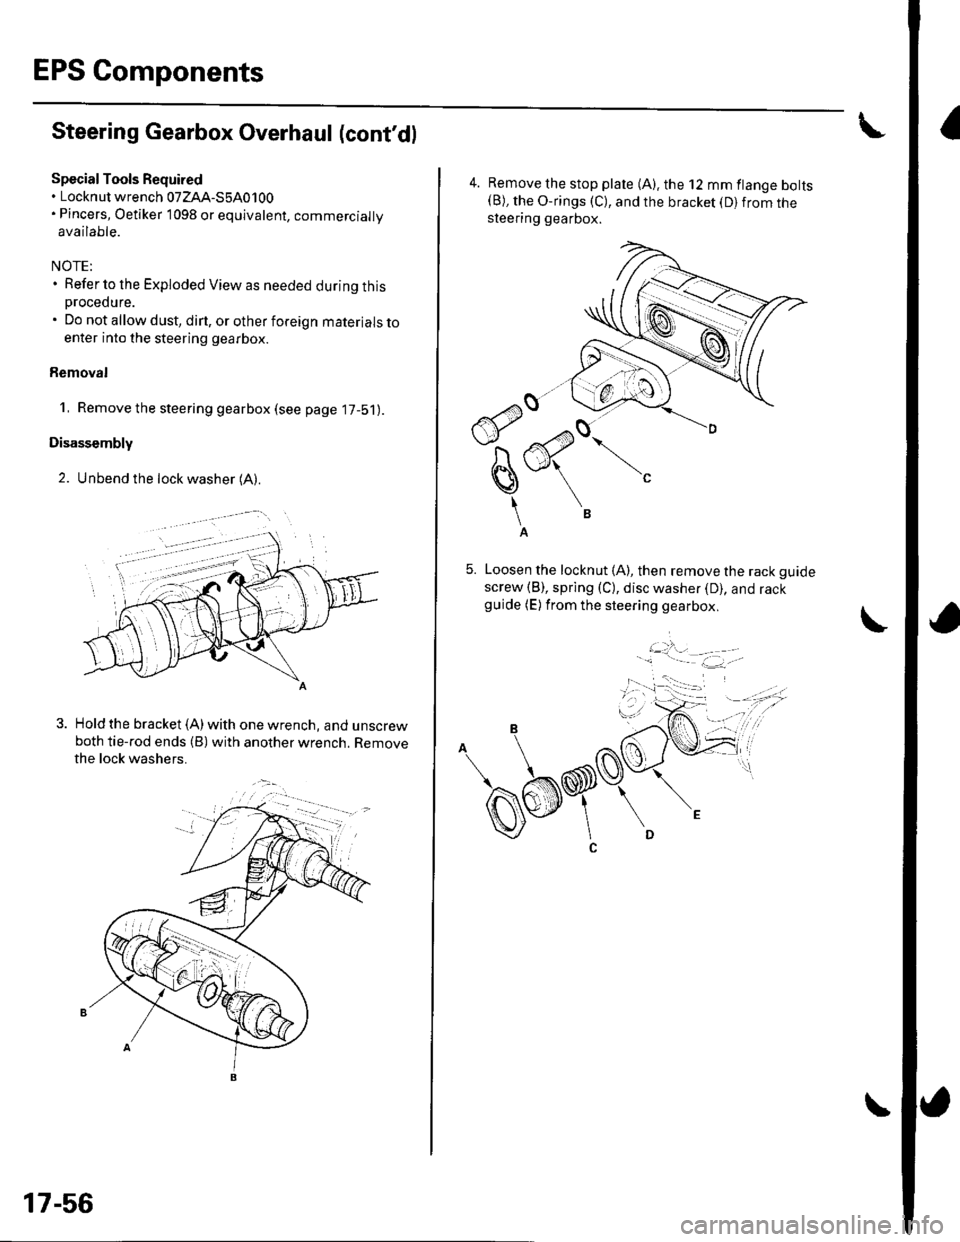
2. Unbend the lock washer (A).
. - -,'i.
Hold the bracket (A) with one wrencn, anq unscrewboth tie-rod ends (B) with another wrench. Removethe lock washers.
17-56
4. Remove the stop plate (A). the 12 mm flange bolts(B), the O-rings (C), and the bracket (D) from thesleering gearbox.
Loosen the locknut (A), then remove the rack guide
screw (B), sprlng (C), disc washer (D), and rackguide (E) from the steering gearbox.
i::..:4,. , -- -. - :.--. '
Page 549 of 1139
EPS Components
Steering Gearbox Overhaul (cont'd)
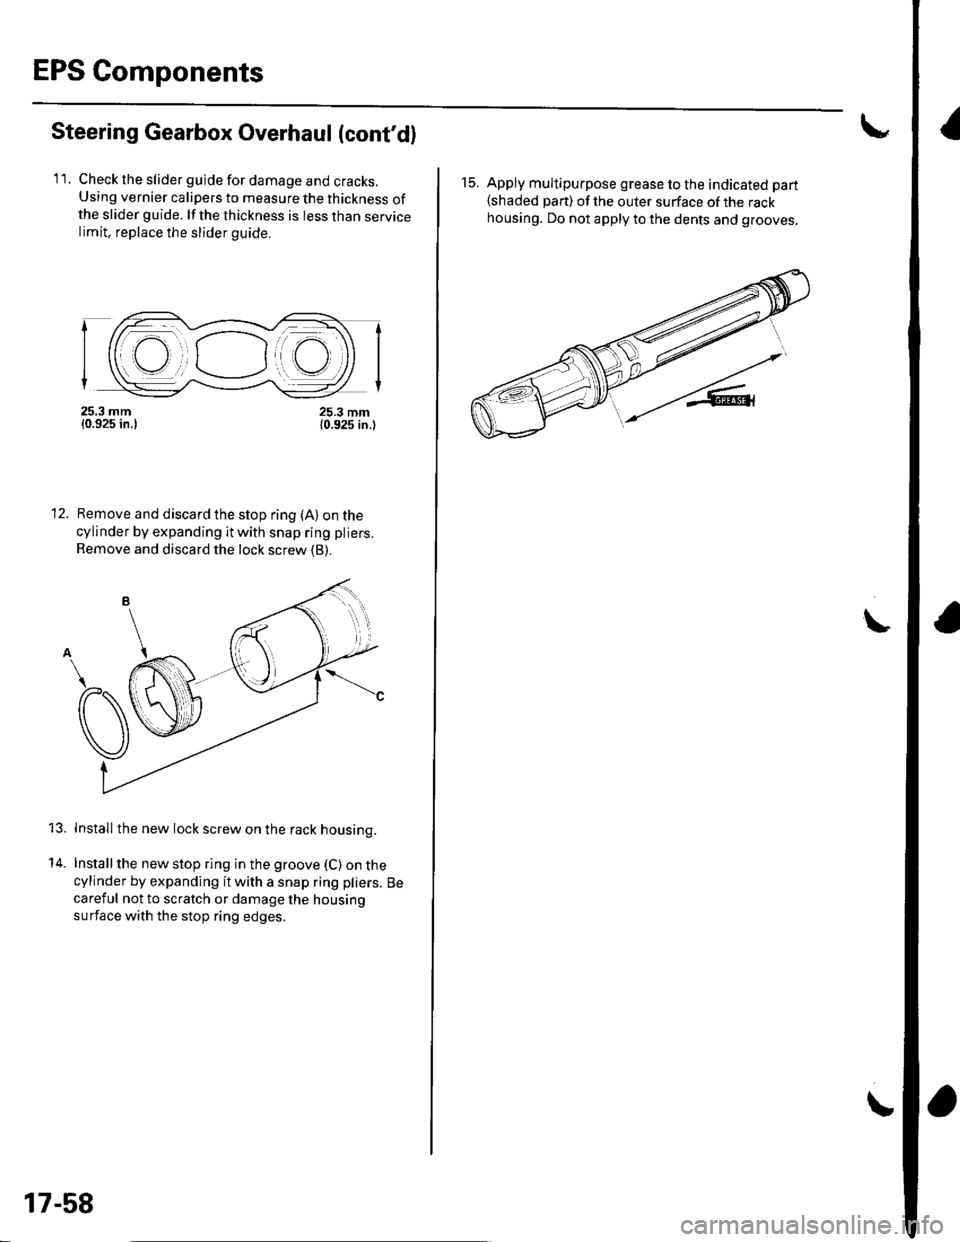
'll. Check the slider guide for damage and cracks.Using vernier calipers to measure the thickness ofthe slider guide. lf the thickness is less than servicelimit, replace the slider guide,
f Z,-----:-r-.--------.t.t'E-r
I (fr--', -.----
/i Il il ( t t , ,)))
|i@r
25.3 mm{0.925 in.}
Remove and discard the stop ring {A)on the
cylinder by expanding it with snap ring pliers.
Remove and discard the lock screw {B}.
13. Install the new lock screw on the rack housing.
14. Installthe new stop ring in the groove (C)on thecylinder by expanding it with a snap ring pliers. Becareful not to scratch or damage the housing
surface with the stop ring edges.
25.3 mm{0.925 in.l
12
17-58
15. Apply multipurpose grease to the indicated part
{shaded part) of the outer surface of the rackhousing. Do not apply to the dents and grooves.
\
I
Page 551 of 1139
EPS Components
{Steering Gearbox Overhaul (cont'dl
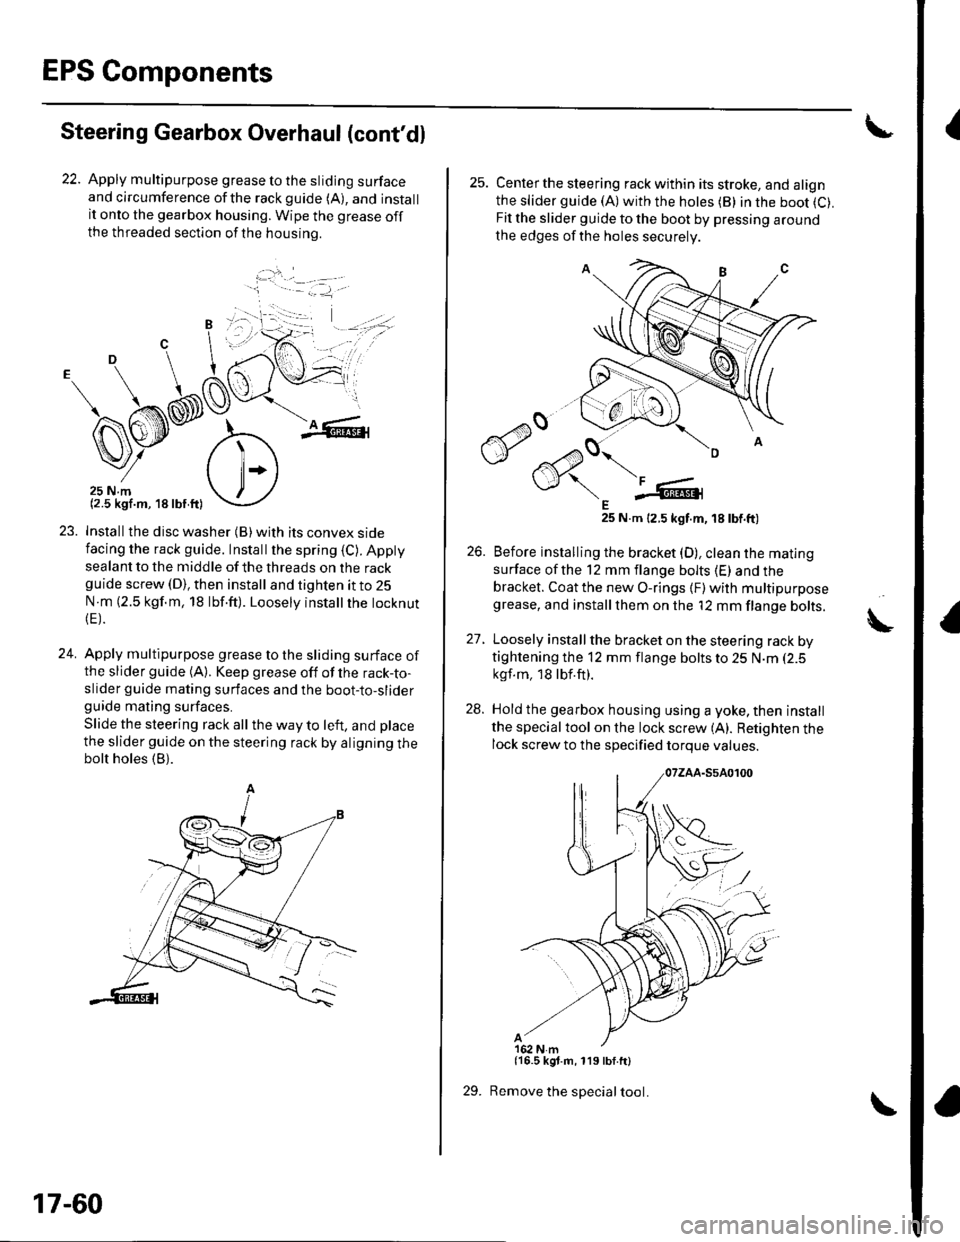
22. Apply multipurpose grease to the sliding surfaceand circumference ofthe rackguide (A), and installit onto the gearbox housing. Wipe the grease offthe threaded section ofthe housrno.
...'.
,. ,l
.j
23. Installthe disc washer (B)with its convex sidefacing the rack guide. Installthe spring (C). Appty
sealant to the middle of the threads on the rackguide screw (D), then install and tighten it to 25
N m (2.5 kgf.m, 18 lbf.ft). Loosely instatlrhe tocknut(E).
24. Apply multipurpose grease to the sliding surface ofthe slider guide (A). Keep grease off of the rack-to-slider guide mating surfaces and the boot-to-sliderguide mating surfaces.
Slide the steering rack all the way to left, and place
the slider guide on the steering rack by aligning thebolt holes (B).
'1 - .- =-1, -
17-60
29.
25. Centerthe steering rack within its stroke, and alignthe slider guide (A)with the hotes (B) in the boot (C).
Fit the slider guide to the boot by pressing around
the edges of the holes securely
E25 N.m 12.5 kgt.m, 18 tbt.ft)
26. Before installing the bracket (D), clean the mating
surface ofthe 12 mm flange bolts (E) and thebracket. Coat the new O-rings {F) with multipurposegrease, and installthem on the '12 mm flange bolts.
27. Loosely install the bracket on the steering rack bytightening the 12 mm flange bolts to 25 N.m (2.5
kgf.m, 18lbf.ft).
28. Hold the gearbox housing using a yoke, then install
the specialtool on the lock screw (A). Retighten thelock screw to the specified torque values.
{16.5 kgt.m, 119 lbf.ft}
Remove the special tool.
A
Page 553 of 1139
EPS Components
Steering Gearbox Overhaul (cont'dl
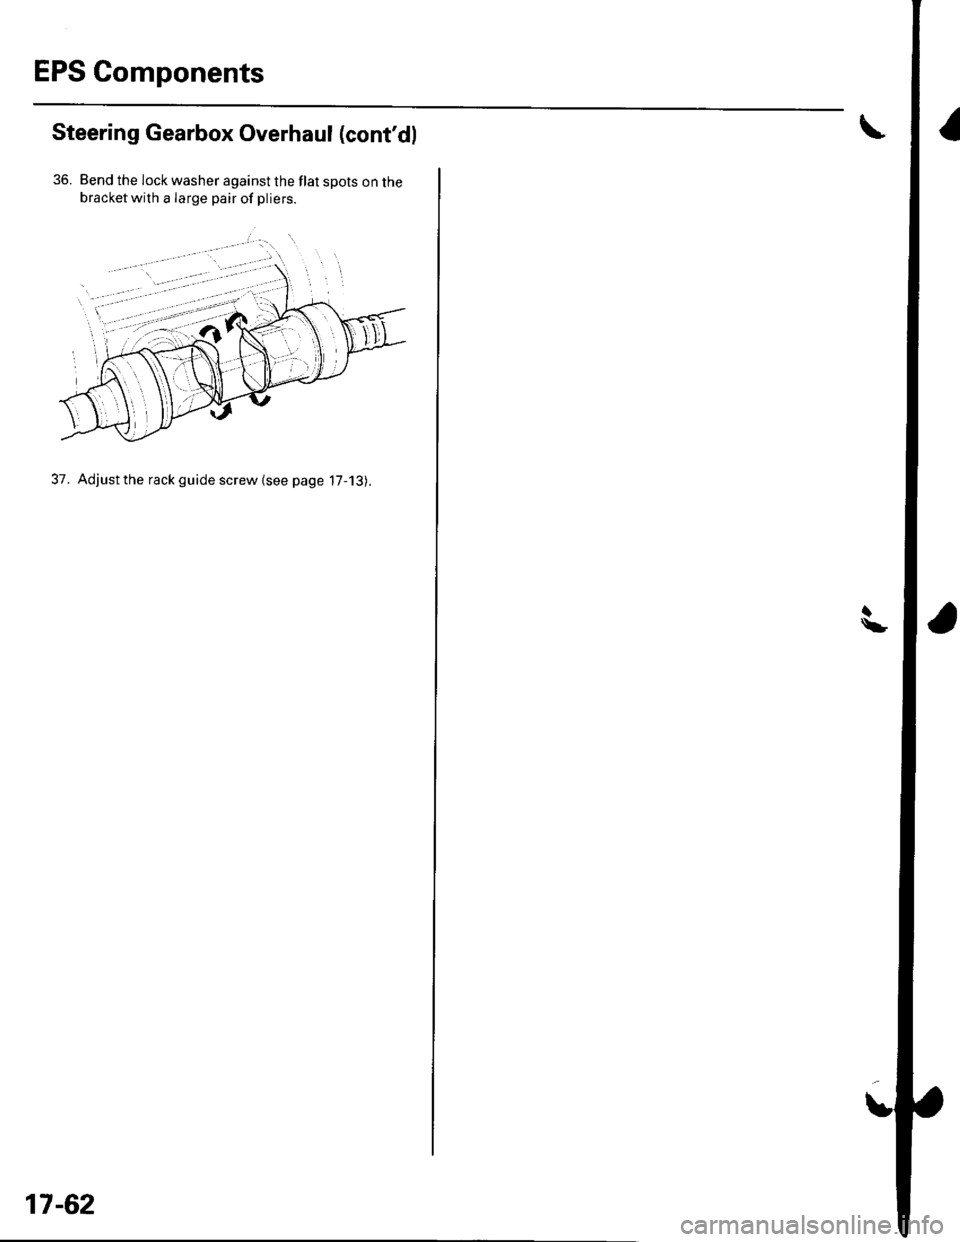
36. Bend the lock washer against the flat spots on thebracketwith a Iarge pair of pliers.
37. Adjust the rack guide screw {see page 17-13).
17-62
Page 555 of 1139
EPS Components
Steering Gearbox Installation (cont'd)
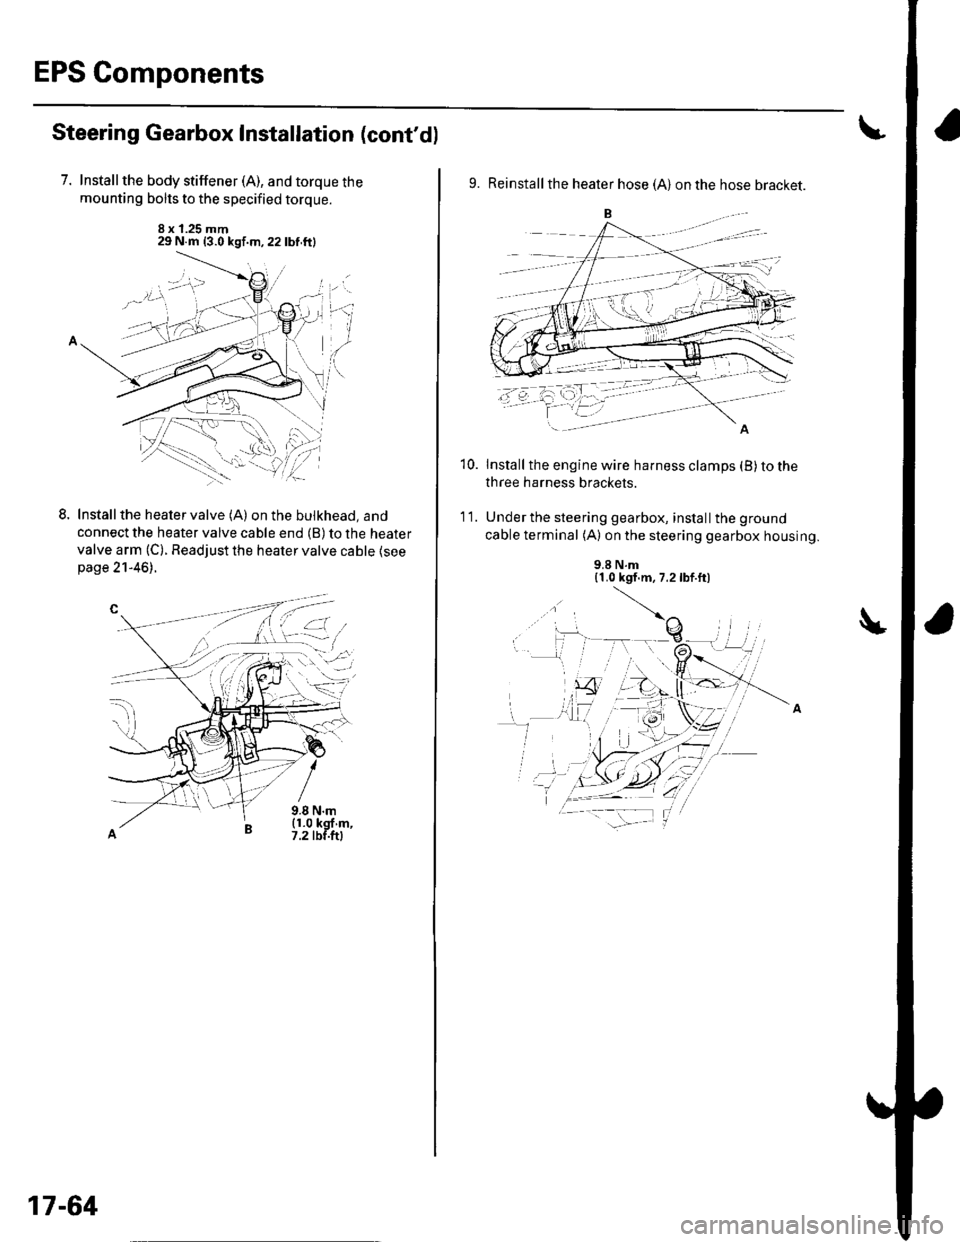
7. Installthe body stiffener (A), and torque the
mounting bolts to the specified torque.
8 x 1.25 mm29 N.m {3.0 kgf.m,22lbf.ftl
LInstall the heater valve (A) on the bulkhead, and
connect the heater valve cable end (B) to the heater
valve arm (C). Readjust the heater valve cable {seepage 21-46).
9.8 N.m(1.0 kgf m,7.2 tbf.ftl
L-t ,:.i.t'
17-64
9. Reinstall the heater hose (A) on the hose bracket.
Install the engine wire harness clamps (B) to the
three harness brackets.
Under the steering gearbox, install the ground
cable terminal (A) on the steering gearbox housing.
10.
'I t.
9.8 N.m{1.0 kgf.m, 7.2lbf.ft)
Page 556 of 1139
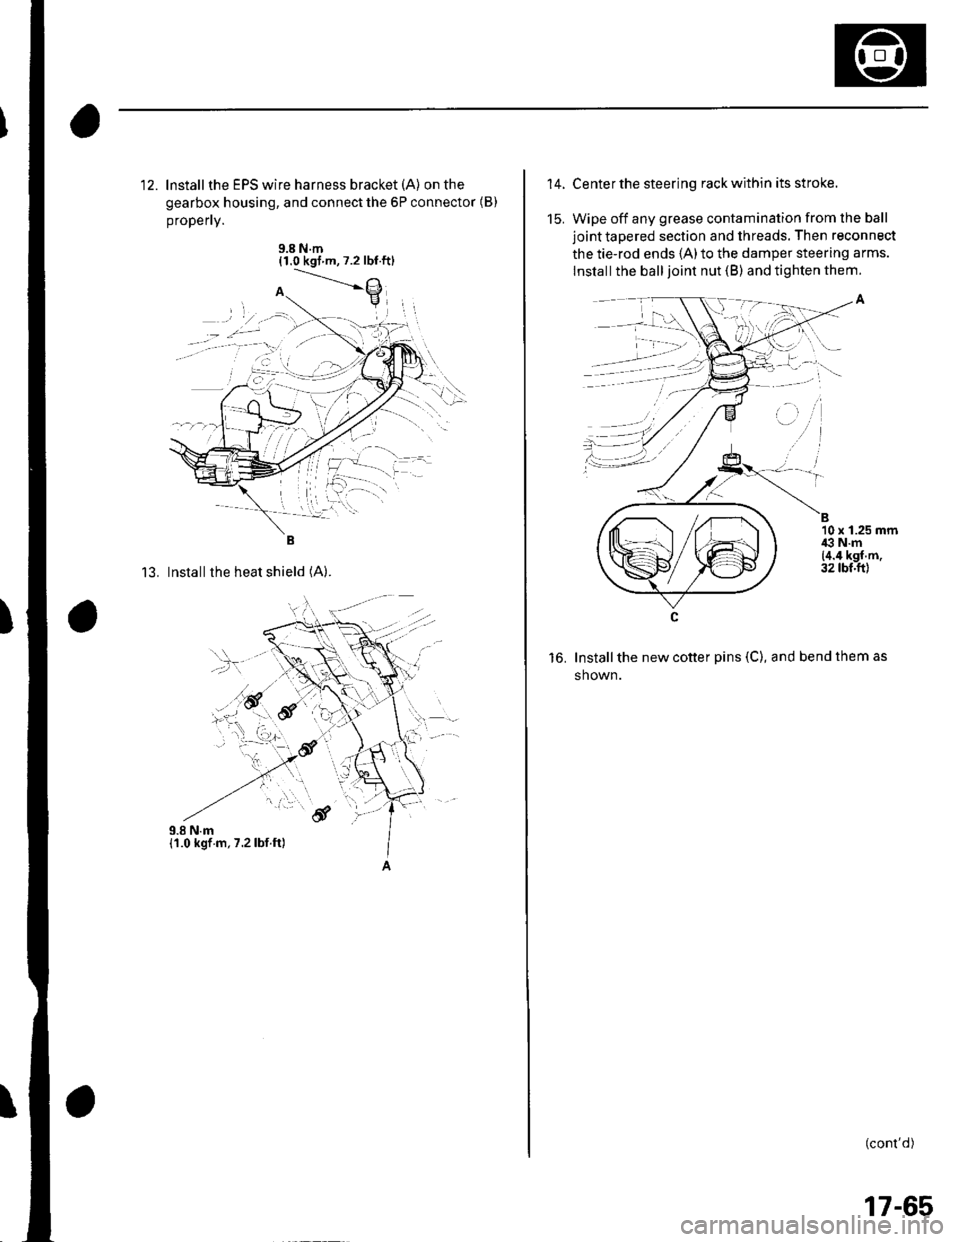
12. lnstallthe EPS wire harness bracket (A) on the
gearbox housing, and connect the 6P connector (B)
propefly.
9.8 N.m{1.0 kgt m,7.2 lbt.ftl
13. Installthe heat shield (A).
,.!,..''6f
14.
15.
Center the steering rack within its stroke.
Wipe off any grease contamination from lhe ball
joint tapered section and threads. Then reconnect
the tie-rod ends 1A)to the damper steering arms.
lnstall the ball joint nut (B) and tighten them.
Install the new cotter pins (C), and bend them as
shown.
(cont'd)
B10 x 1.25 mmi€ N.m{4.4 kgf.m.32 tbt.ftl
to.
, -', ''l
:1)
17-65