relay HONDA CIVIC 2003 7.G Workshop Manual
[x] Cancel search | Manufacturer: HONDA, Model Year: 2003, Model line: CIVIC, Model: HONDA CIVIC 2003 7.GPages: 1139, PDF Size: 28.19 MB
Page 1007 of 1139
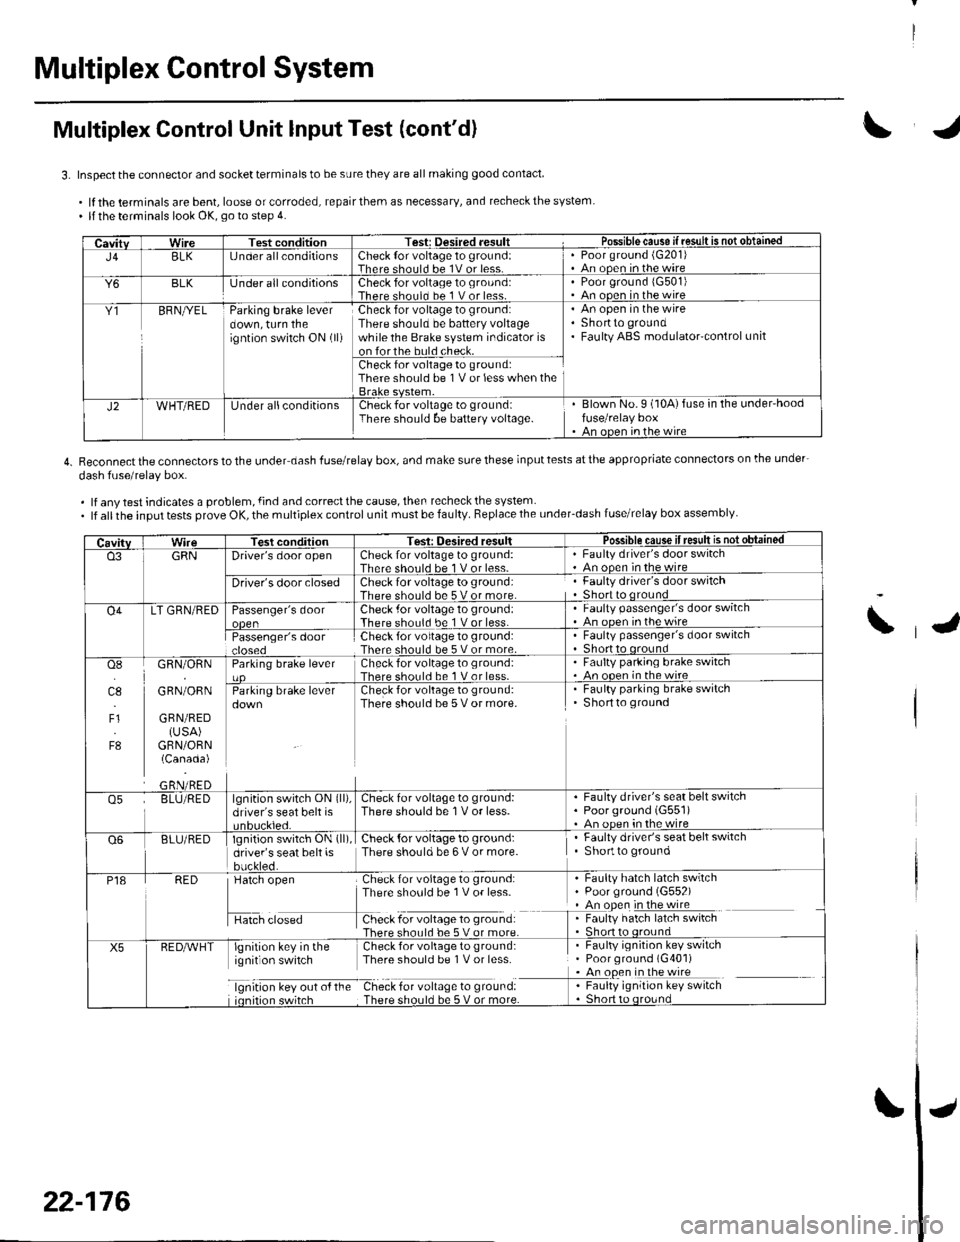
Multiplex Control System
Multiplex Control Unit lnput Test (cont'd)
3. Inspect the connector and socket terminals to be sure they are all making good contact
.lftheterminalsarebent,looseorcorroded,repairthemasnecessary,andrecheckthesystem. llthe terminals look OK, go to step 4.
4. Reconnectthe connectorstothe under dash fuserelay box, and make surethese inputtests atthe appropriate connectors on lhe under-
dash fuse/relav box.
. lf any test indicates a problem, {ind and correct the cause, then recheck the system. lf allthe input tests prove OK, the multiplex control unit must be faulty. Replace the under_dash fuse/relay box assembly
CavitvWireTest conditionTest: Desired .esult r Possible cause if resullE qS!q!!e!!ed
J4BLK[J nder all conditionsCheck {or voltage 1o ground:Therc sholl.l he 1V or lessPoor ground (G20'l)An ooen in the wire
Y6BLKlJnder all conditionsCheck for voltage to ground:There should bc 1 V or less.Poor ground 1G501)An ooen in the wire
Y1BFNryELParking brake leverdown, turn theigntion switch ON (ll)
Check for voltage to ground:There should be battery voltagewhile the Brake system indicator ison forthe buld check.
An open in the wireShortto groundFaulty ABS modulatorcontrol unit
Check for voltage to ground:There should be 1V or less when the
J2WHT/REDUnder allconditionsCheck for voltage to groundiThere should be baftery voltage.Blown No.9 (10A)fuse in the under'hoodfuse/relay boxAn oncn in rhc wire
CavitvTest conditionTesi: Oesired resultPossible cause ifresult is notobtained
o3GRNDriver's door openCheck for voltage to ground:There should be 1 V or less-Faulty driver's door switchAn ooen in the wire
Driver's door closedCheck for voltage to ground:There should be 5 V or more.Faulty driver's door switchShort to qround
O4LT GRN/REDPassenger's doorCheck .for voltage 10 ground:There should be 1 V or less.Faulty passenger's door switchAn ooen inthewire
Passenger's doorCheck for voltage to ground:There should be 5 V or more.Faulty passenger's door switchShort to oround
osI]l.l
4.,
F1
F8
GRN/ORN
GRN/ORN
GRN/RED(USA)GRN/ORN(Canada)
Parking brake leverCheck for voltage to groLrnd:There shorl.l be 1 V or less.Faulty parking brake switch. An ooen in thewireCheck for voltage to ground:There should be 5 V or more.
. Faulty parking brake switchShortto ground
o5BLU/REDlgnition switch ON (ll),
driver's seat belt isCheck for voltage to ground:There should be 1V or less.Faulty driver's seat belt switchPoorground (G551)An oDen in the wire
Q6BLU/REDlgnition switch ON (ll)
driver's seat belt isbuckled.
Check {or voltage to ground:There should be 6 V or more.Faulty driver's seat belt switchShortto ground
P18RED
H",=
Check for voltage to ground:There sho0ld be 1V or less-
f -9*:li:'^:**:':s*:*
Faulty hatch latch swrtchPoor ground (G552)An open in the wireFaulty hatch latch switch
X5lgnirion key in the Check for voliage to gtound:ignit on switch Thpre should be I V or lcss
lgnrtron kev our o{ the Check for vollage to ground:
. Faulty ignition key switch. Poor ground (G401). An open in the wire
I : [11y.'::i':::1"' **6
\
22-176
Page 1008 of 1139
IJ
IJ
IJ
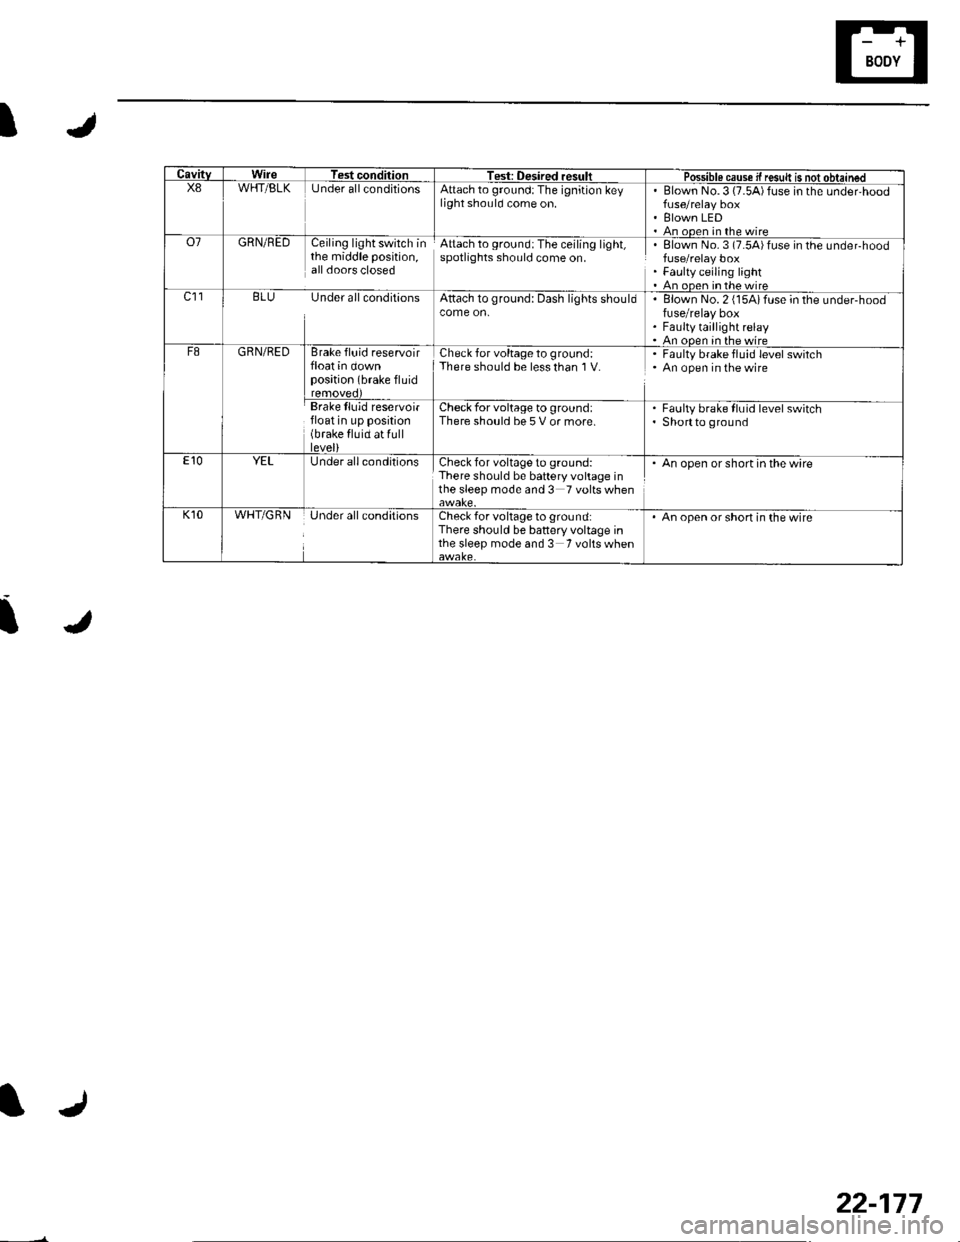
CavitvWireTest conditionTest: Desired resultPossible cause if resuk is not obtainedX8WHT/BLKUnder allconditionsAttach to ground:The ignition keylight should come on.Blown No.3 (7.5A)fuse in the under,hood
Blown LEDAn ooen in the wireo7GRN/REDCeiling light switch inthe middle position,all doors closed
Attach to ground:The ceiling light,spotlights should come on.Elown No. 3 (7.54)fuse in the undeFhood
Faulty ceiling lightAn oDen in the wirec]1BLU Under all conditionsAttach to ground: Dash lights shouldBlown No. 2 (15Aifuse in the under-hoodfuse/relay boxFaulty taillight relayAn ooen in the wireF8GRN/REDBrake fluid reservoirfloat in downposition (brake fluid
Check for voltage to ground:There should be less than I V.Faulty brake fluid level switchAn open in the wire
Brake lluid reservoirfloat in up position(brake fluid at fulllevel)
Check for voltage to ground:There should be 5 V or more.Faulty brake fluid level switchShortto ground
E10YELUnder all conditionsCheck for voltage to ground:There should be battery voltage inthe sleep mode and 3 Tvoltswhen
. An open or short in the wire
K10WHT/GRNUnder all conditionsCheck for voltage to ground:There should be battery voltage inthe sleep mode and 3 Tvoltswhen
An open or short in the wire
22-177
Page 1080 of 1139
![HONDA CIVIC 2003 7.G Workshop Manual I
g]
3
1 1. Check resistance between the No. 2 terminal of the
floor wire harness 3P connector and body ground.
There should be an open circuit. or at least 1 fvl Q ,
FLOOR WIRE HARNESS 3P CONNECTOR
W HONDA CIVIC 2003 7.G Workshop Manual I
g]
3
1 1. Check resistance between the No. 2 terminal of the
floor wire harness 3P connector and body ground.
There should be an open circuit. or at least 1 fvl Q ,
FLOOR WIRE HARNESS 3P CONNECTOR
W](/img/13/5744/w960_5744-1079.png)
I
g]
3
1 1. Check resistance between the No. 2 terminal of the
floor wire harness 3P connector and body ground.
There should be an open circuit. or at least 1 fvl Q ,
FLOOR WIRE HARNESS 3P CONNECTOR
Wire side ot temale terminals
ls the resistance as specified?
YES-Go to step 12.
NO Short to ground in the floor wire harness or
multiplex control unit. Replace the faulty harness or
part.I
Check resistance between the No. 3 terminal of the
floor wire harness 3P connector and body ground.
There should be an open circuit, or at least 1 M Q.
FLOOR WIRE HARNESS 3P CONNECTOR
LT GRN
Wire side of female terminals
ls the resistance as specified?
YES Go to step 13.
NO-Short to ground in the floor wire
replace the floor wire harness.I
12.
13. Check resistance between the No. 8 terminal of
SRS unit connector C (8P) and the No. 3 terminal of
the floor wire harness 3P connector. There should
be0 1Q.
FLOORWIRE HARNESS SRS UNITCONNECTORC I8P}3P CONNECTOB
Wire side of female terminals
ls the resistance as specitied?
YES Go to step 14.
NO Open in the floor wire harness; replace the
floor wire harness.l
Check resistance between the No. 4 terminal of
SRS unit connector C (8P) and the No. 2 terminal of
the floor wire harness 3P connector. There should
be0-1 0.
14.
FLOOR WIRE HARNESS3P CONNECTORSRS UNIT CONNECTOR C IsPI
Wire side of female terminals
ls the resistance as specified?
YES Replace the SRS unit (see page 23-122).1
NO Open in the floor wire harness or multiplex
control unit, or poor connection at the floor wire
harness, the under-dash fuse/relay box, and the
multiplex control unit. Check the connection at the
floor wire harness, the under-dash fuse/relay box,
and the multiplex control unit. lf the connection is
OK, replace the faulty harness or part.l
harness;
23-73
Page 1103 of 1139
sRs
DTG Troubleshooting (cont'd)
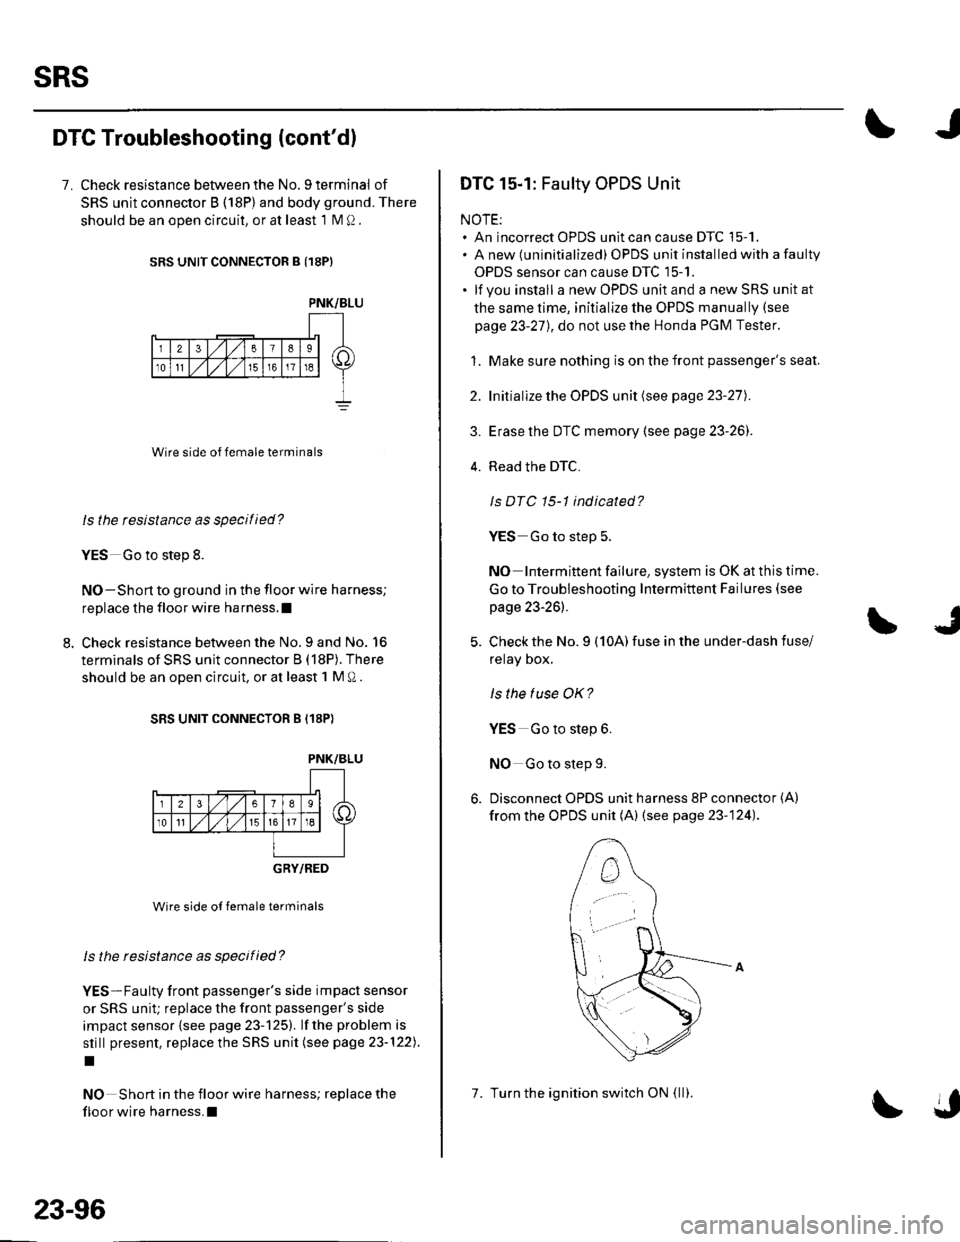
7. Check resistance between the No. 9 terminal of
SRS unit connector B (18P) and body ground. There
should be an ooen circuit, or at least 1 N4 Q.
SRS UNIT CONNECTOR B {18PI
Wire side of female terminals
ls the tesistance as specilied?
YES Go to step 8.
NO-Short to ground in the floor wire harness;
replace the floor wire harness.l
Check resistance between the No.9 and No. 16
terminals of SRS unit connector B (18P). There
should be an open circuit, or at least 1 M O .
SRS UNIT CONNECTOR B (18P)
PNK/BLU
_-r'18 sl /itltlis-l \
236
10tl
GRY/RED
Wire side ot female terminals
ls the resistance as specified?
YES-Faulty front passenger's side impact sensor
or SRS unit; replace the front passenger's side
impact sensor {see page 23-125). lf the problem is
still present, replace the SRS unit (see page 23-122).
I
NO Short in the floor wire harness; replace the
floor wire harness.l
PNK/BLU
23-96
7. Turn the ignition switch ON (ll).
DTC 15-1: Faulty OPDS Unit
NOTE:. An incorrect OPDS unit can cause DTC 15-1.. A new (uninitialized) OPDS unit installed with a faulty
OPDS sensor can cause DTC 15-1.. lf you install a new OPDS unit and a new SRS unit at
the same time, initialize the OPDS manually (see
page 23-27), do not use the Honda PGM Tester.
1. Make sure nothing is on the front passenger's seat.
2. Initialize the OPDS unit (see page 23-27).
3. Erase the DTC memory (see page 23-26]'.
4. Read the DTC.
Is DTC 15-1 indicated?
YES Go to step 5.
NO Intermittent failure, system is OK at this time.
Go to Troubleshooting Intermittent Failures (see
page 23-26).
Check the No. 9 (10A) fuse in the under-dash fuse/
relay Dox,
ls the tuse OK?
YES Go to step 6.
NO Go to step 9.
Disconnect OPDS unit harness 8P connector (A)
from the OPDS unit (A) (see page 23-124).
Page 1104 of 1139
)
)
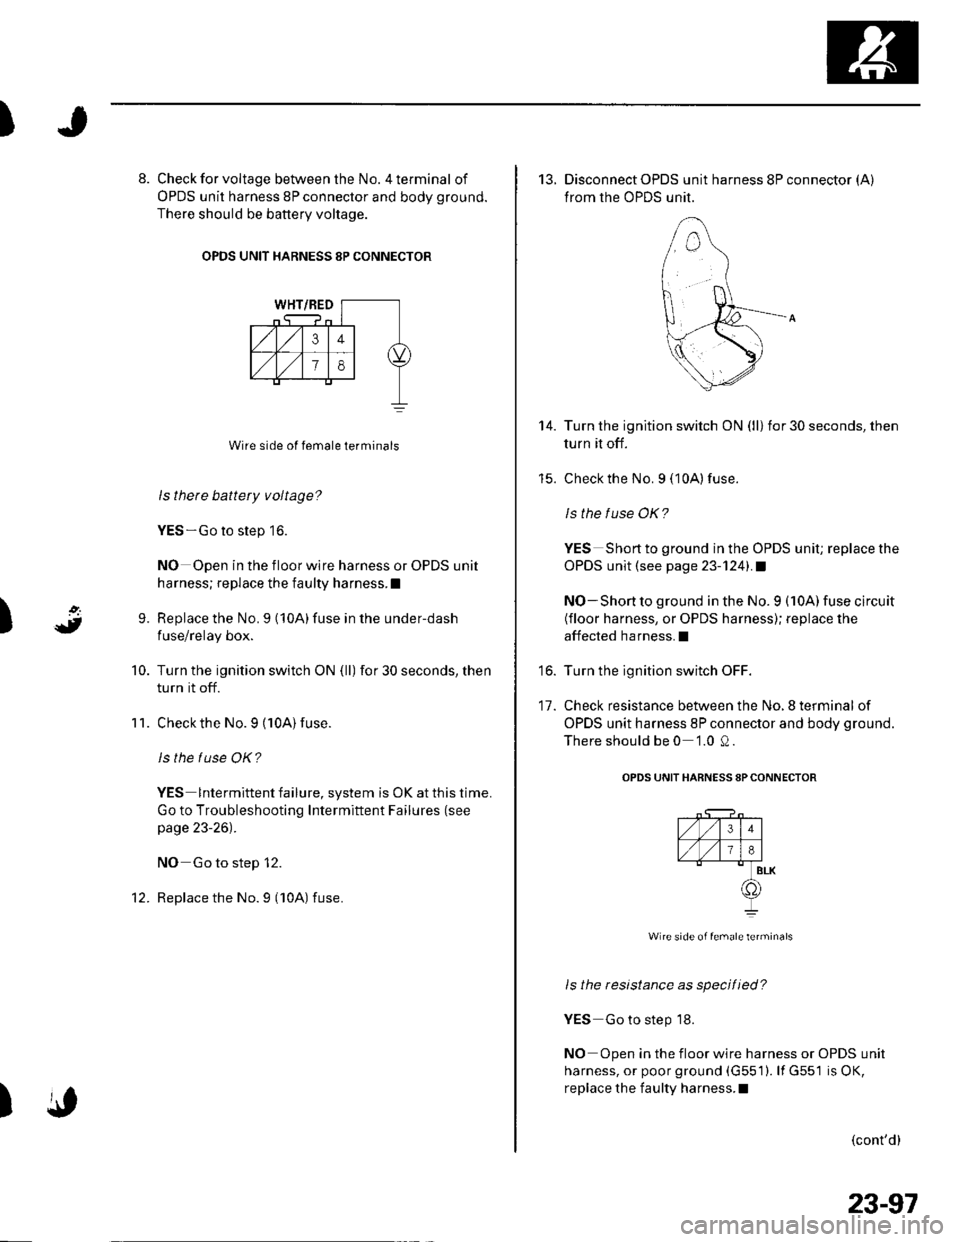
8. Check for voltage between the No. 4 terminal of
OPDS unit harness 8P connector and body ground.
There should be battery voltage.
OPDS UNIT HARNESS 8P CONNECTOR
Wire side of female terminals
ls there battery voltage?
YES-Go to step 16.
NO Open in the floor wire harness or OPDS unit
harness; replace the faulty harness.I
Replace the No.9 (10A)fuse in the under-dash
fuse/relay box.
Turn the ignition switch ON (ll) for 30 seconds, then
turn it off.
Check the No. 9 (10A)fuse.
ls the tuse OK?
YES lntermittent failure, system is OK at this time.
Go to Troubleshooting Intermiftent Failures (see
page 23-26).
NO Go to step 12.
Replace the No. 9 ('l0A) fuse.
9.
10.
11.
)
14.
to.
11.
13. Disconnect OPDS unit harness 8P connector (A)
from the OPDS unit.
Turn the ignition switch ON (ll) for 30 seconds, then
turn it off.
Check the No. 9 (10A) fuse.
ls the f use OK?
YES Short to ground in the OPDS unit; replace the
OPDS unit (see page 23-1241.1
NO-Short to ground in the No. 9 (10A) fuse circuit(floor harness, or OPDS harness); replace the
affected harness.I
Turn the ignition switch OFF.
Check resistance between the No.8 terminal of
OPDS unit harness 8P connector and body ground.
There should be 0 '1.0 Q .
OPDS UNIT HARNESS sPCONNECTOR
l4V-'l^l
TVjEl#BLK
@I
Wire side of female terminals
ls the resistance as specified?
YES Go to step 18.
NO Open in the floor wire harness or OPDS unit
harness, or poor ground (G551). lf G551 is OK,
replace the faulty harness.I
(cont'd)
23-97
Page 1107 of 1139
sRs
DTC Troubleshooting (cont'd)
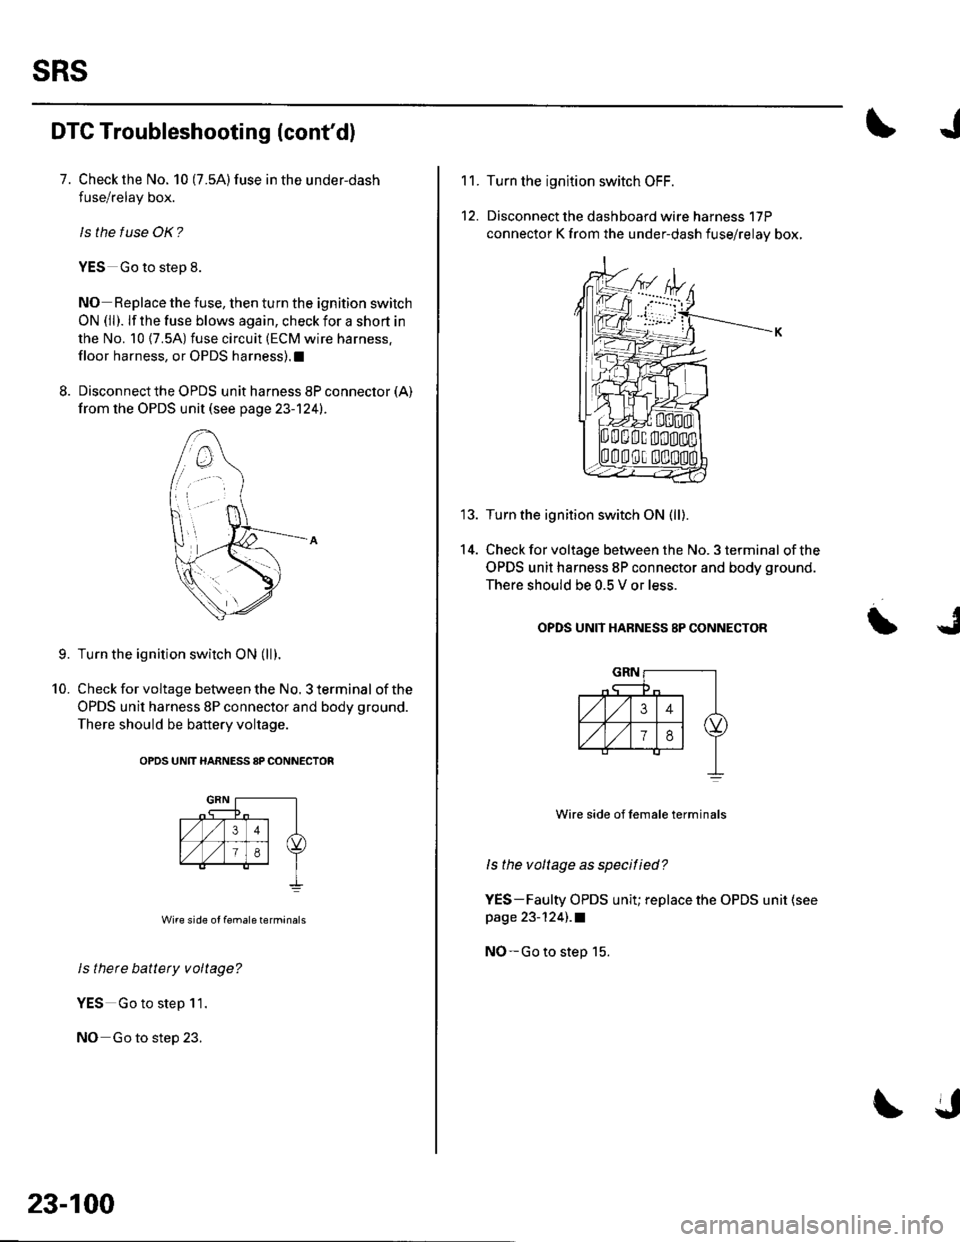
7. Check the No. 10 (7.5A)fuse in the under-dash
fuse/relay box.
ls the f use OK?
YES Go to step 8.
NO Replace the fuse, then turn the ignition switch
ON (ll). lf the fuse blows again, check for a short in
the No. 10 {7.5A) fuse circuit (ECM wire harness.
floor harness, or OPDS harness).1
8. Disconnect the OPDS unit harness 8P connector (A)
from the OPDS unit (see page 23-124).
Turn the ignition switch ON (ll).
Check for voltage between the No. 3 terminal of the
OPDS unit harness 8P connector and body ground.
There should be battery voltage.
OPDS UNtT HARNESS 8P CONNECTOR
Wire side of female terminals
ls there battety voltage?
YES Go to step 11.
NO Go to step 23.
9.
10.
23-100
11.
12.
14.
Turn the ignltion switch OFF.
Disconnect the dashboard wire harness 17P
connector K from the under-dash fuse/relay box,
Turn the ignition switch ON (ll).
Check for voltage between the No. 3 terminal of the
OPDS unit harness 8P connector and body ground.
There should be 0.5 V or less.
OPDS UNIT HABNESS 8P CONNECTOR
Wire side of lemale terminals
ls the voltage as specitied?
YES-Faulty OPDS unit; replace the OPDS unit (see
page 23-124) .a
NO-Go to step 15.
Page 1113 of 1139
sRs
6.
SRS Indicator Circuit Troubleshooting (cont'dl
7.
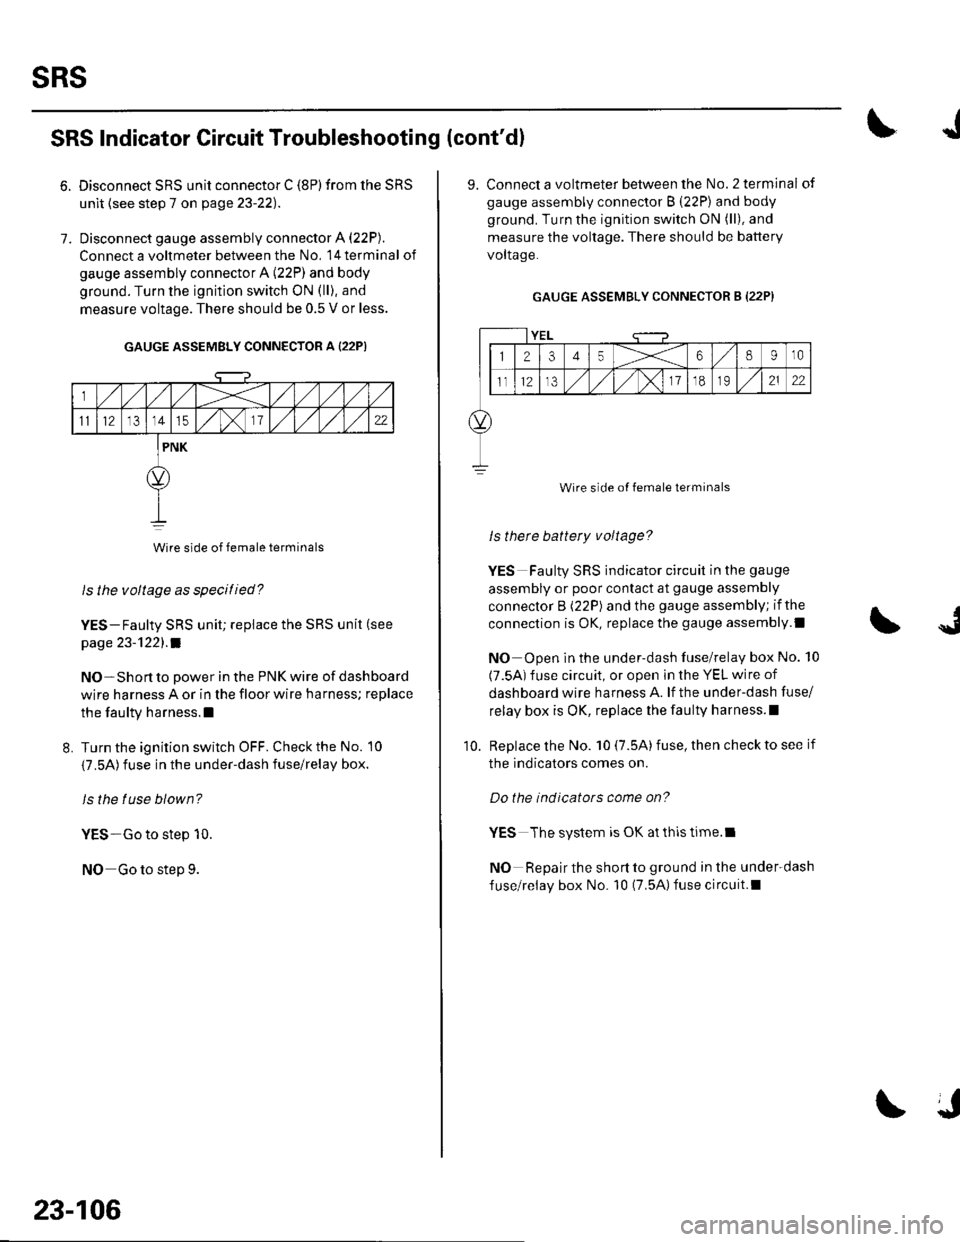
Disconnect SRS unit connector C (8P) from the SRS
unit {see step 7 on page 23-22).
Disconnect gauge assembly connector A (22P).
Connect a voltmeter between the No, l4terminal of
gauge assembly connector A (22P) and body
ground. Turn the ignition switch ON (ll), and
measure voltage. There should be 0.5 V or less.
GAUGE ASSEMBLY CONNECTOR A {22P)
Wire side of female terminals
ls the voltage as specitied?
YES-Faulty SRS unit; replace the SRS unit (see
page 23-'l22l.a
NO-Short to power in the PNK wire of dashboard
wire harness A or in the floor wire harness; replace
the faulty harness.l
L Turn the ignition switch OFF. Check the No. 10
{7.5A)fuse in the under-dash fuse/relay box.
ls the tuse blown?
YES-Go to step 10.
NO Go to step 9.
23-106
J
9. Connect a voltmeter between the No.2 terminal of
gauge assembly connector B (22P) and body
ground. Turn the ignition switch ON (ll), and
measure the voltage. There should be battery
voltaqe.
GAUGE ASSEMBLY CONNECTOR B (22P}
YEL
12345X68910
ll12,/ ,/,/x11o2122
Wire side of female terminals
ls therc battery voltage?
YES Faulty SRS indicator circuit in the gauge
assembly or poor contact at gauge assembly
connector B (22P) and the gauge assembly; if the
connection is OK, replace the gauge assembly.l
NO Open in the under-dash fuse/relay box No. 10
(7.5A) fuse circuit, or open in the YEL wire of
dashboard wire harness A. lf the under-dash fuse/
relay box is OK, replace lhe faulty harness.l
Replace the No. 10 (7.5A) fuse, then check to see if
the indicators comes on.
Do the indicators come on?
YES The system is OK at thls time.l
NO Repair the short to ground in the under-dash
fuse/relay box No. 10 (7.5A)fuse circuit.l
10.
Page 1114 of 1139
JI
I
The SRS lndicator Stays On When ln "SCS"
Menu Method
NOTE:. lf you cannot retrieve DTCSwith the PGM Tester
using the SRS menu method. retrieve the flash codeswith the Tester in SCS mode {see page 23-24|,.. A new SRS unit must sense the entire system is OK
before completing its initial self-test. The most
common cause of an incomplete self-test is the
failure to replace all deployed parts after a collision,
in particular, seat belt tensioners and seat belt buckletenstoners.. An incomplete self-test prevents the PGM Tester fromretrieving DTCS, although flash codes are available in
the Tester's SCS mode.
1 . Erase the DTC memory using the MES connector(see page 23-26).
Does the SRS indicator go off while you are
erasing the DTC memory?
YES-Go to step 42.
NO Go to step 2.
Check the No. '13 { 10A) fuse in the under-dash
fuse/relay box.
lsthe f use OK?
YES--Go to step 19.
NO Go to step 3.
Replacethe No. 13 (10A) fuse.
Turn the ignition switch ON (ll), and wait for 30
seconds. Then turn the ignition switch OFF.
Check rhe No. 13 (10A) fuse.
ls the f use OK?
YES The system is OK at this time.I
NO Go to step 6.
3.
I
6. Replace the No. 13 (10A) fuse.
7. Turn the ignition switch OFF. Disconnect the
battery negative cable, and wait for 3 minutes.
8. Disconnect the driver's airbag 4P connector (see
step 2 on page 23-21).
9. Disconnect the front passenger's airbag 4P
connector (see step 3 on page 23,21).
10. Disconnect both seat belt tensioner 2P connectors(see step 5 on page 23-221.
'11. DisconnectSRS unitconnectorA{18P)fromthe
SRS unit (see step 7 on page 23-22],.
'12. Reconnect the battery negative cable.
13. Turn the ignition switch ON (ll), and wait for 30
seconds. Then turn the ignition switch OFF.
14. Checkthe No. 13 ('10A) fuse.
ls the f use OK?
YES-Short to ground in the SRS unit; replace the
SRS unit (see page 23-122).a
NO Go to step 15.
15. Replace the No. 13 (10A) fuse.
{cont'd)
23-107
Page 1115 of 1139
sRs
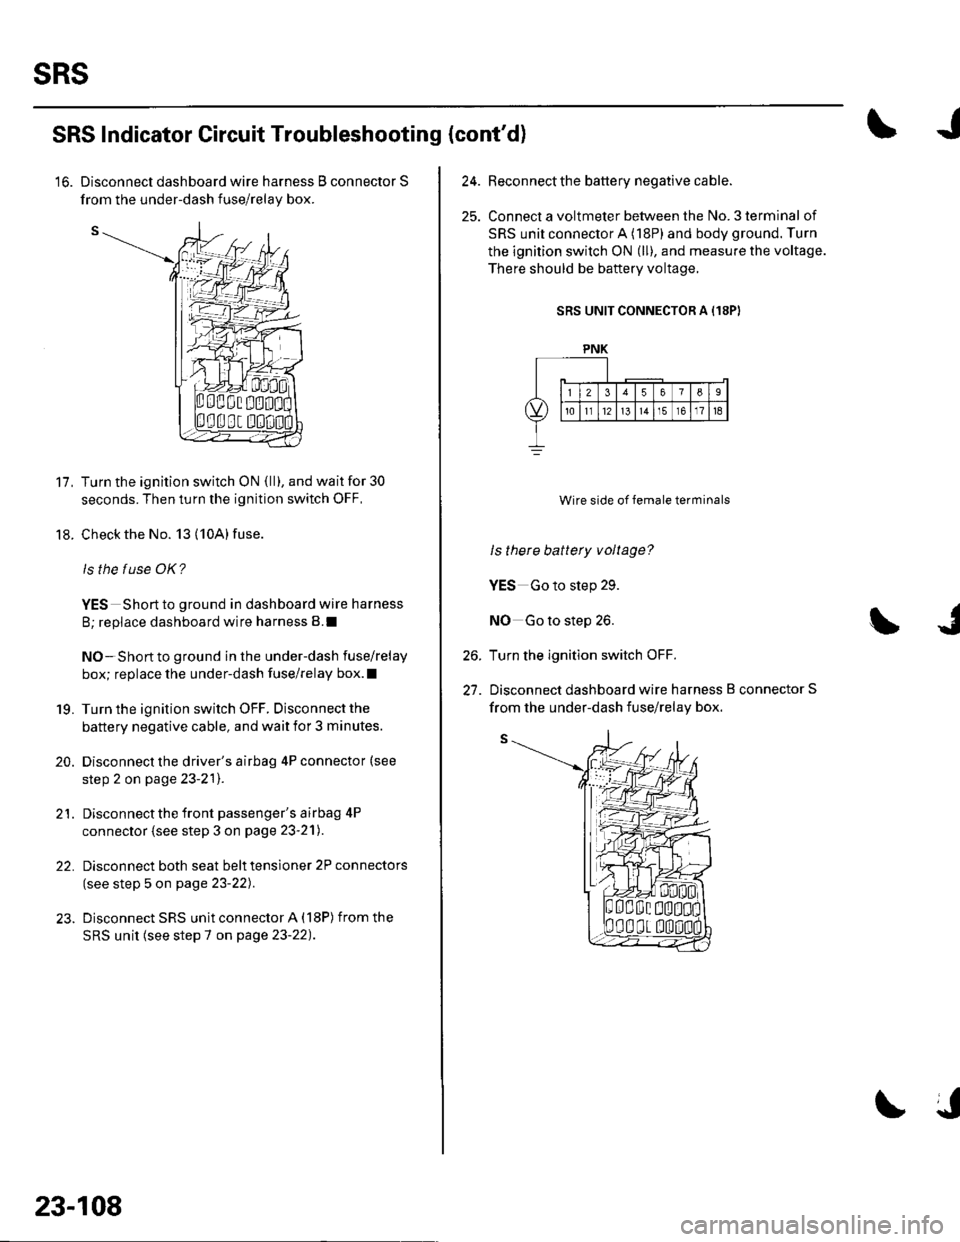
from the under-dash fuse/relav bor.
11.
18.
SRS Indicator Circuit Troubleshooting (cont'd)
'16. Disconnect dashboard wire harness B connector S
Turn the ignition switch ON {ll), and wait for 30
seconds. Then turn the ignition switch OFF,
Check the No. 13 (10A) fuse.
ls the f use OK?
YES Short to ground in dashboard wire harness
B; replace dashboard wire harness B.I
NO-Short to ground in the under-dash fuse/relay
box; replace the under-dash fuse/relay box.l
Turn the ignition switch OFF. Disconnect the
battery negative cable, and wait for 3 minutes.
Disconnect the driver's airbag 4P connector (see
step 2 on page 23-2'l).
Disconnect the front passenger's airbag 4P
connector (see step 3 on page 23-21).
Disconnect both seat belt tensioner 2P connectors
(see step 5 on page 23-22).
Disconnect SRS unit connector A (18P) from the
SRS unit (see step 7 on page 23-22).
19.
20.
21.
22.
23-108
24.Beconnect the battery negative cable.
Connect a voltmeter between the No. 3 terminal of
SRS unit connector A (18P) and body ground. Turn
the ignition switch ON (ll), and measure the voltage.
There should be baftery voltage.
SRS UNIT CONNECTOR A (18PI
Wire side of female terminals
ls there battery voltage?
YES Go to step 29.
NO Go to step 26.
Turn the ignition switch OFF.
Disconnect dashboard wire harness B connector S
26.
27.
PNK
from the under-dash fuse/relav box.
Page 1116 of 1139
I
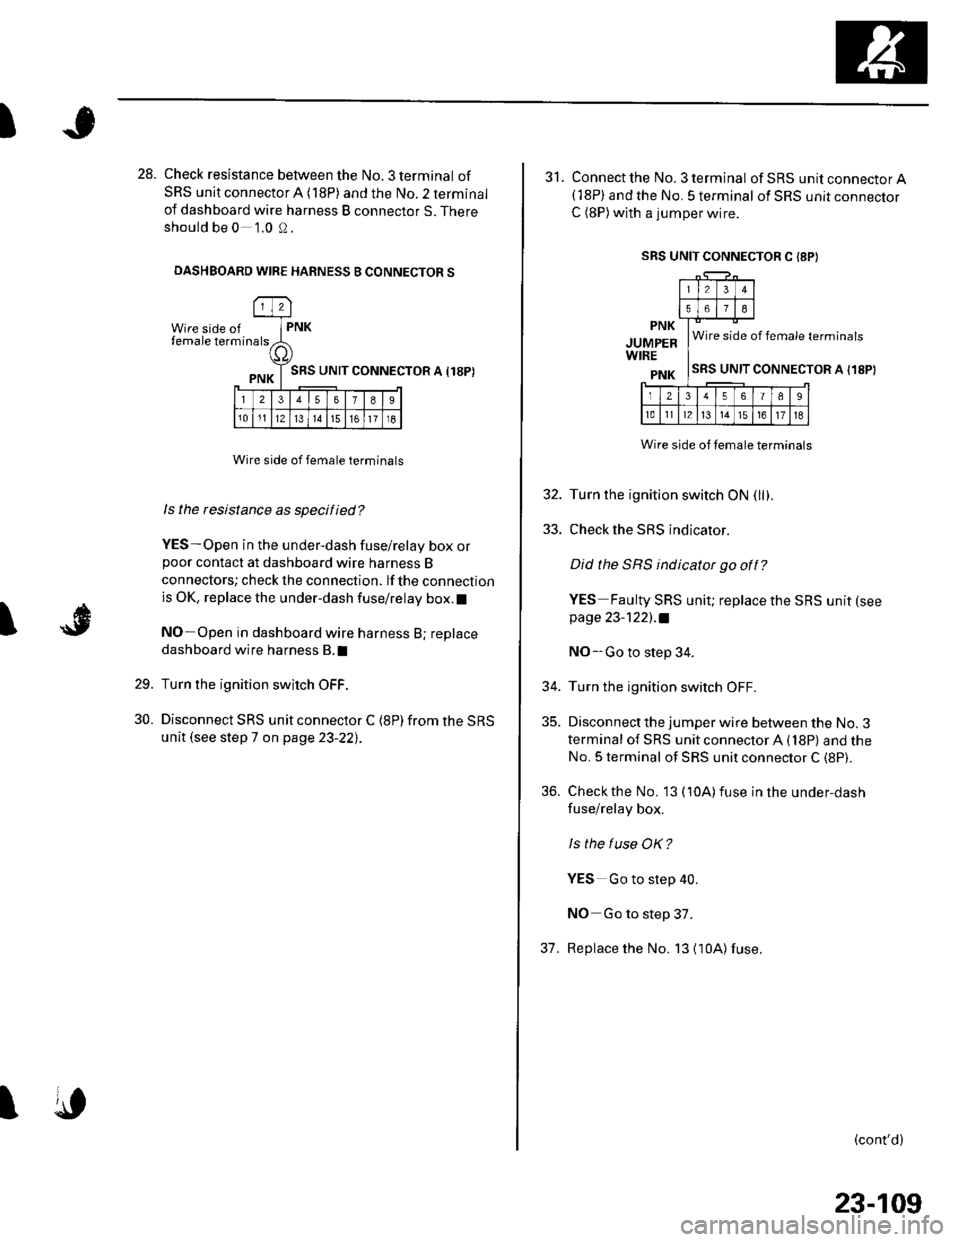
28. Check resistance between the No. 3 terminal of
SRS unit connector A (18P) and the No. 2 terminal
of dashboard wire harness B connector S. There
should be 0 1.0 0.
DASHBOARD WIRE HARNESS B CONNECTOR S
Wire side offemale term
l2
rna lsPNK
a,
PNK T SRS uNrr
l23578I
101112l314151611l8
CONNECTOR A I18P)
I
Wire side of female terminals
ls the rcsistance as specified?
YES-Open in the under-dash fuse/relay box orpoor contact at dashboard wire harness B
connectors; check the connection. lf the connection
is OK, replace the under-dash fuse/relay box.l
NO-Open in dashboard wire harness B; replace
dashboard wire harness B.I
Turn the ignition switch OFF.
Disconnect SRS unit connector C {8P) from the SRS
unit (see step 7 on page 23-22],.
29.
30.
I
SRS UNIT CONNECTOR C I8P}
31. Connect the No. 3 terminal ofSRS unitconnectorA(18P) and the No. 5 terminal of SRS unit connector
C (8P)with a jumper wire.
PNK
JUMPERWIRE
PNK
Wire side of female terminals
SRS UNIT CONNECTOR A I18P)
Wire side of temale terminals
32. Turn the ignition switch ON (llf .
33. Check the SRS indicator.
Did the SRS indicator go off?
YES Faulty SRS unit; replace the SRS unit (see
page 23-122l.a
NO-Go to step 34.
34. Turn the ignition switch OFF.
35. Disconnect the jumper wire between the No. 3
terminal of SRS unit connector A (18P) and the
No. 5 terminal of SRS unit connector C (8P).
36. Check the No. 13 (10A)fuse in the under,dash
fuse/relay box.
ls the f use OK?
YES Go to step 40.
NO Go to step 37.
37. Replace the No. 13 {10A)fuse.
(cont'd)
23-109