radiator replace HONDA CIVIC 2003 7.G User Guide
[x] Cancel search | Manufacturer: HONDA, Model Year: 2003, Model line: CIVIC, Model: HONDA CIVIC 2003 7.GPages: 1139, PDF Size: 28.19 MB
Page 201 of 1139
Fan Controls
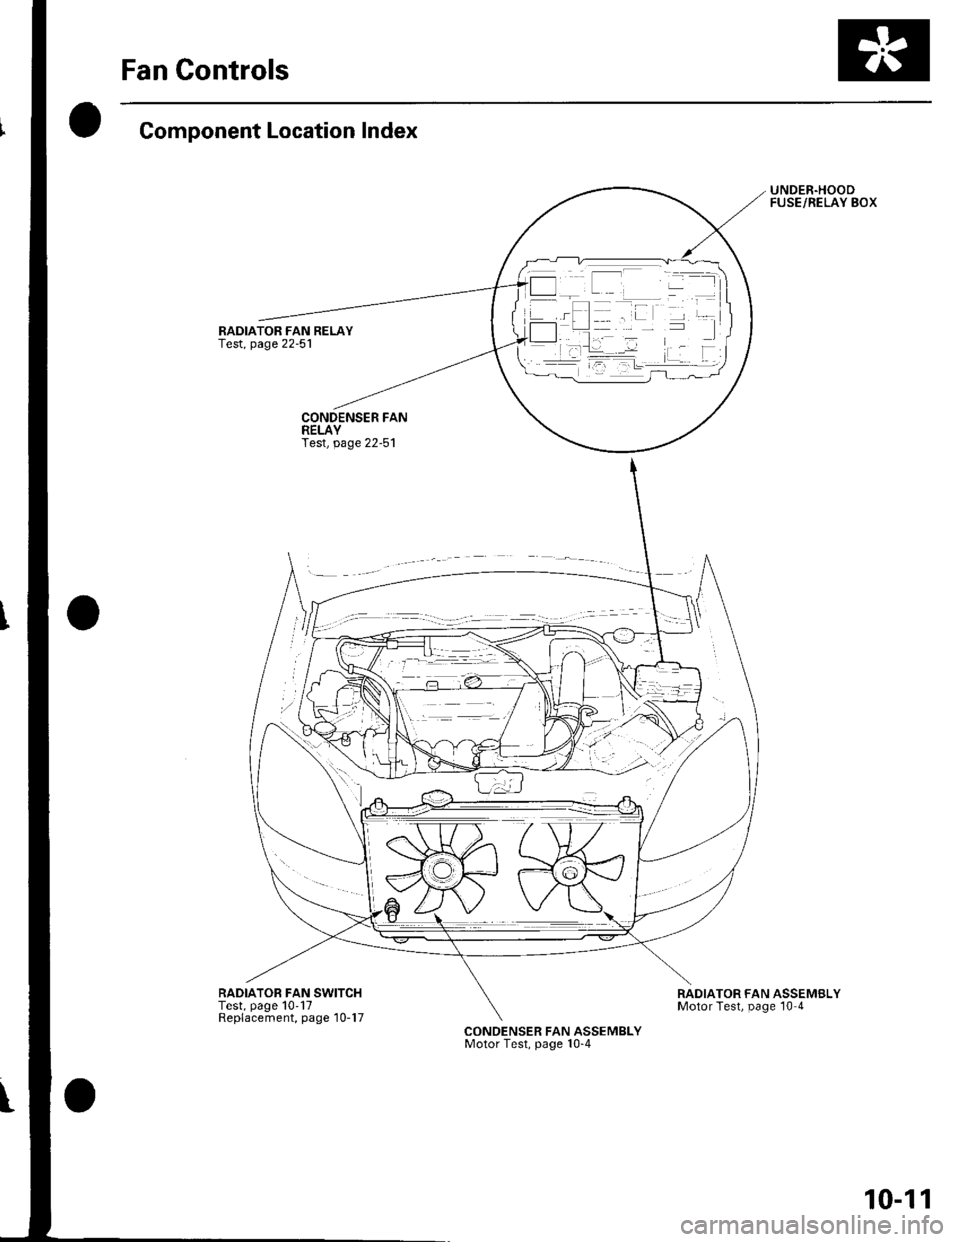
Component Location Index
RADIATOR FAN RELAY
RADIATOB FAN SWITCHTest, page 10'17Replacement, page'10-17
UNDER.HOODFUSE/RELAY BOX
RADIATOR FAN ASSEMBLYMotor Test, page 10 4
CONDENSER FAN ASSEMBLYMotor Test, page 10-4
10-11
Page 204 of 1139
Fan Gontrols
Radiator Fan Circuit Troubleshooting
1. Check the No. 4 (20A) fuse in the under-hood
fuse/relay box, and the No. 14 (10A) fuse in the
under-dash fuse/relay box.
ls the tuse (s) OK?
YES-Go to step 2.
NO- Replace the fuse (s) and recheck.l
2. Remove the radiator fan relay from the under-hood
fuse/relay box, and test it (see page 22-51).
ls the relay OK?
YES Go to step 3.
NO Replace the radiator fan relay. t
3. Measure the voltage between the No. 2 terminal of
the radiator fan relay 4P socket and body ground.
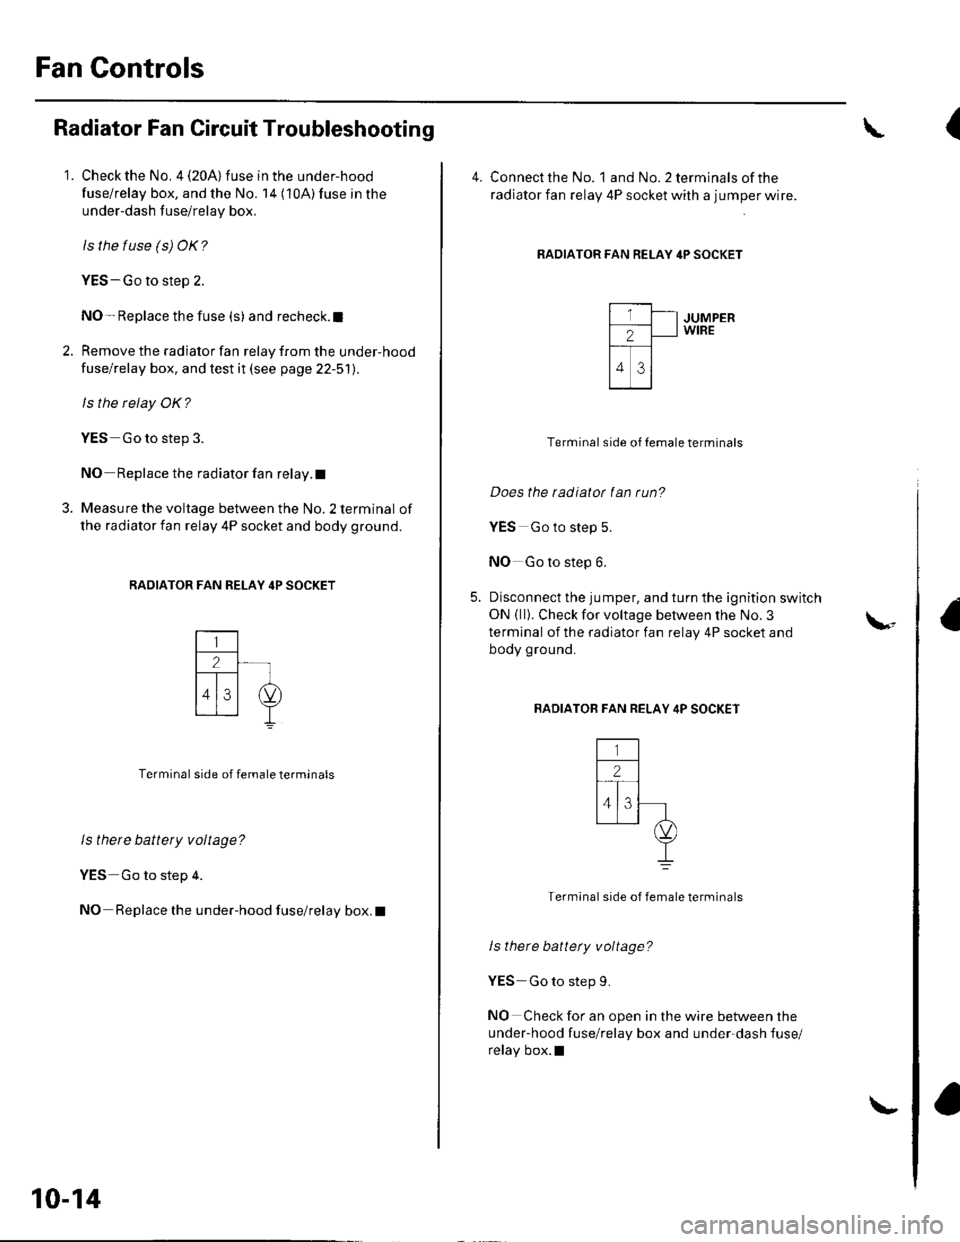
RADIATOR FAN RELAY 4P SOCKET
Terminal side of female terminals
ls there battery voltage?
YES Go to step 4.
NO Replace the under-hood fuse/relay box. I
10-14
\-
(
4. Connect the No. landNo.2terminalsofthe
radiator fan relay 4P socket with a jumper wire.
RADIATOR FAN RELAY 4P SOCKET
JUMPERWIRE
Terminal side of Iemale terminals
Does the radiatot fan run?
YES Go to step 5.
NO Go to step 6.
Disconnect the jumper, and turn the ignition switch
ON { ll}. Check for voltage between the No. 3
terminal of the radiator fan relay 4P socket and
body ground.
BADIATOB FAN RELAY 4P SOCKET
Termlnal side of female terminals
ls there battety voltage?
YES-Go to step 9.
NO Check for an open in the wire between the
under-hood fuse/relay box and under-dash fuse/
relay box.l
\-
Page 205 of 1139
7.
Disconnect the radiator fan motor 2P connector.
Check for continuity between the No. 1 terminal of
the radiator fan relay 4P socket and the No. 2
terminal of the radiator fan motor 2P connector.
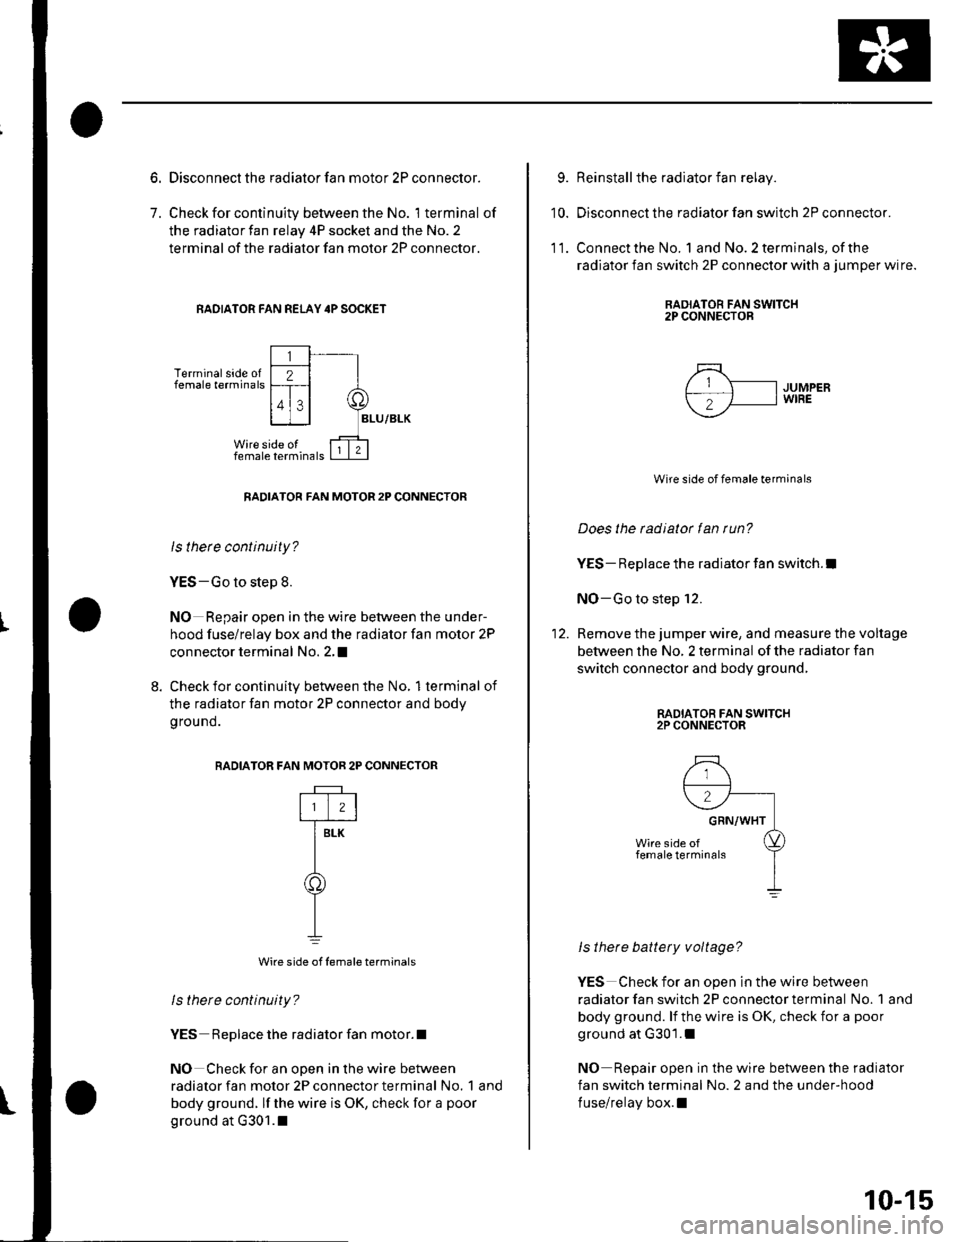
RAOIATOR FAN REI-AY 4P SOCKET
Terminal side offemale terminals
RADIATOR FAN MOTOR 2P CONNECTOR
ls thete continuity?
YES-Go to step 8.
NO Repair open in the wire between the under-
hood fuse/relay box and the radiator fan motor 2P
connector terminal No. 2,I
8. Check for continuity between the No, 1terminal of
the radiator fan motor 2P connector and bodv
g rou nd.
RADIATOR F
Wire side of female terminals
ls there continuity?
YES Replace the radiator fan motor.l
NO Check for an open in the wire between
radiator fan motor 2P connector terminal No. 1 and
body ground. lf the wire is OK, check for a poor
ground at G301.1
AN MOTOR 2P CONNECTOR
rftr
T-
Y
9.
10.
Reinstall the radiator fan relay.
Disconnect the radiator fan switch 2P connector.
Connect the No. 1 and No. 2 terminals, of the
radiator fan switch 2P connector with a jumper wire.
RAOIATOR FAN SWITCH2P CONNECTOR
11.
5\- IJUMPERf-; 'fl I wrRE
--
Wire side of female terminals
Does the radiator fan run?
YES- Replace the radiator fan switch.l
NO-Go to step 12.
Remove the jumper wire, and measure the voltage
between the No, 2 terminal of the radiator fan
switch connector and body ground,
RADIATOR FAN SWITCH2P CONNECTOR
ls there battery voltage?
YES Check for an open in the wire between
radiator fan switch 2P connector terminal No. 1 and
body ground. lf the wire is OK, check for a poor
ground at G301.1
NO Repair open in the wire between the radiator
fan switch terminal No. 2 and the under-hood
fuse/relay box.l
10-15
Page 206 of 1139
Fan Controls
Radiator Fan Switch Circuit
Troubleshooting (Openl
1. Disconnect the radiator fan switch 2P connector.
2. Turn the ignition switch ON (ll).
3. Measure voltage between the No.2 terminal ofthe
radiator fan switch 2P connector and body ground.
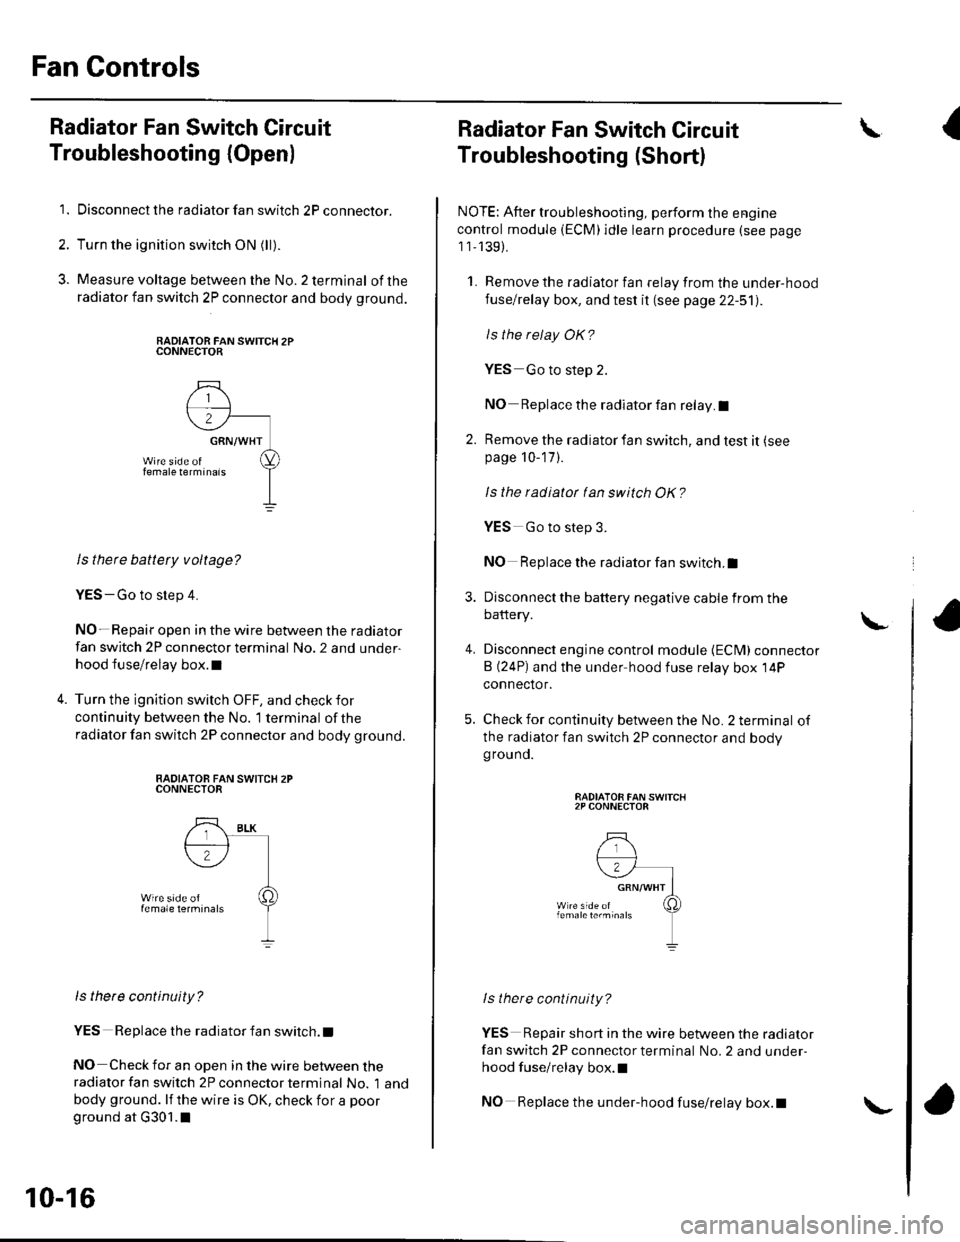
RADIATOR FAN SWITCH 2PCONNECTOR
ls there battety voltage?
YES-Go to step 4.
NO- Repair open in the wire between the radiator
fan switch 2P connector terminal No. 2 and under-
hood fuse/relay box.l
Turn the ignition switch OFF, and check for
continuity between the No. '1 terminal of the
radiator fan switch 2P connector and body ground.
RADIATOB FAN SWITCX 2PCONNECTOR
ls there continuity?
YES Replace the radiator fan switch. t
NO Check for an open in the wire between theradiator fan switch 2P connector terminal No. 1 and
body ground. lf the wire is OK, check for a poor
ground at G301.1
10-16
\-
Radiator Fan Switch Circuit
Troubleshooting (Short)
NOTE: After troubleshooting, perform the engine
control module (ECM)idle learn procedure (see page
1 1,139).
1. Remove the radiator fan relay from the under-hood
fuse/relay box, and test it (see page 22-51).
ls the relay OK?
YES Go to step 2.
NO Replace the radiator fan relay.I
2. Remove the radiator fan switch, and test it (see
page 10-17 ).
Is the radiatot tan switch OK?
4.
YES Go to step 3.
NO Replace the radiator fan switch.I
Disconnect the battery negative cable from the
battery.
Disconnect engine control module {ECM) connector
B (24P) and the under hood fuse relay box 14P
connector.
Check for continuity between the No. 2 terminal of
the radiator fan switch 2P connector and bodygrouno.
RADIATOR FAN SWITCH2P CONNECTOR
lstnere continuity?
YES Repair short in the wire between the radiator
fan switch 2P connector terminal No. 2 and under-
hood fuse/relay box.l
NO Replace the under-hood fuse/relay box.t
\I
\
Page 207 of 1139
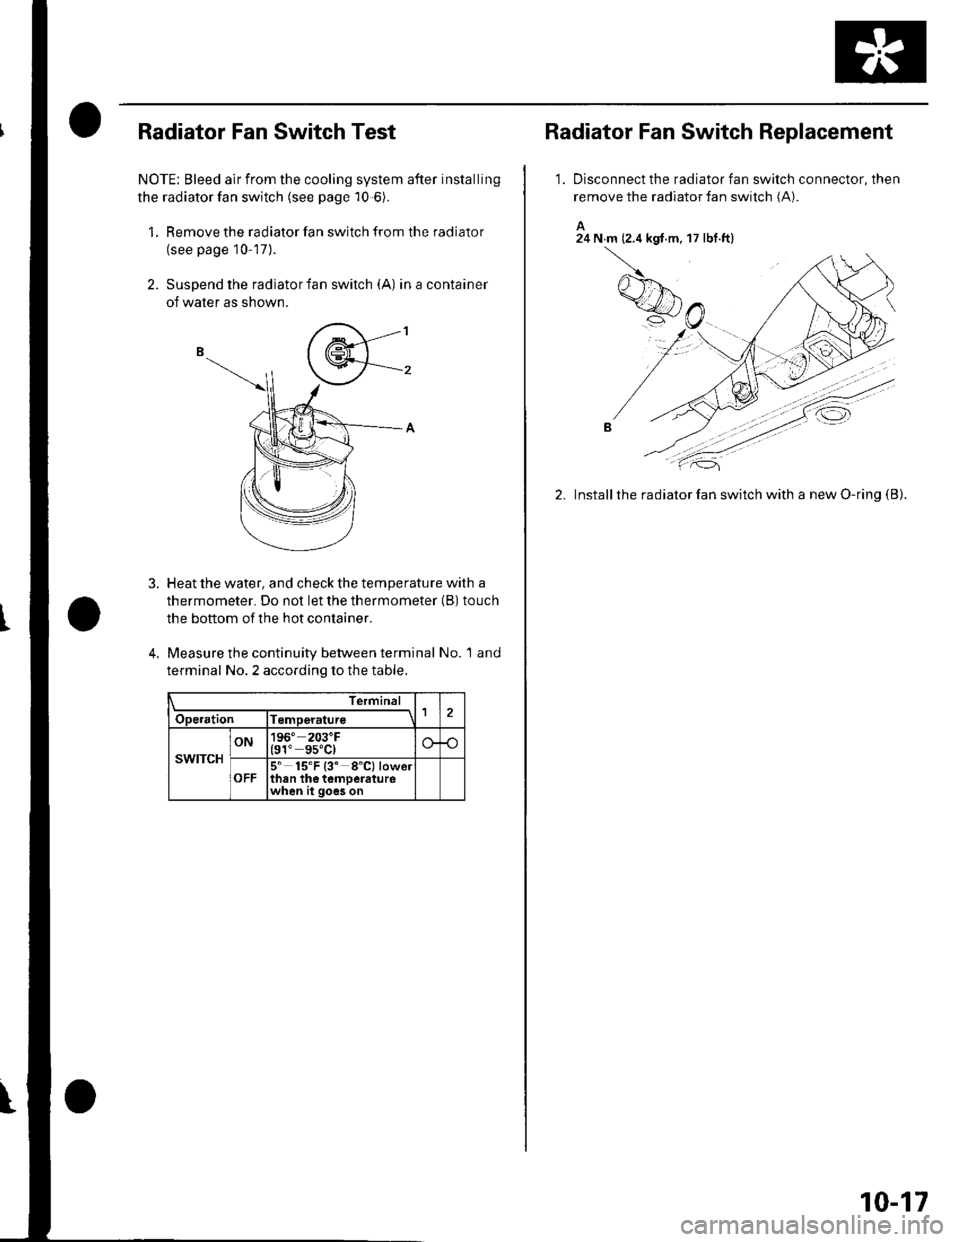
Radiator Fan Switch Test
NOTE: Bleed air from the cooling system after installing
the radiator fan switch (see page 10-6).
1, Remove the radiator fan switch from the radiator
(see page 10-17).
2. Suspend the radiator fan switch (A) inacontainer
of water as shown.
3. Heat the water, and check the temperature with a
thermometer. Do not let the thermometer (B) touch
the bottom of the hot conlainer.
4. Measure the continuity between terminal No. 1 and
terminal No. 2 according to the table.
Termina
Operation lTemperature1
swtTcH
ON196" 203'F(91" gs"C)
OFF5' 15'F {3' 8'C) lowelthan the temoeraturewhen it goes on
Radiator Fan Switch Replacement
1.Disconnect the radiator fan switch connector, then
remove the radiator fan switch (A).
A24 N m (2.4 kgt.m, 17 lbt.ftl
2. Installthe radiator fan switch with a new O-ring (B).
10-17
Page 260 of 1139
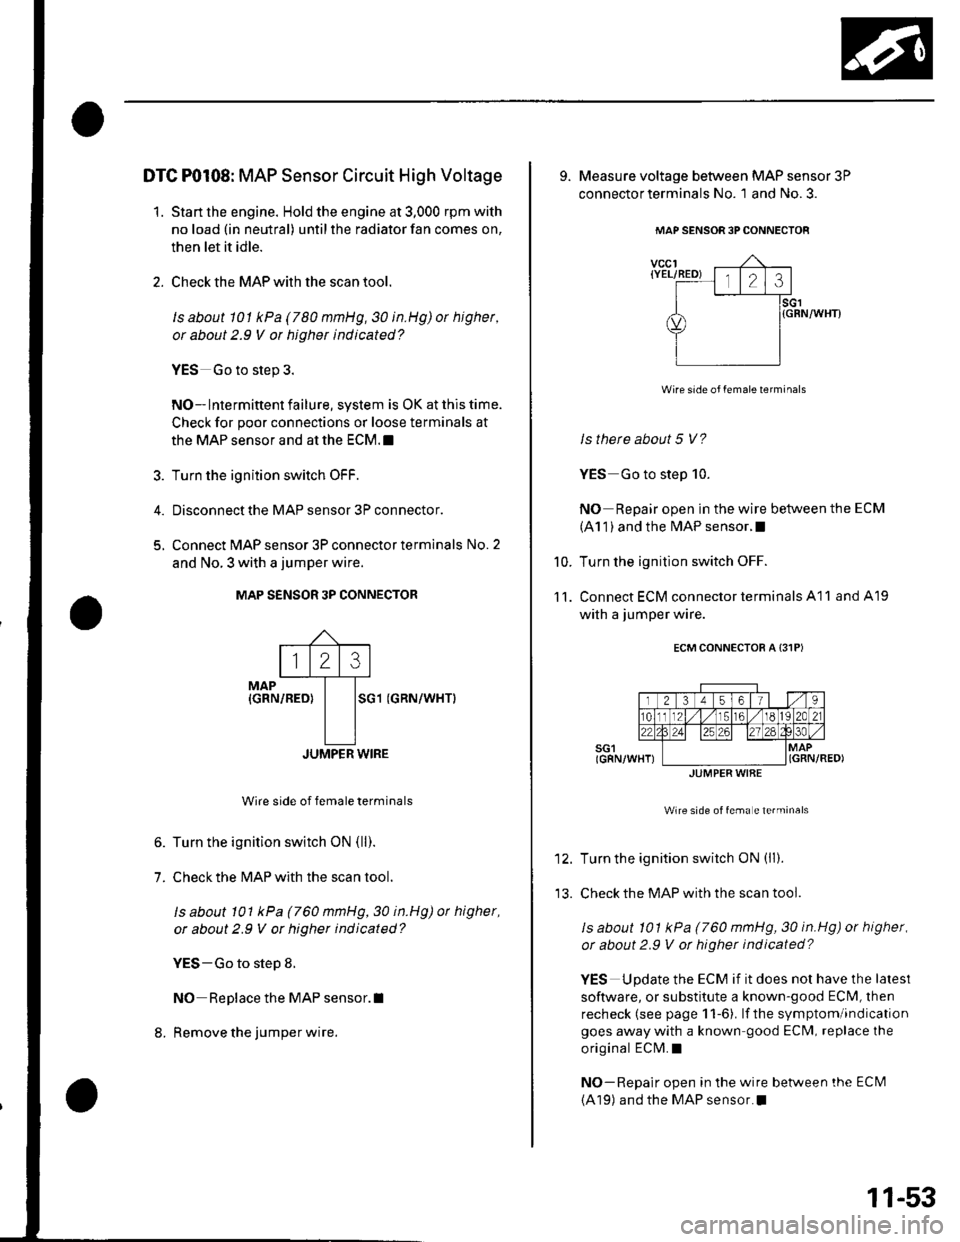
DTC P0108: MAP Sensor Circuit High Voltage
'1. Start the engine. Hold the engine at 3,000 rpm with
no load (in neutral) until the radiator fan comes on,
then let it idle.
2. Check the MAP with the scan tool.
le about 101 kPa (780 nmHg, 30 in.Hg) ot highet,
or about 2.9 V or higher indicated?
YES Go to step 3.
NO-lntermittent failure, system is OK at this time.
Check for poor connections or loose terminals at
the MAP sensor and at the ECM.I
3. Turn the ignition switch OFF.
4. Disconnectthe MAP sensor 3P connector.
5, Connect MAP sensor 3P connector terminals No. 2
and No. 3 with a jumper wire.
MAP S€NSOR 3P CONNECTOR
MAP{GRN/REO}SG1 (GRN/WHTI
JUMPER WIRE
Wire side of female terminals
6. Turn the ignition switch ON (ll).
7. Check the MAP with the scan tool.
ls about 101 kPa (760 mmHg,30 in.Hg) ot higher,
or about 2.9 V or higher indicated?
YES-Go to step 8.
NO Replace the MAP sensor.I
8. Remove the jumper wire.
123
9. Measure voltage between MAP sensor 3P
connector terminals No. 1 and No. 3.
MAP SENSOR 3PCONNECTOF
vccl{YEL/RED) l,lo cll.l.rl
I lsct
d) l{GRN/wHrr
YIilll
Wire side of female lerminals
ls there about 5 V?
YES Go to step 10.
NO Repair open in the wire between the ECM
(A1 1 ) and the MAP sensor.I
Turn the ignition switch OFF.
Connect ECM connector terminals A11 and A19
with a jumper wire.
ECM CONNECTOR A {31PI
Wire side of fema e te.minals
Turn the ignition switch ON (ll).
Check the MAP with the scan tool.
ls about 101 kPa (760 mmHg, 30 in.Hg) or higher,
or about 2.9 V ot higher indicated?
YES Update the ECM if it does not have the lalest
software, or substitute a known-good ECM, lhen
recheck (see page 1 1-6). lf the symptom/indication
goes away with a known good ECM, replace the
original ECM.I
NO-Repair open in the wire betlveen the ECI\il
(A19) and the MAP sensor.I
10.
11.
JUMPER WIAE
11-53
Page 261 of 1139
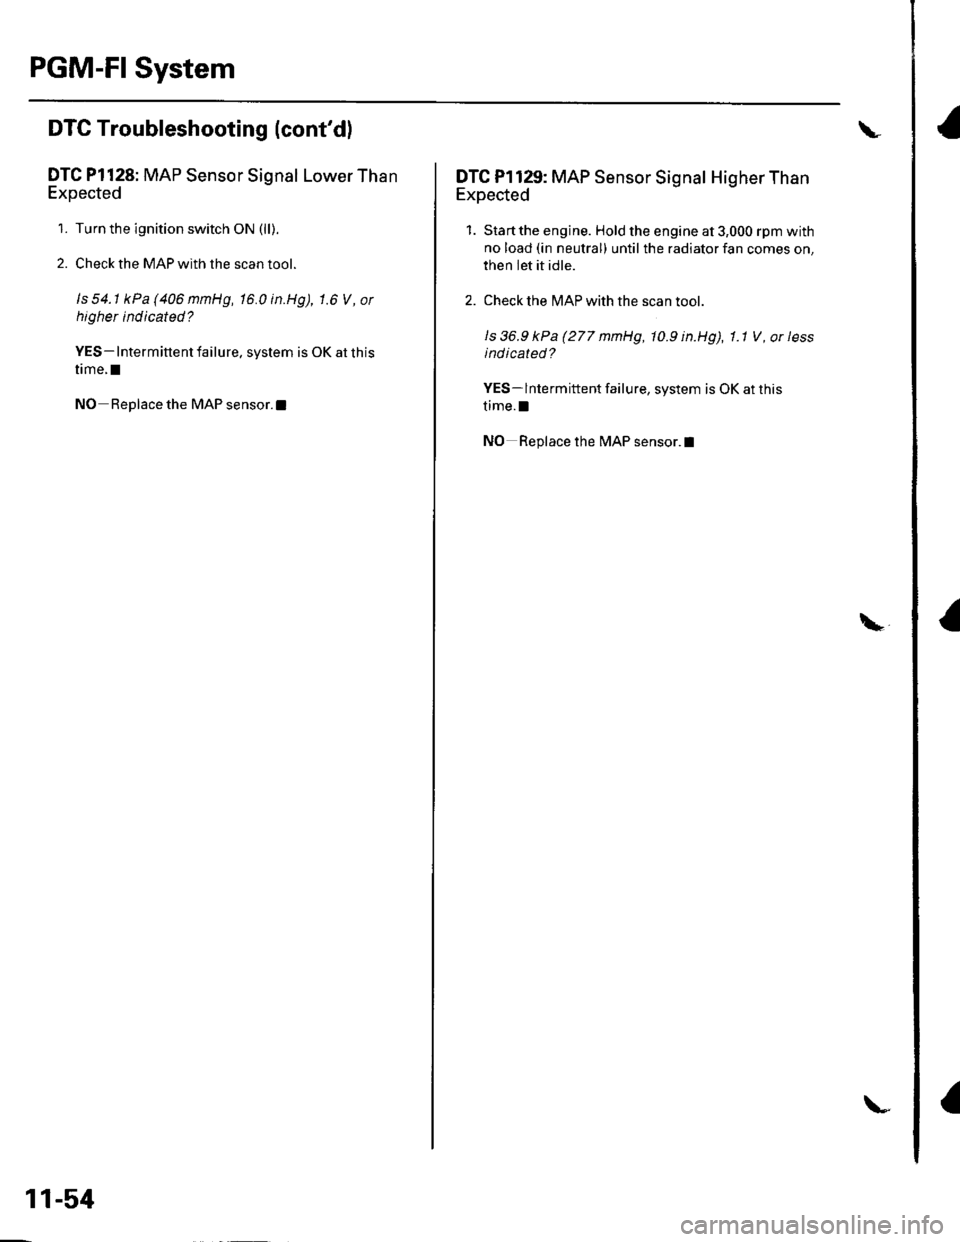
PGM-FI System
a
DTC Troubleshooting (cont'dl
DTC Pl128: MAP Sensor Signal Lower Than
Expected
1. Turn the ignition switch ON (ll).
2. Check the MAP with the scan tool.
ls 54.1 kPa(406mmHg, 16.0in.Hg), 1.6 V, or
higher indicated?
YES- Intermittent failure. system is OK at this
time.I
NO Replace the MAP sensor.l
11-54
\
\
DTC Pl129: MAP Sensor Signal Higher Than
Expected
1. Start the engine. Hold the engine at 3,000 rpm with
no load (in neutral) until the radiator fan comes on,
then Iet it idle.
2. Check the MAP with the scan toot.
ls 36.9 kPa (277 mmHg, 10.9 in.Hg), 1.1 V , or less
indicated?
YES- lntermittent failure, system is OK at this
time.l
NO Replace the MAP sensor.l
\
Page 264 of 1139
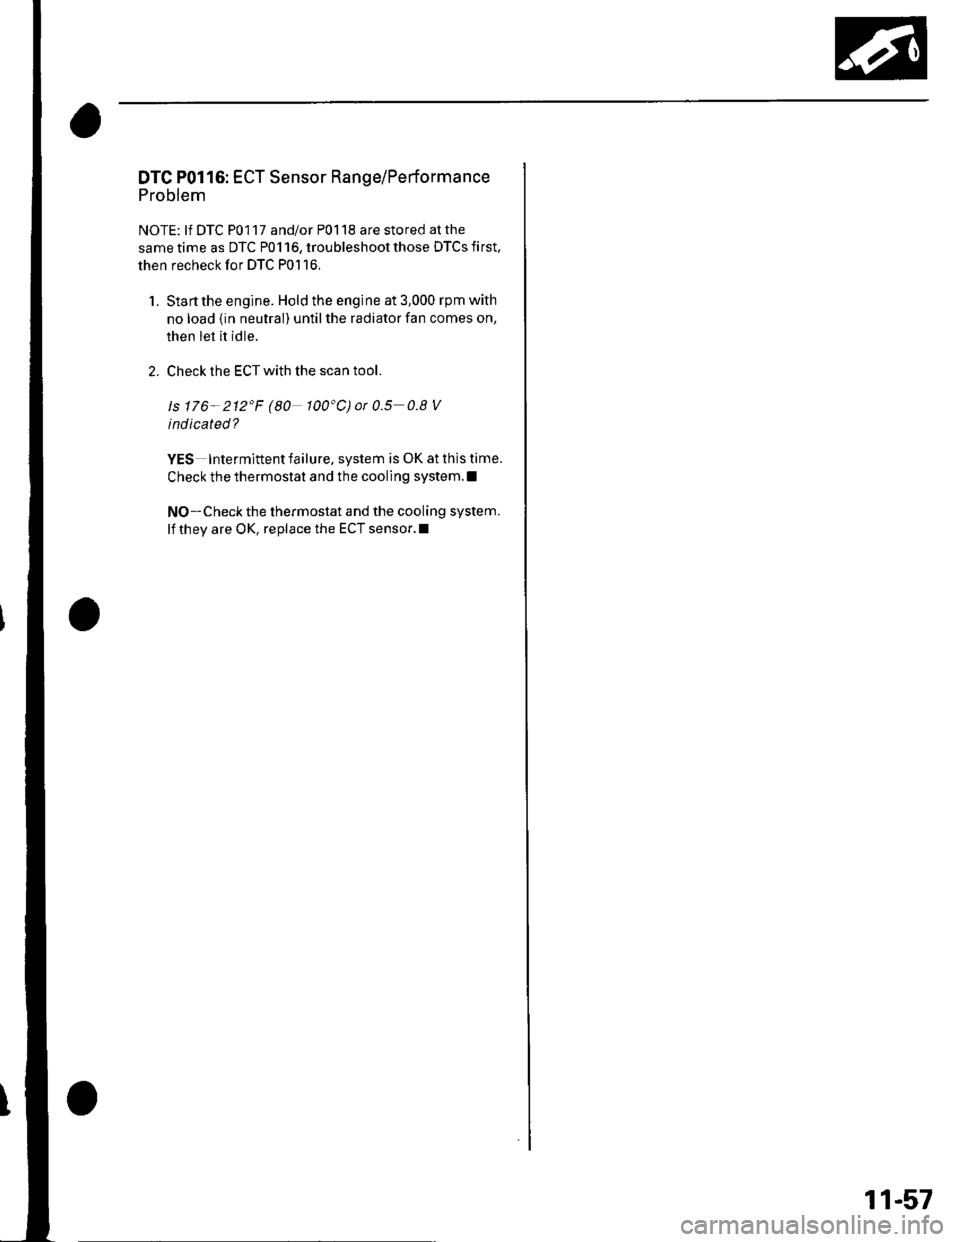
DTC P0116: ECT Sensor Range/Performance
Problem
NOTE: lf DTC P0117 and/or P0118 are stored at the
same time as DTC P0116, troubleshoot those DTCS first,
then recheck for DTC P0116,
1. Stanthe engine. Hold the engine at 3,000 rpm with
no load {in neutral) until the radiator fan comes on,
then let it idle.
2. Check the ECT with the scan tool.
ls 176- 212'F (80 100"C)or0.5 0.8V
indicated?
YES Intermittent failure. system is OK at this time.
Check the thermostat and the cooling system.l
NO-Checkthe thermostat and the cooling system.
lf they are OK, replace the ECT sensor.l
11-57
Page 271 of 1139
PGM-FI System
aDTG Troubleshootang (cont'dl
DTC P0128: Cooling System Malfunction
NOTE; lf the DTCS listed below are stored at the same
time as DTC P0128. troubleshoot those DTCS first, thenrecheck for P0128.
P0107, P0108, P1128, P1129: N4anifold absolutepressure (MAP) sensor
P] I06, P1 107, P1 108: Barometric pressure (BARO)
sensor
P1259: VTEC system
P01 16, P01 17, P01 18: Engine coolant temperature (ECT)
sensor
P01 12, P01 13: Intake air temperature (lAT) sensor
P0500: Vehicle speed sensor {VSS)P0335, P0336: Crankshaft position (CKP) sensor
P0300: Random misfire
P0301, P0302, P0303, P0304: No. 1, No. 2, No.3 or No.4
cylinder misfire
P0505: ldle control system malfunction
P1519: ldle air control (lAC)valve
DTC P0128 can occasionally set when the hood is
opened while the engine is running.
1. Check the engine coolant level
Is the engine coolant level low?
VES Refill the engine coolant. lf necessary, repair
the coolant leakage.l
NO Go to step 2.
2. Turn the ignition switch ON (ll), and make sure the
A,/C is off.
11-64
\
3. Check the radiator fan.
Does the tadiator fan keep running?
YES Checkthe rad iato r fan circuit (see page 10-
14), the radiator fan switch circuit (Short) (see page
10-'16), and the radiator fan switch (see page 10-17).
Also, inspect the ECT and IAT circuits and terminal
connections. lf the circuits, the switch, and the
connections are OK, update the ECI\4 if it does not
have the latest software. or substitute a known-good ECM, then recheck (see page 1 1-6). lf the
symptom/indication goes away with a known-good
ECM, replace the original ECM.I
NO Replace the thermostat (see page 10-8).1
Page 272 of 1139
DTC P0134: Ay'F Sensor (Sensor 1) No Activity
Detected
1. Check the attachment state of the A,/F sensor(Sensor 1).
ls it slacked f rom the exhaust pipe?
YES- Reinstall the Ay'F sensor (Seneor 1) (see page
11-113).t
NO-Go to step 2.
2. Reset the ECM (see page 1 1-4).
3. Stan the engine. Hold the engine speed at
3,000rpm with no load (in neutral) until the radiator
fan comes on, then let it idle for 2 minute.
ls DTC PO134 indicated?
YES-Replace the Ay'F sensor {Seneor 1) (see page
11-113).t
NO - Intermittent failu re, sistem is OK at this time.
Check for poor connections or loose terminals at
the Ay'F sensor (Seneor 1 ) and the ECM.I
DTC P0137: Secondary HO2S (Sensor 2)
Circuit Low Voltage
1. Reset the ECM (see page I1-4)
2. Start the engine. Hold the engine at 3,000 rpm wilh
no load (in neutral) until the radiator fan comes on.
3. Check the secondary HO2S (Sensor 2) output
voltage at 3,000 rpm with the scan tool.
ls there 0.3 V or less?
YES Go to step 4.
NO-lntermittent failure, system is OK at this time.
Check for poor connections or loose terminals at
the secondary HO2S (Sensor 2) and at the ECM.I
Turn the ignition switch OFF.
Disconnect the secondary HO2S (Sensor 2) 4P
connector.
Turn the ignition switch ON (ll).
Check the secondary HO2S (Sensor 2) output
voltage with the scan tool.
ls there 0.3 V or less?
YES Go to step 8.
NO Replace the secondary HO2S (Sensor 2).1
Turn the ignition switch OFF.
Disconnect ECM connector E (31P).
icont'd)
4.
5.
6.
7.
8.
9.
11-65