ect HONDA CIVIC 2003 7.G Workshop Manual
[x] Cancel search | Manufacturer: HONDA, Model Year: 2003, Model line: CIVIC, Model: HONDA CIVIC 2003 7.GPages: 1139, PDF Size: 28.19 MB
Page 443 of 1139
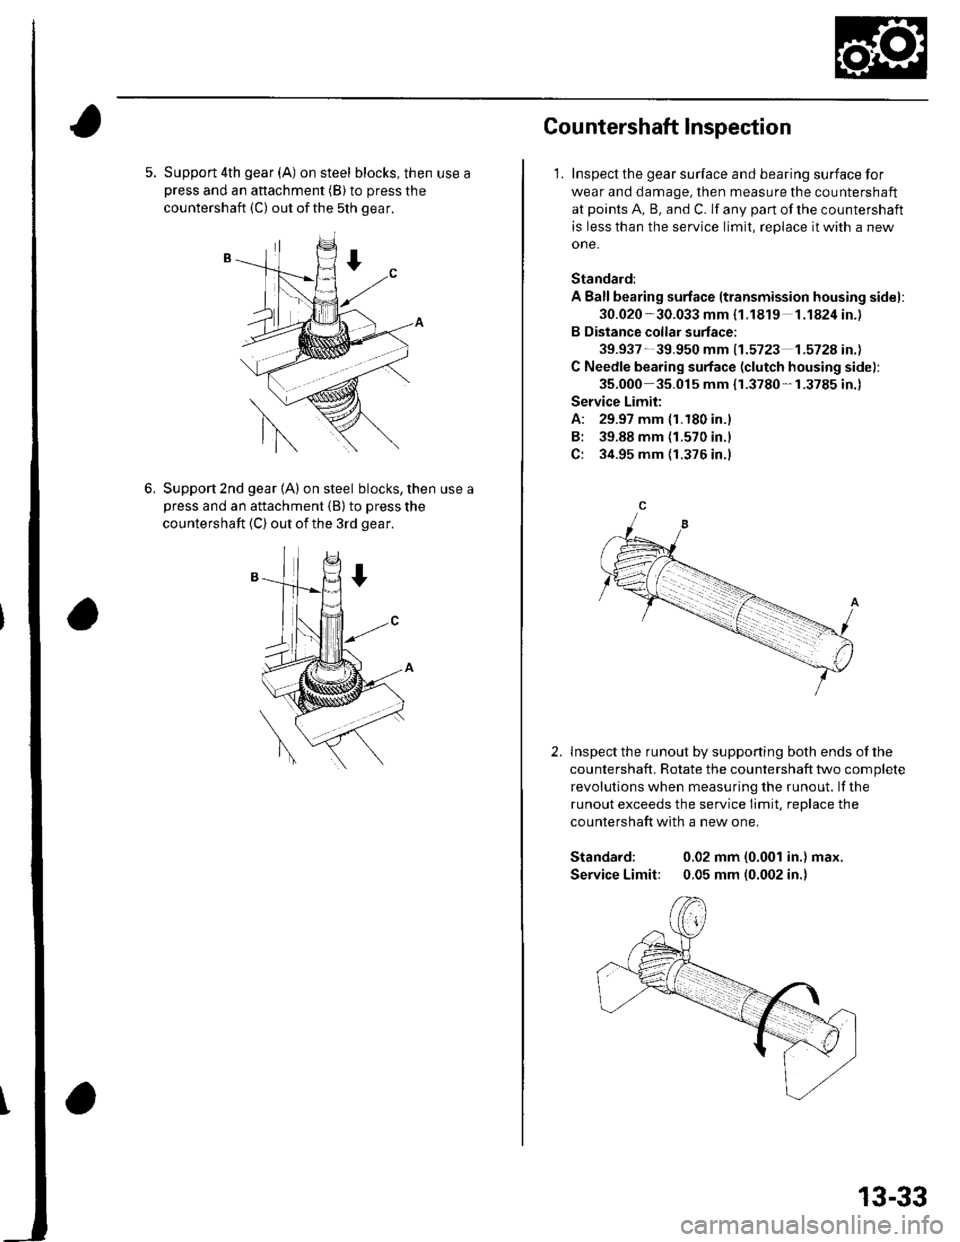
5. Support 4th gear (A) on steel blocks, then use apress and an attachment (B) to press the
countershaft (C) out ofthe 5th gear.
6.Support 2nd gear (A) on steel blocks, then use a
Dress and an attachment {B} to press the
countershaft (C) out of the 3rd gear.
Cou ntershaft lnspection
1. Inspect the gear surface and bearing surface for
wear and damage, then measure the countershaft
at points A, B, and C. lf any part of the countershaft
is less than the service limit, replace it with a new
one.
Standard:
A Ballbearing surface ltransmission housing sidel:
30.020 -30.033 mm {1.1819 1.1824in.)
B Distance collar surface;
39.937- 39.950 mm 11.5723 1.572A in.l
C Needle bearing surface (clutch housing side):
35.000 35.015 mm {r.3780-1.3785 in.)
Service Limit:
A: 29.97 mm {1.180 in.)
B: 39.88 mm {1.570 in.l
C: 34.95 mm {1.376 in.)
lnspect the runout by supporting both ends of lhe
countershaft. Rotate the countershaft two complete
revolutions when measuring the runout. lf the
runout exceeds the service Iimit, replace the
countershaft with a new one.
Standard: 0.02 mm (0.001 in.) max.
Service Limit: 0.05 mm (0.002 in.)
2.
13-33
Page 444 of 1139
Manual Transmission
(
(
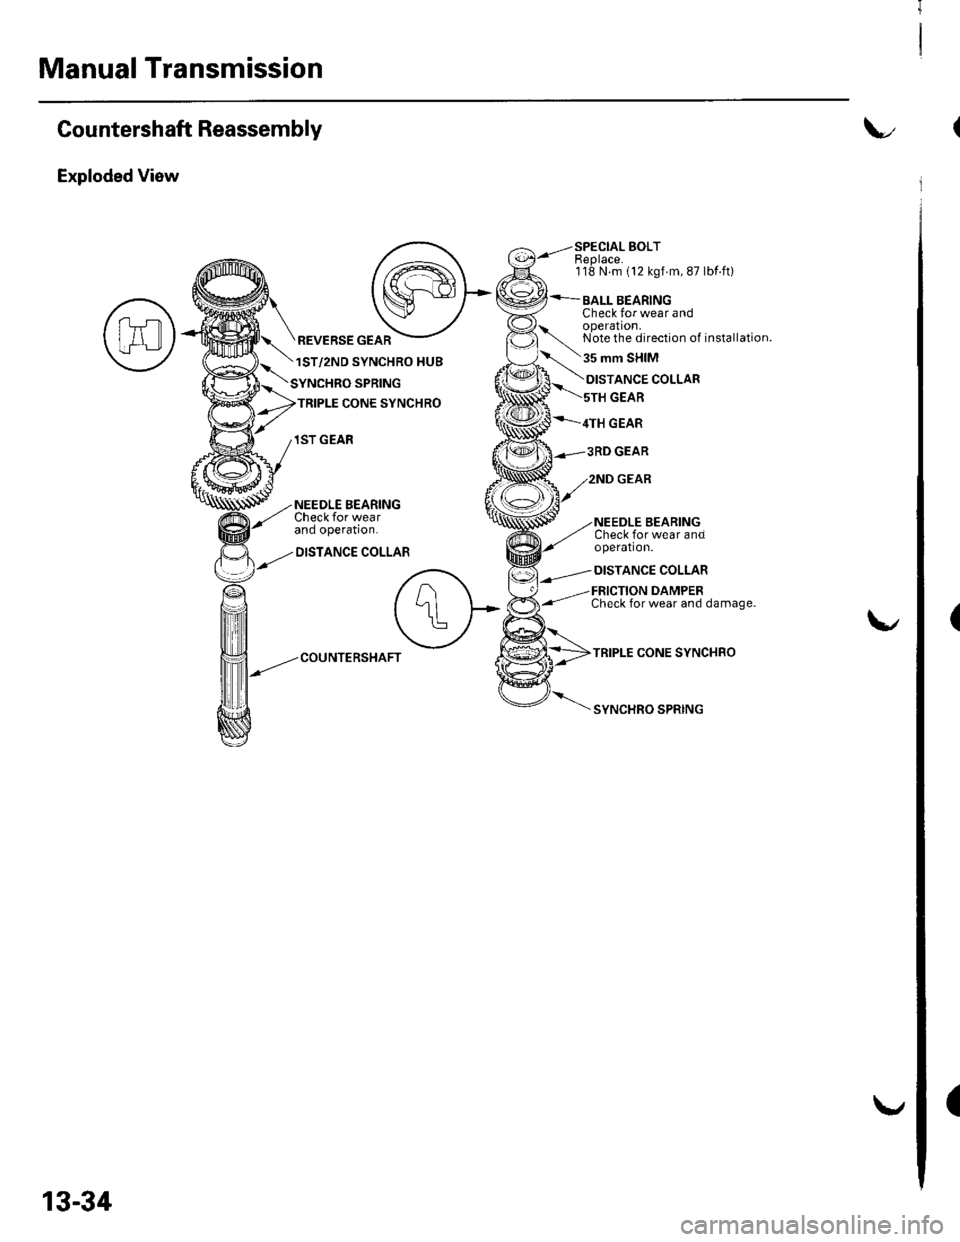
Countershaft Reassembly
Exploded View
SPECIAL BOLTEeplace.118 N.m (12 kgf m, 87 lbf ft)
BALL BEARINGCheck for wear andoperation.Note the direction of installation.
35 mm SHIM
REVERSE GEAR
1ST/2ND SYNCHRO HUB
SPRING
TRIPLE CONE SYNCHRO
1ST GEAR
NEEDLE BEARINGCheck for wearano opera!on.
DISTANCE COLLAR
ANCE COLLAR
GEAR
4TH GEAR
Check for wear andoperation.
DISTANCE COLLAR
FRICTION DAMPERCheck for wear and damage.
TRIPLE CONE SYNCHRO
SYNCHRO SPRING
COUNTERSHAFT
13-34
Page 447 of 1139
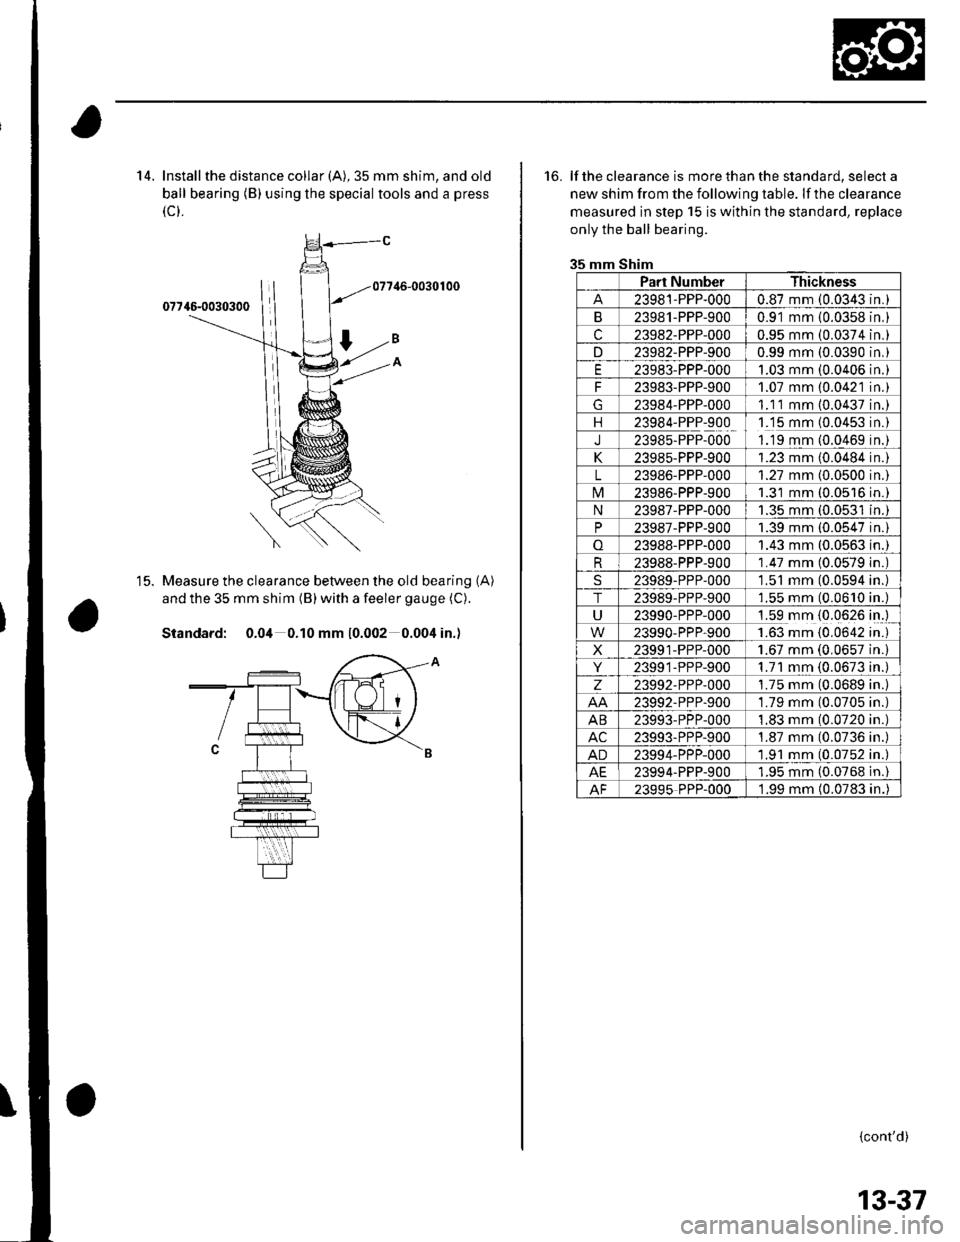
14. Install the distance collar (A), 35 mm shim, and old
ball bearing (B) using the special tools and a press
(c).
Measure the clearance between the old bearing
and the 35 mm shim (B) with a feeler gauge (C).
Standard: 0.04 0.10 mm 10.002 0.004 in.)
(A)t5.
16. lf the clearance is more than the standard, select a
new shim from the following table. lf the clearance
measured in step 15 is within the standard, replace
only the ball bearing.
35 mm Shim
Part NumberThickness
23981-PPP-0000.87 mm (0.0343n.
B23981-PPP-9000.91 mm {0.0358n,
c23982-PPP-0000.95 mm (0.0374n.
D23982-PPP-9000.99 mm (0.0390n,
E23983-PPP-0001.03 mm 10.0406n,
F23983-PPP-9001.07 mm (0.0421n.
23984-PPP-0001.1 1 mm (0.0437n.
1123984-PPP-9001.15 mm (0.0453n.
J23985-PPP-0001.'19 mm (0.0469n.
K23985-PPP-9001.23 mm (0.0484n
L23986-PPP-0001.27 mm (0.0500n.
M23986-PPP-9001.31 mm (0.0516 in.
N23987-PPP-0001.35 mm (0.0531 in.
P23987-PPP-9001.39 mm (0.0547n.
o23988-PPP-0001.43 mm (0.0563 in.
R23988-PPP-9001.47 mm (0.0579 in
23989-PPP-0001.51 mm (0.0594 in
T23989-PPP-9001.55 mm (0.0610 in
U23990-PPP-0001.59 mm {0.0626 in.
1.63 mm {0,0642 in.23990-PPP-900
X23991-PPP-0001.67 mm (0,0657 in
Y23991-PPP-9001.71 mm {0.0673 in
z23992-PPP-0001.75 mm (0.0689 in
23992-PPP-9001.79 mm (0.0705 in
AB23993-PPP-0001.83 mm (0.0720 in
AC23993-PPP-9001.87 mm (0.0736 in
AD23994-PPP-000'1.91 mm (0.0752 in
AE23994'PPP-9001.95 mm (0.0768 in.
AF23995 PPP-0001.99 mm (0.0783 in.
{cont'd)
13-37
Page 448 of 1139
Manual Transmission
Countershaft Reassembly (cont'd)
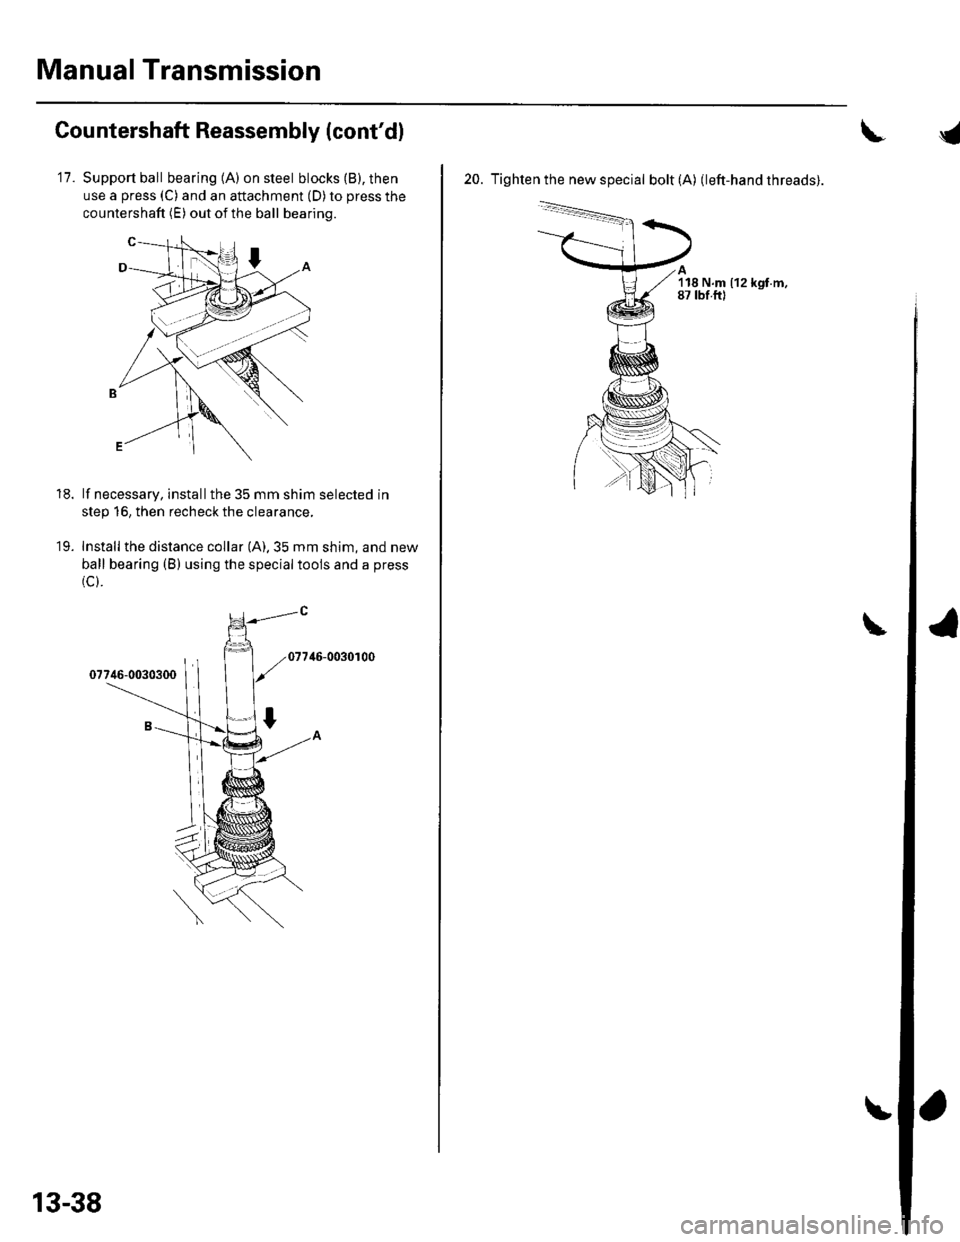
11.Support ball bearing (A) on steel blocks (B), then
use a press (C) and an attachment (D) to press the
countershaft (E) out of the ball bearing.
lf necessary, installthe 35 mm shim selected in
step 16, then recheck the clearance,
Install the distance collar (A).35 mm shim, and new
ball bearing (B) using the specialtools and a press
(c).
46-0030r00
18.
19.
13-38
20. Tighten the new special bolt (A) (left-hand threads).
'l18 N.m (12 kgf.m,87 tbf.ftl
Page 449 of 1139
\
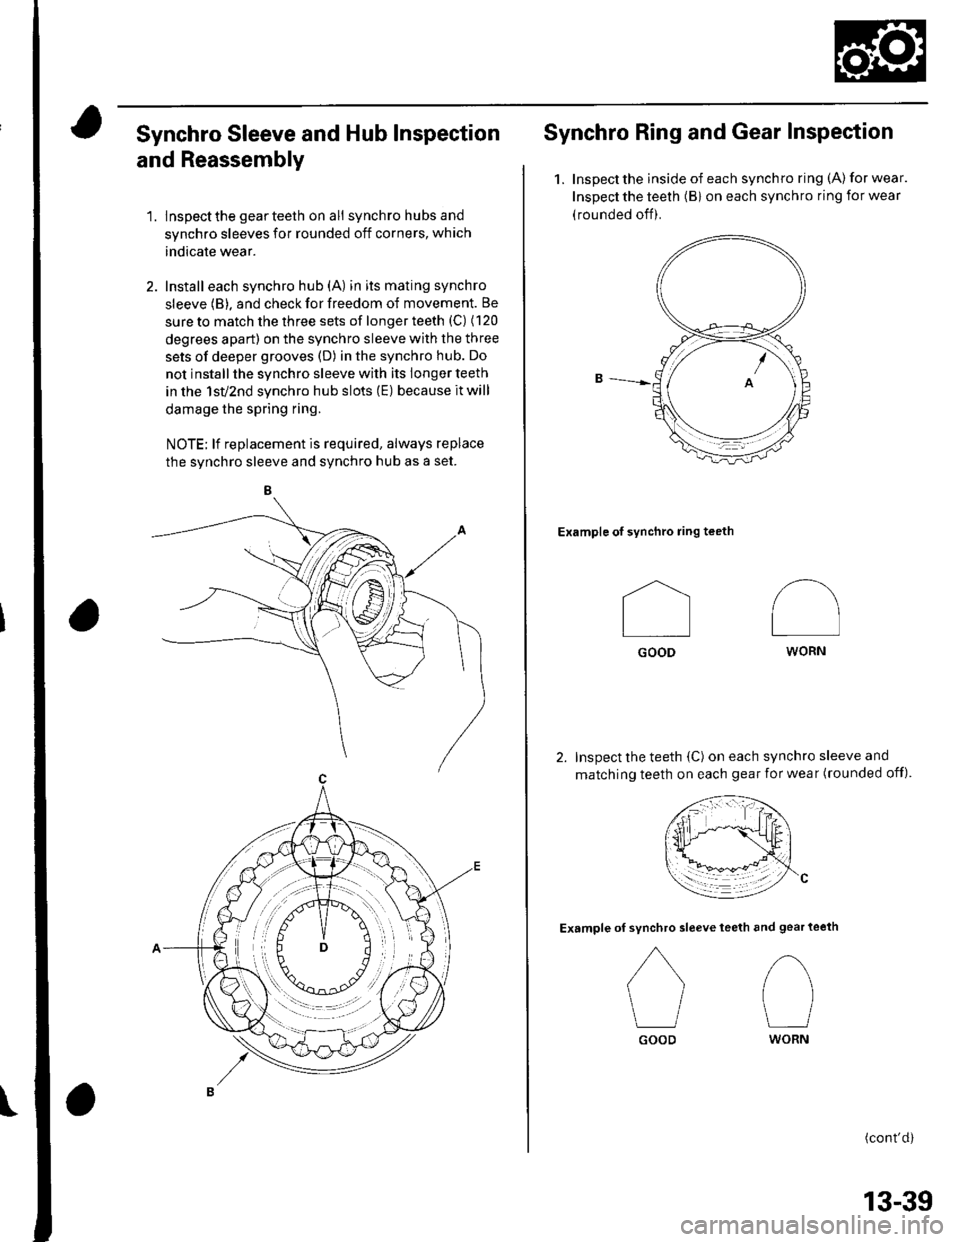
Synchro Sleeve and Hub Inspection
and Reassembly
1. lnspectthe gearteeth on ali synchro hubs and
synchro sleeves for rounded off corners, which
indicate wear.
2. Install each synchro hub (A) in its mating synchro
sleeve (B), and check for freedom of movement. Be
sure to match the three sets of longer teeth (C) (120
degrees apart) on the synchro sleeve with the three
sets of deeper grooves (D) in the synchro hub. Do
not install the synchro sleeve with its longer teeth
in the 1sv2nd synchro hub slots (E) because it will
damage the spring ring.
NOTE; lf replacement is required, always replace
the svnchro sleeve and svnchro hub as a set.
Synchro Ring and Gear Inspection
1.Inspect the inside of each synchro ring (A) for wear.
Inspect the teeth (Bi on each synchro ring for wear
(rounded off).
Example of synchro ring teeth
Inspect the teeth (C) on each synchro sleeve and
matching teeth on each gear for wear (rounded off).
Example ofteeth and gear teeth
(cont'd)
I
Il
GOOD
synchro sleeve
GOOD
/\
I
WORN
tl
WORN
13-39
Page 450 of 1139
Manual Transmission
Synchro Ring and Gear Inspection (cont'dl
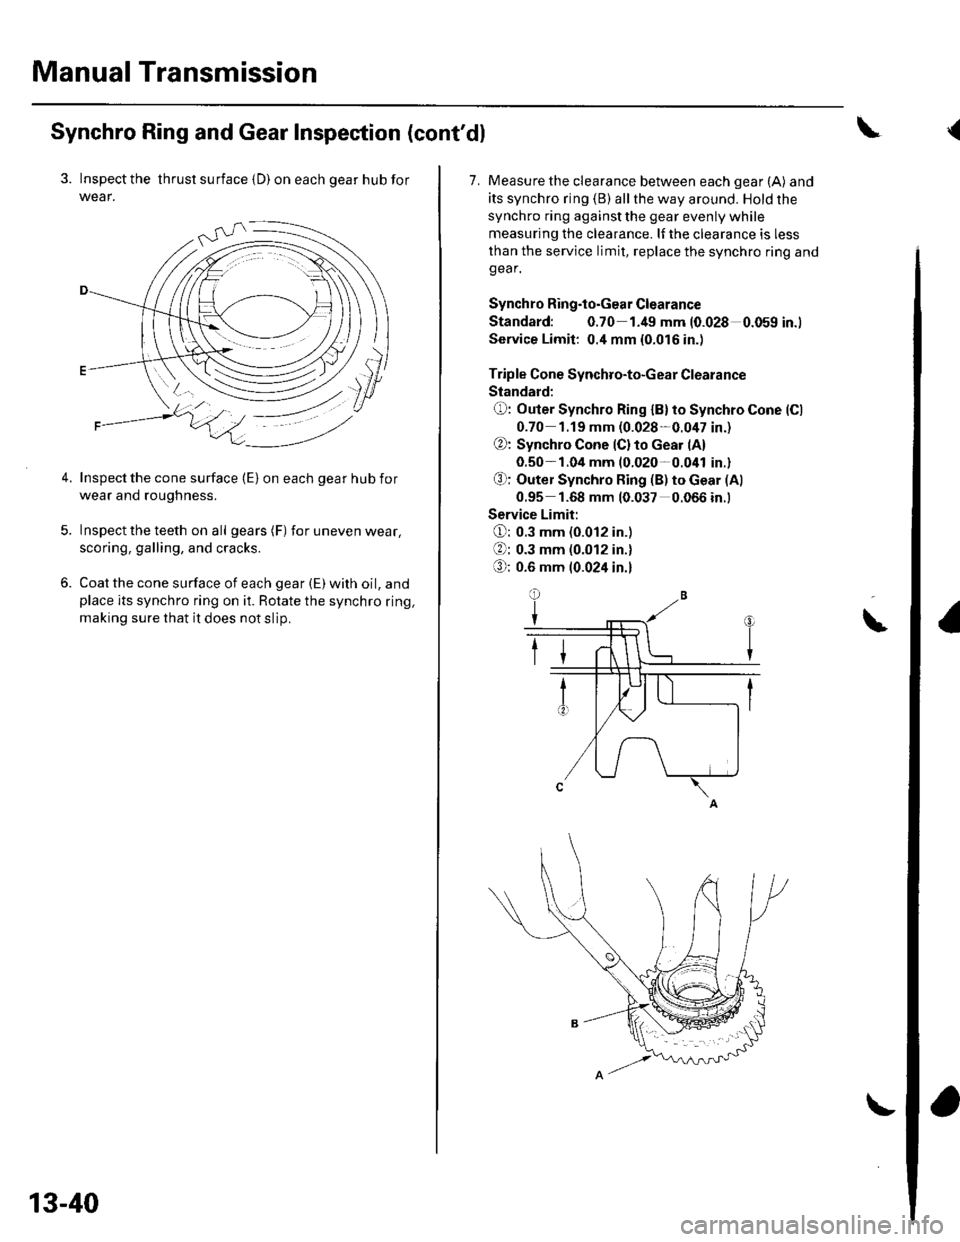
3. Inspect the thrust surface {D) on each gear hub for
wear.
Inspect the cone surface (E) on each gear hub for
wear ano rougnness.
Inspect the teeth on all gears (F) for uneven wear,
scoring, galling, and cracks.
Coat the cone surface of each gear (E) with oil, andplace its synchro ring on it. Rotate the synchro ring,
making sure that it does not slip.
13-40
\
7. Measure the clearance between each gear (A) and
its synchro ring (B) allthe way around. Hold the
synchro ring against the gear evenly while
measuring the clearance. lf the clearance is less
than the service limit, replace the synchro ring andgear.
Synchro Ring.to.Gear Clearance
Standard: 0.70 1.49 mm 10.028 0.059 in.)
Service Limit: 0.4 mm {0.016 in.)
Triple Cone Synchro-to-Gear Clearance
Slandard:
O: Outer Synchro Ring {B}to Synchro Cone (Cl
0-70 1.19 mm (0.028-0.047 in.)
@: Synchro Cone lC) to cear (A)
0.50- 1.04 mm (0.020-0.041 in.)
O: Outer Synchro Ring (B) to Gear (Al
0.95 1.68 mm 10.037 0.066 in.)
Service Limit:
O: 0.3 mm (0.012 in.)
: 0.3 mm (0.012 in.)
O; 0.6 mm 10.024 in.l
\
{
Page 453 of 1139
Mainshaft Thrust Clearance Adiustment
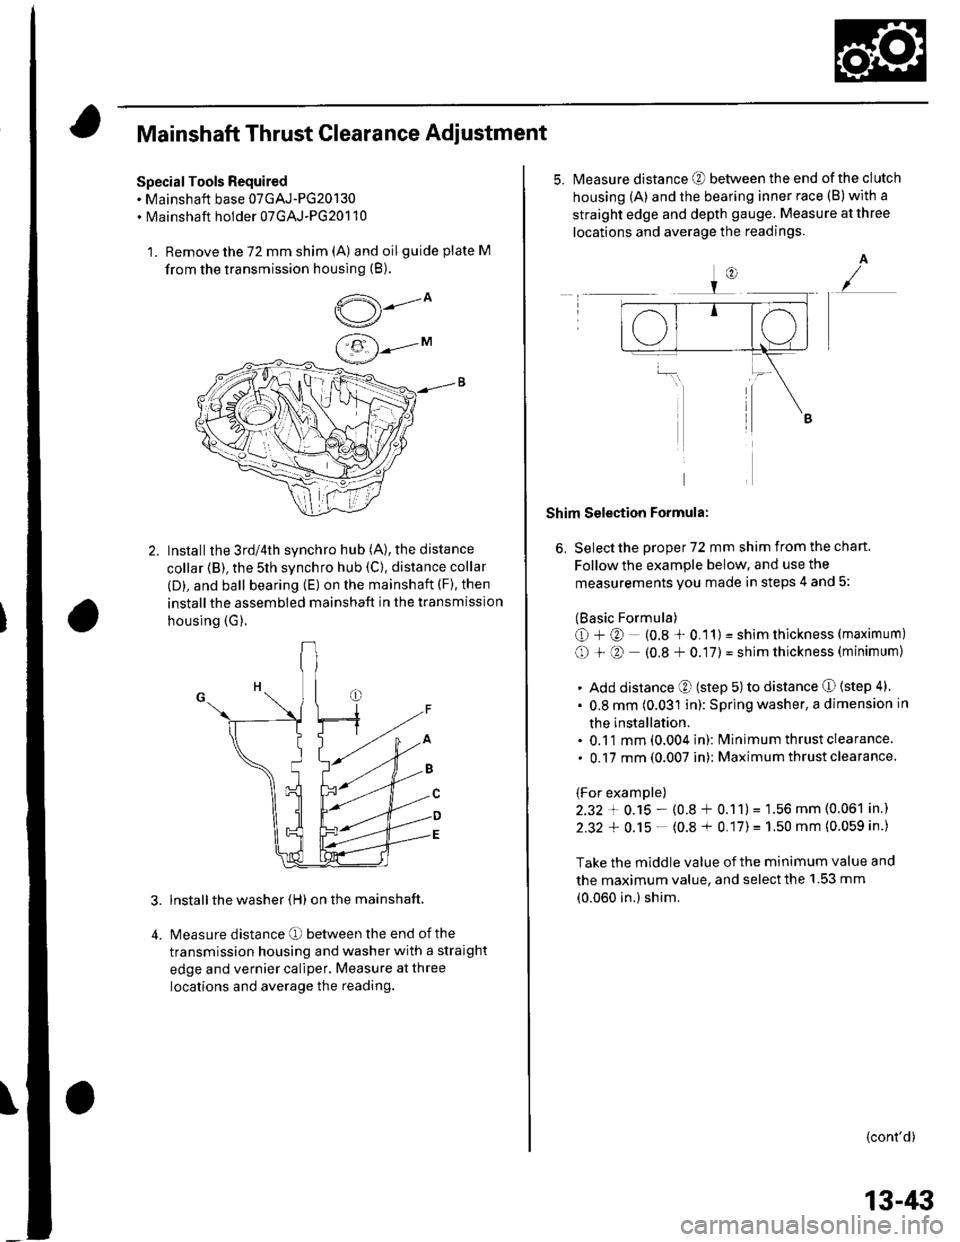
Special Tools Required. Mainshaft base 07GAJ-PG20130. Mainshaft holder 07GAJ-PG20110
1. Remove the 72 mm shim (A) and oilguide plate M
from the transmission housing (B).
,5---ov/
Installthe 3rd/4th synchro hub (A), the distance
collar (B), the 5th synchro hub {C). distance collar
(D), and ball bearing (E) on the mainshaft (F), then
installthe assembled mainshaft in the transmission
housing (G).
lnstall the washer (H) on the mainshaft.
Measure distance O between the end of the
transmission housing and washer with a straight
edge and vernier caliper. Measure at three
locations and average the reading.
5.Measure distance @ between the end of the clutch
housing (A) and the bearing inner race (B)with a
straight edge and depth gauge. Measure at three
locations and average the readings.
A
Shim Selection Formula:
6, Select the proper 72 mm shim from the chan.
Follow the example below, and use the
measurements you made in steps 4 and 5:
(Basic Formula)
O+@ (0.8 * 0.11) = shim thickness (maximum)
O + O (0.8 + 0.17) = shim thickness (minimum)
. Add distance O (step 5) to distance O (step 4)
. 0.8 mm (0.031 in): Spring washer, a dimension in
the installation.. 0.11 mm (0.004 in): lvlinimum thrust clearance
. 0.17 mm (0.007 in): Maximum thrust clearance.
(For example)
2.32 + 0.15 - (0.8 + 0.11)= 1.56 mm (0.061 in.)
2.32 + 0.15 - (0.8 + 0.17)= 1.50 mm (0.059 in.)
Take the middle value of the minimum value and
the maximum value, and select the 1.53 mm
(0.060 in.) shim.
{cont'd)
13-/li|
Page 454 of 1139
Manual Transmission
Mainshaft Thrust Clearance Adjustment (cont'dl
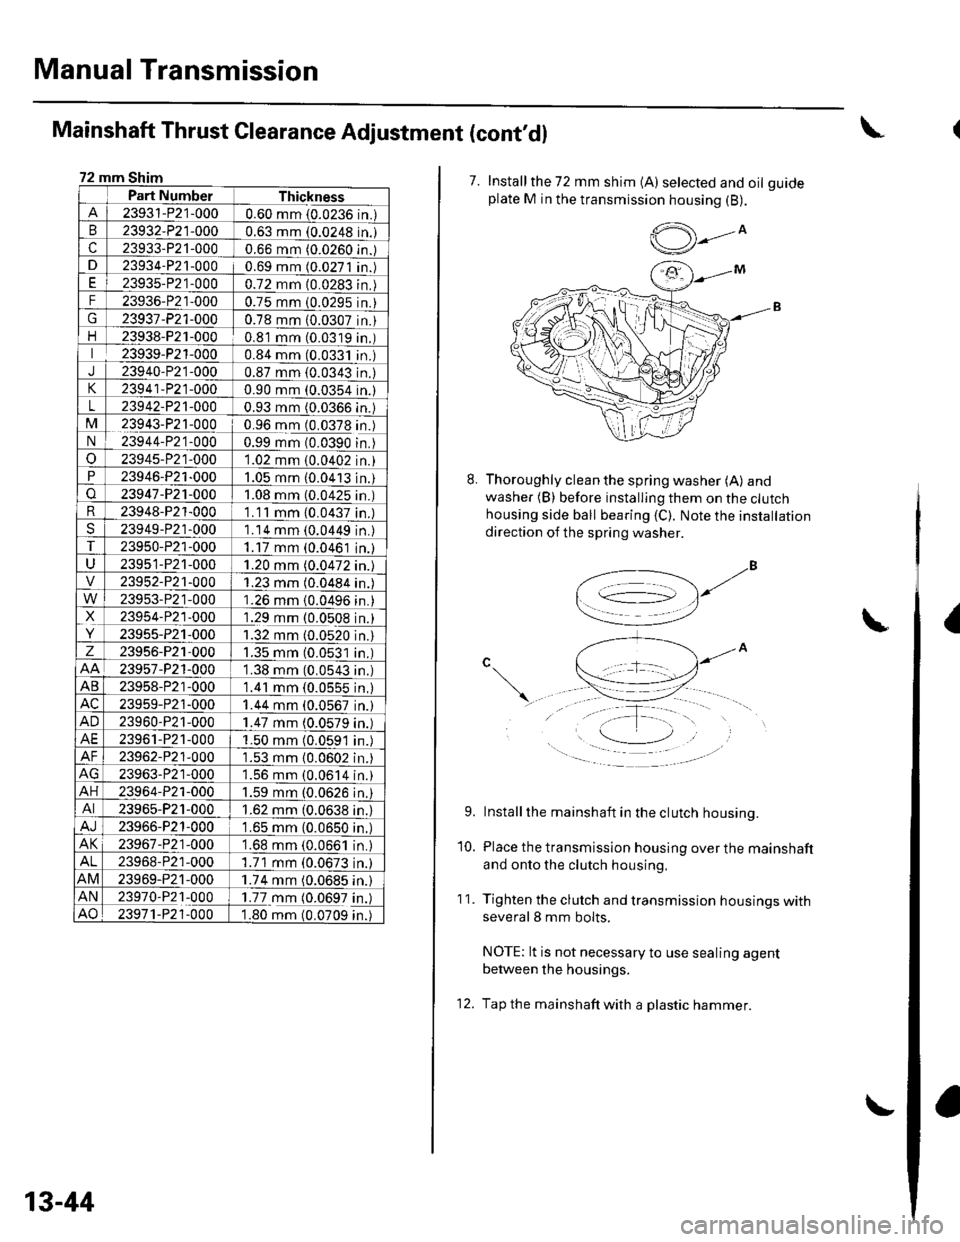
72 mm Shim
Part NumberThickness
23931-P21-0000.60 mm {0.0236 in.)
B23932-P21-0000.63 mm (0.0248 in.
c23933-P21-0000.66 mm (0.0260 in.D23934-P21-0000.69 mm (0.0271 in.
E23935-P21-0000.72 mm (0.0283 in.
F23936-P21-0000.75 mm (0.0295 in.
23931-P21-0000.78 mm (0.0307 in.-23938-P2'l-0000.81 mm (0.0319 in
23939-P21-0000.84 mm (0.0331 in
J23940-P21-0000.87 mm {0.0343 in,
23941-P21-0000.90 mm (0.0354 in.
L23942.P21-0000.93 mm (0.0366 in.
M23943-P21-0000.96 mm (0.0378 in.
N239 44-P21 .0000.99 mm (0.0390 in.
o23945-P21-0001.02 mm (0.0402 in.P23946-P21-0001.05 mm (0.0413 in.
o23941-P2't-000'l.08 mm (0.0425 in
R23948-P2'l-000'1 .1 1 mm {0.0437 in
23949-P21-000'1.14 mm (0.0449 inT23950-P21-0001.17 mm {0.0461n.
U23951-P21-0001.20 mm 10.0472n.
23952-P21-0001.23 mm (0.0484n.
23953-P21-0001.26 mm {0.0496n.X23954-P21-0001.29 mm (0.0508n.
23955-P21-0001.32 mm (0.0520n.z23956-P21,0001.35 mm (0.0531 in
23957-P21-0001.38 mm (0.0543 in
AB23958-P21-0001.41 mm (0.0555nAC23959-P21-0001.44 mm (0.0567n.
AD23960-P21-0001.47 mm (0.0579n.
AE23961-P21-0001.50 mm (0.0591n.AF23962-P21-OOO1.53 mm (0.0602n.AG23963-P21-000156 mm (0.0614n.
AH23964-P21-0001.59 mm (0.0626n.
AI23965-P21-0001.62 mm (0.0638 in
AJ23966-P21-0001.65 mm (0.0650 in
AK23967-P21-0001.68 mm (0.0661 in
AL23968-P2r -0001.71 mm (0.0673 in.
AM23969-P21-0001.74 mm (0.0685 in.
AN2397 0-P21-0001.77 mm (0.0697 in.AO23971-P2't-OOO1.80 mm (0.0709 in.
13-44
12.
7. Installthe 72 mm shim (A) selected and oil guideplate M in the transmission housing (B).
,6,,-oV
Thoroughly clean the spring washer (A) and
washer (B) before installing them on the clutchhousing side ball bearing {C). Note the installation
direction of the spring washer.
8.
{
10.
11.
9.lnstallthe mainshaft in the clutch housing.
Place the transmission housing over the mainshaft
and onto the clutch housing.
Tighten the clutch and transmission housings withseveral 8 mm bolts.
NOTE: lt is not necessary to use sealing agent
between the housings.
Tap the mainshaft with a plastic hammer.
Page 455 of 1139
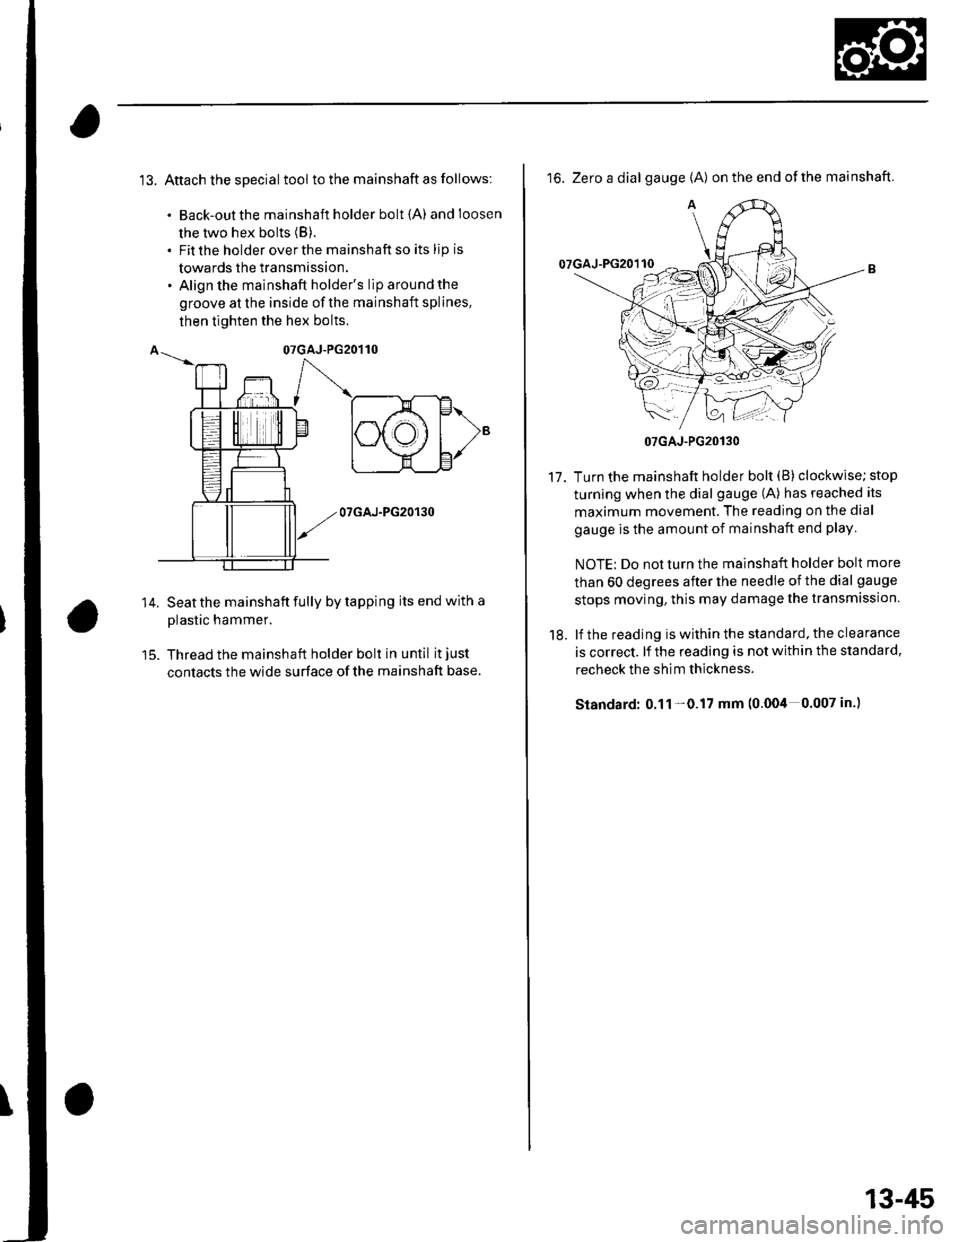
13. Attach the special tool to the mainshaft as follows:
. Back-out the mainshaft holder bolt {A) andloosen
the two hex bolts (B).
. Fit the holder over the mainshaft so its lip is
towards the transmission.. Align the mainshaft holder's lip around the
groove at the inside of the mainshaft splines,
then tighten the hex bolts.
14.
07GAJ-PG20130
Seat the mainshaft fully by tapping its end with a
plastic hammer.
Thread the mainshaft holder bolt in until it just
contacts the wide surface of the mainshaft base.
16. Zero a dial gauge {A) on the end ofthe mainshaft.
Turn the mainshaft holder bolt (B) clockwise; stop
turning when the dial gauge (A) has reached its
maximum movement. The reading on the dial
gauge is the amount of mainshaft end play
NOTE: Do not turn the mainshaft holder bolt more
than 60 degrees after the needle of the dial gauge
stops moving, this may damage the transmission.
lf the reading is within the standard, the clearance
is correct. lf the reading is not within the standard,
recheck the shim thickness.
Standard: 0.11 -0.17 mm (0.004 0.007 in.)
17.
18.
07GAJ-PG20130
13-45
Page 456 of 1139
Manual Transmission
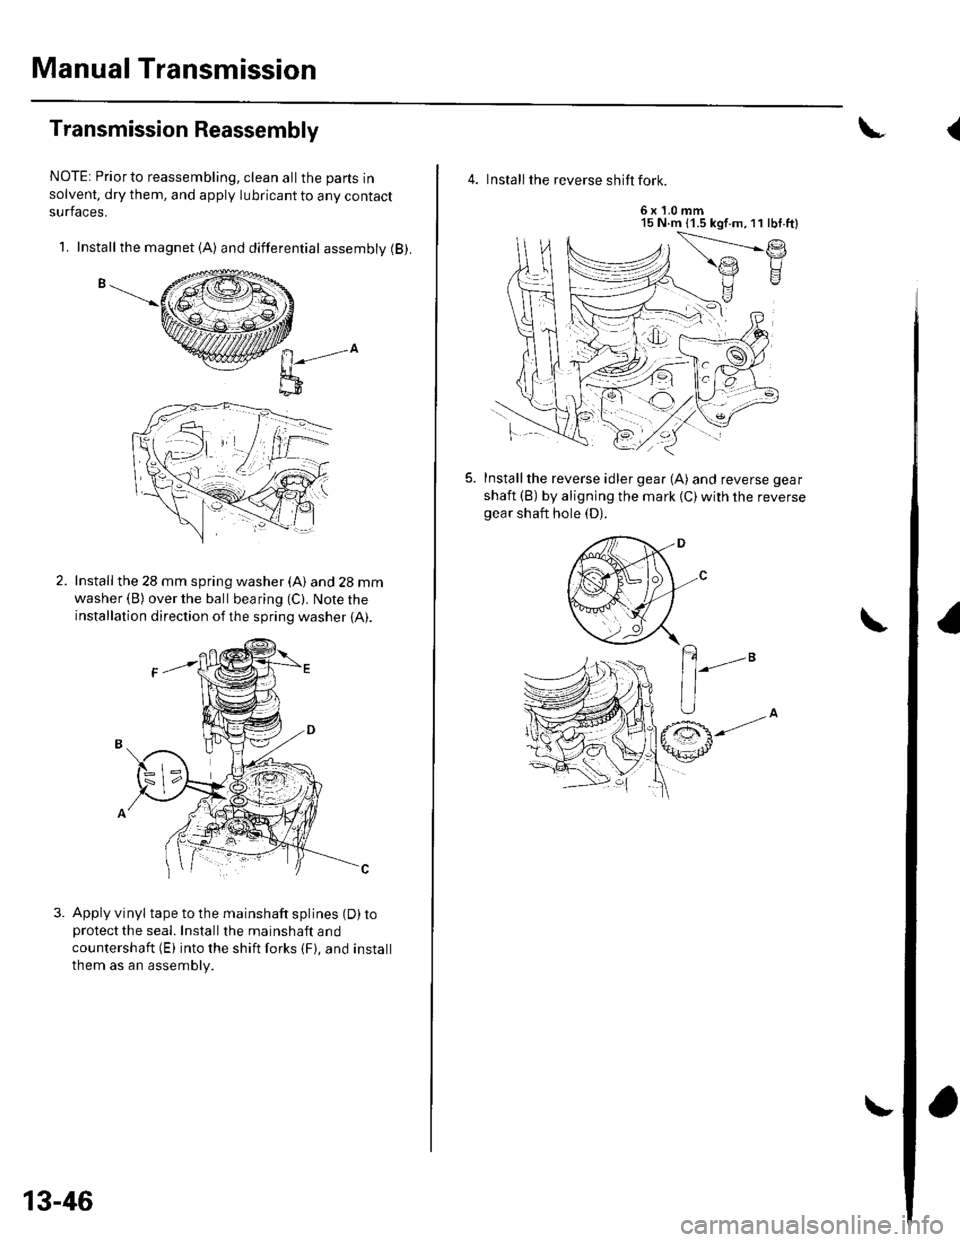
Transmission Reassembly
NOTE: Priorto reassembling, clean allthe parts in
solvent, dry them, and apply lubricant to any contact
surfaces.
1. Install the magnet (A) and differential assembly (B).
n-",-o
l;-D
Install the 28 mm spring washer (A) and 28 mm
washer (B) over the ball bearing (C). Note the
installation direction of the spring washer {A).
Apply vinyl tape to the mainshaft splines (D) toprotectthe seal. Installthe mainshaft and
countershaft (E) into the shift forks {F}. and install
them as an assembly.
13-46
\
4. Install the reverse shift fork.
6x1.0mm15 N.m (1.5 kgf.m,11 lbf.ft)
f.)
Installthe reverse idler gear (A) and reverse gear
shaft (B) by aligning the mark {C)with the reversegear shaft hole (D).
(