heater HONDA CIVIC 2003 7.G Owner's Guide
[x] Cancel search | Manufacturer: HONDA, Model Year: 2003, Model line: CIVIC, Model: HONDA CIVIC 2003 7.GPages: 1139, PDF Size: 28.19 MB
Page 710 of 1139
Interior Trim
Carpet Replacement (cont'dl
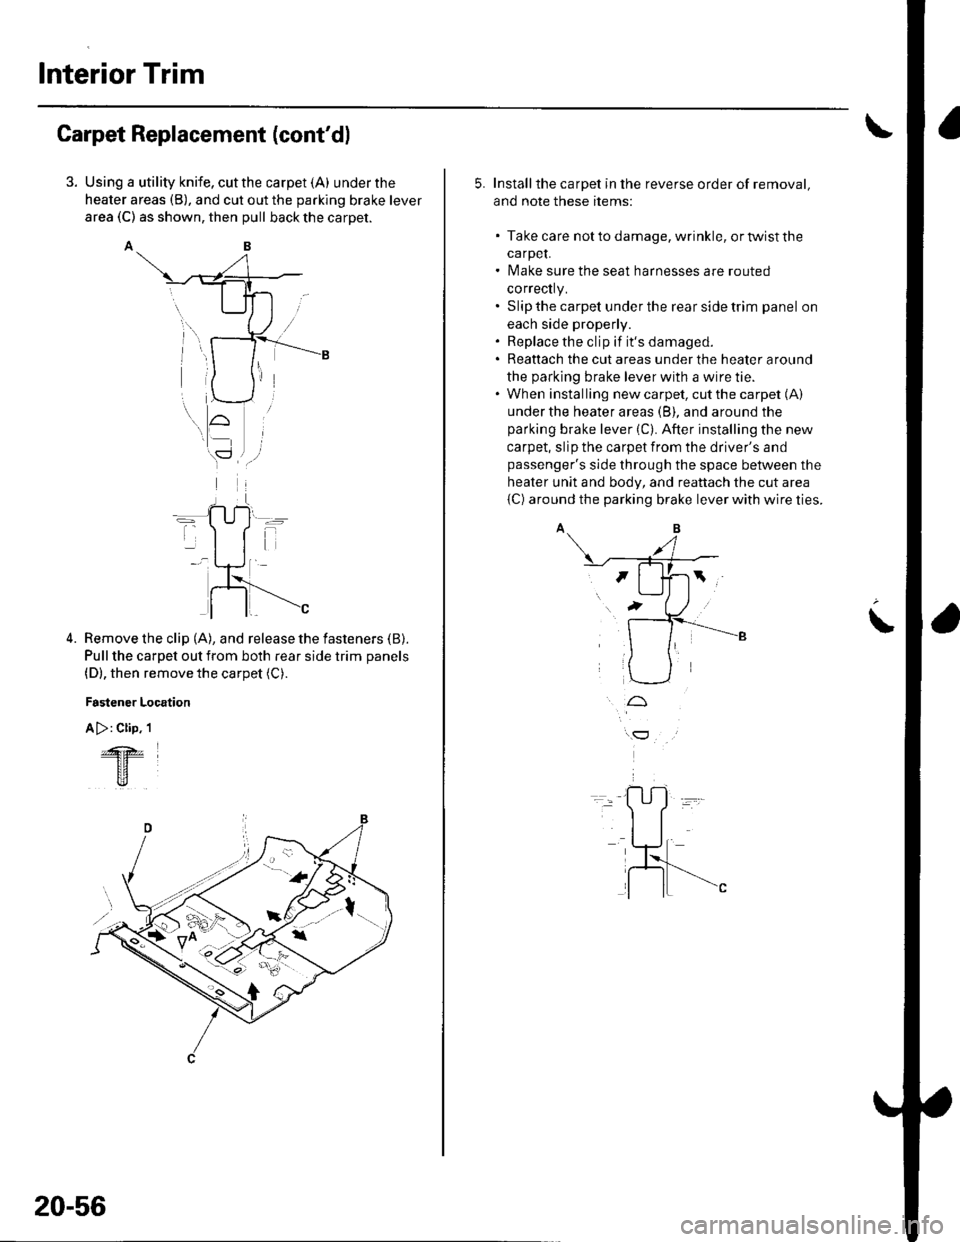
Using a utility knife, cut the carpet (A) under the
heater areas (B), and cut out the parking brake lever
area (C) as shown, then pull back the carpet.
AB
Remove the clip (A), and release the fasteners (B).
Pull the carpet out from both rear side trim panels
(D), then remove the carpet (C).
Fastener Location
A >: Clip. 1
4.
&z
tr
20-56
5. Installthe carpet in the reverse order of removal,
and note these items:
. Take care notto damage, wrinkle, ortwistthe
carpeL. Make sure the seat harnesses are routed
correctly.. Slip the carpet under the rear side trim panel on
each side properly.. Replace the clip if it's damaged.. Reattach the cut areas under the heater around
the parking brake lever with a wire tie.. When installing new carpet, cut the carpet (A)
under the heater areas (B), and around the
parking brake lever (C). After installing the new
carpet, slip the carpet from the driver's and
passenger's side through the space between the
heater unit and body, and reattach the cut area
{C) around the parking brake lever with wire ties.
t
Page 716 of 1139
Dashboard
Dashboard Center Panel Removal/lnstallation
NOTE:. Put on gloves to protect your hands.. When prying with a flat-tip screwdriver, wrap it with
protective tape, and apply protective tape around the
related parts, to prevent damage.. Take care not to scratch the dashboard and related
parts.
1. Make sure you have the anti-theft code for the radio,
the write down the frequencies for the preset
buttons.
Remove these items:
. Driver's dashboard lower cover (see page 20-59)
. Passenger's dashboard lower cover (see page
20-63).. Glove box (see page 20-63).. Shift lever trim {see page 20-61).
From the glove box and driver's dashboard Iower
cover openings, loosen the bolts (A) securing the
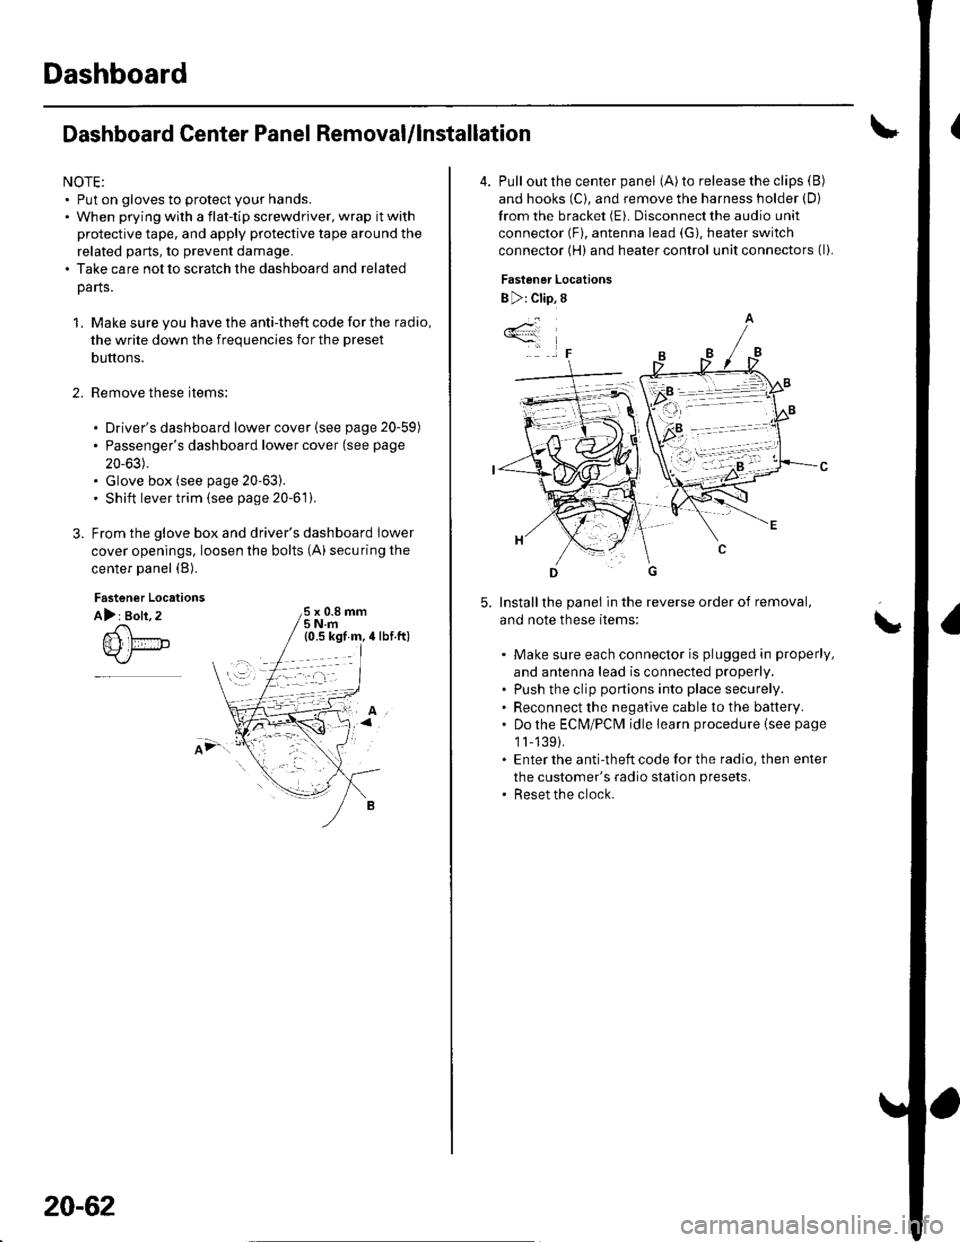
center panel (B).
2.
Fastener Locations
A): Bolt, 2x 0.8 mm5Nm
;.'
20-62
4. Pull out the center panel (A) to release the clips (B)
and hooks (C), and remove the harness holder (D)
from the bracket (E). Disconnect the audio unit
connector (F), antenna lead (G), heater switch
connector (H) and heater control unit connectors (l).
Fastener Locations
B ): Clip, 8
Installthe panel in the reverse order of removal,
and note these items:
Make sure each connector is plugged in properly,
and antenna lead is connected properly.
Push the clip portions into place securely.
Reconnect the negative cable to the battery.
Do the ECN4/PCt\4 idle learn procedure {see page
1l-139).
Enter the anti-theft code for the radio. then enter
the customer's radio station presets.
Reset the clock.
*4
,F
\
Page 773 of 1139
21-2
z t-'5
z t-o
z t-o
21-8
21-9
21-10
21-11
21-14
z t- to
HVAC (Heating, Ventilation, and Air Gonditioningl
Heating and Air Conditioning
SpecialTools
Comoonent Location lndex ........
A/C Service Tios and
Precautions
A,/C Refrigerant Oil
ReDlacement
General Troubleshooting
lnformation
DTC Troubleshooting Index .......
Symptom Troubleshooting
1ndex..............
System Description .....................
Circuit Diagram
DTC Troubleshooting ..................
Recirculation Control Motor
CircuitTroubleshooting .......... 21-25
Heater Control Power and Ground
Circuits Troubleshooting ........ 21-27
Condenser Fan Circuit
Troubleshooting ...................... 21-28
Radiator and Condenser Fans
Common Circuit
Troubfeshooting ...................... 21-29
Compressor Clutch Circuit
Troubleshooting ...................... 21-30
A,/C Pressure Switch Circuit
Troubleshooting ...................... 21-32
Air Mix Control Motor
Test and Reolacement ............. 21-34
Mode Control Motor
Test and Replacement ............. 21-35
Recirculation Control Motor
Test and Reolacement ............. 21-36
Evaporator Temperature Sensor
Reolacement and Test ............. 21-31
Power Transistor Test ................. 21 -38
Heater Control Panel and
Push Switch Assemblv
Removal and Installation ........ 21-38
Dust and Pollen Filter
Reolacement ..21-39
Blower Unit Removal and
lnstallation ...... 21-39
Blower Unit Comoonents
ReDlacement ............................ 21-41
Evaporator Core
Reolacement ..21-42*Heater Unit/Core
ReDlacement ..21-43
Heater Valve Cable
Adjustment .....21-46
CompressorReplacement .......... 21-47
Comoressor Clutch Check .......... 21-48
Comoressor Clutch Overhaul ..... 21-49
Compressor Thermal Protector
Reo1acement ............................ 21-51
Comoressor Relief Valve
Reolacement ............................ 21-51
Condenser Reolacement ............ 21-52
Refrigerant Recovery .................. 21-53
System Evacuation ...................... 21-54
System CharginS ......................... 21-55
Refrigerant LeakTest .................. 21-56
A,/C Svstem Tests ........................ 21-57
Page 775 of 1139
Heating and Air Gonditioning
Component Location Index
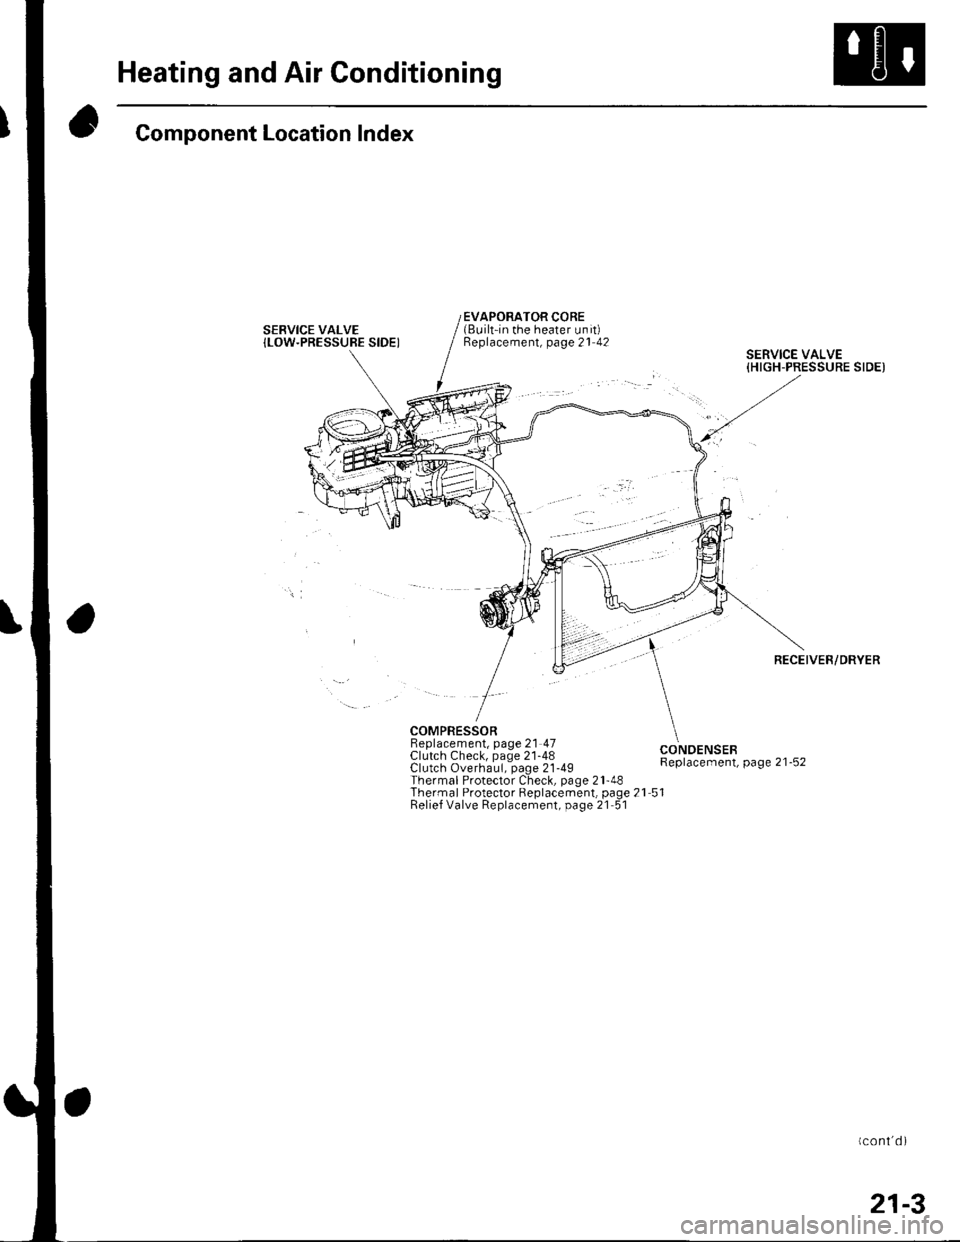
SERVICE VALVE{LOW.PRESSUBE SIDEI
EVAPORATOR CORE(Built-in the heater unit)Beplacement, page 21 42
COMPRESSORBeplacement, page 21 47Clutch Check, page 21-48Clutch Overhaul, page 21-49Thermal Protector Check, page 21-48Thermal Protector Replacement, page 21 51Relief Valve Replacement, page 21 51
SERVICE VALVE{HIGH-PRESSURE SIDEI
RECEIVER/DRYER
CONOENSEBReplacement, page 21-52
Page 777 of 1139
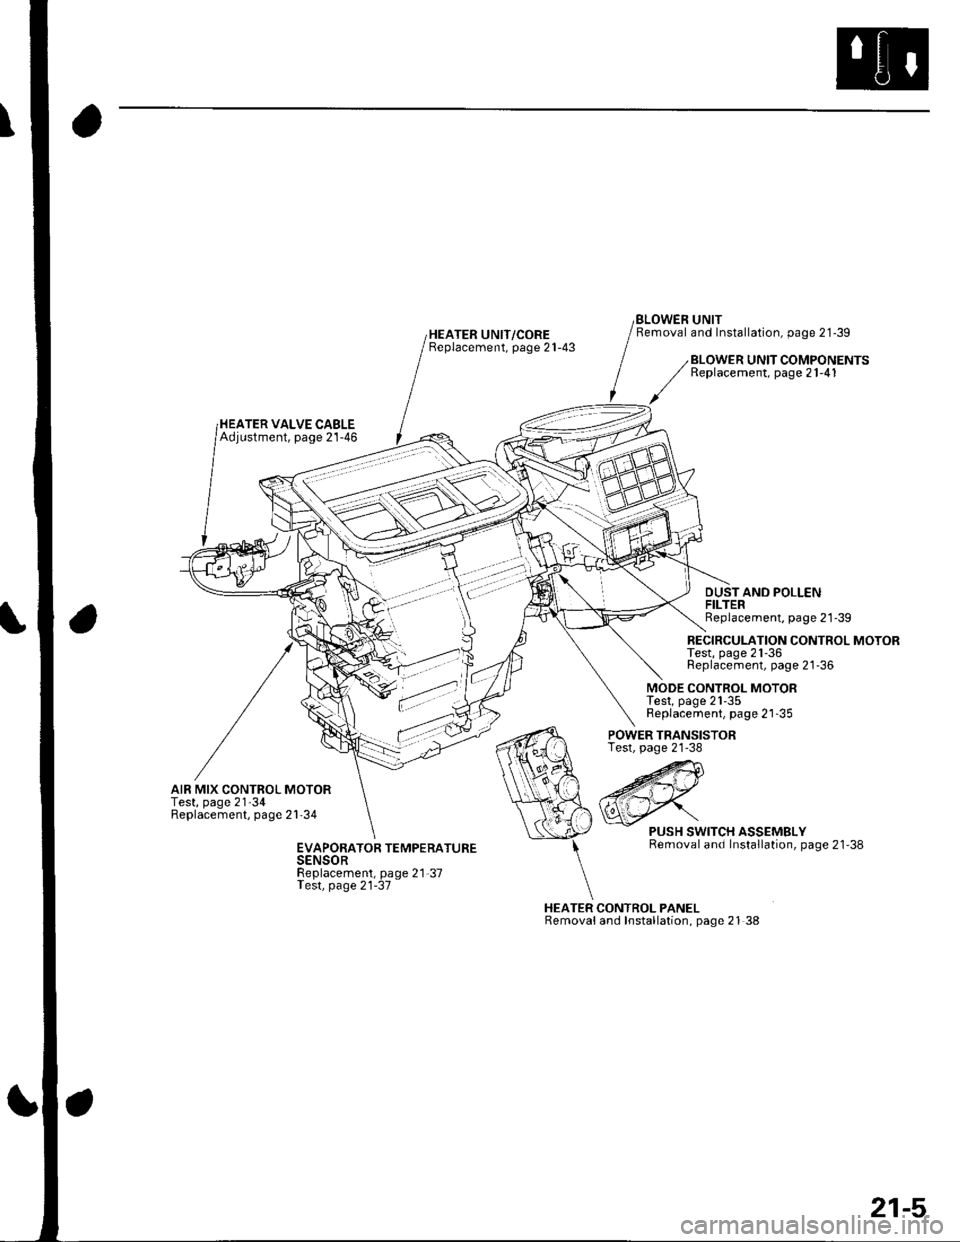
HEATER UNIT/COREBeplacement, page 21-43
BLOWEN UNITRemoval and Installation, page 21-39
HEATER VALVE CABLEAdjustment, page 21-46
BLOWER UNIT COMPONENTSReplacement, page 21-41
DUSTAND POLLENFILTERReplacement, page 21'39
RECIRCULATION CONTROL MOTORTest, page 21-36Replacement, page 21-36
MODE CONTROL MOTORTest, page 21-35Replacement, page 21-35
AIR MIX CONTROL MOTORTest, page 21'34Replacement, page 21'34
POWER TRANSISTORTest, page 21-38
HEATER CONTROL PANELRemovaland Installation, page 21 38
PUSH SWITCH ASSEMBLYRemoval and Installation, page 21'38EVAPORATOR TEMPERATURESENSORReplacement, page 21-37Test, page 21-37
21-5
Page 780 of 1139
Heating and Air Conditioning
General Troubleshooting Information
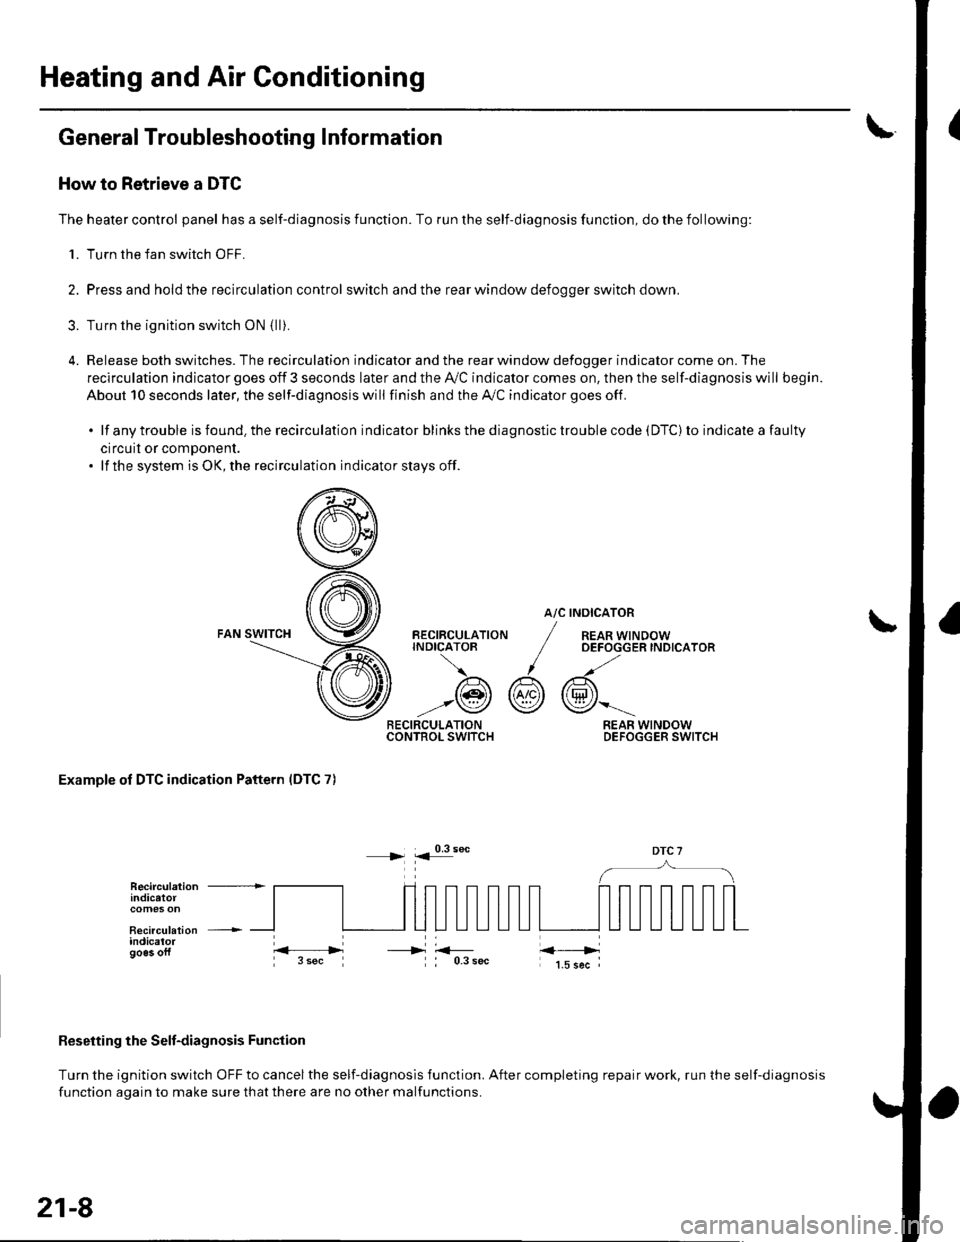
How to Retrieve a DTC
The heater control panel has a self-diagnosis function. To run the self-diagnosis function, do the following:
1. Turn the fan switch OFF.
2. Pressand holdthe recirculation control switch andthe rear window defoooer switch down.
3. Turn the ignition switch oN {lli.
4. Release both switches. The recirculation indicator and the rear window defogger indicator come on. The
recirculation indicator goes off 3 seconds later and the Ay'C indicator comes on. then the self-diagnosis will begin.
About 10 seconds later, the self-diagnosis will finish and the A,/C indicator goes off.
.lfanytroubleisfound.therecirculationindicatorblinksthediagnostictroublecode(DTC)toindicateafaulty
circuil or comDonent.. lf the system is OK, the recirculation indicator stays off.
atc
@r
RECIRCULATIONCONTROL SWITCH
BECIRCULATIONINDICATOB
/A\
-:@
INOICATOR
REAR WINDOWOEFOGGER INDICATOR
REAR WINDOWDEFOGGER SWITCH
Examole of DTC indication Pattern IDTC 7)
DTC 7
Reseiting the Selt-diagnosis Function
Turn the ignition switch OFF to cancel the self-diagnosis function. After completing repair work, run the self-diagnosis
function aoain to make sure thatthere are no other malfunctions.
Recirculation +indicatot
Recirculation +indicalorgo6s oft----->
21-8
Page 781 of 1139
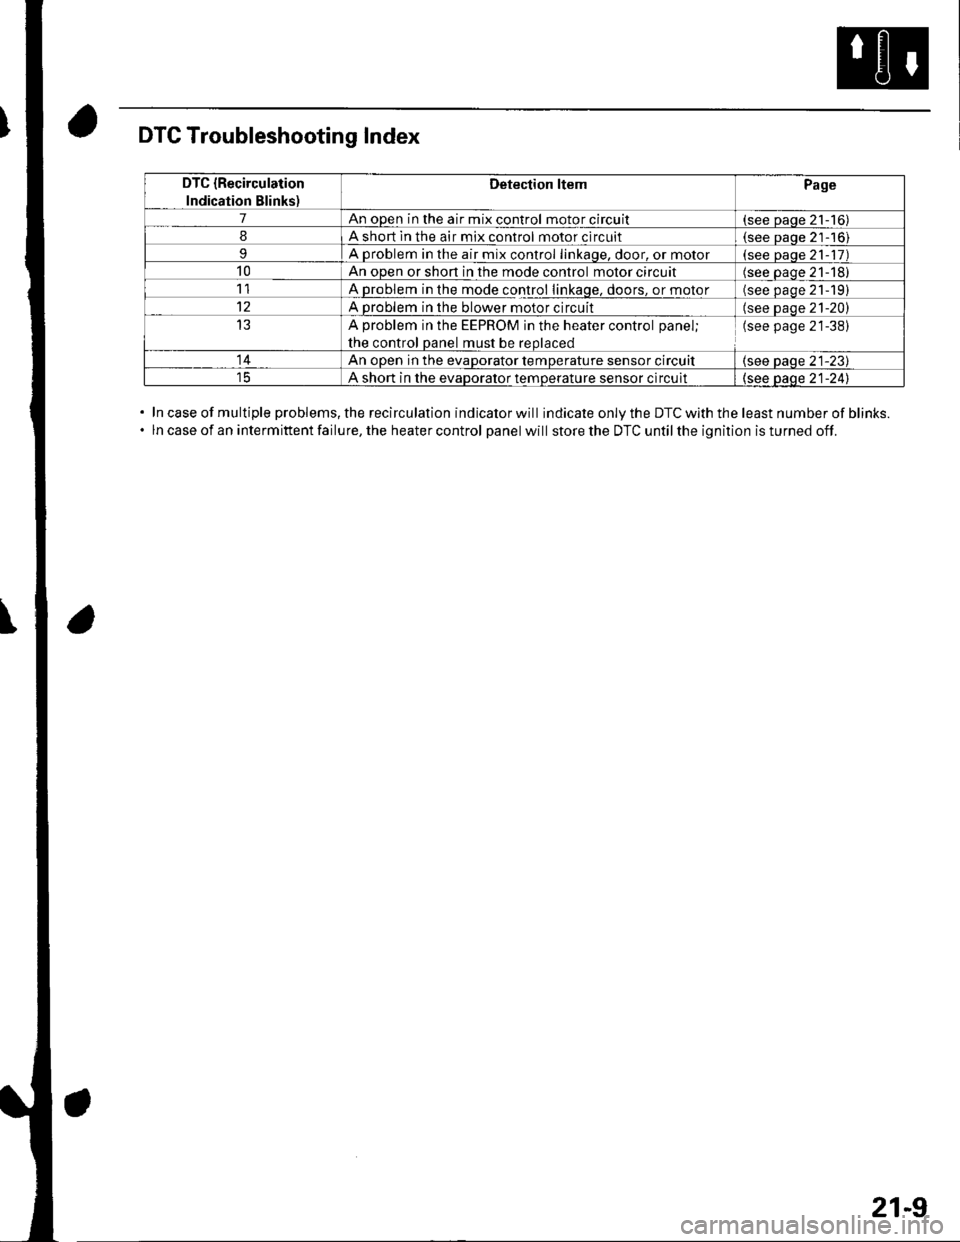
DTC Troubleshooting Index
In case of multiple problems, the recirculation indicator will indicate only the DTC with the least number of blinks.
ln case of an intermittent failure, the heater control panel will store the DTC until the ignition is turned off.
DTC {Recirculation
Indication Blinks)
Detection ltemPage
7An open in the air mix control motor circuit(see paqe 21-16)
8A short ln the air mix control motor circuit(see Daoe 21-'16)
9A problem in the air mix control linkaqe, door, or motor(see paqe 21- 17)
10An open or shon in the mode control motor circuit(see oaqe 21-18)
11A problem in the mode control linkage, doors, or motor(see paqe 21191
12A problem in the blower motor circuit(see paqe 21-20)
13A problem in the EEPROM in the heater control panel;
the control oanel must be reolaced
(see page 21-38)
14An ooen in the evaDorator temDerature sensor circuit(see paqe 21-23)
A short in the evaDoralor temoerature sensor circuit(see oaqe 21-241
21-9
Page 782 of 1139
Heating and Air Conditioning
{
a
a
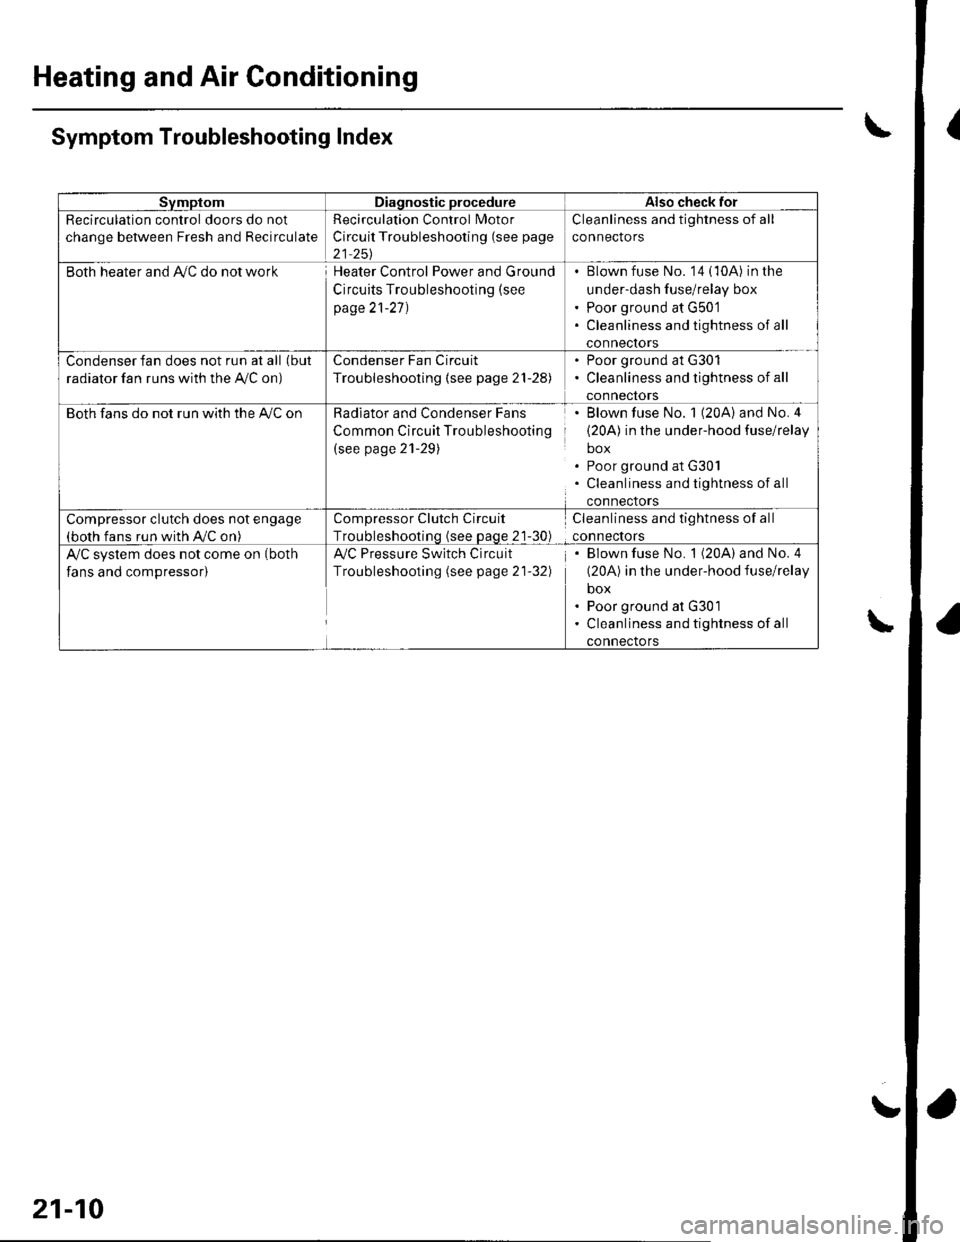
SvmptomDiagnostic procedureAlso check for
Recirculation control doors do not
change between Fresh and Recirculate
Recirculation Control Motor
Circuit Troubleshooting (see page
21 251
Cleanliness and tightness of all
connectors
Both heater and Ay'C do not workHeater Control Power and Ground
Circuits Troubleshooting (see
page 21-27)
Blown fuse No. '14 (10A) in the
under-dash fuse/relay box
Poor ground at G501
Cleanliness and tightness of all
conneclors
Condenser fan does not run at all (but
radiator fan runs with the Ay'C on)
Condenser Fan Circuit
Troubleshooting {see page 21-28)
. Poor ground at G301. Cleanliness and tightness of all
connectors
Both fans do not run with the A,/C onRadiator and Condenser Fans
Common Circuit Troubleshooting
(see page 21-29)
Blown fuse No. 1 (20A) and No.4
(20A) in the under-hood fuse/relay
box
Poor ground at G30l
Cleanliness and tightness of all
connectors
Compressor clutch does not engage(both fans run with A,/C on)
Compressor Clutch Circuit
Troubleshootinq (see Daqe 21-30)
Cleanliness and tightness of all
connectors
A/C system does not come on (both
fans and compressor)
Ay'C Pressure Switch Circuit
Troubleshooting (see page 21-32)
Blown fuse No. 1 (20A) and No. 4
(20A) in the under-hood fuse/relay
box
Poor ground at G301
Cleanliness and tightness of all
connectors
\Symptom Troubleshooting Index
\
21-10
!
Page 783 of 1139
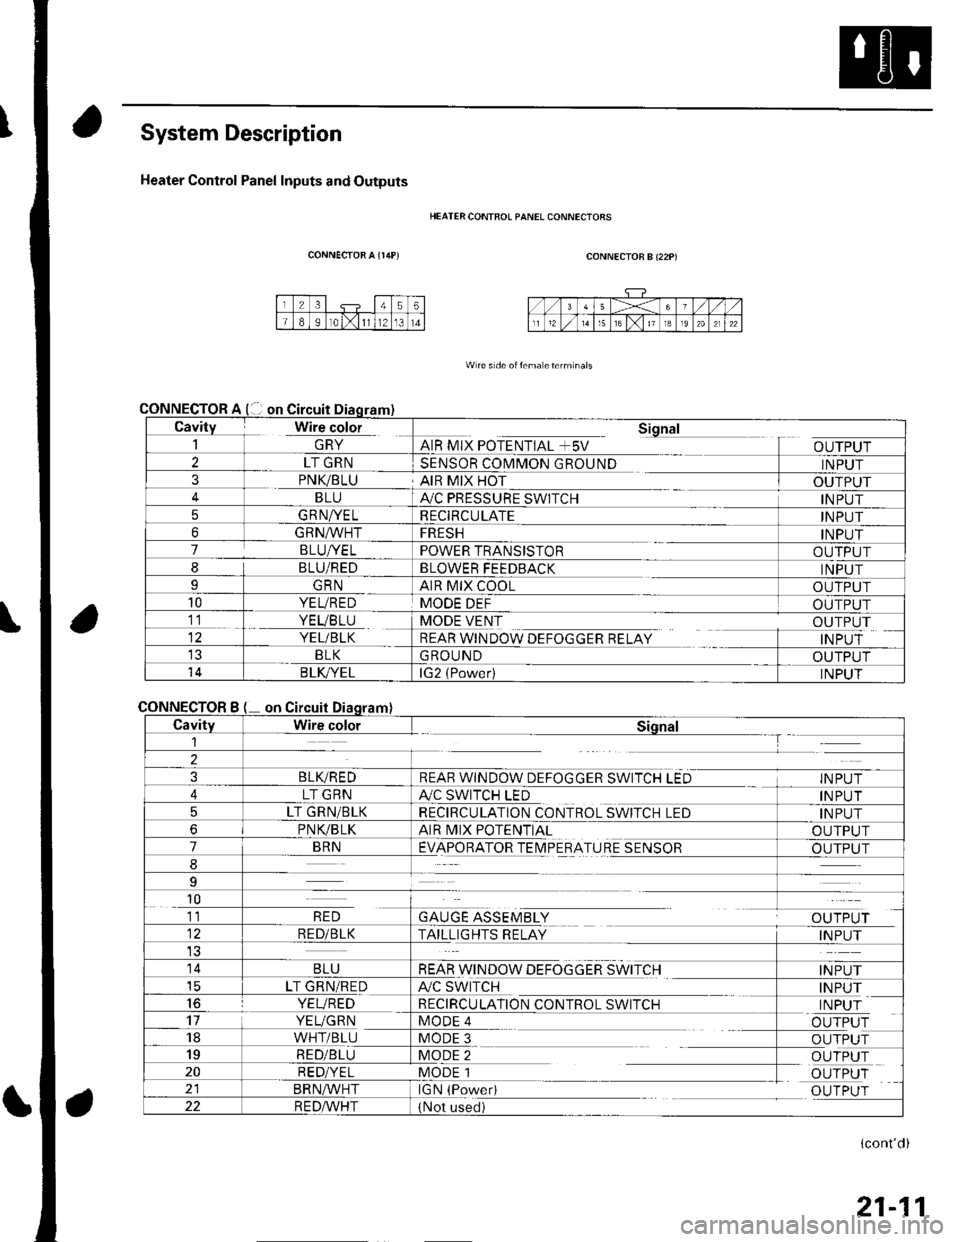
System Description
Heater Control Panel Inputs and Outputs
CONNECTOR A {r/rP)
CONNECTOR
CONNECTOR
HEATER CONTFOL PANEL CONNECIORS
CONNECTOR B (22P)
W re s de oitema eterm nals
Cavity Wire color_| \ln YAIR MIX POTENTIAL +5V
Sional
OUTPUT2LT GRNSENSOR COMMON GROUNDINPUT3PNK/BLUAIR MIX HOTOUTPUTBLUA,/C PRESSURE SWITCHINPUT5GRNA/ELRECIRCULATEINPUT6GRNA/VHTFRESHINPUT7BLUI/ELPOWER TRANSISTOROUTPUT8BLU/REDBLOWER FEEDBACKINPUTIGRNAIR MIX COOLOUTPUT10YEL/REDMODE DEFOUTPUT11. YEVBTU
YEL/BLK
MODE VENT
REAR WINDOW DEFOGGER RELAY
OUTPUT
INPUTBLKGROUNDOUTPUT14B LK/YELlG2 (Power)INPUT
Bon
CavityWire colorSiqnal1--T
2
3BLIVREDREAR WINDOW DEFOGGER SWITCH LEDINPUT
4LT GRNA./C SWITCH LEDINPUT
5LT GRN/BLKRECIRCULATION CONTROL SWITCH LEDINPUT
6PNVBLKAIR MIX POTENTIALOUTPUT
7BRNEVAPORATOR TEIMPERATURE SENSOROUTPUT
8
9
10
GAUGE ASSEMBLYal' 'TDr ri11RED
RED/BLKTAILLIGHTS RELAYINPUT
14BLUREAR WINDOW DEFOGGER SWITCHINPUTicLT GRN/REDA/C SWITCHINPUT16YEVREDRECIRCULATION CONTROL SWITCHINPUT17YEUGRNMODE 4OUTPUT18WHT/BLUMODE 3OUTPUT19RED/BLUMODE 2OUTPUT20RED/YELMODE 1OUTPUTBRN^,^/HTIGN (PowedOUTPUT22R E DA/r'HT(Not used)
(cont'd)
21-11
Page 787 of 1139
Heating and Air Conditioning
DTC Troubleshooting
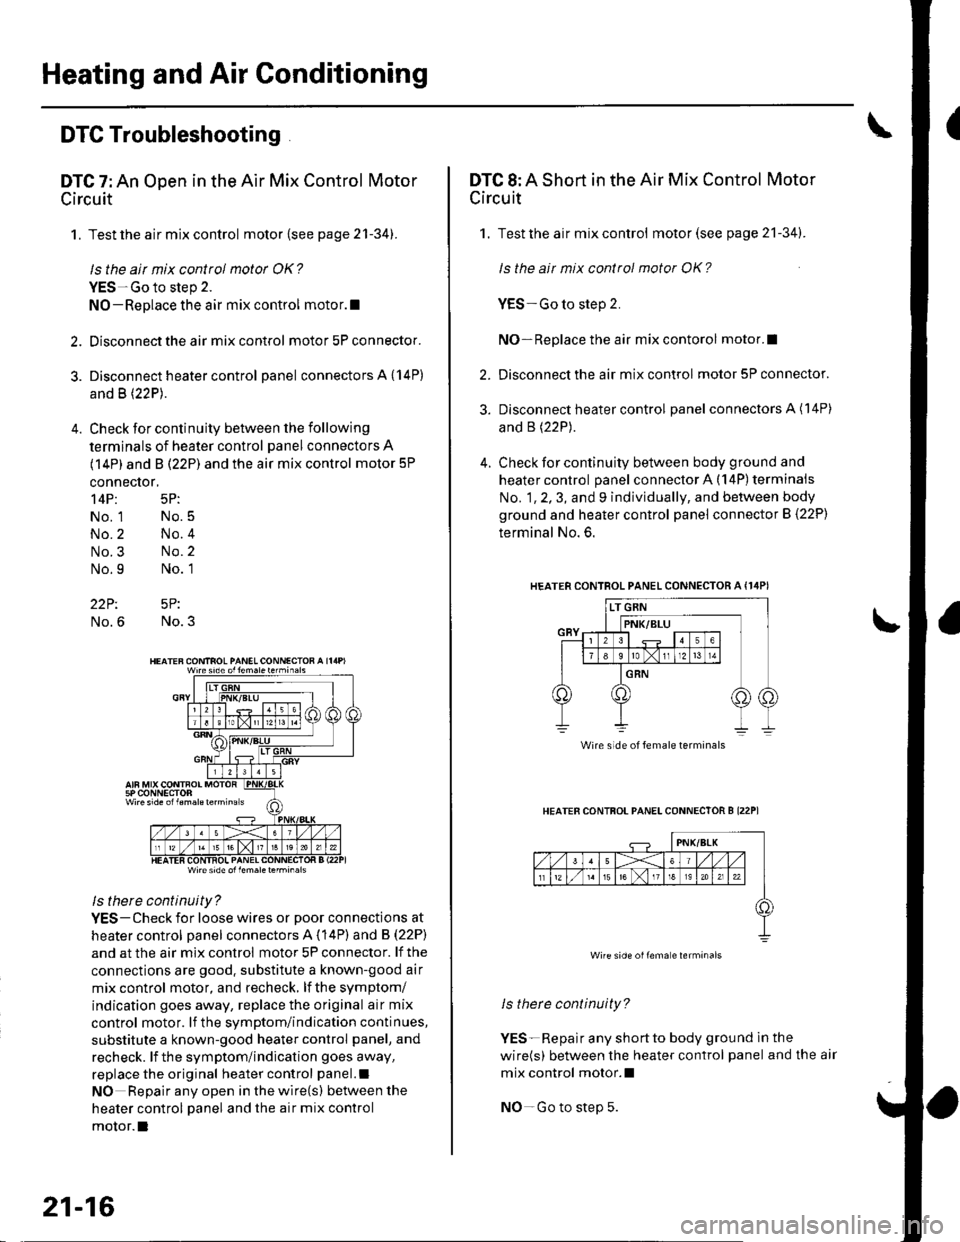
DTC 7: An Open in the Air Mix Control Motor
Circuit
1. Test the air mix control motor {see page 2'l-341.
ls the air mix control motor OK?
YES-Go to step 2.
NO-Replace the air mix control motor.l
2. Disconnect the air mix control motor 5P connector.
3. Disconnect heater control panel connectors A {14P)
and B (22P).
4. Check for continuity between the following
terminals of heater control panel connectors A
(14P) and B (22P) and the air mix control motor 5P
connector,
14P: 5P:
No. 1 No.5
No.2 No.4
No.3 No.2
No.9 No. 1
22P: 5P:
No.6 No.3
Wire side ol lem.letehi.6ls
ls there continuity?
YES-Check for loose wires or poor connections at
heater control oanel connectors A (14P) and B (22P)
and at the air mix control motor 5P connector. lf the
connections are good. substitute a known-good air
mix control motor, and recheck, lf the symptom/
indication goes away, replace the original air mix
control motor. lf the symptom/indication continues,
substitute a known-good heater control panel, and
recheck. lf the symptom/indication goes away,
replace the original heater control panel.l
NO Repair any open inthewire(s) ketweenthe
heater control panel and the air mix control
motor.l
21-16
DTC 8: A Short in the Air Mix Control Motor
Circuit
1. Test the air mix control motor(see page 21-341.
ls the ait mix control motor OK?
YES-Go to step 2.
NO-Replace the air mix contorol motor.I
2. Disconnect the air mix control motor 5P connector.
3. Disconnect heater control panel connectors A (14P)
and B (22P).
4. Check for continuity between body ground and
heater control panel connector A (14P) terminals
No. 1, 2, 3, and 9 individually, and between body
ground and heater control panel connector B (22P)
terminal No. 6.
HEATERCONTROL PANEL CONNECTOR A {I4PI
HEATER CONTFOL PANELCONNECTOR B I22P1
ls therc continuity?
YES-Repair any shortto body ground ln the
wire(s) between the heater control panel and the air
mix control motor.l
NO-Go to step 5.
Wire side of female terminals
Wire side oilema e lerminals