ect HONDA CIVIC 2003 7.G Workshop Manual
[x] Cancel search | Manufacturer: HONDA, Model Year: 2003, Model line: CIVIC, Model: HONDA CIVIC 2003 7.GPages: 1139, PDF Size: 28.19 MB
Page 750 of 1139
Exterior Trim
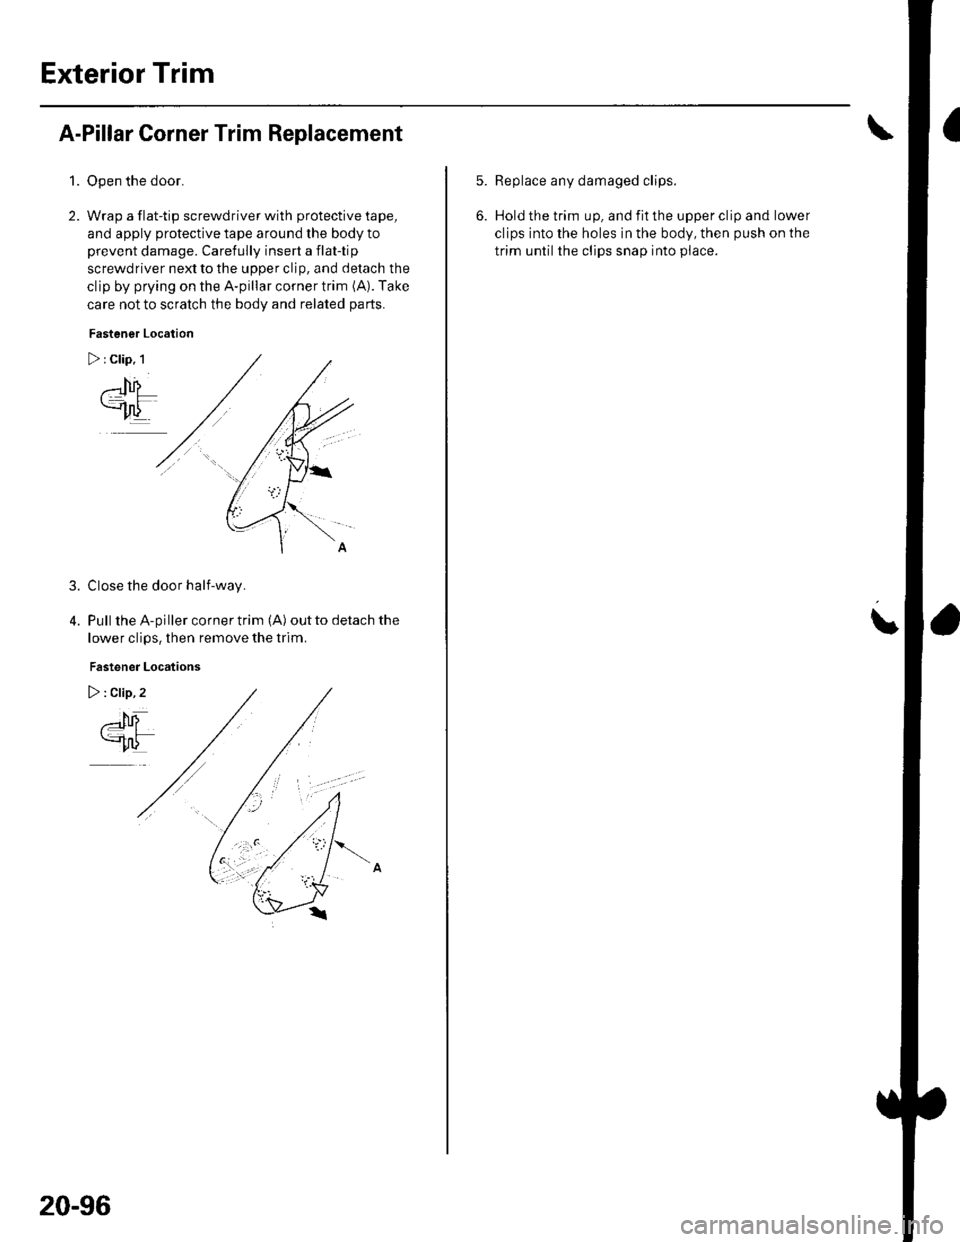
A-Pillar Corner Trim Replacement
1.Open the door.
Wrap a flat-tip screwdriver with protective tape,
and apply protective tape around lhe body to
prevent damage. Carefully insert a flat-tip
screwdriver next to the upper clip, and detach the
clip by prying on the A-pillar corner trim (A). Take
care not to scratch the body and related parts.
Fastener Location
Close the door half-way.
Pull the A-piller corner trim (A) out to detach the
lower clips, then remove the trim.
Fastener Locations
3.
20-96
5.Replace any damaged clips.
Hold the trim up, and fit the upper clip and lower
clips into the holes in the body, then push on the
trim until the clips snap into piace.
\
Page 751 of 1139
1.
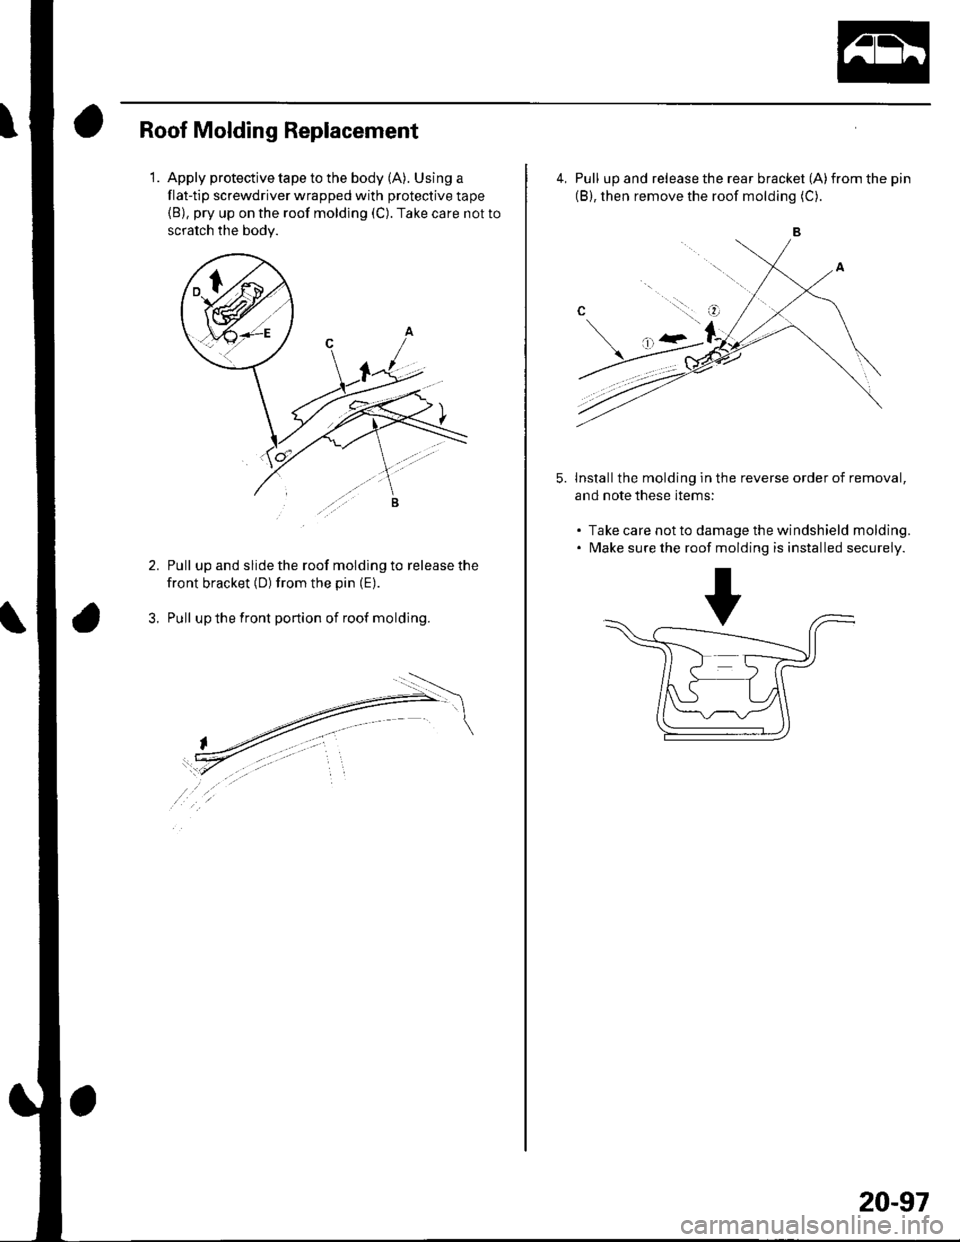
Roof Molding Replacement
Apply protective tape to the body (A). Using a
flat-tip screwdriver wrapped with protective tape(B), pry up on the roof molding (C). Take care not to
scratch the bodv.
Pull up and slide the roof molding to release the
front bracket (D) from the pin (E).
Pull up the front portion of roof molding.
4, Pull up and release the rear bracket (A)from the pin
(B), then remove the roof molding (C).
Install the molding in the reverse order of removal,
and note these items:
. Take care not to damage the windshield molding.. Make sure the roof molding is installed securely.
5.
..:.::.l. g
20-97
Page 752 of 1139
Exterior Trim
\
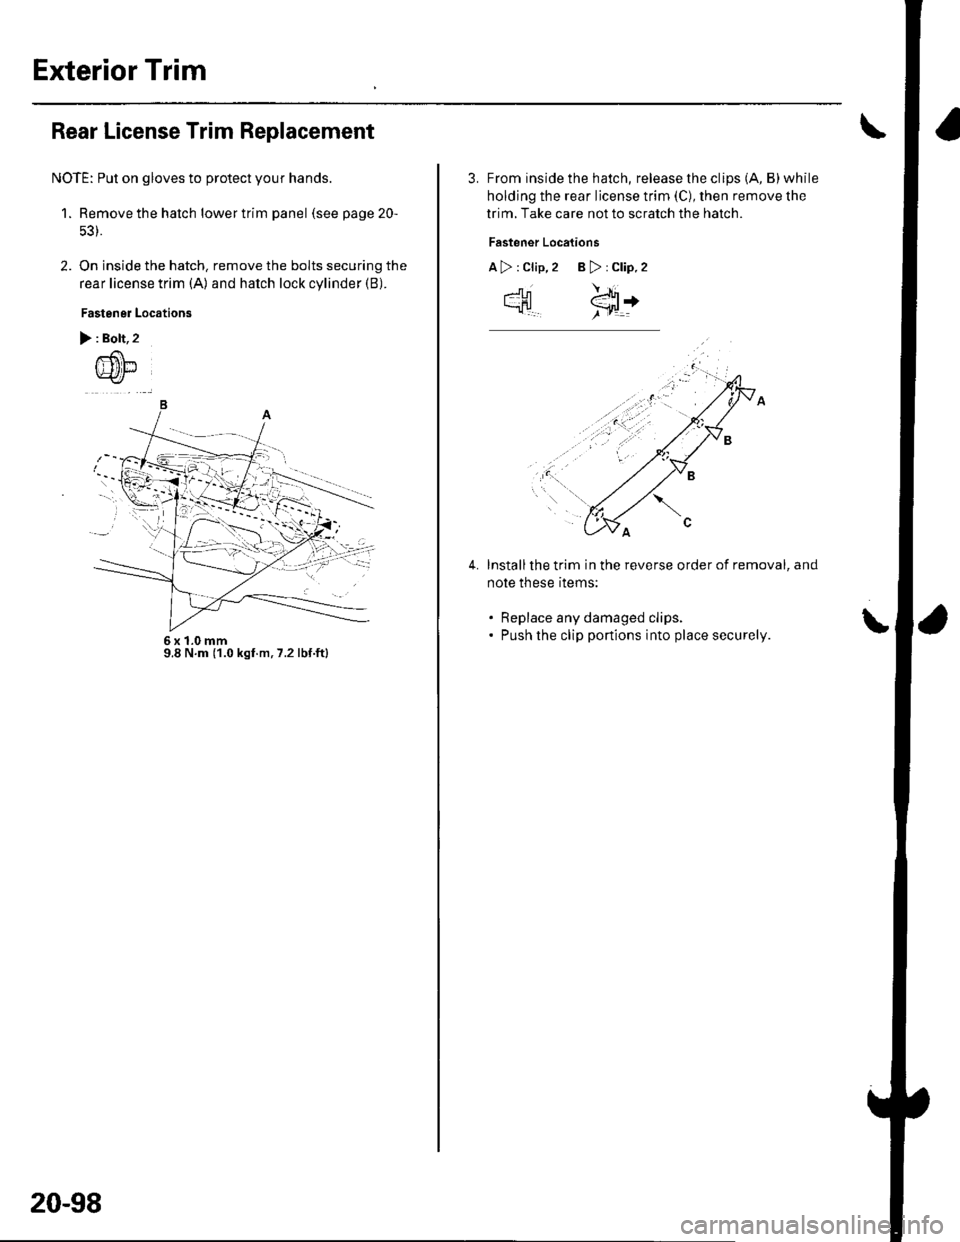
Rear License Trim Replacement
NOTE: Put on gloves to protect your hands.
1. Remove the hatch lower trim panel (see page 20-
2. On inside the hatch. remove the bolts securing the
rear license trim (A) and hatch lock cylinder (B).
Fastener Locations
> : Bolt,2
-)
6x1.0mm9.8 N.m (1.0 kgf.m,7.2lbf.ftl
20-98
3. From inside the hatch, release the clips (A, B)while
holding the rear license trim (C), then remove lhe
trim, Take care not to scratch the hatch.
Fastener Locations
A>:Clip,2 B>:Clip.2
\!-
cHl €:t+
Installthe trim in the reverse order of removal, and
note these rtems:
. Replace any damaged clips.. Push the clip portions into place securely.
4.
Page 753 of 1139
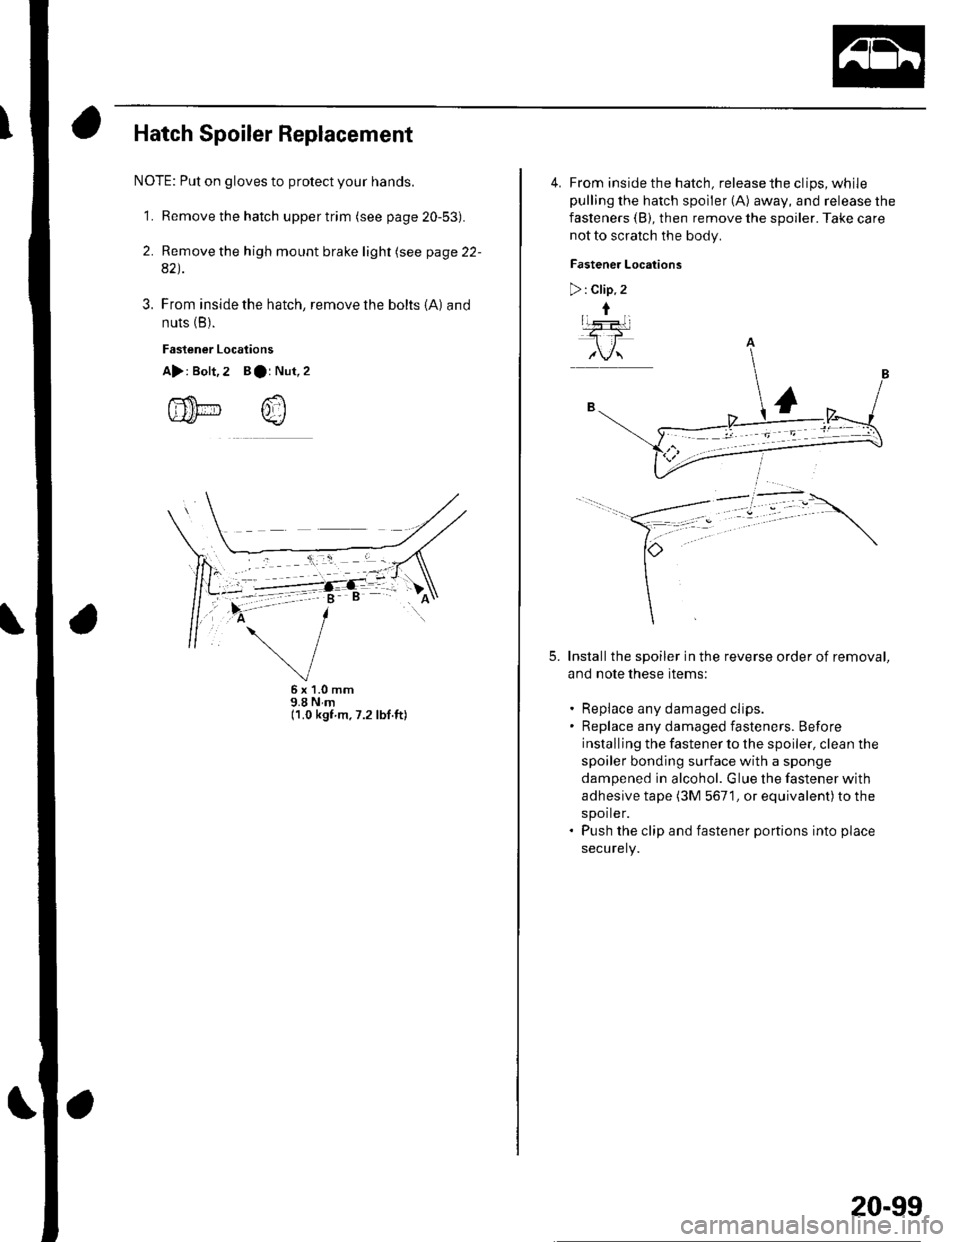
Hatch Spoiler Replacement
NOTE: Put on gloves to protect your hands.
'l. Remove the hatch upper trim (see page 20-53).
2. Remove the high mount brake light (see page 22-
82).
3. From inside the hatch, remove the bolts {A} and
nuts (B).
Fastener Locaiions
A>: Bolt,2 Bar Nut,
fi'f$t-- /,fluLt* v_/
5x1.0mm9.8Nm(1.0 kgf.m.7.2 lbf.ft)
$.A
4. From inside the hatch, release the clips, whilepulling the hatch spoiler (A) away, and release the
fasteners (B), then remove the spoiler. Take care
not to scratch the body.
Fastener Locations
>: Clip. 2
t
Installthe spoiler in the reverse order of removal,
and note these items:
Replace any damaged clips.
Replace any damaged fasteners. Before
installing the fastener to the spoiler, clean the
spoiler bonding surface with a sponge
dampened in alcohol. Glue the fastener with
adhesive tape (3M 5671, or equivalent)to the
spoiler.
Push the clip and fastener portions into place
securely.
5.
20-99
Page 758 of 1139
Fenderwell
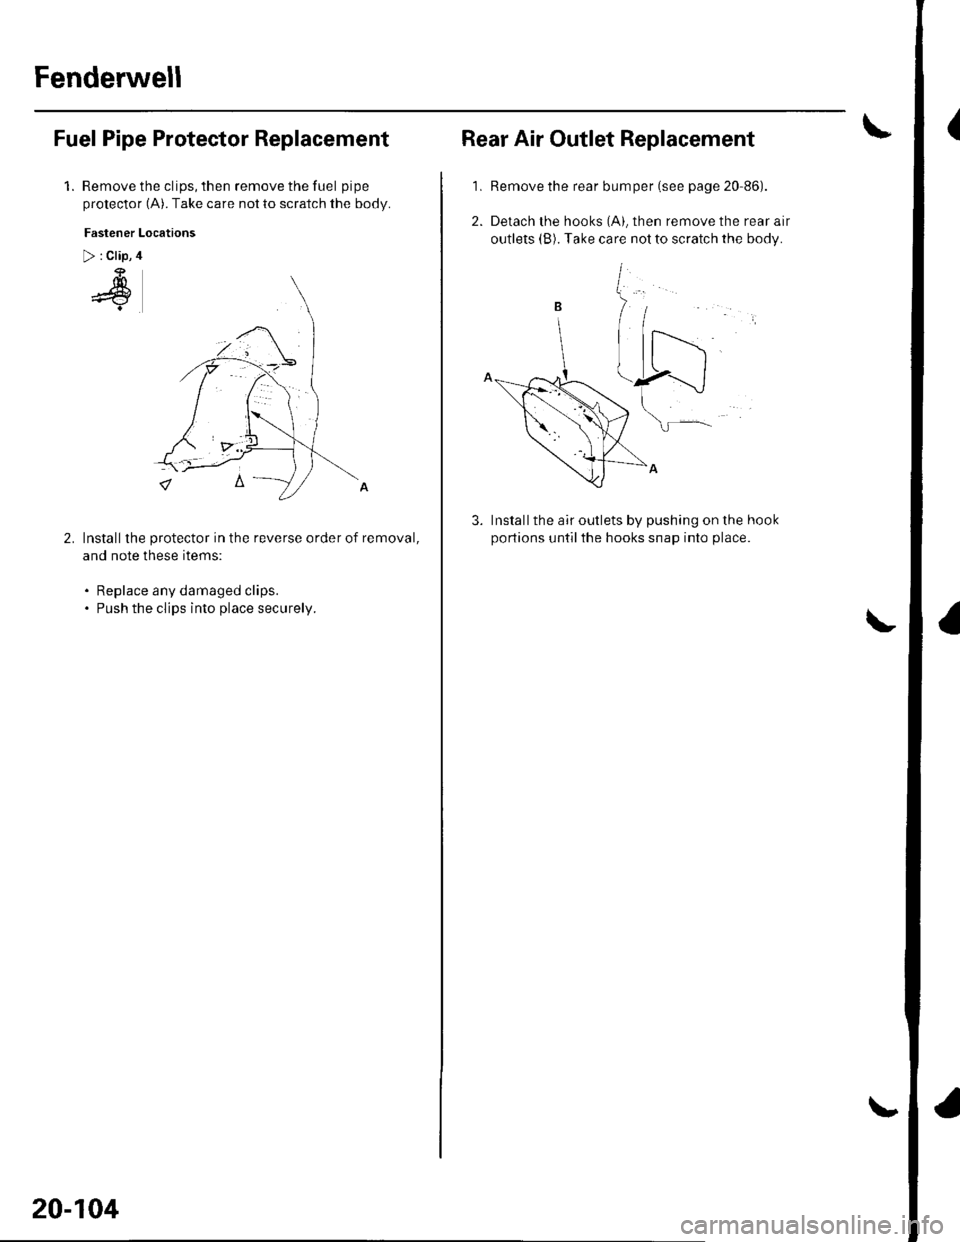
(Fuel Pipe Protector Replacement
1.Remove the clips, then remove the fuel pipe
protector (A). Take care not to scratch the body.
Fastener Locations
> : Clip, 4
4
Installthe protector in the reverse order of removal,
and note these items:
. Replace any damaged clips.. Push the clips into place securelv.
20-104
Rear Air Outlet Replacement
1. Remove the rear bumper (see page 20-86).
Installthe air outlets by pushing on the hook
portions untilthe hooks snap into place.
rne rear atr
the body.
Page 760 of 1139
Openers
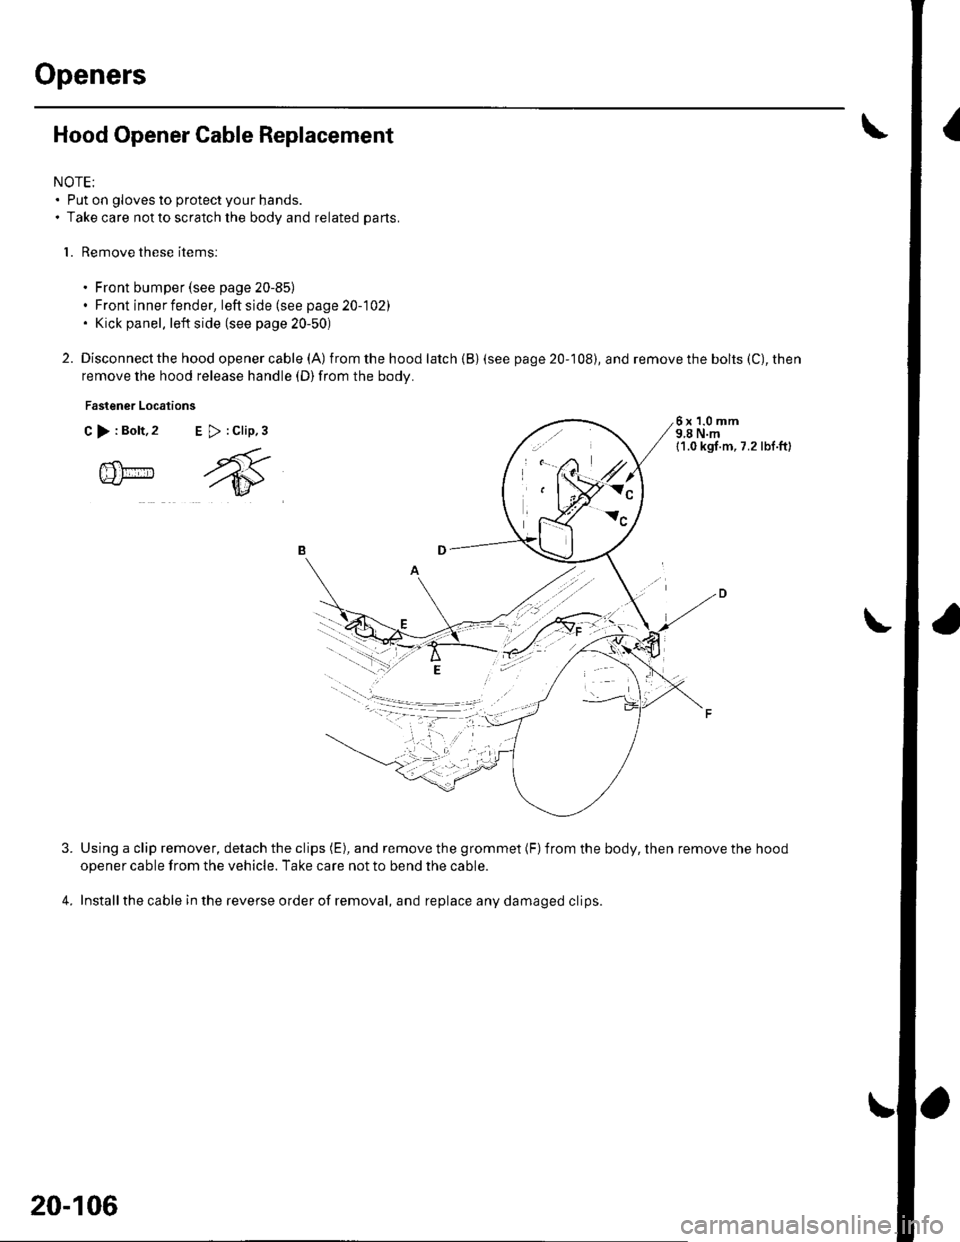
Hood Opener Cable Replacement
NOTE:. Put on gloves to protect your hands.. Take care not to scratch the body and related parts.
l. Remove these items:
. Front bumper (see page 20-85). Front inner fender, leftside(seepage20-102). Kick panel, left side (see page 20-50)
2. Disconnect the hood openercable (A) from the hood latch {B) (see
remove the hood release handle (D)from the body.
Fastener Locations
C >:Bolt,2 E >:Clip,3
page 20-108), and remove the bolts (C), then
6x1.0mm9,8 N.m11.0 kgl.m, 7.2 lbl.ft)
@m
4.
Using a clip remover, detach the clips (E), and remove the grommet (F)from the body, then remove the hood
opener cable from the vehicle. Take care not to bend the cable.
Installthe cable in the reverse order of removal, and replace any damaged clips.
l,.t'.
W:"
20-106
Page 761 of 1139
2.
5.
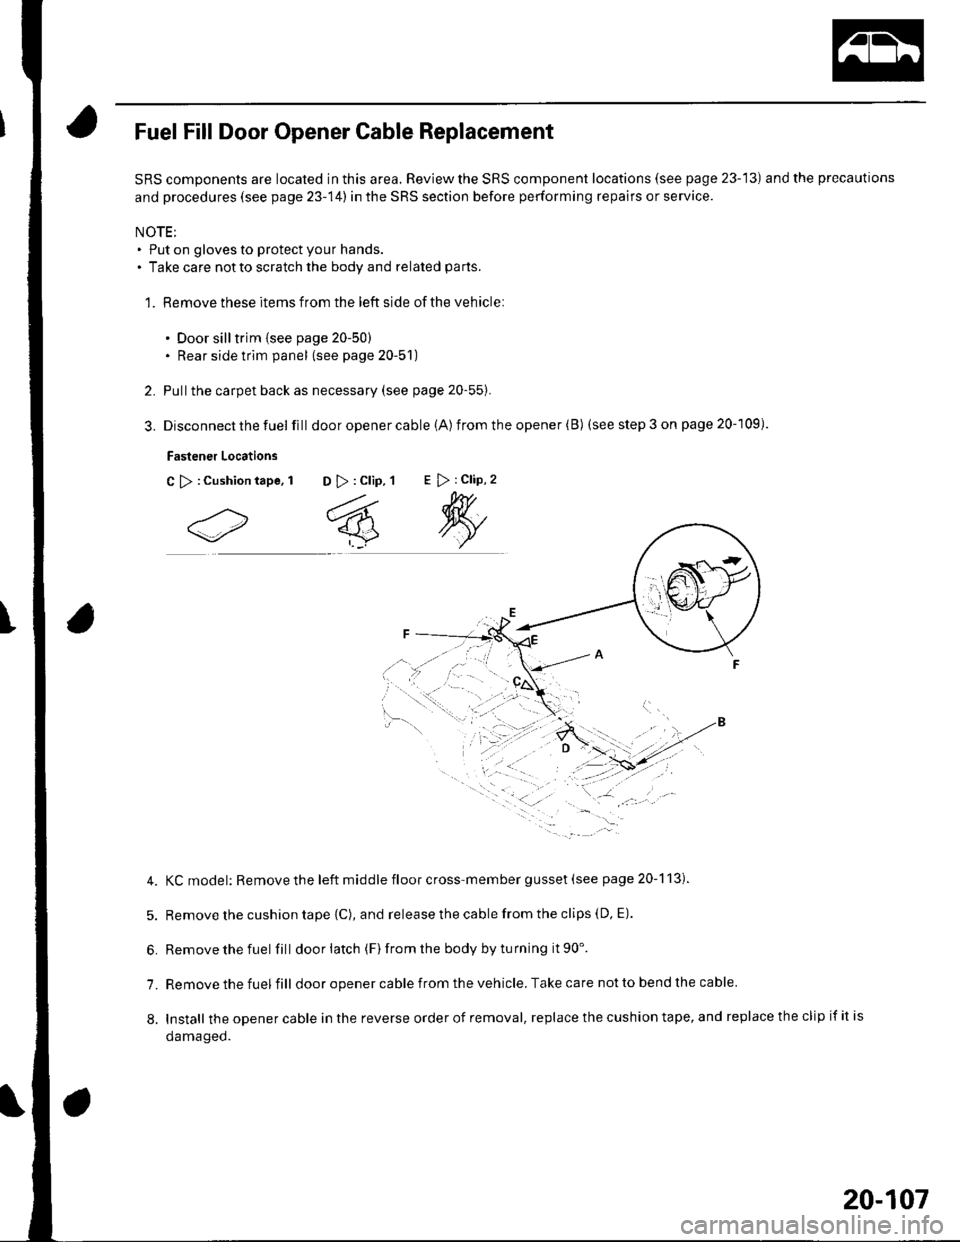
Fuel Fill Door Opener Cable Replacement
SRS components are located in this area. Review the SRS component locations (see page 23-13) and the precautions
and procedures (see page 23-14) in the SRS section before performing repairs or service.
NOTE;. Put on gloves to protect your hands.. Take care notto scratch the body and related parts.
1. Remove these items from the left side of the vehicle:
. Door silltrim {see page 20-50). Rear side trim panel (see page 20-51)
Pullthe carpet back as necessary (see page 20-55).
Disconnect the fuel fill door opener cable (A) from the opener (B) (see step 3 on page 20-109).
Fastener Locations
C >:Cushiontape, 1 D >: Clip, 1E > : Clip, 2
4. KCmodel: Removethe left middle floor cross-member gusset (see page 20-113).
5. Remove the cushion tape {C), and release the cable from the clips (D, E).
6. Removethefuel fill doorlatch (F)fromthe bodybyturning it90'.
7. Remove the fuel fill door opener cable from the vehicle. Take care not to bend the cable
8. Install theopenercableinthereverseorderofremoval,replacethecushiontape,andreplacetheclipifitis
oamageo.
20-107
Page 762 of 1139
Openers
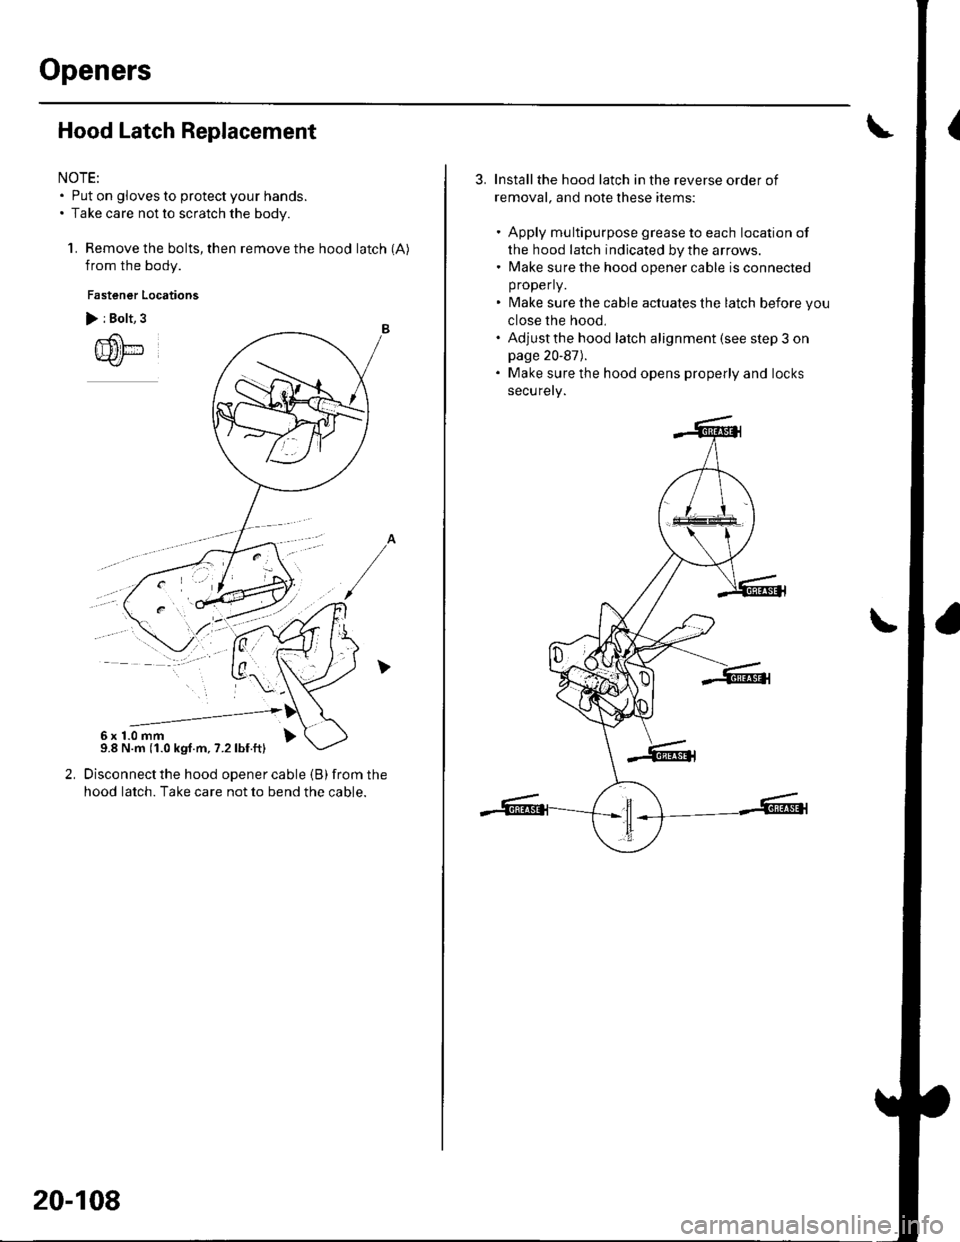
Hood Latch Replacement
NOTE:. Put on gloves to protect your hands.. Take care not to scratch the body.
1. Remove the bolts, then remove the hood latch (A)
from the body.
Fastener Locations
> i Bolt, 3
Disconnect the hood opener cable (B) from the
hood latch. Take care not to bend the cable.
--------------'6x1.0mm9.8 N.m (1.0 kgf.m, 7.2lbf.ft)
20-108
Installthe hood latch in the reverse order of
removal, and note these items:
. Apply multipurpose grease to each location of
the hood latch indicated by the arrows.. Make sure the hood opener cable is connected
properly.
. Make sure the cable actuates the latch before you
close the hood,. Adjustthe hood latch alignment (see step 3 onpage 20-87).. Make sure the hood opens properly and locks
securely.
Page 763 of 1139
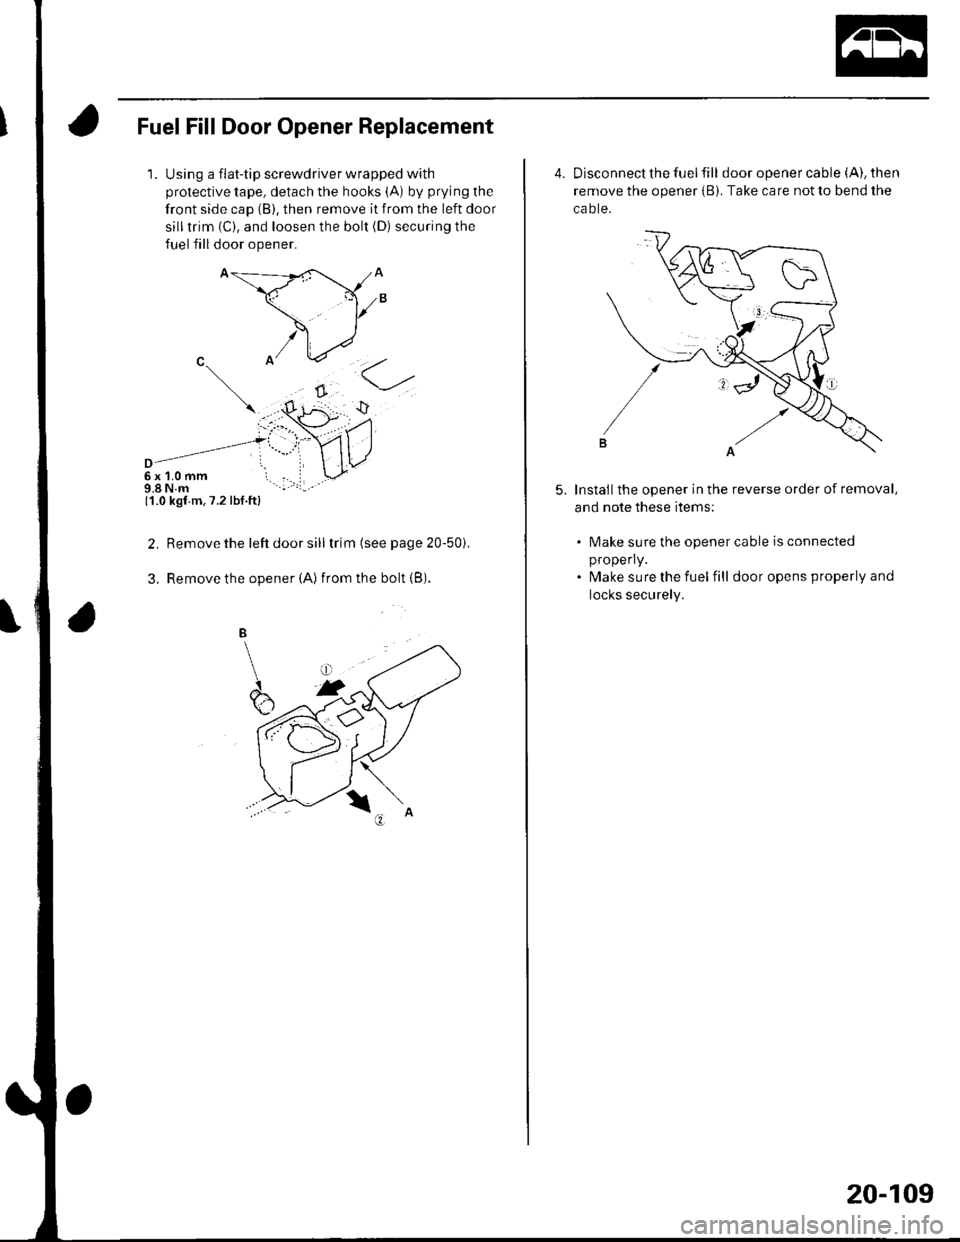
Fuel Fill Door Opener Replacement
1.Using a flat-tip screwdriver wrapped with
protective tape, detach the hooks (A) by prying the
front side cap (B), then remove it from the left door
silltrim (C), and loosen the bolt (D) securing the
fuel fill door opener.
6x1.0mm9.8 N.m11.0 kgf m,7.2 lbf.ft)
Remove the left door sill trim (see page 20-50i.
Remove the opener (Alfrom the bolt {B).
2.
3.
4. Disconnect the fuel fill door opener cable (A), then
remove the opener iB). Take care not to bend the
ca o te.
Installthe opener in the reverse order of removal,
and note these items:
5.
lMake sure the opener cable is connected
properly.
lvlake sure the fuel fill door opens properly and
locks securely.
20-109
Page 764 of 1139
Openers
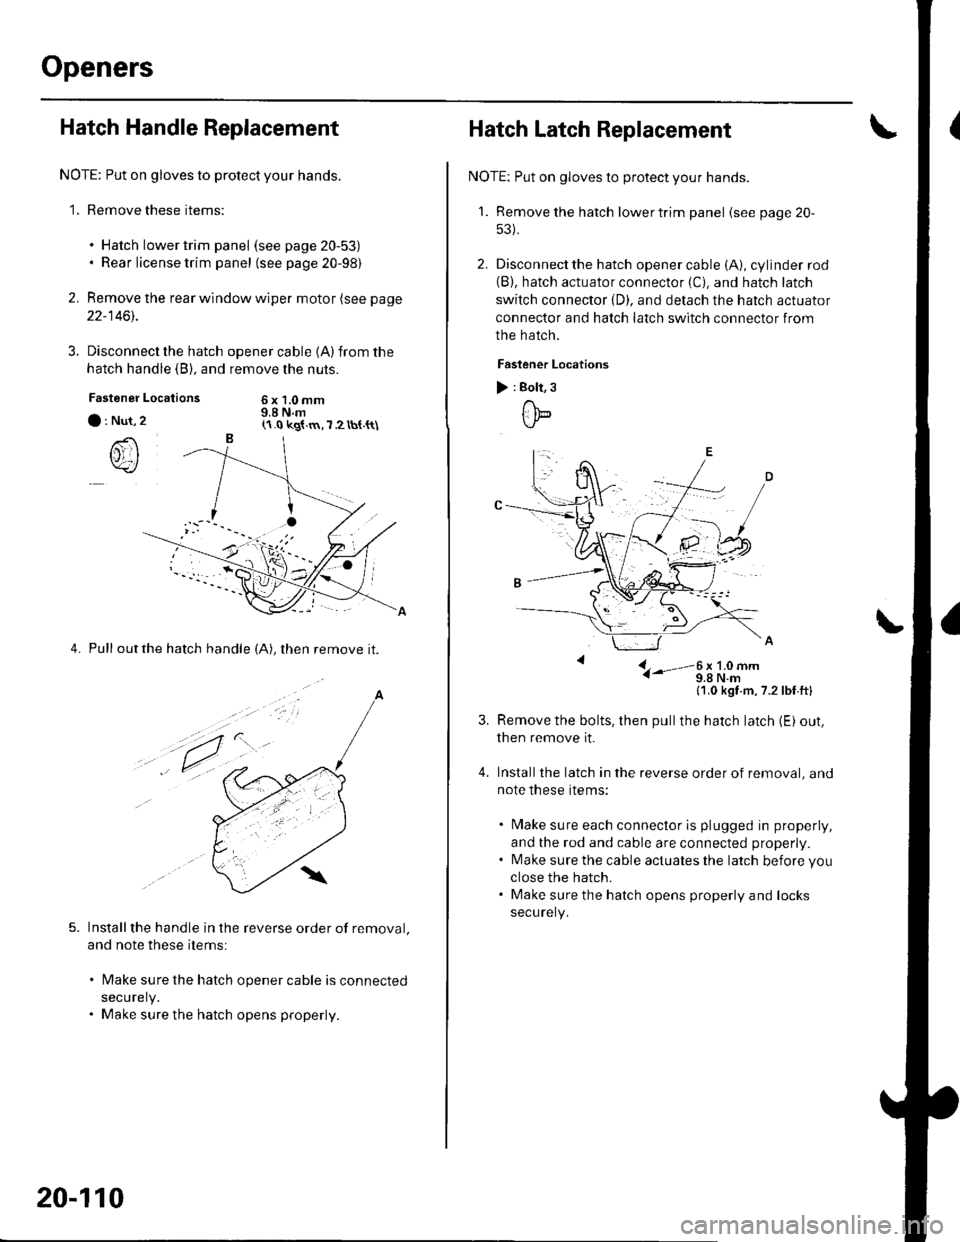
Hatch Handle Replacement
NOTE: Put on gloves to protect your hands.
1. Remove these items:
. Hatch lower trim panel (see page 20-53). Rear license trim panel (see page 20-98)
2. Remove the rear window wiper motor (see page
22-1461.
3. Disconnect the hatch
hatch handle (B), and
Locations
opener cable 1A)from the
remove the nuts.
6x1.0mm9.8 N.mFastener
a : Nut,
()rI
4. Pull outthe hatch handle (A), then remove it.
Installthe handle in the reverse order of removal.
and note these items:
lMake sure the hatch opener cable is connected
securely.
Make sure the hatch opens properly.
(1.0 kg{.m,7 2 tbt.{t\
a
,t.
20-110
Hatch Latch Replacement
NOTE: Put on gloves to protect your hands.
'1. Remove the hatch lowertrim panel (see page 20-
53).
2. Disconnect the hatch opener cable (A), cylinder rod(B). hatch actuator connector (C). and hatch latch
switch connector {D). and detach the hatch actuator
connector and hatch latch switch connector from
the hatch.
Faslener Locations
) : Bolt, 3
ttb
L- i-'-3;li9#-
11,0 kgt m,7.2lbf ftl
Remove the bolts, then pullthe hatch latch (E) out,
then remove it.
Installthe latch in the reverse order of removal, and
note these items:
. Make sure each connector is plugged in properly,
and the rod and cable are connected properly.. l\4ake sure the cable actuates the latch before you
close the hatch.. Make sure the hatch opens properly and locks
securely.