HONDA CLARITY ELECTRIC 2017 Owner's Manual (in English)
Manufacturer: HONDA, Model Year: 2017, Model line: CLARITY ELECTRIC, Model: HONDA CLARITY ELECTRIC 2017Pages: 543, PDF Size: 24.2 MB
Page 421 of 543
419Continued
Driving
Parking Your Vehicle
When Stopped
1.Depress the brake pedal firmly.
2. With the brake pedal depressed, pull up the electric pa rking brake switch slowly,
but fully.
3. Change the gear position to
(P.
4. Turn off the power system.
1Parking Your Vehicle
3WARNING
The vehicle can roll aw ay if left unattended
without confirming th at Park is engaged.
A vehicle that rolls away could cause a crash
resulting in serious injury or death.
Always keep your foot on the brake pedal
until you have confirmed that
( P is shown
on the gear position indicator.
1 When Stopped
NOTICE
The following can damage the driveline:•Depressing the accelera tor and brake pedals
simultaneously.
•Changing into ( P before the vehicle stops
completely.
When facing uphill, do not hold the vehicle by
depressing the accelerator pedal.
Doing so may cause the power system to overheat
and fail.
17 CLARITY BEV CSS-31TRV6000.book 419 ページ 2017年4月14日 金曜日 午前11 時8分
Page 422 of 543
uuParking Your Vehicle uWhen Stopped
420
Driving
Always confirm the electric parking brake is se t, in particular if you are parked on an
incline.1 When Stopped
In extremely cold temper atures, the parking brake
may freeze up if applied. If such temperatures are
expected, do not apply the parking brake but, if
parking on a slope, either turn the front wheels so
they will contact the curb if the vehicle rolls down the
slope or block the wheels to keep the vehicle from
moving. If you do not take either precaution, the
vehicle may roll unexpect edly, leading to a crash.
17 CLARITY BEV CSS-31TRV6000.book 420 ページ 2017年4月14日 金曜日 午前11 時8分
Page 423 of 543
421Continued
Driving
Multi-View Rear Camera
About Your Multi-View Rear Camera
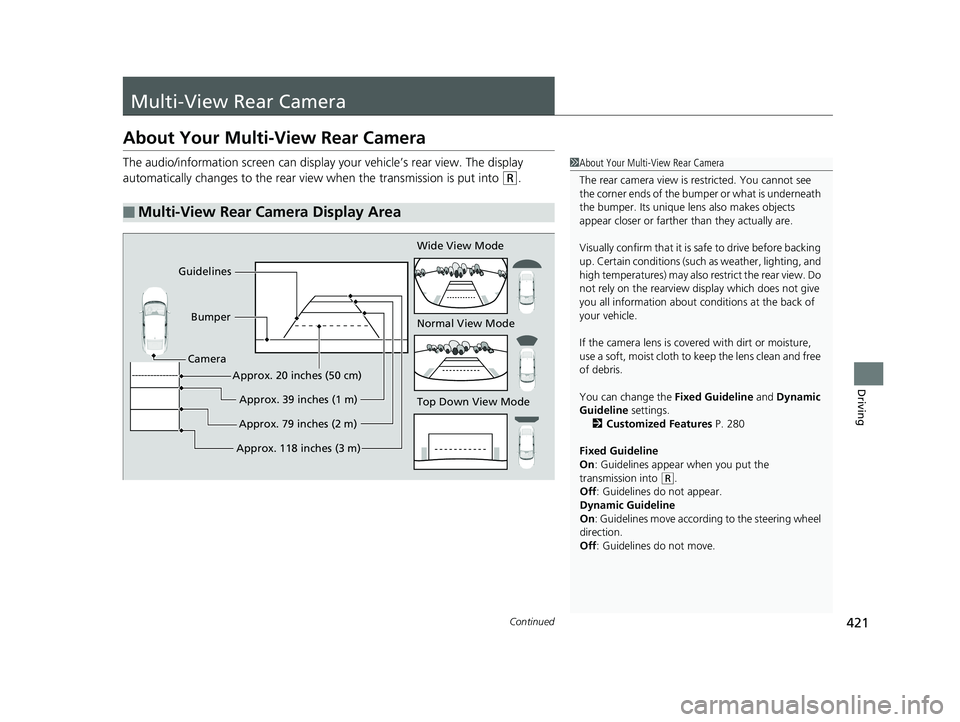
The audio/information screen can display your vehicle’s rear view. The display
automatically changes to the rear view when the transmission is put into
(R.
■Multi-View Rear Camera Display Area
1About Your Multi-View Rear Camera
The rear camera view is restricted. You cannot see
the corner ends of the bum per or what is underneath
the bumper. Its unique le ns also makes objects
appear closer or farther than they actually are.
Visually confirm that it is safe to drive before backing
up. Certain conditions (such as weather, lighting, and
high temperatures) may also re strict the rear view. Do
not rely on the rearview display which does not give
you all information about conditions at the back of
your vehicle.
If the camera lens is cove red with dirt or moisture,
use a soft, moist cloth to keep the lens clean and free
of debris.
You can change the Fixed Guideline and Dynamic
Guideline settings. 2 Customized Features P. 280
Fixed Guideline
On : Guidelines appear when you put the
transmission into
( R.
Off : Guidelines do not appear.
Dynamic Guideline
On : Guidelines move according to the steering wheel
direction.
Off : Guidelines do not move.
Top Down View Mode Normal View Mode Wide View Mode
Guidelines
Bumper
Camera
Approx. 118 inches (3 m)Approx. 79 inches (2 m)Approx. 39 inches (1 m)
Approx. 20 inches (50 cm)
17 CLARITY BEV CSS-31TRV6000.book 421 ページ 2017年4月14日 金曜日 午前11
時8分
Page 424 of 543
422
uuMulti-View Rear Camera uAbout Your Multi-View Rear Camera
Driving
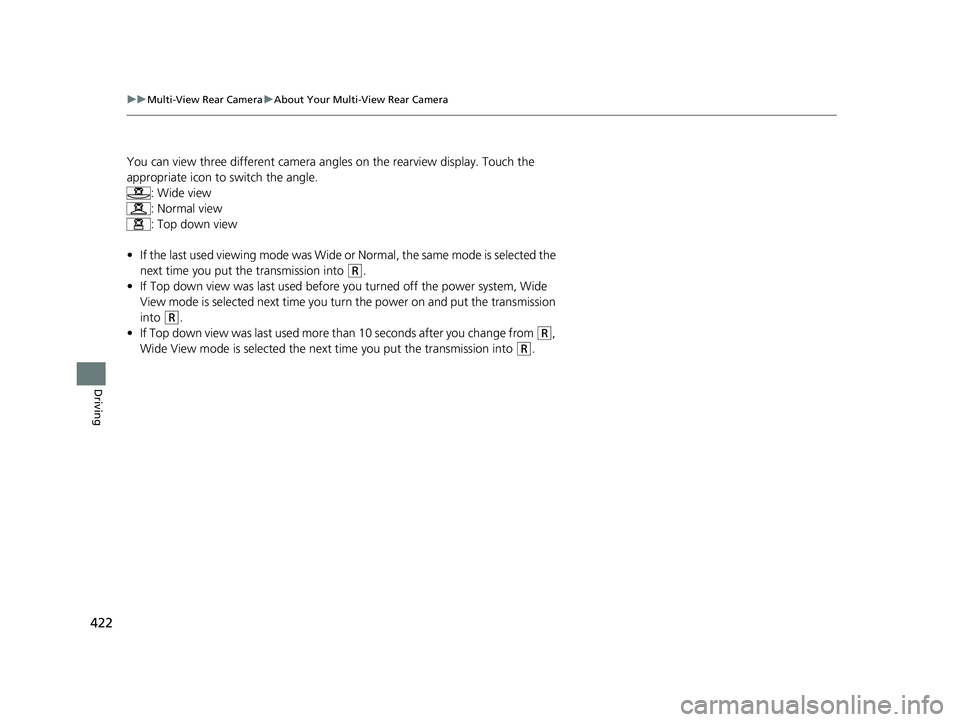
You can view three different camera angl es on the rearview display. Touch the
appropriate icon to switch the angle. : Wide view
: Normal view
: Top down view
• If the last used viewing mode was Wide or Normal, the same mode is selected the
next time you put the transmission into
(R.
• If Top down view was last used before you turned off the power system, Wide
View mode is selected next time you turn the power on and put the transmission
into
(R.
• If Top down view was last used more than 10 seconds after you change from
(R,
Wide View mode is selected the next time you put the transmission into
(R.
17 CLARITY BEV CSS-31TRV6000.book 422 ページ 2017年4月14日 金曜日 午前11 時8分
Page 425 of 543
423
Driving
Charging
Before Charging
Check the following items before you start charging your vehicle.
• The 120 volt charger draws approximately 12 amps. Make sure to use a dedicated
and properly grounded circuit that can supply 12 amps continuously.
u Have an electrician inspect the outlet you are using to see if it meets these
criteria.
• Make sure you plug the charging cable direct ly into the wall outlet dedicated to
vehicle charging.
u Do not use extension cord s, adaptors, or multi-outlet plugs between the
charging cable and the outlet.
• Make sure the charging cable is fully uncoiled before use.
• Make sure the control box, charging connector, and charging cable are free from
any damage, including cracks or frays.
u If you find any damage to the devices, contact an authorized Honda Clarity
Electric dealer.
• Make sure the charging conn ector and inlet are clean.
u If you find any contamination or foreign object in the connector or inlet,
contact an authorized Honda Clarity Electric dealer.
• Make sure the charging cable is dry.
u Check that there is no water in the i mmediate area, and that your hands are
dry.
Note: Outlet needs to be in good shape. Worn or damaged outlet will not make
good contact with the plug. Ensure that the plug is fully inserted and does not come
out of the outlet after installation. A loose connection will cause excessive heat build
up within the plug and damage it.
■Safety Checklist
1 Charging
3WARNING
Using a 120 volt wall outlet that is rated less
than 12 amps or one that is powering other
devices can cause a fire, seriously injuring
you or others.
When using the 120 volt charger, use a
dedicated and properly grounded circuit
rated 12 amps or more. Consult an
electrician if yo u are not sure.
17 CLARITY BEV CSS-31TRV6000.book 423 ページ 2017年4月14日 金曜日 午前11 時8分
Page 426 of 543
424
uuCharging uCharge the High Voltage battery using a Level 1, 2 or SAE J1772 DC charger
Driving
Charge the High Voltage battery using a Level 1, 2 or
SAE J1772 DC charger
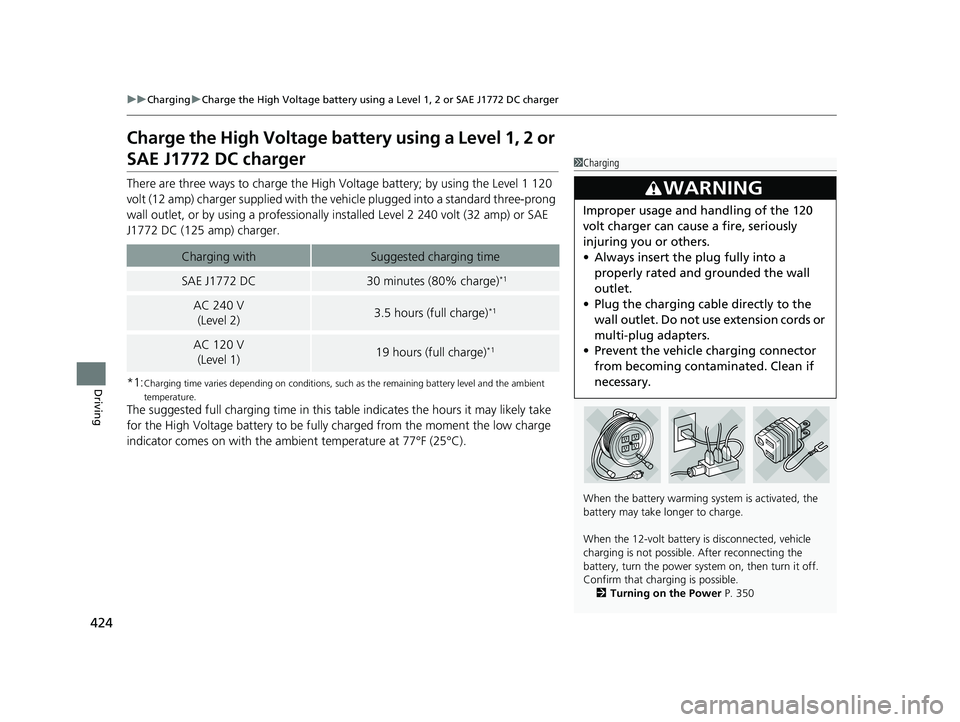
There are three ways to charge the High Voltage battery; by using the Level 1 120
volt (12 amp) charger supplied with the vehicle plugged into a standard three-prong
wall outlet, or by using a professionally installed Level 2 240 volt (32 amp) or SAE
J1772 DC (125 amp) charger.
*1:
Charging time varies depending on conditions, such as the remaining battery level and the ambient
temperature.
The suggested full charging time in this table indicates the hours it may likely take
for the High Voltage battery to be fully charged from the moment the low charge
indicator comes on with the ambient temperature at 77°F (25°C).
Charging withSuggested charging time
SAE J1772 DC 30 minutes (80% charge)*1
AC 240 V (Level 2)3.5 hours (full charge)*1
AC 120 V
(Level 1)19 hours (full charge)*1
1 Charging
When the battery warming system is activated, the
battery may take longer to charge.
When the 12-volt battery is disconnected, vehicle
charging is not possible. After reconnecting the
battery, turn the power system on, then turn it off.
Confirm that charging is possible. 2 Turning on the Power P. 350
3WARNING
Improper usage and handling of the 120
volt charger can cause a fire, seriously
injuring you or others.
•Always insert the plug fully into a
properly rated and grounded the wall
outlet.
• Plug the charging cable directly to the
wall outlet. Do not use extension cords or
multi-plug adapters.
• Prevent the vehicle charging connector
from becoming contaminated. Clean if
necessary.
17 CLARITY BEV CSS-31TRV6000.book 424 ページ 2017年4月14日 金曜日 午前11 時8分
Page 427 of 543
Continued425
uuCharging uCharge the High Voltage battery using a Level 1, 2 or SAE J1772 DC charger
Driving
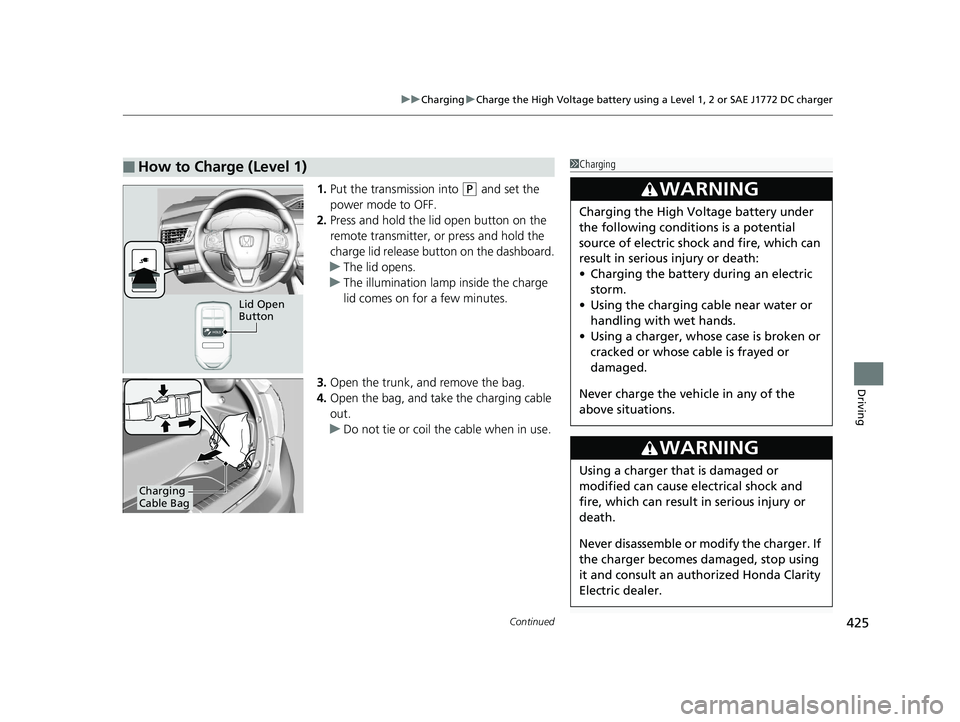
1. Put the transmission into (P and set the
power mode to OFF.
2. Press and hold the lid open button on the
remote transmitter, or press and hold the
charge lid release button on the dashboard.
u The lid opens.
u The illumination lamp inside the charge
lid comes on for a few minutes.
3. Open the trunk, and remove the bag.
4. Open the bag, and take the charging cable
out.
u Do not tie or coil the cable when in use.
■How to Charge (Level 1)
Lid Open
Button
Charging
Cable Bag
1Charging
3WARNING
Charging the High Vo ltage battery under
the following conditions is a potential
source of electric shock and fire, which can
result in serious injury or death:
• Charging the battery during an electric
storm.
• Using the charging cable near water or
handling with wet hands.
• Using a charger, whose case is broken or
cracked or whose cable is frayed or
damaged.
Never charge the vehi cle in any of the
above situations.
3WARNING
Using a charger that is damaged or
modified can cause electrical shock and
fire, which can result in serious injury or
death.
Never disassemble or modify the charger. If
the charger becomes damaged, stop using
it and consult an authorized Honda Clarity
Electric dealer.
17 CLARITY BEV CSS-31TRV6000.book 425 ページ 2017年4月14日 金曜日 午前11 時8分
Page 428 of 543
uuCharging uCharge the High Voltage battery using a Level 1, 2 or SAE J1772 DC charger
426
Driving
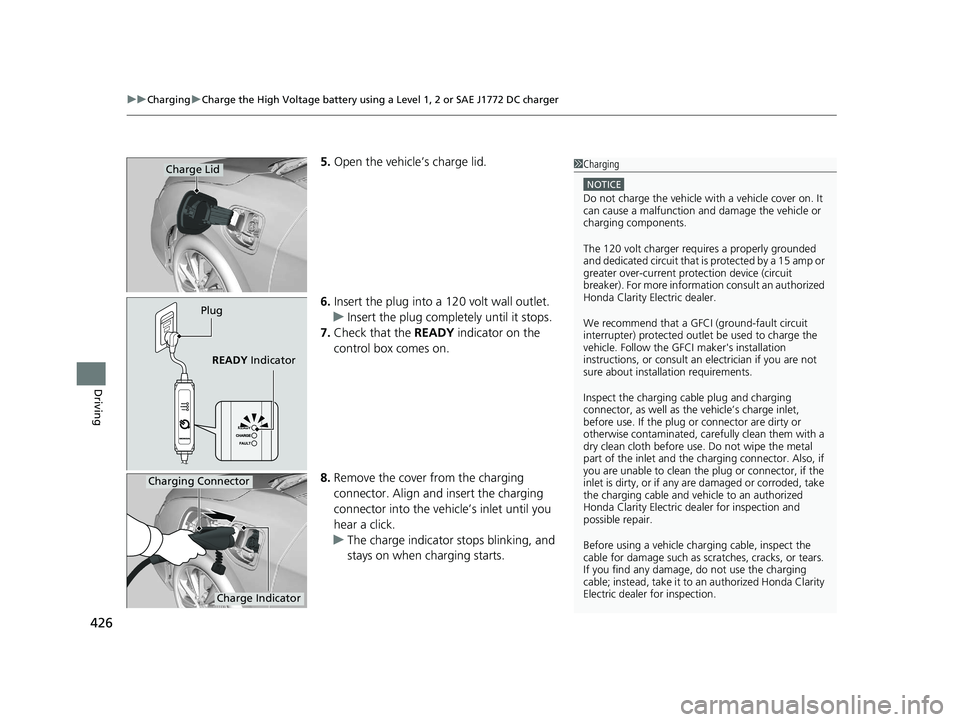
5. Open the vehicle’s charge lid.
6. Insert the plug into a 12 0 volt wall outlet.
u Insert the plug completely until it stops.
7. Check that the READY indicator on the
control box comes on.
8. Remove the cover from the charging
connector. Align and insert the charging
connector into the vehi cle’s inlet until you
hear a click.
u The charge indicator stops blinking, and
stays on when charging starts.Charge Lid
Plug
READY Indicator
1Charging
NOTICE
Do not charge the vehicle wi th a vehicle cover on. It
can cause a malfunction and damage the vehicle or
charging components.
The 120 volt charger requires a properly grounded
and dedicated circuit that is protected by a 15 amp or
greater over-curre nt protection device (circuit
breaker). For more information consult an authorized
Honda Clarity Electric dealer.
We recommend that a GFCI (ground-fault circuit
interrupter) protected outlet be used to charge the
vehicle. Follow the GF CI maker's installation
instructions, or consult an electrician if you are not
sure about installation requirements.
Inspect the charging cable plug and charging
connector, as well as the vehicle’s charge inlet,
before use. If the plug or connector are dirty or
otherwise contaminated, care fully clean them with a
dry clean cloth before use. Do not wipe the metal
part of the inlet and the ch arging connector. Also, if
you are unable to clean the plug or connector, if the
inlet is dirty, or if any ar e damaged or corroded, take
the charging cable and vehi cle to an authorized
Honda Clarity Electric de aler for inspection and
possible repair.
Before using a vehicle char ging cable, inspect the
cable for damage such as scratches, cracks, or tears.
If you find any damage, do not use the charging
cable; instead, take it to an authorized Honda Clarity
Electric dealer for inspection.
Charging Connector
Charge Indicator
17 CLARITY BEV CSS-31TRV6000.book 426 ページ 2017年4月14日 金曜日 午前11 時8分
Page 429 of 543
Continued427
uuCharging uCharge the High Voltage battery using a Level 1, 2 or SAE J1772 DC charger
Driving
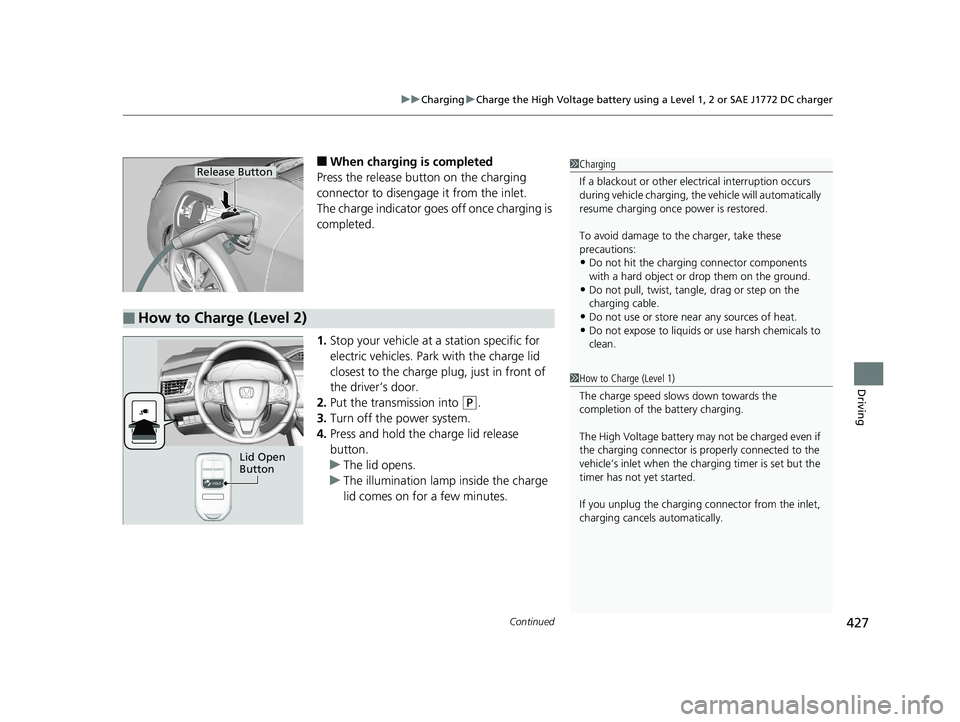
■When charging is completed
Press the release button on the charging
connector to disengag e it from the inlet.
The charge indicator goes off once charging is
completed.
1. Stop your vehicle at a station specific for
electric vehicles. Park with the charge lid
closest to the charge plug, just in front of
the driver’s door.
2. Put the transmission into
(P.
3. Turn off the power system.
4. Press and hold the charge lid release
button.
u The lid opens.
u The illumination lamp inside the charge
lid comes on for a few minutes.
1Charging
If a blackout or other elec trical interruption occurs
during vehicle charging, the vehicle will automatically
resume charging once power is restored.
To avoid damage to th e charger, take these
precautions:
•Do not hit the charging connector components
with a hard object or drop them on the ground.
•Do not pull, twist, tangle, drag or step on the
charging cable.
•Do not use or store near any sources of heat.
•Do not expose to liquids or use harsh chemicals to
clean.
Release Button
■How to Charge (Level 2)
1How to Charge (Level 1)
The charge speed slows down towards the
completion of the battery charging.
The High Voltage battery may not be charged even if
the charging connector is properly connected to the
vehicle’s inlet when the charging timer is set but the
timer has not yet started.
If you unplug the charging connector from the inlet,
charging cancels automatically.
Lid Open
Button
17 CLARITY BEV CSS-31TRV6000.book 427 ページ 2017年4月14日 金曜日 午前11 時8分
Page 430 of 543
uuCharging uCharge the High Voltage battery using a Level 1, 2 or SAE J1772 DC charger
428
Driving
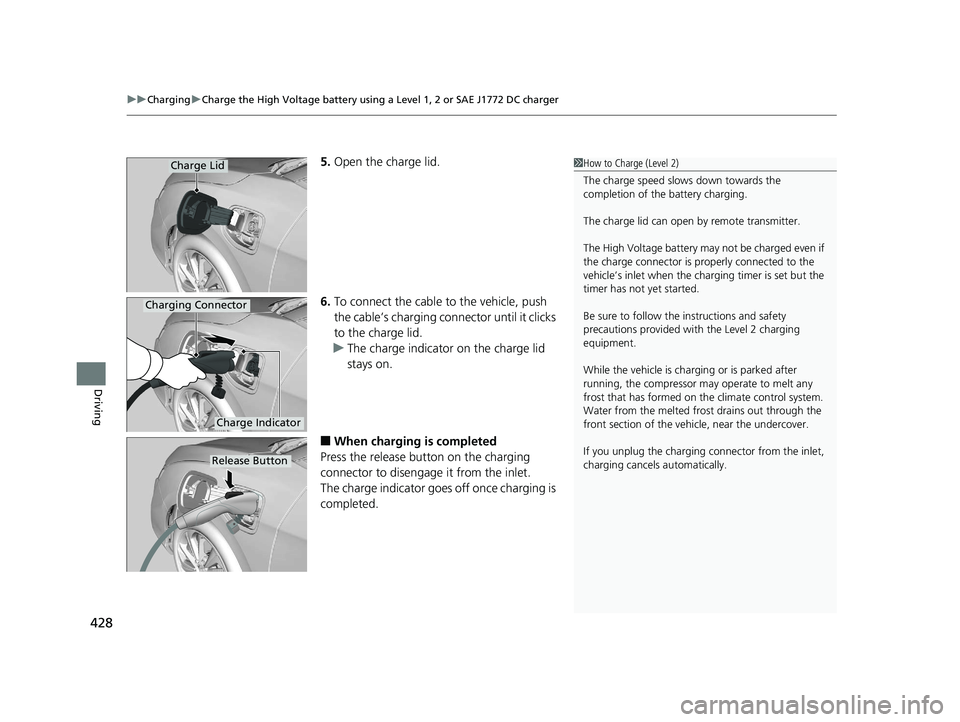
5. Open the charge lid.
6. To connect the cable to the vehicle, push
the cable’s charging conn ector until it clicks
to the charge lid.
u The charge indicator on the charge lid
stays on.
■When charging is completed
Press the release button on the charging
connector to disengage it from the inlet.
The charge indicator goes off once charging is
completed.
1 How to Charge (Level 2)
The charge speed slows down towards the
completion of the battery charging.
The charge lid can open by remote transmitter.
The High Voltage battery may not be charged even if
the charge connector is properly connected to the
vehicle’s inlet when the charging timer is set but the
timer has not yet started.
Be sure to follow the instructions and safety
precautions provided with the Level 2 charging
equipment.
While the vehicle is charging or is parked after
running, the compressor may operate to melt any
frost that has formed on the climate control system.
Water from the melt ed frost drains out through the
front section of the vehi cle, near the undercover.
If you unplug the charging connector from the inlet,
charging cancels automatically.Charge Lid
Charge Indicator
Charging Connector
Release Button
17 CLARITY BEV CSS-31TRV6000.book 428 ページ 2017年4月14日 金曜日 午前11 時8分