HONDA CLARITY ELECTRIC 2017 Owner's Manual (in English)
Manufacturer: HONDA, Model Year: 2017, Model line: CLARITY ELECTRIC, Model: HONDA CLARITY ELECTRIC 2017Pages: 543, PDF Size: 24.2 MB
Page 451 of 543
449
Maintenance
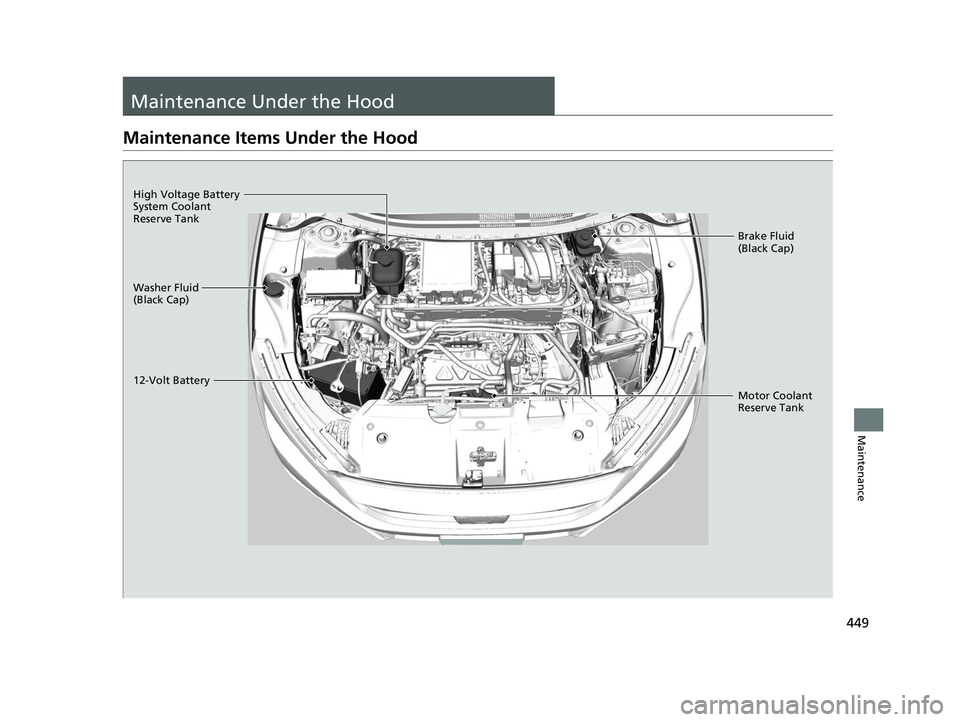
Maintenance Under the Hood
Maintenance Items Under the Hood
Washer Fluid
(Black Cap)
12-Volt BatteryBrake Fluid
(Black Cap)
Motor Coolant
Reserve Tank
High Voltage Battery
System Coolant
Reserve Tank
17 CLARITY BEV CSS-31TRV6000.book 449 ページ 2017年4月14日 金曜日 午前11
時8分
Page 452 of 543
450
uuMaintenance Under the Hood uOpening the Hood
Maintenance
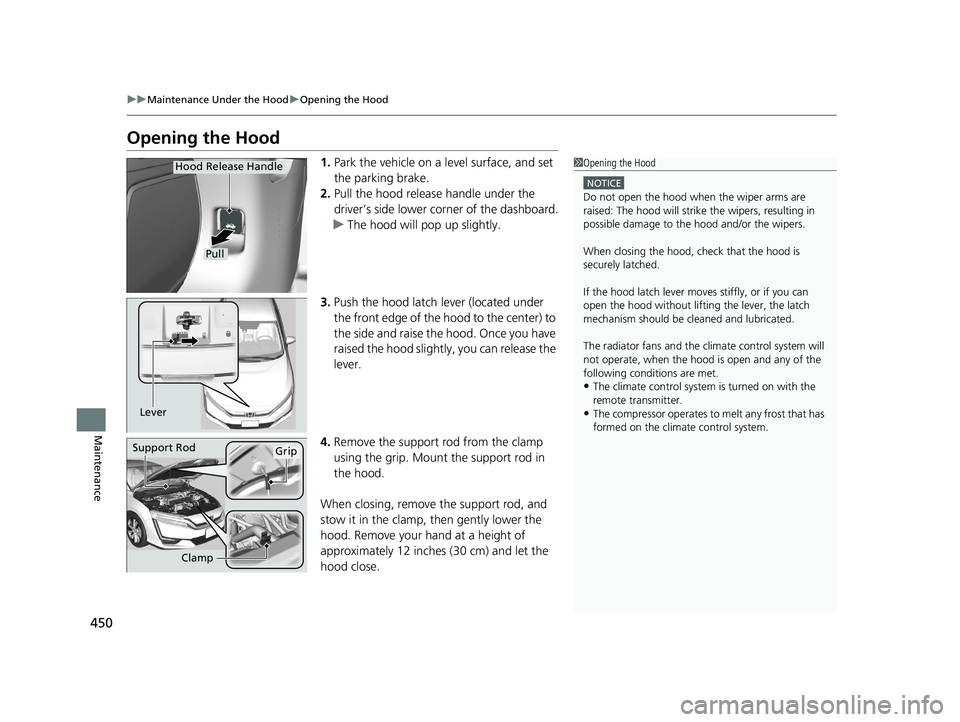
Opening the Hood
1. Park the vehicle on a level surface, and set
the parking brake.
2. Pull the hood release handle under the
driver’s side lower co rner of the dashboard.
u The hood will pop up slightly.
3. Push the hood latch lever (located under
the front edge of the hood to the center) to
the side and raise the hood. Once you have
raised the hood slight ly, you can release the
lever.
4. Remove the support rod from the clamp
using the grip. Mount the support rod in
the hood.
When closing, remove the support rod, and
stow it in the clamp, then gently lower the
hood. Remove your hand at a height of
approximately 12 inches (30 cm) and let the
hood close.1 Opening the Hood
NOTICE
Do not open the hood when the wiper arms are
raised: The hood will strike the wipers, resulting in
possible damage to the hood and/or the wipers.
When closing the hood, check that the hood is
securely latched.
If the hood latch lever moves stiffly, or if you can
open the hood without lifti ng the lever, the latch
mechanism should be cleaned and lubricated.
The radiator fans and the climate control system will
not operate, when the hood is open and any of the
following conditions are met.
•The climate control system is turned on with the
remote transmitter.
•The compressor operates to melt any frost that has
formed on the climate control system.
Pull
Hood Release Handle
Lever
Support RodGrip
Clamp
17 CLARITY BEV CSS-31TRV6000.book 450 ページ 2017年4月14日 金曜日 午前11 時8分
Page 453 of 543
451
uuMaintenance Under the Hood uCooling System
Maintenance
Cooling System
Coolant is used to reduce the temperat ure of the high voltage battery, motor and
related parts. When checking the coolant level, make sure to follow the procedures
listed below. If the cool ant level is below the MIN mark, have your vehicle inspected
by an authorized Honda Clarity Electric dealer.
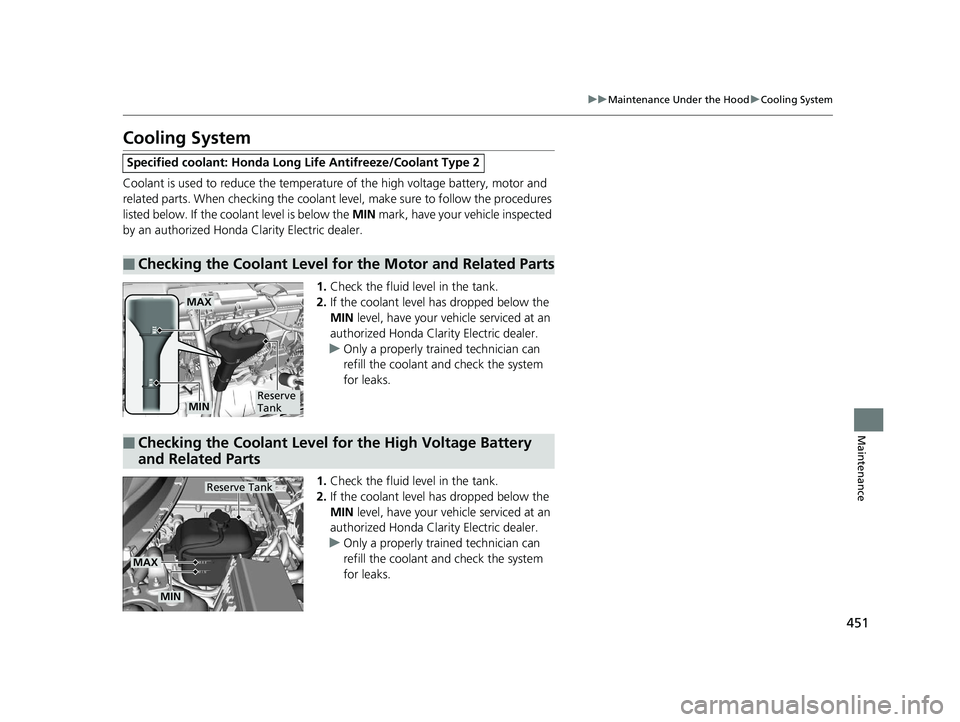
1.Check the fluid level in the tank.
2. If the coolant level has dropped below the
MIN level, have your ve hicle serviced at an
authorized Honda Clarity Electric dealer.
u Only a properly trained technician can
refill the coolant and check the system
for leaks.
1. Check the fluid level in the tank.
2. If the coolant level has dropped below the
MIN level, have your ve hicle serviced at an
authorized Honda Clarity Electric dealer.
u Only a properly trained technician can
refill the coolant and check the system
for leaks.
Specified coolant: Ho nda Long Life Antifreeze/Coolant Type 2
■Checking the Coolant Level for the Motor and Related Parts
MAX
Reserve
TankMIN
■Checking the Coolant Level for the High Voltage Battery
and Related Parts
Reserve Tank
MAX
MIN
17 CLARITY BEV CSS-31TRV6000.book 451 ページ 2017年4月14日 金曜日 午前11 時8分
Page 454 of 543
452
uuMaintenance Under the Hood uTransmission Fluid
Maintenance
Transmission Fluid
Have an authorized Honda Clarity Electric d ealer check the fluid level and replace if
necessary.
Do not attempt to check or change the transmission fluid yourself.
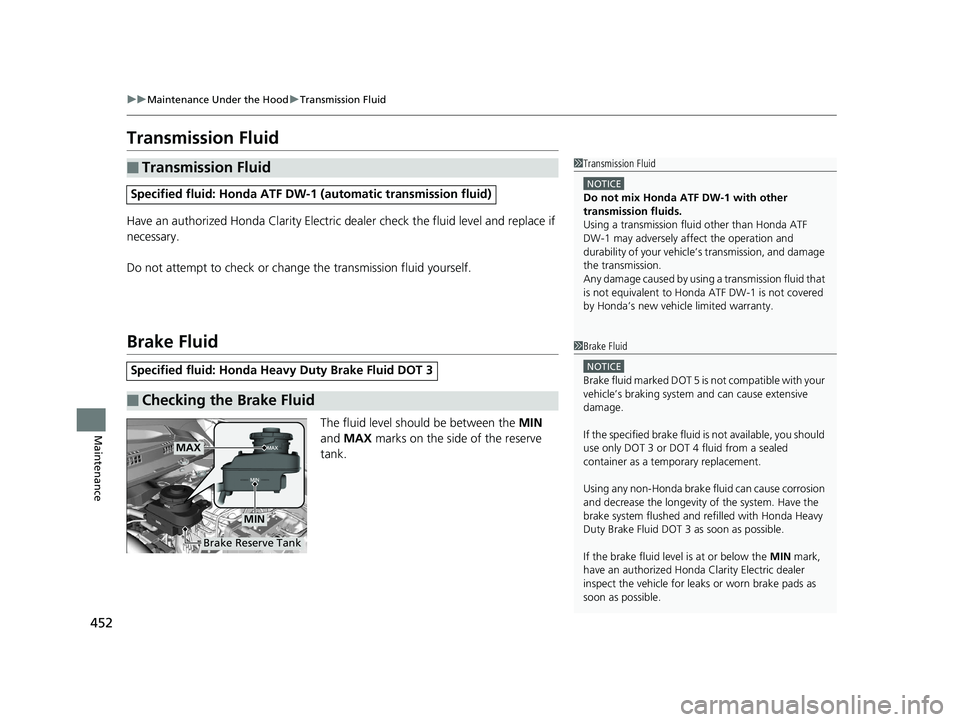
Brake Fluid
The fluid level should be between the MIN
and MAX marks on the side of the reserve
tank.
■Transmission Fluid
Specified fluid: Honda ATF DW-1 (automatic transmission fluid)
Specified fluid: Honda Heavy Duty Brake Fluid DOT 3
■Checking the Brake Fluid
1Transmission Fluid
NOTICE
Do not mix Honda ATF DW-1 with other
transmission fluids.
Using a transmission flui d other than Honda ATF
DW-1 may adversely af fect the operation and
durability of your vehicle’ s transmission, and damage
the transmission.
Any damage caused by usi ng a transmission fluid that
is not equivalent to Honda ATF DW-1 is not covered
by Honda’s new vehi cle limited warranty.
1Brake Fluid
NOTICE
Brake fluid marked DOT 5 is not compatible with your
vehicle’s braking system and can cause extensive
damage.
If the specified brake fluid is not available, you should
use only DOT 3 or DOT 4 fluid from a sealed
container as a temporary replacement.
Using any non-Honda brake fluid can cause corrosion
and decrease the longevity of the system. Have the
brake system flushed and re filled with Honda Heavy
Duty Brake Fluid DOT 3 as soon as possible.
If the brake fluid level is at or below the MIN mark,
have an authorized Honda Clarity Electric dealer
inspect the vehicle for leaks or worn brake pads as
soon as possible.
Brake Reserve Tank
MAX
MIN
17 CLARITY BEV CSS-31TRV6000.book 452 ページ 2017年4月14日 金曜日 午前11 時8分
Page 455 of 543
453
uuMaintenance Under the Hood uRefilling Window Washer Fluid
Maintenance
Refilling Window Washer Fluid
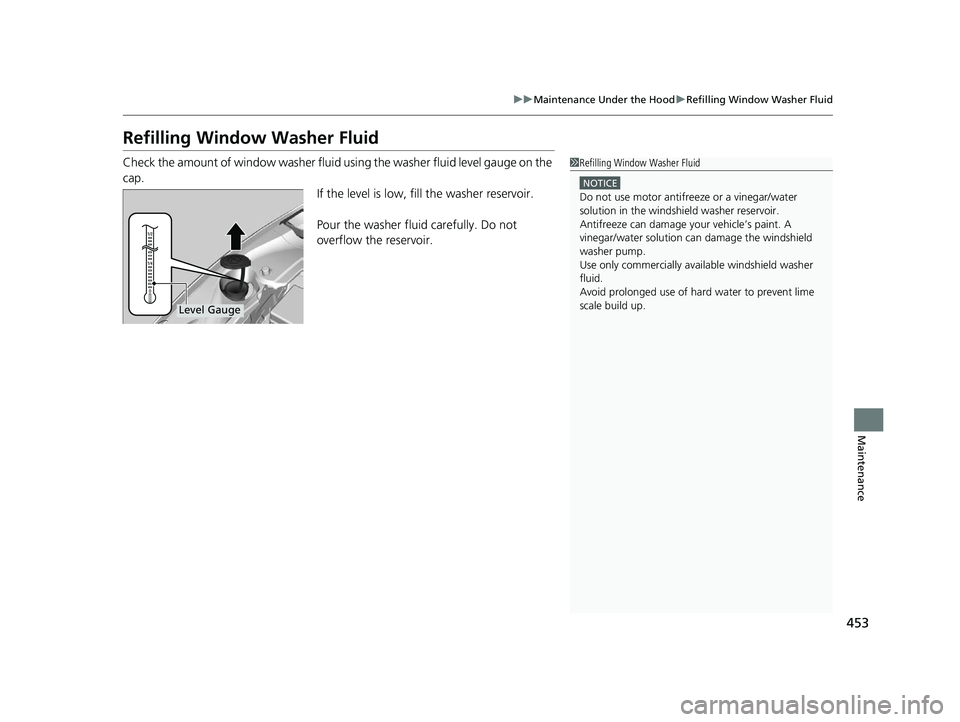
Check the amount of window washer fluid using the washer fluid level gauge on the
cap. If the level is low, fill the washer reservoir.
Pour the washer fluid carefully. Do not
overflow the reservoir.1Refilling Window Washer Fluid
NOTICE
Do not use motor antifreeze or a vinegar/water
solution in the windshield washer reservoir.
Antifreeze can damage y our vehicle’s paint. A
vinegar/water solution ca n damage the windshield
washer pump.
Use only commercially avai lable windshield washer
fluid.
Avoid prolonged use of hard water to prevent lime
scale build up.
Level Gauge
17 CLARITY BEV CSS-31TRV6000.book 453 ページ 2017年4月14日 金曜日 午前11 時8分
Page 456 of 543
454
Maintenance
Replacing Light Bulbs
Headlights
Headlights are LED type. Have an authorized Honda Clarity Electric dealer inspect
and replace the light assembly.
Front Turn Signal and Front Side Marker Lights
Front turn signal and front side marker lights are LED type. Have an authorized
Honda Clarity Electric dealer inspec t and replace the light assembly.
Parking/Daytime Running Lights
Parking/daytime running lights are LED type . Have an authorized Honda Clarity
Electric dealer inspect and replace the light assembly.
1Headlights
The headlight aim is set by the factory, and does not
need to be adjusted. Howeve r, if you regularly carry
heavy items in the trunk, have the aiming readjusted
at an authorized Honda Clar ity Electric dealer or by a
qualified technician.
17 CLARITY BEV CSS-31TRV6000.book 454 ページ 2017年4月14日 金曜日 午前11 時8分
Page 457 of 543
455
uuReplacing Light Bulbs uTaillights/Rear Side Marker, Brake and Rear Turn Signal Lights
Maintenance
Taillights/Rear Side Marker , Brake and Rear Turn
Signal Lights
Taillights/rear side marker, brake and rear turn signal lights are LED type. Have an
authorized Honda Clarity Electric dealer inspect and replace the light assembly.
Taillights and Back-Up Lights
Taillights and back-up lights are LED type. Have an authorized Honda Clarity Electric
dealer inspect and replace the light assembly.
Rear License Plate Light
Rear license plate light is LED type. Have an authorized Honda Clarity Electric dealer
inspect and replace the light assembly.
High-Mount Brake Light
High-mount brake light is LED type. Have an authorized Honda Clarity Electric dealer
inspect and replace the light assembly.
17 CLARITY BEV CSS-31TRV6000.book 455 ページ 2017年4月14日 金曜日 午前11 時8分
Page 458 of 543
456
Maintenance
Checking and Maintaining Wiper Blades
Checking Wiper Blades
If the wiper blade rubber has deteriorated, it will leave streaks and the hard surfaces
of the blade may scratch the window glass.
Changing the Wiper Blade Rubber
1. Set the power mode to VEHICLE OFF
(LOCK).
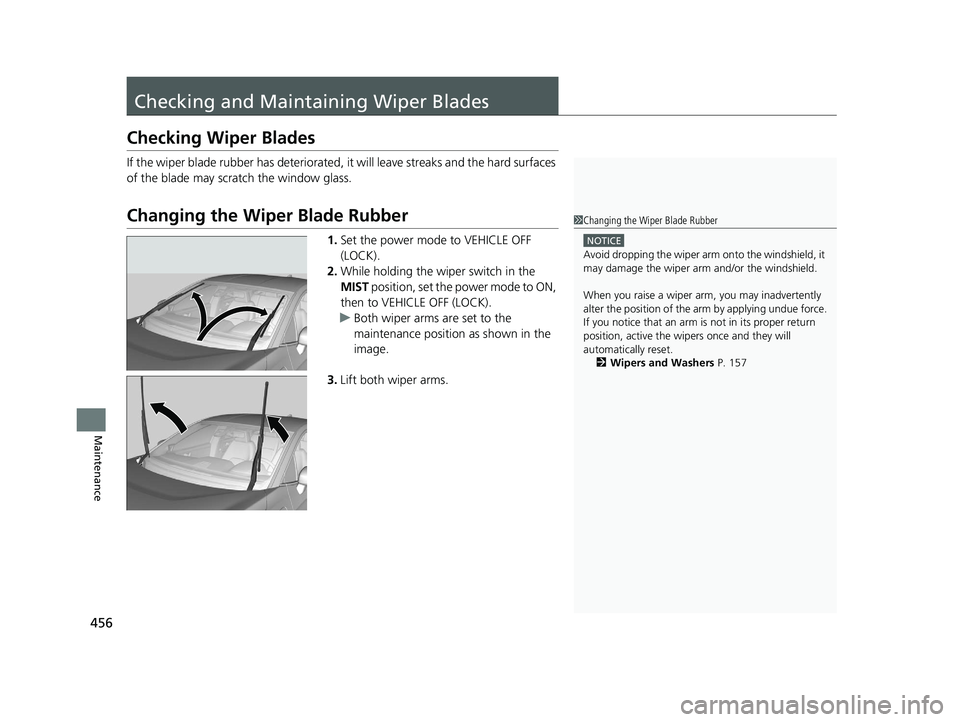
2. While holding the wiper switch in the
MIST position, set the power mode to ON,
then to VEHICLE OFF (LOCK).
u Both wiper arms are set to the
maintenance position as shown in the
image.
3. Lift both wiper arms.
1Changing the Wiper Blade Rubber
NOTICE
Avoid dropping the wiper arm onto the windshield, it
may damage the wiper arm and/or the windshield.
When you raise a wiper arm, you may inadvertently
alter the position of the arm by applying undue force.
If you notice that an arm is not in its proper return
position, active the wipers once and they will
automatically reset. 2 Wipers and Washers P. 157
17 CLARITY BEV CSS-31TRV6000.book 456 ページ 2017年4月14日 金曜日 午前11 時8分
Page 459 of 543
457
uuChecking and Maintaining Wiper Blades uChanging the Wiper Blade Rubber
Continued
Maintenance
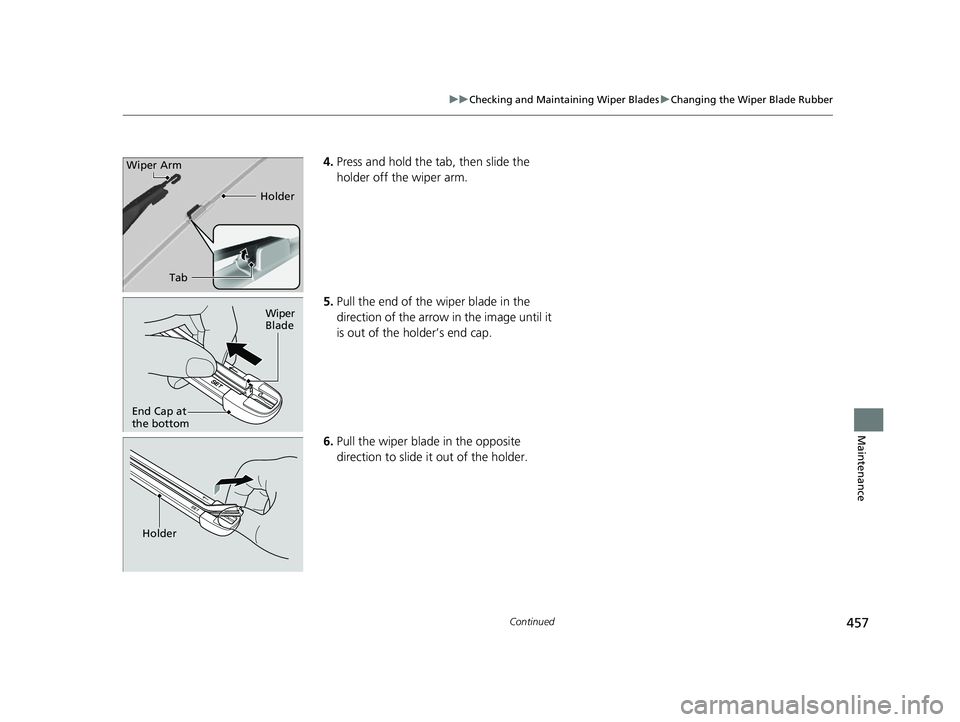
4. Press and hold the ta b, then slide the
holder off the wiper arm.
5. Pull the end of the wiper blade in the
direction of the arrow in the image until it
is out of the holder’s end cap.
6. Pull the wiper blade in the opposite
direction to slide it out of the holder.
Tab Holder
Wiper Arm
Wiper
Blade
End Cap at
the bottom
Holder
17 CLARITY BEV CSS-31TRV6000.book 457 ページ 2017年4月14日 金曜日 午前11
時8分
Page 460 of 543
458
uuChecking and Maintaining Wiper Blades uChanging the Wiper Blade Rubber
Maintenance
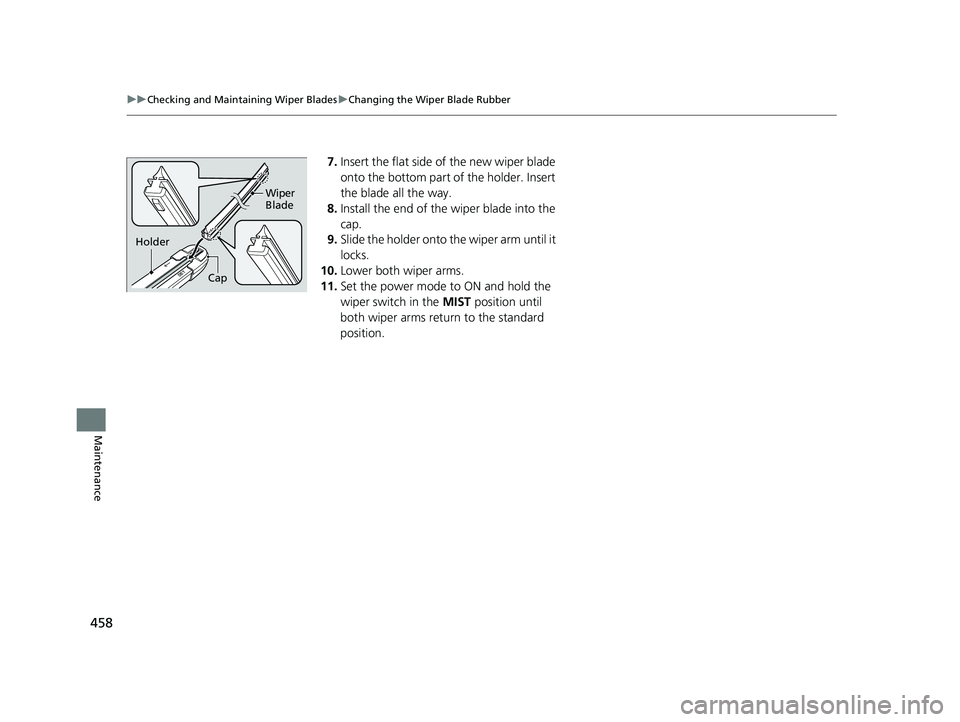
7. Insert the flat side of the new wiper blade
onto the bottom part of the holder. Insert
the blade all the way.
8. Install the end of the wiper blade into the
cap.
9. Slide the holder onto the wiper arm until it
locks.
10. Lower both wiper arms.
11. Set the power mode to ON and hold the
wiper switch in the MIST position until
both wiper arms return to the standard
position.
Cap Wiper
Blade
Holder
17 CLARITY BEV CSS-31TRV6000.book 458 ページ 2017年4月14日 金曜日 午前11
時8分