light HONDA CR-V 2000 RD1-RD3 / 1.G Owner's Guide
[x] Cancel search | Manufacturer: HONDA, Model Year: 2000, Model line: CR-V, Model: HONDA CR-V 2000 RD1-RD3 / 1.GPages: 322, PDF Size: 4.64 MB
Page 147 of 322
Servic
e Statio n Procedure s
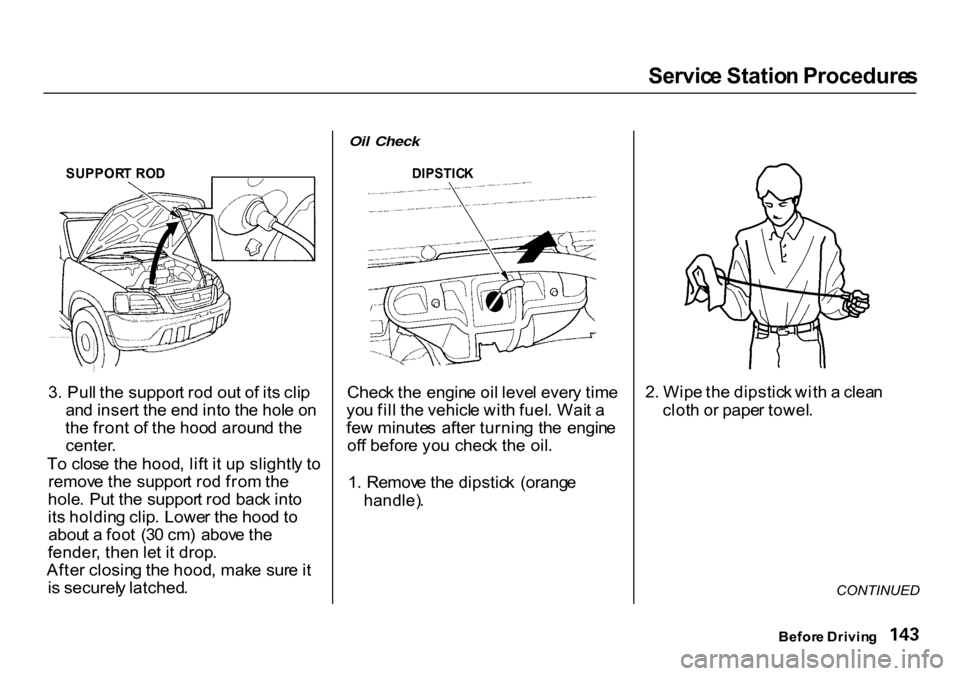
SUPPOR T RO D
3 . Pul l th e suppor t ro d ou t o f it s cli p
an d inser t th e en d int o th e hol e o n
th e fron t o f th e hoo d aroun d th e
center .
T o clos e th e hood , lif t i t u p slightl y t o
remov e th e suppor t ro d fro m th e
hole . Pu t th e suppor t ro d bac k int o
it s holdin g clip . Lowe r th e hoo d t o
abou t a foo t (3 0 cm ) abov e th e
fender , the n le t i t drop .
Afte r closin g th e hood , mak e sur e it
i s securel y latched .
Oil Check
Chec k th e engin e oi l leve l ever y tim e
yo u fil l th e vehicl e wit h fuel . Wai t a
fe w minute s afte r turnin g th e engin e
of f befor e yo u chec k th e oil .
1 . Remov e th e dipstic k (orang e
handle) .
2
. Wip e th e dipstic k wit h a clea n
clot h o r pape r towel .
CONTINUED
Befor e Drivin g
DIPSTIC
K
Page 150 of 322
Accessorie
s an d Modification s
Modifyin g you r vehicle , o r installin g
som e non-Hond a accessories , ca n
mak e you r vehicl e unsafe . Befor e
yo u mak e an y modification s o r ad d
an y accessories , b e sur e t o rea d th e
followin g information .
Accessorie s
You r deale r ha s Genuin e Hond a
accessorie s tha t allo w yo u t o
personaliz e you r vehicle . Thes e
accessorie s hav e bee n designe d an d
approve d fo r you r vehicle , an d ar e
covere d b y warranty .
Non-Hond a accessorie s ar e usuall y
designe d fo r universa l applications .
Althoug h aftermarke t accessorie s
ma y fi t o n you r vehicle , the y ma y no t
mee t factor y specifications , an d
coul d adversel y affec t you r vehicle' s
handlin g an d stability . (Se e
"Modifications " o n pag e 14 7 fo r
additiona l information. ) Whe
n properl y installed , cellula r
phones , alarms , two-wa y radios , an d
low-powere d audi o system s shoul d
no t interfer e wit h you r vehicle' s
computer-controlle d systems , suc h
a s th e SR S an d anti-loc k brak e
system .
However , i f electroni c accessorie s
ar e improperl y installed , o r excee d
you r vehicle' s electrica l syste m
capacity , the y ca n interfer e wit h th e operatio
n o f you r vehicle , o r eve n
caus e th e airbag s t o deploy .
Befor e installin g an y accessory : Mak
e sur e th e accessor y doe s no t
obscure any lights , o r interfer e
wit h prope r vehicl e operatio n o r
performance . B
e sur e electroni c accessorie s d o
no t overloa d electrica l circuit s
(se e pag e 26 8 ) . Hav
e th e installe r contac t you r
Hond a deale r fo r assistanc e befor e
installin g an y electroni c accessory .
I f possible , hav e you r deale r inspec t
th e fina l installation .
Befor e Drivin g
Imprope
r accessorie s o r
modification s ca n affec t you r
vehicle' s handling , stabilit y an d
performance , an d caus e a
cras h i n whic h yo u ca n b e hur t
o r killed .
Follo w al l instruction s i n thi s
owner' s manua l regardin g
accessorie s an d modifications .
Page 152 of 322
Carryin
g Carg o
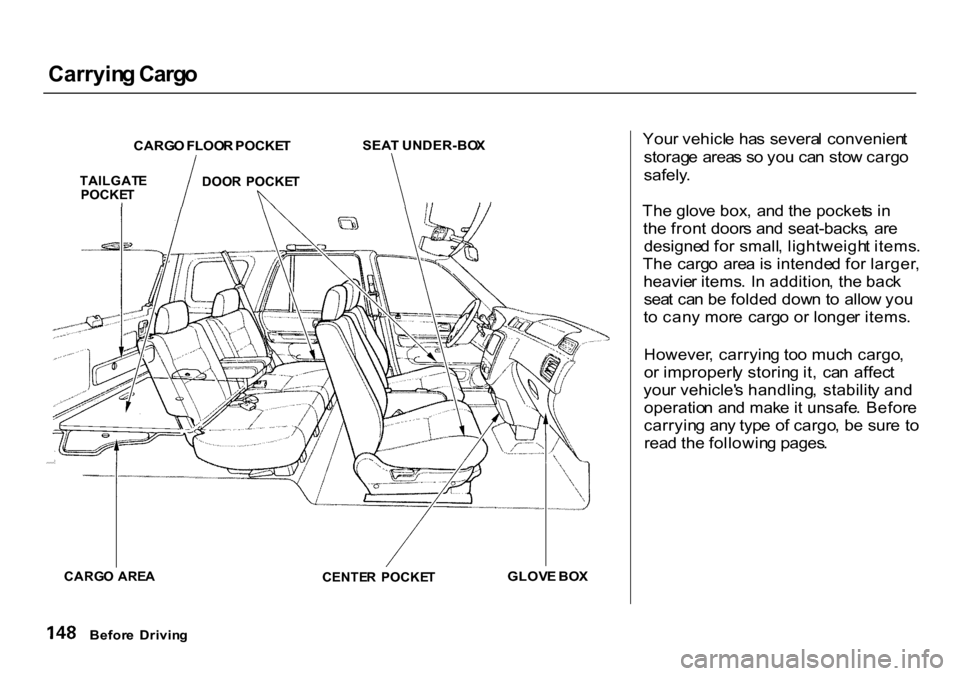
Your vehicl e ha s severa l convenien t
storag e area s s o yo u ca n sto w carg o
safely .
Th e glov e box , an d th e pocket s i n
th e fron t door s an d seat-backs , ar e
designe d fo r small , lightweigh t items .
Th e carg o are a is intende d fo r larger ,
heavie r items . I n addition , th e bac k
sea t ca n b e folde d dow n t o allo w yo u
t o can y mor e carg o o r longe r items .
However , carryin g to o muc h cargo ,
o r improperl y storin g it , ca n affec t
you r vehicle' s handling , stabilit y an d
operatio n an d mak e it unsafe . Befor e
carryin g an y typ e o f cargo , b e sur e t o
rea d th e followin g pages .
Befor e Drivin g
TAILGAT
E
POCKE T
CARG
O FLOO R POCKE T
DOO R POCKE T
SEA
T UNDER-BO X
CENTE R POCKE T
GLOV
E BO X
CARG O ARE A
Page 157 of 322
Preparin
g to Driv e
Yo u shoul d d o th e followin g check s
an d adjustment s ever y da y befor e
yo u driv e you r vehicle .
1 . Mak e sur e al l windows , mirrors ,
an d outsid e light s ar e clea n an d
unobstructed . Remov e frost , snow ,
o r ice .
2 . Chec k tha t th e hoo d an d tailgat e
ar e full y closed .
3 . Visuall y chec k th e tires . I f a tir e
look s low , us e a gaug e to chec k it s
pressure .
4 . Chec k tha t an y item s yo u ma y b e
carryin g wit h yo u insid e ar e store d
properl y o r fastene d clow n
securely .
5
. Chec k th e adjustmen t o f th e sea t
(se e pag e 7 7 ) .
6 . Chec k th e adjustmen t o f th e
insid e an d outsid e mirror s (se e
pag e 8 5 ) .
7 . Chec k th e adjustmen t o f th e
steerin g whee l (se e pag e 64 ).
8 . Mak e sur e th e door s ar e securel y
close d an d locked .
9 . Faste n you r sea t belt . Chec k tha t
you r passenger s hav e fastene d
thei r sea l belt s (se e pag e 1 5 ) .
10.Tur
n th e ignitio n switc h O N (II) .
Chec k th e indicato r light s i n th e
instrumen t panel .
11.Star t th e engin e (se e pag e 15 4 ) .
12.Chec k the gauge s an d indicato r
light s in th e instrumen t pane l (se e
pag e 5 3 ).
Driving
Page 167 of 322
Parkin
g
Alway s us e th e parkin g brak e whe n
yo u par k you r vehicle . Th e indicato r
o n th e instrumen t pane l show s tha t
th e parkin g brak e is no t full y
released ; i t doe s no t indicat e tha t th e
parkin g brak e is firml y set . Mak e
sur e th e parkin g brak e is se t firml y
o r you r vehicl e ma y rol l i f i t i s
parke d o n a n incline .
I f you r vehicl e ha s a n automati c
transmission , se t th e parkin g brak e
befor e yo u pu t th e transmissio n i n
Park . Thi s keep s th e vehicl e fro m
movin g an d puttin g pressur e o n th e
parkin g mechanis m in th e
transmissio n — makin g it easie r t o
mov e th e shif t leve r ou t o f Par k
whe n yo u wan t t o driv e away . I
f th e vehicl e i s facin g uphill , tur n
th e fron t wheels away fro m th e curb .
I f yo u hav e a manua l transmission ,
pu t i t i n firs t gear .
I f th e vehicl e i s facin g downhill , tur n
th e fron t wheel s towar d th e curb . I f
yo u hav e a manua l transmission , pu t
i t i n revers e gear .
Mak e sur e th e parkin g brak e i s full y
release d befor e drivin g away .
Drivin g wit h th e parkin g brak e
partiall y se t ca n overhea t o r damag e
th e rea r brakes . Parkin
g Tip s Mak
e sur e th e window s ar e closed . Tur
n of f th e lights . Plac
e an y packages , valuables , etc. ,
i n th e carg o are a o r tak e the m
wit h you . Loc
k th e doors . Neve
r par k ove r dr y leaves , tal l
grass , o r othe r flammabl e
materials . Th e thre e wa y catalyti c
converte r get s ver y hot , an d coul d
caus e thes e material s t o catc h o n
fire .
Driving
Page 168 of 322
Th
e Brakin g Syste m
You r Hond a i s equippe d wit h fron t
dis c brakes . Th e brake s o n th e rea r
wheel s ar e drum . Th e brakin g
syste m is power-assiste d t o reduc e
th e effor t neede d o n th e brak e pedal .
Pu t you r foo t o n th e brak e peda l onl y
whe n yo u inten d t o brake . Restin g
you r foo t o n th e peda l keep s th e
brake s applie d lightly , causin g the m
t o buil d u p heat . Hea t build-u p ca n
reduc e ho w wel l you r brake s work . I t
als o keep s you r brak e light s o n al l
th e time , confusin g driver s behin d
you .
Constan
t applicatio n o f th e brake s
whe n goin g dow n a lon g hil l build s
u p hea t an d reduce s thei r effective -
ness . Us e th e engin e to assis t th e
brake s b y downshiftin g to a lowe r
gea r an d takin g you r foo t of f th e
accelerato r pedal .
Chec k you r brake s afte r drivin g
throug h dee p water . Appl y th e
brake s moderatel y t o se e if the y fee l
normal . I f not , appl y the m gentl y an d
frequentl y unti l the y do . Sinc e a
longe r distanc e is neede d t o sto p
wit h we t brakes , b e extr a cautiou s
an d aler t i n you r driving . Brak
e Wea r Indicator s
Th e fron t dis c brake s o n al l vehicle s
hav e audibl e brak e wea r indicators .
Whe n th e brak e pad s nee d replacing ,
yo u wil l hea r a distinctiv e metalli c
"screeching " soun d whe n yo u appl y
th e brakes . I f yo u d o no t hav e th e
brak e pad s replaced , the y wil l begi n
screechin g al l th e time .
You r brake s ma y sometime s squea l
o r squea k whe n yo u appl y the m
lightly . D o no t confus e thi s wit h th e
brak e wea r indicators . The y mak e a
ver y audibl e "screeching. "
Drivin g
Page 172 of 322
Drivin
g i n Ba d Weathe r
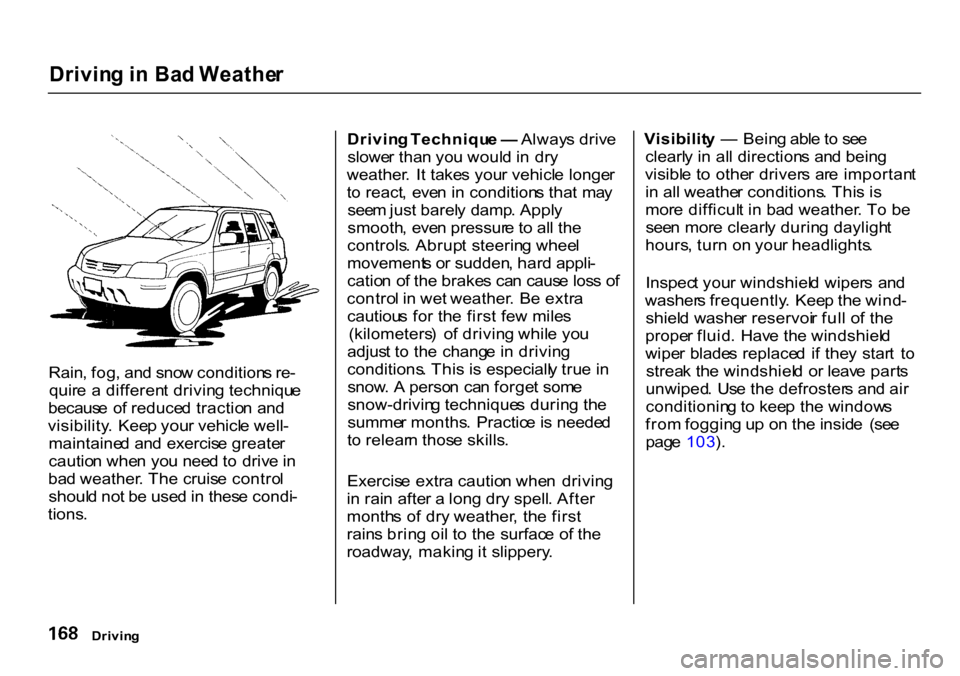
Rain , fog , an d sno w condition s re -
quir e a differen t drivin g techniqu e
becaus e o f reduce d tractio n an d
visibility . Kee p you r vehicl e well -
maintaine d an d exercis e greate r
cautio n whe n yo u nee d t o driv e in
ba d weather . Th e cruis e contro l
shoul d no t b e use d in thes e condi -
tions .
Drivin
g Techniqu e — Alway s driv e
slowe r tha n yo u woul d in dr y
weather . I t take s you r vehicl e longe r
t o react , eve n in condition s tha t ma y
see m jus t barel y damp . Appl y
smooth , eve n pressur e to al l th e
controls . Abrup t steerin g whee l
movement s o r sudden , har d appli -
catio n o f th e brake s ca n caus e los s o f
contro l i n we t weather . B e extr a
cautiou s fo r th e firs t fe w mile s
(kilometers ) o f drivin g whil e yo u
adjus t t o th e chang e in drivin g
conditions . Thi s i s especiall y tru e in
snow . A perso n ca n forge t som e
snow-drivin g technique s durin g th e
summe r months . Practic e is neede d
t o relear n thos e skills .
Exercis e extr a cautio n whe n drivin g
i n rai n afte r a lon g dr y spell . Afte r
month s o f dr y weather , th e firs t
rain s brin g oi l t o th e surfac e o f th e
roadway , makin g it slippery . Visibilit
y — Bein g abl e to se e
clearl y i n al l direction s an d bein g
visibl e t o othe r driver s ar e importan t
i n al l weathe r conditions . Thi s i s
mor e difficul t i n ba d weather . T o b e
see n mor e clearl y durin g dayligh t
hours , tur n o n you r headlights .
Inspec t you r windshiel d wiper s an d
washer s frequently . Kee p th e wind -
shiel d washe r reservoi r ful l o f th e
prope r fluid . Hav e th e windshiel d
wipe r blade s replace d i f the y star t t o
strea k th e windshiel d o r leav e part s
unwiped . Us e th e defroster s an d ai r
conditionin g to kee p th e window s
fro m foggin g u p o n th e insid e (se e
pag e 103 ).
Drivin g
Page 176 of 322
Towin
g a Traile r
Trailer Brakes
Hond a recommend s tha t an y traile r
havin g a tota l weigh t o f 1,00 0 Ib s
(45 0 kg ) o r mor e b e equippe d wit h
it s ow n electri c o r surge-typ e brakes .
I f yo u choos e electri c brakes , b e
sur e the y ar e electronicall y actuated .
D o no t attemp t t o ta p int o you r
vehicle' s hydrauli c system . N o
matte r ho w successfu l i t ma y seem ,
an y attemp t t o attac h traile r brake s
t o you r vehicle' s hydrauli c syste m
wil l lowe r brakin g effectivenes s an d
creat e a potentia l hazard .
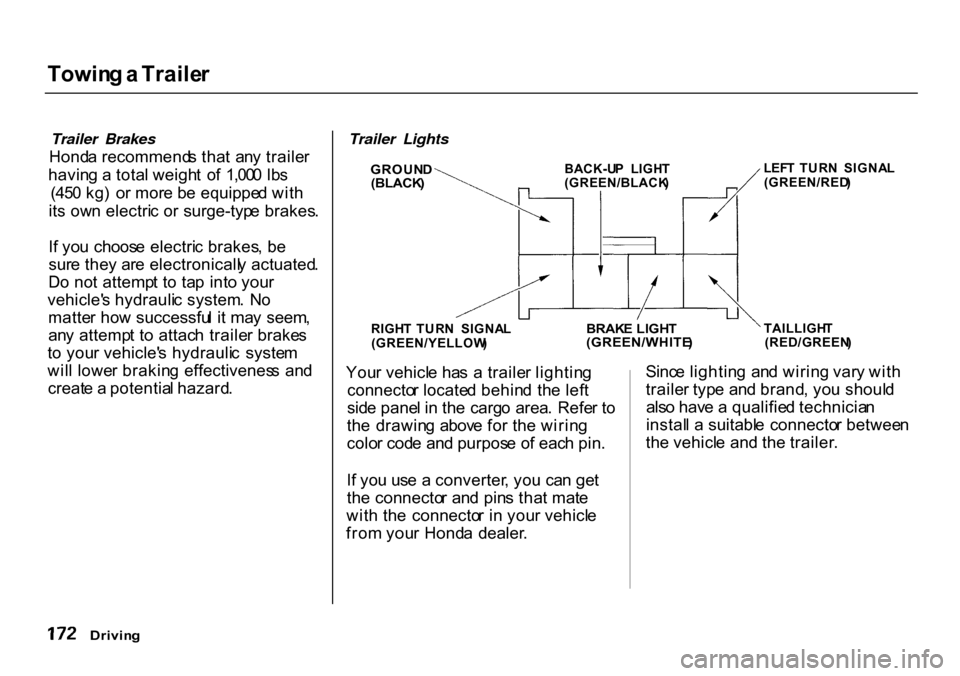
Trailer Lights
GROUN D
(BLACK )
LEF
T TUR N SIGNA L
(GREEN/RED )
RIGH T TUR N SIGNA L
(GREEN/YELLOW )
BRAK
E LIGH T
(GREEN/WHITE )
TAILLIGH
T
(RED/GREEN )
You r vehicl e ha s a traile r lightin g
connecto r locate d behin d th e lef t
sid e pane l i n th e carg o area . Refe r t o
th e drawin g abov e fo r th e wirin g
colo r cod e an d purpos e o f eac h pin .
I f yo u us e a converter , yo u ca n ge t
th e connecto r an d pin s tha t mat e
wit h th e connecto r i n you r vehicl e
fro m you r Hond a dealer . Sinc
e lightin g an d wirin g var y wit h
traile r typ e an d brand , yo u shoul d
als o hav e a qualifie d technicia n
instal l a suitabl e connecto r betwee n
th e vehicl e an d th e trailer .
Drivin g
BACK-U
P LIGH T
(GREEN/BLACK )
Page 177 of 322
Towin
g a Traile r
Additional Trailer Equipment Man y state s an d Canadia n province s
requir e specia l outsid e mirror s whe n
towin g a trailer . Eve n if the y don't ,
yo u shoul d instal l specia l mirror s if
yo u canno t clearl y se e behin d you , o r
i f th e traile r create s a blin d spot .
As k you r traile r sale s o r renta l
agenc y if an y othe r item s ar e
recommende d o r require d fo r you r
towin g situation .
Pre-To
w Checklis t
Whe n preparin g to tow , an d befor e
drivin g away , b e sur e to chec k th e
following : Th
e vehicl e ha s bee n properl y
serviced , an d th e tires , brakes ,
suspension , an d coolin g syste m
ar e in goo d operatin g condition . Al
l weight s an d load s ar e withi n
limit s (se e page s 17 0 an d 171 ). Th
e hitch , safet y chain , an d an y
other attachment s ar e secure . Al
l item s o n an d in th e traile r ar e
properl y secure d an d canno t shif t
whil e yo u drive . Th
e light s an d brake s o n you r
vehicl e an d th e traile r ar e workin g
properly . You
r vehicl e tire s an d spar e ar e
properl y inflate d (se e pag e 22 2 ) ,
an d th e traile r tire s an d spar e ar e
inflate d a s recommende d b y th e
traile r maker .
Driving
Page 187 of 322
Maintenanc
e
Thi s sectio n explain s wh y i t i s
importan t t o kee p you r vehicl e wel l
maintaine d an d t o follo w basi c
maintenanc e safet y precautions .
Thi s sectio n als o include s
Maintenanc e Schedule s fo r norma l
drivin g an d sever e drivin g conditions ,
a Maintenanc e Record , an d instruc -
tion s fo r simpl e maintenanc e task s
yo u ma y wan t t o tak e car e o f
yourself .
I f yo u hav e th e skill s an d tool s t o per -
for m mor e comple x maintenanc e
task s o n you r Honda , yo u ma y wan t
t o purchas e th e Servic e Manual . Se e
pag e 29 3 fo r informatio n o n ho w to
obtai n a copy , o r se e you r Hond a
dealer .
Maintenanc e Safety...................... . 18 4
Importan t Safet y Precautions. . 18 5
Maintenanc e Schedule................. . 18 6 Require
d Maintenanc e Record... . 19 3
Owne r Maintenanc e Checks....... . 19 5
Flui d Locations.............................. . 19 6
Engin e Oil...................................... . 19 7
Addin g Oil.................................. . 19 7
Recommende d Oil.................... . 19 7
Syntheti c Oil.............................. . 19 8
Additives.................................... . 19 8
Changin g th e Oi l an d Filter..... . 19 9
Coolin g System............................. . 20 1
Addin g Engin e Coolant............ . 20 1
Replacin g Engin e Coolant....... . 20 3
Windshiel d Washers.................... . 20 6
Transmissio n Fluid....................... . 20 7
Automati c Transmission.......... . 20 7
5-spee d Manua l
Transmission......................... . 20 8
Rea r Differentia l Fluid................. . 20 9
Brak e an d Clutc h Fluid................ . 21 0
Brak e System............................ . 21 0
Clutc h System........................... . 21 1
Powe r Steering.............................. . 21 1
Ai r Cleane r Element..................... . 21 2
Hoo d Latch.................................... . 21 3
Spar k Plugs.................................... . 21 3
Replacement.............................. . 21 3
Specifications............................
. 21 4
Battery........................................... . 21 5
Wipe r Blades................................. . 21 7
Ai r Conditionin g System.............. . 21 9
Ai r Conditionin g Filter................. . 22 0
Driv e Belts..................................... . 22 0
Timin g Belt.................................... . 22 1
Tires............................................... . 22 1
Inflation...................................... . 22 1
Recommende d Tir e
Pressure s fo r Norma l
Driving........................... . 22 2
Inspection.................................. . 22 3
Maintenance.............................. . 22 3
Tir e Rotation............................. . 22 4
Replacin g Tire s an d Wheels... . 22 5
Wheel s an d Tires...................... . 22 6
Winte r Driving.......................... . 22 6
Sno w Tires............................. . 22 6
Tir e Chains............................ . 22 7
Lights............................................. . 22 8
Headligh t Aiming..................... . 23 0
Replacin g Bulbs........................ . 23 2
Storin g You r Vehicle.................... . 23 9
Maintenanc e