light HONDA CR-V 2000 RD1-RD3 / 1.G Workshop Manual
[x] Cancel search | Manufacturer: HONDA, Model Year: 2000, Model line: CR-V, Model: HONDA CR-V 2000 RD1-RD3 / 1.GPages: 322, PDF Size: 4.64 MB
Page 240 of 322
Light
s
3 . Pul l th e bul b straigh t ou t o f it s
socket . Pus h th e ne w bul b in unti l
i t bottom s in th e socket .
4 . Tur n o n th e parkin g light s an d
chec k tha t th e ne w bul b is
working .
5 . Reinstal l th e socket . Sna p th e
cove r bac k in place .
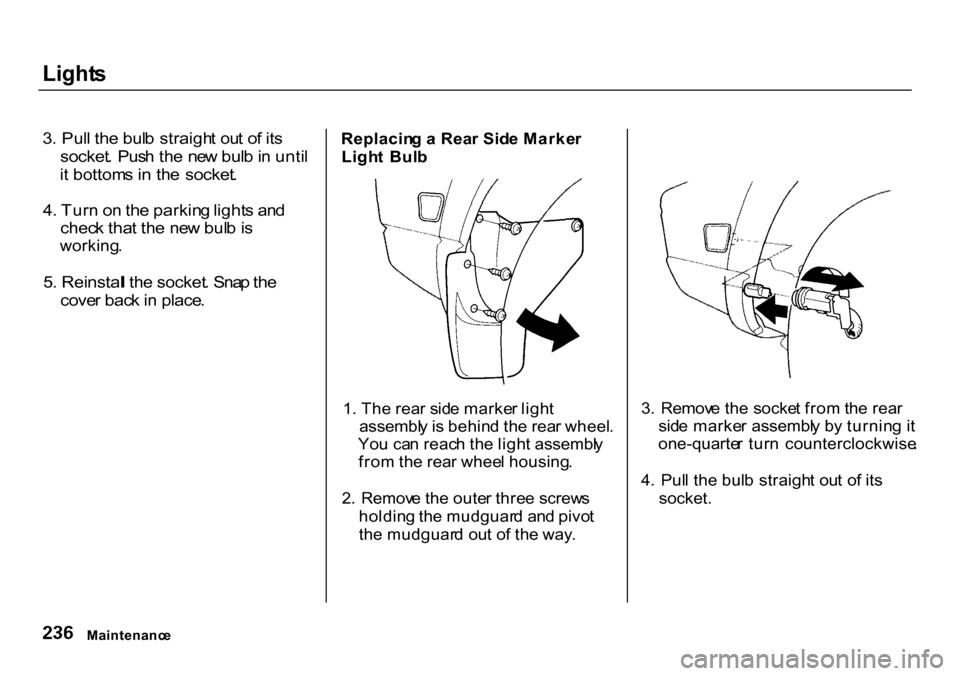
Replacin
g a Rea r Sid e Marke r
Ligh t Bul b
1 . Th e rea r sid e marke r ligh t
assembl y is behin d th e rea r wheel .
Yo u ca n reac h th e ligh t assembl y
fro m th e rea r whee l housing .
2 . Remov e th e oute r thre e screw s
holdin g th e mudguar d an d pivo t
th e mudguar d ou t o f th e way . 3
. Remov e th e socke t fro m th e rea r
sid e marke r assembl y b y turnin g i t
one-quarte r tur n counterclockwise .
4 . Pul l th e bul b straigh t ou t o f it s
socket.
Maintenanc e
Page 241 of 322
Light
s
5 . Instal l th e ne w bul b in th e socket.
6. Inser t th e socke t bac k int o th e
rea r sid e marke r ligh t assembly .
Tur n it clockwis e t o loc k i t i n place .
7 . Tes t th e light s t o mak e sur e th e
ne w bul b is working .
8 . Pu t th e mudguar d bac k i n plac e
an d secur e i t wit h th e thre e
screws .
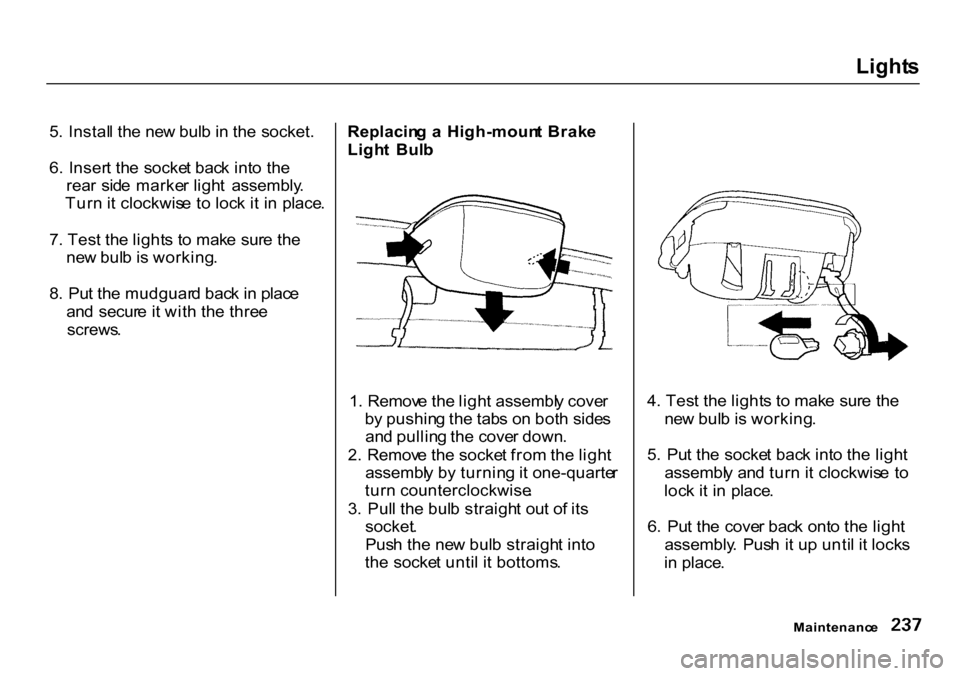
Replacin
g a High-moun t Brak e
Ligh t Bul b
1 . Remov e th e ligh t assembl y cove r
b y pushin g th e tab s o n bot h side s
an d pullin g th e cove r down .
2 . Remov e th e socke t fro m th e ligh t
assembl y b y turnin g it one-quarte r
tur n counterclockwise .
3 . Pul l th e bul b straigh t ou t o f it s
socket .
Pus h th e ne w bul b straigh t int o
th e socke t unti l i t bottoms . 4
. Tes t th e light s t o mak e sur e th e
ne w bul b is working .
5 . Pu t th e socke t bac k int o th e ligh t
assembl y an d tur n i t clockwis e t o
loc k i t i n place .
6 . Pu t th e cove r bac k ont o th e ligh t
assembly . Pus h i t u p unti l i t lock s
i n place .
Maintenanc e
Page 242 of 322
Light
s
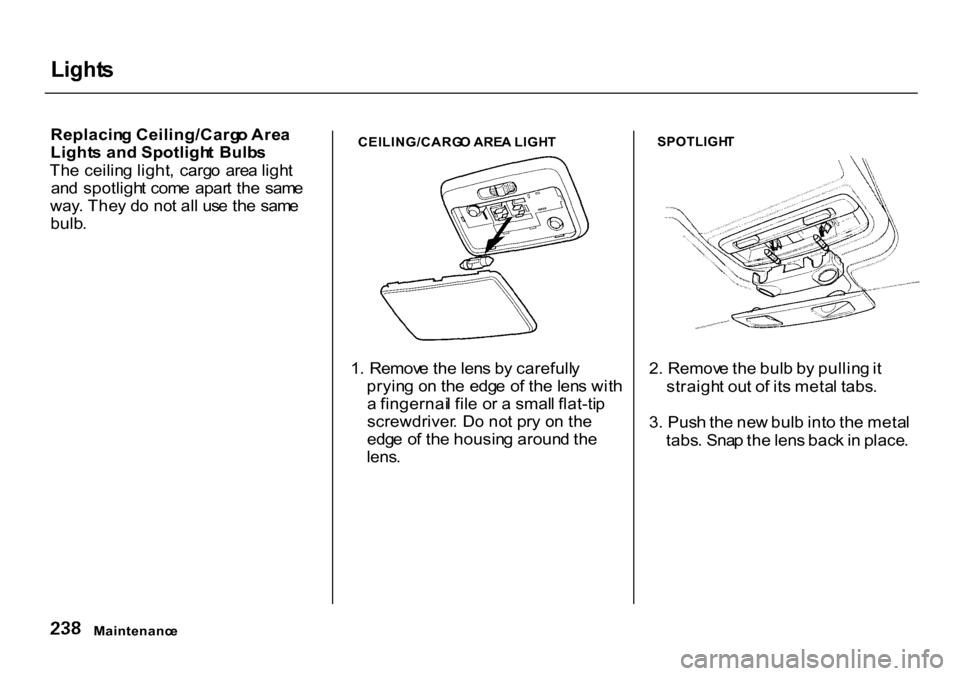
Replacin g Ceiling/Carg o Are a
Light s an d Spotligh t Bulb s
Th e ceilin g light , carg o are a ligh t
an d spotligh t com e apar t th e sam e
way . The y d o no t al l us e th e sam e
bulb . CEILING/CARG
O ARE A LIGH T
1 . Remov e th e len s b y carefull y
pryin g o n th e edg e o f th e len s wit h
a fingernai l fil e o r a smal l flat-ti p
screwdriver . D o no t pr y o n th e
edg e o f th e housin g aroun d th e
lens .
SPOTLIGH
T
2 . Remov e th e bul b b y pullin g it
straigh t ou t o f it s meta l tabs .
3 . Pus h th e ne w bul b int o th e meta l
tabs . Sna p th e len s bac k in place .
Maintenanc e
Page 243 of 322
Storin
g You r Vehicl e
I f yo u nee d t o par k you r vehicl e fo r
a n extende d perio d (mor e tha n on e
month) , ther e ar e severa l thing s yo u
shoul d d o t o prepar e i t fo r storage .
Prope r preparatio n help s preven t
deterioratio n an d make s it . easie r t o
ge t you r vehicl e bac k o n th e road . I f
possible , stor e you r vehicl e indoors .
Fil l th e fue l tank .
Chang e th e engin e oi l an d filte r
(se e pag e 199 ).
Was h an d dr y th e exterio r
completely .
Clea n th e interior . Mak e sur e th e
carpeting , floo r mats , etc . ar e
completel y dry .
Leav e th e parkin g brak e off . Pu t
th e transmissio n in Revers e (5 -
spee d manual ) o r Par k
(automatic) .
Bloc
k th e rea r wheels .
I f th e vehicl e is t o b e store d fo r a
longe r period , i t shoul d b e
supported on jackstand s s o th e
tire s ar e of f th e ground .
Leav e on e windo w ope n slightl y (i f
th e vehicl e is bein g store d
indoors) .
Disconnec t th e battery .
Suppor t th e fron t an d rea r wipe r
blad e arm s wit h a folde d towe l o r
ra g s o the y d o no t touc h th e
windshield .
T o minimiz e sticking , appl y a
silicon e spra y lubrican t t o al l doo r
an d tailgat e seals . Also , appl y a
vehicl e bod y wa x t o th e painte d
surface s tha t mat e wit h th e doo r
an d tailgat e seals . Cove
r th e vehicl e wit h a
"breathable " cover , on e mad e
fro m a porou s materia l suc h a s
cotton . Nonporou s materials , suc h
a s plasti c sheeting , tra p moisture ,
whic h ca n damag e th e paint .
I f possible , ru n th e engin e fo r a
whil e periodicall y (preferabl y onc e
a month) .
I f yo u stor e you r vehicl e fo r 1 2
month s o r longer , hav e you r Hond a
deale r perfor m th e inspection s calle d
fo r i n th e 2 4 months/30,00 0 mile s
(48,00 0 km ) maintenanc e schedul e
(Norma l Conditions ) a s soo n a s yo u
tak e it ou t o f storag e (se e pag e 18 8 ) .
Th e replacement s called for i n th e
maintenanc e schedul e ar e no t
neede d unles s th e vehicl e ha s
actuall y reache d tha t tim e o r mileage .
Maintenanc e
Page 246 of 322
Exterio
r Car e
Washin g
Frequen t washin g help s preserv e
you r vehicle' s beauty . Dir t an d gri t
ca n scratc h th e paint , whil e tre e sa p
an d bir d dropping s ca n permanentl y
rui n th e finish .
Was h you r vehicl e in a shad y area ,
no t i n direc t sunlight . I f th e vehicl e i s
parke d in th e sun , mov e it int o th e
shad e an d le t th e exterio r coo l dow n
befor e yo u start .
Onl y us e th e solvent s an d cleaner s
recommende d in thi s Owner' s
Manual .
Chemical solvents and strong cleaners
can damage the paint, metal, and
plastic on your vehicle. Rins
e th e vehicl e thoroughl y wit h
coo l wate r t o remov e loos e dirt .
Fil l a bucke t wit h coo l water . Mi x
i n a mil d detergent , suc h a s
dishwashin g liqui d o r a produc t
mad e especiall y fo r ca r washing .
Was h th e vehicl e usin g th e wate r
an d detergen t solutio n an d a soft -
bristl e brush , sponge , o r sof t cloth .
Star t a t th e to p an d wor k you r wa y
down . Rins e frequently .
Chec k th e bod y fo r roa d tar , tre e
sap , etc . Remov e thes e stain s wit h
ta r remove r o r turpentine . Rins e i t
of f immediatel y s o it doe s no t
har m th e finish . Remembe r t o re -
wa x thes e areas , eve n if th e res t o f
th e vehicl e doe s no t nee d waxing .Whe
n yo u hav e washe d an d rinse d
th e whol e exterior , dr y i t wit h a
chamoi s o r sof t towel . Lettin g it
air-dr y wil l caus e dullin g an d wate r
spots .
A s yo u dr y th e vehicle , inspec t i t fo r
chip s an d scratche s tha t coul d allo w
corrosio n t o start . Repai r the m wit h
touch-u p pain t (se e pag e 24 4 ) .
Appearanc e Car e
NOTIC
E
Page 247 of 322
Exterio
r Car e
Waxin g
Alway s was h an d dr y th e whol e
vehicl e befor e waxin g it . Yo u shoul d
wa x you r vehicle , includin g th e meta l
trim , wheneve r wate r sit s o n th e
surfac e i n larg e patches . I t shoul d
for m int o bead s o r droplet s afte r
waxing .
Yo u shoul d us e a qualit y liqui d o r
past e wax . Appl y i t accordin g t o th e
instruction s o n th e container . I n
general , ther e ar e tw o type s o f
products :
Waxe s — A wa x coat s th e finis h an d
protect s i t fro m damag e b y exposur e
t o sunlight , ai r pollution , etc . Yo u
shoul d us e a wa x o n you r Hond a
whe n i t i s new . Polishe
s — Polishe s an d cleaner /
waxe s ca n restor e th e shin e t o pain t
tha t ha s oxidize d an d los t som e o f it s
shine . The y normall y contai n mil d
abrasive s an d solvent s tha t remov e
th e to p laye r o f th e finish . Yo u
shoul d us e a polis h o n you r Hond a if
th e finis h doe s no t hav e it s origina l
shin e afte r usin g a wax .
Cleanin g tar , insects , etc . wit h
remover s als o take s of f th e wax .
Remembe r t o re-wa x thos e areas ,
eve n i f th e res t o f th e vehicl e doe s
no t nee d waxing .
Aluminu
m Wheel s
On some models
Clea n you r Honda' s aluminu m allo y
wheel s a s yo u d o th e res t o f th e
exterior . Was h the m wit h th e sam e
solution , an d rins e the m thoroughly .
Th e wheel s hav e a protectiv e clear -
coa t tha t keep s th e aluminu m fro m
corrodin g an d tarnishing . Usin g
hars h chemicals , includin g som e
commercia l whee l cleaners , o r stif f
brushe s ca n damag e thi s clear-coat .
Onl y us e a mil d detergen t an d sof t
brus h o r spong e t o clea n th e wheels .
Appearanc e Car e
Page 254 of 322
Changin
g a Fla t Tir e
I f yo u hav e a fla t tir e whil e driving ,
sto p in a saf e plac e t o chang e it .
Stoppin g in traffi c o r o n th e shoulde r
o f a bus y roa d is dangerous . Driv e
slowl y alon g th e shoulde r unti l yo u
ge t t o a n exi t o r a n are a t o sto p tha t
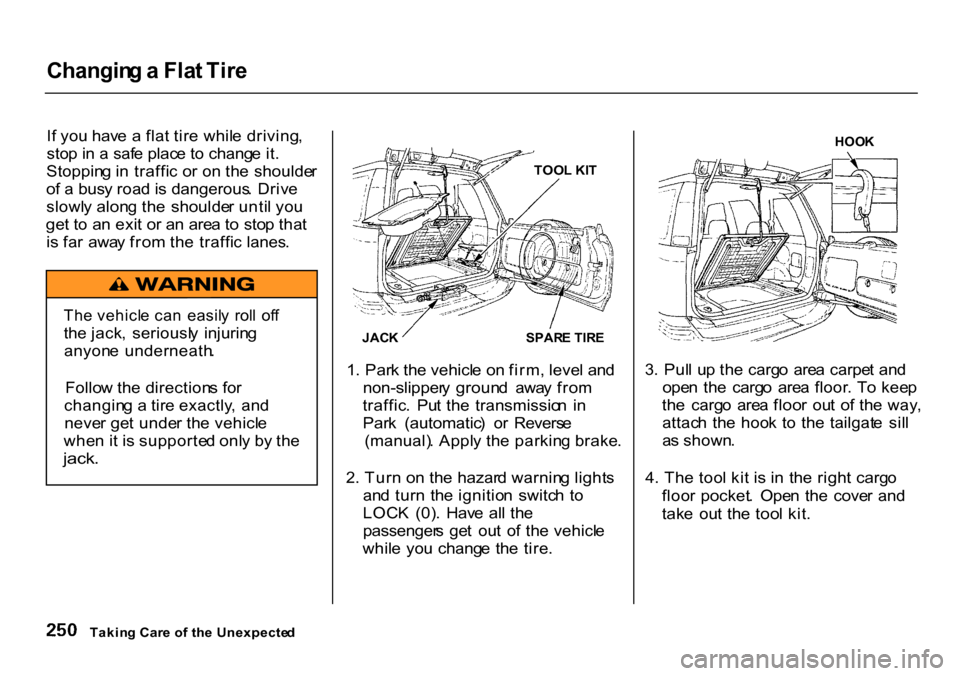
i s fa r awa y fro m th e traffi c lanes . TOO
L KI T
JAC K
SPARE TIR E
1 . Par k th e vehicl e o n firm , leve l an d
non-slipper y groun d awa y fro m
traffic . Pu t th e transmissio n i n
Par k (automatic ) o r Revers e
(manual) . Appl y th e parkin g brake .
2 . Tur n o n th e hazar d warnin g light s
an d tur n th e ignitio n switc h t o
LOC K (0) . Hav e al l th e
passenger s ge t ou t o f th e vehicl e
whil e yo u chang e th e tire .
HOO
K
3 . Pul l u p th e carg o are a carpe t an d
ope n th e carg o are a floor . T o kee p
th e carg o are a floo r ou t o f th e way ,
attac h th e hoo k t o th e tailgat e sil l
a s shown .
4 . Th e too l ki t i s i n th e righ t carg o
floo r pocket . Ope n th e cove r an d
tak e ou t th e too l kit .
Takin g Car e o f th e Unexpecte d
Th
e vehicl e ca n easil y rol l of f
th e jack , seriousl y injurin g
anyon e underneath .
Follo w th e direction s fo r
changin g a tir e exactly , an d
neve r ge t unde r th e vehicl e
whe n i t i s supporte d onl y b y th e
jack .
Page 260 of 322
Changin
g a Fla t Tir e
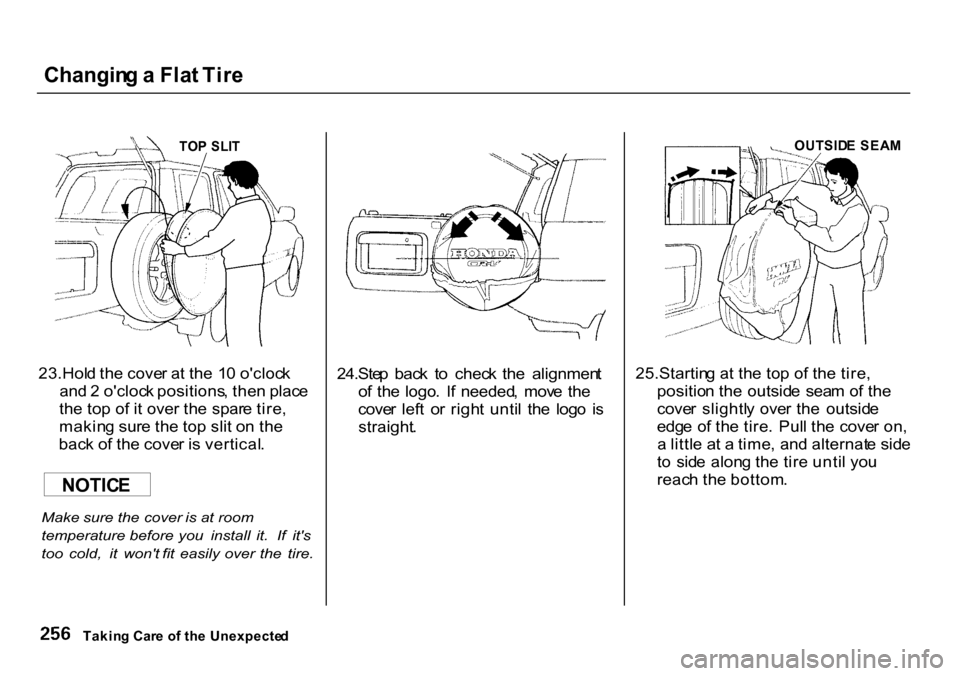
TO P SLI T
23.Hol d th e cove r a t th e 1 0 o'cloc k
an d 2 o'cloc k positions , the n plac e
th e to p o f i t over the spar e tire ,
makin g sur e th e to p sli t o n th e
bac k o f th e cove r i s vertical .
Make sure the cover is at room
temperature before you install it. If it's
too cold, it won't fit easily over the tire.
24.Ste
p bac k t o chec k th e alignmen t
o f th e logo . I f needed , mov e th e
cove r lef t o r righ t unti l th e log o i s
straight .
OUTSID
E SEA M
25.Startin g a t th e to p o f th e tire ,
positio n th e outsid e sea m o f th e
cove r slightl y ove r th e outsid e
edg e o f th e tire . Pul l th e cove r on ,
a littl e a t a time , an d alternat e sid e
t o sid e alon g th e tir e unti l yo u
reac h th e bottom .
Takin g Car e o f th e Unexpecte d
NOTIC
E
Page 262 of 322
I
f You r Engin e Won' t Star t
Diagnosin g wh y you r engin e won' t
star t fall s int o tw o areas , dependin g
o n wha t yo u hea r whe n yo u tur n th e
ke y t o STAR T (III) :
Yo u hea r nothing , o r almos t
nothing . Th e engine' s starte r
moto r doe s no t operat e a t all , o r
operate s ver y slowly .
Yo u ca n hea r th e starte r moto r
operatin g normally , o r th e starte r
moto r sound s lik e i t i s spinnin g
faste r tha n normal , bu t th e engin e
doe s no t star t u p an d run . Nothin
g Happen s o r th e Starte r
Moto r Operate s Ver y Slowl y
Whe n yo u tur n th e ignitio n switc h to
STAR T (III) , yo u d o no t hea r th e
norma l nois e o f th e engin e tryin g to
start . Yo u ma y hea r a clickin g soun d
o r serie s o f clicks , o r nothin g a t all .
Chec k thes e things :
Chec k th e transmissio n interlock .
I f yo u hav e a manua l transmission ,
th e clutc h peda l mus t b e pushe d
al l th e wa y t o th e floo r o r th e
starte r wil l no t operate . Wit h a n
automati c transmission , i t mus t b e
i n Par k o r Neutral . Tur
n th e ignitio n switc h t o O N (II) .
Tur n o n the headlight s an d chec k
thei r brightness . I f th e headlight s
ar e ver y di m o r don' t ligh t a t all ,
th e batter y is discharged . Se e
Jum p Startin g o n pag e 26 0 .
Tur n th e ignitio n switc h t o STAR T
(III) . I f th e headlight s d o no t dim ,
chec k th e conditio n o f th e fuses . I f
th e fuse s ar e OK , ther e is proba -
bl y somethin g wron g wit h th e
electrica l circui t fo r th e ignitio n
switc h o r starte r motor . Yo u wil l
nee d a qualifie d technicia n to
determin e th e problem . (Se e
Emergenc y Towin g o n pag e 27 3 . )
Takin g Car e o f th e Unexpecte d
Page 263 of 322
I
f You r Engin e Won' t Star t
I f th e headlight s di m noticeabl y o r
g o ou t whe n yo u tr y t o star t th e
engine , eithe r th e batter y i s dis -
charge d o r th e connection s ar e
corroded . Chec k th e conditio n o f th e
batter y an d termina l connection s
(se e pag e 21 5 ) . Yo u ca n the n tr y
jum p startin g th e vehicl e fro m a
booste r batter y (se e pag e 260 ). Th
e Starte r Operate s Normall y
I n thi s case , th e starte r motor' s
spee d sound s normal , o r eve n faste r
tha n normal , whe n yo u tur n th e
ignitio n switc h t o STAR T (III) , bu t
th e engin e doe s no t run .
Ar e yo u usin g th e prope r starting -
procedure ? Refe r t o Startin g th e
Engin e o n pag e 15 4 .
D o yo u hav e fuel ? Tur n th e
ignitio n switc h t o O N (II ) fo r a
minut e an d watc h th e fue l gauge .
Th e lo w fue l leve l warnin g ligh t
ma y no t b e working , s o yo u wer e
no t reminde d t o fil l th e tank . Ther
e ma y b e a n electrica l
problem , suc h a s n o powe r t o th e
fue l pump . Chec k al l th e fuse s
(se e pag e 269 ).
I f yo u fin d nothin g wrong , yo u wil l
nee d a qualifie d technicia n t o fin d
th e problem . Se e Emergenc y
Towin g o n pag e 27 3 .
Takin g Car e o f th e Unexpecte d