HONDA CR-V 2000 RD1-RD3 / 1.G Manual Online
Manufacturer: HONDA, Model Year: 2000, Model line: CR-V, Model: HONDA CR-V 2000 RD1-RD3 / 1.GPages: 322, PDF Size: 4.64 MB
Page 81 of 322
Key
s an d Locks , Seat s
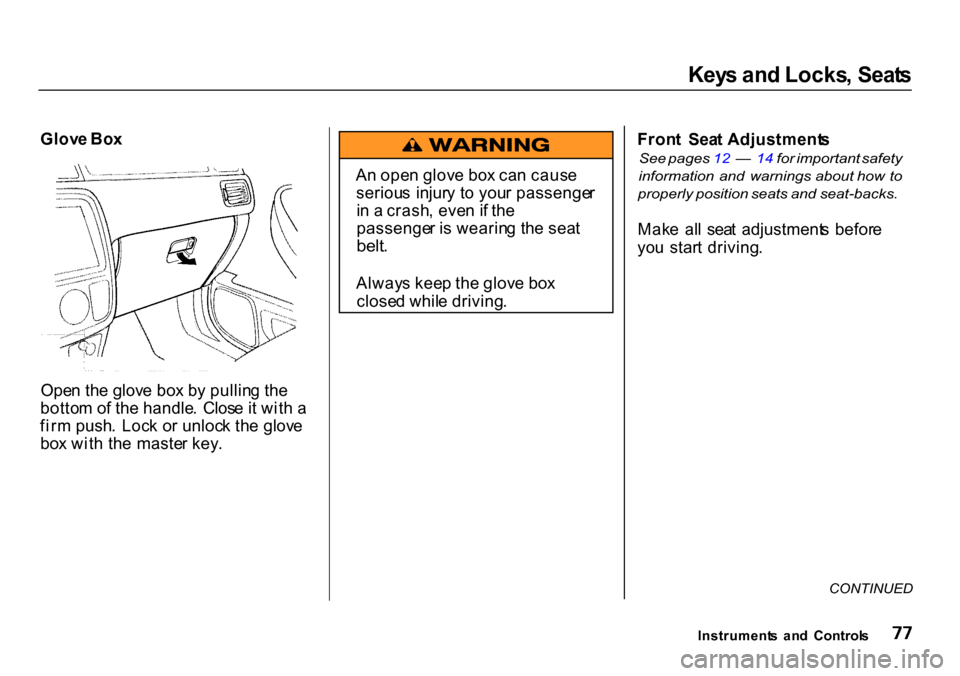
Ope n th e glov e bo x b y pullin g th e
botto m o f th e handle . Clos e it wit h a
fir m push . Loc k o r unloc k th e glov e
bo x wit h th e maste r key . Fron
t Sea t Adjustment s
See pages 12 — 14 for important safety
information and warnings about how to
properly position seats and seat-backs.
Mak e al l sea t adjustment s befor e
yo u star t driving .
CONTINUED
Instrument s an d Control s
Glov
e Bo x
An ope n glov e bo x ca n caus e
seriou s injur y t o you r passenge r
i n a crash , eve n if th e
passenge r i s wearin g th e sea t
belt .
Alway s kee p th e glov e bo x
close d whil e driving .
Page 82 of 322

Seat
s
T o adjus t th e sea t forwar d an d
backward , pul l u p o n th e leve r unde r
th e sea t cushion' s fron t edge . Mov e
th e sea t t o th e desire d positio n an d
releas e th e lever . Tr y t o mov e th e
sea t t o mak e sur e it i s locke d in
position .
T
o chang e th e angl e o f th e seat-back ,
pul l u p o n th e leve r o n th e outsid e o f
th e sea t bottom . Mov e th e seat-bac k
t o th e desire d positio n an d releas e
th e lever . Le t th e seal-bac k latc h in
th e ne w position .
Driver'
s Sea t Heigh t Adjustmen t
Th e heigh t o f you r driver' s sea t i s
adjustable . Tur n th e fron t dia l o n th e
outsid e o f th e sea t cushio n t o rais e
th e fron t o f th e sea t botto m an d tur n
th e rea r dia l t o rais e th e rear .
Mak e al l sea t adjustment s befor e
yo u star t driving .
Instrument s an d Control s
Page 83 of 322
Seat
s
Hea d Restraint s
See page 14 for important safety
information and a warning about how to
properly position the head restraints,
Th e hea d restraint s hel p protec t yo u
an d you r passenger s fro m whiplas h
an d othe r injuries . The y ar e mos t
effectiv e whe n yo u adjust them so
th e bac k o f th e occupant' s hea d rest s
agains t th e cente r o f th e restraint . A
talle r perso n shoul d adjus t th e
restrain t a s hig h a s possible .
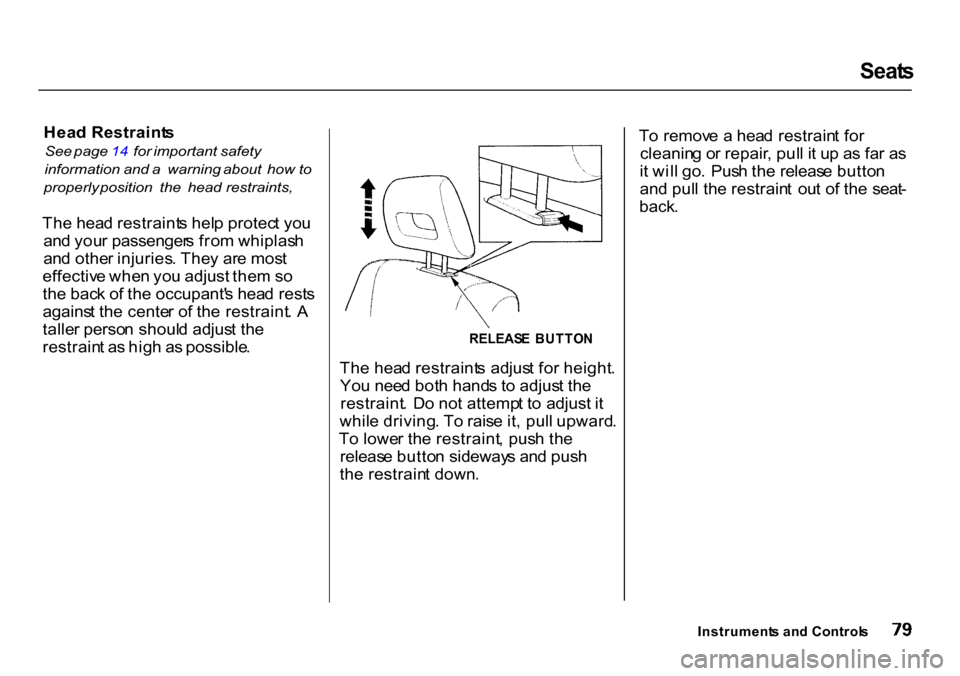
The hea d restraint s adjus t fo r height .
Yo u nee d bot h hand s t o adjus t th e
restraint . D o no t attemp t t o adjust it
whil e driving . T o rais e it , pul l upward .
T o lowe r th e restraint , pus h th e
releas e butto n sideway s an d pus h
th e restrain t down . T
o remov e a hea d restrain t fo r
cleanin g o r repair , pul l i t u p a s fa r a s
i t wil l go . Pus h th e releas e butto n
an d pul l th e restrain t ou t o f th e seat -
back .
Instrument s an d Control s
RELEAS
E BUTTO N
Page 84 of 322
Seat
s
Rea r Seat-bac k Adjustmen t
See pages 12 — 14 for important safely
information and warnings about how to
properly position seals and seat-backs.
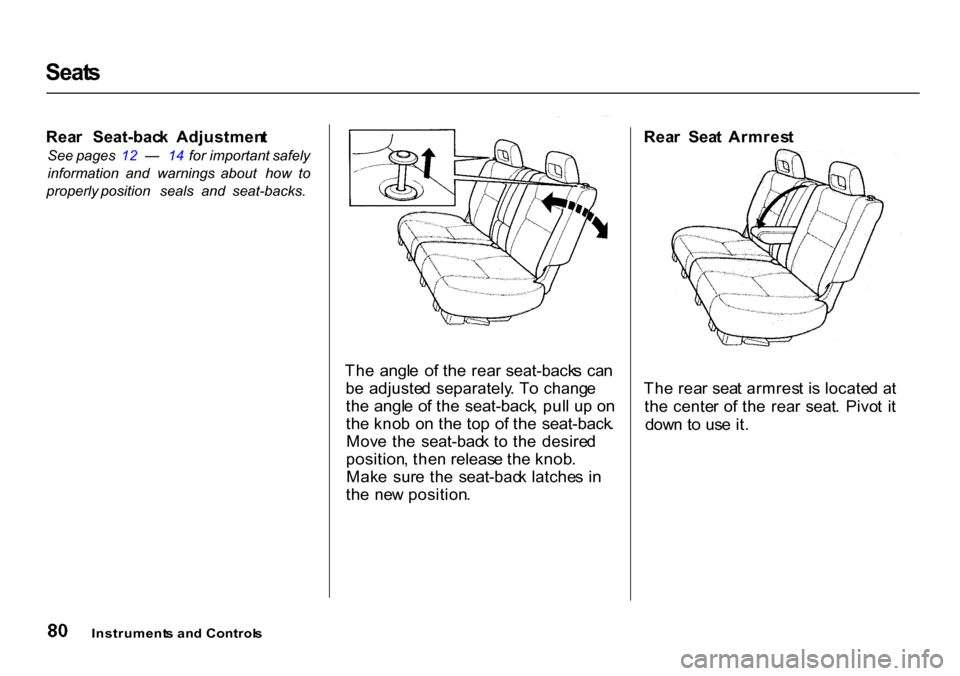
The angl e o f th e rea r seat-back s ca n
b e adjuste d separately . T o chang e
th e angl e o f th e seat-back , pul l u p o n
th e kno b o n th e to p o f th e seat-back .
Mov e th e seat-bac k t o th e desire d
position , the n releas e th e knob .
Mak e sur e th e seat-bac k latche s i n
th e ne w position . Rea
r Sea t Armres t
Th e rea r sea t armres t i s locate d a t
th e cente r o f th e rea r seat . Pivo t i t
dow n t o us e it .
Instrument s an d Control s
Page 85 of 322
Seat
s
Reclinin g th e Fron t an d Rea r
Seat-back s
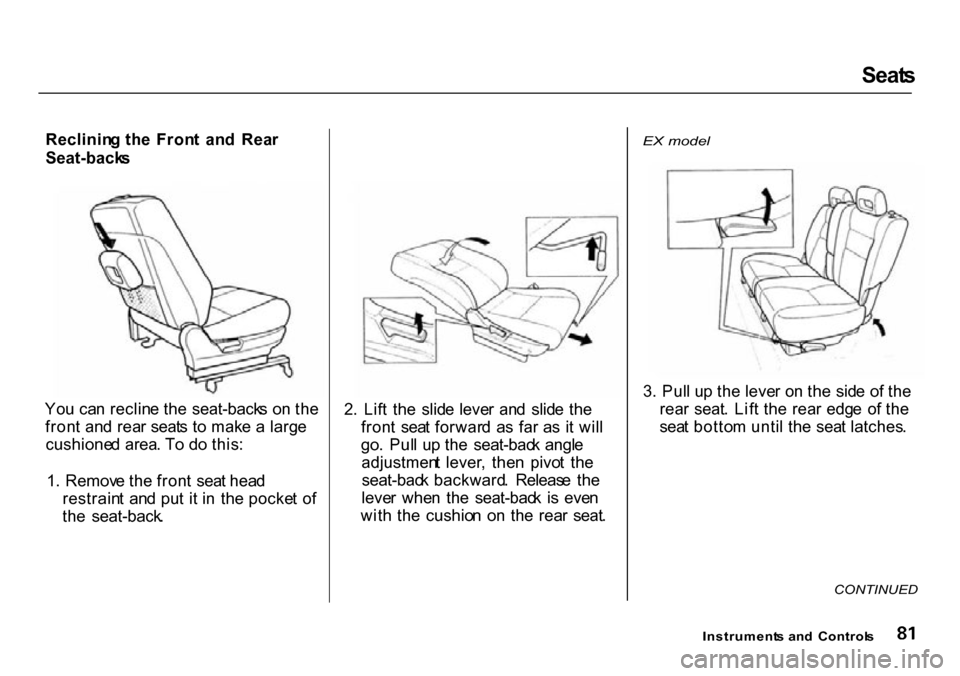
Yo u ca n reclin e th e seat-back s o n th e
fron t an d rea r seat s t o mak e a larg e
cushione d area . T o d o this :
1 . Remov e th e fron t sea t hea d
restrain t an d pu t i t i n th e pocke t o f
th e seat-back . 2
. Lif t th e slid e leve r an d slid e th e
fron t sea t forwar d a s fa r a s i t wil l
go . Pul l u p th e seat-bac k angl e
adjustmen t lever , the n pivo t th e
seat-bac k backward . Releas e th e
leve r whe n th e seat-bac k i s eve n
wit h th e cushio n o n th e rea r seat .
EX
model
3 . Pul l u p th e leve r o n th e sid e o f th e
rea r seat . Lif t th e rea r edg e o f th e
sea t botto m unti l th e sea t latches .
CONTINUED
Instrument s an d Control s
Page 86 of 322
Seat
s
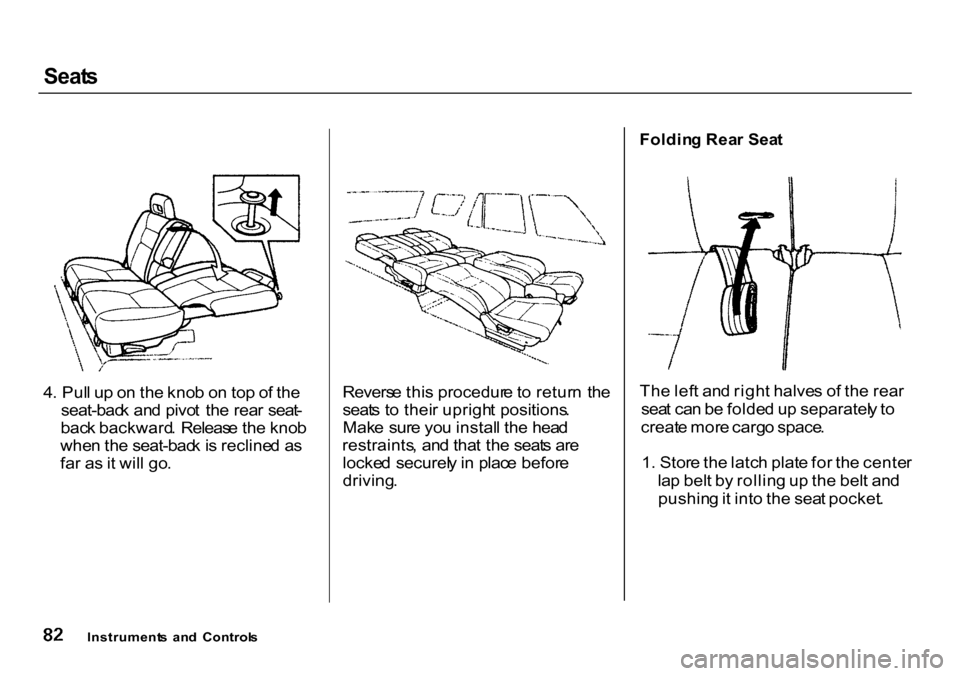
4 . Pul l u p o n th e kno b o n to p o f th e
seat-bac k an d pivo t th e rea r seat -
bac k backward . Releas e th e kno b
whe n th e seat-bac k is recline d a s
fa r a s it wil l go . Revers
e thi s procedur e to retur n th e
seat s t o thei r uprigh t positions .
Mak e sur e yo u instal l th e hea d
restraints , an d tha t th e seat s ar e
locke d securel y in plac e befor e
driving .
Foldin
g Rea r Sea t
Th e lef t an d righ t halve s o f th e rea r
sea t ca n b e folde d u p separatel y to
creat e mor e carg o space .
1 . Stor e th e latc h plat e fo r th e cente r
la p bel t b y rollin g u p th e bel t an d
pushin g it int o th e sea t pocket .
Instrument s an d Control s
Page 87 of 322
Seat
s
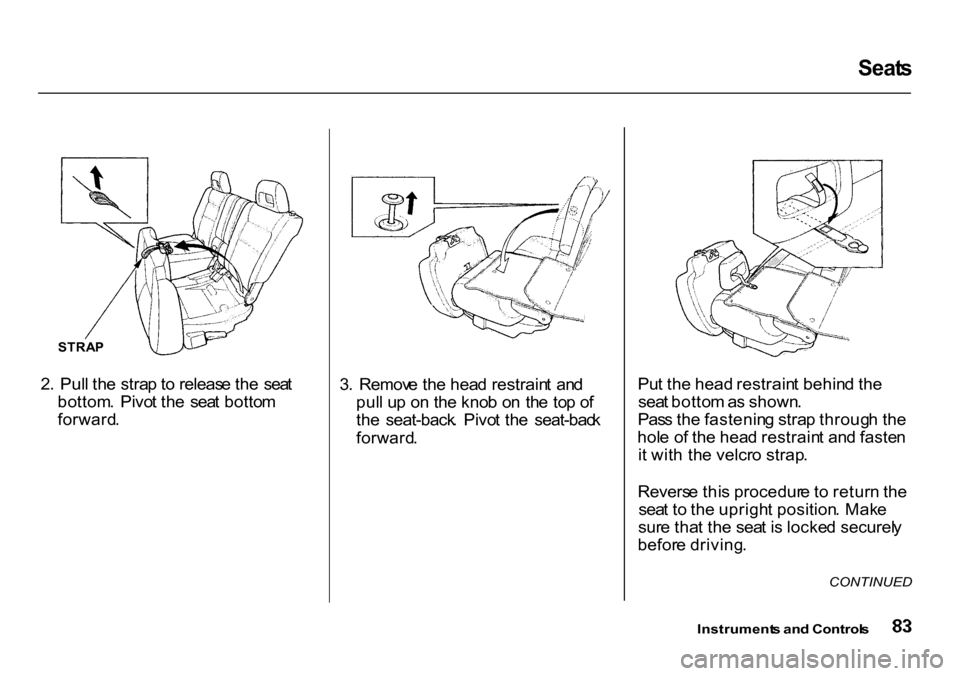
2 . Pul l th e stra p to releas e th e sea t
bottom . Pivo t th e sea t botto m
forward . 3
. Remov e th e hea d restrain t an d
pul l u p o n th e kno b o n th e to p o f
th e seat-back . Pivo t th e seat-bac k
forward . Pu
t th e head restrain t behin d th e
sea t botto m as shown .
Pas s th e fastenin g stra p throug h th e
hol e o f th e hea d restrain t an d faste n
i t wit h th e velcr o strap .
Revers e thi s procedur e t o retur n th e
sea t t o th e uprigh t position . Mak e
sur e tha t th e sea t i s locke d securel y
befor e driving .
Instrument s an d Control s
STRA
P
CONTINUED
Page 88 of 322
Seats
, Powe r Window s
Mak e sur e an y item s store d in th e
carg o are a ar e secured . Loos e item s
ca n fl y forwar d an d caus e injur y i f
yo u hav e t o brak e hard . Powe
r Window s
You r vehicle' s window s ar e electri -
cally-powered . Tur n th e ignitio n
switc h t o O N (II ) t o rais e o r lowe r
an y window .
Eac h doo r ha s a switc h tha t control s
it s window . T o ope n th e window ,
pus h th e switc h dow n an d hol d it -
Releas e th e switc h whe n yo u wan t
th e windo w to stop . Clos e th e
windo w b y pushin g th e switc h u p
an d holdin g it .
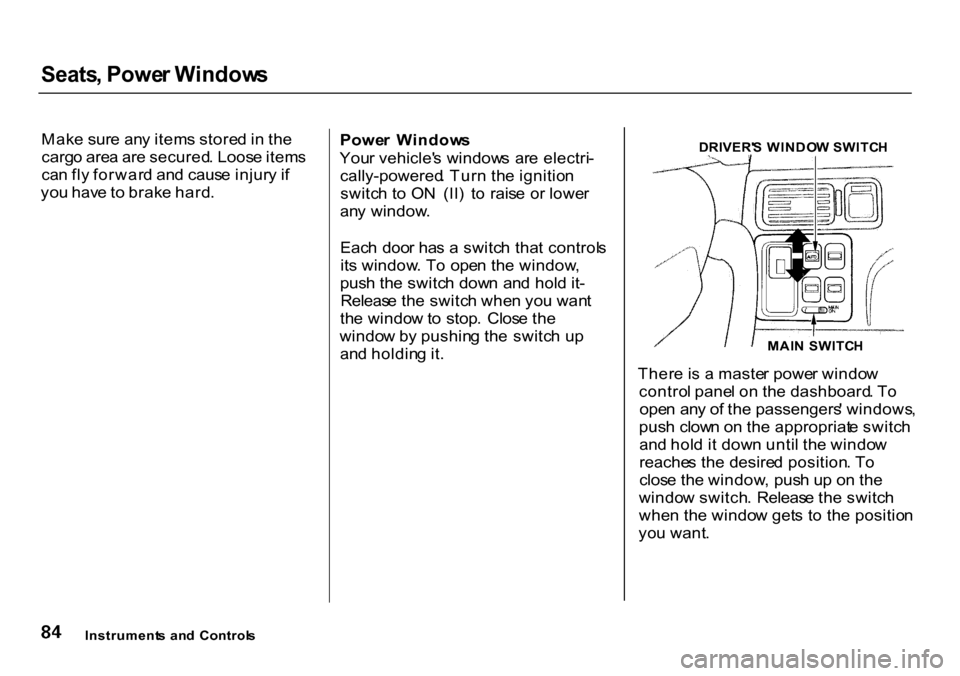
There is a maste r powe r windo w
contro l pane l o n th e dashboard . T o
ope n an y o f th e passengers ' windows ,
pus h clow n o n th e appropriat e switc h
an d hol d i t dow n unti l th e windo w
reache s th e desire d position . T o
clos e th e window , pus h u p o n th e
windo w switch . Releas e th e switc h
whe n th e windo w get s t o th e positio n
yo u want .
Instrument s an d Control s DRIVER'
S WINDO W SWITC H
MAI N SWITC H
Page 89 of 322
Powe
r Windows , Mirror s
Th e maste r contro l pane l als o con -
tain s thes e extr a features :
AUT O — To ope n th e driver' s
windo w fully , pus h th e windo w
switc h firml y dow n an d releas e it .
Th e windo w automaticall y goe s al l
th e wa y down . T o sto p th e windo w
fro m goin g al l th e wa y down , pus h
th e windo w switc h u p briefly .
T o ope n th e driver' s windo w onl y
partially , pus h th e windo w switc h
dow n lightl y an d hol d it . Th e windo w
wil l sto p a s soo n a s yo u releas e th e
switch .
Th
e AUT O functio n onl y work s t o
lowe r th e driver' s window . T o rais e
th e window , yo u mus t pus h th e
windo w switc h u p an d hol d it unti l
th e windo w reache s th e desire d
position .
Th e MAI N switc h control s powe r t o
th e passengers ' windows . Wit h thi s
switc h off , th e passengers ' window s
canno t b e raise d o r lowered . Th e
MAI N switc h doe s no t affec t th e
driver' s window . Kee p th e MAI N
switc h of f whe n yo u hav e childre n in
th e vehicl e s o the y d o no t injur e
themselve s b y operatin g th e
window s unintentionally .
Mirror
s
Kee p th e insid e an d outsid e mirror s
clea n an d adjuste d fo r bes t visibility .
B e sur e t o adjus t th e mirror s befor e
yo u star t driving .
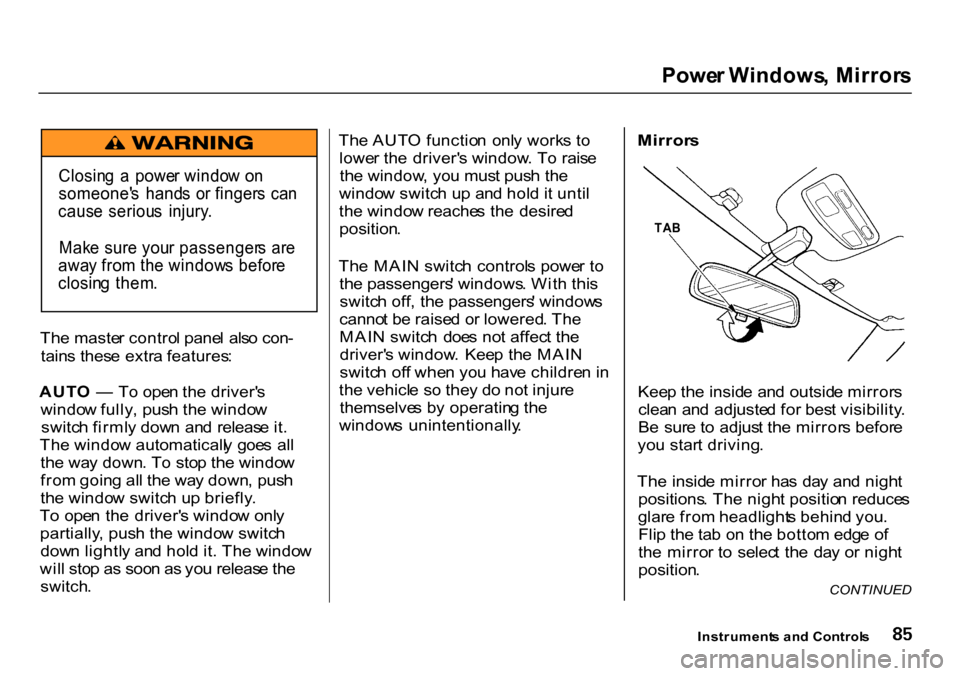
Th e insid e mirro r ha s da y an d nigh t
positions . Th e nigh t positio n reduce s
glar e fro m headlight s behin d you .
Fli p th e ta b o n th e botto m edg e o f
th e mirro r t o selec t th e da y o r nigh t
position .
Instrument s an d Control s
Closin
g a powe r windo w o n
someone' s hand s o r finger s ca n
caus e seriou s injury .
Mak e sur e you r passenger s ar e
awa y fro m th e window s befor e
closin g them .
CONTINUED
TA
B
Page 90 of 322
Mirrors
, Parkin g Brak e
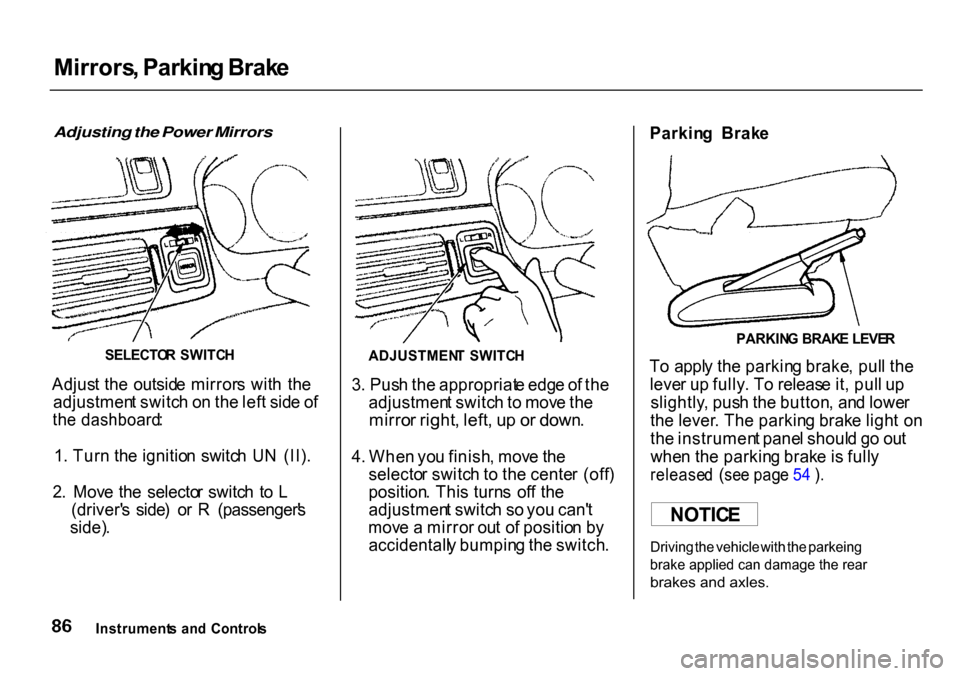
Adjusting the Power Mirrors
Adjus t th e outsid e mirror s wit h th e
adjustmen t switc h o n th e lef t sid e o f
th e dashboard :
1 . Tur n th e ignitio n switc h U N (II) .
2 . Mov e th e selecto r switc h t o L
(driver' s side ) o r R (passenger' s
side) . 3
. Pus h th e appropriat e edg e o f th e
adjustmen t switc h to mov e th e
mirro r right , left , u p o r down .
4 . Whe n yo u finish , mov e th e
selecto r switc h t o th e cente r (off )
position . Thi s turn s of f th e
adjustmen t switc h s o yo u can' t
mov e a mirro r ou t o f positio n b y
accidentall y bumpin g th e switch .Parkin
g Brak e
T o appl y th e parkin g brake , pul l th e
leve r u p fully . T o releas e it , pul l u p
slightly , pus h th e button , an d lowe r
th e lever . Th e parkin g brak e ligh t o n
th e instrumen t pane l shoul d g o ou t
whe n th e parkin g brak e is full y
release d (se e pag e 5 4 ) .
SELECTO
R SWITC H
ADJUSTMENT SWITC H PARKIN
G BRAK E LEVE R
NOTIC E
Driving the vehicle with the parkeing
brake applied can damage the rear
brakes and axles.
Instrument s an d Control s