Start HONDA CR-V 2013 RM1, RM3, RM4 / 4.G User Guide
[x] Cancel search | Manufacturer: HONDA, Model Year: 2013, Model line: CR-V, Model: HONDA CR-V 2013 RM1, RM3, RM4 / 4.GPages: 361, PDF Size: 6.58 MB
Page 74 of 361
73
uuIndicatorsu
Continued
Instrument Panel
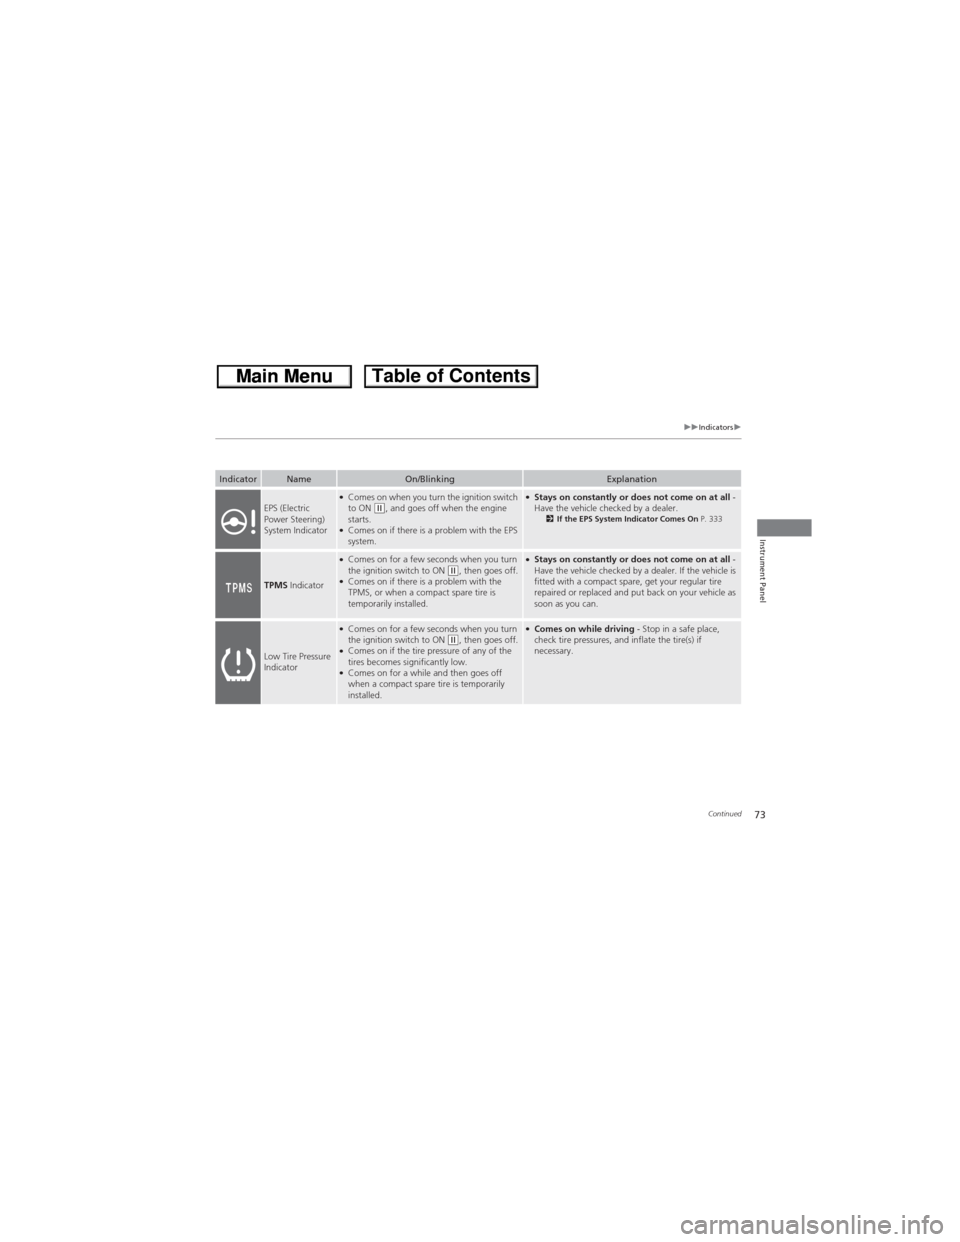
IndicatorNameOn/BlinkingExplanation
EPS (Electric
Power Steering)
System Indicator●Comes on when you turn the ignition switch
to ON (w, and goes off when the engine
starts.
●Comes on if there is a problem with the EPS
system.
●Stays on constantly or does not come on at all -
Have the vehicle checked by a dealer.
2If the EPS System Indicator Comes On P. 333
TPMS Indicator
●Comes on for a few seconds when you turn
the ignition switch to ON (w, then goes off.●Comes on if there is a problem with the
TPMS, or when a compact spare tire is
temporarily installed.
●Stays on constantly or does not come on at all -
Have the vehicle checked by a dealer. If the vehicle is
fitted with a compact spare, get your regular tire
repaired or replaced and put back on your vehicle as
soon as you can.
Low Tire Pressure
Indicator
●Comes on for a few seconds when you turn
the ignition switch to ON (w, then goes off.●Comes on if the tire pressure of any of the
tires becomes significantly low.
●Comes on for a while and then goes off
when a compact spare tire is temporarily
installed.
●Comes on while driving - Stop in a safe place,
check tire pressures, and inflate the tire(s) if
necessary.
Page 76 of 361
75
uuIndicatorsu
Continued
Instrument Panel
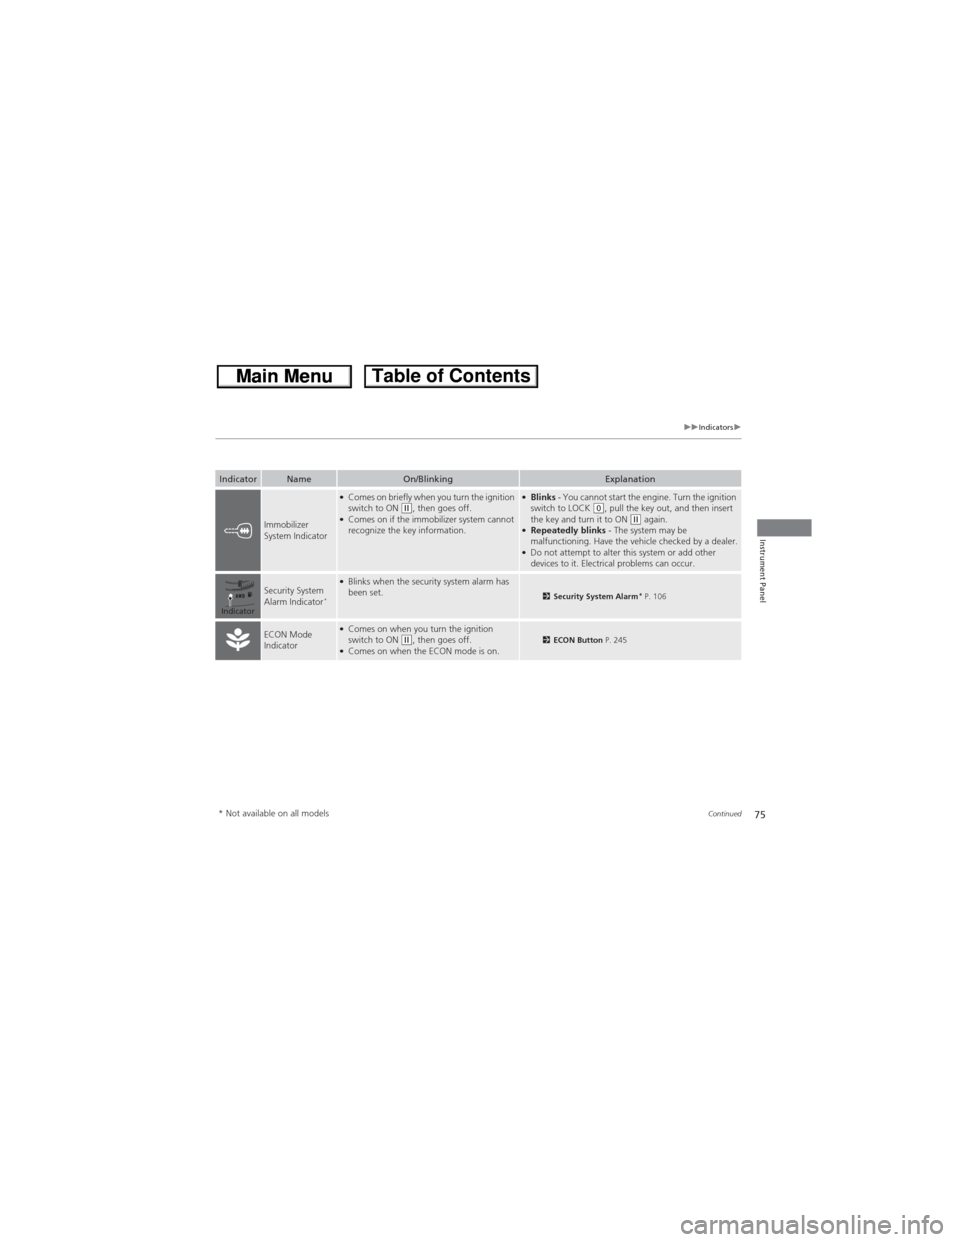
IndicatorNameOn/BlinkingExplanation
Immobilizer
System Indicator
●Comes on briefly when you turn the ignition
switch to ON (w, then goes off.●Comes on if the immobilizer system cannot
recognize the key information.
●Blinks - You cannot start the engine. Turn the ignition
switch to LOCK (0, pull the key out, and then insert
the key and turn it to ON (w again.●Repeatedly blinks - The system may be
malfunctioning. Have the vehicle checked by a dealer.
●Do not attempt to alter this system or add other
devices to it. Electrical problems can occur.
Security System
Alarm Indicator*
●Blinks when the security system alarm has
been set.2Security System Alarm* P. 106
ECON Mode
Indicator●Comes on when you turn the ignition
switch to ON (w, then goes off.●Comes on when the ECON mode is on.2ECON Button P. 245
Indicator
* Not available on all models
Page 98 of 361
97Continued
Controls
Locking and Unlocking the Doors
Key Types and Functions
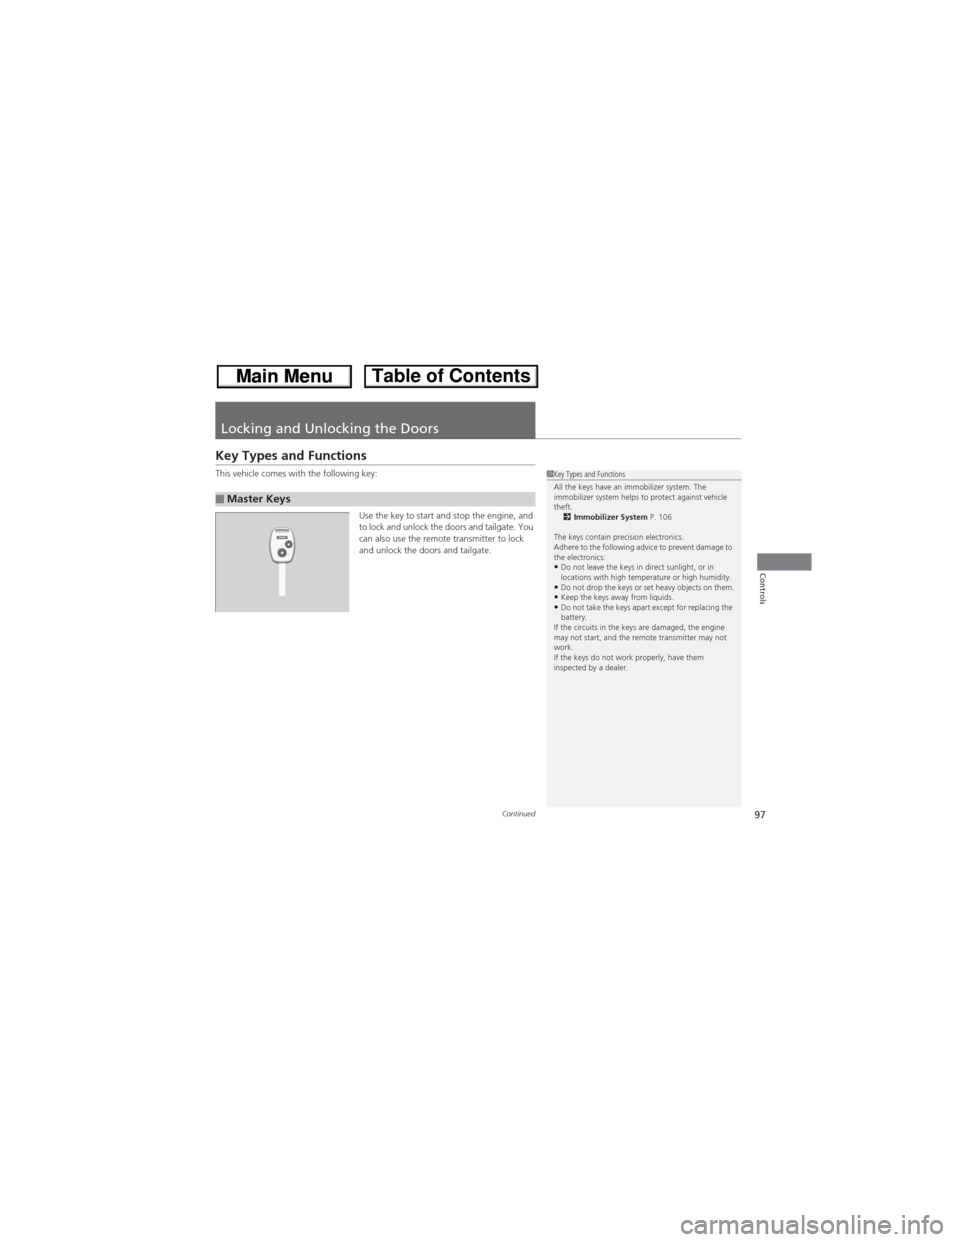
This vehicle comes with the following key:
Use the key to start and stop the engine, and
to lock and unlock the doors and tailgate. You
can also use the remote transmitter to lock
and unlock the doors and tailgate.
■Master Keys
1Key Types and Functions
All the keys have an immobilizer system. The
immobilizer system helps to protect against vehicle
theft.
2Immobilizer System P. 106
The keys contain precision electronics.
Adhere to the following advice to prevent damage to
the electronics:
•Do not leave the keys in direct sunlight, or in
locations with high temperature or high humidity.
•Do not drop the keys or set heavy objects on them.•Keep the keys away from liquids.•Do not take the keys apart except for replacing the
battery.
If the circuits in the keys are damaged, the engine
may not start, and the remote transmitter may not
work.
If the keys do not work properly, have them
inspected by a dealer.
Page 99 of 361
uuLocking and Unlocking the DoorsuKey Types and Functions
98
Controls
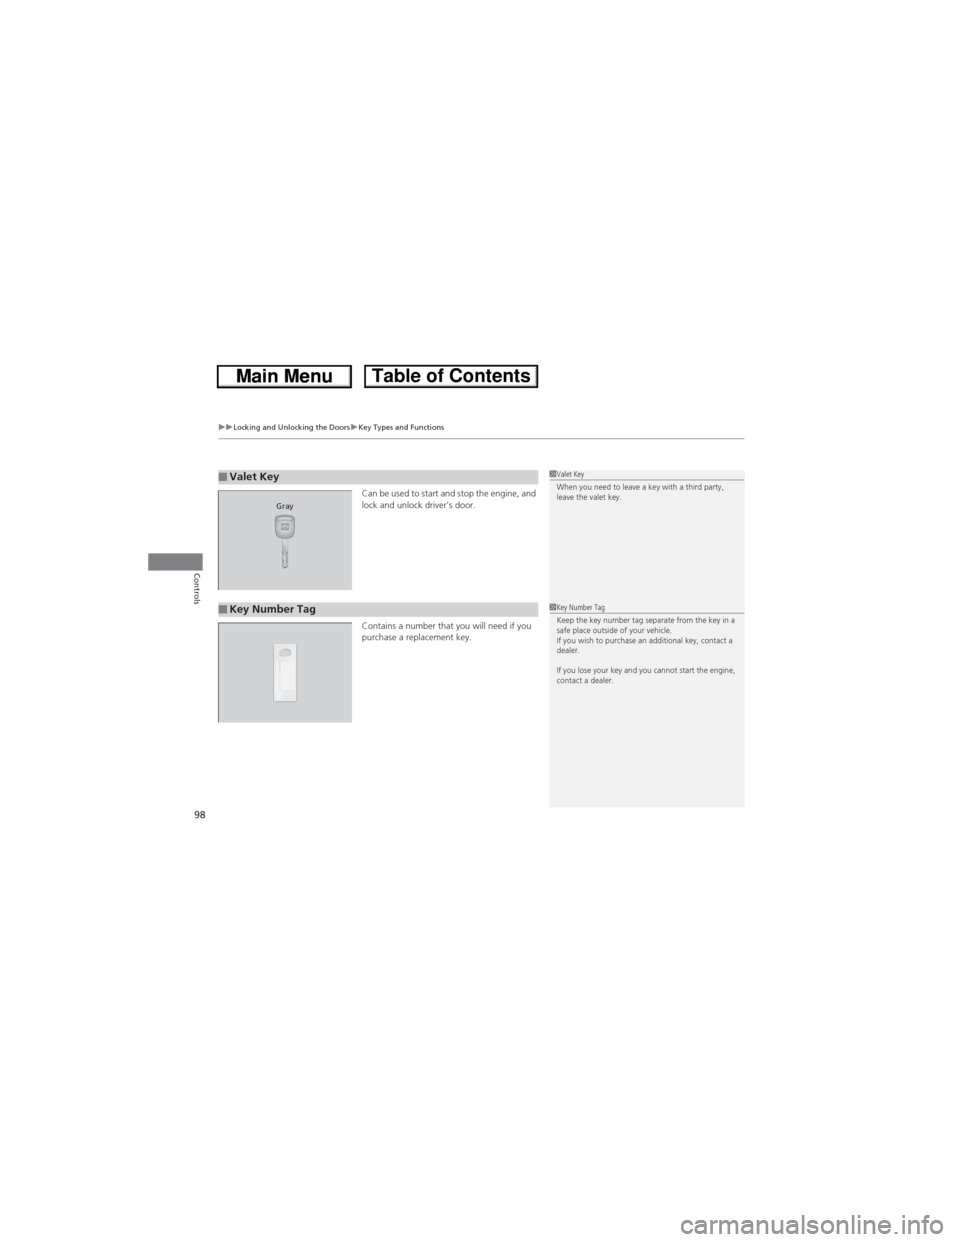
Can be used to start and stop the engine, and
lock and unlock driver's door.
Contains a number that you will need if you
purchase a replacement key.■Valet Key1Valet Key
When you need to leave a key with a third party,
leave the valet key.
Gray
■Key Number Tag1Key Number Tag
Keep the key number tag separate from the key in a
safe place outside of your vehicle.
If you wish to purchase an additional key, contact a
dealer.
If you lose your key and you cannot start the engine,
contact a dealer.
Page 107 of 361
106
Controls
Security System
Immobilizer System
The immobilizer system prevents a key that has not been pre-registered from
starting the engine. Each key contains electronic transmitters that use electronic
signals to verify the key.
Pay attention to the following when inserting the key into the ignition switch:
•Do not allow objects that emit strong radio waves near the ignition switch.
•Make sure the key is not covered by or touching a metal object.
•Do not bring a key from another vehicle's immobilizer system near the ignition
switch.
Security System Alarm*
The security system alarm activates when the tailgate, hood, or doors are opened
without the key, or remote transmitter.
■When the security system alarm activates
The horn sounds intermittently and all the exterior lights flash.
■To deactivate the security system alarm
Unlock the vehicle using the key or remote transmitter, or turning the ignition switch
to ON
(w. The system, along with the horn and flashing lights, is deactivated.
1Immobilizer SystemNOTICELeaving the ignition key in the vehicle can result in
theft or accidental movement of the vehicle.
Always take the ignition key with you whenever you
leave the vehicle unattended.
Do not alter the system or add other devices to it.
Doing so may damage the system and make your
vehicle inoperable.
1Security System Alarm*The security alarm continues for a maximum of two
minutes until the security system deactivates.
* Not available on all models
Page 112 of 361
111
Controls
Operating the Switches Around the Steering Wheel
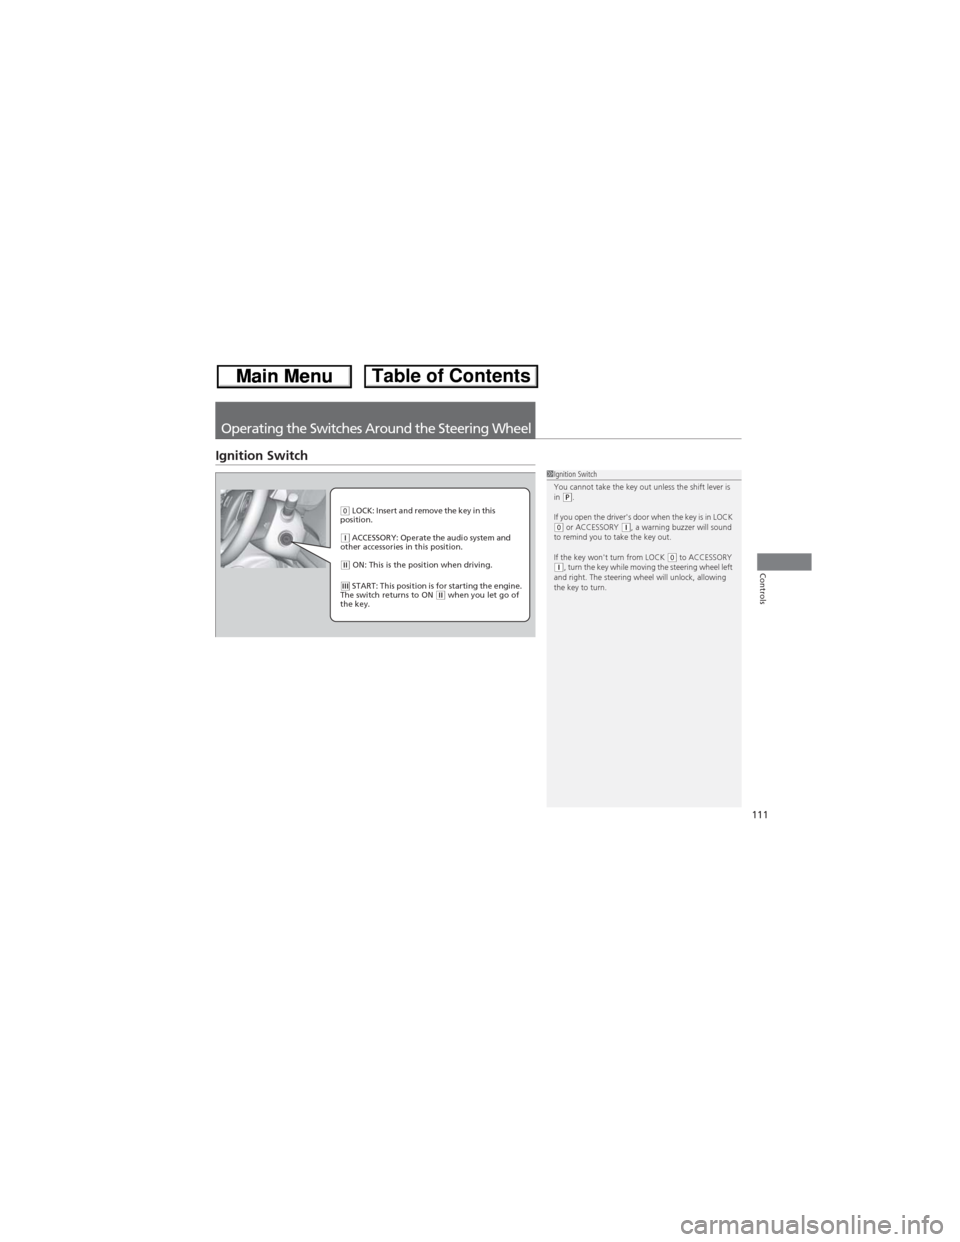
Ignition Switch
1Ignition Switch
You cannot take the key out unless the shift lever is
in
(P.
If you open the driver's door when the key is in LOCK
(0 or ACCESSORY (q, a warning buzzer will sound
to remind you to take the key out.
If the key won't turn from LOCK
(0 to ACCESSORY (q, turn the key while moving the steering wheel left
and right. The steering wheel will unlock, allowing
the key to turn.
(0 LOCK: Insert and remove the key in this
position.
(q ACCESSORY: Operate the audio system and
other accessories in this position.
(w ON: This is the position when driving.
(e START: This position is for starting the engine.
The switch returns to ON (w when you let go of
the key.
Page 116 of 361
115
uuOperating the Switches Around the Steering WheeluWipers and Washers
Continued
Controls
Wipers and Washers
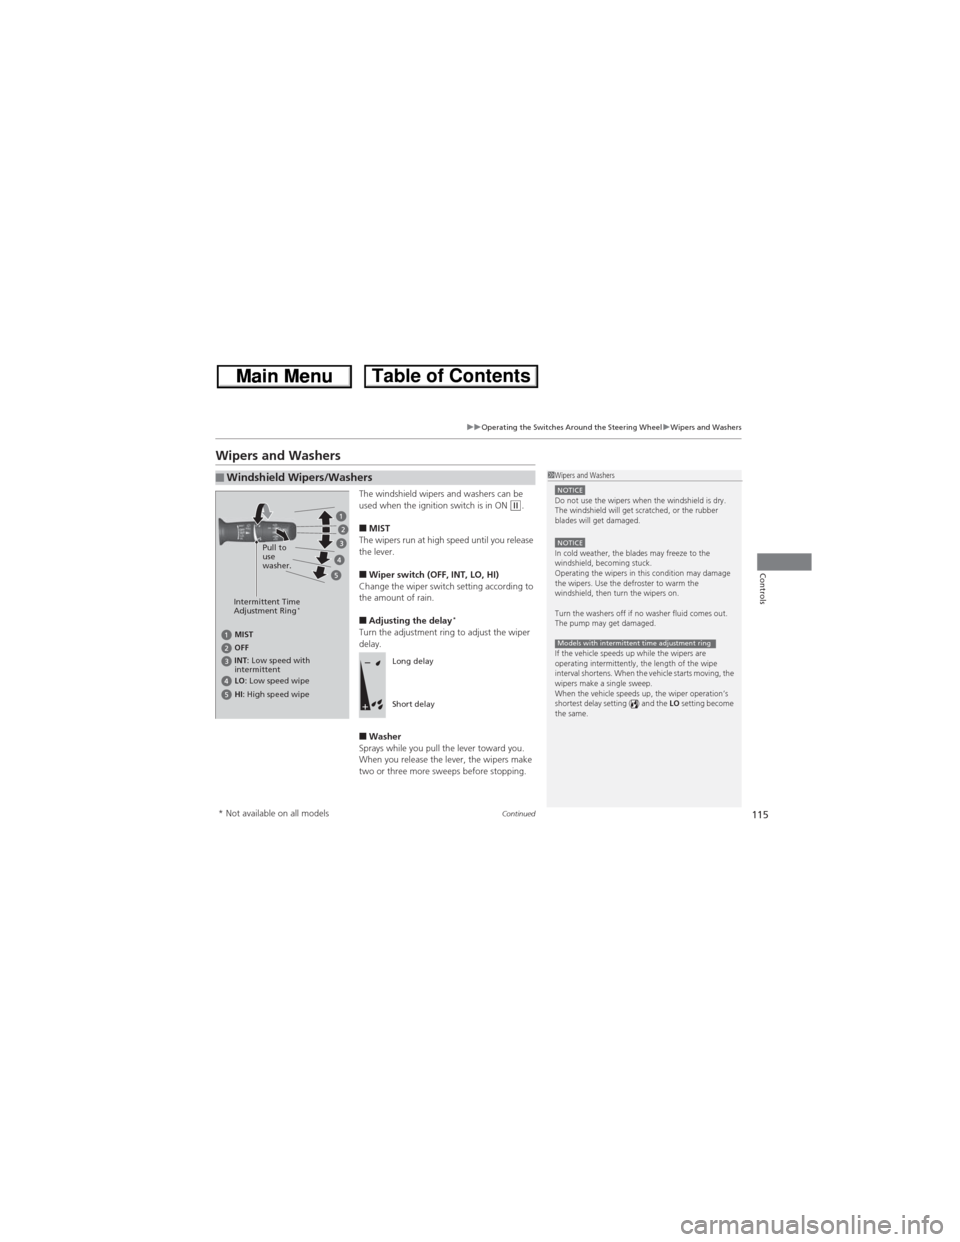
The windshield wipers and washers can be
used when the ignition switch is in ON (w.
■MIST
The wipers run at high speed until you release
the lever.
■Wiper switch (OFF, INT, LO, HI)
Change the wiper switch setting according to
the amount of rain.
■Adjusting the delay*Turn the adjustment ring to adjust the wiper
delay.
■Washer
Sprays while you pull the lever toward you.
When you release the lever, the wipers make
two or three more sweeps before stopping.
■Windshield Wipers/Washers1Wipers and WashersNOTICEDo not use the wipers when the windshield is dry.
The windshield will get scratched, or the rubber
blades will get damaged.
NOTICEIn cold weather, the blades may freeze to the
windshield, becoming stuck.
Operating the wipers in this condition may damage
the wipers. Use the defroster to warm the
windshield, then turn the wipers on.
Turn the washers off if no washer fluid comes out.
The pump may get damaged.
If the vehicle speeds up while the wipers are
operating intermittently, the length of the wipe
interval shortens. When the vehicle starts moving, the
wipers make a single sweep.
When the vehicle speeds up, the wiper operation’s
shortest delay setting ( ) and the LO setting become
the same.
Models with intermittent time adjustment ring
Intermittent Time
Adjustment Ring*
MIST
INT: Low speed with
intermittent OFF
LO: Low speed wipe
HI: High speed wipePull to
use
washer.
Long delay
Short delay
* Not available on all models
Page 119 of 361
118
uuOperating the Switches Around the Steering WheeluRear Defogger/Heated Door Mirror* Button
Controls
Rear Defogger/Heated Door Mirror* Button
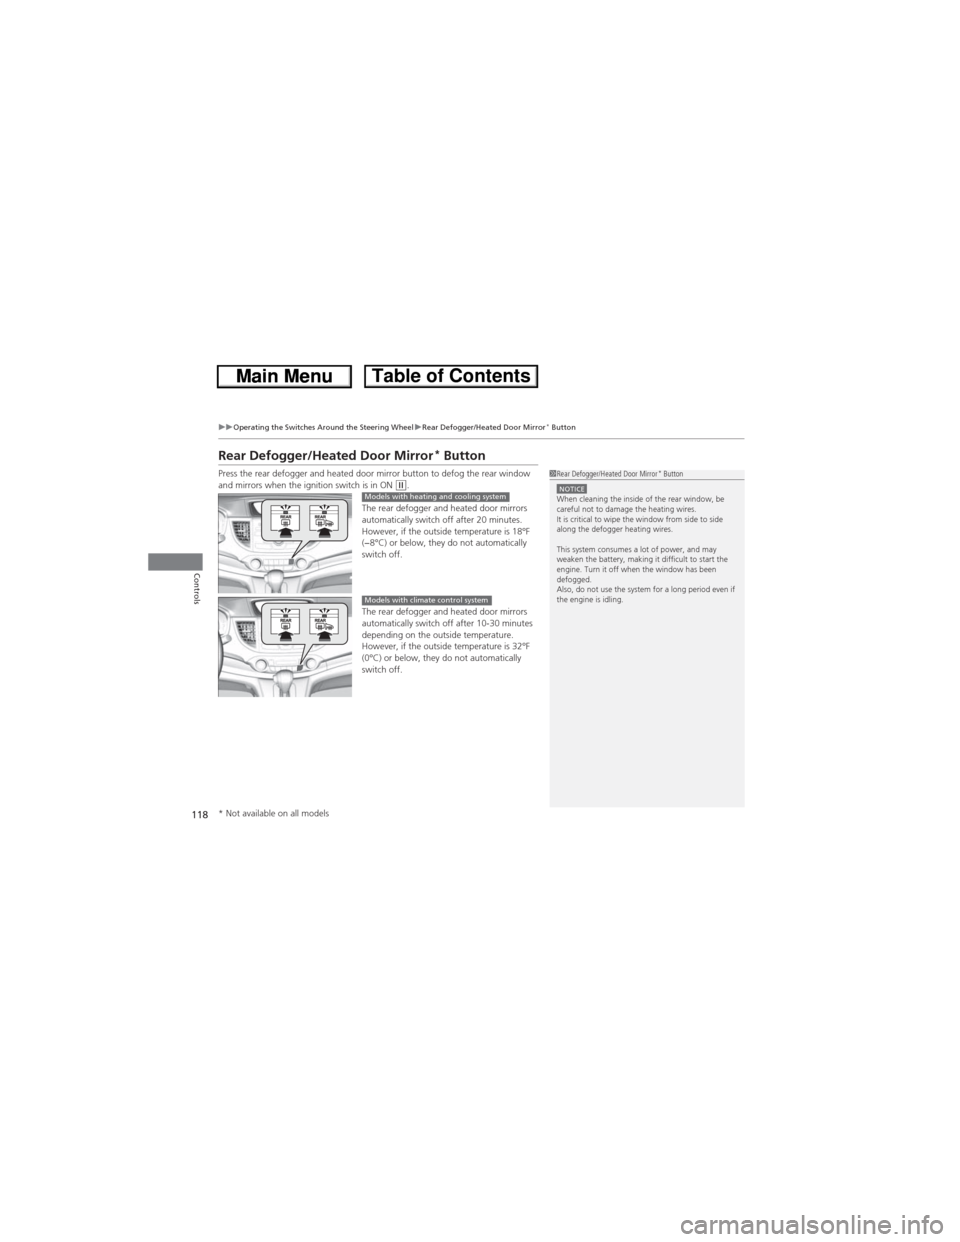
Press the rear defogger and heated door mirror button to defog the rear window
and mirrors when the ignition switch is in ON (w.
The rear defogger and heated door mirrors
automatically switch off after 20 minutes.
However, if the outside temperature is 18°F
(−8°C) or below, they do not automatically
switch off.
The rear defogger and heated door mirrors
automatically switch off after 10-30 minutes
depending on the outside temperature.
However, if the outside temperature is 32°F
(0°C) or below, they do not automatically
switch off.1Rear Defogger/Heated Door Mirror* ButtonNOTICEWhen cleaning the inside of the rear window, be
careful not to damage the heating wires.
It is critical to wipe the window from side to side
along the defogger heating wires.
This system consumes a lot of power, and may
weaken the battery, making it difficult to start the
engine. Turn it off when the window has been
defogged.
Also, do not use the system for a long period even if
the engine is idling.Models with heating and cooling system
Models with climate control system
* Not available on all models
Page 120 of 361
119
uuOperating the Switches Around the Steering WheeluAdjusting the Steering Wheel
Controls
Adjusting the Steering Wheel
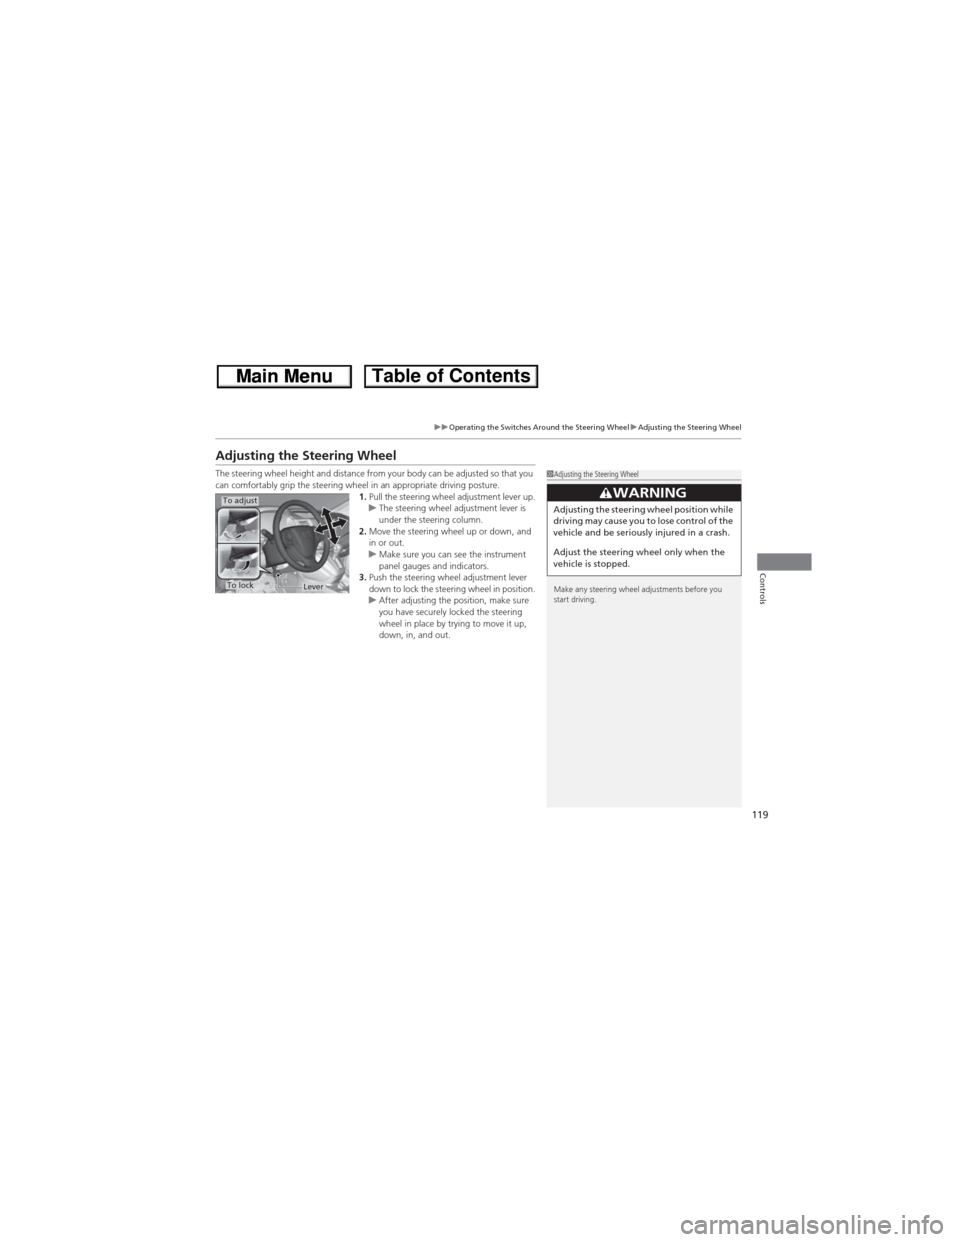
The steering wheel height and distance from your body can be adjusted so that you
can comfortably grip the steering wheel in an appropriate driving posture.
1.Pull the steering wheel adjustment lever up.
uThe steering wheel adjustment lever is
under the steering column.
2.Move the steering wheel up or down, and
in or out.
uMake sure you can see the instrument
panel gauges and indicators.
3.Push the steering wheel adjustment lever
down to lock the steering wheel in position.
uAfter adjusting the position, make sure
you have securely locked the steering
wheel in place by trying to move it up,
down, in, and out.1Adjusting the Steering Wheel
Make any steering wheel adjustments before you
start driving.
3WARNINGAdjusting the steering wheel position while
driving may cause you to lose control of the
vehicle and be seriously injured in a crash.
Adjust the steering wheel only when the
vehicle is stopped.To adjust
To lockLever
Page 121 of 361
120
Controls
Adjusting the Mirrors
Interior Rearview Mirror
Adjust the angle of the rearview mirror when you are sitting in the correct driving
position.
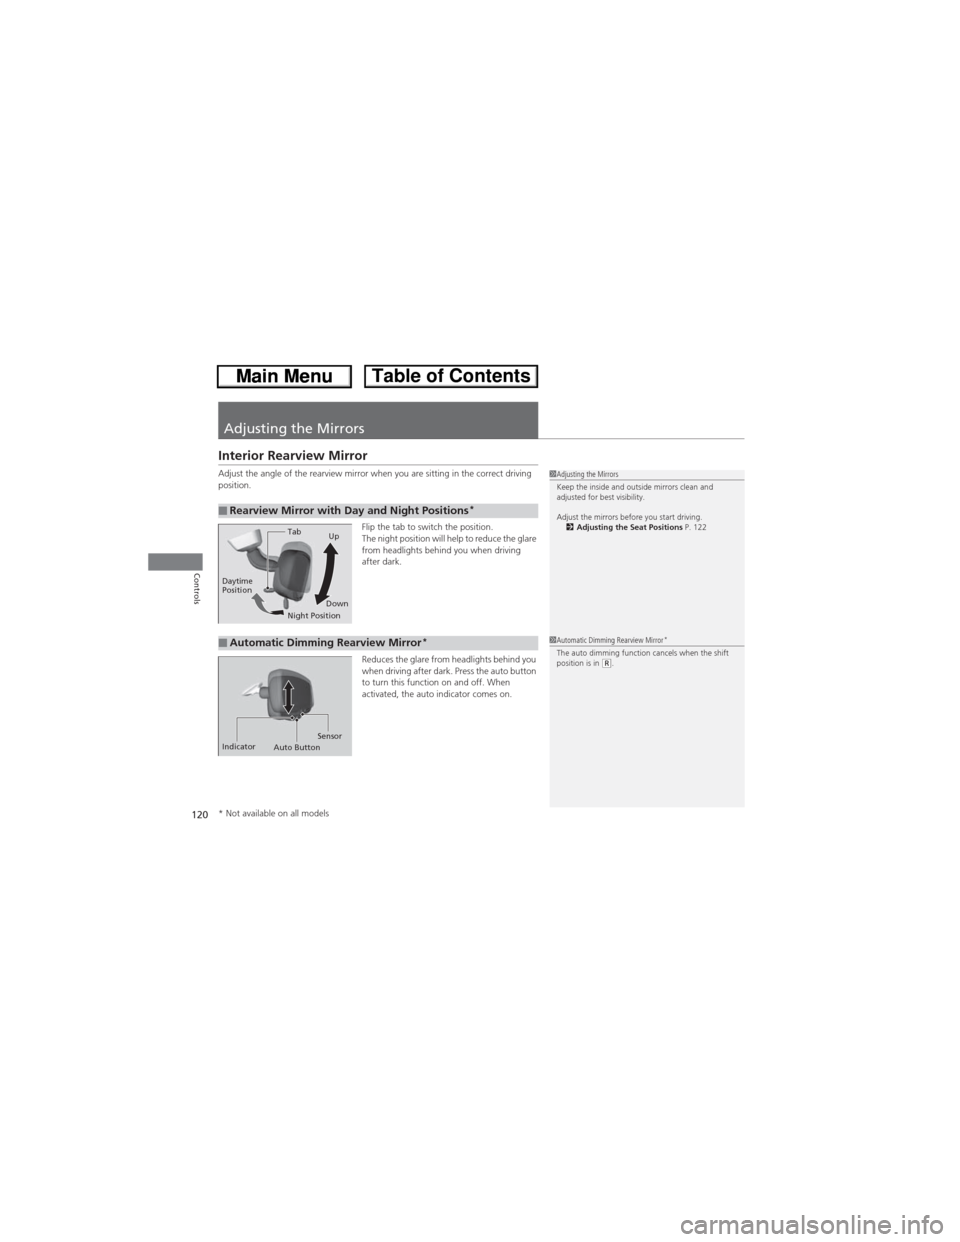
Flip the tab to switch the position.
The night position will help to reduce the glare
from headlights behind you when driving
after dark.
Reduces the glare from headlights behind you
when driving after dark. Press the auto button
to turn this function on and off. When
activated, the auto indicator comes on.
■Rearview Mirror with Day and Night Positions*
1Adjusting the Mirrors
Keep the inside and outside mirrors clean and
adjusted for best visibility.
Adjust the mirrors before you start driving.
2Adjusting the Seat Positions P. 122
Tab
Daytime
Position
Night PositionUp
Down
■Automatic Dimming Rearview Mirror*
Indicator
Auto ButtonSensor
1Automatic Dimming Rearview Mirror*The auto dimming function cancels when the shift
position is in (R.
* Not available on all models