display HONDA CR-V 2014 RM1, RM3, RM4 / 4.G Service Manual
[x] Cancel search | Manufacturer: HONDA, Model Year: 2014, Model line: CR-V, Model: HONDA CR-V 2014 RM1, RM3, RM4 / 4.GPages: 365, PDF Size: 18.39 MB
Page 170 of 365
169
uuAudio System Basic Operation uPlaying a USB Flash Drive
Continued
Features
Playing a USB Flash Drive
Your audio system reads and plays sound files on a USB flash drive in either MP3,
WMA or AAC*1 format.
Connect your USB flash drive to the USB adapter cable, then press the AUX button.
2USB Adapter Cable P. 151
*1:Only AAC format files recorded with iTunes® are playable on this unit.
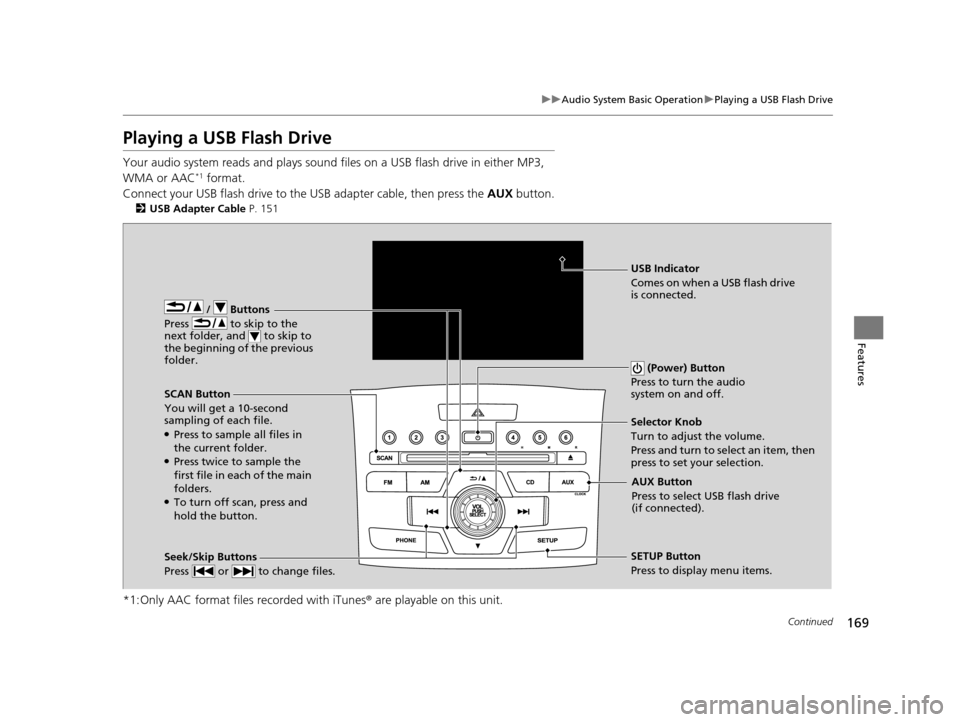
/ Buttons
Press to skip to the
next folder, and to skip to
the beginning of the previous
folder.
SCAN Button
You will get a 10-second
sampling of each file.
●Press to sample all files in
the current folder.
●Press twice to sample the
first file in each of the main
folders.
●To turn off scan, press and
hold the button. (Power) Button
Press to turn the audio
system on and off.
Seek/Skip Buttons
Press or to change files.SETUP Button
Press to display menu items. Selector Knob
Turn to adjust the volume.
Press and turn to se lect an item, then
press to set your selection.
AUX Button
Press to select USB flash drive
(if connected).
USB Indicator
Comes on when a USB flash drive
is connected.
14 CR-V-31T0A6200.book 169 ページ 2014年2月10日 月曜日 午後7時1分
Page 171 of 365
uuAudio System Basic Operation uPlaying a USB Flash Drive
170
Features
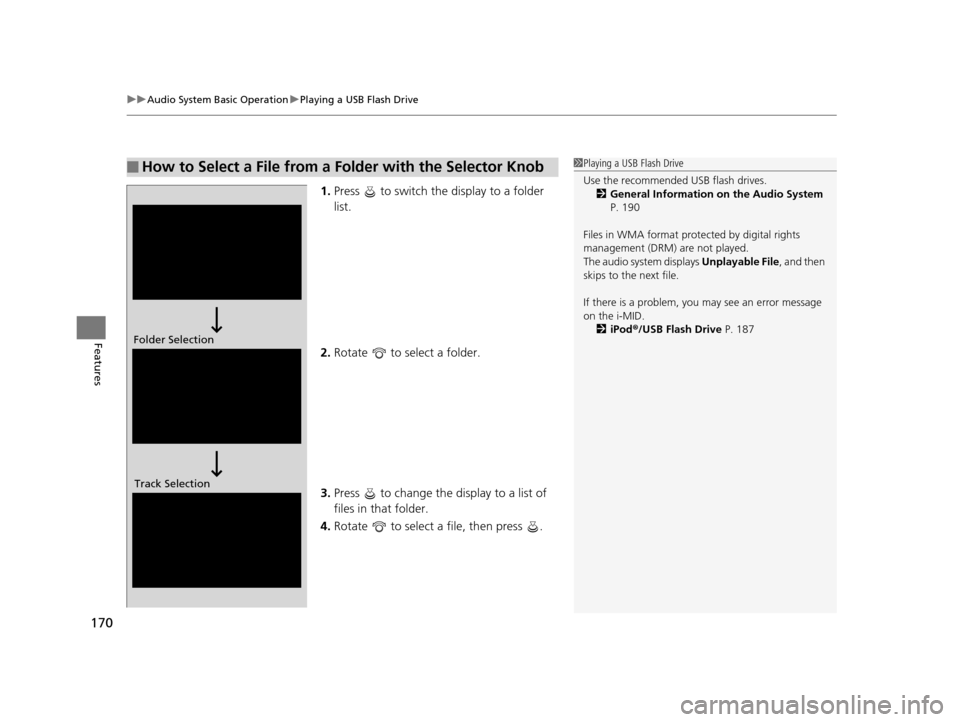
1. Press to switch the display to a folder
list.
2. Rotate to select a folder.
3. Press to change the display to a list of
files in that folder.
4. Rotate to select a file, then press .
■How to Select a File from a Folder with the Selector Knob1Playing a USB Flash Drive
Use the recommended USB flash drives.
2 General Information on the Audio System
P. 190
Files in WMA format prot ected by digital rights
management (DRM) are not played.
The audio system displays Unplayable File, and then
skips to the next file.
If there is a problem, you may see an error message
on the i-MID.
2 iPod ®/USB Flash Drive P. 187
Folder Selection
Track Selection
14 CR-V-31T0A6200.book 170 ページ 2014年2月10日 月曜日 午後7時1分
Page 173 of 365
172
uuAudio System Basic Operation uPlaying Bluetooth ® Audio
Features
Playing Bluetooth ® Audio
Your audio system allows you to listen to music from your Bluetooth®-compatible
phone.
This function is available when the phone is paired and connected to the vehicle’s
Bluetooth ® HandsFreeLink ® (HFL) system.
2 Phone Setup P. 201
1Playing Bluetooth ® Audio
Not all Bluetooth -enabled phones with streaming
audio capabilities are comp atible with the system.
For a list of compatible phones:
•U.S.: Visit www.acura.com/handsfreelink , or call 1-
888-528-7876.
•Canada: Visit www.handsfreelink.ca , or call 1-888-
528-7876.
In some states, it may be il legal to perform some data
device functions while driving.
If more than one phone is paired to the HFL system,
there will be a delay before the system begins to play.
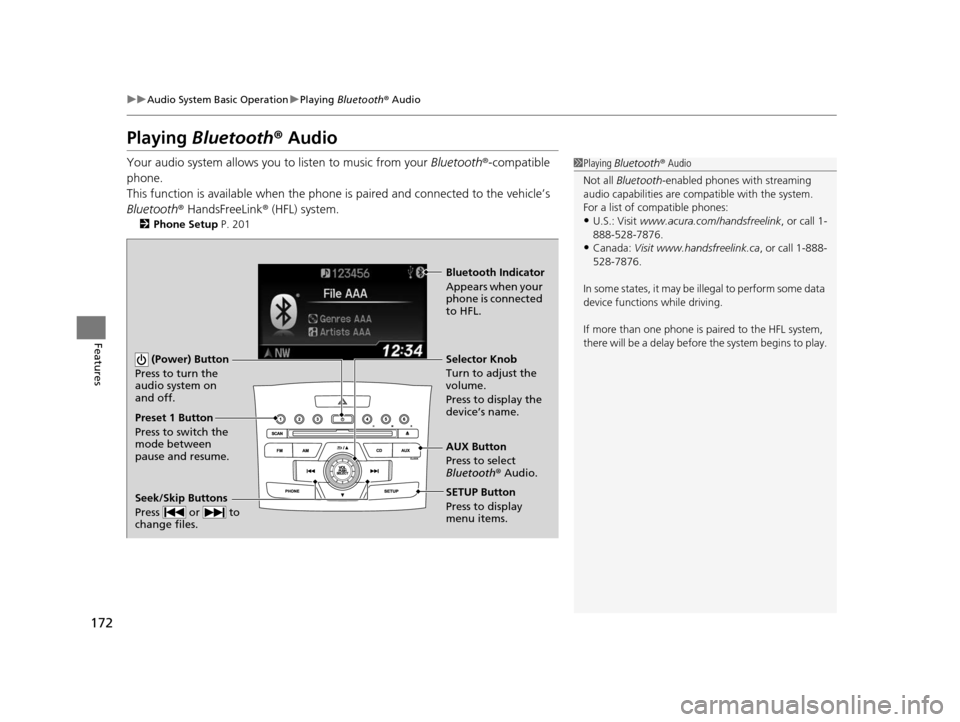
(Power) Button
Press to turn the
audio system on
and off.
SETUP Button
Press to display
menu items. Selector Knob
Turn to adjust the
volume.
Press to display the
device’s name.
AUX Button
Press to select
Bluetooth ® Audio.
Seek/Skip Buttons
Press or to
change files.
Bluetooth Indicator
Appears when your
phone is connected
to HFL.
Preset 1 Button
Press to switch the
mode between
pause and resume.
14 CR-V-31T0A6200.book 172 ページ 2014年2月10日 月曜日 午後7時1分
Page 175 of 365
174
Features
Rear Entertainment System*
Allows the rear seat passengers to enjoy a different entertainment source, such as a
DVD or CD, than the front passengers.
The rear seat passenger can listen to audi o from the rear entertainment system with
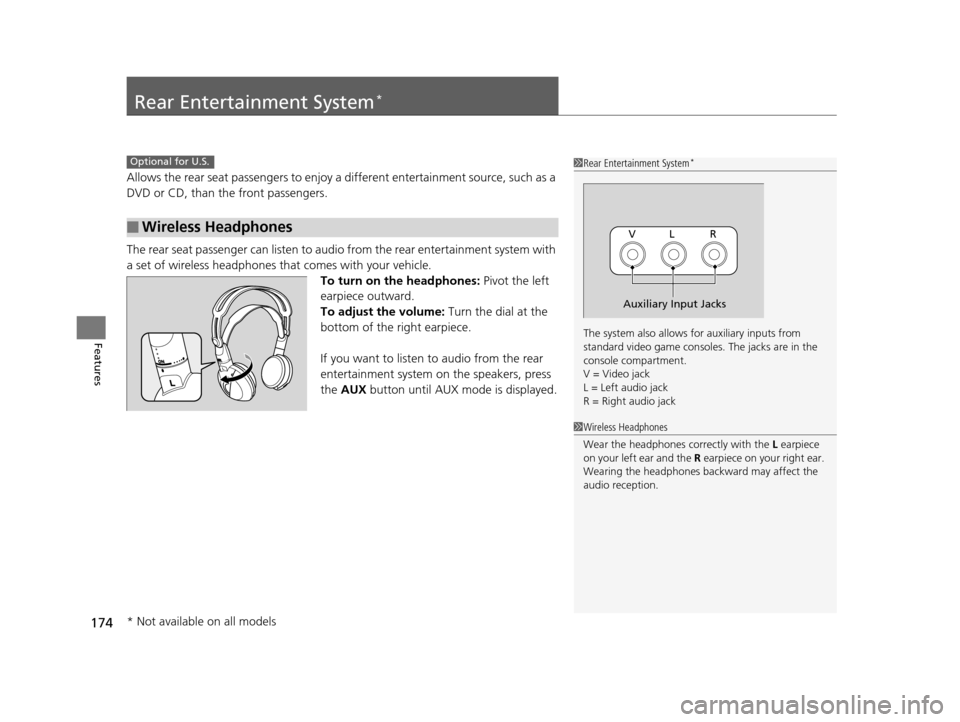
a set of wireless headphones that comes with your vehicle. To turn on the headphones: Pivot the left
earpiece outward.
To adjust the volume: Turn the dial at the
bottom of the right earpiece.
If you want to listen to audio from the rear
entertainment system on the speakers, press
the AUX button until AUX mode is displayed.
■Wireless Headphones
Optional for U.S.1Rear Entertainment System*
The system also allows for auxiliary inputs from
standard video game consol es. The jacks are in the
console compartment.
V = Video jack
L = Left audio jack
R = Right audio jack
VL R
Auxiliary Input Jacks
1 Wireless Headphones
Wear the headphones co rrectly with the L earpiece
on your left ear and the R earpiece on y our right ear.
Wearing the headphones backward may affect the
audio reception.
* Not available on all models
14 CR-V-31T0A6200.book 174 ページ 2014年2月10日 月曜日 午後7時1分
Page 176 of 365
Continued175
uuRear Entertainment System*uOperating the System
Features
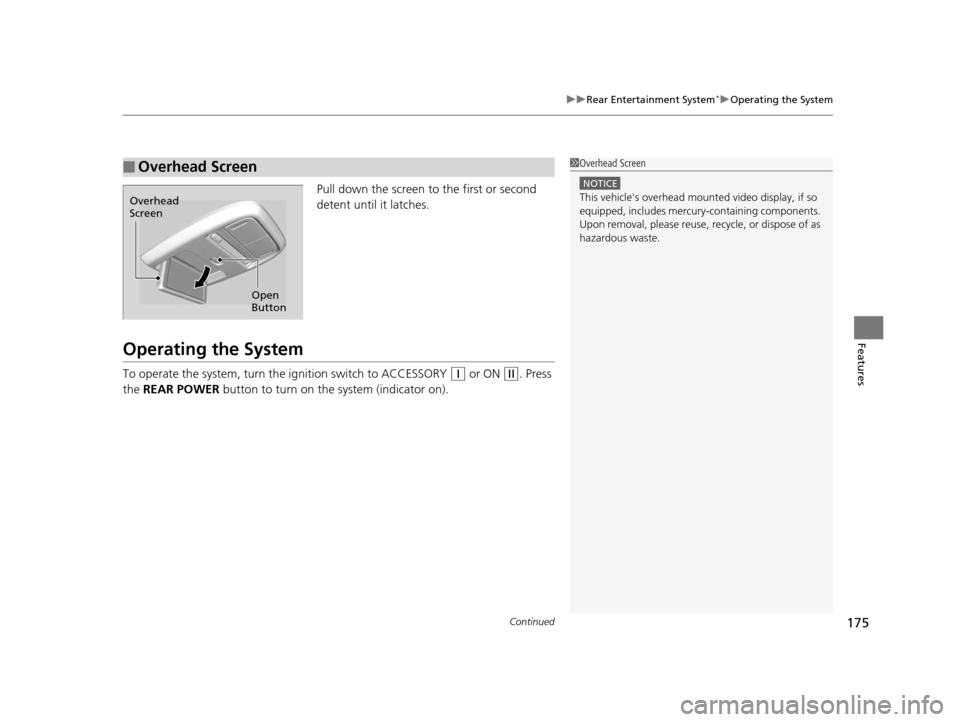
Pull down the screen to the first or second
detent until it latches.
Operating the System
To operate the system, turn th e ignition switch to ACCESSORY (q or ON (w. Press
the REAR POWER button to turn on the system (indicator on).
■Overhead Screen1Overhead Screen
NOTICE
This vehicle's overhead mount ed video display, if so
equipped, includes mercur y-containing components.
Upon removal, please reuse, recycle, or dispose of as
hazardous waste.
Open
Button
Overhead
Screen
14 CR-V-31T0A6200.book 175 ページ 2014年2月10日 月曜日 午後7時1分
Page 178 of 365
177
uuRear Entertainment System*uOperating the System
Continued
Features
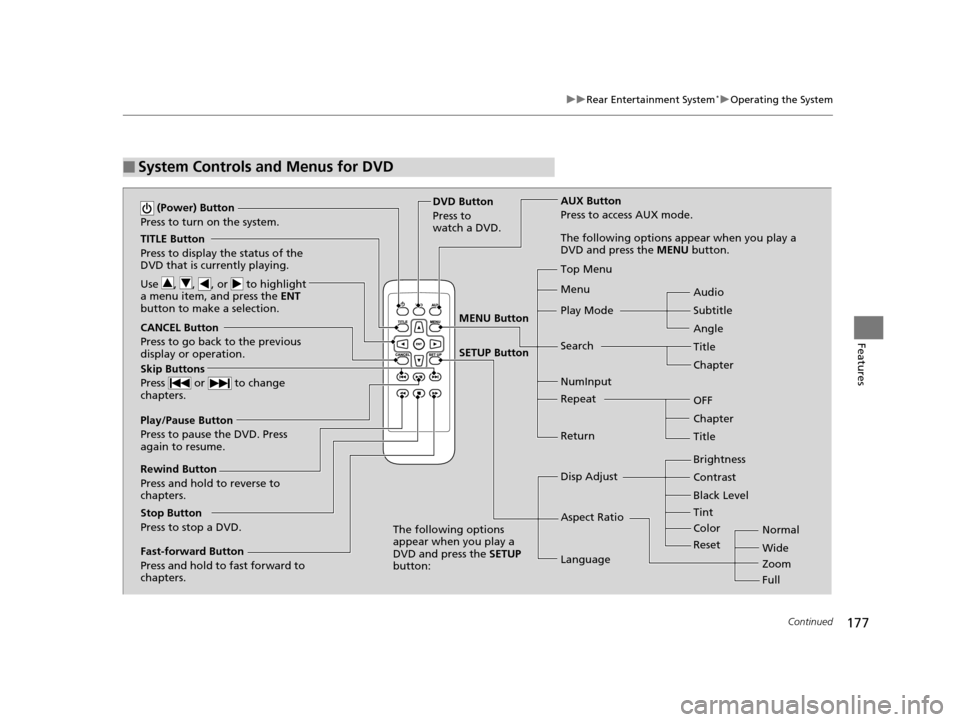
■System Controls and Menus for DVD
TITLE Button
Press to display the status of the
DVD that is currently playing.
Use , , , or to highlight
a menu item, and press the ENT
button to make a selection.
(Power) Button
Press to turn on the system.
CANCEL Button
Press to go back to the previous
display or operation.
Skip Buttons
Press or to change
chapters.
Stop Button
Press to stop a DVD. DVD Button
Press to
watch a DVD.
AUX Button
Press to access AUX mode.
The following options appear when you play a
DVD and press the
MENU button.
Top Menu
Menu
Play Mode
Search Subtitle Audio
Angle
Chapter Title
OFF
NumInput
Repeat
Chapter
Title
Return
The following options
appear when you play a
DVD and press the SETUP
button: Disp Adjust
Aspect Ratio
LanguageBrightness
Contrast
Black Level
Color Tint
Normal
Wide
Zoom
Full
Rewind Button
Press and hold to reverse to
chapters.
Fast-forward Button
Press and hold to fast forward to
chapters.
Play/Pause Button
Press to pause the DVD. Press
again to resume.
Reset
MENU Button
SETUP Button
14 CR-V-31T0A6200.book 177 ページ 2014年2月10日 月曜日 午後7時1分
Page 180 of 365
179
uuRear Entertainment System*uOperating the System
Continued
Features
Top Menu:
The top page of the DVD’s title menu appears. The title menu also appears when
you press the MENU button while the DVD is in the slot not playing. Press the
CANCEL or MENU button to return.
Menu:
The DVD’s title menu appears.
Play Mode:
You can change the following three settings:
Audio - Select a language for audio that is available on the DVD. The sound
characteristics (Dolby Digita l, LPCM, MPEG Audio, etc) of that audio is also
displayed.
Subtitle - Select a subtitle that is available on the DVD.
Angle - Select a view angle that is availabl e on the DVD. If the DVD currently playing
does not carry multiple angles, only one option Angle 1 comes on. Press the
CANCEL or MENU button to return.
14 CR-V-31T0A6200.book 179 ページ 2014年2月10日 月曜日 午後7時1分
Page 182 of 365
Continued181
uuRear Entertainment System*uOperating the System
Features
■SETUP button on the remote
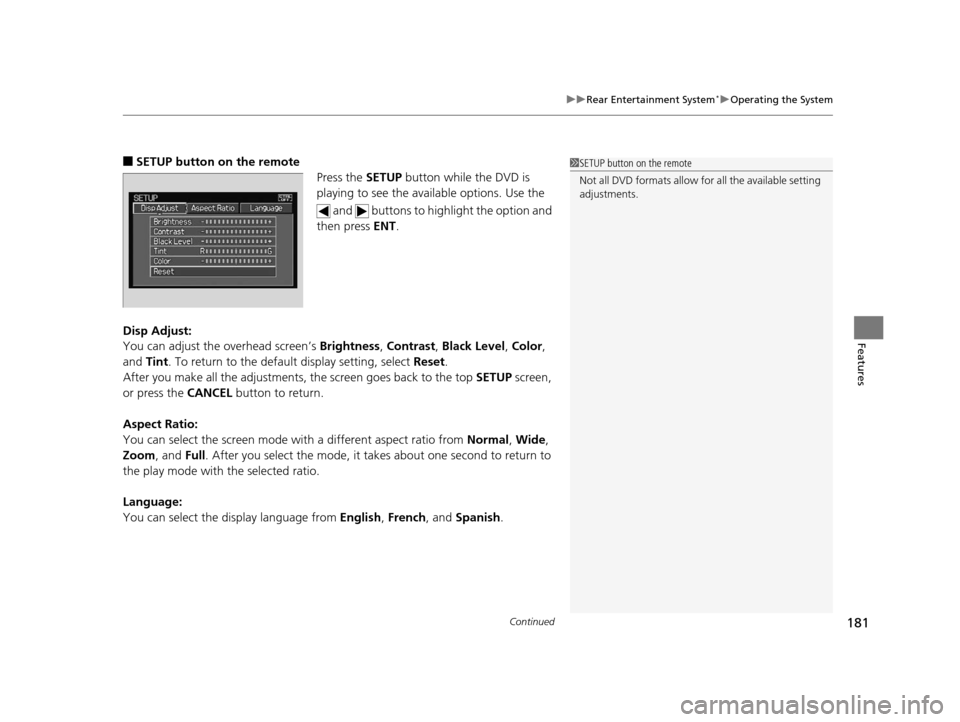
Press the SETUP button while the DVD is
playing to see the ava ilable options. Use the
and buttons to highlight the option and
then press ENT.
Disp Adjust:
You can adjust the overhead screen’s Brightness, Contrast , Black Level , Color ,
and Tint. To return to the defaul t display setting, select Reset.
After you make all the adjustments, the screen goes back to the top SETUP screen,
or press the CANCEL button to return.
Aspect Ratio:
You can select the screen mode wi th a different aspect ratio from Normal , Wide ,
Zoom , and Full. After you select the mode, it t akes about one second to return to
the play mode with the selected ratio.
Language:
You can select the display language from English, French , and Spanish .1SETUP button on the remote
Not all DVD formats allow for all the available setting
adjustments.
14 CR-V-31T0A6200.book 181 ページ 2014年2月10日 月曜日 午後7時1分
Page 183 of 365
uuRear Entertainment System*uOperating the System
182
Features
Initial Settings -
Press the SETUP button to configure the initial Language, Dynamic Range, and
Angle Mark settings before playing a DVD.
Language Settings:
Select the language for the DVD’s displa yed menus (Menu Language), the DVD’s
audio (Audio Language), and the DVD’s subtitle (Subtitle Language).
1. Select the language setting.
2. Select the language from English, French, Spanish, Arabic, German, Italian,
Dutch, Chinese, Kor ean, Thai, Japanese, and other.
3. If you select other, you need to enter the four di git language code to configure
the language that is not listed. Select Yes to go to the number input screen.
u To return to the Language Settings screen, select No.
4. Press the ENT button each time you input a digit.
u If you want to delete a number, select DEL.
5. The cursor automatically goes to ENT after you input four digits. Press the ENT
button to command.
Dynamic Range:
This feature reduces the difference between the loud and quiet sound levels. Select
ON or OFF .
Angle Mark:
You can select whether to display the angle mark appearing in the upper right
corner of the screen when you change the view angle while the DVD is playing.
Select ON or OFF .
When the DVD is not playing1SETUP button on the remote
Initial Settings:
The prior language varies by disc. You may not be
able to configure your selected language setting.
14 CR-V-31T0A6200.book 182 ページ 2014年2月10日 月曜日 午後7時1分
Page 185 of 365
uuRear Entertainment System*uOperating the System
184
Features
■Playing a CD
Press the DVD button.
The available options that appear on the overhead screen are Repeat, Random, and Scan.
The fast-forward, rewind, , and buttons work similarly to operation a DVD.
2Playing a DVD P. 178
To scroll the audio data title, press the TITLE button for five seconds.
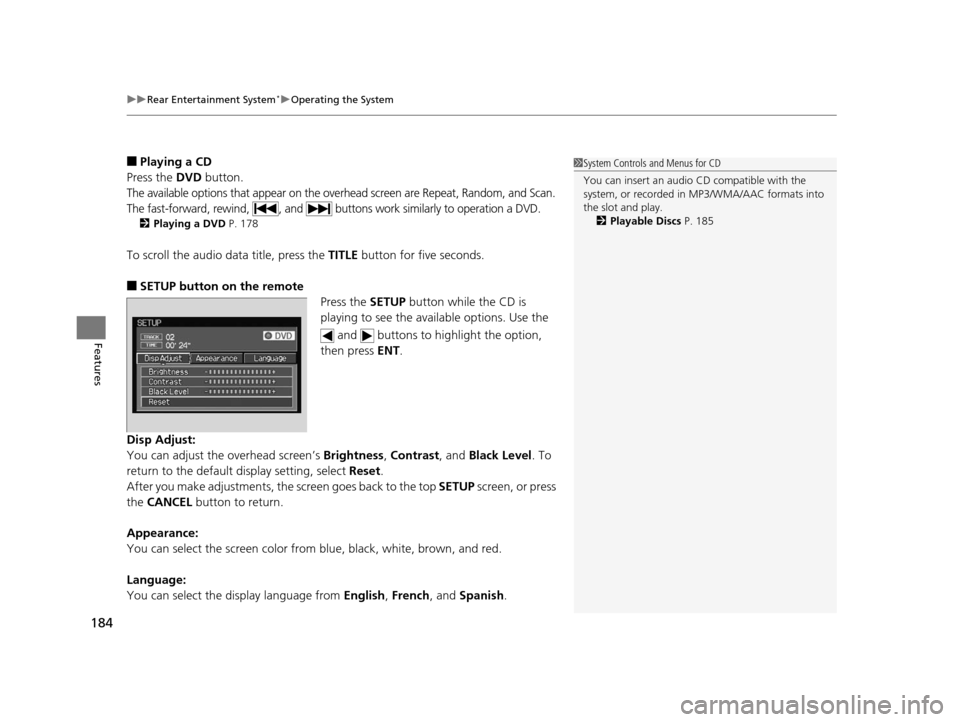
■SETUP button on the remote
Press the SETUP button while the CD is
playing to see the ava ilable options. Use the
and buttons to highlight the option,
then press ENT.
Disp Adjust:
You can adjust the overhead screen’s Brightness, Contrast, and Black Level . To
return to the default display setting, select Reset.
After you make adjustments, the screen goes back to the top SETUP screen, or press
the CANCEL button to return.
Appearance:
You can select the screen color from blue, black, white, brown, and red.
Language:
You can select the display language from English, French, and Spanish.
1System Controls and Menus for CD
You can insert an audio CD compatible with the
system, or recorded in MP3/WMA/AAC formats into
the slot and play.
2 Playable Discs P. 185
14 CR-V-31T0A6200.book 184 ページ 2014年2月10日 月曜日 午後7時1分