change wheel HONDA CR-V 2016 RM1, RM3, RM4 / 4.G Quick Guide
[x] Cancel search | Manufacturer: HONDA, Model Year: 2016, Model line: CR-V, Model: HONDA CR-V 2016 RM1, RM3, RM4 / 4.GPages: 80, PDF Size: 7.99 MB
Page 19 of 80
30 || 31
I
NSTRUMENT PANELINSTRUMENT PANEL
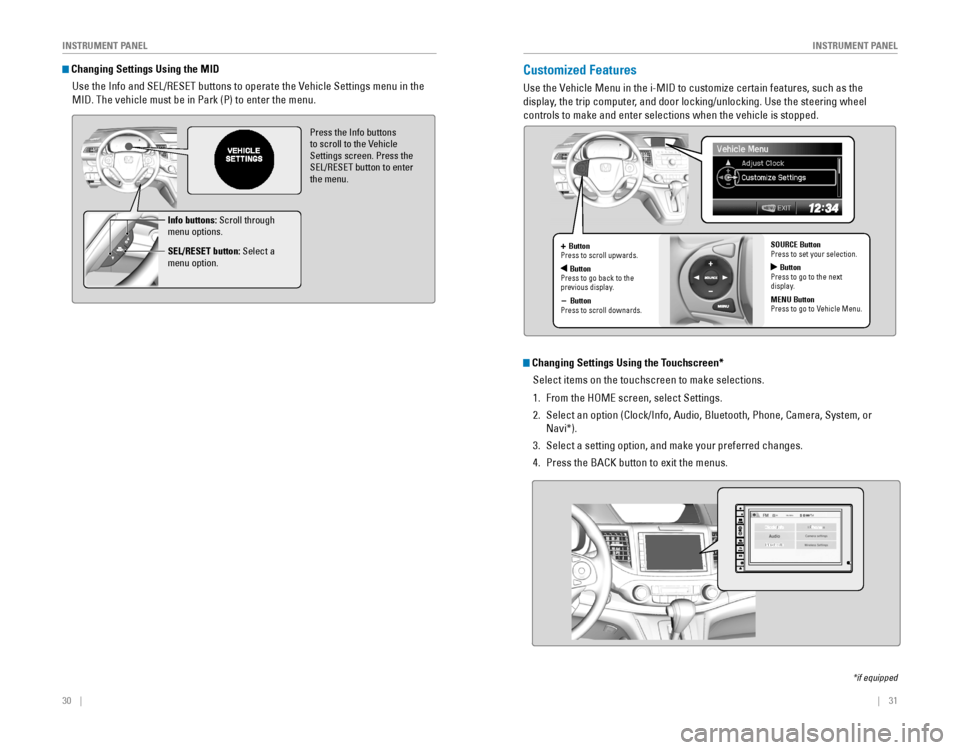
Changing Settings Using the MID
Use the Info and SEL/RESET buttons to operate the Vehicle Settings menu in the
MID. The vehicle must be in Park (P) to enter the menu.
Press the Info buttons to scroll to the Vehicle
Settings screen. Press the
SEL/RESET button to enter the menu.
Info buttons: Scroll through
menu options.
SEL/RESET button: Select a
menu option.
Customized Features
Use the Vehicle Menu in the i-MID to customize certain features, such as the
display, the trip computer, and door locking/unlocking. Use the steering wheel
controls to make and enter selections when the vehicle is stopped.
*if equipped
+ Button
Press to scroll upwards.
ButtonPress to go back to the previous display.
- Button
Press to scroll downards. SOURCE Button
Press to set your selection.
Button
Press to go to the next
display.
MENU Button
Press to go to Vehicle Menu.
Changing Settings Using the Touchscreen*
Select items on the touchscreen to make selections.
1. From the HOME screen, select Settings.
2. Select an option (Clock/Info, Audio, Bluetooth, Phone, Camera, System, or
Navi*).
3. Select a setting option, and make your preferred changes.
4. Press the BACK button to exit the menus.
Page 32 of 80
56 || 57
AUDIO AND CONNECTIVITY
AUDIO AND CONNECTIVITY
*if equipped
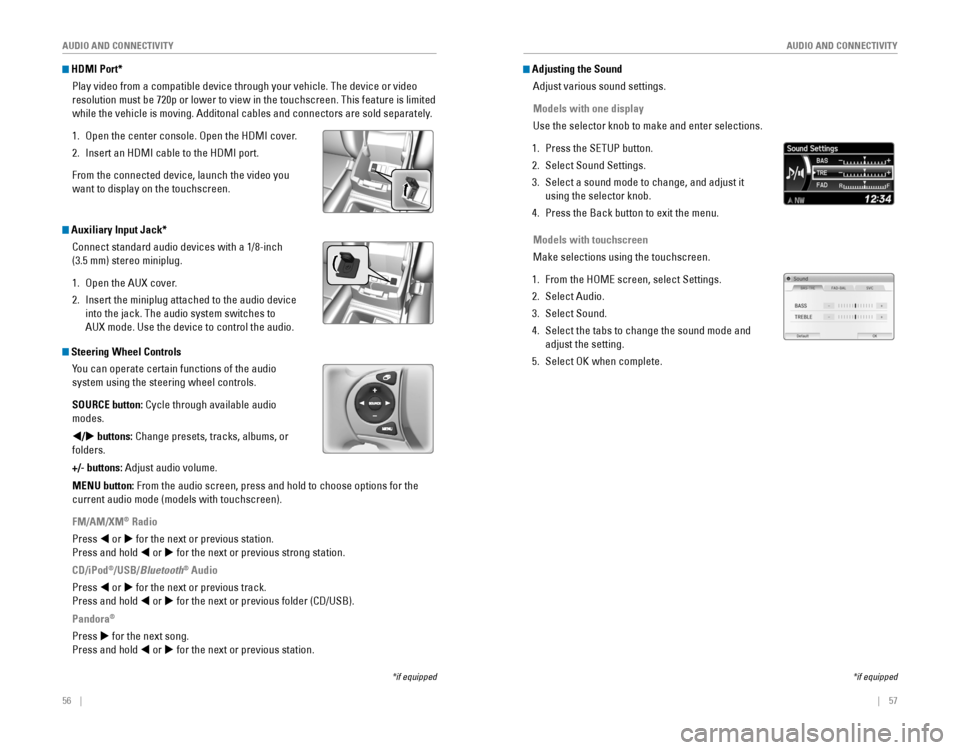
HDMI Port*
Play video from a compatible device through your vehicle. The device or video
resolution must be 720p or lower to view in the touchscreen. This feature is limited
while the vehicle is moving. Additonal cables and connectors are sold separately.
1. Open the center console. Open the HDMI cover.
2. Insert an HDMI cable to the HDMI port.
From the connected device, launch the video you
want to display on the touchscreen.
*if equipped
Adjusting the Sound
Adjust various sound settings.
Models with one display
Use the selector knob to make and enter selections.
1. Press the SETUP button.
2. Select Sound Settings.
3. Select a sound mode to change, and adjust it
using the selector knob.
4. Press the Back button to exit the menu.
Models with touchscreen
Make selections using the touchscreen.
1. From the HOME screen, select Settings.
2. Select Audio.
3. Select Sound.
4. Select the tabs to change the sound mode and
adjust the setting.
5. Select OK when complete. Steering Wheel ControlsYou can operate certain functions of the audio
system using the steering wheel controls.
SOURCE button:
Cycle through available audio
modes.
t/u buttons:
Change presets, tracks, albums, or
folders.
+/- buttons: Adjust audio volume.
MENU button: From the audio screen, press and hold to choose options for the
current audio mode (models with touchscreen).
FM/AM/XM
® Radio
Press t or u for the next or previous station.
Press and hold t or u for the next or previous strong station.
CD/iPod
®/USB/Bluetooth® Audio
Press t or u for the next or previous track.
Press and hold t or u
for the next or previous folder (CD/USB).
Pandora®
Press u for the next song.
Press and hold t or u for the next or previous station.
Auxiliary Input Jack*
Connect standard audio devices with a 1/8-inch
(3.5 mm) stereo miniplug.
1. Open the AUX cover.
2. Insert the miniplug attached to the audio device
into the jack. The audio system switches to
AUX mode. Use the device to control the audio.
Page 53 of 80
98 || 99
DRIVING
DRIVING
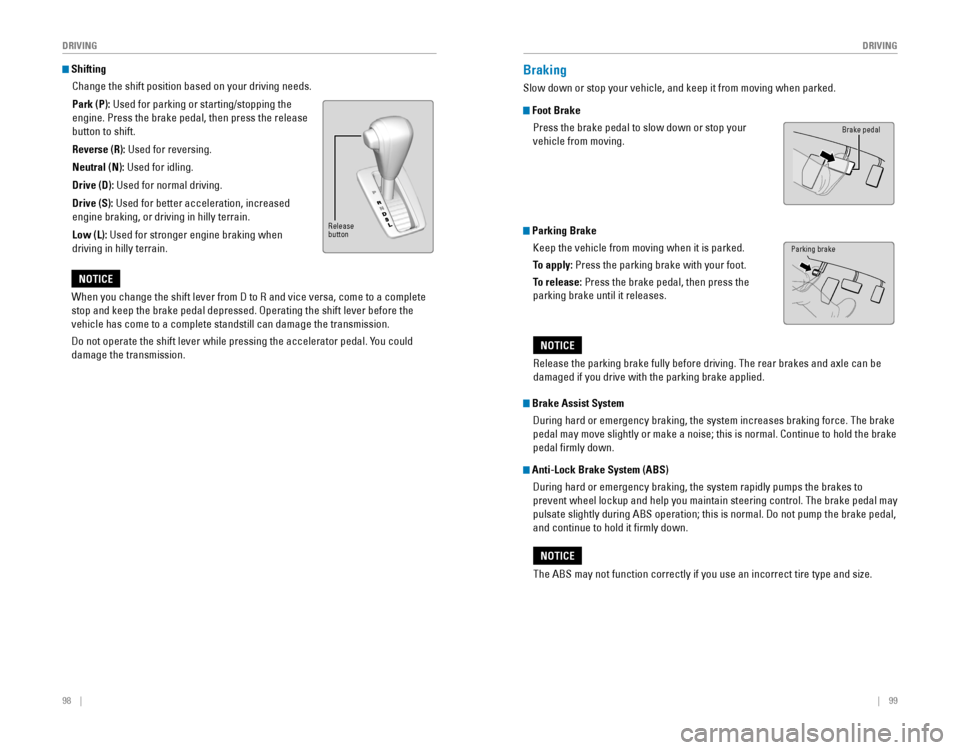
Shifting
Change the shift position based on your driving needs.
Park (P): Used for parking or starting/stopping the
engine. Press the brake pedal, then press the release
button to shift.
Reverse (R): Used for reversing.
Neutral (N): Used for idling.
Drive (D): Used for normal driving.
Drive (S):
Used for better acceleration, increased
engine braking, or driving in hilly terrain.
Low (L): Used for stronger engine braking when
driving in hilly terrain.
When you change the shift lever from D to R and vice versa, come to a complete
stop and keep the brake pedal depressed. Operating the shift lever before the
vehicle has come to a complete standstill can damage the transmission.
Do not operate the shift lever while pressing the accelerator pedal. You could
damage the transmission.
NOTICE
Braking
Slow down or stop your vehicle, and keep it from moving when parked.
Foot Brake
Press the brake pedal to slow down or stop your
vehicle from moving.
Parking Brake
Keep the vehicle from moving when it is parked.
To apply:
Press the parking brake with your foot.
To release: Press the brake pedal, then press the
parking brake until it releases.
Brake Assist System
During hard or emergency braking, the system increases braking force. The brake
pedal may move slightly or make a noise; this is normal. Continue to hold the brake
pedal firmly down.
Anti-Lock Brake System (ABS)
During hard or emergency braking, the system rapidly pumps the brakes to
prevent wheel lockup and help you maintain steering control. The brake pedal may
pulsate slightly during ABS operation; this is normal. Do not pump the brake pedal,
and continue to hold it firmly down.
The ABS may not function correctly if you use an incorrect tire type and size.
NOTICE
Brake pedal
Release
button
Parking brake
Release the parking brake fully before driving. The rear brakes and axle can be
damaged if you drive with the parking brake applied.
NOTICE
Page 57 of 80
106 || 107
DRIVING
DRIVING
*if equipped
Collision Mitigation Braking System™ (CMBS™)*
Can alert you when a potential frontal collision with a vehicle or pedes\
trian is
determined and reduce your vehicle speed when a collision is deemed unavoidable
to help minimize collision severity.
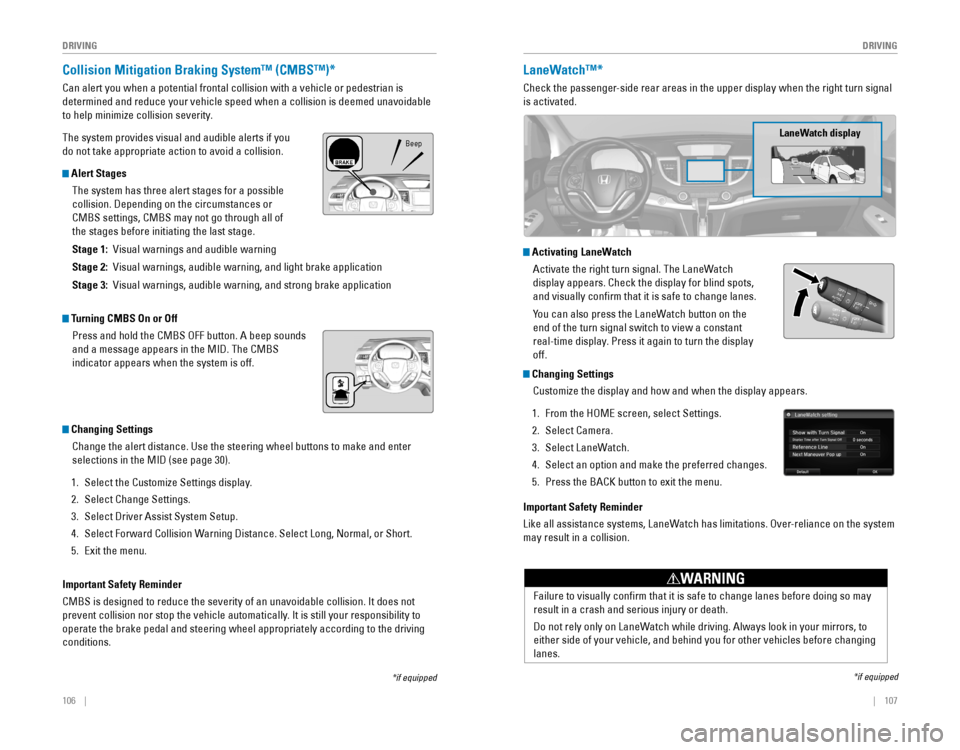
The system provides visual and audible alerts if you
do not take appropriate action to avoid a collision.
Alert Stages
The system has three alert stages for a possible
collision. Depending on the circumstances or
CMBS settings, CMBS may not go through all of
the stages before initiating the last stage.
Stage 1: Visual warnings and audible warning
Stage 2: Visual warnings, audible warning, and light brake application
Stage 3: Visual warnings, audible warning, and strong brake application
Beep
LaneWatch™*
Check the passenger-side rear areas in the upper display when the right turn signal
is activated.
LaneWatch display
Activating LaneWatch
Activate the right turn signal. The LaneWatch
display appears. Check the display for blind spots,
and visually confirm that it is safe to change lanes.
You can also press the LaneWatch button on the
end of the turn signal switch to view a constant
real-time display. Press it again to turn the display
off.
*if equipped
Turning CMBS On or Off
Press and hold the CMBS OFF button. A beep sounds
and a message appears in the MID. The CMBS
indicator appears when the system is off.
Changing Settings
Change the alert distance. Use the steering wheel buttons to make and enter
selections in the MID (see page 30).
1. Select the Customize Settings display.
2. Select Change Settings.
3. Select Driver Assist System Setup.
4. Select Forward Collision Warning Distance. Select Long, Normal, or Short.
5. Exit the menu.
Important Safety Reminder
CMBS is designed to reduce the severity of an unavoidable collision. It does not
prevent collision nor stop the vehicle automatically. It is still your responsibility to
operate the brake pedal and steering wheel appropriately according to the driving
conditions.
Failure to visually confirm that it is safe to change lanes before doing so may
result in a crash and serious injury or death.
Do not rely only on LaneWatch while driving. Always look in your mirrors, to
either side of your vehicle, and behind you for other vehicles before changing
lanes.
WARNING
Changing Settings
Customize the display and how and when the display appears.
1. From the HOME screen, select Settings.
2. Select Camera.
3. Select LaneWatch.
4. Select an option and make the preferred changes.
5. Press the BACK button to exit the menu.
Important Safety Reminder
Like all assistance systems, LaneWatch has limitations. Over-reliance on the system
may result in a collision.
Page 58 of 80
108 || 109
DRIVING
DRIVING
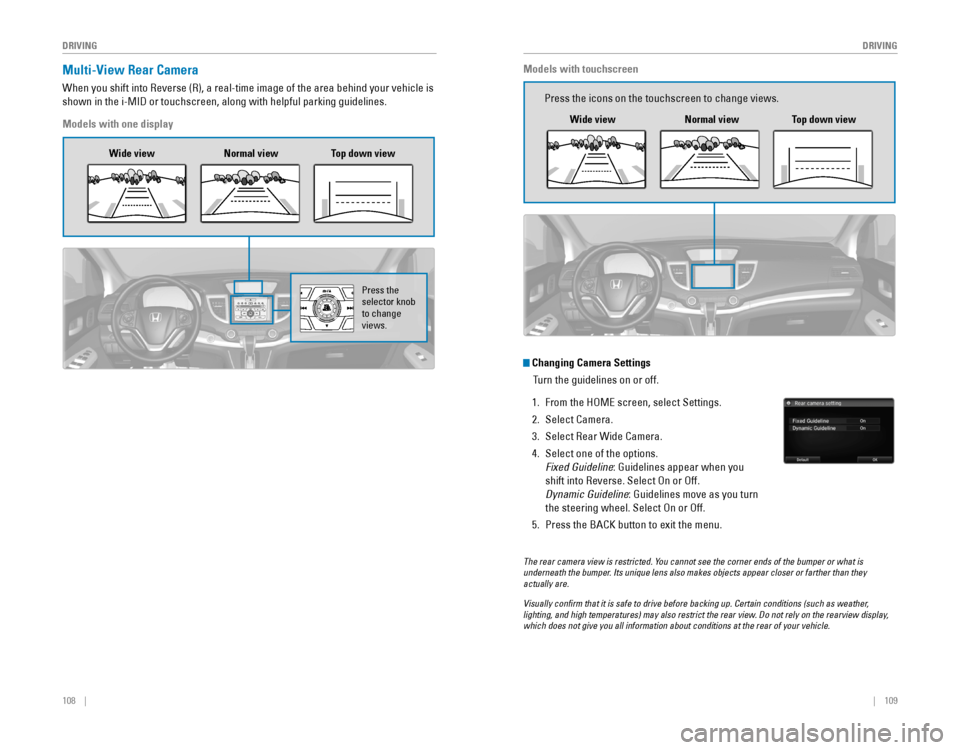
Multi-View Rear Camera
When you shift into Reverse (R), a real-time image of the area behind your vehicle is
shown in the i-MID or touchscreen, along with helpful parking guidelines.
Models with one display
Wide view Normal viewTop down view
Press the selector knob to change
views.
The rear camera view is restricted. You cannot see the corner ends of the bumper or what is underneath the bumper. Its unique lens also makes objects appear closer or farther than they actually are.
Visually confirm that it is safe to drive before backing up. Certain conditions (such as weather, lighting, and high temperatures) may also restrict the rear view. Do not rely on the rearview display, which does not give you all information about conditions at the rear of your vehicle.
Changing Camera Settings
Turn the guidelines on or off.
1. From the HOME screen, select Settings.
2. Select Camera.
3. Select Rear Wide Camera.
4. Select one of the options.
Fixed Guideline: Guidelines appear when you
shift into Reverse. Select On or Off.
Dynamic Guideline: Guidelines move as you turn
the steering wheel. Select On or Off.
5. Press the BACK button to exit the menu.
Models with touchscreen
Wide view Normal viewTop down view
Press the icons on the touchscreen to change views.
Page 61 of 80
114 || 115
HANDLING THE UNEXPECTED
HANDLING THE UNEXPECTED
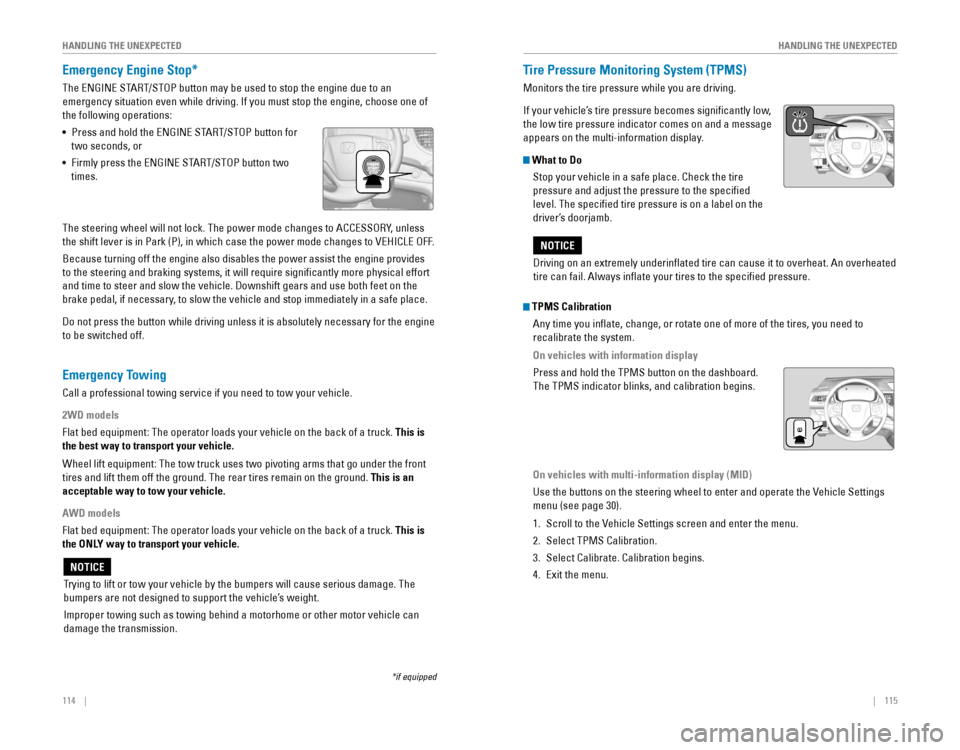
Emergency Engine Stop*
The ENGINE START/STOP button may be used to stop the engine due to an
emergency situation even while driving. If you must stop the engine, choose one of
the following operations:
•
Press and hold the ENGINE START/STOP button for
two seconds, or
•
Firmly press the ENGINE START/STOP button two
times.
The steering wheel will not lock. The power mode changes to ACCESSORY, unless
the shift lever is in Park (P), in which case the power mode changes to VEHICLE OFF.
Because turning off the engine also disables the power assist the engine provides
to the steering and braking systems, it will require significantly more physical effort
and time to steer and slow the vehicle. Downshift gears and use both feet on the
brake pedal, if necessary, to slow the vehicle and stop immediately in a safe place.
Do not press the button while driving unless it is absolutely necessary for the engine
to be switched off.
*if equipped
Trying to lift or tow your vehicle by the bumpers will cause serious damage. The
bumpers are not designed to support the vehicle’s weight.
Improper towing such as towing behind a motorhome or other motor vehicle can
damage the transmission.
NOTICE
Tire Pressure Monitoring System (TPMS)
Monitors the tire pressure while you are driving.
If your vehicle’s tire pressure becomes significantly low,
the low tire pressure indicator comes on and a message
appears on the multi-information display.
What to Do Stop your vehicle in a safe place. Check the tire
pressure and adjust the pressure to the specified
level. The specified tire pressure is on a label on the
driver’s doorjamb.
Emergency Towing
Call a professional towing service if you need to tow your vehicle.
2WD models
Flat bed equipment: The operator loads your vehicle on the back of a truck. This is
the best way to transport your vehicle.
Wheel lift equipment: The tow truck uses two pivoting arms that go under the front
tires and lift them off the ground. The rear tires remain on the ground.\
This is an
acceptable way to tow your vehicle.
AWD models
Flat bed equipment: The operator loads your vehicle on the back of a truck. This is
the ONLY way to transport your vehicle.
Driving on an extremely underinflated tire can cause it to overheat. An overheated
tire can fail. Always inflate your tires to the specified pressure.
NOTICE
TPMS Calibration
Any time you inflate, change, or rotate one of more of the tires, you \
need to
recalibrate the system.
On vehicles with information display
Press and hold the TPMS button on the dashboard.
The TPMS indicator blinks, and calibration begins.
On vehicles with multi-information display (MID)
Use the buttons on the steering wheel to enter and operate the Vehicle Settings
menu (see page 30).
1. Scroll to the Vehicle Settings screen and enter the menu.
2. Select TPMS Calibration.
3. Select Calibrate. Calibration begins.
4. Exit the menu.
Page 62 of 80
116 || 117
HANDLING THE UNEXPECTED
HANDLING THE UNEXPECTED
Tire Pressure Monitoring System (TPMS) — Required Federal Explanatio\
n
U.S. models only
Each tire, including the spare (if provided), should be checked monthly
when cold and inflated to the inflation pressure recommended by the
vehicle manufacturer on the vehicle placard or tire inflation pressure\
label.
(If your vehicle has tires of a different size than the size indicated on the
vehicle placard or tire inflation pressure label, you should determine the
proper tire inflation pressure for those tires.)
As an added safety feature, your vehicle has been equipped
with a tire pressure monitoring system (TPMS) that illuminates
a low tire pressure telltale when one or more of your tires is
significantly under-inflated.
Accordingly, when the low tire pressure telltale illuminates, you should
stop and check your tires as soon as possible, and inflate them to the
proper pressure.
Driving on a significantly under-inflated tire causes the tire to overheat
and can lead to tire failure. Under-inflation also reduces fuel efficiency
and tire tread life, and may affect the vehicle’s handling and stopping
ability.
Please note that the TPMS is not a substitute for proper tire maintenance,
and it is the driver’s responsibility to maintain correct tire pressure, even
if under-inflation has not reached the level to trigger illumination of the
TPMS low tire pressure telltale.
Your vehicle has also been equipped with a TPMS malfunction indicator
to indicate when the system is not operating properly. The TPMS
malfunction indicator is combined with the low tire pressure telltale.
When the system detects a malfunction, the telltale will flash for
approximately one minute and then remain continuously illuminated. This \
sequence will continue upon subsequent vehicle start-ups as long as the
malfunction exists.
When the malfunction indicator is illuminated, the system may not be able
to detect or signal low tire pressure as intended.
TPMS malfunctions may occur for a variety of reasons, including the
installation of replacement or alternate tires or wheels on the vehicle \
that
prevent the TPMS from functioning properly.
Always check the TPMS malfunction telltale after replacing one or
more tires or wheels on your vehicle to ensure that the replacement
or alternate tires and wheels allow the TPMS to continue to function
properly.
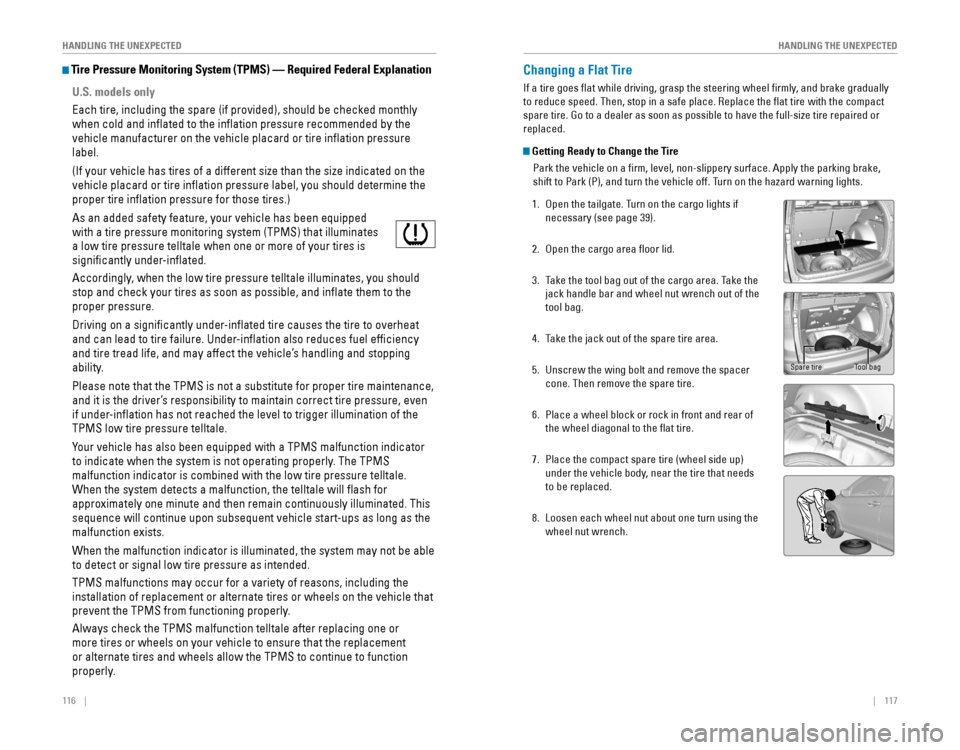
Changing a Flat Tire
If a tire goes flat while driving, grasp the steering wheel firmly, and brake gradually
to reduce speed. Then, stop in a safe place. Replace the flat tire wit\
h the compact
spare tire. Go to a dealer as soon as possible to have the full-size tire repaired or
replaced.
Getting Ready to Change the Tire
Park the vehicle on a firm, level, non-slippery surface. Apply the parking brake,
shift to Park (P), and turn the vehicle off. Turn on the hazard warning lights.
1. Open the tailgate. Turn on the cargo lights if
necessary (see page 39).
2. Open the cargo area floor lid.
3. Take the tool bag out of the cargo area. Take the
jack handle bar and wheel nut wrench out of the
tool bag.
4. Take the jack out of the spare tire area.
5. Unscrew the wing bolt and remove the spacer
cone. Then remove the spare tire.
6. Place a wheel block or rock in front and rear of
the wheel diagonal to the flat tire.
7. Place the compact spare tire (wheel side up)
under the vehicle body, near the tire that needs
to be replaced.
8. Loosen each wheel nut about one turn using the
wheel nut wrench.
Tool bagSpare tire
Page 63 of 80
118 || 119
HANDLING THE UNEXPECTED
HANDLING THE UNEXPECTED
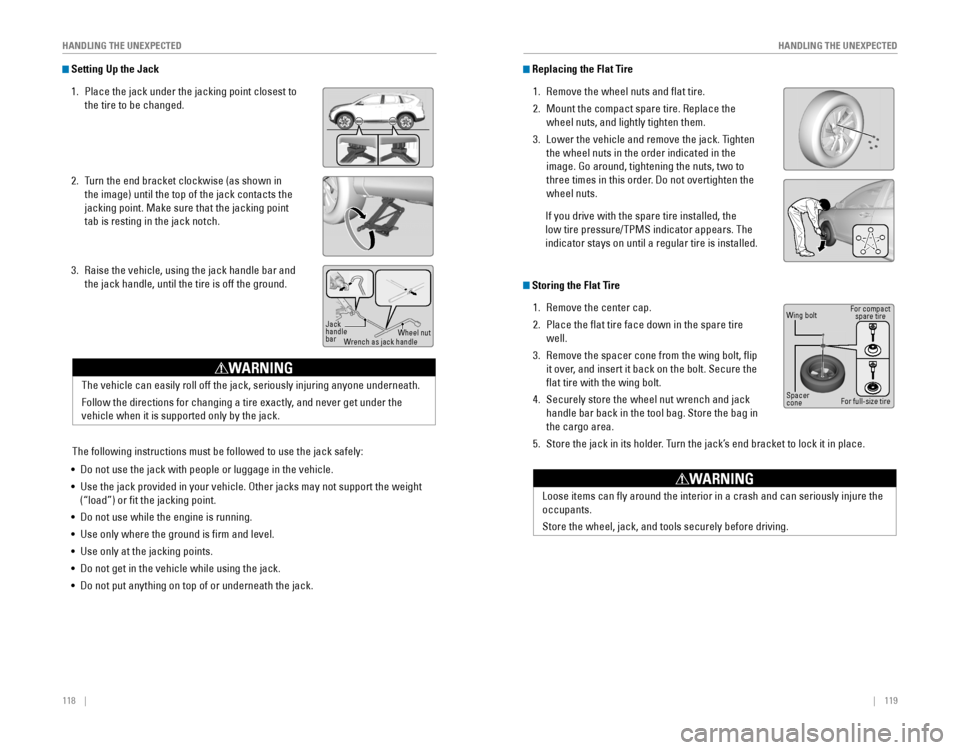
Setting Up the Jack
1. Place the jack under the jacking point closest to
the tire to be changed.
2. Turn the end bracket clockwise (as shown in
the image) until the top of the jack contacts the
jacking point. Make sure that the jacking point
tab is resting in the jack notch.
3. Raise the vehicle, using the jack handle bar and
the jack handle, until the tire is off the ground.
The vehicle can easily roll off the jack, seriously injuring anyone unde\
rneath.
Follow the directions for changing a tire exactly, and never get under the
vehicle when it is supported only by the jack.
WARNING
Jack
handle
bar Wheel nut
Wrench as jack handle
The following instructions must be followed to use the jack safely:
• Do not use the jack with people or luggage in the vehicle.
• Use the jack provided in your vehicle. Other jacks may not support the w\
eight
(“load”) or fit the jacking point.
•
Do not use while the engine is running.
• Use only where the ground is firm and level.
• Use only at the jacking points.
•
Do not get in the vehicle while using the jack.
• Do not put anything on top of or underneath the jack.
Replacing the Flat Tire
1. Remove the wheel nuts and flat tire.
2. Mount the compact spare tire. Replace the
wheel nuts, and lightly tighten them.
3. Lower the vehicle and remove the jack. Tighten
the wheel nuts in the order indicated in the
image. Go around, tightening the nuts, two to
three times in this order. Do not overtighten the
wheel nuts.
If you drive with the spare tire installed, the
low tire pressure/TPMS indicator appears. The
indicator stays on until a regular tire is installed.
Loose items can fly around the interior in a crash and can seriously i\
njure the
occupants.
Store the wheel, jack, and tools securely before driving.
WARNING
Storing the Flat Tire
1. Remove the center cap.
2. Place the flat tire face down in the spare tire
well.
3. Remove the spacer cone from the wing bolt, flip
it over, and insert it back on the bolt. Secure the
flat tire with the wing bolt.
4. Securely store the wheel nut wrench and jack
handle bar back in the tool bag. Store the bag in
the cargo area.
5. Store the jack in its holder. Turn the jack’s end bracket to lock it in place.
Wing bolt
Spacer
cone For compact
spare tireFor full-size tire
Page 66 of 80
124 || 125
MAINTENANCE
MAINTENANCE
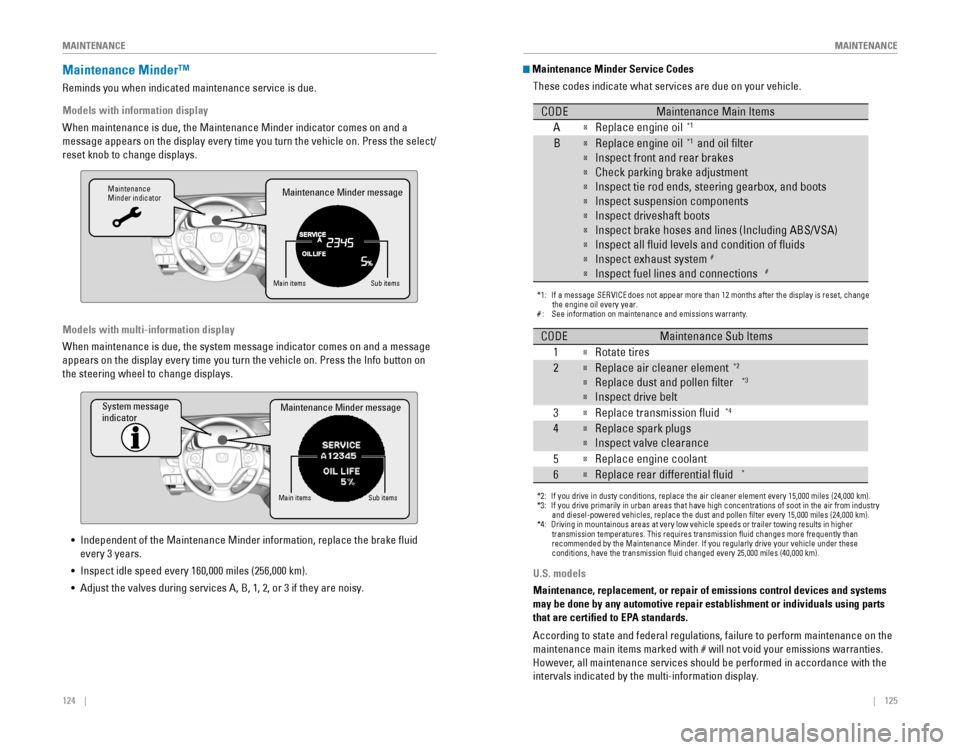
Maintenance Minder™
Reminds you when indicated maintenance service is due.
Models with information display
When maintenance is due, the Maintenance Minder indicator comes on and a\
message appears on the display every time you turn the vehicle on. Press the select/
reset knob to change displays.
Maintenance
Minder indicator
Main itemsSub items
Maintenance Minder message
Models with multi-information display
When maintenance is due, the system message indicator comes on and a mes\
sage
appears on the display every time you turn the vehicle on. Press the Info button on
the steering wheel to change displays.
System message
indicator
Main itemsSub items
Maintenance Minder message
• Independent of the Maintenance Minder information, replace the brake fluid
every 3 years.
•
Inspect idle speed every 160,000 miles (256,000 km).
• Adjust the valves during services A, B, 1, 2, or 3 if they are noisy.
U.S. models
Maintenance, replacement, or repair of emissions control devices and sys\
tems
may be done by any automotive repair establishment or individuals using \
parts
that are certified to EPA standards.
According to state and federal regulations, failure to perform maintenan\
ce on the
maintenance main items marked with # will not void your emissions warranties.
However, all maintenance services should be performed in accordance with the
intervals indicated by the multi-information display.
Maintenance Minder Service Codes
These codes indicate what services are due on your vehicle.
*1: If a message SERVICE does not appear more than 12 months after the display is reset, change \
the engine oil every year.
#: See information on maintenance and emissions warranty.
CODEMaintenance Main Items
A
�Replace engine oi l*1
B�Replace engine oil*1 and oil �lter
�Inspect front and rear brakes
�Check parking brake adjustment
�Inspect tie rod ends, steering gearbox, and boots
�Inspect suspension components
�Inspect driveshaft boots
�Inspect brake hoses and lines (Including ABS/VSA)
�Inspect all �uid levels and condition of �uids
�Inspect exhaust system#
�Inspect fuel lines and connections#
*2: If you drive in dusty conditions, replace the air cleaner element every \
15,000 miles (24,000 km).
*3: If you drive primarily in urban areas that have high concentrations of s\
oot in the air from industry and diesel-powered vehicles, replace the dust and pollen �lter every \
15,000 miles (24,000 km).
*4: Driving in mountainous areas at very low vehicle speeds or trailer towing results in higher
transmission temperatures. This requires transmission �uid changes mo\
re frequently than
recommended by the Maintenance Minder. If you regularly drive your vehic\
le under these
conditions, have the transmission �uid changed every 25,000 miles (4\
0,000 km).
CODEMaintenance Sub Items
1
�Rotate tires
2�Replace air cleaner element*2
�Replace dust and pollen �lter*3
�Inspect drive belt
3
�Replace transmission �uid*4
4�Replace spark plug s
�Inspect valve clearance
5
�Replace engine coolant
6�Replace rear differential �uid*
Page 68 of 80
128 || 129
MAINTENANCE
MAINTENANCE
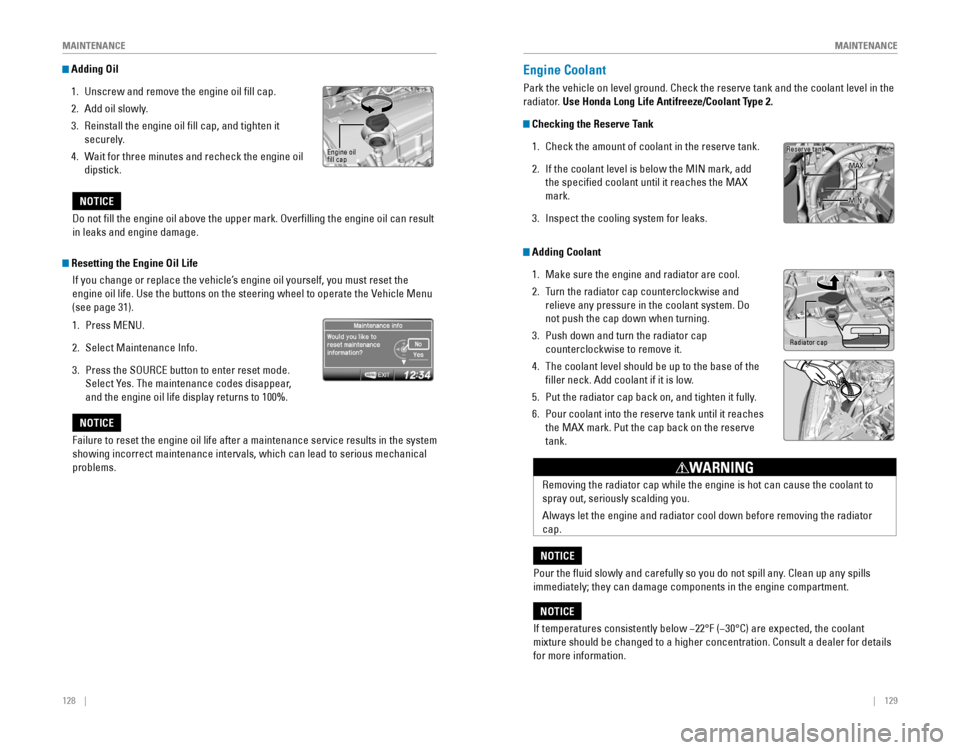
Adding Oil
1. Unscrew and remove the engine oil fill cap.
2. Add oil slowly.
3. Reinstall the engine oil fill cap, and tighten it
securely.
4. Wait for three minutes and recheck the engine oil
dipstick.Engine oil fill cap
Do not fill the engine oil above the upper mark. Overfilling the engine oil can result
in leaks and engine damage.
NOTICE
Failure to reset the engine oil life after a maintenance service results\
in the system
showing incorrect maintenance intervals, which can lead to serious mecha\
nical
problems.
NOTICE
Resetting the Engine Oil Life
If you change or replace the vehicle’s engine oil yourself, you must reset the
engine oil life. Use the buttons on the steering wheel to operate the Vehicle Menu
(see page 31).
1. Press MENU.
2. Select Maintenance Info.
3. Press the SOURCE button to enter reset mode.
Select Yes. The maintenance codes disappear,
and the engine oil life display returns to 100%.
Engine Coolant
Park the vehicle on level ground. Check the reserve tank and the coolant\
level in the
radiator. Use Honda Long Life Antifreeze/Coolant Type 2.
Checking the Reserve Tank
1. Check the amount of coolant in the reserve tank.
2. If the coolant level is below the MIN mark, add
the specified coolant until it reaches the MAX
mark.
3. Inspect the cooling system for leaks.
If temperatures consistently below −22°F (−30°C) are expected, the coolant
mixture should be changed to a higher concentration. Consult a dealer for details
for more information.
NOTICE
Reserve tank
MAX
MIN
Removing the radiator cap while the engine is hot can cause the coolant \
to
spray out, seriously scalding you.
Always let the engine and radiator cool down before removing the radiator
cap.
WARNING
Pour the fluid slowly and carefully so you do not spill any. Clean up any spills
immediately; they can damage components in the engine compartment.
NOTICE
Adding Coolant
1. Make sure the engine and radiator are cool.
2. Turn the radiator cap counterclockwise and
relieve any pressure in the coolant system. Do
not push the cap down when turning.
3. Push down and turn the radiator cap
counterclockwise to remove it.
4. The coolant level should be up to the base of the
filler neck. Add coolant if it is low.
5. Put the radiator cap back on, and tighten it fully.
6. Pour coolant into the reserve tank until it reaches
the MAX mark. Put the cap back on the reserve
tank.
Radiator cap