traction control HONDA CR-V 2016 RM1, RM3, RM4 / 4.G Quick Guide
[x] Cancel search | Manufacturer: HONDA, Model Year: 2016, Model line: CR-V, Model: HONDA CR-V 2016 RM1, RM3, RM4 / 4.GPages: 80, PDF Size: 7.99 MB
Page 41 of 80
74 || 75
Learn how to operate the vehicle’s hands-free calling system.
Basic HFL Operation
Make and receive phone calls using the vehicle’s audio system, without handling
your phone. Visit handsfreelink.com (U.S.) or handsfreelink.ca (Canada) to check
phone compatibility.
To reduce the potential for driver distraction, certain manual functions \
may be
inoperable or grayed out while the vehicle is moving. Stop or pull over \
to perform
the function.
Models with one display
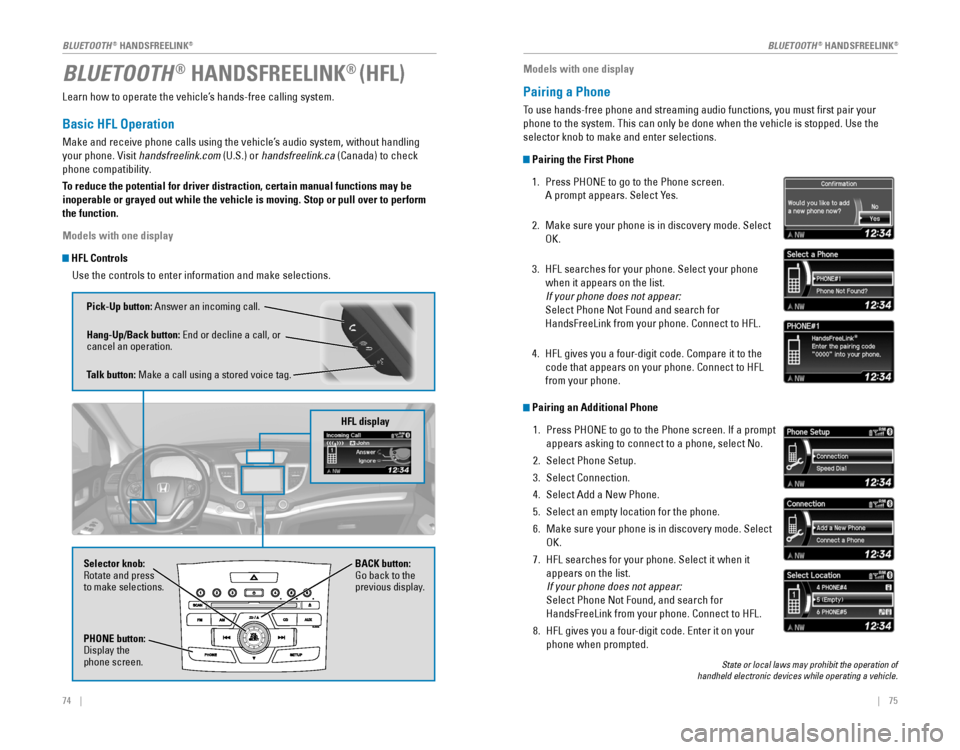
HFL ControlsUse the controls to enter information and make selections.
BLUETOOTH® HANDSFREELINK® (HFL)
Pick-Up button: Answer an incoming call.
Hang-Up/Back button:
End or decline a call, or cancel an operation.
Talk button: Make a call using a stored voice tag.
HFL display
Selector knob:
Rotate and press
to make selections. BACK button: Go back to the previous display.
PHONE button: Display the phone screen.
Models with one display
Pairing a Phone
To use hands-free phone and streaming audio functions, you must first p\
air your
phone to the system. This can only be done when the vehicle is stopped. Use the
selector knob to make and enter selections.
Pairing the First Phone
1. Press PHONE to go to the Phone screen.
A prompt appears. Select Yes.
2. Make sure your phone is in discovery mode. Select
OK.
3. HFL searches for your phone. Select your phone
when it appears on the list.
If your phone does not appear:
Select Phone Not Found and search for
HandsFreeLink from your phone. Connect to HFL.
4. HFL gives you a four-digit code. Compare it to the
code that appears on your phone. Connect to HFL
from your phone.
Pairing an Additional Phone
1. Press PHONE to go to the Phone screen. If a prompt
appears asking to connect to a phone, select No.
2. Select Phone Setup.
3. Select Connection.
4. Select Add a New Phone.
5. Select an empty location for the phone.
6. Make sure your phone is in discovery mode. Select
OK.
7. HFL searches for your phone. Select it when it
appears on the list.
If your phone does not appear:
Select Phone Not Found, and search for
HandsFreeLink from your phone. Connect to HFL.
8. HFL gives you a four-digit code. Enter it on your
phone when prompted.
State or local laws may prohibit the operation of handheld electronic devices while operating a vehicle.
BLUETOOTH® HANDSFREELINK®BLUETOOTH® HANDSFREELINK®
Page 43 of 80
78 || 79
Basic HFL Operation
Make and receive phone calls using the vehicle’s audio system, without handling
your phone. Visit handsfreelink.com (U.S.) or handsfreelink.ca (Canada) to check
phone compatibility.
To reduce the potential for driver distraction, certain manual functions \
may be
inoperable or grayed out while the vehicle is moving. Stop or pull over \
to perform
the function. Voice commands are also available.
Models with touchscreen
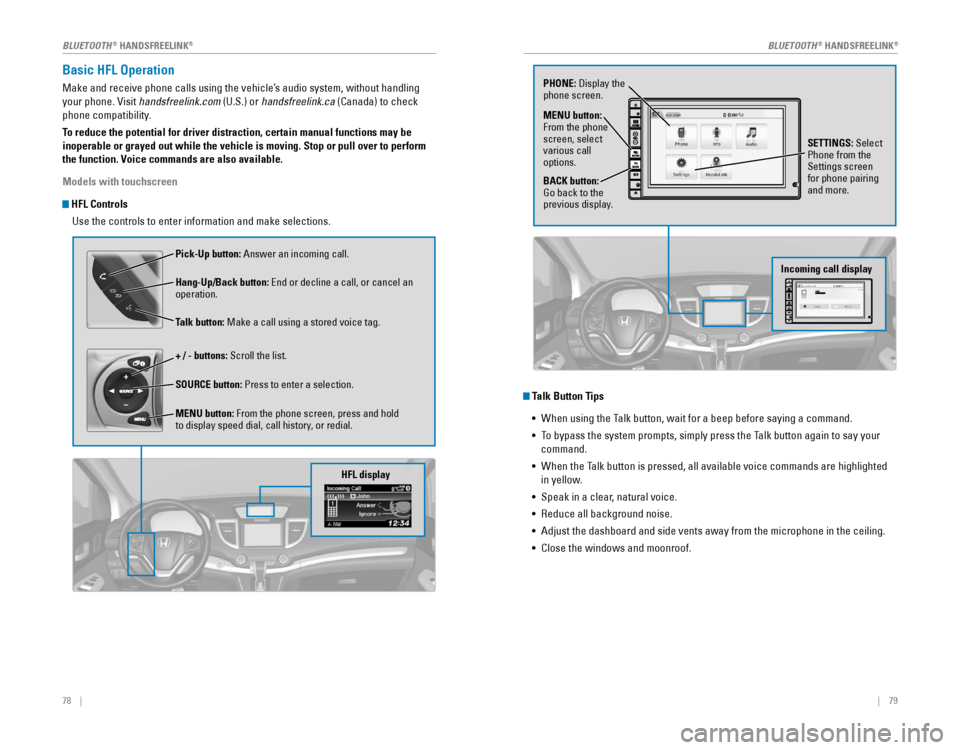
HFL Controls
Use the controls to enter information and make selections.
Pick-Up button: Answer an incoming call.
Hang-Up/Back button:
End or decline a call, or cancel an operation.
Talk button: Make a call using a stored voice tag.
+ / - buttons: Scroll the list.
SOURCE button: Press to enter a selection.
MENU button: From the phone screen, press and hold
to display speed dial, call history, or redial.
HFL display
Talk Button Tips
•
When using the Talk button, wait for a beep before saying a command.
• To bypass the system prompts, simply press the Talk button again to say your
command.
•
When the Talk button is pressed, all available voice commands are highlighted
in yellow.
• Speak in a clear, natural voice.
•
Reduce all background noise.
• Adjust the dashboard and side vents away from the microphone in the ceiling.
• Close the windows and moonroof.
PHONE: Display the phone screen.
MENU button:
From the phone
screen, select
various call
options.
BACK button:
Go back to the previous display. SETTINGS: Select
Phone from the
Settings screen
for phone pairing
and more.
Incoming call display
BLUETOOTH® HANDSFREELINK®BLUETOOTH® HANDSFREELINK®
Page 46 of 80
| 85
NAVIGATION84 |
Models with touchscreen
HondaLink™ Assist
Automatically connect and talk to an operator who can locate your vehicl\
e and send
emergency help in the event of a collision. Visit www.hondalink.com (U.S.) or honda.
ca/hondalinkassist (Canada) for more information.
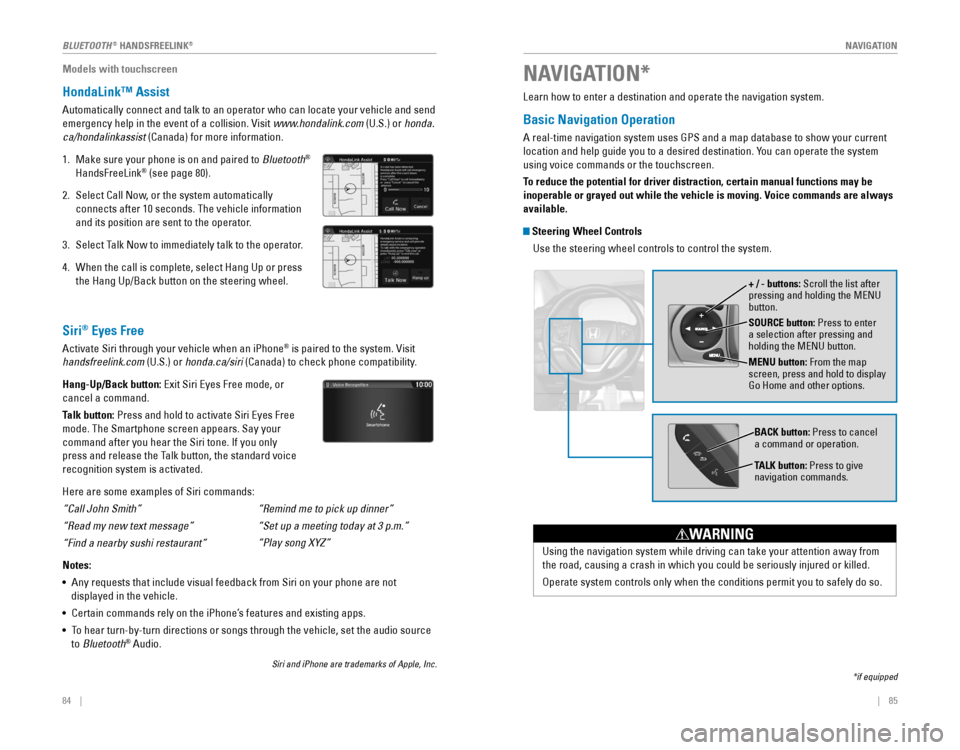
1. Make sure your phone is on and paired to Bluetooth®
HandsFreeLink® (see page 80).
2. Select Call Now, or the system automatically
connects after 10 seconds. The vehicle information
and its position are sent to the operator.
3. Select Talk Now to immediately talk to the operator.
4. When the call is complete, select Hang Up or press
the Hang Up/Back button on the steering wheel.
Learn how to enter a destination and operate the navigation system.
Basic Navigation Operation
A real-time navigation system uses GPS and a map database to show your current
location and help guide you to a desired destination. You can operate the system
using voice commands or the touchscreen.
To reduce the potential for driver distraction, certain manual functions \
may be
inoperable or grayed out while the vehicle is moving. Voice commands are always
available.
Steering Wheel Controls
Use the steering wheel controls to control the system.
NAVIGATION*
*if equipped
SOURCE button: Press to enter
a selection after pressing and
holding the MENU button.
MENU button: From the map
screen, press and hold to display
Go Home and other options. + / - buttons: Scroll the list after
pressing and holding the MENU button.
Using the navigation system while driving can take your attention away f\
rom
the road, causing a crash in which you could be seriously injured or killed.
Operate system controls only when the conditions permit you to safely do\
so.
WARNING
BACK button: Press to cancel
a command or operation.
TALK button: Press to give
navigation commands.
Siri® Eyes Free
Activate Siri through your vehicle when an iPhone® is paired to the system. Visit
handsfreelink.com (U.S.) or honda.ca/siri
(Canada) to check phone compatibility.
Hang-Up/Back button: Exit Siri Eyes Free mode, or
cancel a command.
Talk button:
Press and hold to activate Siri Eyes Free
mode. The Smartphone screen appears. Say your
command after you hear the Siri tone. If you only
press and release the Talk button, the standard voice
recognition system is activated.
Here are some examples of Siri commands:
“Call John Smith”
“Read my new text message”
“Find a nearby sushi restaurant”
Notes:
•
Any requests that include visual feedback from Siri on your phone are not
displayed in the vehicle.
• Certain commands rely on the iPhone’s features and existing apps.
•
To hear turn-by-turn directions or songs through the vehicle, set the audio source
to Bluetooth® Audio.
Siri and iPhone are trademarks of Apple, Inc.
“Remind me to pick up dinner”
“Set
up a meeting today at 3 p.m.”
“Play
song XYZ”
BLUETOOTH® HANDSFREELINK®
Page 52 of 80
96 || 97
DRIVING
DRIVING
Exceeding any load limit or improperly loading your vehicle and trailer can
cause a crash in which you can be seriously hurt or killed.
Check the loading of your vehicle and trailer carefully before starting to drive.
WARNING
Towing a Trailer
Your vehicle can tow a trailer if you carefully observe the load limits, use the proper
equipment, and follow the towing guidelines. See the Owner’s Manual on the Owner
Information CD or at owners.honda.com (U.S.) or www.myhonda.ca (Canada) for
more information.
Towing Load Limits
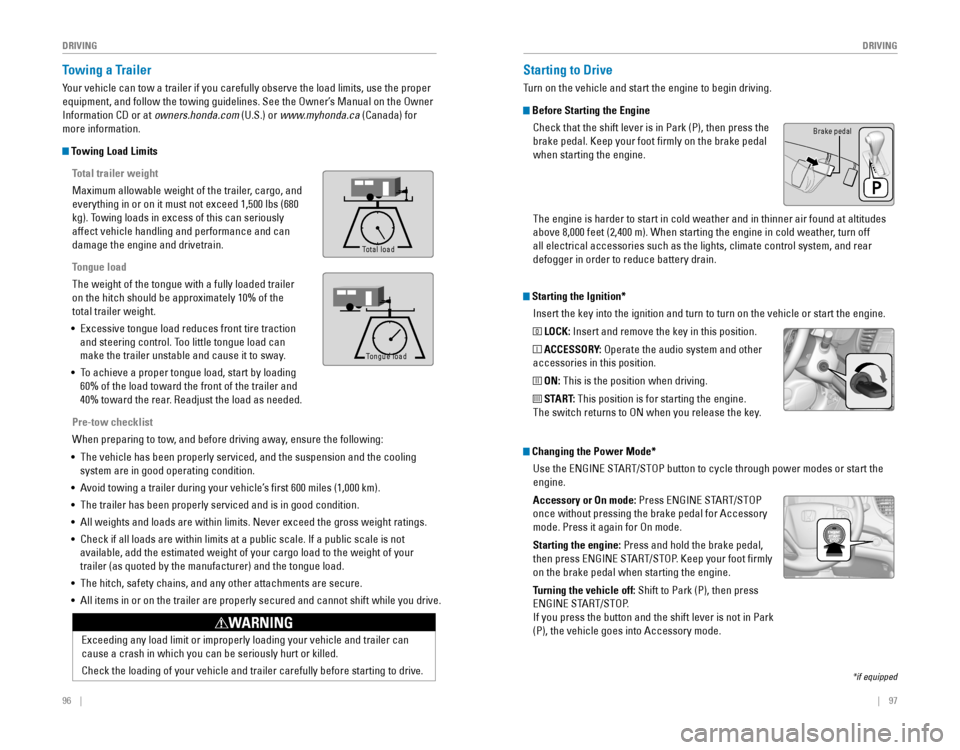
Total trailer weight
Maximum allowable weight of the trailer, cargo, and
everything in or on it must not exceed 1,500 lbs (680
kg). Towing loads in excess of this can seriously
affect vehicle handling and performance and can
damage the engine and drivetrain.
Tongue load
The weight of the tongue with a fully loaded trailer
on the hitch should be approximately 10% of the
total trailer weight.
•
Excessive tongue load reduces front tire traction
and steering control. Too little tongue load can
make the trailer unstable and cause it to sway.
• To achieve a proper tongue load, start by loading
60% of the load toward the front of the trailer and
40% toward the rear. Readjust the load as needed.
Pre-tow checklist
When preparing to tow, and before driving away, ensure the following:
• The vehicle has been properly serviced, and the suspension and the cooling
system are in good operating condition.
• Avoid towing a trailer during your vehicle’s first 600 miles (1,000 km).
•
The trailer has been properly serviced and is in good condition.
• All weights and loads are within limits. Never exceed the gross weight r\
atings.
•
Check if all loads are within limits at a public scale. If a public scale is not
available, add the estimated weight of your cargo load to the weight of your
trailer (as quoted by the manufacturer) and the tongue load.
• The hitch, safety chains, and any other attachments are secure.
• All items in or on the trailer are properly secured and cannot shift whi\
le you drive.
To ng ue Loa d
Tong ue Loa d
Total load
Tongue load
Starting the Ignition*
Insert the key into the ignition and turn to turn on the vehicle or start the engine.
0 LOCK: Insert and remove the key in this position.
I ACCESSORY: Operate the audio system and other
accessories in this position.
II ON: This is the position when driving.
III START: This position is for starting the engine.
The switch returns to ON when you release the key.
Starting to Drive
Turn on the vehicle and start the engine to begin driving.
Before Starting the Engine
Check that the shift lever is in Park (P), then press the
brake pedal. Keep your foot firmly on the brake pedal
when starting the engine.
Brake pedal
The engine is harder to start in cold weather and in thinner air found a\
t altitudes
above 8,000 feet (2,400 m). When starting the engine in cold weather, turn off
all electrical accessories such as the lights, climate control system, a\
nd rear
defogger in order to reduce battery drain.
*if equipped
Changing the Power Mode*Use the
ENGINE START/STOP button to cycle through power modes or start the
engine.
Accessory or On mode:
Press ENGINE START/STOP
once without pressing the brake pedal for Accessory
mode. Press it again for On mode.
Starting the engine:
Press and hold the brake pedal,
then press ENGINE START/STOP. Keep your foot firmly
on the brake pedal when starting the engine.
Turning the vehicle off: Shift to Park (P), then press
ENGINE START/STOP.
If you press the button and the shift lever is not in Park
(P), the vehicle goes into Accessory mode.
Page 54 of 80
100 || 101
DRIVING
DRIVING
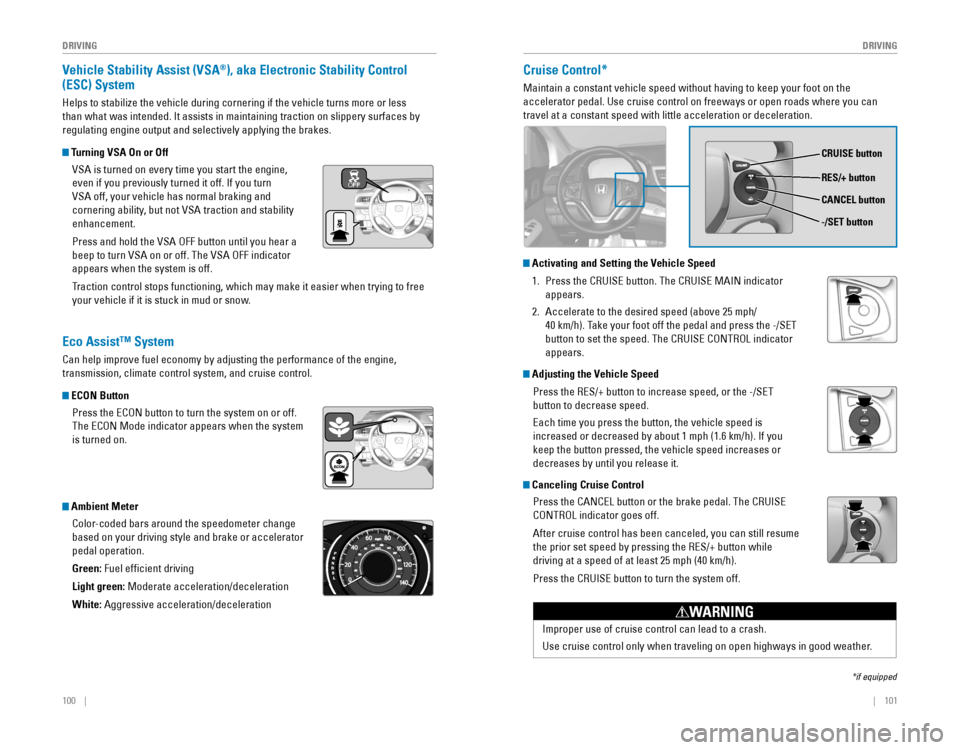
Vehicle Stability Assist (VSA®), aka Electronic Stability Control
(ESC) System
Helps to stabilize the vehicle during cornering if the vehicle turns more or less
than what was intended. It assists in maintaining traction on slippery surfaces by
regulating engine output and selectively applying the brakes.
Turning VSA On or Off
VSA is turned on every time you start the engine,
even if you previously turned it off. If you turn
VSA off, your vehicle has normal braking and
cornering ability, but not VSA traction and stability
enhancement.
Press and hold the VSA OFF button until you hear a
beep to turn VSA on or off. The VSA OFF indicator
appears when the system is off.
Traction control stops functioning, which may make it easier when trying to free
your vehicle if it is stuck in mud or snow.
Cruise Control*
Maintain a constant vehicle speed without having to keep your foot on th\
e
accelerator pedal. Use cruise control on freeways or open roads where yo\
u can
travel at a constant speed with little acceleration or deceleration.
*if equipped
Eco Assist™ System
Can help improve fuel economy by adjusting the performance of the engine,
transmission, climate control system, and cruise control.
ECON Button
Press the ECON button to turn the system on or off.
The ECON Mode indicator appears when the system
is turned on.
Ambient Meter
Color-coded bars around the speedometer change
based on your driving style and brake or accelerator
pedal operation.
Green: Fuel efficient driving
Light green:
Moderate acceleration/deceleration
White: Aggressive acceleration/deceleration
CRUISE button
RES/+ button
-/SET button CANCEL button
Improper use of cruise control can lead to a crash.
Use cruise control only when traveling on open highways in good weather.
WARNING
Activating and Setting the Vehicle Speed
1. Press the CRUISE button. The CRUISE MAIN indicator
appears.
2. Accelerate to the desired speed (above 25 mph/
40 km/h). Take your foot off the pedal and press the -/SET
button to set the speed. The CRUISE CONTROL indicator
appears.
Adjusting the Vehicle Speed
Press the RES/+ button to increase speed, or the -/SET
button to decrease speed.
Each time you press the button, the vehicle speed is
increased or decreased by about 1 mph (1.6 km/h). If you
keep the button pressed, the vehicle speed increases or
decreases by until you release it.
Canceling Cruise Control
Press the CANCEL button or the brake pedal. The CRUISE
CONTROL indicator goes off.
After cruise control has been canceled, you can still resume
the prior set speed by pressing the RES/+ button while
driving at a speed of at least 25 mph (40 km/h).
Press the CRUISE button to turn the system off.
Page 72 of 80
136 || 137
MAINTENANCE
MAINTENANCE
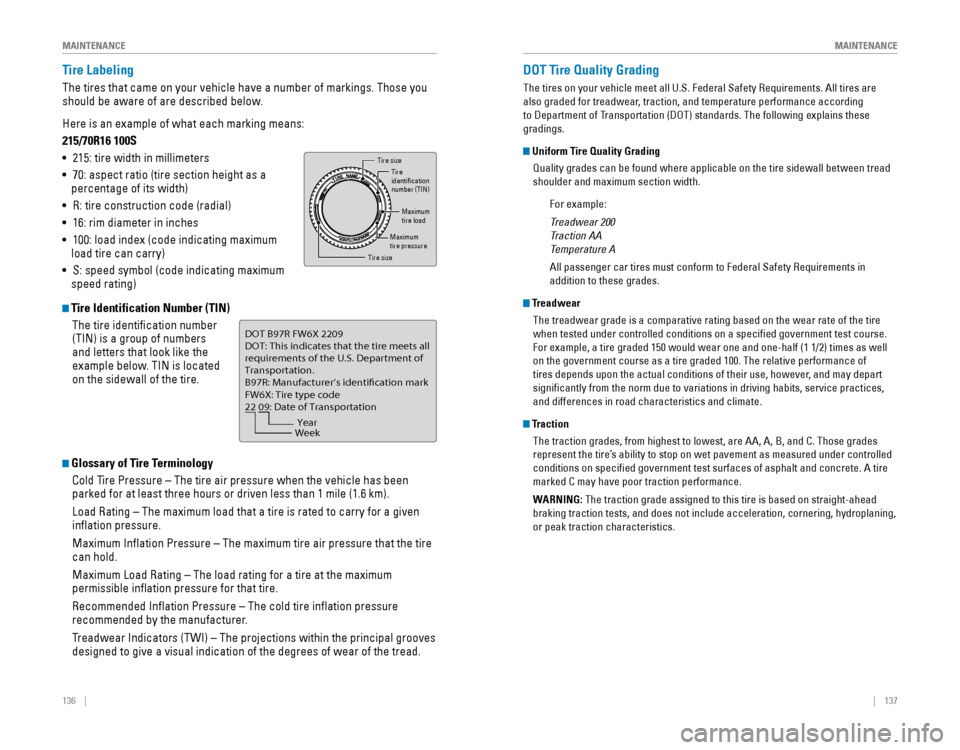
Tire Labeling
The tires that came on your vehicle have a number of markings. Those you
should be aware of are described below.
Here is an example of what each marking means:
215/70R16 100S
• 215: tire width in millimeters
•
70: aspect ratio (tire section height as a
percentage of its width)
• R: tire construction code (radial)
• 16: rim diameter in inches
• 100: load index (code indicating maximum
load tire can carry)
•
S: speed symbol (code indicating maximum
speed rating)
Tire Identification Number (TIN)
The tire identification number
(TIN) is a group of numbers
and letters that look like the
example below. TIN is located
on the sidewall of the tire.
Glossary of Tire Terminology
Cold Tire Pressure – The tire air pressure when the vehicle has been
parked for at least three hours or driven less than 1 mile (1.6 km).
Load Rating – The maximum load that a tire is rated to carry for a gi\
ven
inflation pressure.
Maximum Inflation Pressure – The maximum tire air pressure that the tire
can hold.
Maximum Load Rating – The load rating for a tire at the maximum
permissible inflation pressure for that tire.
Recommended Inflation Pressure – The cold tire inflation pressure
recommended by the manufacturer.
Treadwear Indicators (TWI) – The projections within the principal grooves
designed to give a visual indication of the degrees of wear of the tread\
.
Tire size
Tire
identi�cation
number (TIN)
Maximum
tire load
Maximum
tire pressure
Tire size
DOT B97R FW6X 2209\n
DOT: This in\ficat\bs t\nhat th\b tir\b m\b\bts all
r\bquir\bm\bnts of th\b U.S\n. D\bpartm\bnt of
Transportation.
B97R: Manufactur\br’s \ni\f\bntifcation mark
FW6X: Tir\b typ\b co\f\b
22 09: Dat\b of Transp\nortation
Year
Week
DOT Tire Quality Grading
The tires on your vehicle meet all U.S. Federal Safety Requirements. All tires are
also graded for treadwear, traction, and temperature performance according
to Department of Transportation (DOT) standards. The following explains these
gradings.
Uniform Tire Quality Grading
Quality grades can be found where applicable on the tire sidewall between tread
shoulder and maximum section width.
For example:
Treadwear 200
Traction AA
Temperature A
All passenger car tires must conform to Federal Safety Requirements in
addition to these grades.
Treadwear
The treadwear grade is a comparative rating based on the wear rate of the tire
when tested under controlled conditions on a specified government test\
course.
For example, a tire graded 150 would wear one and one-half (1 1/2) times as well
on the government course as a tire graded 100. The relative performance \
of
tires depends upon the actual conditions of their use, however, and may depart
significantly from the norm due to variations in driving habits, service practices,
and differences in road characteristics and climate.
TractionThe traction grades, from highest to lowest, are AA, A, B, and C. Those \
grades
represent the tire’s ability to stop on wet pavement as measured under controlled
conditions on specified government test surfaces of asphalt and concre\
te. A tire
marked C may have poor traction performance.
WARNING:
The traction grade assigned to this tire is based on straight-ahead
braking traction tests, and does not include acceleration, cornering, hydroplaning,
or peak traction characteristics.
Page 75 of 80
142 || 143
CUSTOMER INFORMATION
CUSTOMER INFORMATION
Contact Us
Honda dealer personnel are trained professionals. They should be able to answer
all your questions. If you encounter a problem that your dealership does not solve
to your satisfaction, please discuss it with the dealership’s service manager or
general manager. If you are dissatisfied with the decision made by the dealership’s
management, contact Honda Automobile Customer Service.
U.S. owners
American Honda Motor Co., Inc.
Honda Automobile Customer Service
1919 Torrance Blvd.
Mail Stop 500-2N-7A
Torrance, CA 90501-2746
Tel: (800) 999-1009
In Puerto Rico and
the U.S. Virgin Islands
Bella International
P.O. Box 190816
San Juan, PR 00919-0816
Tel: (787) 620-7546
When you call or write, please give us the following information:
•
Vehicle Identification Number
• Date of purchase
• Odometer reading of your vehicle
•
Your name, address, and telephone number
• A detailed description of the problem
• Name of the dealer who sold the vehicle to you Canadian owners
Honda Canada, Inc.
Customer Relations
180 Honda Blvd.
Markham, ON
L6C 0H9
Tel: (888) 946-6329
Fax: (877) 939-0909
e-mail: [email protected]
Q:
Why can’t I select an item using the selector knob or touchscreen*?
A: To prevent driver distraction, certain items are limited or inoperable while the
vehicle is moving. Use voice commands or pull over to select the items.
Q: Where can I find the vehicle identification number (VIN)?
A: Check the label on the driver’s doorjamb.
*if equipped
Honda Roadside Assistance
24-hour emergency road service is available to you in the United States and Canada
throughout your 3-year/36,000-mile warranty term. Services include jump starting,
flat tire and lockout assistance, towing, and more (limitations apply\
).
Call (866) 864-5211 (U.S.) or (800) 465-7587 (Canada).
Warranty Coverages
Below is a brief summary of the warranties covering your new vehicle.
New Vehicle Limited Warranty: Covers your new vehicle, except for the emissions
control system and accessories, against defects in materials and workman\
ship.
Emissions Control Systems Defects Warranty and Emissions Performance
Warranty: Covers your vehicle’s emissions control systems. Time, mileage, and
coverage are conditional.
Seat Belt Limited Warranty:
Covers seat belts that fail to function properly.
Rust Perforation Limited Warranty: Covers all exterior body panels that rust through
from the inside.
Accessory Limited Warranty: Covers Honda accessories.
Replacement Parts Limited Warranty: Covers all Honda replacement parts against
defects in materials and workmanship.
Replacement Battery Limited Warranty: Provides prorated coverage for a
replacement battery purchased from a Honda dealer.
Replacement Muffler Lifetime Limited Warranty: Covers a replacement muffler for
the duration of the ownership.
Restrictions and exclusions apply to all these warranties. See the Warranty Manual
on the Owner Information CD or at owners.honda.com (U.S.) or myhonda.ca
(Canada) for complete descriptions of each warranty, including time, mileage, and
other conditional limitations.
Your vehicle’s original tires are covered by their manufacturer. Tire warranty
information can be found on the Owner Information CD or at owners.honda.com
(U.S.) or myhonda.ca (Canada).