key HONDA CR-V 2020 (in English) Service Manual
[x] Cancel search | Manufacturer: HONDA, Model Year: 2020, Model line: CR-V, Model: HONDA CR-V 2020Pages: 671, PDF Size: 33.11 MB
Page 454 of 671
452
Driving
Before Driving
Driving Preparation
Check the following items before you start driving.
• Make sure there are no obstructions on the windows, door mirrors, exterior
lights, or other parts of the vehicle.
u Remove any frost, snow, or ice.
u Remove any snow on the roof, as this can slip down and obstruct your field of
vision while driving. If frozen solid , remove ice once it has softened.
u When removing ice from around the wheels, be sure not to damage the wheel
or wheel components.
• Make sure the hood is securely closed.
u If the hood opens while driving, your front view will be blocked.
• Make sure the tires are in good condition.
u Check air pressures, and check for damage and excessive wear.
2Checking and Maintaining Tires P. 590
•Make sure there are no people or ob jects behind or around the vehicle.
u There are blind spots from the inside.
■Exterior Checks1Exterior Checks
NOTICE
When doors are frozen s hut, use warm water around
the door edges to melt any ice. Do not try to force
them open, as this can damage the rubber trim
around the doors. When done, wipe dry to avoid
further freezing.
Do not pour warm water into the key cylinder.
You will be unable to insert the key if the water
freezes in the hole.
Heat from the engine and exhaust can ignite
flammable material s left under the hood, causing a
fire. If you've parked y our vehicle for an extended
period, inspect and remove any debris that may have
collected, such as dried grass and leaves that have
fallen or have been carried in for use as a nest by a
small animal. Also check under the hood for leftover
flammable materials after you or someone else has
performed maintenance on your vehicle.
20 CR-V PET ELP_MAP_HMIN_HCM_J-31TLA6310.book 452 ページ 2019年10月3日 木曜日 午後4時55分
Page 467 of 671
465Continued
Driving
When Driving
Starting the Engine
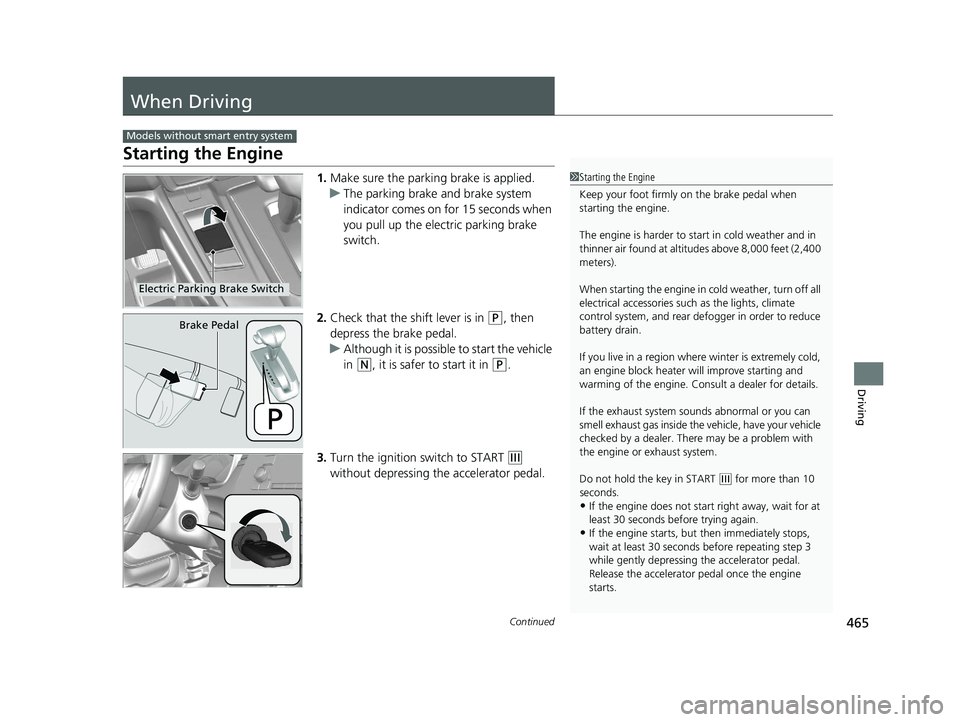
1.Make sure the parkin g brake is applied.
u The parking brake and brake system
indicator comes on for 15 seconds when
you pull up the electric parking brake
switch.
2. Check that the shift lever is in
(P, then
depress the brake pedal.
u Although it is possible to start the vehicle
in
(N, it is safer to start it in (P.
3. Turn the ignition switch to START
(e
without depressing the accelerator pedal.
Models without smart entry system
1 Starting the Engine
Keep your foot firmly on the brake pedal when
starting the engine.
The engine is harder to st art in cold weather and in
thinner air found at altit udes above 8,000 feet (2,400
meters).
When starting the engine in cold weather, turn off all
electrical accessories such as the lights, climate
control system, and rear de fogger in order to reduce
battery drain.
If you live in a region where winter is extremely cold,
an engine block heater will improve starting and
warming of the engine. Cons ult a dealer for details.
If the exhaust system sounds abnormal or you can
smell exhaust gas inside the vehicle, have your vehicle
checked by a dealer. There may be a problem with
the engine or exhaust system.
Do not hold the key in START
( e for more than 10
seconds.
•If the engine does not start right away, wait for at
least 30 seconds before trying again.
•If the engine starts, but then immediately stops,
wait at least 30 seconds before repeating step 3
while gently depressing the accelerator pedal.
Release the accelerator pedal once the engine
starts.
Electric Parking Brake Switch
Brake Pedal
20 CR-V PET ELP_MAP_HMIN_HCM_J-31TLA6310.book 465 ページ 2019年10月3日 木曜日 午後4時55分
Page 468 of 671
uuWhen Driving uStarting the Engine
466
Driving
1. Keeping your right foot on the br ake pedal, put the shift lever in (D. Select (R
when reversing.
2. With the parking brake applied, release the brake pedal and gently depress the
accelerator pedal.
u Make sure the parking brake and brake system indicator goes off.
2 Parking Brake P. 528
■Hill start assist system
Hill start assist keeps the brake engaged br iefly to help prevent the vehicle from
rolling on inclines as you move your fo ot from the brake pedal to the accelerator.
Move the shift lever to
(D, (S, or (L when facing uphill, or (R when facing
downhill, then release the brake pedal.
■Starting to Drive1 Starting the Engine
The immobilizer system pr otects your vehicle from
theft. If an improperly code d key (or other device) is
used, the engine's fuel system is disabled.
2 Immobilizer System P. 160
You can also release the parking brake by pressing
the electric parking brake sw itch while depressing the
brake pedal. When facing downhill, you can start
your vehicle more smoothly by manually releasing it
with the electric parki ng brake switch than by
releasing it with th e accelerator pedal.
1Hill start assist system
Hill start assist may not prevent the vehicle from
rolling downhill on a very st eep or slippery slope, and
does not operate on small inclines.
Hill start assist is not a replacement for the parking
brake.
Hill start assist will operate even when VSA ® is
switched off.
20 CR-V PET ELP_MAP_HMIN_HCM_J-31TLA6310.book 466 ページ 2019年10月3日 木曜日 午後4時55分
Page 472 of 671
uuWhen Driving uStarting the Engine
470
Driving
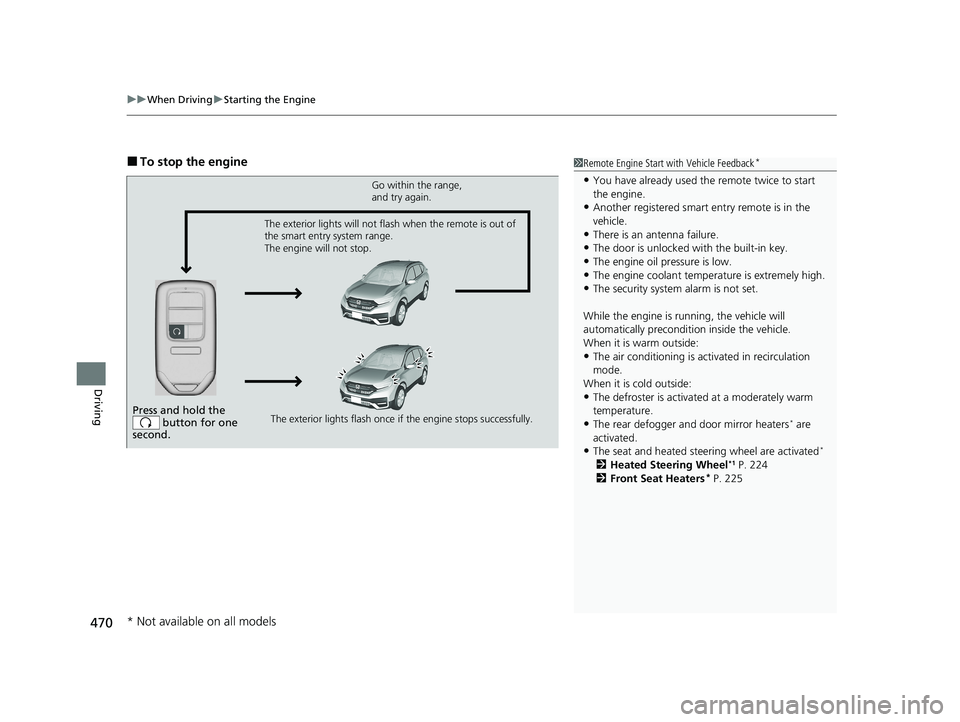
■To stop the engine1Remote Engine Start with Vehicle Feedback*
•You have already used the remote twice to start
the engine.
•Another registered smart entry remote is in the
vehicle.
•There is an antenna failure.
•The door is unlocked with the built-in key.
•The engine oil pressure is low.•The engine coolant temper ature is extremely high.
•The security system alarm is not set.
While the engine is running, the vehicle will
automatically preconditi on inside the vehicle.
When it is warm outside:
•The air conditioning is acti vated in recirculation
mode.
When it is cold outside:
•The defroster is activated at a moderately warm
temperature.
•The rear defogger and door mirror heaters* are
activated.
•The seat and heated steering wheel are activated*
2 Heated Steering Wheel*1 P. 224
2 Front Seat Heaters* P. 225
Press and hold the
button for one
second.
Go within the range,
and try again.
The exterior lights flash once if the engine stops successfully.
The exterior lights will not flash when the remote is out of
the smart entry system range.
The engine will not stop.
* Not available on all models
20 CR-V PET ELP_MAP_HMIN_HCM_J-31TLA6310.book 470 ページ 2019年10月3日 木曜日 午後4時55分
Page 476 of 671
474
uuWhen Driving uShifting
Driving
Shifting
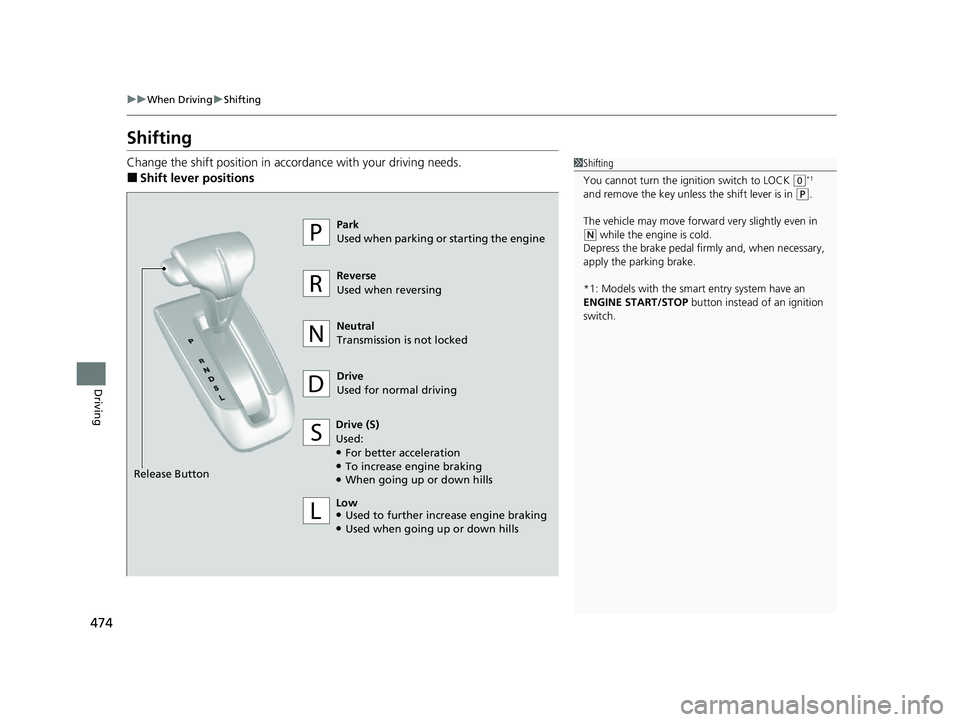
Change the shift positi on in accordance with your driving needs.
■Shift lever positions
1Shifting
You cannot turn the ignition switch to LOCK
(0*1
and remove the key unless the shift lever is in ( P.
The vehicle may move forward very slightly even in
(N while the engine is cold.
Depress the brake pe dal firmly and, when necessary,
apply the parking brake.
*1: Models with the smart entry system have an
ENGINE START/STOP button instead of an ignition
switch.
Drive
Used for normal driving
Park
Used when parking or starting the engine
Reverse
Used when reversing
Neutral
Transmission is not locked
Drive (S)
Used:
●For better acceleration●To increase engine braking●When going up or down hills
Release Button
Low
●Used to further increase engine braking●Used when going up or down hills
20 CR-V PET ELP_MAP_HMIN_HCM_J-31TLA6310.book 474 ページ 2019年10月3日 木曜日 午後4時55分
Page 565 of 671
563
Maintenance
Maintenance MinderTM
Select the Maintenance Minder to see maintenance items that are due soon and to
see the percentage of life remaining in the engine oil.
When the engine oil life is less than 15%, a Maintenance Minder message will
appear every time you turn the ignition switch to ON
(w*1, reminding you to bring
your vehicle to a dealer for service.
*1: Models with the keyles s access system have an ENGINE START/STOP button instead of an
ignition switch.
20 CR-V PET ELP_MAP_HMIN_HCM_J-31TLA6310.book 563 ページ 2019年10月3日 木曜日 午後4時55分
Page 566 of 671
564
uuMaintenance MinderTMuTo Use Maintenance MinderTM
Maintenance
To Use Maintenance MinderTM
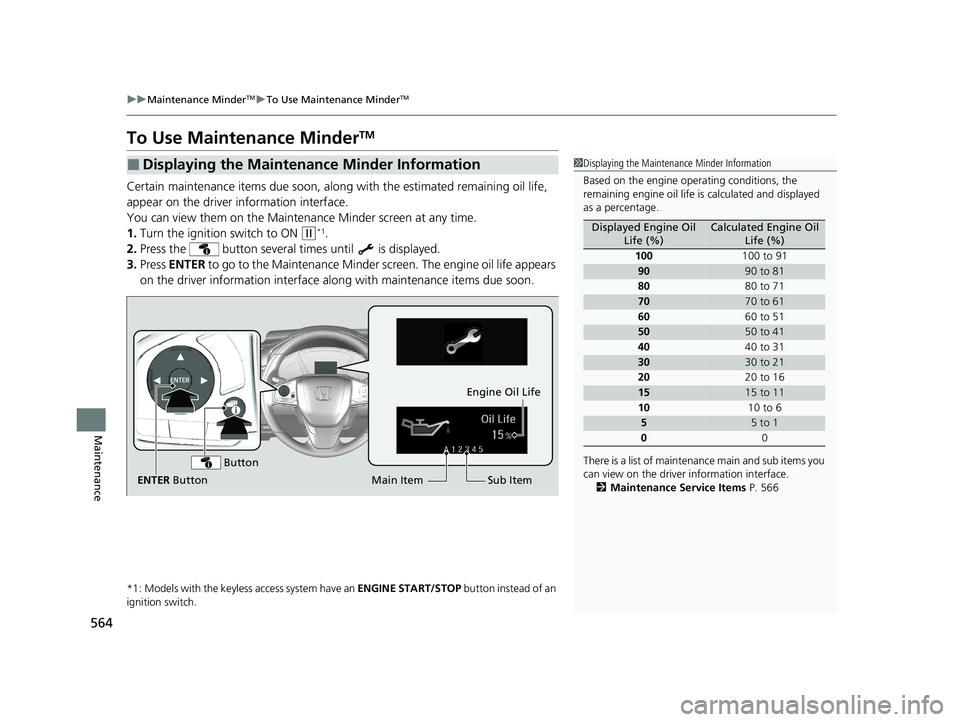
Certain maintenance items due soon, along with the estimated remaining oil life,
appear on the driver information interface.
You can view them on the Maintenance Minder screen at any time.
1. Turn the ignition switch to ON
(w*1.
2. Press the button several times until is displayed.
3. Press ENTER to go to the Maintenance Minder sc reen. The engine oil life appears
on the driver information interface al ong with maintenance items due soon.
*1: Models with the keyless access system have an ENGINE START/STOP button instead of an
ignition switch.
■Displaying the Maintenance Minder Information1 Displaying the Maintena nce Minder Information
Based on the engine ope rating conditions, the
remaining engine oi l life is calculated and displayed
as a percentage.
There is a list of maintena nce main and sub items you
can view on the driver information interface.
2 Maintenance Service Items P. 566
Displayed Engine Oil
Life (%)Calculated Engine Oil Life (%)
100 100 to 91
9090 to 81
80 80 to 71
7070 to 61
60 60 to 51
5050 to 41
40 40 to 31
3030 to 21
20 20 to 16
1515 to 11
10 10 to 6
55 to 1
0 0
Sub Item
Engine Oil Life
Main Item
ENTER Button
Button
20 CR-V PET ELP_MAP_HMIN_HCM_J-31TLA6310.book 564 ページ 2019年10月3日 木曜日 午後4時55分
Page 570 of 671
uuMaintenance MinderTMuTo Use Maintenance MinderTM
568
Maintenance
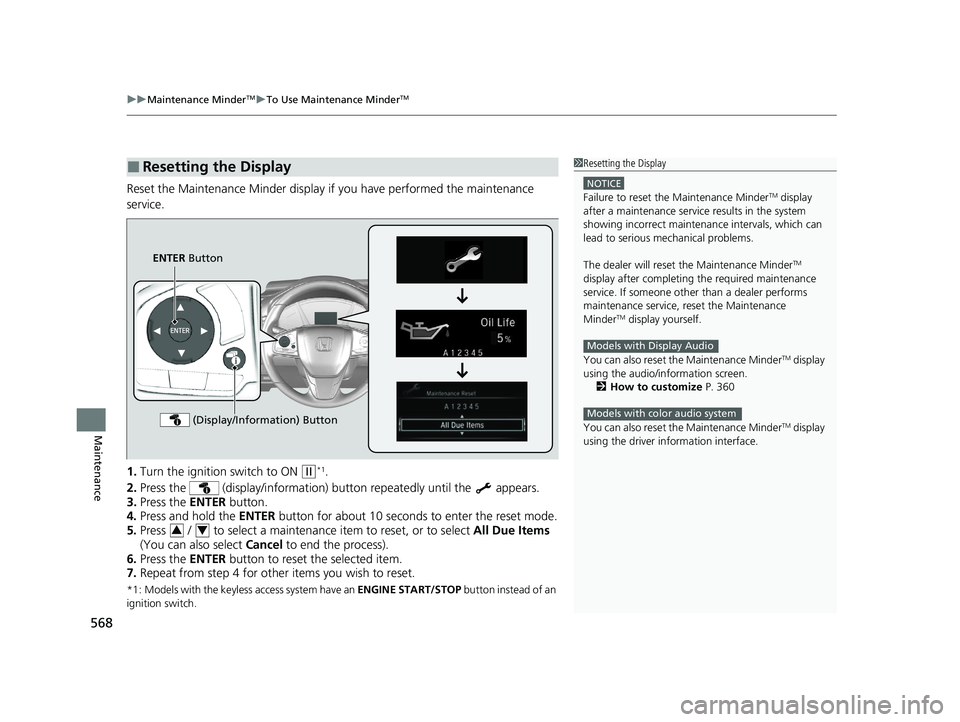
Reset the Maintenance Minder display if you have performed the maintenance
service.
1. Turn the ignition switch to ON
(w*1.
2. Press the (display/information) bu tton repeatedly until the appears.
3. Press the ENTER button.
4. Press and hold the ENTER button for about 10 seconds to enter the reset mode.
5. Press / to select a maintenance item to reset, or to select All Due Items
(You can also select Cancel to end the process).
6. Press the ENTER button to reset the selected item.
7. Repeat from step 4 for other items you wish to reset.
*1: Models with the keyless access system have an ENGINE START/STOP button instead of an
ignition switch.
■Resetting the Display1 Resetting the Display
NOTICE
Failure to reset the Maintenance MinderTM display
after a maintenance servic e results in the system
showing incorrect maintenance intervals, which can
lead to serious mechanical problems.
The dealer will reset the Maintenance Minder
TM
display after completing th e required maintenance
service. If someone other than a dealer performs
maintenance service, reset the Maintenance
Minder
TM display yourself.
You can also reset the Maintenance Minder
TM display
using the audio/information screen.
2 How to customize P. 360
You can also reset the Maintenance Minder
TM display
using the driver information interface.
Models with Display Audio
Models with color audio system
ENTER Button
(Display/Information) Button
34
20 CR-V PET ELP_MAP_HMIN_HCM_J-31TLA6310.book 568 ページ 2019年10月3日 木曜日 午後4時55分
Page 603 of 671
601Continued
Maintenance
Remote Transmitter Care
Replacing the Button Battery
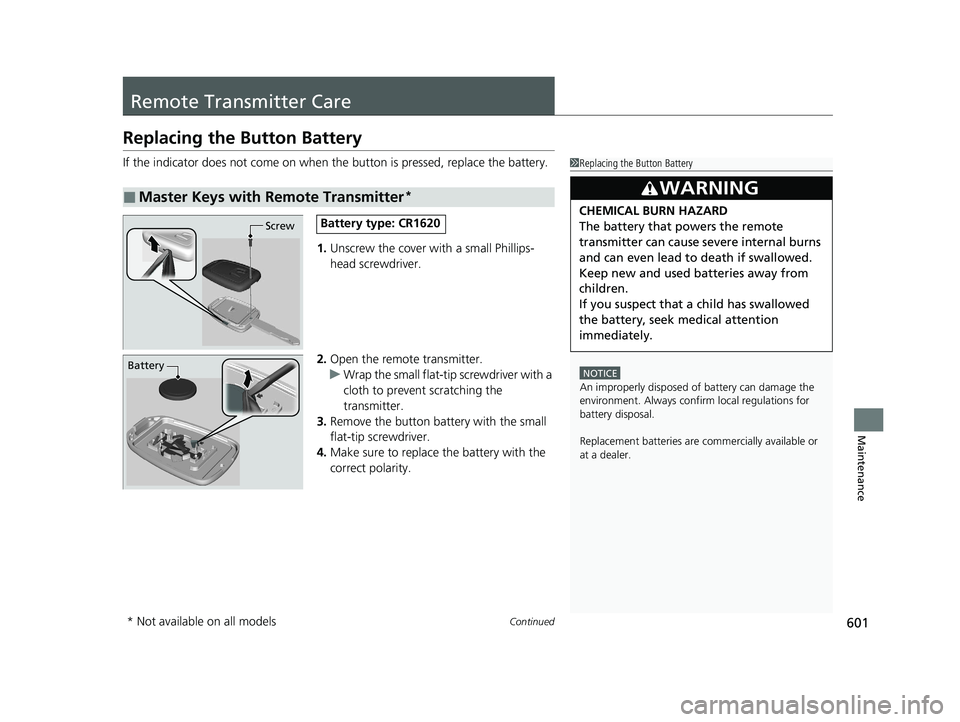
If the indicator does not come on when the button is pressed, replace the battery.
1. Unscrew the cover with a small Phillips-
head screwdriver.
2. Open the remote transmitter.
u Wrap the small flat-tip screwdriver with a
cloth to prevent scratching the
transmitter.
3. Remove the button battery with the small
flat-tip screwdriver.
4. Make sure to replace the battery with the
correct polarity.
■Master Keys with Remote Transmitter*
1Replacing the Button Battery
NOTICE
An improperly disposed of battery can damage the
environment. Always conf irm local regulations for
battery disposal.
Replacement batteries are commercially available or
at a dealer.
3WARNING
CHEMICAL BURN HAZARD
The battery that powers the remote
transmitter can cause severe internal burns
and can even lead to death if swallowed.
Keep new and used batteries away from
children.
If you suspect that a child has swallowed
the battery, seek medical attention
immediately.
ScrewBattery type: CR1620
Battery
* Not available on all models
20 CR-V PET ELP_MAP_HMIN_HCM_J-31TLA6310.book 601 ページ 2019年10月3日 木曜日 午後4時55分
Page 604 of 671
602
uuRemote Transmitter Care uReplacing the Button Battery
Maintenance
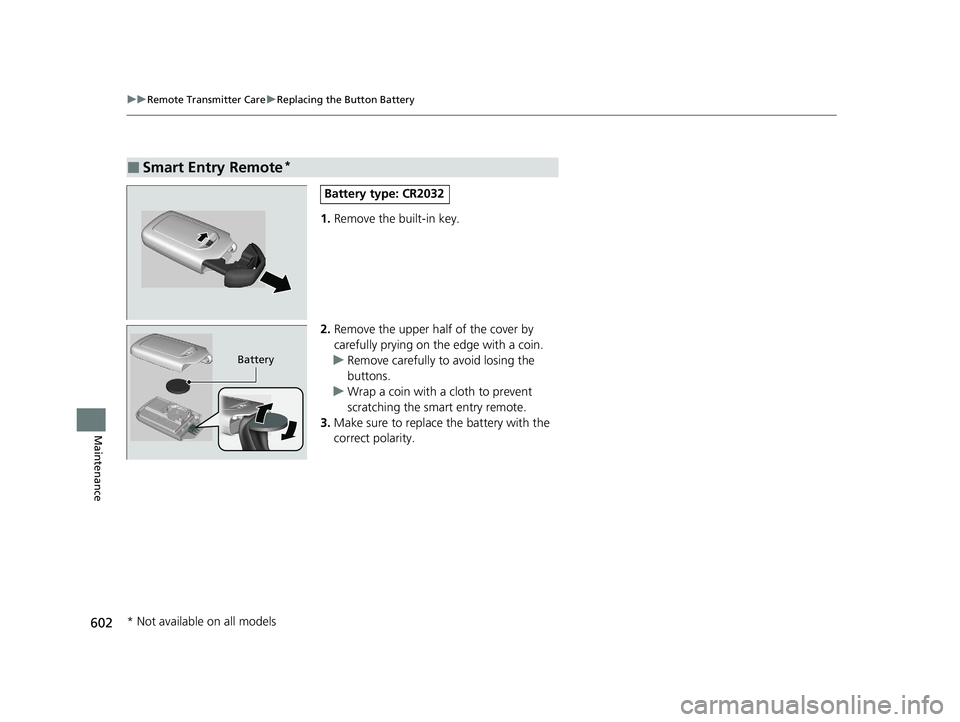
1. Remove the built-in key.
2. Remove the upper half of the cover by
carefully prying on the edge with a coin.
u Remove carefully to avoid losing the
buttons.
u Wrap a coin with a cloth to prevent
scratching the smart entry remote.
3. Make sure to replace the battery with the
correct polarity.
■Smart Entry Remote*
Battery type: CR2032
Battery
* Not available on all models
20 CR-V PET ELP_MAP_HMIN_HCM_J-31TLA6310.book 602 ページ 2019年10月3日 木曜日 午後4時55分