wheel HONDA CR-Z 2012 1.G Owner's Manual
[x] Cancel search | Manufacturer: HONDA, Model Year: 2012, Model line: CR-Z, Model: HONDA CR-Z 2012 1.GPages: 333, PDF Size: 10.43 MB
Page 120 of 333
119
Continued
Controls
Adjusting the Seats
Adjusting the Seat Positions
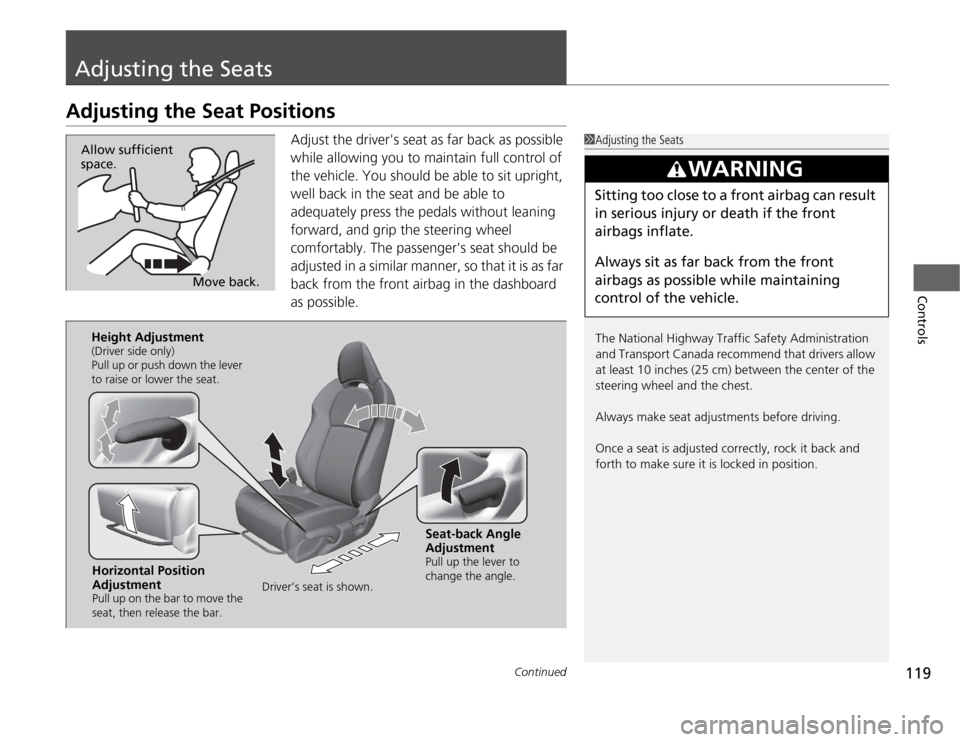
Adjust the driver's seat as far back as possible
while allowing you to maintain full control of
the vehicle. You should be able to sit upright,
well back in the seat and be able to
adequately press the pedals without leaning
forward, and grip the steering wheel
comfortably. The passenger's seat should be
adjusted in a similar manner, so that it is as far
back from the front airbag in the dashboard
as possible.
1Adjusting the Seats
The National Highway Traffic Safety Administration
and Transport Canada recommend that drivers allow
at least 10 inches (25 cm) between the center of the
steering wheel and the chest.
Always make seat adjustments before driving.
Once a seat is adjusted correctly, rock it back and forth to make sure it is locked in position.
3WARNING
Sitting too close to a front airbag can result
in serious injury or death if the front
airbags inflate.
Always sit as far back from the front
airbags as possible while maintaining
control of the vehicle.
Move back.
Allow sufficient space.
Horizontal Position
Adjustment
Pull up on the bar to move the
seat, then release the bar.
Height Adjustment
(Driver side only)
Pull up or push down the lever
to raise or lower the seat.
Seat-back Angle
Adjustment
Pull up the lever to
change the angle.
Driver’s seat is shown.
Page 121 of 333
uuAdjusting the SeatsuAdjusting the Seat Positions
120
Controls
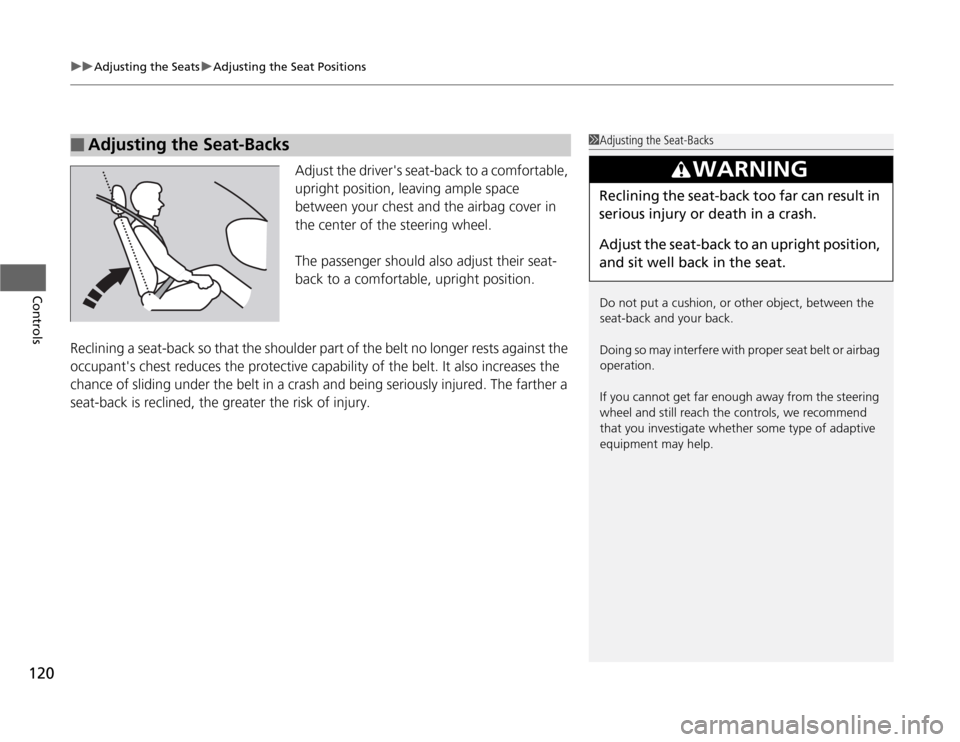
Adjust the driver's seat-back to a comfortable,
upright position, leaving ample space
between your chest and the airbag cover in
the center of the steering wheel.
The passenger should also adjust their seat-
back to a comfortable, upright position.
Reclining a seat-back so that the shoulder part of the belt no longer rests against the
occupant's chest reduces the protective capability of the belt. It also increases the
chance of sliding under the belt in a crash and being seriously injured. The farther a
seat-back is reclined, the greater the risk of injury.
■Adjusting the Seat-Backs1Adjusting the Seat-Backs
Do not put a cushion, or other object, between the
seat-back and your back.
Doing so may interfe re with proper seat belt or airbag
operation.
If you cannot get far enough away from the steering
wheel and still reach the controls, we recommend
that you investigate whether some type of adaptive
equipment may help.
3WARNING
Reclining the seat-back too far can result in
serious injury or death in a crash.
Adjust the seat-back to an upright position,
and sit well back in the seat.
Page 137 of 333
136
Features
Audio System
About Your Audio System
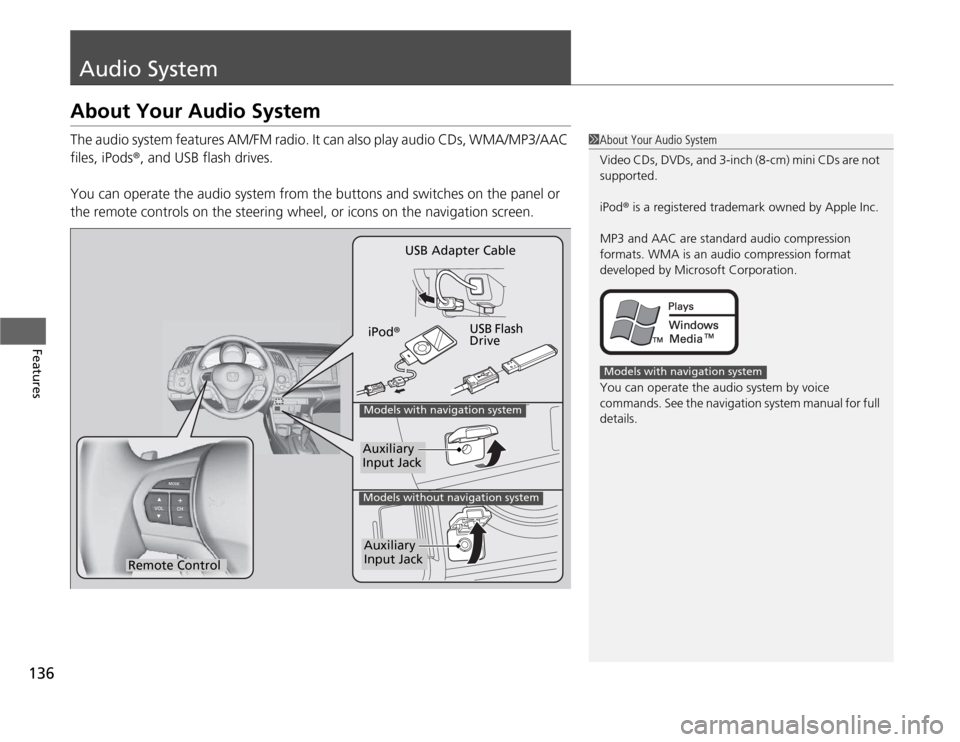
The audio system features AM/FM radio. It can also play audio CDs, WMA/MP3/AAC files, iPods®, and USB flash drives.
You can operate the audio system from the buttons and switches on the panel or
the remote controls on the steering wheel, or icons on the navigation screen.
1About Your Audio System
Video CDs, DVDs, and 3-inch (8-cm) mini CDs are not
supported.
iPod® is a registered trademark owned by Apple Inc.
MP3 and AAC are standard audio compression
formats. WMA is an audio compression format
developed by Microsoft Corporation.
You can operate the audio system by voice
commands. See the navigation system manual for full details.
Models with navigation system
Remote Control iPod
® USB Flash Drive
USB Adapter Cable
Models with navigation system
Models without navigation system
Auxiliary Input Jack
Auxiliary Input Jack
Page 142 of 333
141
Continued
Features
Audio without Navigation System
Audio System Basic Operation
To use the audio system function, the ignition switch must be in ACCESSORY
(q
or
ON
(w .
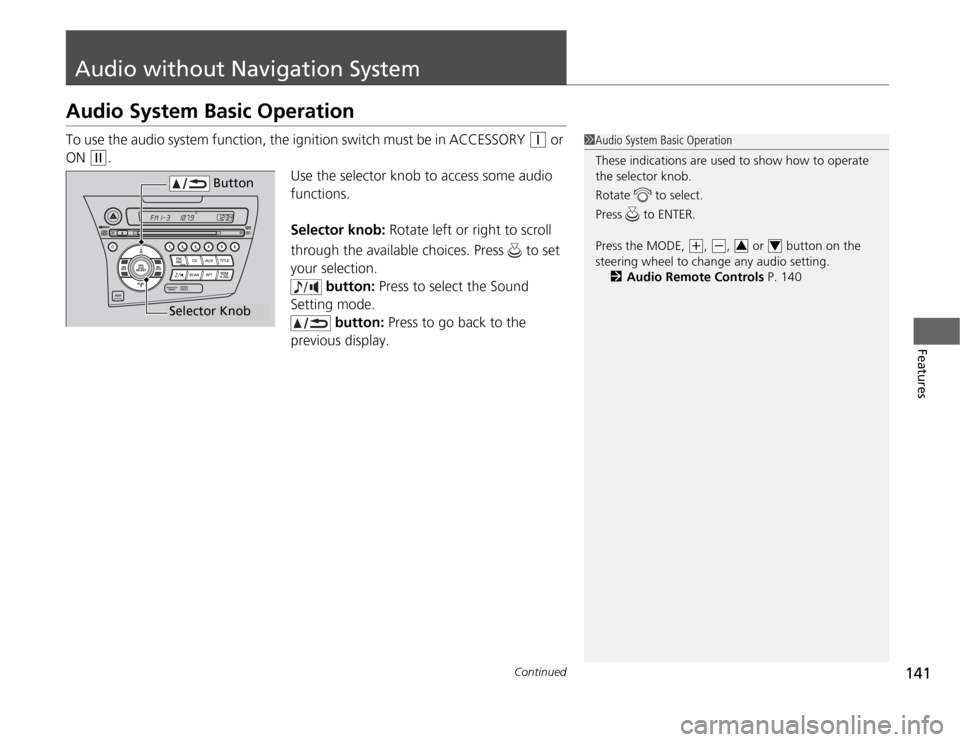
Use the selector knob to access some audio
functions.
Selector knob: Rotate left or right to scroll
through the available choices. Press to set
your selection. button: Press to select the Sound
Setting mode.
button: Press to go back to the
previous display.
1Audio System Basic Operation
These indications are used to show how to operate
the selector knob.
Rotate to select.
Press to ENTER.
Press the MODE,
(+ , (-, or button on the
steering wheel to change any audio setting. 2 Audio Remote Controls P. 14034
Button
Selector Knob
Page 145 of 333
uuAudio without Navigation SystemuPlaying the AM/FM Radio
144
Features
Use the auto select feature to scan both band s and store the strongest station in
each preset.
Press the A.SEL button to activate the feature.
To turn off auto select, press the A.SEL button again. This restores the presets you
originally set.
Provides text data information related to your selected RDS capable FM station. ■ RDS INFO ON
Press the TITLE button while listening to an RDS capable station. “RDS INFO ON”
appears, and the station name is displayed.
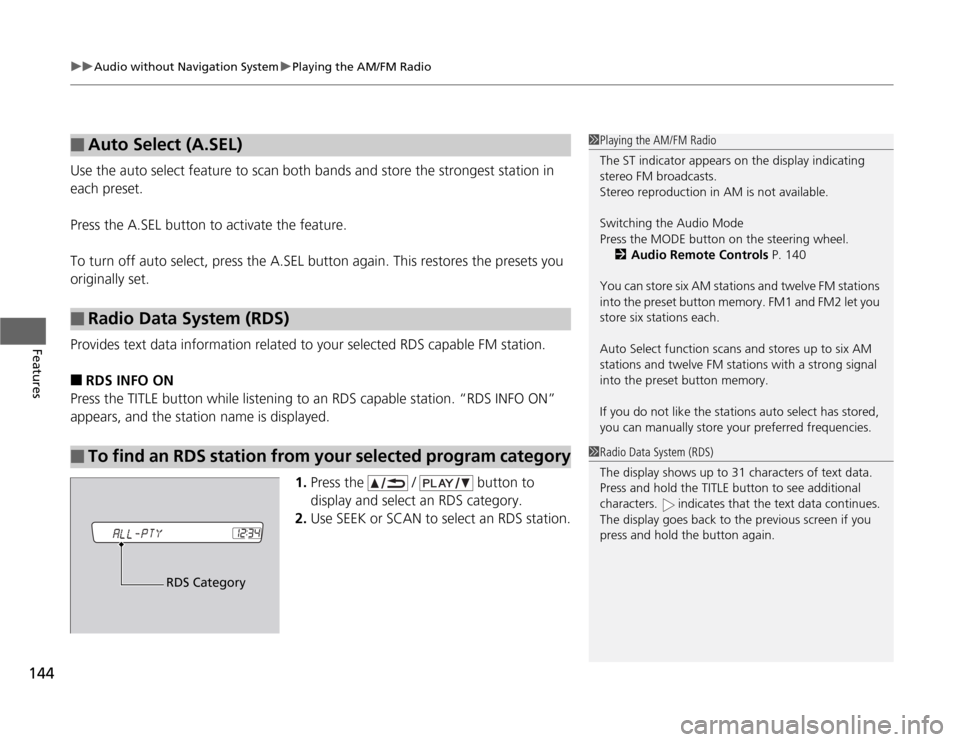
1.Press the / button to
display and select an RDS category.
2. Use SEEK or SCAN to select an RDS station.
■Auto Select (A.SEL)
■Radio Data System (RDS)
■To find an RDS station from your selected program category
1Playing the AM/FM Radio
The ST indicator appears on the display indicating
stereo FM broadcasts.
Stereo reproduction in AM is not available. Switching the Audio Mode
Press the MODE button on the steering wheel.
2 Audio Remote Controls P. 140
You can store six AM stations and twelve FM stations
into the preset button memory. FM1 and FM2 let you store six stations each.
Auto Select function scans and stores up to six AM
stations and twelve FM stations with a strong signal
into the preset button memory.
If you do not like the stations auto select has stored,
you can manually store your preferred frequencies.
1Radio Data System (RDS)
The display shows up to 31 characters of text data.
Press and hold the TITLE button to see additional
characters. indicates that the text data continues.
The display goes back to the previous screen if you
press and hold the button again.
RDS Category
Page 156 of 333
155
uuAudio with Navigation System*uPlaying the AM/FM Radio
Features
Use the auto select feature to scan both bands and store the strongest station in
each preset.
Touch AUTO SEL to activate the feature.
To turn off auto select, touch AUTO SEL again.
■Auto Select1Playing the AM/FM Radio
The STEREO indicator appears on the display
indicating stereo FM broadcasts.
Stereo reproduction in AM is not available. Switching the Audio Mode
Press the MODE button on the steering wheel.
2 Audio Remote Controls P. 140
You can store six AM stations and twelve FM stations
into the preset button memory. FM1 and FM2 let you store six stations each.
Auto Select function scans and stores up to six AM
stations and twelve FM stations with a strong signal
into the preset button memory.
If you do not like the stations auto select has stored,
you can manually store your preferred frequencies.
Page 174 of 333
173
Continued
Features
Bluetooth
® HandsFreeLink ®*
Bluetooth
® HandsFreeLink ® (HFL) allows you to place and receive phone calls using
your vehicle's audio system, without handling your cell phone.
Using HFL
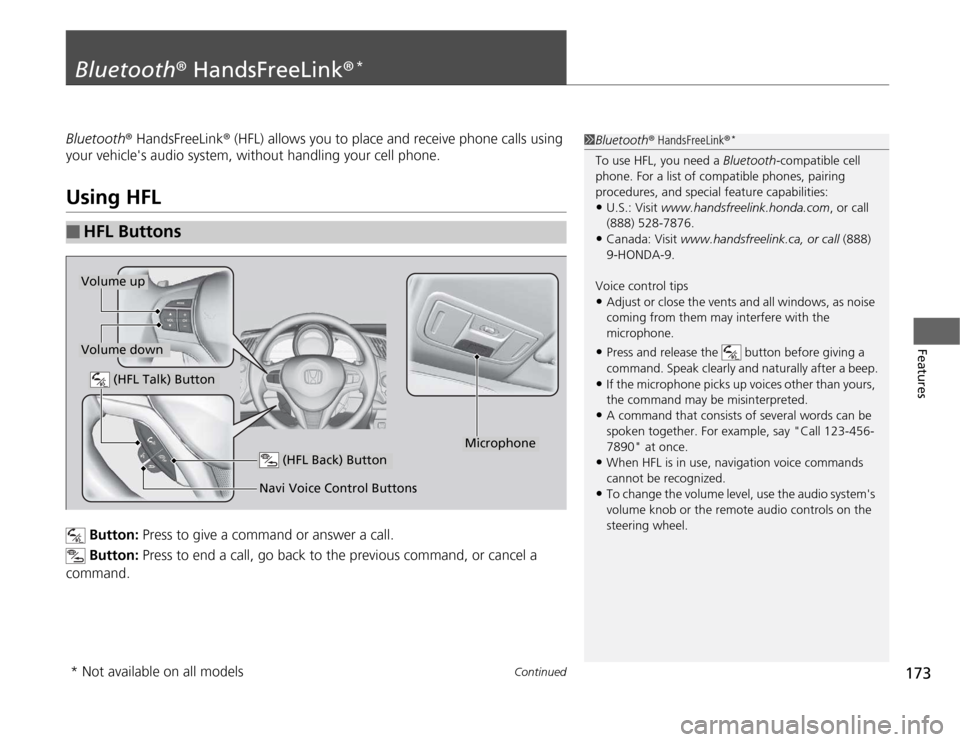
Button: Press to give a command or answer a call.
Button: Press to end a call, go back to the previous command, or cancel a
command.
■HFL Buttons
1Bluetooth ® HandsFreeLink ®*
To use HFL, you need a Bluetooth-compatible cell
phone. For a list of compatible phones, pairing
procedures, and special feature capabilities: • U.S.: Visit www.handsfreelink.honda.com , or call
(888) 528-7876.
• Canada: Visit www.handsfreelink.ca, or call (888)
9-HONDA-9.
Voice control tips • Adjust or close the vents and all windows, as noise
coming from them may in terfere with the
microphone.
• Press and release the button before giving a
command. Speak clearly and naturally after a beep.
• If the microphone picks up voices other than yours,
the command may be misinterpreted.
• A command that consists of several words can be
spoken together. For example, say "Call 123-456-
7890" at once.
• When HFL is in use, navigation voice commands
cannot be recognized.
• To change the volume level, use the audio system's
volume knob or the remote audio controls on the
steering wheel.
(HFL Talk) Button
Volume up
Microphone
(HFL Back) Button
Volume down
Navi Voice Control Buttons
* Not available on all models
Page 193 of 333
192
Driving
Before Driving
Driving Preparation
Check the following items before you start driving. •Make sure there are no obstructions on the windows, door mirrors, exterior
lights, or other parts of the vehicle.
uRemove any frost, snow, or ice.
uRemove any snow on the roof, as this can slip down and obstruct your field of
vision while driving. If frozen solid, remove ice once it has softened.
uWhen removing ice from around the wheels, be sure not to damage the wheel
or wheel components.
• Make sure the hood is securely closed.
uIf the hood opens while driving, your front view will be blocked.
• Make sure the tires are in good condition.
uCheck air pressures, and check for damage and excessive wear.
2 Checking and Maintaining Tires P. 269
• Make sure there are no people or objects behind or around the vehicle.
uThere are blind spots from the inside.
■Exterior Checks1Exterior Checks
NOTICE
When doors are frozen shut, use warm water around
the door edges to melt any ice. Do not try to force
them open, as this can damage the rubber trim
around the doors. When done, wipe dry to avoid further freezing.
Do not pour warm water into the key cylinder.
You will be unable to insert key if the water freezes in
the hole.
Page 194 of 333
Continued193
uuBefore DrivinguDriving Preparation
Driving
•Store or secure all items on board properly.
uCarrying too much cargo, or improperly storing it, can affect your vehicle's
handling, stability, stopping distance, and tires, and make it unsafe.
2 Maximum Load Limit P. 195
• Do not pile items higher than the seat height.
uThey can block your view and may be thrown forward in the event of sudden
braking.
• Do not place anything in the seat footwells. Make sure to secure the floor mats.
uAn object or unsecured floor mat can interfere with your brake and accelerator
pedal operation while driving.
• If you have any animals on board, do not let them move around in the vehicle.
uThey may interfere with driving and a crash could occur.
• Securely close and lock both doors and the hatch.
2 Locking/Unlocking the Doors from the Inside P. 102
• Adjust your seating position properly.
2 Adjusting the Seats P. 119
• Adjust the mirrors and steering wheel properly for your driving.
uAdjust them while sitting in the proper driving position.
2 Adjusting the Mirrors P. 118
2 Adjusting the Steering Wheel P. 117
■Interior Checks1Interior Checks
The headlight aim is set by the factory, and does not
need to be adjusted. However, if you regularly carry
heavy items in the cargo area, have the aiming
readjusted at a dealer or by a qualified technician.
Page 206 of 333
Continued205
uuWhen DrivinguShifting
Driving
Use the paddle shifters to change between first and seventh speeds without
removing your hands from the steering wheel. The transmission switches to the 7-
speed manual shift mode when you pull a paddle shifter while driving. This mode is
useful when engine braking is needed.
You can cancel this mode by pressing any of the three driving mode buttons, or
pulling the
(+ paddle shifter for a few seconds.
■ When the driving mode is in ECON or NORMAL
The shift mode goes into the 7-speed manual shift mode temporarily, and the
number is displayed in the shift indicator.
The 7-speed manual shift mode is canceled automatically if you drive at constant
speed or accelerate, and the number in the shift indicator goes off.
The 7-speed manual shift mode is especially useful when reducing the vehicle speed
temporarily before making a turn. ■ When the driving mo de is in SPORT
The shift mode goes into the 7-speed manual shift mode. The
(M indicator and the
speed number are displayed in the shift indicat or. As the vehicle speed slows down,
the transmission automatically shifts down accordingly. When the vehicle comes to
a stop, it automatically shifts down into first.
If the vehicle speed increases and the engine speed reaches near the tachometer’s
red zone, the transmission automatically shifts up.
■7-Speed Manual Shift Mode17-Speed Manual Shift Mode
To improve fuel economy, the transmission may shift
up to a higher speed than the seventh under certain circumstances. In this case, the number in the shift
indicator remains as "7."
In the 7-speed manual shift mode, the transmission
shifts up or down by operating either paddle shifter
under the following conditions:
Shift Up: The engine speed reaches the lowest
threshold of the higher speed position.
Shift Down: The engine speed reaches the highest
threshold of the lower speed position.
When the engine speed reaches near the
tachometer’s red zone, the transmission shifts up
automatically.
When the engine speed reaches the lowest threshold
of the selected speed position, the transmission shifts down automatically.
Operating the paddle shifters on slippery surfaces
may cause the tires to lock up. In this case, the 7-
speed manual shift mode is canceled and goes back
to the normal D driving mode.