brake HONDA CR-Z 2013 1.G User Guide
[x] Cancel search | Manufacturer: HONDA, Model Year: 2013, Model line: CR-Z, Model: HONDA CR-Z 2013 1.GPages: 325, PDF Size: 11.73 MB
Page 26 of 325
25
Quick Reference Guide
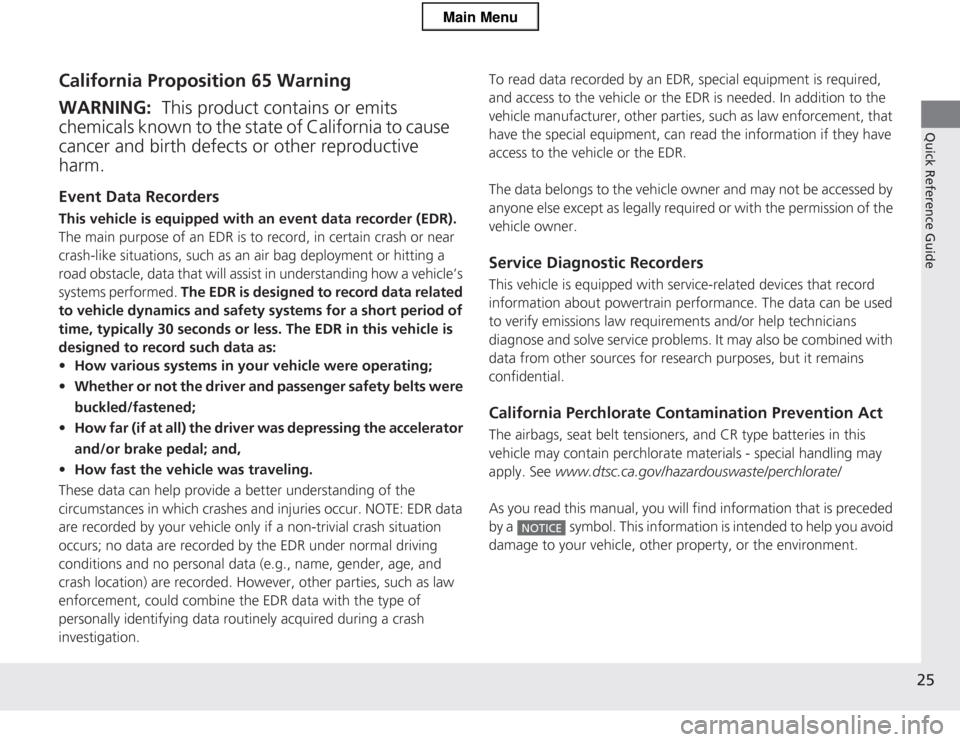
California Proposition 65 Warning Event Data Recorders
This vehicle is equipped with an event data recorder (EDR).
The main purpose of an EDR is to record, in certain crash or near
crash-like situations, such as an air bag deployment or hitting a
road obstacle, data that will assist in understanding how a vehicle’s
systems performed. The EDR is designed to record data related
to vehicle dynamics and safety systems for a short period of
time, typically 30 seconds or less. The EDR in this vehicle is
designed to record such data as: • How various systems in your vehicle were operating;
• Whether or not the driver and passenger safety belts were buckled/fastened;
• How far (if at all) the driver was depressing the accelerator
and/or brake pedal; and,
• How fast the vehicle was traveling.
These data can help provide a better understanding of the
circumstances in which crashes and injuries occur. NOTE: EDR data
are recorded by your vehicle only if a non-trivial crash situation
occurs; no data are recorded by the EDR under normal driving
conditions and no personal data (e.g., name, gender, age, and
crash location) are recorded. However, other parties, such as law
enforcement, could combine the EDR data with the type of
personally identifying data routinely acquired during a crash investigation.
WARNING: This product contains or emits
chemicals known to the st ate of California to cause
cancer and birth defects or other reproductive
harm.
To read data recorded by an EDR, special equipment is required,
and access to the vehicle or the EDR is needed. In addition to the
vehicle manufacturer, other parties, such as law enforcement, that
have the special equipment, can read the information if they have
access to the vehicle or the EDR.
The data belongs to the vehicle owner and may not be accessed by
anyone else except as legally required or with the permission of the
vehicle owner.
Service Diagnostic Recorders
This vehicle is equipped with service-related devices that record information ab out powertrain performance. The data can be used
to verify emissions law requirements and/or help technicians
diagnose and solve service problems. It may also be combined with
data from other sources for research purposes, but it remains
confidential.
California Perchlorate C ontamination Prevention Act
The airbags, seat belt tensioners, and CR type batteries in this vehicle may contain perchlor ate materials - special handling may
apply. See www.dtsc.ca.gov/hazardouswaste/p erchlorate/
As you read this manual, you will find information that is preceded
by a symbol. This information is intended to help you avoid
damage to your vehicle, oth er property, or the environment.
NOTICE
Main Menu
Page 67 of 325
66
Instrument Panel
Indicators
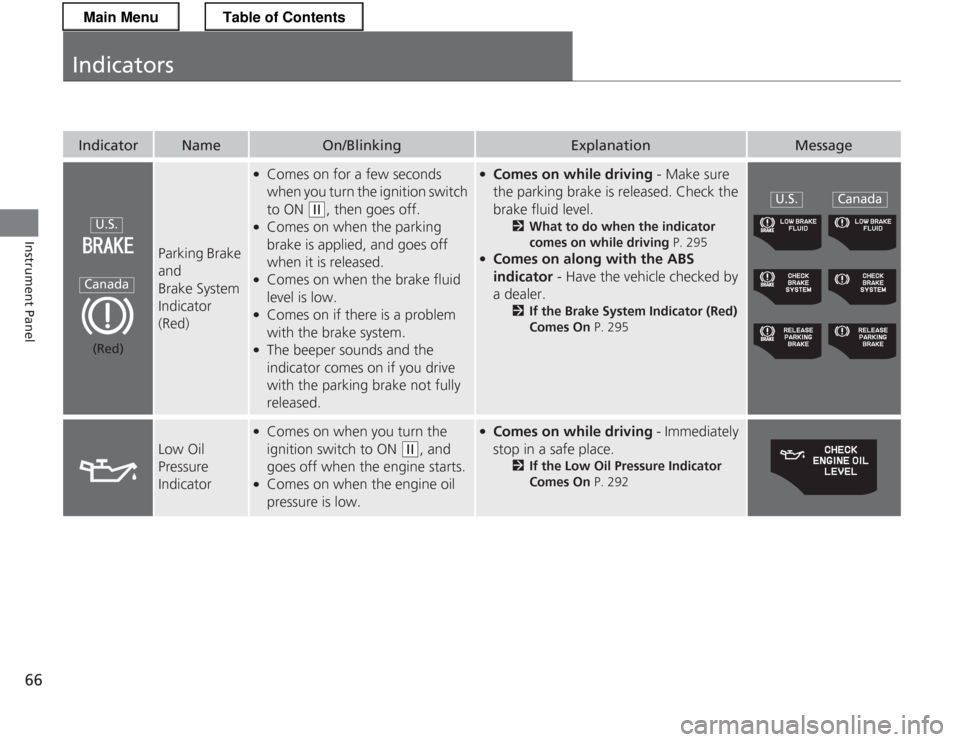
IndicatorNameOn/BlinkingExplanationMessage
Parking Brake and
Brake System Indicator
(Red)
●Comes on for a few seconds
when you turn the ignition switch to ON
(w , then goes off.
● Comes on when the parking
brake is applied, and goes off when it is released.
● Comes on when the brake fluid
level is low.
● Comes on if there is a problem
with the brake system.
● The beeper sounds and the
indicator comes on if you drive
with the parking brake not fully released.
●Comes on while driving - Make sure
the parking brake is released. Check the
brake fluid level. 2What to do when the indicator
comes on while driving P. 295
● Comes on along with the ABS indicator - Have the vehicle checked by
a dealer. 2If the Brake System Indicator (Red)
Comes On P. 295
Low Oil
Pressure
Indicator
●
Comes on when you turn the
ignition switch to ON
(w , and
goes off when the engine starts.
● Comes on when the engine oil
pressure is low.
●Comes on while driving - Immediately
stop in a safe place. 2If the Low Oil Pressure Indicator
Comes On P. 292
U.S.
Canada
(Red)
U.S.Canada
Main MenuTable of Contents
Page 70 of 325
69
uuIndicatorsu
Continued
Instrument Panel
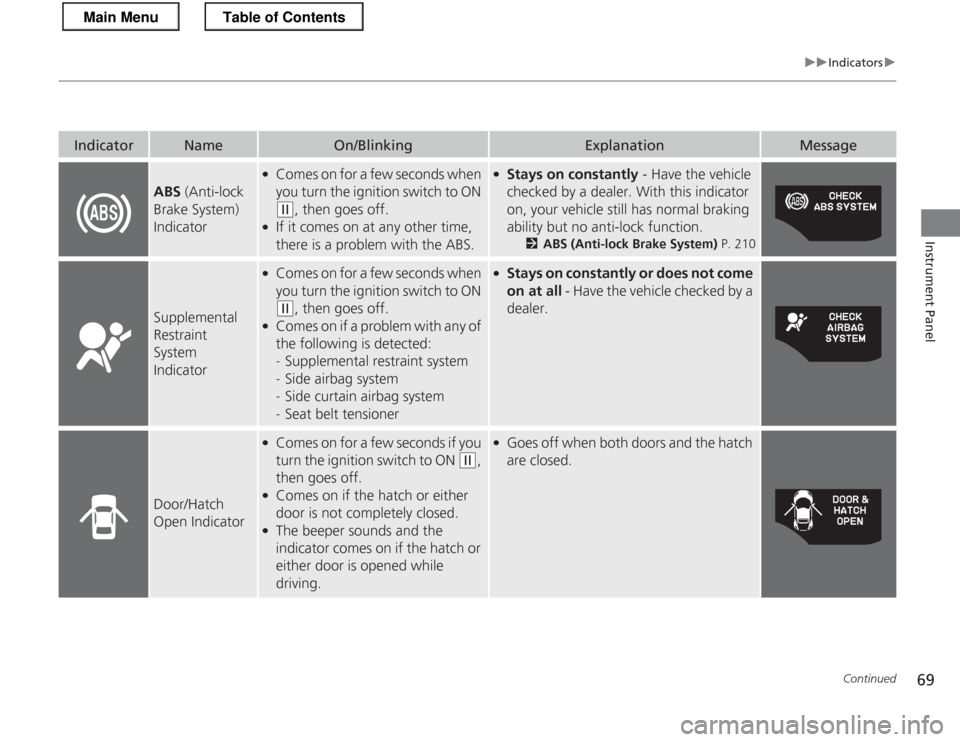
IndicatorNameOn/BlinkingExplanationMessage
ABS (Anti-lock
Brake System)
Indicator
● Comes on for a few seconds when
you turn the ignition switch to ON
(w , then goes off.
● If it comes on at any other time,
there is a problem with the ABS.
●Stays on constantly - Have the vehicle
checked by a dealer. With this indicator
on, your vehicle still has normal braking
ability but no anti-lock function. 2ABS (Anti-lock Brake System) P. 210
Supplemental
Restraint System
Indicator
●
Comes on for a few seconds when
you turn the ignition switch to ON
(w , then goes off.
● Comes on if a problem with any of
the following is detected: -Supplemental restraint system
- Side airbag system
- Side curtain airbag system
- Seat belt tensioner
●
Stays on constantly or does not come on at all - Have the vehicle checked by a
dealer.
Door/Hatch
Open Indicator
● Comes on for a few seconds if you
turn the ignition switch to ON
(w ,
then goes off.
● Comes on if the hatch or either
door is not completely closed.
● The beeper sounds and the
indicator comes on if the hatch or
either door is opened while
driving.
●Goes off when both doors and the hatch are closed.
Main MenuTable of Contents
Page 71 of 325
70
uuIndicatorsu
Instrument Panel
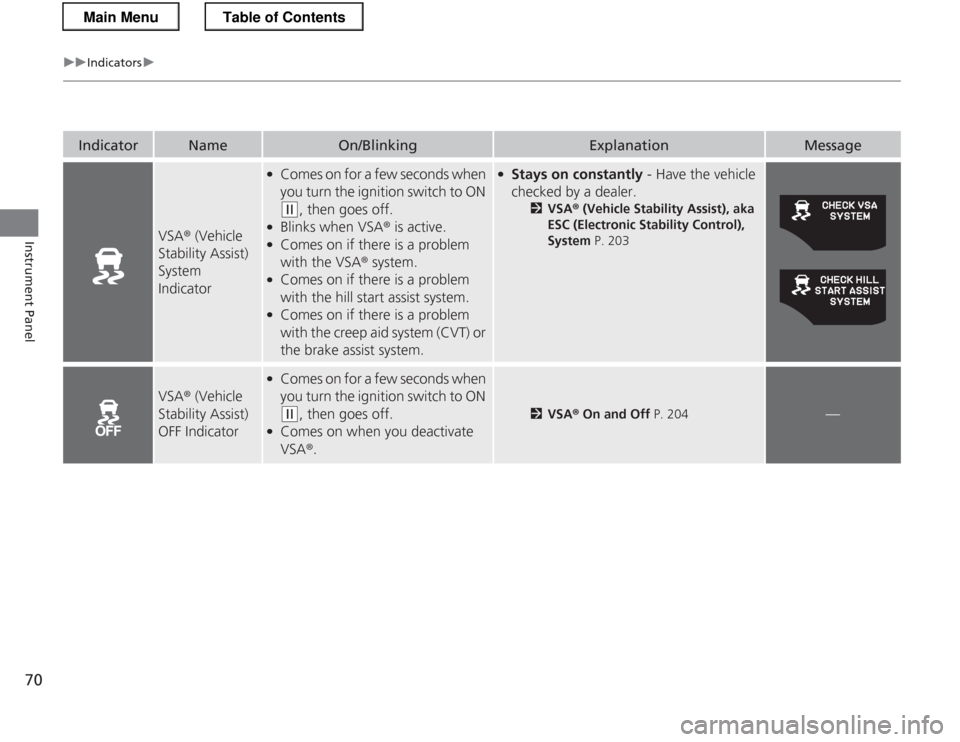
IndicatorNameOn/BlinkingExplanationMessage
VSA® (Vehicle
Stability Assist) System
Indicator
● Comes on for a few seconds when
you turn the ignition switch to ON
(w , then goes off.
● Blinks when VSA ® is active.
● Comes on if there is a problem with the VSA ® system.
● Comes on if there is a problem
with the hill start assist system.
● Comes on if there is a problem
with the creep aid system (CVT) or
the brake assist system.
● Stays on constantly - Have the vehicle
checked by a dealer. 2VSA ® (Vehicle Stability Assist), aka
ESC (Electronic Stability Control),
System P. 203
VSA® (Vehicle
Stability Assist)
OFF Indicator
● Comes on for a few seconds when
you turn the ignition switch to ON
(w , then goes off.
● Comes on when you deactivate VSA ®.2 VSA ® On and Off P. 204—
Main MenuTable of Contents
Page 80 of 325
79
uuIndicatorsuMulti-Information Display Warning and Information Messages
Continued
Instrument Panel
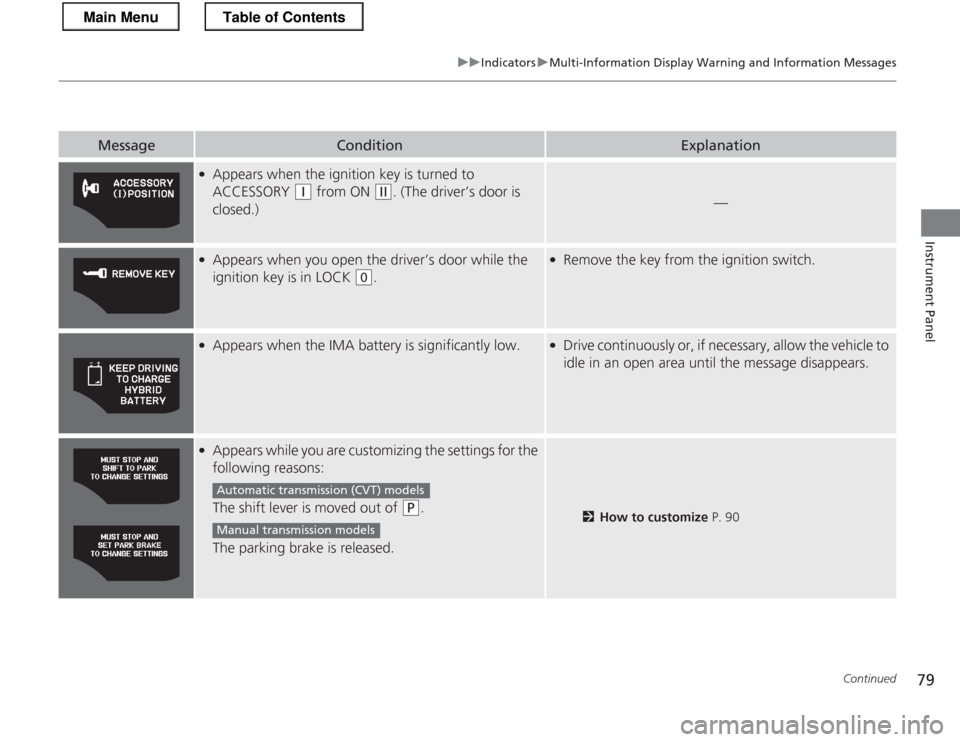
MessageConditionExplanation
●Appears when the ignition key is turned to
ACCESSORY
(q from ON (w. (The driver’s door is
closed.)—
● Appears when you open the driver’s door while the
ignition key is in LOCK
(0 .
●
Remove the key from the ignition switch.
●
Appears when the IMA battery is significantly low.●Drive continuously or, if necessary, allow the vehicle to
idle in an open area until the message disappears.
●Appears while you are customizing the settings for the
following reasons:
The shift lever is moved out of
(P .
The parking brake is released.2 How to customize P. 90
Automatic transmiss ion (CVT) models
Manual transmission models
Main MenuTable of Contents
Page 87 of 325
uuGauges and Multi-Information DisplayuMulti-Information Display
86
Instrument Panel
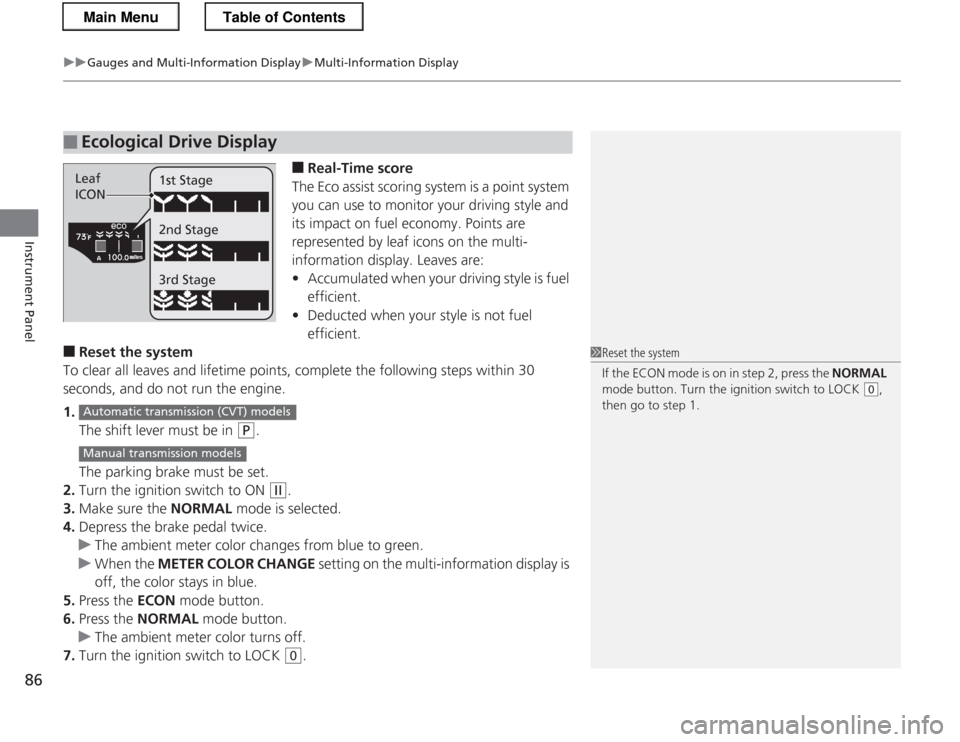
■ Real-Time score
The Eco assist scoring system is a point system
you can use to monitor your driving style and
its impact on fuel economy. Points are
represented by leaf icons on the multi-
information display. Leaves are:• Accumulated when your driving style is fuel
efficient.
• Deducted when your style is not fuel efficient.
■ Reset the system
To clear all leaves and lifetime points, complete the following steps within 30
seconds, and do not run the engine. 1. The shift lever must be in
(P .
The parking brake must be set.
2. Turn the ignition switch to ON
(w .
3. Make sure the NORMAL mode is selected.
4. Depress the brake pedal twice.
uThe ambient meter color changes from blue to green.
uWhen the METER COLOR CHANGE setting on the multi-information display is
off, the color stays in blue.
5. Press the ECON mode button.
6. Press the NORMAL mode button.
uThe ambient meter color turns off.
7. Turn the ignition switch to LOCK
(0 .
■Ecological Drive Display
Leaf
ICON 1st Stage 2nd Stage 3rd Stage
1Reset the system
If the ECON mode is on in step 2, press the
NORMAL
mode button. Turn the ignition switch to LOCK
(0 ,
then go to step 1.
Automatic transmiss ion (CVT) models
Manual transmission models
Main MenuTable of Contents
Page 91 of 325
uuGauges and Multi-Information DisplayuMulti-Information Display
90
Instrument Panel
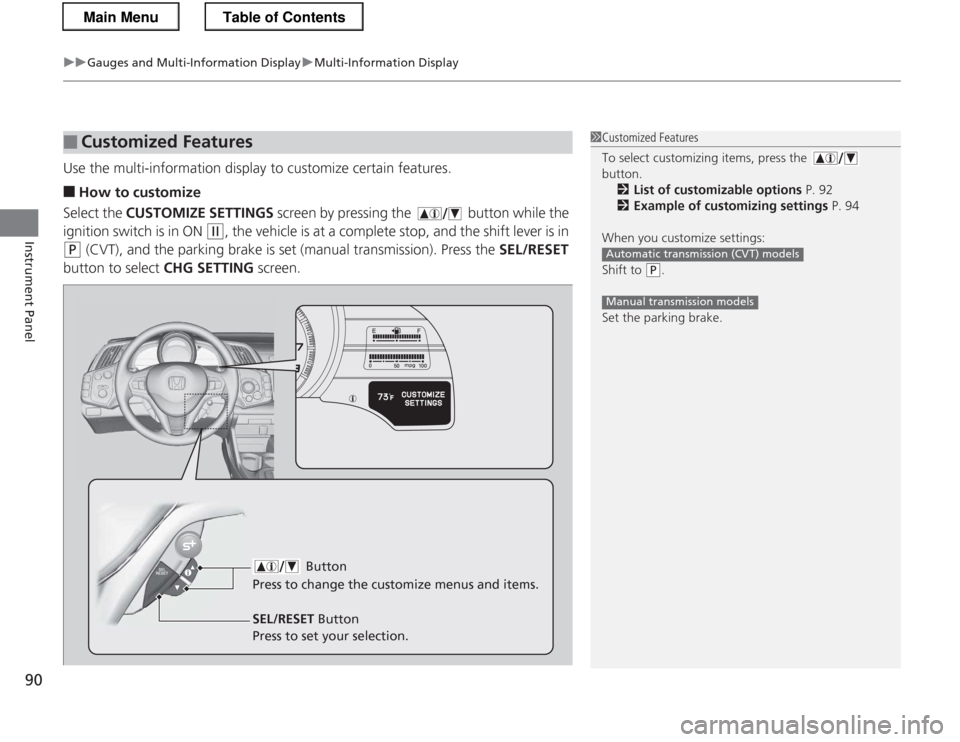
Use the multi-information display to customize certain features. ■ How to customize
Select the CUSTOMIZE SETTINGS screen by pressing the button while the
ignition switch is in ON
(w , the vehicle is at a complete stop, and the shift lever is in
(P (CVT), and the parking brake is set (manual transmission). Press the SEL/RESET
button to select CHG SETTING screen.
■Customized Features1Customized Features
To select customizing items, press the button.
2 List of customizable options P. 92
2 Example of customizing settings P. 94
When you customize settings:
Shift to
(P .
Set the parking brake.
Automatic transmission (CVT) models
Manual transmission models
Button
Press to change the cu stomize menus and items.
SEL/RESET Button
Press to set your selection.
Main MenuTable of Contents
Page 104 of 325
103
uuLocking and Unlocking the DoorsuAuto Door Locking/Unlocking
Controls
Auto Door Locking/Unlocking
Your vehicle locks all doors and unlocks the driver’s door automatically when a
certain condition is met. ■Drive lock mode
The auto door lock function automatically locks all the doors and hatch when the
vehicle reaches about 10 mph (15 km/h). ■ Park unlock mode
The driver’s door unlocks when the shift lever is moved into
(P with the brake pedal
depressed. The settings can be changed to unlock all doors.
■ Ignition switch unlock mode
The driver’s door unlocks when the igni tion switch is moved out of ON
(w. The
settings can be changed to unlock all doors.
■Auto Door Locking
■Auto Door Unlocking
1Auto Door Locking/Unlocking
You can turn off or change to another auto door
locking/unlocking setting using the multi-information
display. 2 Customized Features P. 90
Automatic transmission (CVT) models
Manual transmission models
Main MenuTable of Contents
Page 114 of 325
113
uuOperating the Switches Around the Steering WheeluFog Lights*
Controls
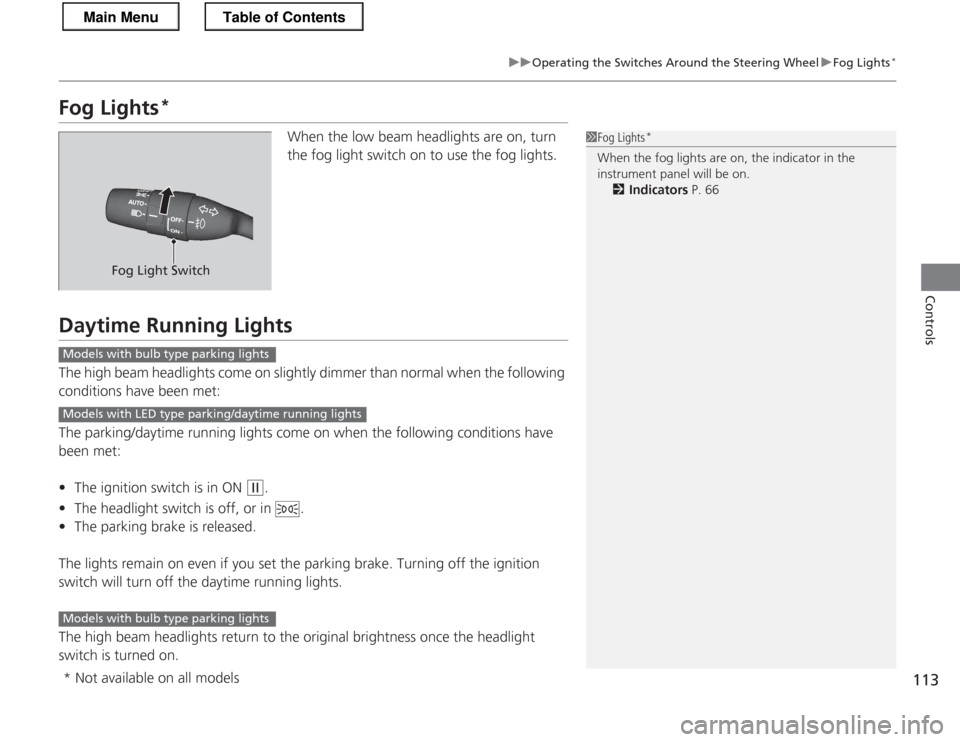
Fog Lights *
When the low beam headlights are on, turn
the fog light switch on to use the fog lights.
Daytime Running Lights
The high beam headlights come on slightly dimmer than normal when the following
conditions have been met:
The parking/daytime running lights come on when the following conditions have
been met: •The ignition switch is in ON
(w .
• The headlight switch is off, or in .
• The parking brake is released.
The lights remain on even if you set the parking brake. Turning off the ignition
switch will turn off the daytime running lights.
The high beam headlights return to the original brightness once the headlight
switch is turned on.
1Fog Lights *
When the fog lights are on, the indicator in the
instrument panel will be on. 2 Indicators P. 66
Fog Light Switch
Models with bulb type parking lights
Models with LED type parking/daytime running lights
Models with bulb type parking lights
* Not available on all models
Main MenuTable of Contents
Page 131 of 325
uuInterior Lights/Interior Convenience ItemsuInterior Convenience Items
130
Controls
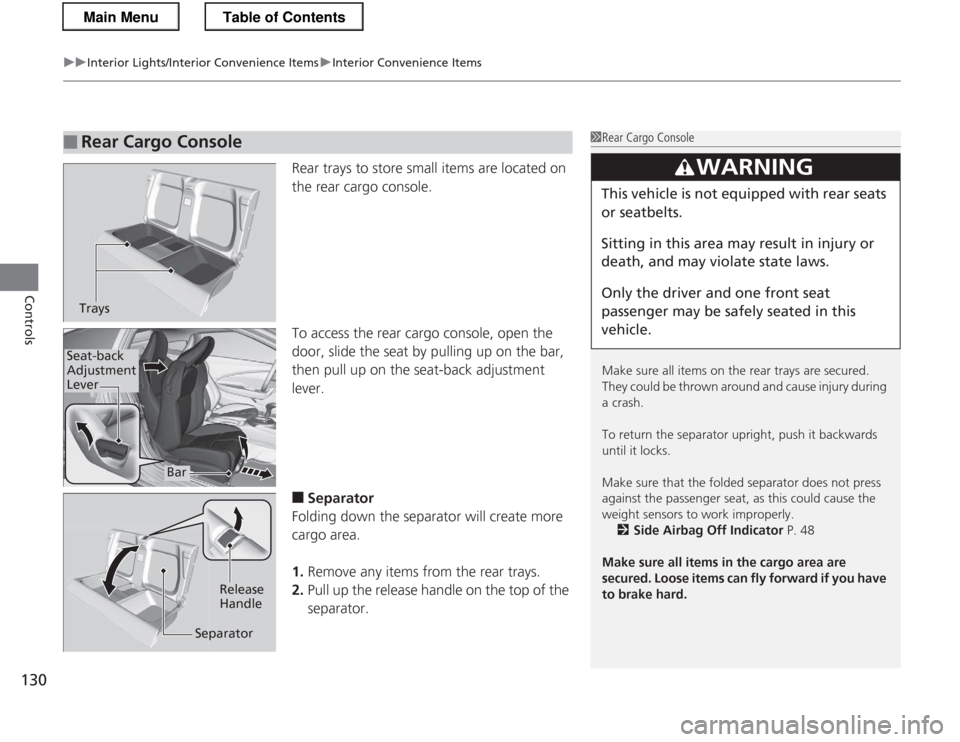
Rear trays to store small items are located on
the rear cargo console.
To access the rear cargo console, open the
door, slide the seat by pulling up on the bar, then pull up on the seat-back adjustment lever. ■ Separator
Folding down the separator will create more cargo area. 1. Remove any items from the rear trays.
2. Pull up the release handle on the top of the
separator.
■Rear Cargo Console1Rear Cargo Console
Make sure all items on the rear trays are secured.
They could be thrown around and cause injury during a crash.
To return the sepa rator upright, push it backwards
until it locks.
Make sure that the fol ded separator does not press
against the passenger seat, as this could cause the
weight sensors to work improperly.
2 Side Airbag Off Indicator P. 48
Make sure all items in the cargo area are
secured. Loose items can fly forward if you have
to brake hard.
3WARNING
This vehicle is not equipped with rear seats
or seatbelts.
Sitting in this area may result in injury or
death, and may violate state laws.
Only the driver and one front seat
passenger may be safely seated in this vehicle.
Trays
Bar
Seat-back Adjustment
Lever
Release Handle
Separator
Main MenuTable of Contents