HONDA CR-Z 2016 1.G Owners Manual
CR-Z 2016 1.G
HONDA
HONDA
https://www.carmanualsonline.info/img/13/5820/w960_5820-0.png
HONDA CR-Z 2016 1.G Owners Manual
Trending: glove box, automatic transmission, belt, brake sensor, brake light, mirror, boot
Page 321 of 409
320
Maintenance
Replacing Light Bulbs
Headlight Bulbs
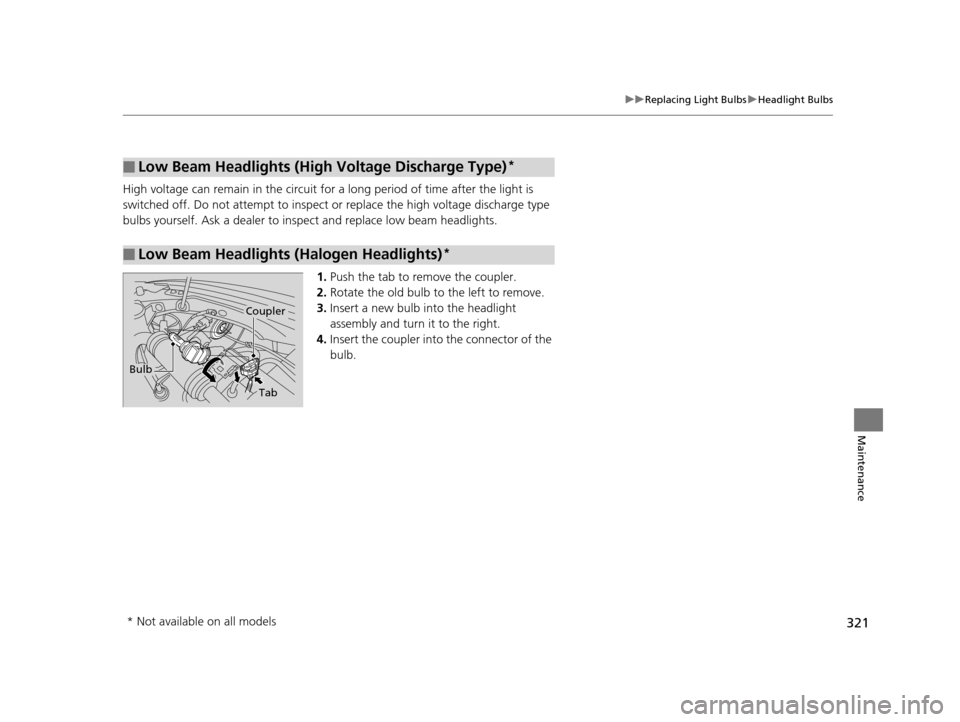
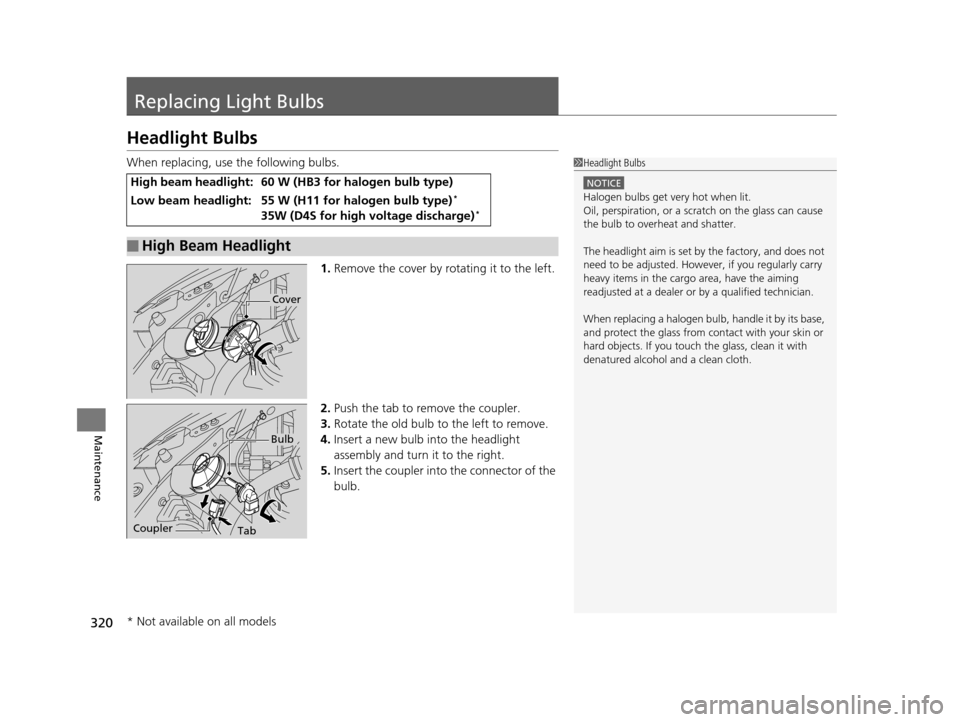
When replacing, use the following bulbs.1.Remove the cover by rotating it to the left.
2. Push the tab to remove the coupler.
3. Rotate the old bulb to the left to remove.
4. Insert a new bulb into the headlight
assembly and turn it to the right.
5. Insert the coupler into the connector of the
bulb.
High beam headlight:60 W (HB3 for halogen bulb type)
Low beam headlight:55 W (H11 for halogen bulb type)*
35W (D4S for high voltage discharge)*
■High Beam Headlight
1Headlight Bulbs
NOTICE
Halogen bulbs get very hot when lit.
Oil, perspiration, or a scratch on the glass can cause
the bulb to overhe at and shatter.
The headlight aim is set by the factory, and does not
need to be adjusted. Howeve r, if you regularly carry
heavy items in the cargo area, have the aiming
readjusted at a dealer or by a qualified technician.
When replacing a halogen bu lb, handle it by its base,
and protect the glass from c ontact with your skin or
hard objects. If you touch the glass, clean it with
denatured alcohol and a clean cloth.
Cover
TabCoupler
Bulb
* Not available on all models
16 CR-Z-31SZT6500.book 320 ページ 2015年9月11日 金曜日 午前11時47分
Page 322 of 409
321
uuReplacing Light Bulbs uHeadlight Bulbs
Maintenance
High voltage can remain in the circuit for a long period of time after the light is
switched off. Do not attempt to inspect or replace the high vo ltage discharge type
bulbs yourself. Ask a dealer to inspect and replace low beam headlights.
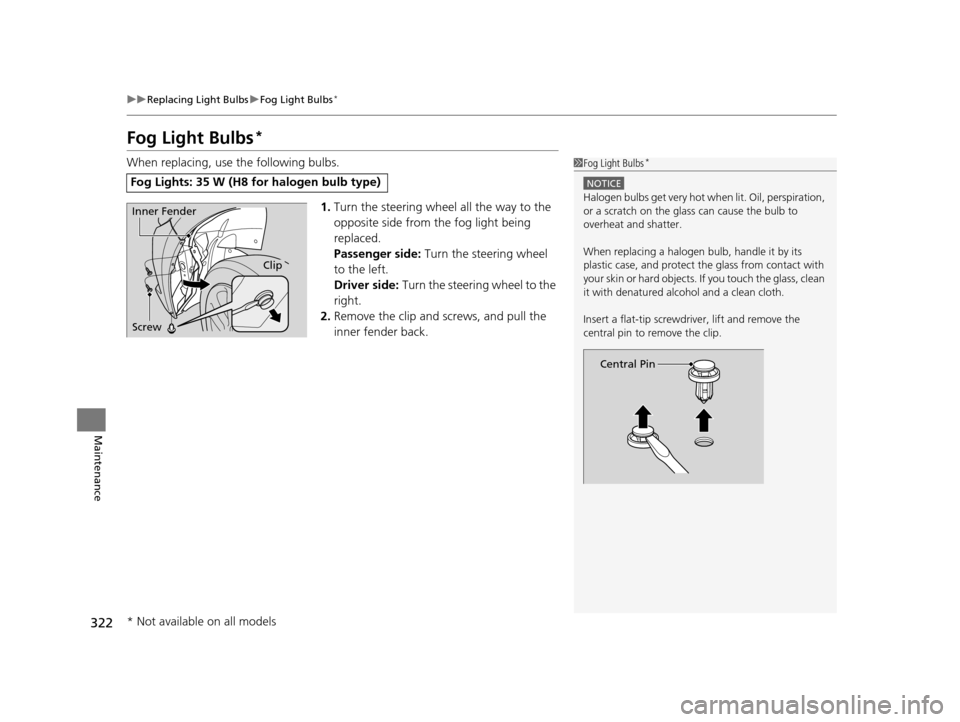
1.Push the tab to remove the coupler.
2. Rotate the old bulb to the left to remove.
3. Insert a new bulb into the headlight
assembly and turn it to the right.
4. Insert the coupler into the connector of the
bulb.
■Low Beam Headlights (High Voltage Discharge Type)*
■Low Beam Headlights (Halogen Headlights)*
Bulb
Coupler
Tab
* Not available on all models
16 CR-Z-31SZT6500.book 321 ページ 2015年9月11日 金曜日 午前11時47分
Page 323 of 409
322
uuReplacing Light Bulbs uFog Light Bulbs*
Maintenance
Fog Light Bulbs*
When replacing, use the following bulbs.
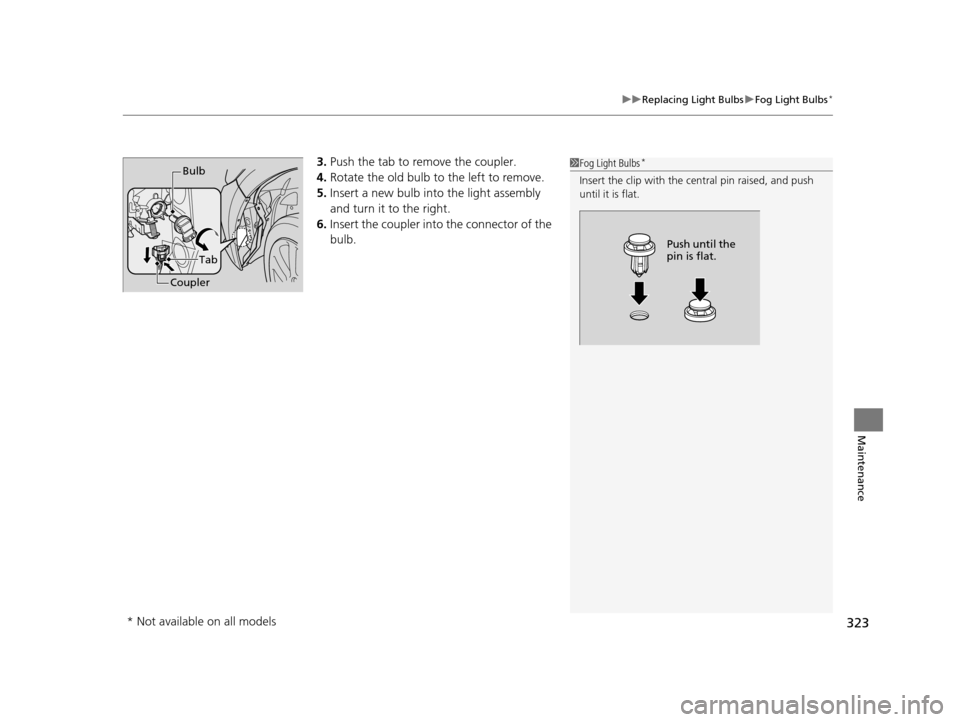
1.Turn the steering wheel all the way to the
opposite side from the fog light being
replaced.
Passenger side: Turn the steering wheel
to the left.
Driver side: Turn the steering wheel to the
right.
2. Remove the clip and screws, and pull the
inner fender back.
Fog Lights: 35 W (H8 for halogen bulb type)
1Fog Light Bulbs*
NOTICE
Halogen bulbs get very hot wh en lit. Oil, perspiration,
or a scratch on the glass can cause the bulb to
overheat and shatter.
When replacing a halogen bulb, handle it by its
plastic case, and protect th e glass from contact with
your skin or hard objects. If you touch the glass, clean
it with denatured alc ohol and a clean cloth.
Insert a flat-tip screwdriver, lift and remove the
central pin to remove the clip.
Central Pin
Inner Fender
Screw
Clip
* Not available on all models
16 CR-Z-31SZT6500.book 322 ページ 2015年9月11日 金曜日 午前11時47分
Page 324 of 409
323
uuReplacing Light Bulbs uFog Light Bulbs*
Maintenance
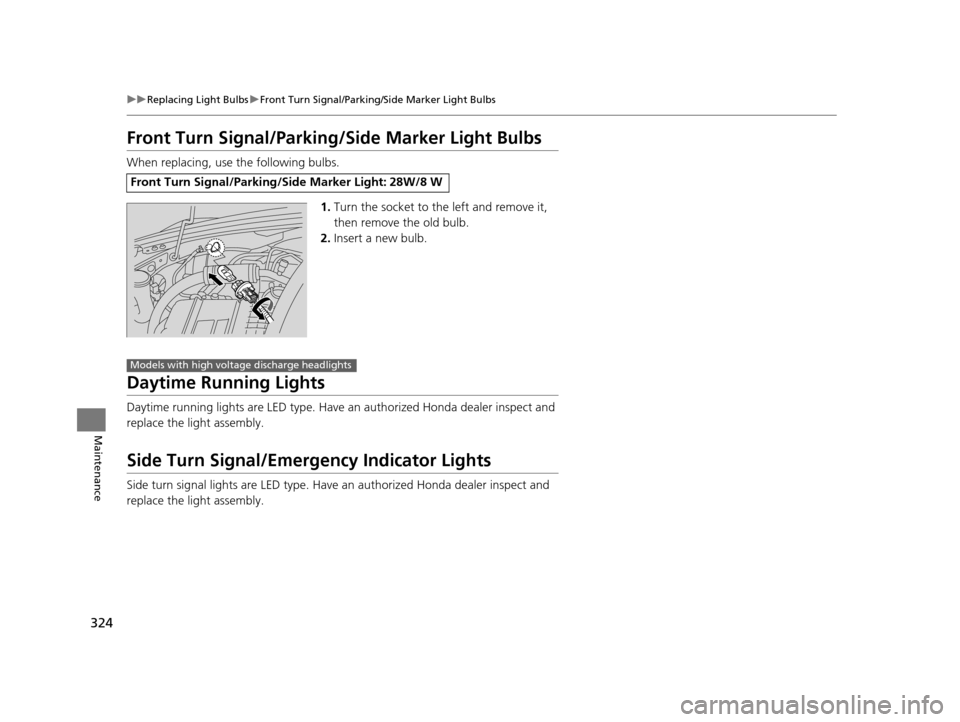
3. Push the tab to remove the coupler.
4. Rotate the old bulb to the left to remove.
5. Insert a new bulb into the light assembly
and turn it to the right.
6. Insert the coupler into the connector of the
bulb.1 Fog Light Bulbs*
Insert the clip with the central pin raised, and push
until it is flat.
Push until the
pin is flat.
Bulb
Tab
Coupler
* Not available on all models
16 CR-Z-31SZT6500.book 323 ページ 2015年9月11日 金曜日 午前11時47分
Page 325 of 409
324
uuReplacing Light Bulbs uFront Turn Signal/Parking/Side Marker Light Bulbs
Maintenance
Front Turn Signal/Parking/Side Marker Light Bulbs
When replacing, use the following bulbs.
1.Turn the socket to the left and remove it,
then remove the old bulb.
2. Insert a new bulb.
Daytime Running Lights
Daytime running lights are LED type. Have an authorized Honda dealer inspect and
replace the light assembly.
Side Turn Signal/Emergency Indicator Lights
Side turn signal lights are LED type. Have an authorized Honda dealer inspect and
replace the light assembly.
Front Turn Signal/Parking/Side Marker Light: 28W/8 W
Models with high voltage discharge headlights
16 CR-Z-31SZT6500.book 324 ページ 2015年9月11日 金曜日 午前11時47分
Page 326 of 409
325
uuReplacing Light Bulbs uBack-Up Light, Rear Turn Signal Light and Rear Side Marker Light Bulbs
Continued
Maintenance
Back-Up Light, Rear Turn Signal Light and Rear Side
Marker Light Bulbs
When replacing, use the following bulbs.
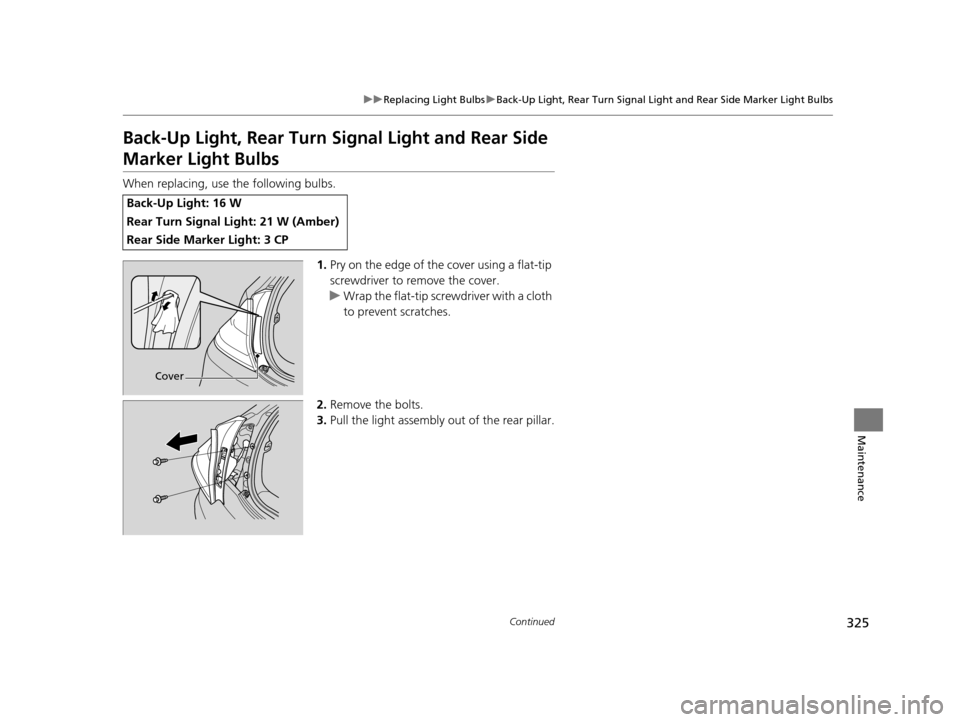
1.Pry on the edge of the cover using a flat-tip
screwdriver to remove the cover.
u Wrap the flat-tip scre wdriver with a cloth
to prevent scratches.
2. Remove the bolts.
3. Pull the light assembly out of the rear pillar.
Back-Up Light: 16 W
Rear Turn Signal Light: 21 W (Amber)
Rear Side Marker Light: 3 CP
Cover
16 CR-Z-31SZT6500.book 325 ページ 2015年9月11日 金曜日 午前11時47分
Page 327 of 409
326
uuReplacing Light Bulbs uBrake/Taillights
Maintenance
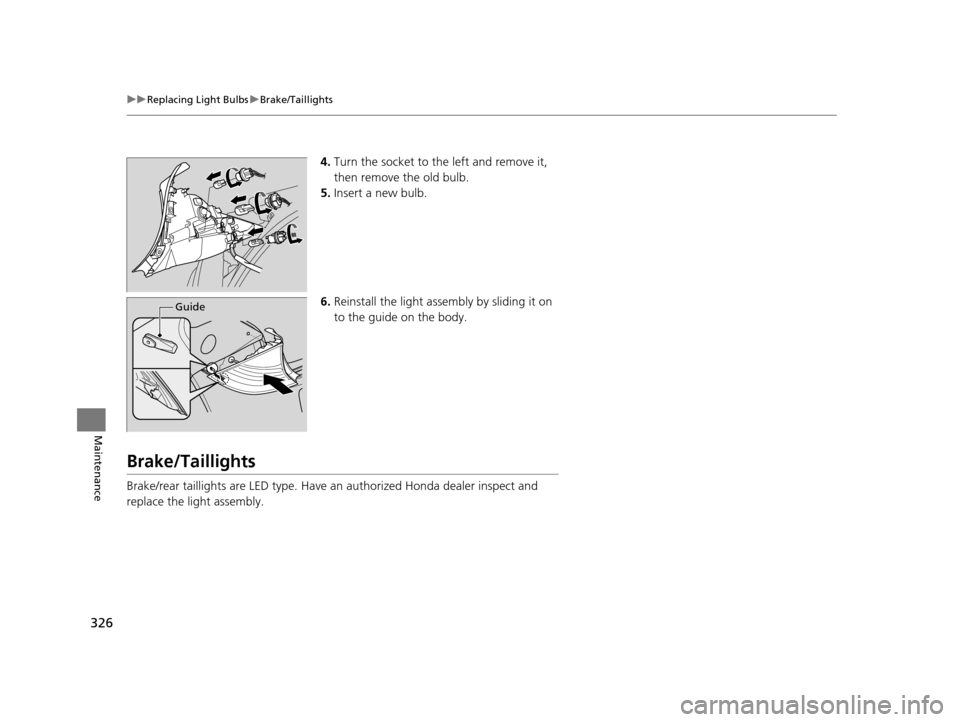
4. Turn the socket to the left and remove it,
then remove the old bulb.
5. Insert a new bulb.
6. Reinstall the light assembly by sliding it on
to the guide on the body.
Brake/Taillights
Brake/rear taillights are LED type. Have an authorized Honda dealer inspect and
replace the light assembly.
Guide
16 CR-Z-31SZT6500.book 326 ページ 2015年9月11日 金曜日 午前11時47分
Page 328 of 409
327
uuReplacing Light Bulbs uRear License Plate Light Bulbs
Maintenance
Rear License Plate Light Bulbs
When replacing, use the following bulb.
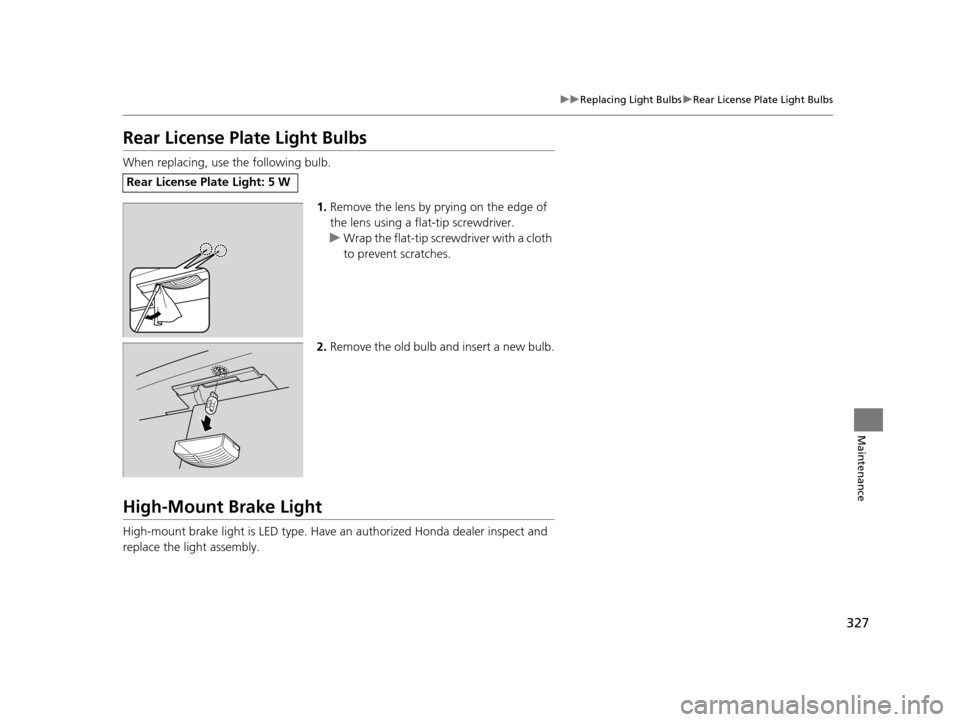
1.Remove the lens by prying on the edge of
the lens using a flat-tip screwdriver.
u Wrap the flat-tip scre wdriver with a cloth
to prevent scratches.
2. Remove the old bulb and insert a new bulb.
High-Mount Brake Light
High-mount brake light is LED type. Have an authorized Honda dealer inspect and
replace the light assembly.
Rear License Plate Light: 5 W
16 CR-Z-31SZT6500.book 327 ページ 2015年9月11日 金曜日 午前11時47分
Page 329 of 409
328
Maintenance
Checking and Maintaining Wiper Blades
Checking Wiper Blades
If the wiper blade rubber has deteriorated, it will leave streaks and the hard surfaces
of the blade may scratch the window glass.
Changing the Front Wiper Blade Rubber
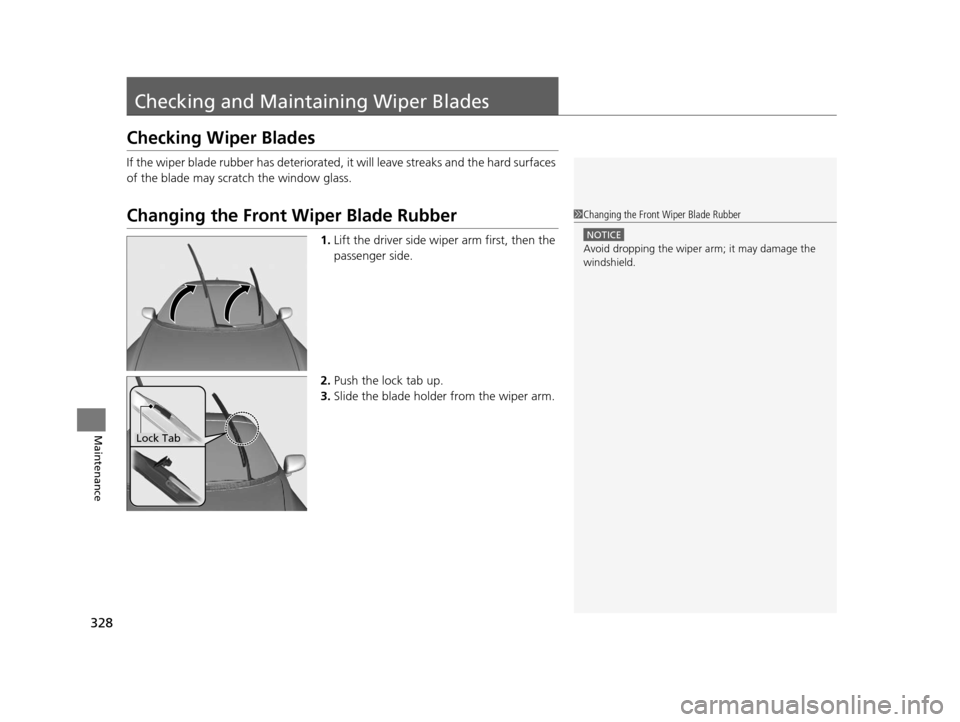
1. Lift the driver side wiper arm first, then the
passenger side.
2. Push the lock tab up.
3. Slide the blade holder from the wiper arm.
1Changing the Front Wiper Blade Rubber
NOTICE
Avoid dropping the wiper ar m; it may damage the
windshield.
Lock Tab
16 CR-Z-31SZT6500.book 328 ページ 2015年9月11日 金曜日 午前11時47分
Page 330 of 409
329
uuChecking and Maintaining Wiper Blades uChanging the Front Wiper Blade Rubber
Maintenance
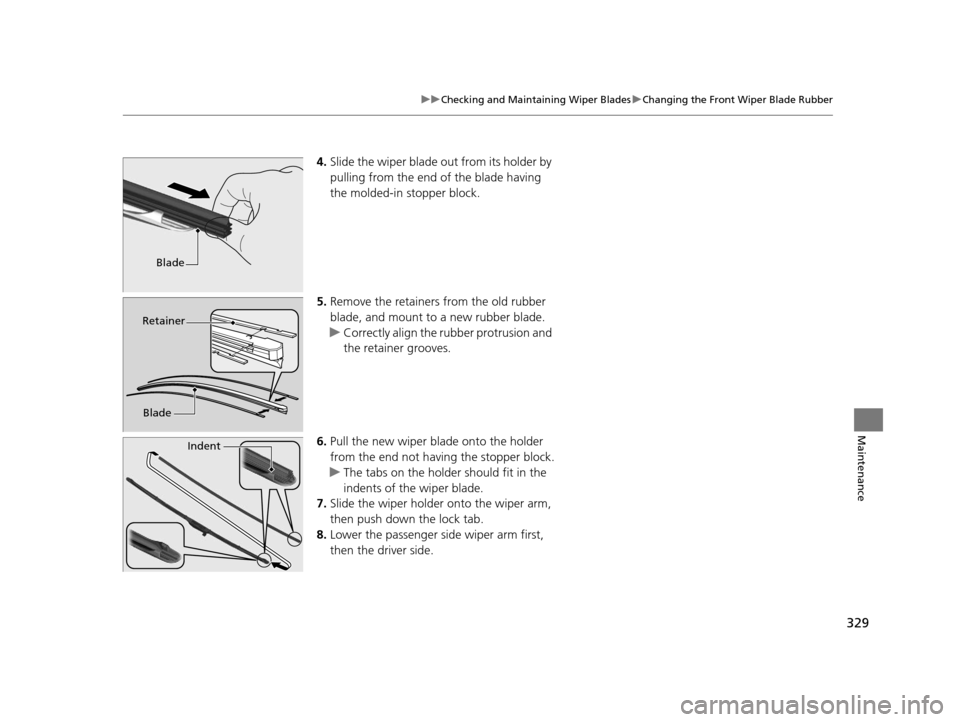
4. Slide the wiper blade out from its holder by
pulling from the end of the blade having
the molded-in stopper block.
5. Remove the retainers from the old rubber
blade, and mount to a new rubber blade.
u Correctly align the rubber protrusion and
the retainer grooves.
6. Pull the new wiper blade onto the holder
from the end not having the stopper block.
u The tabs on the holder should fit in the
indents of the wiper blade.
7. Slide the wiper holder onto the wiper arm,
then push down the lock tab.
8. Lower the passenger side wiper arm first,
then the driver side.
Blade
Retainer
Blade
Indent
16 CR-Z-31SZT6500.book 329 ページ 2015年9月11日 金曜日 午前11時47分
Trending: maintenance reset, instrument panel, immobilizer, TPMS reset, inflation pressure, fuse box, ESP

