HONDA CR-Z 2016 1.G Quick Guide
Manufacturer: HONDA, Model Year: 2016, Model line: CR-Z, Model: HONDA CR-Z 2016 1.GPages: 64, PDF Size: 4.38 MB
Page 21 of 64
34 || 35
V EHICLE C ONTROLS
V
EHICLE C ONTROLS
TABLE OF CONTENTS
INDEX
VISUAL INDEX
VOICE COMMAND
INDEX
SAFETY
INFORMATION
CUSTOMER
INFORMATION
INSTRUMENT PANEL
SPECIFICATIONS
VEHICLE
CONTROLS
MAINTENANCE
AUDIO AND
CONNECTIVITY
HANDLING THE UNEXPECTED
BLUETOOTH®
HANDSFREELINK®
DRIVING
HONDALINK®
NAVIGATION
Failure to reinstall, or correctly reinstall, the head restraints can re\
sult in
severe injury during a crash.
Always replace the head restraints before driving.
WARNING
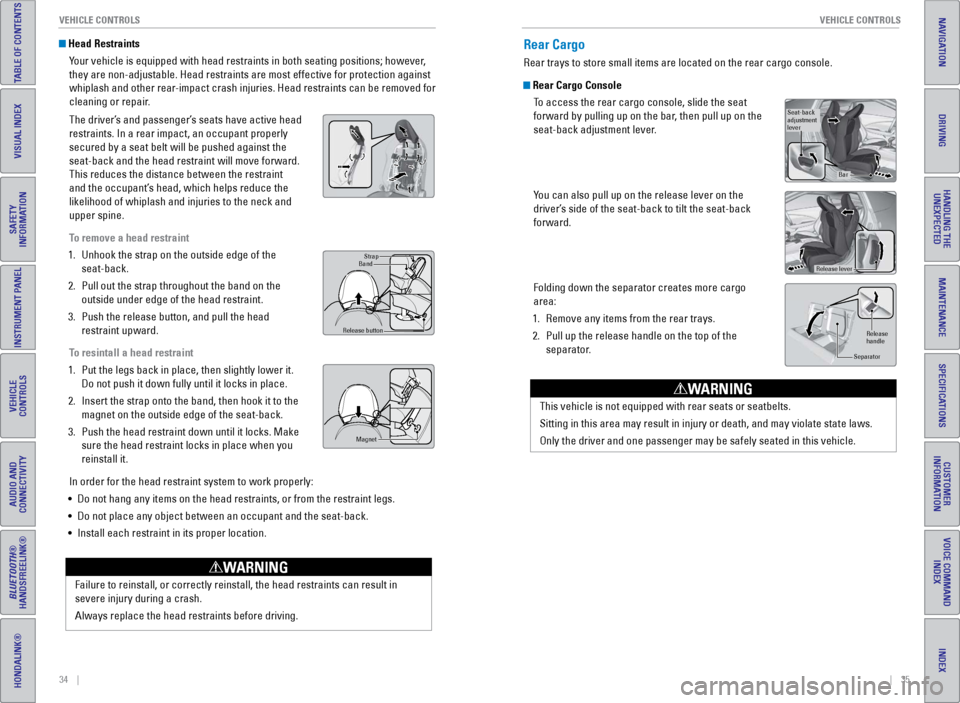
Head Restraints
Your vehicle is equipped with head restraints in both seating positions; \
however,
they are non-adjustable. Head restraints are most effective for protecti\
on against
whiplash and other rear-impact crash injuries. Head restraints can be removed for
cleaning or repair.
The driver’s and passenger’s seats have active head
restraints. In a rear impact, an occupant properly
secured by a seat belt will be pushed against the
seat-back and the head restraint will move forward.
This reduces the distance between the restraint
and the occupant’s head, which helps reduce the
likelihood of whiplash and injuries to the neck and
upper spine.
To remove a head restraint
1.
Unhook the strap on the outside edge of the
seat-back.
2.
Pull out the strap throughout the band on the
outside under edge of the head restraint.
3.
Push the release button, and pull the head
restraint upward.
T
o resintall a head restraint
1.
Put the legs back in place, then slightly lower it.
Do not push it down fully until it locks in place.
2.
Insert the strap onto the band, then hook it to the
magnet on the outside edge of the seat-back.
3.
Push the head restraint down until it locks. Make
sure the head restraint locks in place when you
reinstall it.
In order for the head restraint system to work properly:
•
Do not hang any items on the head restraints, or from the restraint legs\
.
•
Do not place any object between an occupant and the seat-back.
•
Install each restraint in its proper location.
Strap
Band
Release button
Magne t
Rear Cargo
Rear trays to store small items are located on the rear cargo console.
Rear Cargo Console
To access the rear cargo console, slide the seat
forward by pulling up on the bar, then pull up on the
seat-back adjustment lever.
You can also pull up on the release lever on the
driver’s side of the seat-back to tilt the seat-back
forward.
Folding down the separator creates more cargo
area:
1.
Remove any items from the rear trays.
2.
Pull up the release handle on the top of the
separator
.
Seat-back
adjustment
lever
Bar
Release lever
Release
handle
Separator
This vehicle is not equipped with rear seats or seatbelts.
Sitting in this area may result in injury or death, and may violate stat\
e laws.
Only the driver and one passenger may be safely seated in this vehicle.
WARNING
Page 22 of 64
36 || 37
V EHICLE C ONTROLS
V
EHICLE C ONTROLS
TABLE OF CONTENTS
INDEX
VISUAL INDEX
VOICE COMMAND
INDEX
SAFETY
INFORMATION
CUSTOMER
INFORMATION
INSTRUMENT PANEL
SPECIFICATIONS
VEHICLE
CONTROLS
MAINTENANCE
AUDIO AND
CONNECTIVITY
HANDLING THE UNEXPECTED
BLUETOOTH®
HANDSFREELINK®
DRIVING
HONDALINK®
NAVIGATION
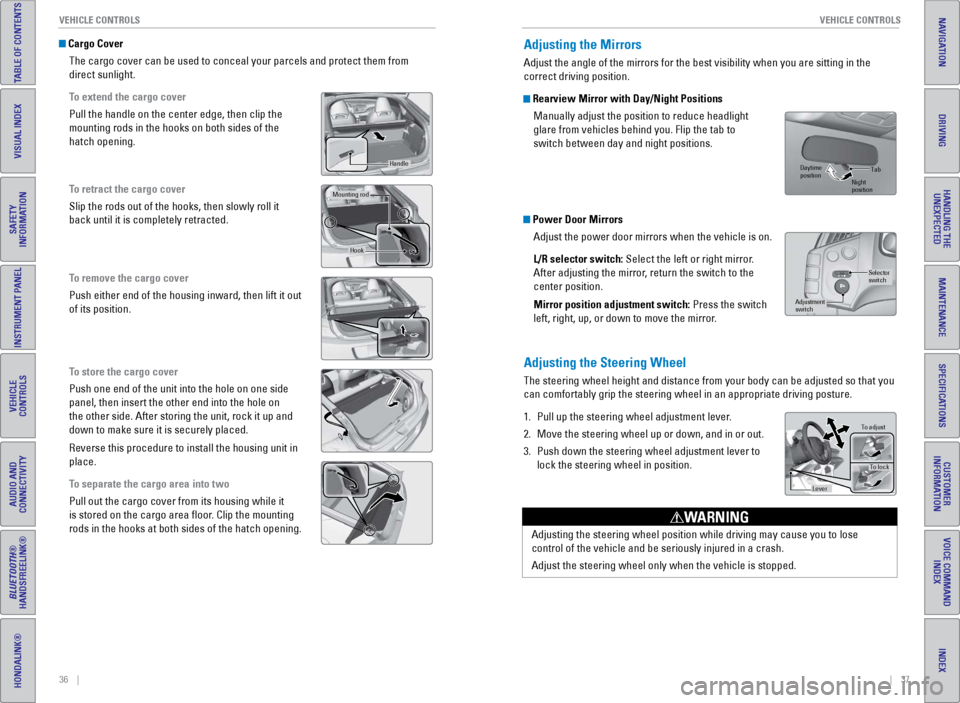
Cargo Cover
The cargo cover can be used to conceal your parcels and protect them fro\
m
direct sunlight.
To extend the cargo cover
Pull the handle on the center edge, then clip the
mounting rods in the hooks on both sides of the
hatch opening.
To retract the cargo cover
Slip the rods out of the hooks, then slowly roll it
back until it is completely retracted.
To remove the cargo cover
Push either end of the housing inward, then lift it out
of its position.
To store the cargo cover
Push one end of the unit into the hole on one side
panel, then insert the other end into the hole on
the other side. After storing the unit, rock it up and
down to make sure it is securely placed.
Reverse this procedure to install the housing unit in
place.
To separate the cargo area into two
Pull out the cargo cover from its housing while it
is stored on the cargo area floor. Clip the mounting
rods in the hooks at both sides of the hatch opening.
Handle
Mounting ro d
Hook
Adjusting the Mirrors
Adjust the angle of the mirrors for the best visibility when you are sit\
ting in the
correct driving position.
Rearview Mirror with Day/Night Positions
Manually adjust the position to reduce headlight
glare from vehicles behind you. Flip the tab to
switch between day and night positions.
Power Door MirrorsAdjust the power door mirrors when the vehicle is on.
L/R selector switch: Select the left or right mirror.
After adjusting the mirror, return the switch to the
center position.
Mirror position adjustment switch: Press the switch
left, right, up, or down to move the mirror.
Adjusting the Steering Wheel
The steering wheel height and distance from your body can be adjusted so\
that you
can comfortably grip the steering wheel in an appropriate driving postur\
e.
1.
Pull up the steering wheel adjustment lever
.
2.
Move the steering wheel up or down, and in or out.
3.
Push down the steering wheel adjustment lever to
lock the steering wheel in position.
Selector
switch
Adjustment
switch
Tab
Daytime
position Night
position
To adjust
To lock
Lever
Adjusting the steering wheel position while driving may cause you to los\
e
control of the vehicle and be seriously injured in a crash.
Adjust the steering wheel only when the vehicle is stopped.
WARNING
Page 23 of 64
38 || 39
V EHICLE C ONTROLS
V
EHICLE C ONTROLS
TABLE OF CONTENTS
INDEX
VISUAL INDEX
VOICE COMMAND
INDEX
SAFETY
INFORMATION
CUSTOMER
INFORMATION
INSTRUMENT PANEL
SPECIFICATIONS
VEHICLE
CONTROLS
MAINTENANCE
AUDIO AND
CONNECTIVITY
HANDLING THE UNEXPECTED
BLUETOOTH®
HANDSFREELINK®
DRIVING
HONDALINK®
NAVIGATION
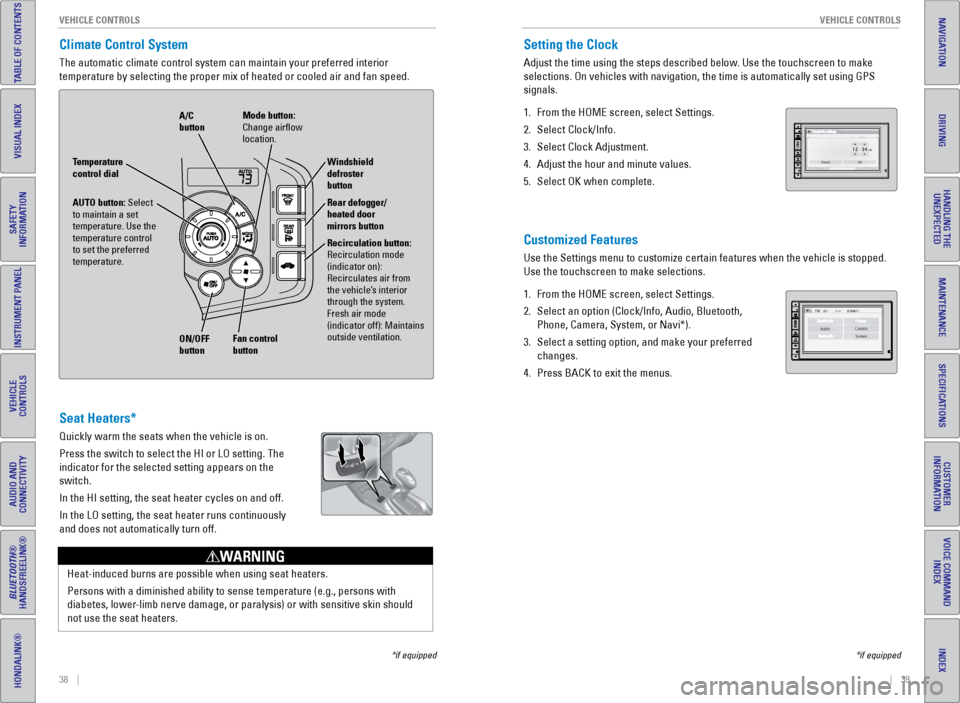
Climate Control System
The automatic climate control system can maintain your preferred interio\
r
temperature by selecting the proper mix of heated or cooled air and fan \
speed.
*if equipped
Seat Heaters*
Quickly warm the seats when the vehicle is on.
Press the switch to select the HI or LO setting. The
indicator for the selected setting appears on the
switch.
In the HI setting, the seat heater cycles on and off.
In the LO setting, the seat heater runs continuously
and does not automatically turn off.
Heat-induced burns are possible when using seat heaters.
Persons with a diminished ability to sense temperature (e.g., persons w\
ith
diabetes, lower-limb nerve damage, or paralysis) or with sensitive skin should
not use the seat heaters.
WARNING
AUTO button: Select
to maintain a set
temperature. Use the
temperature control
to set the preferred
temperature.
ON/OFF
button A/C
button
Recirculation button:
Recirculation mode
(indicator on):
Recirculates air from
the vehicle’s interior
through the system.
Fresh air mode
(indicator off): Maintains
outside ventilation. Rear defogger/
heated door
mirrors button Windshield
defroster
button
Fan control
button Mode button:
Change airflow
location.
Temperature
control dial
Setting the Clock
Adjust the time using the steps described below. Use the touchscreen to make
selections. On vehicles with navigation, the time is automatically set u\
sing GPS
signals.
1.
From the HOME screen, select Settings.
2.
Select Clock/Info.
3.
Select Clock Adjustment.
4.
Adjust the hour and minute values.
5.
Select OK when complete.
Customized Features
Use the Settings menu to customize certain features when the vehicle is \
stopped.
Use the touchscreen to make selections.
1.
From the HOME screen, select Settings.
2.
Select an option (Clock/Info, Audio, Bluetooth,
Phone, Camera, System, or Navi*).
3.
Select a setting option, and make your preferred
changes.
4.
Press BACK to exit the menus.
*if equipped
Page 24 of 64
40 || 41
AUDIO AND CONNECTIVITY
AUDIO AND CONNECTIVITY
TABLE OF CONTENTS
INDEX
VISUAL INDEX
VOICE COMMAND
INDEX
SAFETY
INFORMATION
CUSTOMER
INFORMATION
INSTRUMENT PANEL
SPECIFICATIONS
VEHICLE
CONTROLS
MAINTENANCE
AUDIO AND
CONNECTIVITY
HANDLING THE UNEXPECTED
BLUETOOTH®
HANDSFREELINK®
DRIVING
HONDALINK®
NAVIGATION
Learn how to operate the vehicle’s audio system.
Basic Audio Operation
Connect audio devices and operate buttons and displays for the audio sys\
tem.
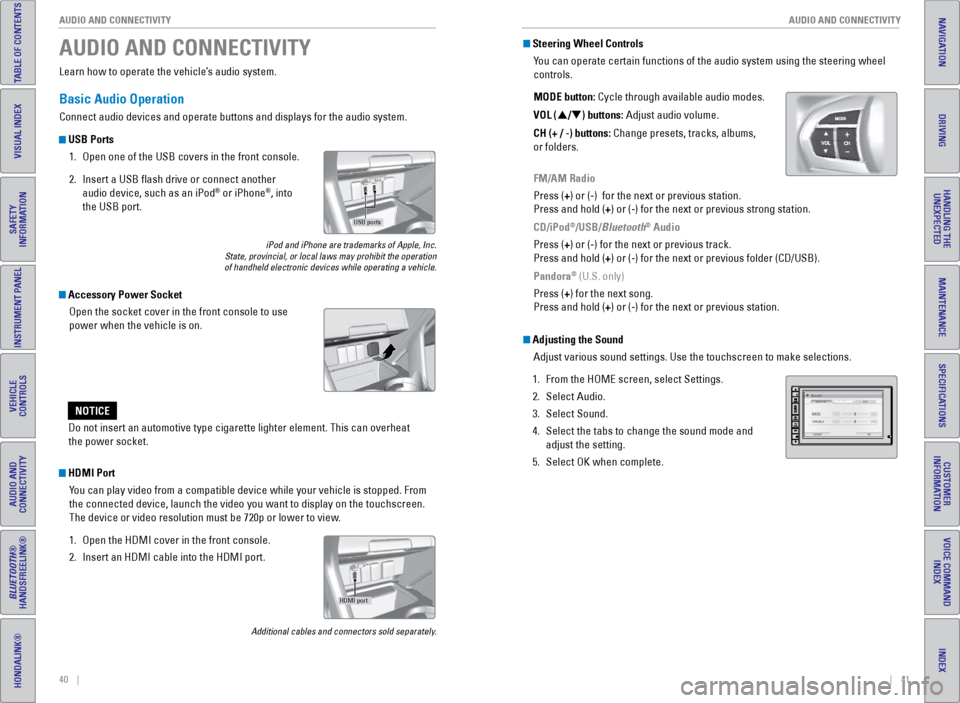
USB Ports
1.
Open one of the USB covers in the front console.
2.
Insert a USB flash drive or connect another
audio device, such as an iPod® or iPhone®, into
the USB port.
iPod and iPhone are trademarks of Apple, Inc.
State, provincial, or local laws may prohibit the operation
of handheld electronic devices while operating a vehicle.
AUDIO AND CONNECTIVITY
Do not insert an automotive type cigarette lighter element. This can ove\
rheat
the power socket.
NOTICE
HDMI Port
You can play video from a compatible device while your vehicle is stopped. From
the connected device, launch the video you want to display on the touchs\
creen.
The device or video resolution must be 720p or lower to view.
1.
Open the HDMI cover in the front console.
2.
Insert an HDMI cable into the HDMI port.
Additional cables and connectors sold separately.
Accessory Power SocketOpen the socket cover in the front console to use
power when the vehicle is on.
USB ports
HDMI port
Steering Wheel ControlsYou can operate certain functions of the audio system using the steering \
wheel
controls.
MODE button: Cycle through available audio modes.
VOL (p/q) buttons: Adjust audio volume.
CH (+ / -) buttons: Change presets, tracks, albums,
or folders.
FM/AM Radio
Press (+) or (-) for the next or previous station.
Press and hold (+) or (-) for the next or previous strong station.
CD/iPod
®/USB/Bluetooth® Audio
Press (+) or (-) for the next or previous track.
Press and hold (+) or (-) for the next or previous folder (CD/USB).
Pandora
® (U.S. only)
Press (+) for the next song.
Press and hold (+) or (-) for the next or previous station.
Adjusting the Sound Adjust various sound settings. Use the touchscreen to make selections.
1.
From the HOME screen, select Settings.
2.
Select Audio.
3.
Select Sound.
4.
Select the tabs to change the sound mode and
adjust the setting.
5.
Select OK when complete.
Page 25 of 64
42 || 43
AUDIO AND CONNECTIVITY
AUDIO AND CONNECTIVITY
TABLE OF CONTENTS
INDEX
VISUAL INDEX
VOICE COMMAND
INDEX
SAFETY
INFORMATION
CUSTOMER
INFORMATION
INSTRUMENT PANEL
SPECIFICATIONS
VEHICLE
CONTROLS
MAINTENANCE
AUDIO AND
CONNECTIVITY
HANDLING THE UNEXPECTED
BLUETOOTH®
HANDSFREELINK®
DRIVING
HONDALINK®
NAVIGATION
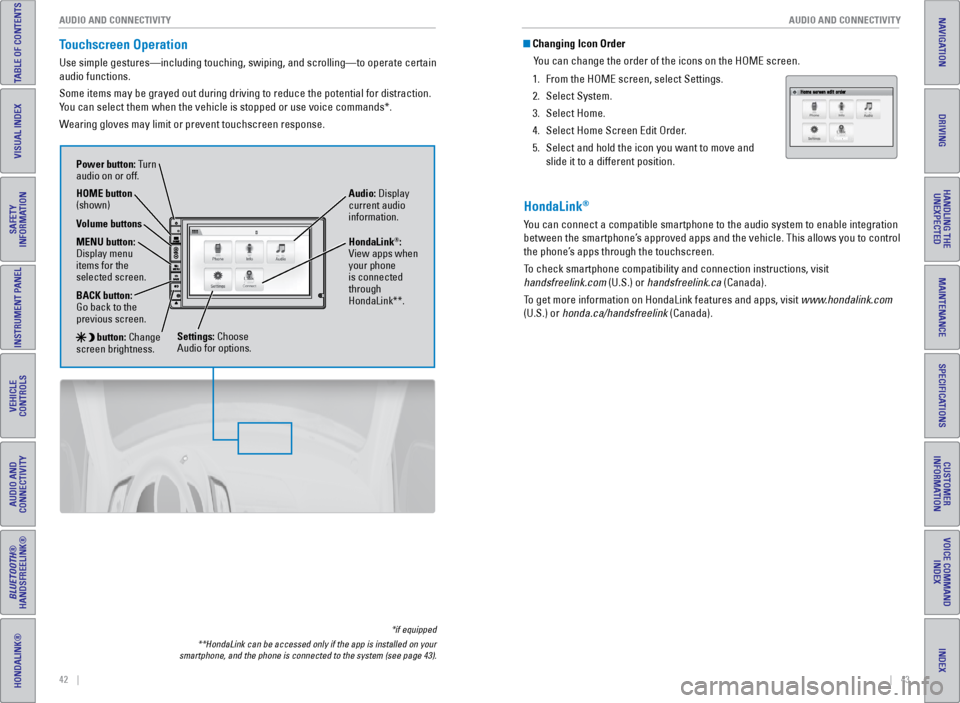
Touchscreen Operation
Use simple gestures—including touching, swiping, and scrolling—to \
operate certain
audio functions.
Some items may be grayed out during driving to reduce the potential for \
distraction.
You can select them when the vehicle is stopped or use voice commands*.
Wearing gloves may limit or prevent touchscreen response.
*if equipped
**HondaLink can be accessed only if the app is installed on your
smartphone, and the phone is connected to the system (see page 43).
Power button: Turn
audio on or off.
HOME button
(shown)
MENU button:
Display menu
items for the
selected screen.
BACK button:
Go back to the
previous screen.
button: Change
screen brightness. Settings: Choose
Audio for options. HondaLink
®:
View apps when
your phone
is connected
through
HondaLink**. Audio: Display
current audio
information.
Volume buttons
Changing Icon Order
You can change the order of the icons on the HOME screen.
1.
From the HOME screen, select Settings.
2.
Select System.
3.
Select Home.
4.
Select Home Screen Edit Order
.
5.
Select and hold the icon you want to move and
slide it to a different position.
HondaLink®
You can connect a compatible smartphone to the audio system to enable int\
egration
between the smartphone’s approved apps and the vehicle. This allows you to control
the phone’s apps through the touchscreen.
To check smartphone compatibility and connection instructions, visit
handsfreelink.com (U.S.) or handsfreelink.ca (Canada).
To get more information on HondaLink features and apps, visit www.hondalink.com
(U.S.) or honda.ca/handsfreelink (Canada).
Page 26 of 64
44 || 45
AUDIO AND CONNECTIVITY
AUDIO AND CONNECTIVITY
TABLE OF CONTENTS
INDEX
VISUAL INDEX
VOICE COMMAND
INDEX
SAFETY
INFORMATION
CUSTOMER
INFORMATION
INSTRUMENT PANEL
SPECIFICATIONS
VEHICLE
CONTROLS
MAINTENANCE
AUDIO AND
CONNECTIVITY
HANDLING THE UNEXPECTED
BLUETOOTH®
HANDSFREELINK®
DRIVING
HONDALINK®
NAVIGATION
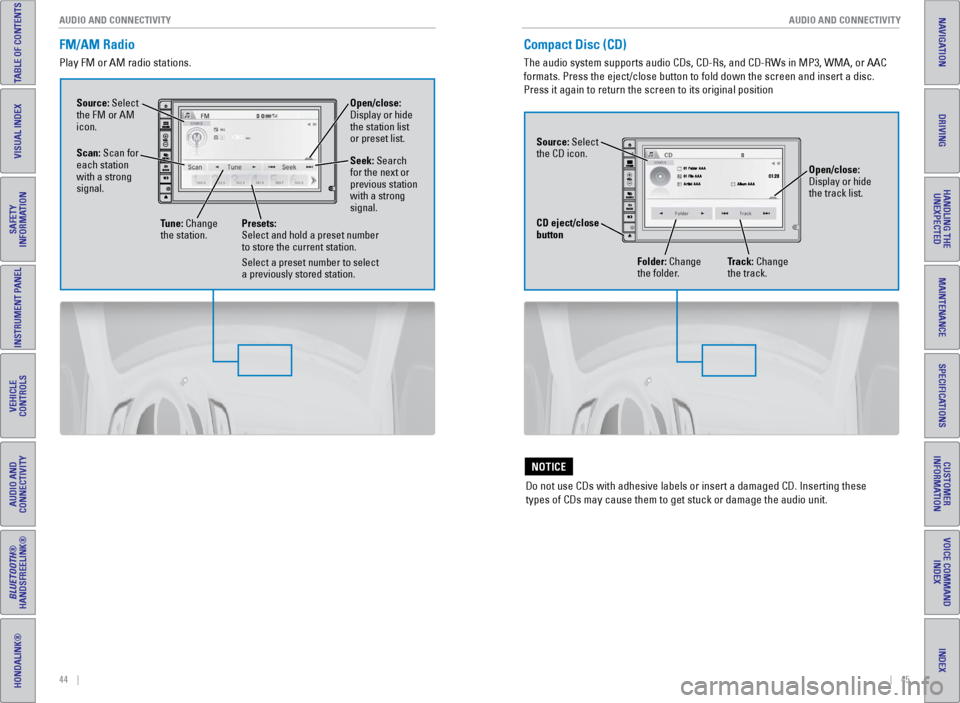
FM/AM Radio
Play FM or AM radio stations.
Source: Select
the FM or AM
icon.
Tune: Change
the station. Seek: Search
for the next or
previous station
with a strong
signal. Open/close:
Display or hide
the station list
or preset list.
Scan: Scan for
each station
with a strong
signal.
Presets:
Select and hold a preset number
to store the current station.
Select a preset number to select
a previously stored station.
Compact Disc (CD)
The audio system supports audio CDs, CD-Rs, and CD-RWs in MP3, WMA, or AAC
formats. Press the eject/close button to fold down the screen and insert\
a disc.
Press it again to return the screen to its original position
Do not use CDs with adhesive labels or insert a damaged CD. Inserting th\
ese
types of CDs may cause them to get stuck or damage the audio unit.
NOTICE
Source: Select
the CD icon. Folder: Change
the folder. Open/close:
Display or hide
the track list.
Track: Change
the track.
CD eject/close
button
Page 27 of 64
46 || 47
AUDIO AND CONNECTIVITY
AUDIO AND CONNECTIVITY
TABLE OF CONTENTS
INDEX
VISUAL INDEX
VOICE COMMAND
INDEX
SAFETY
INFORMATION
CUSTOMER
INFORMATION
INSTRUMENT PANEL
SPECIFICATIONS
VEHICLE
CONTROLS
MAINTENANCE
AUDIO AND
CONNECTIVITY
HANDLING THE UNEXPECTED
BLUETOOTH®
HANDSFREELINK®
DRIVING
HONDALINK®
NAVIGATION
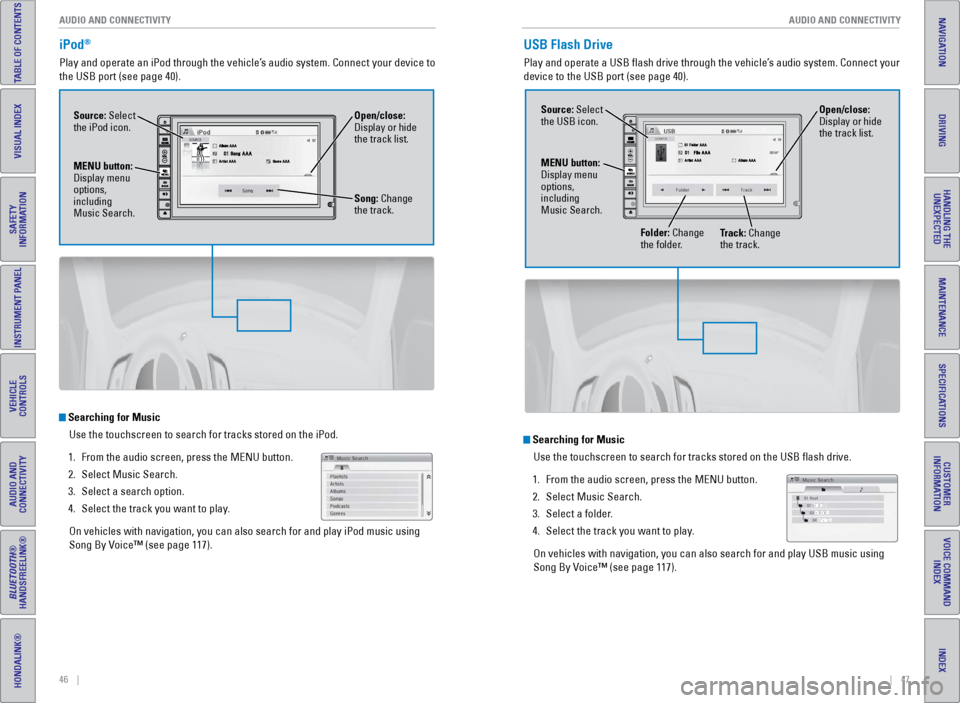
iPod®
Play and operate an iPod through the vehicle’s audio system. Connect your device to
the USB port (see page 40).
Searching for Music
Use the touchscreen to search for tracks stored on the iPod.
1.
From the audio screen, press the MENU button.
2.
Select Music Search.
3.
Select a search option.
4.
Select the track you want to play
.
On vehicles with navigation, you can also search for and play iPod music using
Song By Voice™ (see page 117).
Source: Select
the iPod icon. Open/close:
Display or hide
the track list.
MENU button:
Display menu
options,
including
Music Search. Song: Change
the track.
USB Flash Drive
Play and operate a USB flash drive through the vehicle’s audio system. Connect your
device to the USB port (see page 40).
Searching for Music
Use the touchscreen to search for tracks stored on the USB flash drive\
.
1.
From the audio screen, press the MENU button.
2.
Select Music Search.
3.
Select a folder
.
4.
Select the track you want to play
.
On vehicles with navigation, you can also search for and play USB music using
Song By Voice™ (see page 117).
Source: Select
the USB icon.
Folder: Change
the folder. Open/close:
Display or hide
the track list.
MENU button:
Display menu
options,
including
Music Search. Track: Change
the track.
Page 28 of 64
48 || 49
AUDIO AND CONNECTIVITY
AUDIO AND CONNECTIVITY
TABLE OF CONTENTS
INDEX
VISUAL INDEX
VOICE COMMAND
INDEX
SAFETY
INFORMATION
CUSTOMER
INFORMATION
INSTRUMENT PANEL
SPECIFICATIONS
VEHICLE
CONTROLS
MAINTENANCE
AUDIO AND
CONNECTIVITY
HANDLING THE UNEXPECTED
BLUETOOTH®
HANDSFREELINK®
DRIVING
HONDALINK®
NAVIGATION
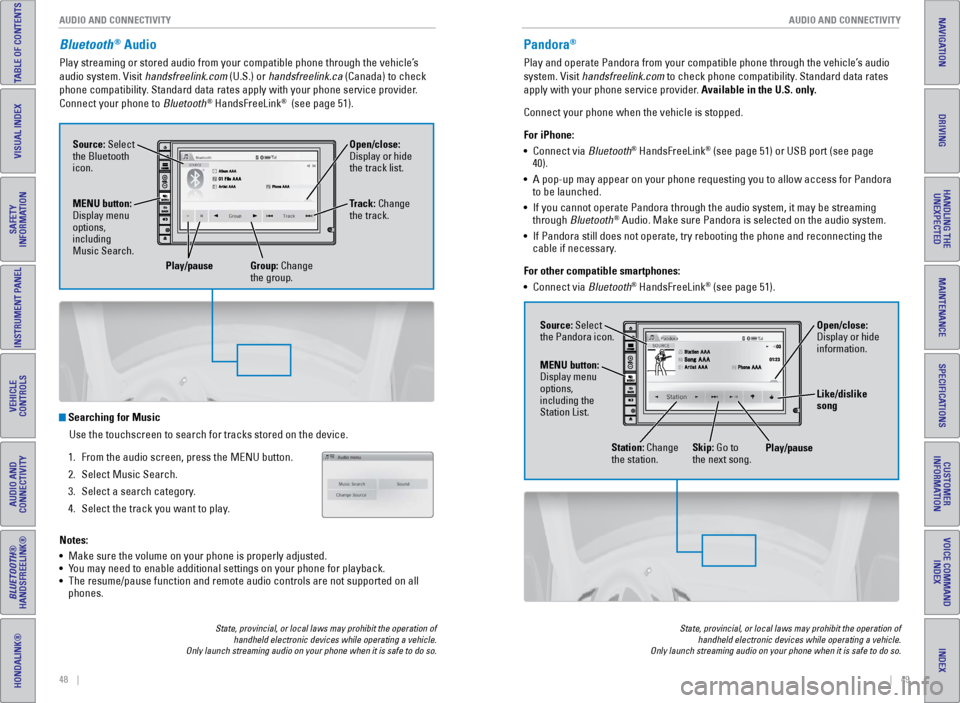
Bluetooth® Audio
Play streaming or stored audio from your compatible phone through the ve\
hicle’s
audio system. Visit handsfreelink.com (U.S.) or handsfreelink.ca (Canada) to check
phone compatibility. Standard data rates apply with your phone service provider.
Connect your phone to Bluetooth
® HandsFreeLink® (see page 51).
State, provincial, or local laws may prohibit the operation of
handheld electronic devices while operating a vehicle.
Only launch streaming audio on your phone when it is safe to do so.
Searching for Music
Use the touchscreen to search for tracks stored on the device.
1.
From the audio screen, press the MENU button.
2.
Select Music Search.
3.
Select a search category
.
4.
Select the track you want to play
.
Notes:
•
Make sure the volume on your phone is properly adjusted.
•
Y
ou may need to enable additional settings on your phone for playback.
•
The resume/pause function and remote audio controls are not supported on\
all
phones.
Source: Select
the Bluetooth
icon. Open/close:
Display or hide
the track list.
MENU button:
Display menu
options,
including
Music Search. Track: Change
the track.
Play/pause Group: Change the group.
Pandora®
Play and operate Pandora from your compatible phone through the vehicle’\
s audio
system. Visit handsfreelink.com to check phone compatibility. Standard data rates
apply with your phone service provider. Available in the U.S. only.
Connect your phone when the vehicle is stopped.
For iPhone:
•
Connect via
Bluetooth
® HandsFreeLink® (see page 51) or USB port (see page
40).
•
A pop-up may appear on your phone requesting you to allow access for Pan\
dora
to be launched.
•
If you cannot operate Pandora through the audio system, it may be stream\
ing
through
Bluetooth
® Audio. Make sure Pandora is selected on the audio system.
•
If Pandora still does not operate, try rebooting the phone and reconnect\
ing the
cable if necessary.
For other compatible smartphones:
•
Connect via
Bluetooth
® HandsFreeLink® (see page 51).
State, provincial, or local laws may prohibit the operation of handheld electronic devices while operating a vehicle.
Only launch streaming audio on your phone when it is safe to do so.
Source: Select
the Pandora icon.
Station: Change
the station. Skip: Go to
the next song. Open/close:
Display or hide
information.
MENU button:
Display menu
options,
including the
Station List. Like/dislike
song
Play/pause
Page 29 of 64
50 || 51
TABLE OF CONTENTS
INDEX
VISUAL INDEX
VOICE COMMAND
INDEX
SAFETY
INFORMATION
CUSTOMER
INFORMATION
INSTRUMENT PANEL
SPECIFICATIONS
VEHICLE
CONTROLS
MAINTENANCE
AUDIO AND
CONNECTIVITY
HANDLING THE UNEXPECTED
BLUETOOTH®
HANDSFREELINK®
DRIVING
HONDALINK®
NAVIGATION
Learn how to operate the vehicle’s hands-free calling system.
Basic HFL Operation
Make and receive phone calls using the vehicle’s audio system, without handling
your phone. Visit handsfreelink.com (U.S.) or handsfreelink.ca (Canada) to check
phone compatibility.
To reduce the potential for driver distraction, certain manual functions \
may be
inoperable or grayed out while the vehicle is moving. Stop or pull over \
to perform
the function. Voice commands are also available.
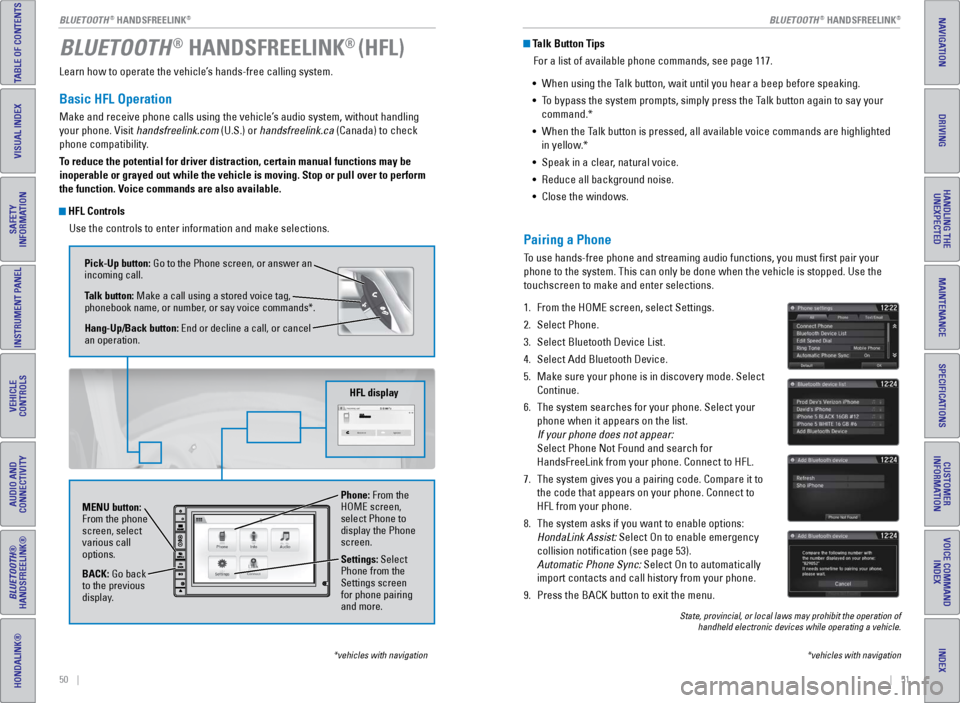
HFL Controls
Use the controls to enter information and make selections.
BLUETOOTH® HANDSFREELINK® (HFL)
*vehicles with navigation
Pick-Up button: Go to the Phone screen, or answer an
incoming call.
Talk button: Make a call using a stored voice tag,
phonebook name, or number, or say voice commands*.
Hang-Up/Back button: End or decline a call, or cancel
an operation.
MENU button:
From the phone
screen, select
various call
options.
BACK: Go back
to the previous
display. Phone: From the
HOME screen,
select Phone to
display the Phone
screen.
Settings: Select
Phone from the
Settings screen
for phone pairing
and more.
HFL display
Talk Button Tips
For a list of available phone commands, see page 117.
•
When using the T
alk button, wait until you hear a beep before speaking.
•
T
o bypass the system prompts, simply press the Talk button again to say your
command.*
•
When the T
alk button is pressed, all available voice commands are highlighted
in yellow.*
•
Speak in a clear
, natural voice.
•
Reduce all background noise.
•
Close the windows.
*vehicles with navigation
Pairing a Phone
To use hands-free phone and streaming audio functions, you must first p\
air your
phone to the system. This can only be done when the vehicle is stopped. \
Use the
touchscreen to make and enter selections.
1.
From the HOME screen, select Settings.
2.
Select Phone.
3.
Select Bluetooth Device List.
4.
Select Add Bluetooth Device.
5.
Make sure your phone is in discovery mode. Select
Continue.
6.
The system searches for your phone. Select your
phone when it appears on the list.
If your phone does not appear:
Select Phone Not Found and search for
HandsFreeLink from your phone. Connect to HFL.
7.
The system gives you a pairing code. Compare it to
the code that appears on your phone. Connect to
HFL from your phone.
8.
The system asks if you want to enable options:
HondaLink Assist: Select On to enable emergency
collision notification (see page 53).
Automatic Phone Sync: Select On to automatically
import contacts and call history from your phone.
9.
Press the BACK button to exit the menu.
State, provincial, or local laws may prohibit the operation of handheld electronic devices while operating a vehicle.
BLUETOOTH® HANDSFREELINK®BLUETOOTH® HANDSFREELINK®
Page 30 of 64
52 || 53
TABLE OF CONTENTS
INDEX
VISUAL INDEX
VOICE COMMAND
INDEX
SAFETY
INFORMATION
CUSTOMER
INFORMATION
INSTRUMENT PANEL
SPECIFICATIONS
VEHICLE
CONTROLS
MAINTENANCE
AUDIO AND
CONNECTIVITY
HANDLING THE UNEXPECTED
BLUETOOTH®
HANDSFREELINK®
DRIVING
HONDALINK®
NAVIGATION
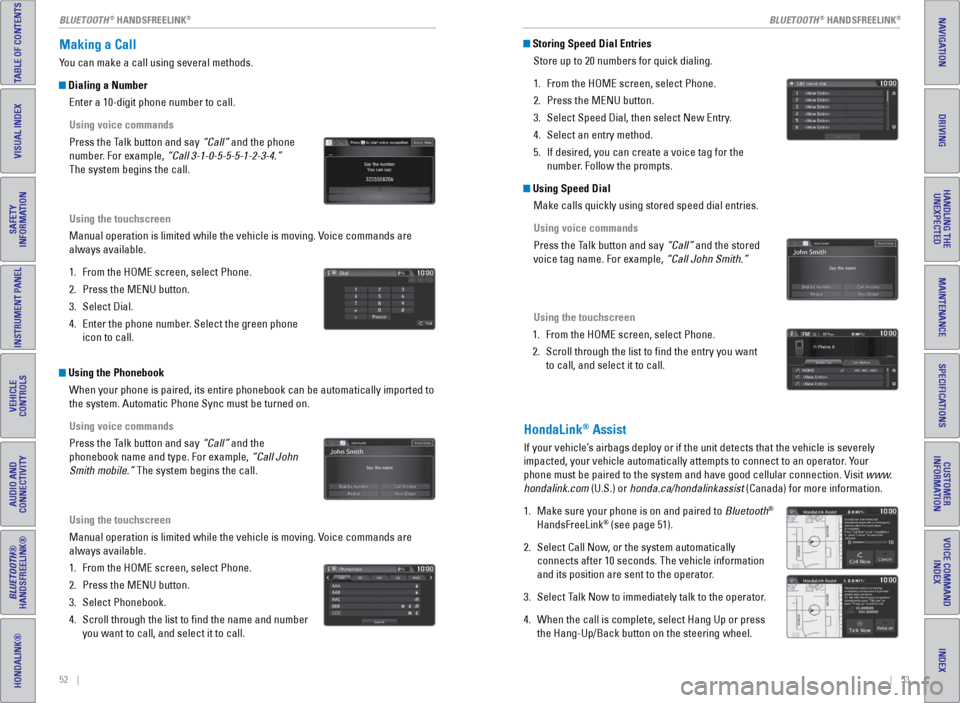
Making a Call
You can make a call using several methods.
Dialing a Number
Enter a 10-digit phone number to call.
Using voice commands
Press the Talk button and say “Call” and the phone
number. For example, “Call 3-1-0-5-5-5-1-2-3-4.”
The system begins the call.
Using the touchscreen
Manual operation is limited while the vehicle is moving. Voice commands are
always available.
1.
From the HOME screen, select Phone.
2.
Press the MENU button.
3.
Select Dial.
4.
Enter the phone number
. Select the green phone
icon to call.
Using the Phonebook
When your phone is paired, its entire phonebook can be automatically imp\
orted to
the system. Automatic Phone Sync must be turned on.
Using voice commands
Press the Talk button and say “Call” and the
phonebook name and type. For example, “Call John
Smith mobile.” The system begins the call.
Using the touchscreen
Manual operation is limited while the vehicle is moving. Voice commands are
always available.
1.
From the HOME screen, select Phone.
2.
Press the MENU button.
3.
Select Phonebook.
4.
Scroll through the list to find the name and number
you want to call, and select it to call.
Storing Speed Dial EntriesStore up to 20 numbers for quick dialing.
1.
From the HOME screen, select Phone.
2.
Press the MENU button.
3.
Select Speed Dial, then select New Entry
.
4.
Select an entry method.
5.
If desired, you can create a voice tag for the
number
. Follow the prompts.
Using Speed DialMake calls quickly using stored speed dial entries.
Using voice commands
Press the Talk button and say “Call” and the stored
voice tag name. For example, “Call John Smith.”
Using the touchscreen
1.
From the HOME screen, select Phone.
2.
Scroll through the list to find the entry you want
to call, and select it to call.
HondaLink® Assist
If your vehicle’s airbags deploy or if the unit detects that the vehicle is severely
impacted, your vehicle automatically attempts to connect to an operator. Your
phone must be paired to the system and have good cellular connection. Vi\
sit www.
hondalink.com (U.S.) or honda.ca/hondalinkassist (Canada) for more information.
1.
Make sure your phone is on and paired to
Bluetooth
®
HandsFreeLink® (see page 51).
2.
Select Call Now
, or the system automatically
connects after 10 seconds. The vehicle information
and its position are sent to the operator.
3.
Select T
alk Now to immediately talk to the operator.
4.
When the call is complete, select Hang Up or press
the Hang-Up/Back button on the steering wheel.
BLUETOOTH® HANDSFREELINK®BLUETOOTH® HANDSFREELINK®