HONDA CROSSTOUR 2012 1.G Technology Reference Guide
Manufacturer: HONDA, Model Year: 2012, Model line: CROSSTOUR, Model: HONDA CROSSTOUR 2012 1.GPages: 16, PDF Size: 8.16 MB
Page 1 of 16
T E C H N O L O G YR E F E R E N C E G U I D E
2 0 1 2 C R O S S T O U R
o w n e r s . h o n d a . c o m
\f 1 T P 6 Q 2 0 2 0 1 2 H o n d a C r o s s t o u r T e c h n o l o g y R e f e r e n c e G u i d e
0 0 X \f 1 � T P 6 � Q 2 0 0 ©2011 American Honda Motor Co., Inc. — All Rights Reserved P r i n t e d i n U . S . A .
12 Crosstour TRG\fATG_NEW STYLE \b/30/2011 9\f42 AM Page 1
Page 2 of 16
Navigation*............................................\2...........................................\2........................\f8
Bluetooth®HandsFreeLink®(HFL)....................................\2.................................... 20
iPod®or USB Flash Drive ....................................\2........................................\2......... 23
Fuel Fill Door....................................\2....................................\2................................... 24
Hidden Removable Utility Box ....................................\2........................................\2 25
Compact Spare Tire ....................................\2....................................\2....................... 26
Owner Link ..........................................................\2..................................................\2.. 28
Safety Reminder ....................................\2....................................\2.............................. 29
Fuel Recommendation.........................................\2.................................................. 29
Auto Door Locks .....................................................................................................
2
Instrument Panel Indicators ................................................................................... 4
Information Display .................................................................................................. 6
Tire Pressure Monitoring System (TPMS)........................................................... 7
Driving Position Memory System (DPMS)
*....................................\2..................... 8
Rearview Camera ..................................................................................................... 9
Reverse Tilt Door Mirrors
*....................................\2....................................\2.......... \f0
HomeLink® *..............................................................................................................\f\f
Voice Recognition ................................................................................................... \f2
BLUETOOTH®
HANDSFREELINK®p.20
VOICE RECOGNITION p.12
INSTRUMENT PANEL p. 4
NAVIGATIONp.18
AUDIO p.2\f
T E C H N O L O G Y R E F E R E N C E G U I D E
The Technology Reference Guide is designed to help you get
acquainted with your new Honda and provide basic
instructions on some of its technology and convenience
features.
This guide is not intended as a substitute for the Owner’s
Manual. For complete information on vehicle controls and
operation, please refer to the respective sections in the
Owner’s Manual.
As with the Owner’s Manual, this guide covers all trim levels
of the Crosstour. Therefore, you may find descriptions of
equipment and features that are not on your particular
vehicle.
*if equipped
12 Crosstour TRG\fATG_NEW STYLE \b/30/2011 9\f42 AM Page 2
Page 3 of 16
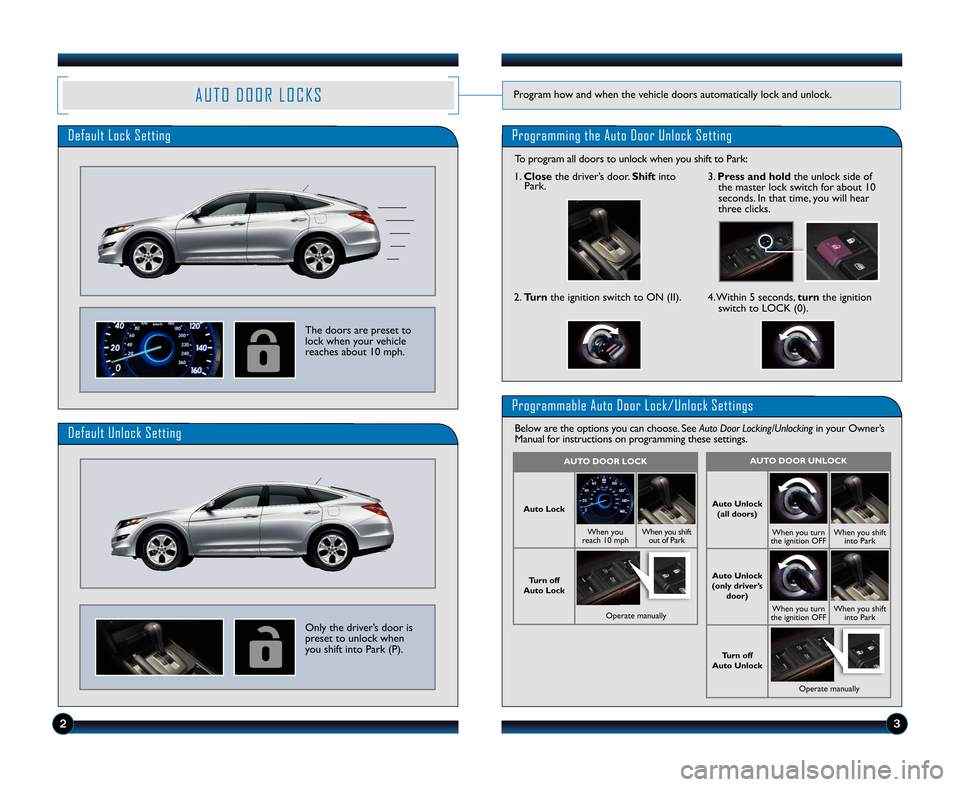
A U T O D O O R L O C K SProgram how and when the vehicle doors automatically lock and unlock.
Default Lock SettingProgramming the Auto Door Unlock Setting
The doors are preset to
lock when your vehicle
reaches about \f0 mph.
Default Unlock Setting
Only the driver’s door is
preset to unlock when
you shift into Park (P).
Programmable Auto Door Lock\bUnlock Settings
Below are the options you can choose. See Auto Door Locking/Unlockingin your Owner’s
Manual for instructions on programming these settings.
AUTO \fOOR UNLOCK
Auto Unlock
(all doors)
When you turn
the ignition OFFWhen you shift into Park
Auto Unlock
(only driver’s door)
When you turn
the ignition OFFWhen you shift into Park
Turn off
Auto Unlock
Operate manually
AUTO \fOOR LOCK
Auto Lock
When you
reach \f0 mphWhen you shift out of Park
Turn off
Auto Lock
Operate manually
\f. Close the driver’s door. Shiftinto
Park.
2. Turn the ignition switch to ON (II).4. Within 5 seconds, turnthe ignition
switch to LOCK (0).
3. Press and hold the unlock side of
the master lock switch for about \f0
seconds. In that time, you will hear
three clicks.
23
To program all doors to unlock when you shift to Park:
12 Crosstour TRG\fATG_NEW STYLE \b/30/2011 9\f42 AM Page 3
Page 4 of 16
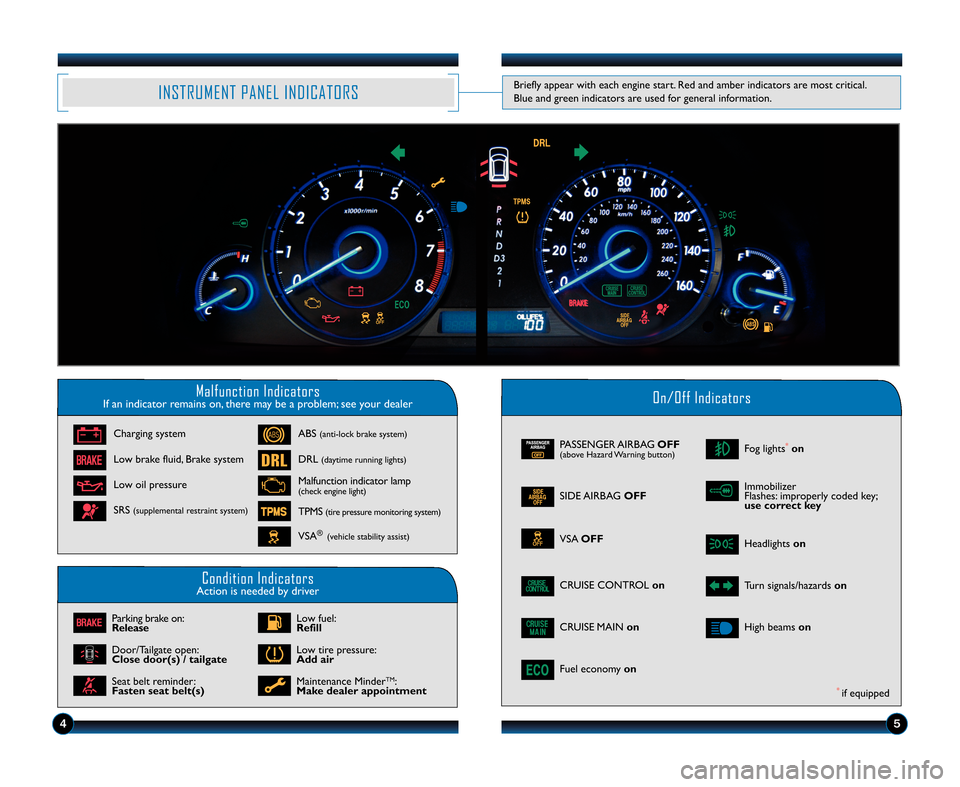
Malfunction IndicatorsIf an indicator remains on, there may be a problem; see your dealerOn\bOff Indicators
Condition IndicatorsAction is needed by driver
PASSENGER AIRBAGOFF(above Hazard Warning button)
SIDE AIRBAGOFF
VSAOFF
CRUISE CONTROL on
ECOFuel economyon
Fog lights*on
Headlightson
Turn signals/hazards on
CRUISE MAINonHigh beamson
Charging system
Low brake fluid, Brake system
Low oil pressure
ABS(anti\block brake system)
DRL(daytime running lights)
Malfunction indicator lamp(check engine light)
TPMS(tire pressure monitoring system)
VSA®(vehicle stability assist)
SRS(supplemental restraint system)
Parking brake on:
Release
Door/Tailgate open:
Close door(s) / tailgate
Seat belt reminder:
Fasten seat belt(s)
Low fuel:
Refill
Low tire pressure:
Add air
Maintenance MinderTM:
Make dealer appointment
INSTRUMENT PANEL INDICATORS
Immobilizer
Flashes: improperly coded key;
use correct key
Briefly appear with each engine start. Red and amber indicators are most critical.
Blue and green indicators are used for general information.
4\b
*if equipped
12 Crosstour TRG\fATG_NEW STYLE \b/30/2011 9\f43 AM Page 4
Page 5 of 16
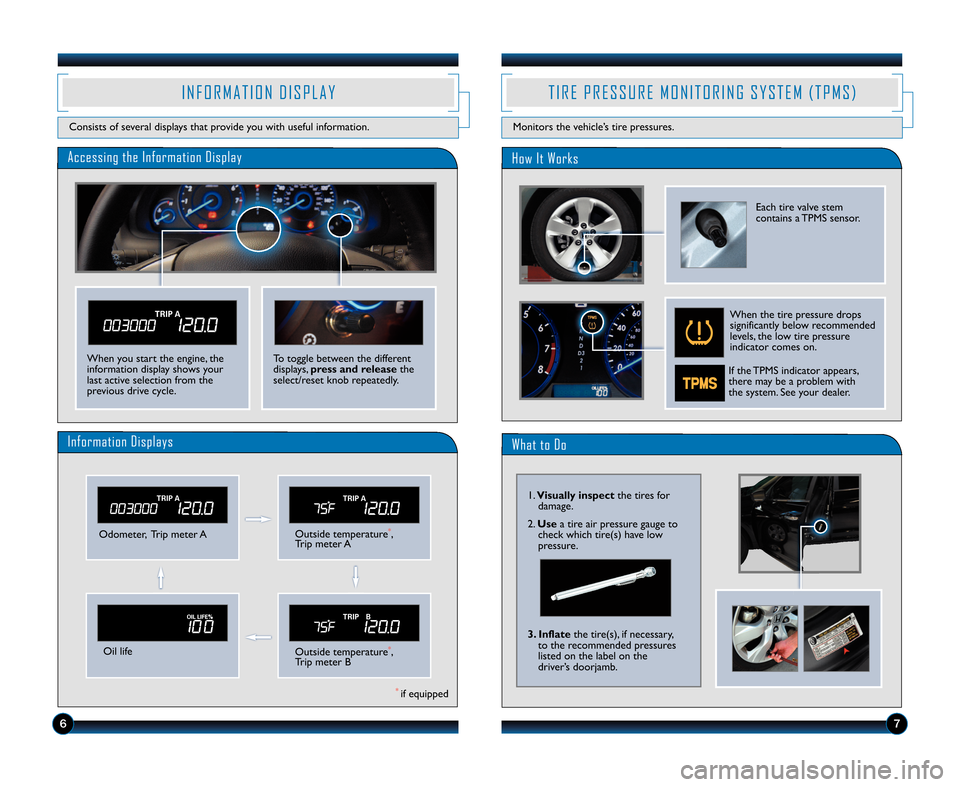
Accessing the Information DisplayHow It Works
Odometer, Trip meter AOutside temperature*,
Trip meter A
Oil lifeOutside temperature*,
Trip meter B
Information Displays
I N F O R M A T I O N D I S P L A Y
Consists of several displays that provide you with useful information.
T I R E P R E S S U R E M O N I T O R I N G S Y S T E M ( T P M S )
Monitors the vehicle’s tire pressures.
To toggle between the different
displays, press and release the
select/reset knob repeatedly.When you start the engine, the
information display shows your
last active selection from the
previous drive cycle.
Each tire valve stem
contains a TPMS sensor.
When the tire pressure drops
significantly below recommended
levels, the low tire pressure
indicator comes on.
67
What to Do
\f. Visually inspect the tires for
damage.
2. Use a tire air pressure gauge to
check which tire(s) have low
pressure.
3. Inflate the tire(s), if necessary,
to the recommended pressures
listed on the label on the
driver’s doorjamb.
*if equipped
If the TPMS indicator appears,
there may be a problem with
the system. See your dealer.
12 Crosstour TRG\fATG_NEW STYLE \b/30/2011 9\f43 AM Page 5
Page 6 of 16
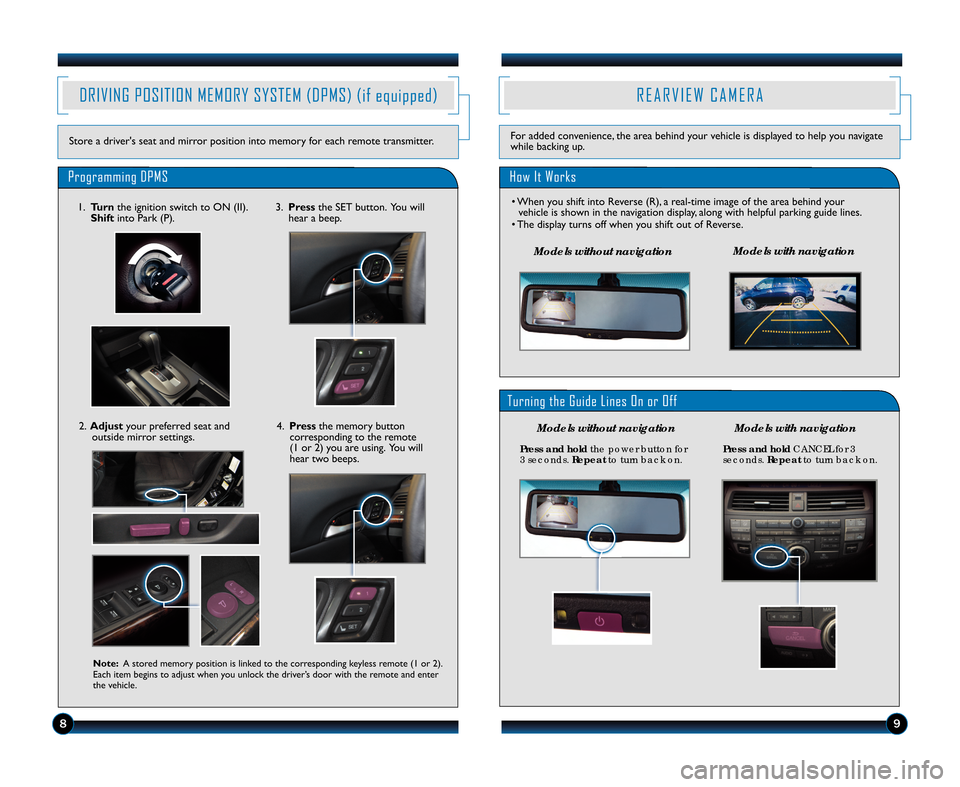
R E A R V I E W C A M E R A
How It Works
• When you shift into Reverse (R), a real\btime image of the area behind yourvehicle is shown in the navigation display, along with helpful parking guide lines.
• The display turns off when you shift out of Reverse.
For added convenience, the area behind your vehicle is displayed to help you navigate
while backing up.
DRIVING POSITION MEMORY SYSTEM (DPMS) (if equipped)
Store a driver's seat and mirror position into memory for each remote transmitter.
Programming DPMS
Note\b A stored memory position is linked to the corresponding keyless remote (\f or 2).
Each item begins to adjust when you unlock the driver’s door with the remote and enter
the vehicle.
\f. Turn the ignition switch to ON (II).
Shift into Park (P).
2. Adjust your preferred seat and
outside mirror settings. 3.
Press the SET button. You will
hear a beep.
4. Press the memory button
corresponding to the remote
(\f or 2) you are using. You will
hear two beeps.
8\f
Model\f w\bthout nav\bgat\bon Model\f w\bth nav\bgat\bon
P\fess and ho\bd
the power button for
3 secon\fs. Repeatto turn back on. P\fess and ho\bd
CA\bCEL for 3
secon\fs. Repeatto turn back on.
Turning the Guide Lines On or Off
Model\f w\bthout nav\bgat\bon Model\f w\bth nav\bgat\bon
12 Crosstour TRG\fATG_NEW STYLE \b/30/2011 9\f44 AM Page \b
Page 7 of 16
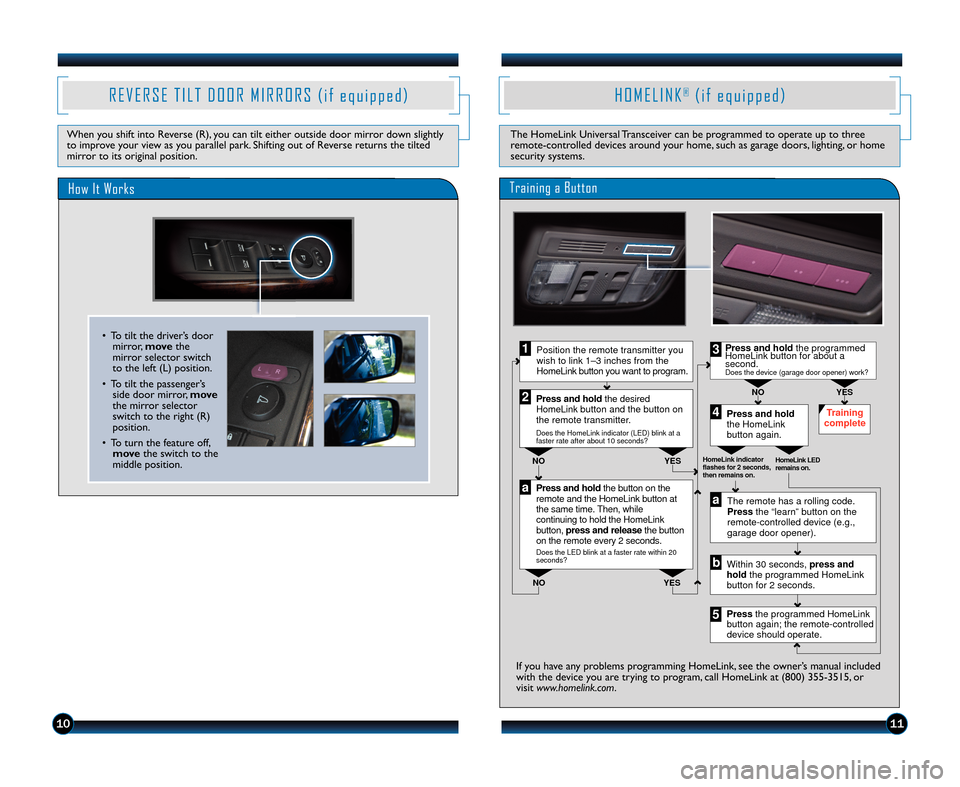
H O M E L I N K®( i f e q u i p p e d )
The HomeLink Universal Transceiver can be programmed to operate up to three
remote\bcontrolled devices around your home, such as garage doors, lighting, or home
security systems.
Press and hold thebutton on the
remote and the HomeLin kbutton at
the same time. Th en, while
continuing to hold the HomeLink
button, press and release thebutton
on the remote every 2seconds.
Does the LED blink at a faster rate within 20
seconds?
Press and hold
the HomeLink
button again. Training
complete
YES
NO
HomeLink indicator
flashes for 2 seconds,
then remains on. HomeLink LED
remains on.YES
NO YES
NO
Position the remote transmitter you
wish to link 1–3 inches from the
HomeLink button you want to program.1
Press and hold the desired
HomeLink button and the button on
the remote transmitter.
Does the HomeLink indicator (LED) blink at a
faster rate after about 10 seconds?
2
a
The remote has a rolling code.
Pressthe “learn” button on the
remote-controlled device (e.g.,
garage door opener).
Press the programmed HomeLink
button again; the remote-controlled
device should operate. Within 30 seconds, pressand
hold the programmed HomeLink
button for 2 seconds.a
Press and hold the programmed
HomeLink button for about a
second.
Does the device (garage door opener) work?
3
b
4
5
Training a Button
If you have any problems programming HomeLink, see the owner’s manual included
with the device you are trying to program, call HomeLink at (800) 355\b35\f5, or
visit www.homelink.com .
R E V E R S E T I L T D O O R M I R R O R S ( i f e q u i p p e d )
When you shift into Reverse (R), you can tilt either outside door mirror down slightly
to improve your view as you parallel park. Shifting out of Reverse returns the tilted
mirror to its original position.
How It Works
• To tilt the driver’s door
mirror, movethe
mirror selector switch
to the left (L) position.
• To tilt the passenger’s side door mirror, move
the mirror selector
switch to the right (R)
position.
• To turn the feature off, move the switch to the
middle position.
1011
12 Crosstour TRG\fATG_NEW STYLE \b/30/2011 9\f44 AM Page 7
Page 8 of 16
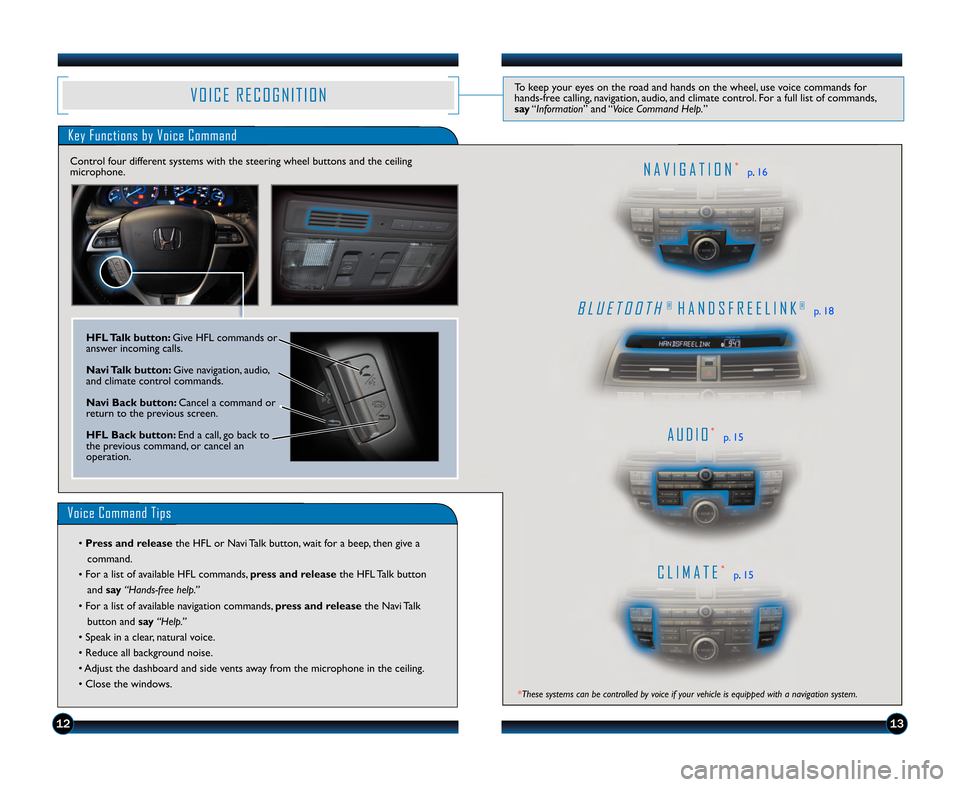
B L U E T O O T H®H A N D S F R E E L I N K®p. \f8
A U D I O*p. \f5
C L I M A T E*p.\f5
N A V I G A T I O N*p .\f6
V O I C E R E C O G N I T I O NTo keep your eyes on the road and hands on the wheel, use voice commands for
hands\bfree calling, navigation, audio, and climate control. For a full list of commands,
say “Information ” and “Voice Command Help. ”
Key Functions by Voice Command
Control four different systems with the steering wheel buttons and the ceiling
microphone.
Voice Command Tips
• Press and release the HFL or Navi Talk button, wait for a beep, then give a
command.
• For a list of available HFL commands,
press and releasethe HFL Talk button
and say“Hands�free help.”
• For a list of available navigation commands, press and releasethe Navi Talk
button and say“Help.”
• Speak in a clear, natural voice.
• Reduce all background noise.
• Adjust the dashboard and side vents away from the microphone in the ceiling.
• Close the windows.
HFL Talk button\b Give HFL commands or
answer incoming calls.
Navi Talk button\b Give navigation, audio,
and climate control commands.
Navi Back button\b Cancel a command or
return to the previous screen.
HFL Back button\b End a call, go back to
the previous command, or cancel an
operation.
1213
*These systems can be controlled by voice if your vehicle is equipped with a navigation system.
12 Crosstour TRG\fATG_NEW STYLE \b/30/2011 9\f44 AM Page 8
Page 9 of 16
Press and release the Navi Talk button before you give a command.Press and release the Navi Talk button before you give a command.
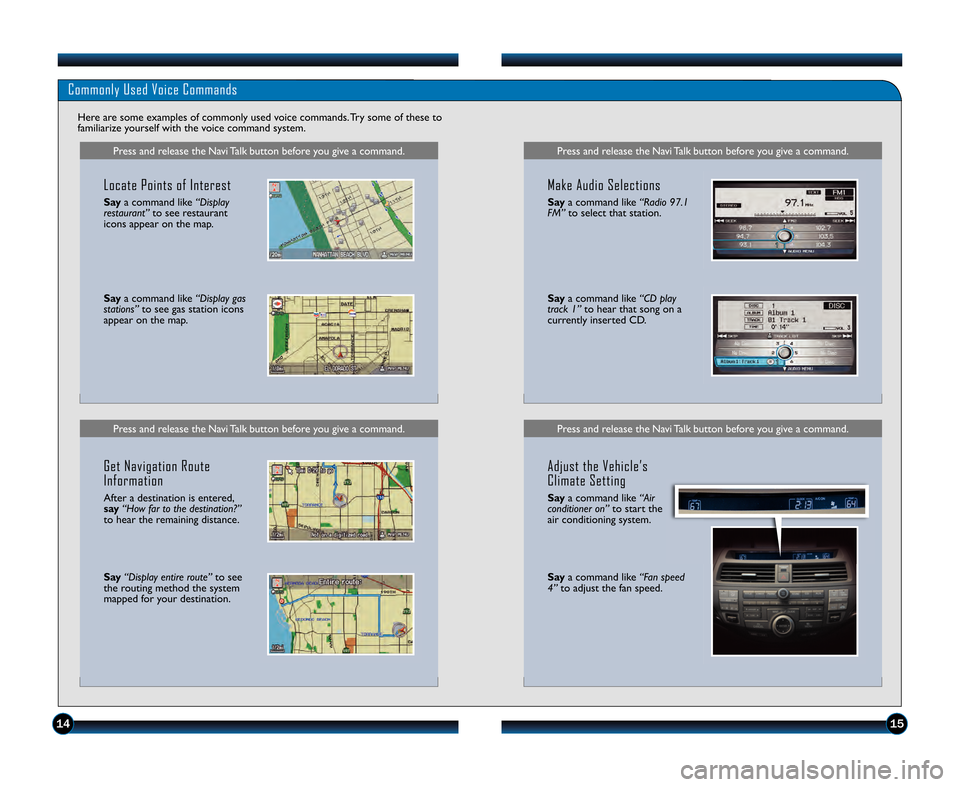
Commonly Used Voice Commands
Here are some examples of commonly used voice commands. Try some of these to
familiarize yourself with the voice command system.
Press and release the Navi Talk button before you give a command.
Locate Points of Interest
Say a command like “Display
restaurant” to see restaurant
icons appear on the map.
Say a command like “Display gas
stations” to see gas station icons
appear on the map.
Get Navigation Route
Information
After a destination is entered,
say “How far to the destination?”
to hear the remaining distance.
Say “Display entire route” to see
the routing method the system
mapped for your destination.
Press and release the Navi Talk button before you give a command.
Make Audio Selections
Say a command like “Radio \f7.1
FM” to select that station.
Saya command like “CD play
track 1” to hear that song on a
currently inserted CD.
Adjust the Vehicle’s
Climate Setting
Say a command like “Air
conditioner on” to start the
air conditioning system.
Say a command like “Fan speed
4” to adjust the fan speed.
141\b
12 Crosstour TRG\fATG_NEW STYLE \b/30/2011 9\f44 AM Page 9
Page 10 of 16
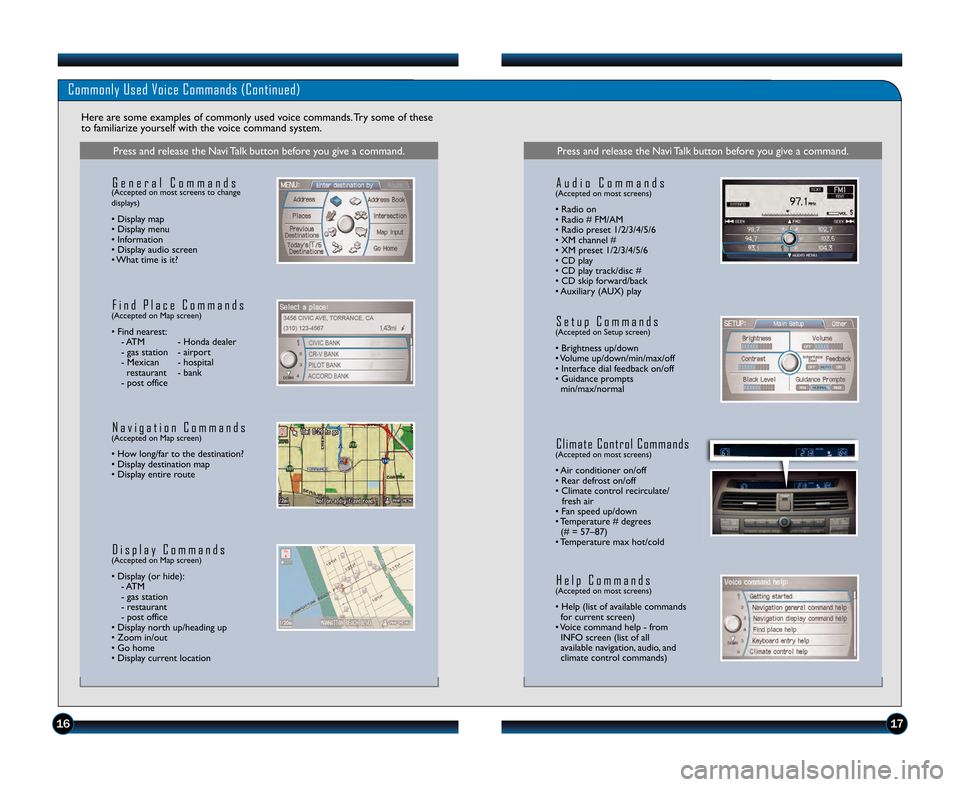
Commonly Used Voice Commands (Continued)
Here are some examples of commonly used voice commands. Try some of these
to familiarize yourself with the voice command system.
Press and release the Navi Talk button before you give a command.
G e n e r a l C o m m a n d s(Accepted on most screens to change
displays)
• Display map
• Display menu
• Information
• Display audio screen
• What time is it?
F i n d P l a c e C o m m a n d s(Accepted on Map screen)
• Find nearest: \b ATM \b Honda dealer
\b gas station \b airport
\b Mexican \b hospital restaurant \b bank
\b post office
N a v i g a t i o n C o m m a n d s(Accepted on Map screen)
• How long/far to the destination?
• Display destination map
• Display entire route
D i s p l a y C o m m a n d s(Accepted on Map screen)
• Display (or hide): \b ATM
\b gas station
\b restaurant
\b post office
• Display north up/heading up
• Zoom in/out
• Go home
• Display current location
Press and release the Navi Talk button before you give a command.
A u d i o C o m m a n d s(Accepted on most screens)
• Radio on
• Radio # FM/AM
• Radio preset \f/2/3/4/5/6
• XM channel #
• XM preset \f/2/3/4/5/6
• CD play
• CD play track/disc #
• CD skip forward/back
• Auxiliary (AUX) play
S e t u p C o m m a n d s(Accepted on Setup screen)
• Brightness up/down
• Volume up/down/min/max/off
• Interface dial feedback on/off
• Guidance prompts min/max/normal
C l i m a t e C o n t r o l C o m m a n d s(Accepted on most screens)
• Air conditioner on/off
• Rear defrost on/off
• Climate control recirculate/ fresh air
• Fan speed up/down
• Temperature # degrees (# = 57–87)
• Temperature max hot/cold
H e l p C o m m a n d s(Accepted on most screens)
• Help (list of available commands for current screen)
• Voice command help \b from INFO screen (list of all
available navigation, audio, and
climate control commands)
1617
12 Crosstour TRG\fATG_NEW STYLE \b/30/2011 9\f45 AM Page 10