navigation HONDA CROSSTOUR 2013 1.G Owners Manual
[x] Cancel search | Manufacturer: HONDA, Model Year: 2013, Model line: CROSSTOUR, Model: HONDA CROSSTOUR 2013 1.GPages: 573, PDF Size: 25.21 MB
Page 3 of 573
2
Quick Reference Guide
Quick Reference Guide
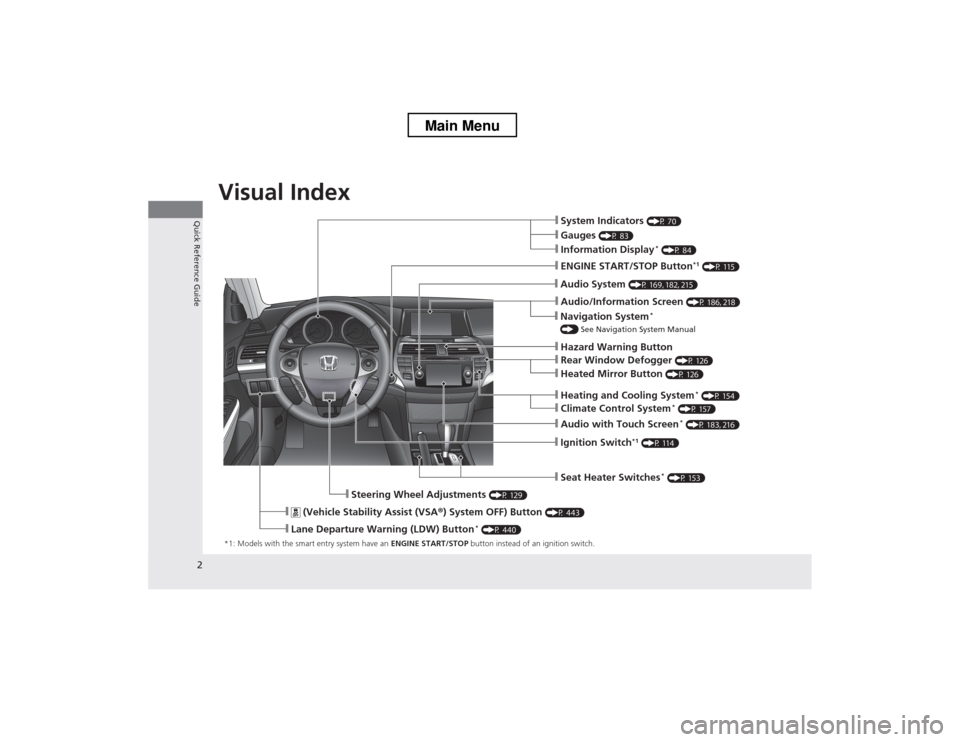
Visual Index
*1: Models with the smart entry system have an ENGINE START/STOP button instead of an ignition switch.
❙System Indicators (P 70)
❙Information Display *
(P 84)
❙Audio System (P 169, 182, 215)
❙ENGINE START/STOP Button *1
(P 115)
❙Ignition Switch *1
(P 114)
❙ (Vehicle Stability Assist (VSA ®) System OFF) Button (P 443)
❙Lane Departure Warning (LDW) Button *
(P 440)
❙Audio/Information Screen (P 186, 218)
❙Seat Heater Switches*
(P 153)
❙Steering Wheel Adjustments (P 129)
❙Heating and Cooling System*
(P 154)
❙Gauges (P 83)
❙Navigation System *
() See Navigation System Manual
❙Audio with Touch Screen *
(P 183, 216)
❙Hazard Warning Button
❙Climate Control System *
(P 157)
❙Rear Window Defogger (P 126)
❙Heated Mirror Button (P 126)
Main Menu
Page 4 of 573
3
Quick Reference Guide
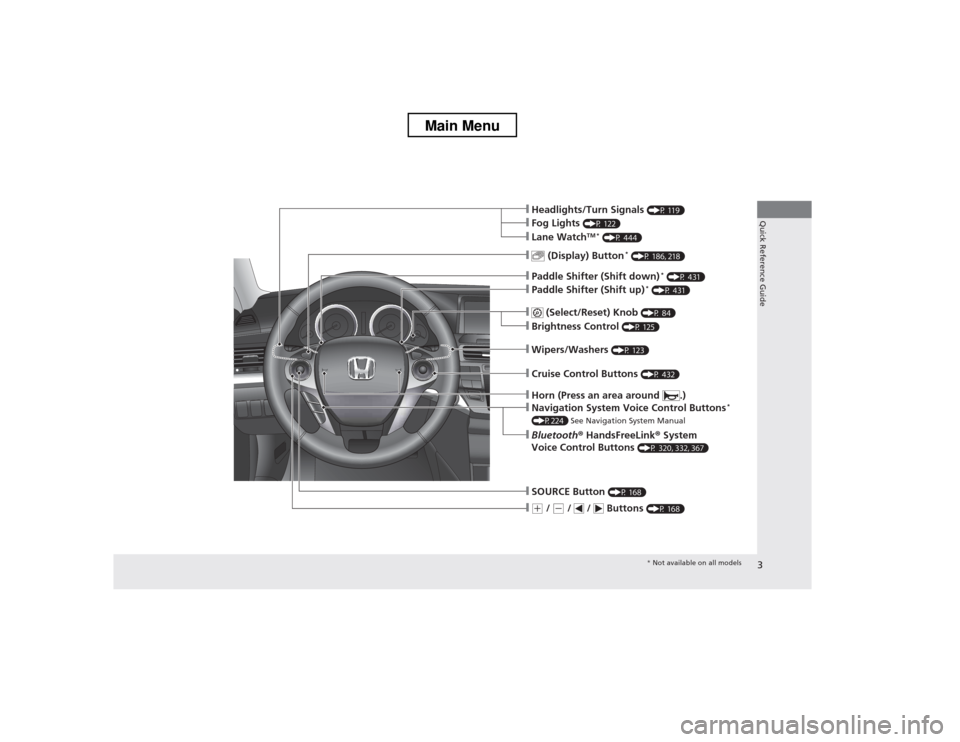
❙Wipers/Washers (P 123)
❙Navigation System Voice Control Buttons *
(P224) See Navigation System Manual
❙(+ / (- / / Buttons (P 168)
❙SOURCE Button (P 168)
❙ (Display) Button *
(P 186, 218)
❙Headlights/Turn Signals (P 119)
❙Fog Lights (P 122)
❙Paddle Shifter (Shift down) *
(P 431)
❙Paddle Shifter (Shift up) *
(P 431)
❙Lane Watch TM *
(P 444)
❙Horn (Press an area around .)
❙Bluetooth ® HandsFreeLink ® System
Voice Control Buttons (P 320, 332, 367)
❙ (Select/Reset) Knob
(P 84)
❙Brightness Control (P 125)
❙Cruise Control Buttons (P 432)
* Not available on all models
Main Menu
Page 10 of 573
9
Quick Reference Guide
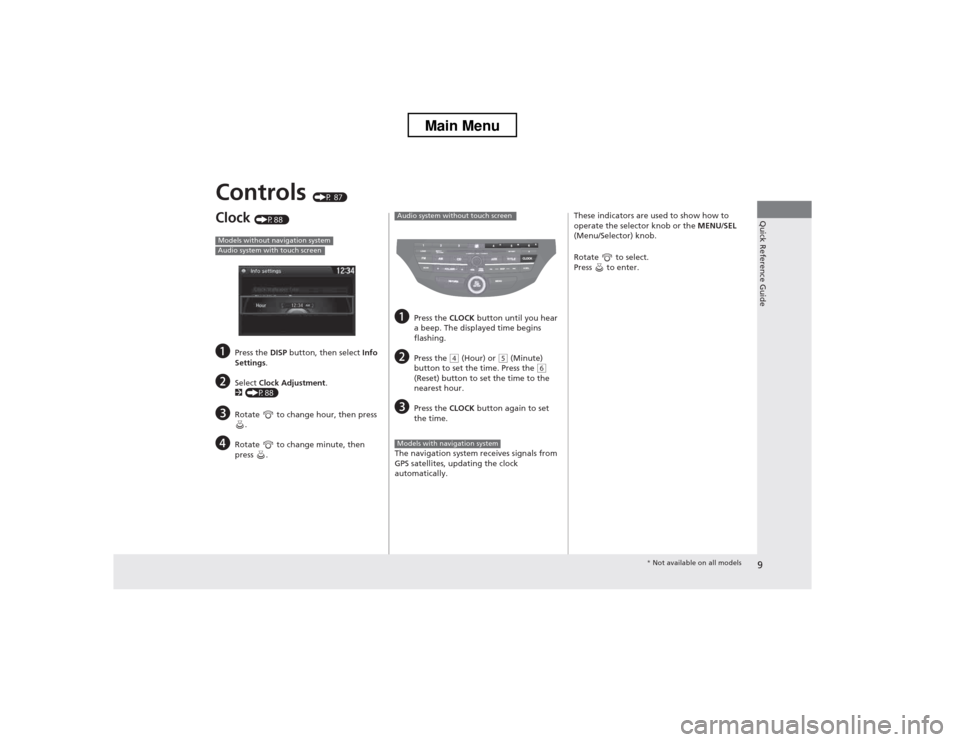
Controls (P 87)
Clock (P88 )
a Press the DISP button, then select Info
Settings .
b Select Clock Adjustment .
2 (P88)
c Rotate to change hour, then press
.
d Rotate to change minute, then
press .
Models without navigation systemAudio system with touch screen
aPress the CLOCK button until you hear
a beep. The displayed time begins
flashing.
b Press the
(4 (Hour) or (5 (Minute)
button to set the time. Press the (6
(Reset) button to set the time to the nearest hour.
c Press the CLOCK button again to set
the time.
The navigation system receives signals from
GPS satellites, updating the clock
automatically.
Audio system without touch screen
Models with navigation system
These indicators are used to show how to
operate the selector knob or the MENU/SEL
(Menu/Selector) knob.
Rotate to select.
Press to enter.
* Not available on all models
Main Menu
Page 17 of 573
16
Quick Reference Guide
*1: Icons that appear on the screen vary by the source selected.
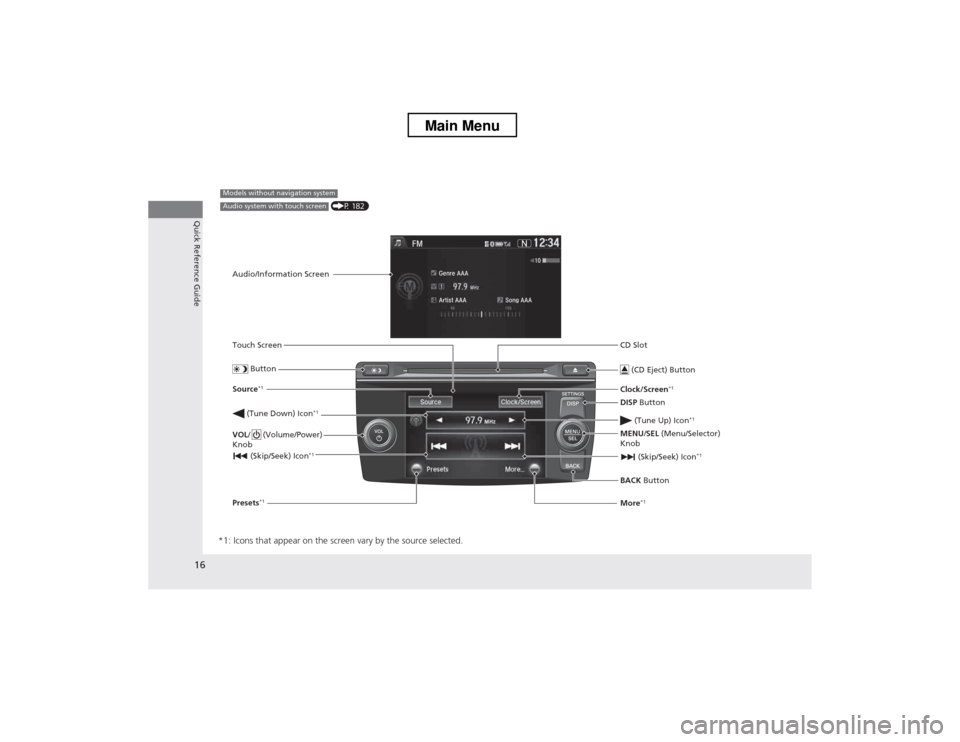
CD Slot (CD Eject) Button
BACK Button
MENU
/SEL (Menu/Selector)
Knob
(Tune Down) Icon
*1
(Skip/Seek) Icon*1
Models without navigation system
Audio/Information Screen
Touch Screen
Button
Source *1
VOL / (Volume/Power)
Knob
(Skip/Seek) Icon *1
Presets*1 Clock/Screen
*1
DISP Button
(Tune Up) Icon *1More*1
(P 182)Audio system with touch screen
Main Menu
Page 18 of 573
17
Quick Reference Guide
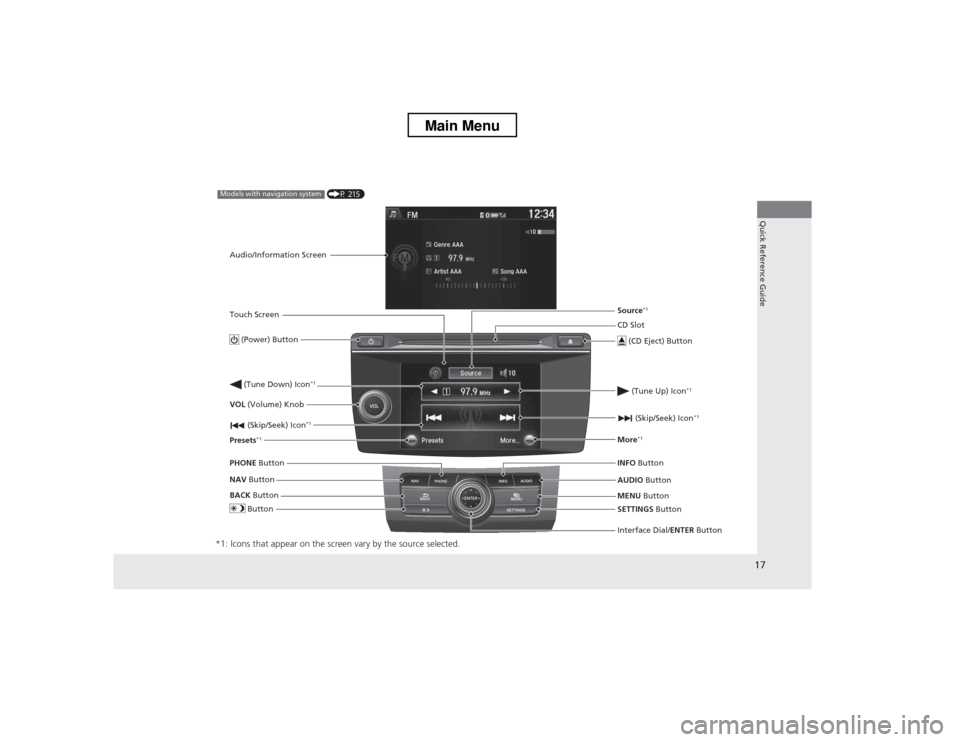
*1: Icons that appear on the screen vary by the source selected.
CD Slot (CD Eject) Button
MENU Button
Interface Dial/ ENTER Button
(Skip/Seek) Icon
*1
(P 215)Models with navigation system
Audio/Information Screen
Touch Screen
Button
Source *1
VOL (Volume) Knob
(Skip/Seek) Icon *1
Presets*1 (Tune Up) Icon
*1More*1
(Power) Button
(Tune Down) Icon *1
INFO
Button
AUDIO Button
SETTINGS Button
BACK
Button
NAV
Button
PHONE
Button
Main Menu
Page 89 of 573
88
Controls
Setting the Clock
Clock
You can adjust the time in the clock display with the ignition switch is in ON
(w*1
.
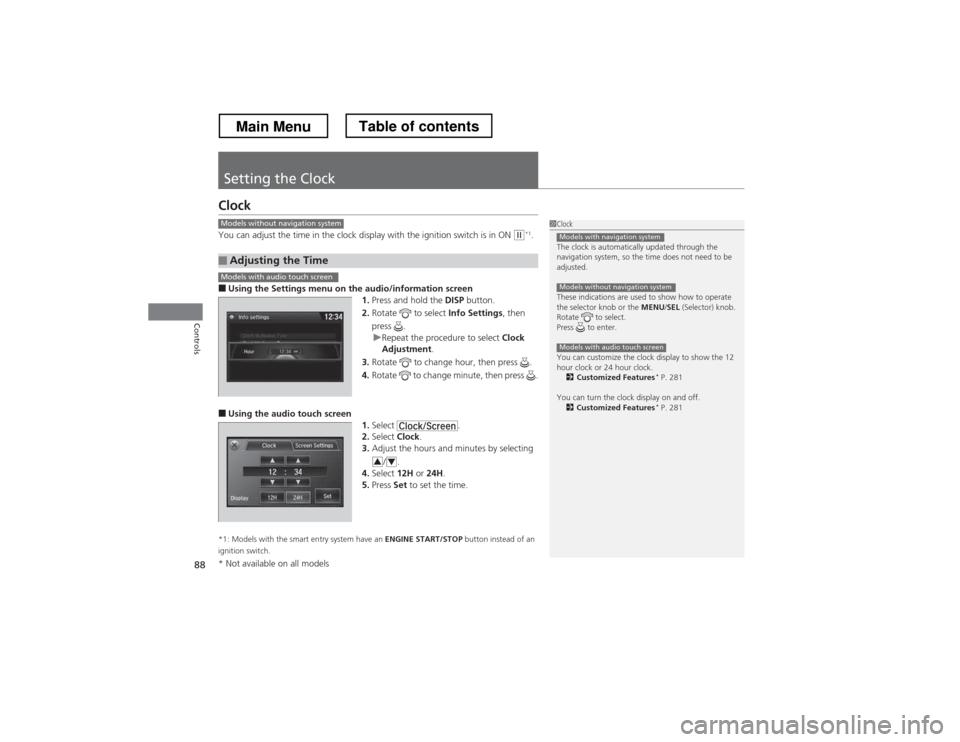
■ Using the Settings menu on th e audio/information screen
1. Press and hold the DISP button.
2. Rotate to select Info Settings, then
press .
uRepeat the procedure to select Clock
Adjustment .
3. Rotate to change hour, then press .
4. Rotate to change minute, then press .
■ Using the audio touch screen
1.Select .
2. Select Clock.
3. Adjust the hours and minutes by selecting
/.
4. Select 12H or 24H .
5. Press Set to set the time.
*1: Models with the smart entry system have an ENGINE START/STOP button instead of an
ignition switch.
■Adjusting the Time
1Clock
The clock is automatically updated through the
navigation system, so the time does not need to be
adjusted.
These indications are used to show how to operate
the selector knob or the MENU/SEL (Selector) knob.
Rotate to select.
Press to enter.
You can customize the clock display to show the 12
hour clock or 24 hour clock. 2 Customized Features *
P. 281
You can turn the clock display on and off. 2 Customized Features *
P. 281
Models with navigation system
Models without navigation system
Models with audio touch screen
Models without navigation system
Models with audio touch screen
34
* Not available on all models
Main MenuTable of contents
Page 162 of 573
161
uuClimate Control System*uSynchronized Mode
Controls
Synchronized Mode
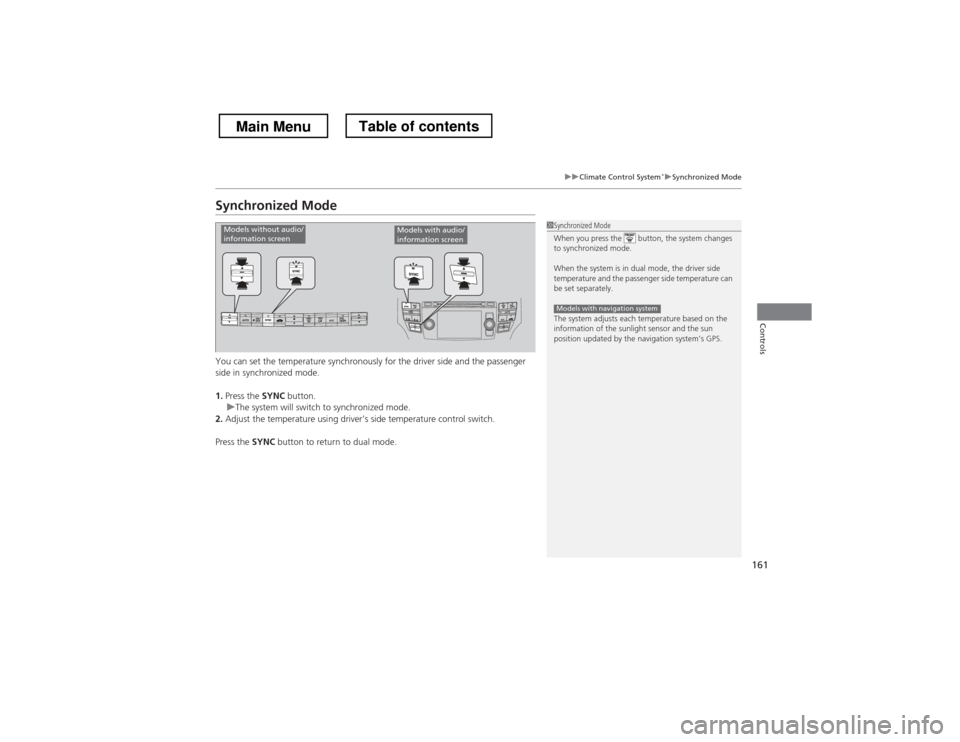
You can set the temperature synchronously for the driver side and the passenger
side in synchronized mode. 1.
Press the SYNC button.
uThe system will switch to synchronized mode.
2. Adjust the temperature using driver’s side temperature control switch.
Press the SYNC button to return to dual mode.
1Synchronized Mode
When you press the button, the system changes
to synchronized mode.
When the system is in dual mode, the driver side
temperature and the passenger side temperature can
be set separately.
The system adjusts each temperature based on the
information of the sunlight sensor and the sun
position updated by the navigation system’s GPS.
Models with navigation system
Models without audio/
information screenModels with audio/
information screen
Main MenuTable of contents
Page 164 of 573
163
Features
This chapter describes how to operate technology features.
Audio System About Your Audio System................ 164
USB Adapter Cable .......................... 165
Auxiliary Input Jack .......................... 165
Audio System Theft Protection ......... 166
Region Setting *
............................... 167
Audio Remote Controls.................... 168
Audio System Basic Operation ........ 169
Audio System Basic Operation ........ 182
Models without navigation systemAudio system without touch screen
Audio system with touch screen
Audio System Basic Operation........ 215
Audio Error Messages ...................... 268
General Information on the Audio
System ............................................. 276
Customized Features *
...................... 281
HomeLink ® Universal Transceiver *
.. 318
Bluetooth® HandsFreeLink®.... 320, 332, 367Compass *
.................................. 405, 407
Models with navigation system
* Not available on all models
Main Menu
Page 165 of 573
164
Features
Audio System
About Your Audio System
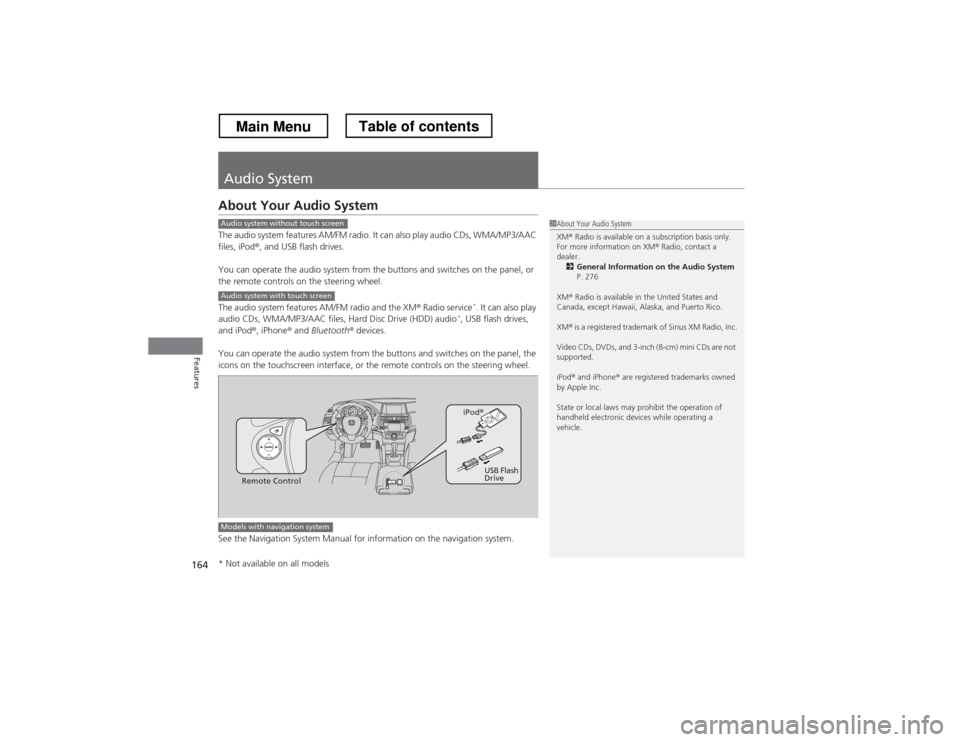
The audio system features AM/FM radio. It can also play audio CDs, WMA/MP3/AAC files, iPod®, and USB flash drives.
You can operate the audio system from the buttons and switches on the panel, or
the remote controls on the steering wheel.
The audio system features AM/FM radio and the XM ® Radio service *
. It can also play
audio CDs, WMA/MP3/AAC files, Hard Disc Drive (HDD) audio *
, USB flash drives,
and iPod ®, iPhone ® and Bluetooth ® devices.
You can operate the audio system from the buttons and switches on the panel, the
icons on the touchscreen interface, or the remote controls on the steering wheel.
See the Navigation System Manual for information on the navigation system.
1About Your Audio System XM ® Radio is available on a subscription basis only.
For more information on XM ® Radio, contact a
dealer. 2 General Information on the Audio System
P. 276
XM ® Radio is available in the United States and
Canada, except Hawaii, Alaska, and Puerto Rico. XM ® is a registered trademark of Sirius XM Radio, Inc.
Video CDs, DVDs, and 3-inch (8-cm) mini CDs are not
supported.
iPod ® and iPhone ® are registered trademarks owned
by Apple Inc.
State or local laws may prohibit the operation of
handheld electronic devices while operating a
vehicle.Audio system without touch screen
Audio system with touch screen
Remote Control iPod
®
USB Flash
Drive
Models with navigation system
* Not available on all models
Main MenuTable of contents
Page 216 of 573
215
Features
Audio System Basic Operation
To use the audio system function, the ignition switch must be in ACCESSORY (q or
ON (w *1
.
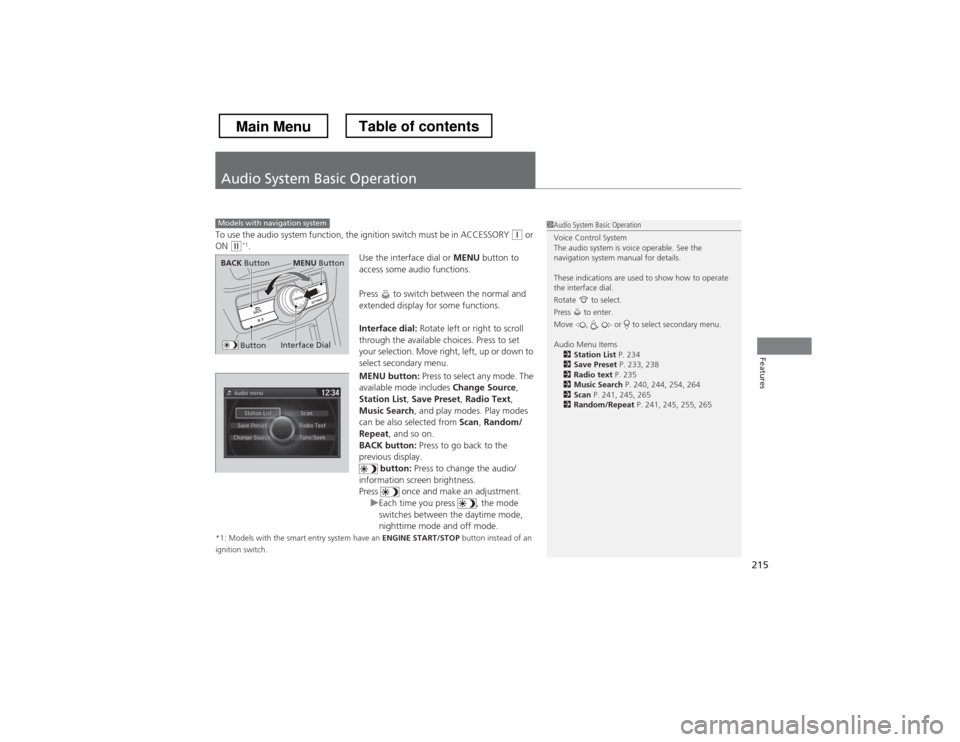
Use the interface dial or MENU button to
access some audio functions.
Press to switch between the normal and
extended display for some functions.
Interface dial: Rotate left or right to scroll
through the available choices. Press to set
your selection. Move right, left, up or down to
select secondary menu.
MENU button: Press to select any mode. The
available mode includes Change Source,
Station List , Save Preset , Radio Text ,
Music Search , and play modes. Play modes
can be also selected from Scan, Random/
Repeat , and so on.
BACK button: Press to go back to the
previous display. button: Press to change the audio/
information screen brightness.
Press once and make an adjustment.
uEach time you press , the mode
switches between the daytime mode,
nighttime mode and off mode.
*1: Models with the smart entry system have an ENGINE START/STOP button instead of an
ignition switch.
Models with navigation system1Audio System Basic Operation
Voice Control System
The audio system is voice operable. See the
navigation system manual for details.
These indications are used to show how to operate the interface dial.
Rotate to select.
Press to enter.
Move , , or to select secondary menu.
Audio Menu Items 2 Station List P. 234
2 Save Preset P. 233, 238
2 Radio text P. 235
2 Music Search P. 240, 244, 254, 264
2 Scan P. 241, 245, 265
2 Random/Repeat P. 241, 245, 255, 265
Interface Dial
MENU ButtonBACK Button
Button
Main MenuTable of contents